Corn Gnocchi w/ Pork, Zucchini & Mushrooms

The other day when Brion & I had time to do a walk-about through Winners, we noticed some ‘corn’ potato gnocchi. Being gnocchi lovers we decided to give it a try. Of course, you might know I would inevitably have to research the company before making it just for interest’s sake…..

The corn potato gnocchi from Siena Artie are crafted using rehydrated potatoes (70%), corn flour, potato starch, corn starch, rice flour, salt, and acidity regulators.

The inclusion of corn flour and starch instead of wheat is designed to provide a gluten-free alternative that retains the traditional texture and flavor of Italian potato gnocchi. These gnocchi are produced in Italy, emphasizing a ‘traditional Italian recipe’. 

The corn potato gnocchi produced by Siena Artie is a modern commercial adaptation of a traditional Italian staple that traces its roots back centuries. While Siena Artie specifically markets these products as being made from old Italian family recipes, the use of corn and potato reflects the broader history of the dish. 

Gnocchi originated in Roman times, originally made from a semolina porridge-like dough mixed with eggs. Potatoes were introduced to Italy in the 16th century but only became the ‘star’ ingredient in gnocchi in the late 19th century. This shift occurred largely because potatoes grew more easily in the cooler climates of Northern Italy than traditional grains.

The inclusion of corn (maize) or corn meal in gnocchi is a regional variation found throughout the Italian peninsula. Like potatoes, corn became a vital substitute when wheat was scarce or too expensive for small landowners. 

Siena Artie’s recipes often use approximately 70% rehydrated potatoes, adhering to the 19th-century standard where mashed potatoes became the foundation of the dough.

By offering variations like whole wheat or corn-based gnocchi, the company mirrors the historical ‘cucina povera’ (poor cuisine) tradition of using whatever local starch—such as chestnut flour, breadcrumbs, or corn—was available.

While traditional gnocchi were hand-rolled—a time-consuming process often saved for Sundays or special occasions—Siena Artie provides a shelf-stable or vacuum-sealed version that maintains the classic ribbed texture designed to hold sauce. 

I crafted a recipe using a pork/beef combo along with some of our favorite veggies to go with the corn/potato gnocchi. This is what developed.

Print Recipe
Corn Gnocchi w/ Pork, Zucchini & Mushrooms
Instructions
  1. Melt butter in a 12-inch skillet over medium-high heat. Add gnocchi in a single layer & cook on one side for 2-3 minutes until browned & toasted. Shake the pan to toss the gnocchi & continue cooking for another 2-3 minutes, tossing occasionally, until both sides are toasted. Remove gnocchi to a plate & set aside.
  2. Preheat oven to 350 F.
  3. Turn the heat to high & return skillet to stove. When the pan is hot, add the pork/beef combo & season with salt, pepper, cumin, paprika & mustard powder. Stir-fry for a few minutes until the meat starts to turn brown. Add the leeks, mushrooms, zucchini, corn & garlic. Cook, stirring occasionally, until meat is cooked & veggies are tender-crisp. Drain if necessary.
  4. Add the tomatoes, broth, gorgonzola cheese & gnocchi back into the skillet. Stir to combine. Pour mixture into an 11 x 7-inch casserole dish. Top with remaining cheese.
  5. Cover with foil & bake for 20 minutes then remove foil & continue to bake another 10 minutes or until bubbling. Remove from oven & top with sliced green onions. Allow to cool for 5-10 minutes then serve with some crusty bread.

Cheesy Salsa Chicken Casserole

One of the many aspects of Mexican food that has been essential for so many years is chicken. Chicken has played a massive role in both Mexico’s food and culture for centuries. Today, it is still one of the most popularly consumed forms of protein across the country and can be added into any dish perfectly.

What many of us recognize as Mexican cuisine is the product of a storied fusion of cultures and flavors. Its culinary adaptability has impacted its spread and popularity on a global scale. Due in part to big business, immigration, and widespread likability, Mexican food and dishes have largely become regular constituents in North American homes. While some of these popular iterations of Mexican food are far removed from their Mexican origins, they make up a large portion of the diets of many North Americans.

This cheesy salsa chicken casserole is a good example of Mexican American cuisine which is modified Mexican cuisine under the influence of American culture.

Salsa has become North America’s favorite condiment. Unlike most sauces, salsa is easy to make and endlessly customizable, but because of the simplicity of the concept, freshness is key to making a great salsa. 

Salsa is one of those foods that’s easy to prepare and magically highlights the flavors of your fresh seasonal produce. Not all salsa has to be spicy, and it can be adjusted for personal tastes. 

The history of salsa is a fascinating journey that spans centuries and continents. What began as a simple, spicy sauce for the ancient peoples of the Americas has evolved into a global culinary sensation. The blending of indigenous and Spanish ingredients, coupled with regional creativity, has given us a wide array of salsas that cater to every palate.

Print Recipe
Cheesy Salsa Chicken Casserole
Instructions
  1. Preheat oven to 375°F. Lightly grease a 9 x 13 inch baking dish.
  2. In the baking dish, mix the uncooked rice, chicken broth, refried beans & about half of the jar of salsa.
  3. Season the chicken pieces with preferred seasoning & push them down into the rice mixture. Drain mushrooms & sprinkle over chicken.
  4. Cover the dish tightly with foil. Bake for 35-40 minutes, or until the chicken is cooked through (165°F internal temp) & the rice is tender.
  5. Remove the foil, pour the remaining salsa over the top, and sprinkle generously with shredded cheese.
  6. Return to the oven uncovered for 5-10 minutes, or until the cheese is melted and bubbly.
  7. Let it stand for 5 minutes before serving to allow the sauce to set. Top with sliced green onions, cilantro or sour cream if desired.
Recipe Notes

• No-prep Rice: If you want a faster cook time, use 3 cups of pre-cooked rice (or leftover rice) & reduce the chicken broth to 1/2 cup.
• Creamy Version: Stir 100 gm of softened cream cheese into the rice/bean mixture before adding the chicken for a creamier texture.
• Faster Cooking: Use shredded rotisserie chicken instead of raw, reducing the bake time to just 20 minutes to heat through.

Ratatouille Crepe-adillas

Quesadillas but with crepes instead of tortillas. A quesadilla (kay-suh-dee-yuh) is a popular savory Mexican turnover that consists of a heated, filled, and folded tortilla. Quesadillas originated in central and southern Mexico, where they were first made with corn tortillas and filled with Oaxaca cheese. (The name quesadilla is a combination of tortilla and queso, which means cheese in Spanish). Over the years, other fillings, such as cooked meats and vegetables, found their way into quesadilla.

Quesadillas have gone through various transformations over time, especially as they became more popular. What started as a simple combination of tortillas and fillings evolved with new ingredients and techniques. Regional differences also influenced how the dish is prepared.

Corn tortillas are the traditional option for quesadillas, though nowadays, you’re just as likely to find them made with whatever you wish. Try subbing your tortilla for something else entirely, like thin crepes. Crepe style pancakes are one of those simple culinary treasures, just some eggs, milk, butter, flour and you’ve got it.

The tortilla vs crepe debate ultimately comes down to personal preference. Both flatbreads offer unique culinary experiences and can be enjoyed in countless ways. Whether you prefer the earthy flavor and versatility of a tortilla or the delicate charm and versatility of a crepe, there’s no denying the allure of these culinary masterpieces.

If you’re accustomed to enjoying crepes when they’re soft, you’ll also love them when they’re hot and crispy! While you can make these crispy crepe-adillas with just cheese, if you’re going to get creative with the ingredients, stay away from anything that’s too chunky or watery that the crepe won’t be able to hold up.  Roasting the vegetables is such a nice option.

Print Recipe
Ratatouille Crepe-adillas
Votes: 1
Rating: 5
You:
Rate this recipe!
Course Lunch
Cuisine Mexican
Keyword crepe-adillas
Servings
Ingredients
Other Ingredients
Course Lunch
Cuisine Mexican
Keyword crepe-adillas
Servings
Ingredients
Other Ingredients
Votes: 1
Rating: 5
You:
Rate this recipe!
Instructions
Crepe Batter
  1. Place all the ingredients for the crepe batter into a medium/large bowl. Mix with a hand (immersion) blender or in a stand blender until smooth. You can also just whisk it by hand. Cover the bowl with a kitchen towel and let stand for 30 minutes. While the batter is resting, prepare the filling.
Roasted Veggies/Cheese
  1. Preheat oven to 450 F.
  2. Combine all vegetables in a large bowl, toss with olive oil, salt & pepper.
  3. Line 2 cookie sheets with foil, spray foil with non-stick cooking spray. Spread vegetables in a single layer over prepared cookie sheets.
  4. Place in the oven & roast for 15-20 min, or until veggies are tender & have a bit of char on them.
  5. Grate cheddar cheese.
Cooking the Crepes
  1. Whisk the crepe batter before using.
  2. Using a large nonstick skillet or crepe pan, add a small amount of butter over medium-high heat. Pour about 1/4 cup crepe batter onto skillet & form a circle with the bottom of cup or swirl it around the crepe pan so it flattens out. Cook for 30 seconds on the first side or until it firms up, then carefully flip the crepe & cook for another 15-20 seconds. Repeat until all batter is used.
Assemble/Grilling
  1. Spoon 2 Tablespoons of cottage cheese over one half of each crepe; top with 2-3 tablespoons of roasted vegetables & sprinkle with some grated cheddar cheese. Fold the crepe in half then again in half creating a triangle.
  2. Heat a small amount of butter on the griddle, add the filled crepes and cook on both sides until golden and crispy and the cheese is melted.
Recipe Notes

• For a heartier crepe-adilla, add some cooked, shredded chicken or pulled pork.
• Serve with a zesty tomato sauce if you wish.

Roasted Vegetable & Smoked Cheddar Pizza

Summer equates to fresh produce so why not make the most of it in a vegetable pizza? When it comes to veggies the key word here is ‘ROASTED’. The veggies go in the oven with a little oil, herbs & spices until they start to brown up which brings out a little caramelization of their natural flavors and transforms them into little nuggets of vegetable GOLD.  

Roasting vegetables brings out a depth of flavor with a hint of sweetness that lets the vegetables shine through in a truly magical way. Any combination of your favorite vegetables will work, so there is a lot of flexibility here.

Print Recipe
Roasted Vegetable & Smoked Cheddar Pizza
Votes: 1
Rating: 5
You:
Rate this recipe!
Course Main Dish
Cuisine American
Servings
NAAN PIZZAS
Course Main Dish
Cuisine American
Servings
NAAN PIZZAS
Votes: 1
Rating: 5
You:
Rate this recipe!
Instructions
Roasted Vegetables
  1. Preheat oven to 400 F.
  2. In a large bowl, TOSS all roasted vegetable ingredients, combing well. Spread veggies onto a parchment lined baking sheet & roast for 20 minutes, stirring once half way through baking.
Herb Sauce
  1. In a saucepan, combine all sauce ingredients. Heat & stir over medium heat until cream cheese is melted & sauce becomes thick & creamy. Grate smoked cheddar cheese.
Assembly/Baking
  1. When vegetables are roasted, lower oven temperature to 375 F.
  2. Divide herb sauce evenly between the 4 Naan breads & spread over each. Next, divide the roasted vegetables between the 4 pizzas. Top with grated smoked cheddar cheese.
  3. Bake pizzas for 10-15 minutes or until veggies are nicely roasted & edges are crispy. Remove from oven & serve.

BBQ Chicken Pizza Stuffed Pull-Apart Bread

CELEBRATING CANADA DAY!

Food and drink are almost as synonymous with Canada Day as the colors of red and white. More importantly this date celebrates the historical event in which Canada gained its independence from Great Britain in 1867.

On July 1st, from coast to coast, the country’s birthday is highlighted with colorful parades, concerts, carnivals, festivals and firework displays.

Although barbecues are definitely the preferred choice of food event for the occasion, I thought this pull apart bread could also fit into the celebration.

BBQ chicken stuffed bread is a wonderful fusion of flavors that combines the smoky goodness of barbecue chicken, bacon and veggies with the comfort of warm, melty cheese in a crispy, crusty bread.

Inspired by ‘stromboli’ (where filling is baked inside bread), this stuffed bread is the perfect meal for anyone who loves BBQ chicken pizza! You can eat it on its own, slice it up as a snack or make it a meal with the perfect side salad!

Mouth-watering BBQ sauce soaks into the crust as it bakes and the cheese on top gives it that WOW factor.

Print Recipe
BBQ Chicken Pizza Stuffed Pull-Apart Bread
Instructions
  1. Preheat oven to 375 F.
  2. In a saucepan, cook bacon until slightly crisp, remove from pan to a paper towel. Crumble bacon & set aside. Sauté onion & mushroom slices in bacon drippings until just cooked. Set aside. Slice cooked chicken breast, olives & cheese.
  3. Slice into the bread, but not all the way through. You need to cut deep enough into the bread to open out the loaf and fill between the “slices, while leaving the loaf connected at the base. Make another cut lengthwise through the middle, again not cutting all the way through.
  4. Spoon (or squeeze directly out of the bottle) the barbecue sauce into each cut and spread to evenly coat the inside of the bread. Insert the chicken breast, cheese slices, onions, olives & mushrooms into each slice/wedge. Push all ingredients down into the bread really well.
  5. Sprinkle with the Italian pizza herbs; wrap loaf in foil & bake for 15 - 20 minutes, or until cheese has melted.
  6. If you like the bread to be crispy, uncover & bake again for a further 10 minutes, or until bread has turned golden & is crispy.
  7. Remove the pizza pull apart bread from the oven & serve hot.

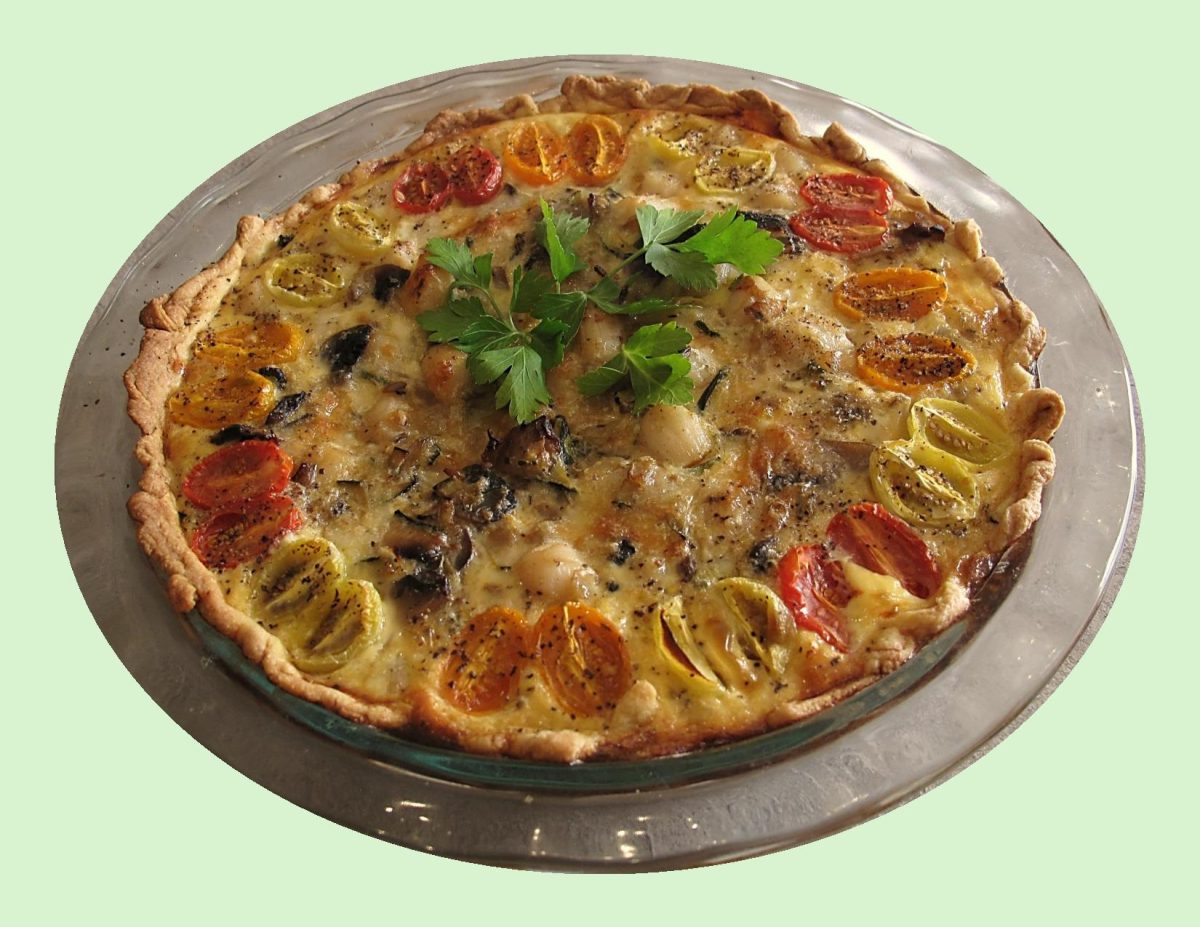
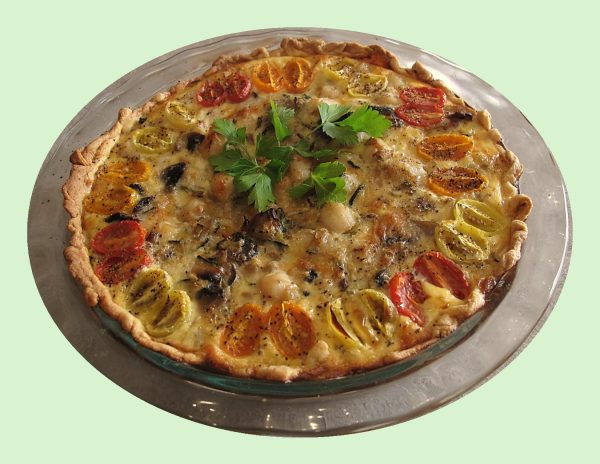
Scallop & Zucchini Quiche

While there’s still time to enjoy summer, it’s definitely prime time for eating some satisfying summer squash.

Zucchini, also known as courgetti, belongs to the same family as pumpkin. The most widely known version is green, though golden varieties exist too, which are yellow or orange.

While zucchini is treated as a vegetable in the culinary sphere, it’s technically the fruit of the zucchini flower (which can also be consumed).

Scallops are buttery, delicious, and easily likeable. This special kind of seafood has won our hearts in the casual and fine dining setting. We continue to ask ourselves how we can enhance the flavor of this seafood treat even more. Since scallops are briny and sweet with a relatively subtle flavor profile, they’ll complement everything from crunchy sweet corn to zippy citrus salads and summer or winter squash.

They’re one of the more sustainably sourced seafood because they are typically harvested from places, they are endemic to. This means that scallops don’t feed off other marine life unnaturally and they’re not placed in areas foreign to them.

I think you will find this scallop and zucchini quiche is nice served as a hot or cold summer entrée.

Print Recipe
Scallop & Zucchini Quiche
Votes: 1
Rating: 5
You:
Rate this recipe!
Servings
Ingredients
Cornmeal Pastry
Servings
Ingredients
Cornmeal Pastry
Votes: 1
Rating: 5
You:
Rate this recipe!
Instructions
Pastry
  1. In a small bowl, combine sour cream & ice water; set aside. In a large bowl, whisk together flour, cornmeal, sugar & salt. Using a pastry blender or fingertips, cut in butter until mixture resembles both coarse crumbs & small peas. Sprinkle the cold sour cream mixture over dough, 1 Tbsp at a time, tossing with a fork to evenly distribute it.
  2. After you have added all the sour cream mixture, dough should be moist enough to stick together when pressed; if not add additional cold water, 1 tsp at a time. DO NOT overwork dough. Press dough into a disk & wrap in plastic wrap. Refrigerate for at least 2 hours.
Filling
  1. In a saucepan, fry bacon until cooked but not real crisp. Remove bacon & place on paper towel to drain. In the same saucepan, sauté onions, zucchini mushrooms & garlic in remaining bacon drippings until tender but not over cooked. Add scallops during the last few minutes of sautéing. Remove from pan & combine with bacon; cool slightly.
  2. Preheat oven to 350 F.
  3. Grate cheese. Whisk together eggs, milk, Old Bay seasoning, salt & pepper. Halve the cherry tomatoes.
  4. Roll out pastry to fit a 9-inche quiche pan. Line the crust with parchment paper and fill with uncooked beans or rice. Bake for 10 minutes, then remove from the oven, remove the beans (or rice) & paper. Sprinkle half of the grated cheddar on the quiche shell. Place filling mixture on top; form a ring of tomato halves around the outside edge. Sprinkle with remaining cheese then pour milk mixture over the quiche.
  5. Sprinkle half of the grated cheddar on the quiche shell. Place filling mixture on top; form a ring of tomato halves around the outside edge. Sprinkle with remaining cheese then pour milk mixture over the quiche.
  6. Bake for about 45 minutes or until set.

Creamy Chicken Skillet w/ Italian Seasoning

Italian cuisine is renowned for its delicious and aromatic flavors, and one of the most essential ingredients that contribute to this is a blend of herbs and spices that add a distinct flavor to various dishes.

While these herbs are readily available in Italy, they were not always easy to find in America. As a result, early Italian immigrants needed a way to add their preferred flavors to dishes. ‘Italian seasoning’ provided exactly that. Its origins are a bit mysterious, with some people believing it originated in Italy and others insisting it is an American invention. However, the most common understanding is that the Greeks and Romans developed Italian seasoning somewhere in the Mediterranean during ancient times.

Italian seasoning is a mix of dried herbs with an earthy, piney flavor that’s subtly sweet and peppery. This kitchen staple includes dried basil, dried oregano, dried rosemary, dried thyme and dried marjoram, but there are several variations that also feature additions like dried sage, fennel seeds or even spices like garlic powder or crushed red-pepper flakes. Traditionally, though, it is just those five core herbs.

It has become a staple in North American kitchens and can be used to flavor just about anything, but some of our favorite uses are in classic Italian American dishes like meatballs, pizza or chicken Parmesan. It adds extra interest to olive oil for dipping bread or vinaigrette for salads. Or stir it into marinades to infuse your meat with woodsy, herbal flavor.

These chicken cutlets cook quickly and are highlighted with a creamy sauce made with tomatoes, zucchini and Italian seasoning. Nice served with roasted mashed cauliflower, brown or Basmati rice or orzo pasta.

Print Recipe
Creamy Chicken Skillet w/ Italian Seasoning
Votes: 1
Rating: 5
You:
Rate this recipe!
Servings
Votes: 1
Rating: 5
You:
Rate this recipe!
Instructions
Chicken
  1. In a small dish, combine all chicken seasonings & sprinkle on both sides of chicken cutlets. Heat 1 tablespoon oil in a large skillet over medium heat. Add the chicken & cook, turning once, until browned & cooked through. Transfer to a plate.
Sauce
  1. Add the remaining 1 tablespoon oil, zucchini, mushrooms & onions to the pan. Cook, stirring, until starting to soften, about 2 minutes. Cook, scraping up any browned bits, until the liquid has mostly evaporated, about 2 minutes. Add tomatoes, cream cheese & Italian seasoning. Bring to a simmer and cook, stirring to melt the cream cheese, for 5 minutes. Return the chicken to the pan and turn to coat with the sauce. Serve topped with basil or Italian parsley if desired.
  2. Nice to serve with roasted mashed cauliflower, brown rice, orzo or basmati rice.

Chicken & Mushroom Crepes

These chicken and mushroom crepes are a fantastic summer recipe to serve for lunch or a fancy brunch. The best part about it is most of it can be made the day ahead, leaving just the bechamel sauce, assembly, and baking to the day of your event.

Béchamel sauce is a key ingredient in hundreds of recipes, from simple dishes like creamed peas to elegant cheese soufflés. At one time considered a sauce reserved for the well-do-to, Béchamel today is probably the most frequently made sauce in the Western world.

Also known as white sauce, Béchamel is an ‘ingredient’ sauce – a sauce made to use in another dish or as a foundation for a more complex sauce. It is composed of whole milk heated and thickened with a roux.

The popularity of Béchamel sauce has spread far and wide, and today there are many variations of this sauce found throughout the world.

Print Recipe
Chicken & Mushroom Crepes
Votes: 1
Rating: 5
You:
Rate this recipe!
Course Lunch
Cuisine French
Servings
SERVINGS
Course Lunch
Cuisine French
Servings
SERVINGS
Votes: 1
Rating: 5
You:
Rate this recipe!
Instructions
Chicken
  1. Preheat oven to 375 F. Place chicken on a rimmed baking sheet fitted with a rack & roast for 35-40 mins or until the chicken is cooked through. Set aside to cool. Then shred of meat with forks & transfer to a bowl. Set aside until ready to use. This can be done in advance.
Crepes
  1. Combine flour & salt together in a large bowl then add the milk slowly, whisking until combined. Add the beaten eggs, whisking until smooth. Then whisk in the melted butter & the dill.
  2. Heat a non-stick 12-inch skillet on medium-high heat. Grease the pan with a paper towel with canola or vegetable oil. Once hot pour 1 ladle full of batter into the pan & swirl the batter around until it covers the bottom of the pan. Allow to cook until set and edges start to turn golden brown.
  3. Slide a thin spatula under the crepe enough to grab hold of it & flip it quickly with your hands. Cook on the other side for 30 seconds more. Slide the crepe off the pan onto a cutting board. Repeat the process until all batter is used. Allow the crepes to cool while you prepare the filling.
Filling
  1. In a large skillet melt the butter, add the leeks & cook until they are soft & fragrant. Then add the mushrooms, Worcestershire sauce, salt & pepper to taste & freshly chopped parsley. Transfer mixture to a bowl & set aside to cool.
Béchamel Sauce
  1. Melt the butter in a deep skillet. Once foamy add the flour, whisking together until a paste is formed. Slowly add the milk, whisking until combined. Simmer mixture until thickened, then add 1 minced garlic clove & season with salt & pepper to taste.
Assembly
  1. Preheat oven to 350 F.
  2. Place crepe over a small gratin dish, fill with 2 Tbsp of the mushroom mixture, top with ¼ cup of shredded chicken. Ladle 2 Tbsp of béchamel sauce on top. Roll crepe & drizzle more béchamel on top. Sprinkle with gruyere cheese & paprika.
  3. Bake for 10-12 mins. Then place under the broiler for another 1-2 minutes. Garnish with fresh parsley.

Barley Chicken & Mushroom Casserole

A glass of beer, a loaf of bread, a bowl of cereal, a standard of measurement, a form of currency, a medication – they all began with barley – an ancient grain, possibly even older than rice. Barley’s once exalted status has been redefined. No longer does it serve as a unit of monetary exchange or a unit of measurement. No physician thinks of prescribing it for an ailing patient. Now, barley is largely relegated to being a food or a key ingredient in the making of beer.

We owe much to the desert nomads and the camel caravans who endured sandstorms and unrelenting heat to trade their sacks of barley with distant neighbors, who then traded with other distant neighbors. Our steaming bowl of mushroom barley soup is a hand-me-down recipe with roots that take us back to prehistoric man. In 2005 barley ranked fourth for cereal production. There are many types of barley, many different uses for it and a long history of its importance to mankind.

Barley has a unique family-friendly quality. You can make a batch ahead on a Sunday, and it keeps well for at least three days in the fridge, and up to three months in the freezer. Monday, you can use it as breakfast and Tuesday, put a cup or two in your salad, and on Wednesday, you can add a barley casserole to your meal.

Four ways to cook barley. For each cup of barley, add 2 1/4 cups of water.

-Stove top: bring barley to a boil, reduce heat and simmer for 30 to 50 minutes.

-Rice cooker: barley will cook in the same amount of time as brown rice — approximately one cycle in a rice cooker.

-Oven: place barley and liquid in a covered casserole dish and cook it in the oven.

-Slow cooker: cook barley in a slow cooker for 3 to 4 hours on low heat.

Barley Chicken & Mushroom Casserole is such a wholesome and comforting meal.

Print Recipe
Barley Chicken & Mushroom Casserole
Votes: 1
Rating: 5
You:
Rate this recipe!
Servings
Votes: 1
Rating: 5
You:
Rate this recipe!
Instructions
Chicken Thighs
  1. Preheat oven to 400° F. Line a rimmed baking sheet with foil or parchment paper. Set aside.
  2. In a small bowl, whisk together the seasonings until well combined. Pat the chicken thighs dry with paper towels and place them in the baking dish.
  3. Rub both sides of the chicken with olive oil. Sprinkle the seasoning mixture over the chicken, rubbing it on both sides of the chicken thighs.
  4. Bake in the preheated oven, without moving or turning, until the internal temperature of the thickest part of the chicken reaches at least 165° F. This will take about 30-40 minutes, depending on the size of your chicken thighs. During the last 15 minutes, place the cherry tomatoes on baking tray & roast. Remove chicken thighs & tomatoes from oven. Slice thighs in 1/4-inch thick slices. Keep chicken & roasted tomatoes warm.
Barley
  1. In a saucepan, place the water & vegetable broth powder, stir to dissolve. Add barley & bring to a boil. Reduce heat to a simmer & cook barley until tender. Cooking time for pearl barley is around 35 minutes. Turn off the heat, stir the barley, cover the saucepan and let it stand for another 5 to 10 minutes.
Vegetables
  1. In a saucepan, sauté vegetables in 1 Tbsp oil until tender then season to taste. Combine with cooked barley.
Serving
  1. In a casserole serving dish, place the veg/barley mixture. Top with sliced chicken thighs & roasted tomatoes. Garnish with sliced green onion & serve.
Recipe Notes
  • If you find the barley & vegetables seem a bit dry add a bit more vegetable broth.

Boursin French Bread w/ Pork & Shrimp Stuffing

Today, March 21, our family celebrates the birth date of my father. Although he left this earth many years ago, I have so many memories of the wonderful childhood I enjoyed due to the parents I had. As my life unfolds, I realize more each day the impact having had a strong role model has made on my life. The word ‘thank you’ is so inadequate.

In the early 1950’s, my father was able to purchase another piece of land about 4 miles from our home place. Between the two farms it became the equivalent of a ‘section’. Before this time, the cattle had to be moved to a community pasture in the foothills where they would have enough grass to graze on over the summer. At that time to transport them, you had no choice but to herd them down the road allowance for approximately 20-30 miles on foot. To say the least it was a long grueling event for both the cattle and family members.

The ‘other farm’, as we referred to it, had originally been a slaughter house for the town meat market. It consisted of one large building, corals and a few other buildings. There was a slough on the land which dad had converted to a ‘dug out’ where the cattle could go and drink freely. The land was used for grain crops where in turn the cattle could be pastured on.

One of my fondest memories about the other farm was our picnic lunches. In the summer when dad would be working on the land, instead of my mother just packing a lunch for him that he could take in the morning, she would fix a wonderful ‘picnic lunch’. At about 11:30 in the morning, mom would pack up the lunch she had prepared, complete with plates, silverware, a tablecloth, etc., and we would drive to the ‘other farm’. There was just the right amount of space between two grain buildings to set up a make-shift table and stools. We would put the table cloth down and spread out our little picnic ‘feast’. Dad would be so surprised and we would all enjoy our lunch immensely. Mom always knew how to make the most simple things fun for us.

Lunch was always different from the usual lunch box meal and my mother never seemed to be short on tasty ideas. Today’s stuffed French bread meal is definitely a more elevated version of a picnic meal but it did bring me back to those wonderful cherished memories from childhood.

This meal seems so fitting to have today in honor of my father’s birthday. He loved bread, pork & seafood so I’ve got it covered.

Print Recipe
Boursin French Bread w/ Pork & Shrimp Stuffing
Votes: 1
Rating: 5
You:
Rate this recipe!
Servings
Servings
Votes: 1
Rating: 5
You:
Rate this recipe!
Instructions
Shrimp Stuffing
  1. In a saucepan, cook rice & barley in vegetable broth until tender. Drain (you can use this broth elsewhere) & transfer to a large bowl.
  2. Sauté celery, onion & mushrooms in 2 Tbsp butter until tender-crisp. Combine sautéed vegetables with rice/barley mixture. Stir in shrimp & seasonings & cook for a few more minutes until shrimp is just cooked. Remove from saucepan & set aside.
Boursin Cheese Sauce
  1. In a saucepan, melt the butter over low heat. Stir in the spices. Add the milk & adjust heat to steaming -- do not simmer or boil. Add Boursin to the milk mixture, break it up into pieces with the side of a large spoon & stir until Boursin has melted into the mixture. Remove from heat & cool.
Tenderloin
  1. Remove silver skin & butterfly tenderloin. Using a meat mallet, pound out the tenderloin to about 3/4-inch thickness. Heat a griddle & sear meat on both sides. Set aside.
Assembly /Baking
  1. Preheat oven to 375 F.
  2. Cut the French bread in half lengthwise & scoop out the soft insides. Remove only just enough to be able to fit the tenderloin in the cavity. Spread the hollowed out cavity with the Boursin cheese sauce (save some for inside the butterflied tenderloin). Cover bottom & sides completely.
  3. Spread remaining cheese sauce over inside of butterflied tenderloin. Close the tenderloin so you can fit it inside the bread cavity. Once you have it in there, open it as much as possible & fill it with the shrimp stuffing. It will be slightly mounded.
  4. Using a large piece of foil paper, place the bread 'boat' in the center & pull the foil up around it. Lightly cover the top just to keep the stuffing from drying out until the rest is cooked.
  5. Bake for 1 1/2 hours in a baking pan with a wire rack in the bottom to prevent the bottom of the bread from burning.
  6. Remove from oven & allow to sit for about 5 minutes then remove foil & place on cutting board & slice.