Mexican Chicken & Rice w/ Cheese Sauce

One of the many aspects of Mexican food that has been essential for so many years is chicken. Chicken has played a massive role in both Mexico’s food and culture for centuries. Today, it is still one of the most popularly consumed forms of protein across the country and can be added into any dish perfectly.

Today’s blog recipe is juicy, flavorful Mexican-inspired chicken smothered in a creamy, rich cheese sauce and served over Mexican rice. To say Mexican rice is simply just rice is an understatement. Mexican rice comes from a flavorful history and is served a number of different ways. For example, in Northern Mexico, Mexican rice is typically prepared with chicken broth and flavored with tomato. In Southern Mexico, white rice is more common as a side to many dishes. Common ingredients in Mexican rice typically include spices like cumin, cilantro, parsley, and tomato sauce or salsa.

Mexican rice is prepared by browning long-grain rice in cooking oil, then flavoring it with onion, garlic, and tomato sauce, salsa, or paste. Typically, parsley and cilantro are added to enhance the flavor and color of the rice. Often, Mexican rice is seasoned with cumin, chili powder, and other spices. Traditionally, vegetables like carrot and corn are added into the rice to add another layer of texture.

Mexican rice is more than just a side dish; it’s a symbol of the rich culinary heritage of Mexico. From its origins as a humble fusion of Spanish and indigenous ingredients to the diverse regional variations that exist today, Mexican rice is a dish that continues to evolve while remaining rooted in tradition. 

Print Recipe
Mexican Chicken & Rice w/ Cheese Sauce
Votes: 1
Rating: 5
You:
Rate this recipe!
Servings
SERVINGS
Servings
SERVINGS
Votes: 1
Rating: 5
You:
Rate this recipe!
Instructions
Chicken
  1. Mix together your seasonings & season both sides of the chicken breasts well. Heat a grill pan over medium to high heat & grill the chicken until done. Set aside.
Cheese Sauce
  1. In a medium sized sauce pot, melt butter over medium heat. Whisk in flour & cook until it begins to just bubble around the edges.
  2. Add in the milk, slowly, whisking to combine as you go. Continue to whisk until mix as heated through. It needs to be hot enough to melt the cheese, but not boiling.
  3. When the mix is hot, start whisking in cheese in small amounts at a time until all of the cheese has been mixed in. Once the cheese is melted, stir in the paprika & cayenne pepper. Season with salt if needed. Serve hot over the chicken.
Rice
  1. In a large saucepan, heat the oil over medium heat. Add the rice, stir to coat in the oil & cook until slightly golden. Stir in the garlic, salt & cumin.
  2. Add the tomato sauce & chicken broth. Turn the heat to medium high heat & bring the mix to a boil.
  3. Once boiling, reduce heat to low, cover with a lid & allow to simmer for 20 to 25 minutes. Remove from heat, toss in freshly chopped cilantro, stir to combine.
  4. Serve under Mexican chicken topped with cheese sauce.

Shrimp Rice Bowl

The concept of the ‘rice bowl’ in restaurants, referring to a bowl of rice topped with various ingredients, is not attributed to a single individual or restaurant. It’s a concept with deep historical roots and although it’s hard to say exactly where and when rice bowls first appeared, it’s widely believed that they originated in Japan and made their way through Korea, China, and later other parts of Asia.

These dishes, featuring rice topped with ingredients, have been enjoyed for centuries. The modern ‘bowl’ trend, however, has been influenced by various culinary traditions and the increasing popularity of customizable and convenient meal options. 

A rice bowl marries simplicity with versatility, a celebration of flavor and creativity. Rice bowls can be as straightforward or as elaborate as one chooses to make them. The ingredients are usually cooked and seasoned, providing a balanced and flavorful meal.

This shrimp bowl is quick and easy to prepare, making it an ideal choice for a busy weeknight dinner or a hearty, nourishing lunch. The shrimp is marinated in Mexican spices and fresh lime juice, then cooked and served with rice and fresh veggies. Brion & I just love this meal!

Print Recipe
Shrimp Rice Bowl
Instructions
Shrimp Marinade
  1. Start by marinating shrimp. Add the oil, lime juice, spices & cilantro to a medium bowl. Pat shrimp dry, then add them to the marinade & toss to fully coat. Cover & marinate in the fridge for 15 minutes.
Dressing
  1. In a small blender, whisk all dressing ingredients together until creamy. Set aside.
Other Ingredients
  1. Cook rice according to package directions & divide between 2 serving bowls.
  2. In a microwave steam dish, cook shucked corn ear for 7 minutes. If you wish, at this point, heat 1 Tbsp of olive oil in a saucepan & sauté corn cob for a few minutes until golden on all sides. Allow corn to cool & then cut corn off the cob. This step is purely up to you.
  3. Dice red onion, slice green onion, slice olives (if using), halve cherry tomatoes, slice avocado & grate cheese (if using).
  4. To cook shrimp, heat a medium skillet over medium-high heat (no oil needed). When it's hot, add the shrimp to the skillet in an even layer & cook for 2-3 minutes on one side, flip & cook for another 2-3 minutes on the other side. The shrimp will turn an opaque & pink color when its done. Remove the shrimp from the heat & stir to fully coat it in any sauces that are in the pan.
Assemble Bowls
  1. Top the rice in each serving bowl with shrimp, corn, avocado, onions, cherry tomatoes, olives & sprinkle with cheese. Drizzle with prepared dressing & serve.
Recipe Notes

• There are numerous bottled dressings that would be suitable if you prefer not to make your own such as Cilantro Ranch.

Corn Gnocchi w/ Pork, Zucchini & Mushrooms

The other day when Brion & I had time to do a walk-about through Winners, we noticed some ‘corn’ potato gnocchi. Being gnocchi lovers we decided to give it a try. Of course, you might know I would inevitably have to research the company before making it just for interest’s sake…..

The corn potato gnocchi from Siena Artie are crafted using rehydrated potatoes (70%), corn flour, potato starch, corn starch, rice flour, salt, and acidity regulators.

The inclusion of corn flour and starch instead of wheat is designed to provide a gluten-free alternative that retains the traditional texture and flavor of Italian potato gnocchi. These gnocchi are produced in Italy, emphasizing a ‘traditional Italian recipe’. 

The corn potato gnocchi produced by Siena Artie is a modern commercial adaptation of a traditional Italian staple that traces its roots back centuries. While Siena Artie specifically markets these products as being made from old Italian family recipes, the use of corn and potato reflects the broader history of the dish. 

Gnocchi originated in Roman times, originally made from a semolina porridge-like dough mixed with eggs. Potatoes were introduced to Italy in the 16th century but only became the ‘star’ ingredient in gnocchi in the late 19th century. This shift occurred largely because potatoes grew more easily in the cooler climates of Northern Italy than traditional grains.

The inclusion of corn (maize) or corn meal in gnocchi is a regional variation found throughout the Italian peninsula. Like potatoes, corn became a vital substitute when wheat was scarce or too expensive for small landowners. 

Siena Artie’s recipes often use approximately 70% rehydrated potatoes, adhering to the 19th-century standard where mashed potatoes became the foundation of the dough.

By offering variations like whole wheat or corn-based gnocchi, the company mirrors the historical ‘cucina povera’ (poor cuisine) tradition of using whatever local starch—such as chestnut flour, breadcrumbs, or corn—was available.

While traditional gnocchi were hand-rolled—a time-consuming process often saved for Sundays or special occasions—Siena Artie provides a shelf-stable or vacuum-sealed version that maintains the classic ribbed texture designed to hold sauce. 

I crafted a recipe using a pork/beef combo along with some of our favorite veggies to go with the corn/potato gnocchi. This is what developed.

Print Recipe
Corn Gnocchi w/ Pork, Zucchini & Mushrooms
Instructions
  1. Melt butter in a 12-inch skillet over medium-high heat. Add gnocchi in a single layer & cook on one side for 2-3 minutes until browned & toasted. Shake the pan to toss the gnocchi & continue cooking for another 2-3 minutes, tossing occasionally, until both sides are toasted. Remove gnocchi to a plate & set aside.
  2. Preheat oven to 350 F.
  3. Turn the heat to high & return skillet to stove. When the pan is hot, add the pork/beef combo & season with salt, pepper, cumin, paprika & mustard powder. Stir-fry for a few minutes until the meat starts to turn brown. Add the leeks, mushrooms, zucchini, corn & garlic. Cook, stirring occasionally, until meat is cooked & veggies are tender-crisp. Drain if necessary.
  4. Add the tomatoes, broth, gorgonzola cheese & gnocchi back into the skillet. Stir to combine. Pour mixture into an 11 x 7-inch casserole dish. Top with remaining cheese.
  5. Cover with foil & bake for 20 minutes then remove foil & continue to bake another 10 minutes or until bubbling. Remove from oven & top with sliced green onions. Allow to cool for 5-10 minutes then serve with some crusty bread.

Blackberry Chicken

HONORING LORETTA’S MEMORY!

Today, July 25, my sister Loretta would have been 82. Over the years I have shared many experiences on the blog that I had enjoyed with Loretta. She was an avid follower of the blog and always encouraged me to keep writing. In February of 2023, Loretta’s time on this earth ended. Loretta was a beautiful melody in the rhythm of my life. Her passing has left such an empty place in my heart.

The phrase ‘too much of a good thing’ is certainly not true when it comes to the many memories we shared. I will always give anything to recollect and relive the memories we created together.

She was a constant in my life during her lifetime. Loretta was so much more than just a sister to me. Only her love, kindness, and the memories we shared can bridge the gap between the departure of her passing.

Loretta was a very kind, gentle soul. She was a sister, mother, grandmother, great grandmother, friend and professional health care worker as well as many other things she did with such love and compassion.

I wanted to make something special on the blog to honor her memory. This blackberry chicken seems fitting since she loved berries.

Print Recipe
Blackberry Chicken
Votes: 1
Rating: 5
You:
Rate this recipe!
Cuisine Canadian
Servings
Cuisine Canadian
Servings
Votes: 1
Rating: 5
You:
Rate this recipe!
Instructions
  1. In a small bowl, mash 2 Tbsp berries. Add 1/4 cup broth, brown sugar, vinegar, oil, garlic, 1/4 teaspoon paprika & cumin.
  2. Place chicken in an 11x7-in. baking dish coated with cooking spray; pour broth mixture over the top. Sprinkle with thyme, salt, pepper & remaining paprika.
  3. Bake, uncovered, at 375 F. for 20-25 minutes or until cooked through, basting occasionally with pan juices. Remove chicken and keep warm.
  4. Skim fat from pan drippings. In a small saucepan, combine cornstarch & remaining broth until smooth. Gradually stir in drippings. Bring to a boil; cook & stir for 1-2 minutes or until thickened. Serve with chicken; sprinkle with remaining blackberries. Mashed potatoes or pasta with some roasted veggies round out this meal nicely.

Creamy Chicken Skillet w/ Italian Seasoning

Italian cuisine is renowned for its delicious and aromatic flavors, and one of the most essential ingredients that contribute to this is a blend of herbs and spices that add a distinct flavor to various dishes.

While these herbs are readily available in Italy, they were not always easy to find in America. As a result, early Italian immigrants needed a way to add their preferred flavors to dishes. ‘Italian seasoning’ provided exactly that. Its origins are a bit mysterious, with some people believing it originated in Italy and others insisting it is an American invention. However, the most common understanding is that the Greeks and Romans developed Italian seasoning somewhere in the Mediterranean during ancient times.

Italian seasoning is a mix of dried herbs with an earthy, piney flavor that’s subtly sweet and peppery. This kitchen staple includes dried basil, dried oregano, dried rosemary, dried thyme and dried marjoram, but there are several variations that also feature additions like dried sage, fennel seeds or even spices like garlic powder or crushed red-pepper flakes. Traditionally, though, it is just those five core herbs.

It has become a staple in North American kitchens and can be used to flavor just about anything, but some of our favorite uses are in classic Italian American dishes like meatballs, pizza or chicken Parmesan. It adds extra interest to olive oil for dipping bread or vinaigrette for salads. Or stir it into marinades to infuse your meat with woodsy, herbal flavor.

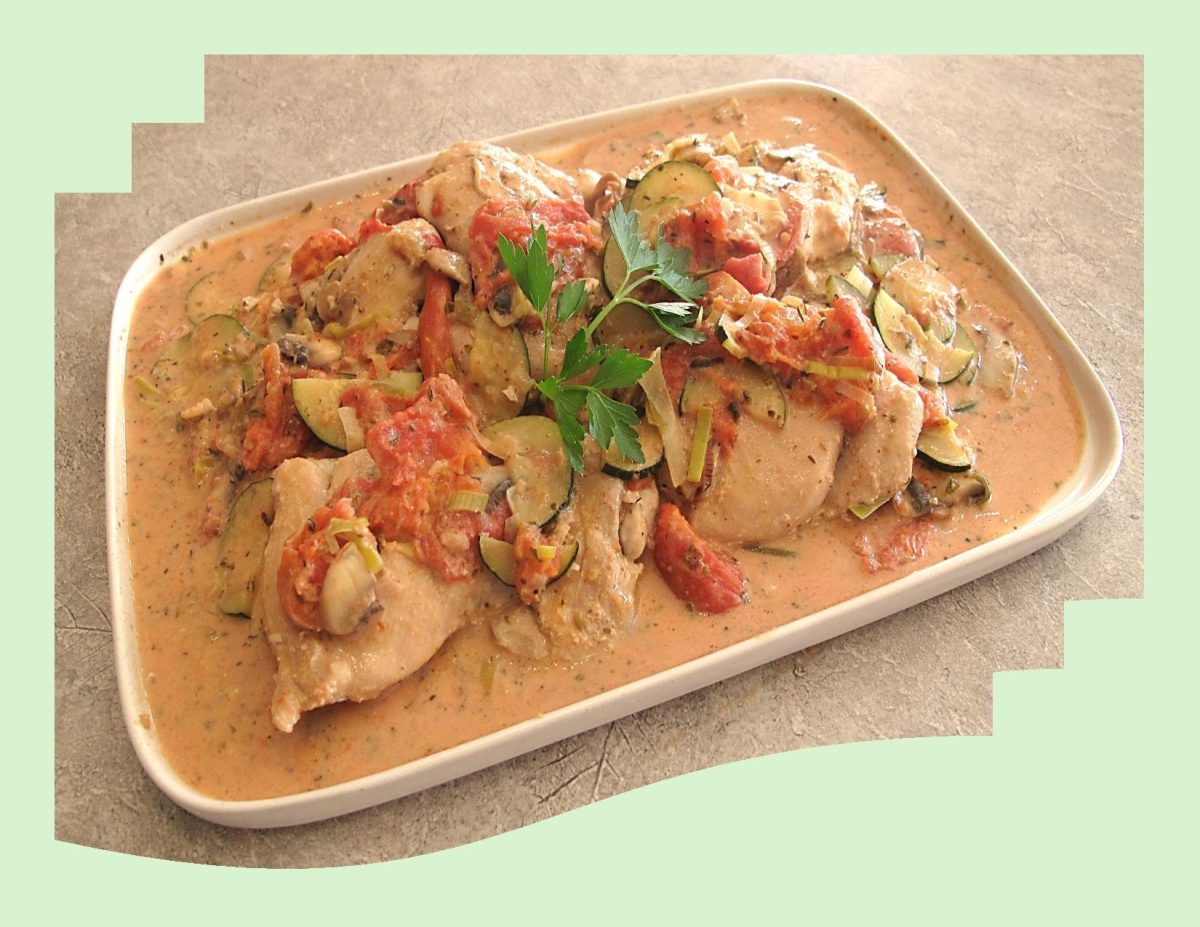
These chicken cutlets cook quickly and are highlighted with a creamy sauce made with tomatoes, zucchini and Italian seasoning. Nice served with roasted mashed cauliflower, brown or Basmati rice or orzo pasta.

Print Recipe
Creamy Chicken Skillet w/ Italian Seasoning
Votes: 1
Rating: 5
You:
Rate this recipe!
Servings
Votes: 1
Rating: 5
You:
Rate this recipe!
Instructions
Chicken
  1. In a small dish, combine all chicken seasonings & sprinkle on both sides of chicken cutlets. Heat 1 tablespoon oil in a large skillet over medium heat. Add the chicken & cook, turning once, until browned & cooked through. Transfer to a plate.
Sauce
  1. Add the remaining 1 tablespoon oil, zucchini, mushrooms & onions to the pan. Cook, stirring, until starting to soften, about 2 minutes. Cook, scraping up any browned bits, until the liquid has mostly evaporated, about 2 minutes. Add tomatoes, cream cheese & Italian seasoning. Bring to a simmer and cook, stirring to melt the cream cheese, for 5 minutes. Return the chicken to the pan and turn to coat with the sauce. Serve topped with basil or Italian parsley if desired.
  2. Nice to serve with roasted mashed cauliflower, brown rice, orzo or basmati rice.

Shrimp Taco Salad

When you think of Mexican food you probably think of the standard burritos, nachos and quesadillas. While those dishes are definitely tasty why not do the summer ‘thing’ and incorporate these ingredients in a salad.

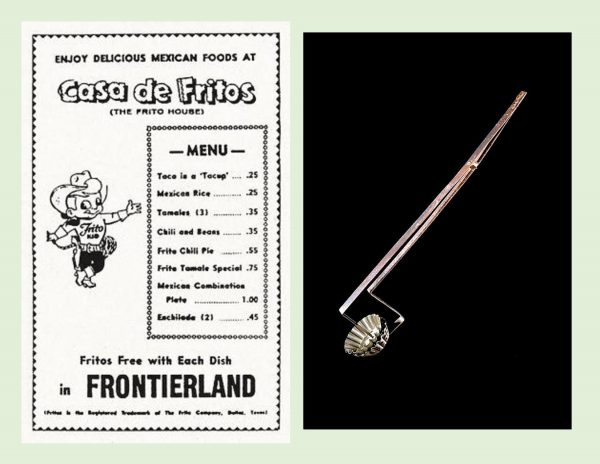
The idea of a full meal salad has always appealed to me. Of course, there are many of these using a variety of ingredients. Probably one of the most popular was the taco salad. The earliest record of it dates back to the 1960’s with its predecessor being the small teacup sized ‘Tacup’. It consisted of beef, beans, sour cream and cheese, served in a small ‘bowl’ made entirely of a Fritos tortilla.

The taco in a Tacup was invented by Charles Elmer Doolin, the founder of Fritos (tortilla chips). He created a device that looked like tongs but with two tart molds at the end of each tong. One mold would fit within the other mold with a tortilla sandwiched between them. The scalloped-edged shell was dipped into hot oil. Holes in the bottom mold exposed the tortilla to the hot oil, enabling it to cook evenly.

Tacups were first served in Dallas, Texas in the early 1950’s and by 1955, he was selling them in Fritos’ flagship restaurant, ‘Casa de Fritos’, at Disneyland in Anaheim, California. It became popular enough that the Tacup was made bigger and served as a full, main-dish sized salad bowl.

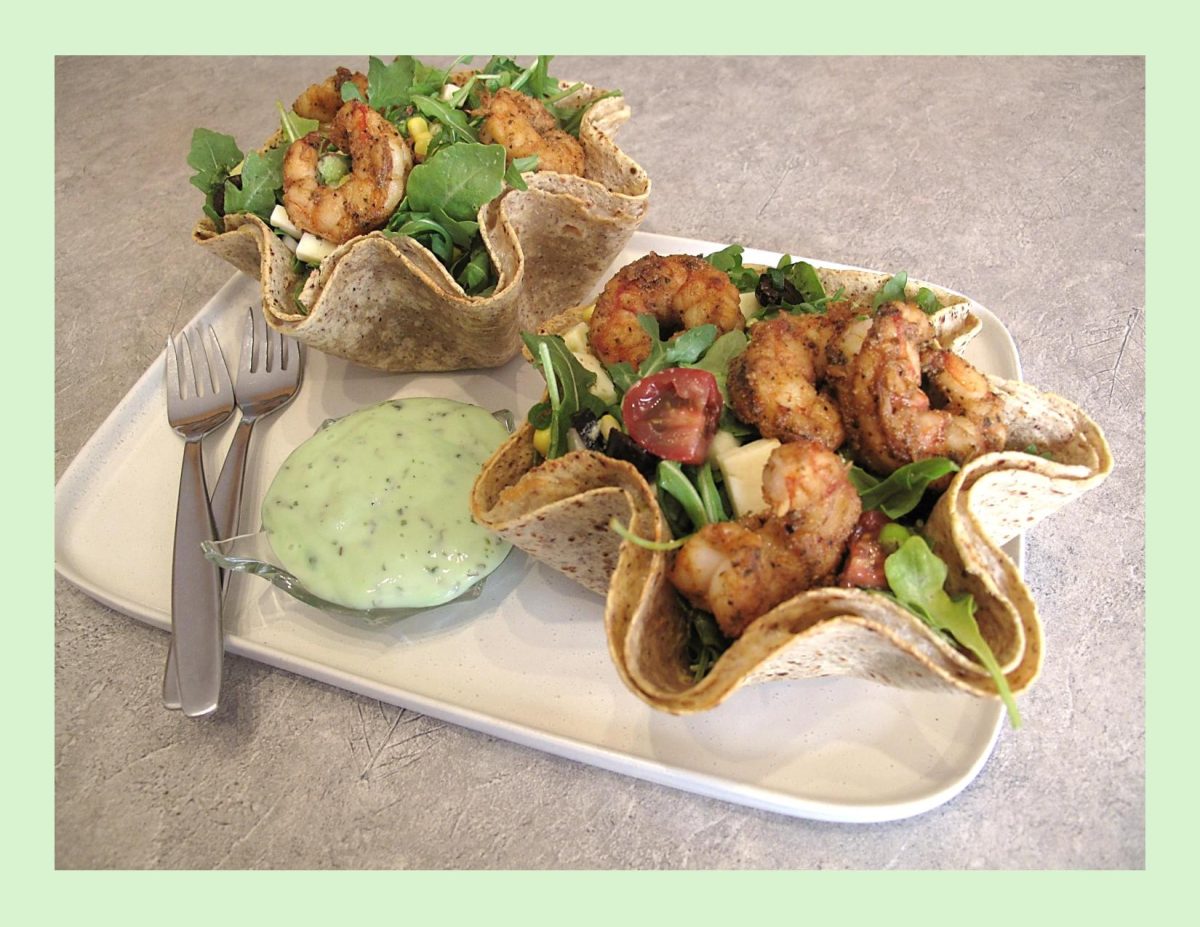
Today’s salad is a satisfying meal, a seriously feel-good dinner salad that’s crisp, spicy, and fresh all at once. Tacos de camarones (‘shrimp tacos’) originated in Baja California in Mexico. But these shrimp tacos in salad form gives you that full meal deal. All the very best elements —seasoned shrimp, healthy fresh veggies, in an edible tortilla bowl with a homemade cilantro lime dressing.

Print Recipe
Shrimp Taco Salad
Instructions
Cilantro Dressing
  1. In a food processor, place the cilantro, garlic, avocado, lime juice, honey, coriander & salt. Pulse to combine. With the machine is running, pour in the olive oil & process until smooth.
Shrimp
  1. In a medium bowl, add all marinade ingredients (except shrimp) & blend well. Add shrimp tossing well to coat. Set aside to marinate for 15 minutes. In a saucepan, melt a Tbsp butter then sauté shrimp over medium-high heat for 5 minutes or just until shrimp is cooked.
Salad Ingredients
  1. In a saucepan, fry bacon until cooked but not too crisp, drain on paper towel & chop. Drain canned or cook fresh corn on the cob & remove kernels from cob. Peel, pit & cube avocado. Sprinkle a bit of lime juice on it to keep it from going brown. Halve grape tomatoes. Slice green onions, chives & dill. Drain sliced black olives. Cube cheese.
Tortilla Bowls
  1. Preheat oven to 350 F.
  2. Brush inside of 2 heat resistant glass bowls with oil. Place one tortilla in each bowl so that the shape more or less adheres to the bowl. Line each tortilla with cheese slices then place a second tortilla on top.
  3. Place the bowls with the layered tortillas in the oven & bake for 7 minutes. Remove the bowls from the oven & allow to cool before removing the 'edible tortilla bowls'.
Assembly
  1. Place tortilla bowls on serving plates. In a large mixing bowl place shrimp & all salad ingredients. Toss gently, then divide between tortilla bowls. Drizzle with cilantro dressing (or dressing of choice) & serve.

Turkey, Bacon & Apricot Pie

HAPPY THANKSGIVING DAY!

For the last 66 years, Canada has celebrated Thanksgiving Day on the second Monday in October. It’s one of those holidays that tend to bring families together, both physically and emotionally. Unfortunately, though, in this highly technological age, it seems as if we have become more connected digitally than emotionally.

We have now entered into our Autumn season with all its breathtaking fall foliage. Part of Canada’s appeal is it’s four seasons that offer changing landscapes and temperatures. Fall also represents a time of change. As nature bursts with its fabulous fall foliage, it gives us a little bit of extra time to make the most of what we have left in this year before the grand finale.

I, for one, have always loved the changing seasons. That’s not to say that I like freezing cold and slippery roads but that I have come to understand the important role each one plays in the ‘big picture’. When Brion and I initially landscaped our property, careful consideration was given to what plants were planted. Over the years it has developed into a beautiful tapestry of color through our growing season.

Growing up on the farm, Fall was an especially busy time with the grain crops being harvested, garden vegetables being canned, frozen or just stored for use over the coming months. So much needed to be done before winter would set in. As a teenager it all just seemed like a lot of work. Even as hard as my parents worked at making a living from farming, I think they felt a real sense of satisfaction in what they were able to achieve. I realize now that even without being aware of it the visual beauty of the farmland at harvest was imprinted on me forever.

Most of us here in Canada, have far more things to be grateful for than not. I have fond memories of my wonderful parents, carefree childhood days with my siblings, having enjoyed a successful career, a loving husband, our home, the many wonderful world travels we have been able to enjoy together, but above all we are both in relatively good health. It is so important to just take the time and appreciate the blessings in our lives and make every day count.

For our Thanksgiving meal I am preparing a turkey, bacon & apricot pie. Should be good!

Print Recipe
Turkey, Bacon & Apricot Pie
Votes: 1
Rating: 5
You:
Rate this recipe!
Servings
Votes: 1
Rating: 5
You:
Rate this recipe!
Instructions
  1. Heat the olive oil over medium-high heat in a large skillet. Add the bacon & cook until slightly crispy. Remove from pan with a slotted spoon to paper towel & set aside.
  2. Add the onion to skillet & sauté over a low heat until soft but not colored. Add the mushrooms & cook until soft & any liquid has evaporated, add thyme; set aside.
  3. Melt butter in skillet, then add the flour & stir over heat for 1 minute. Remove from the heat, gradually add the milk a little at a time, stirring well. Return to heat & bring to a boil; add turkey broth & stir. Simmer for 2-3 minutes; add seasonings.
  4. Add bacon, turkey, apricots & mushroom mixture to the sauce. Stir well.
  5. Preheat oven to 400 F.
  6. Roll 1 sheet of puff pastry to fit a DEEP 9-inch pie dish. From the second sheet of puff pastry cut pastry designs of your choice for top crust.
  7. Spoon filling into pie dish & top with pastry designs. Brush pastry with egg wash & place in oven.
  8. Bake for 30-40 minutes or until pastry is golden brown & filling is piping hot. Remove from oven & allow to cool slightly before serving.
Recipe Notes
  • Don't hesitate to use your own spice combination in place of the coriander & cumin.
  • Spiced cranberries make an extra special condiment for this meal.

Spicy Chicken Loaf

Every region of the world has its unique flavors and spices. In many cases, the best way to discover a new cuisine is by its spice rack. No other ingredient can help us taste the characteristic flavors of a cuisine quite as easily, immediately tipping us off to the differences between a mild German dish and a spice-packed Indian one. But spices also tell the story of our world—the history of how we’re all connected. As people have brought their flavors with them, they’ve been shared and reinterpreted giving us the various, vastly different global, national, and regional cuisines we love to explore.

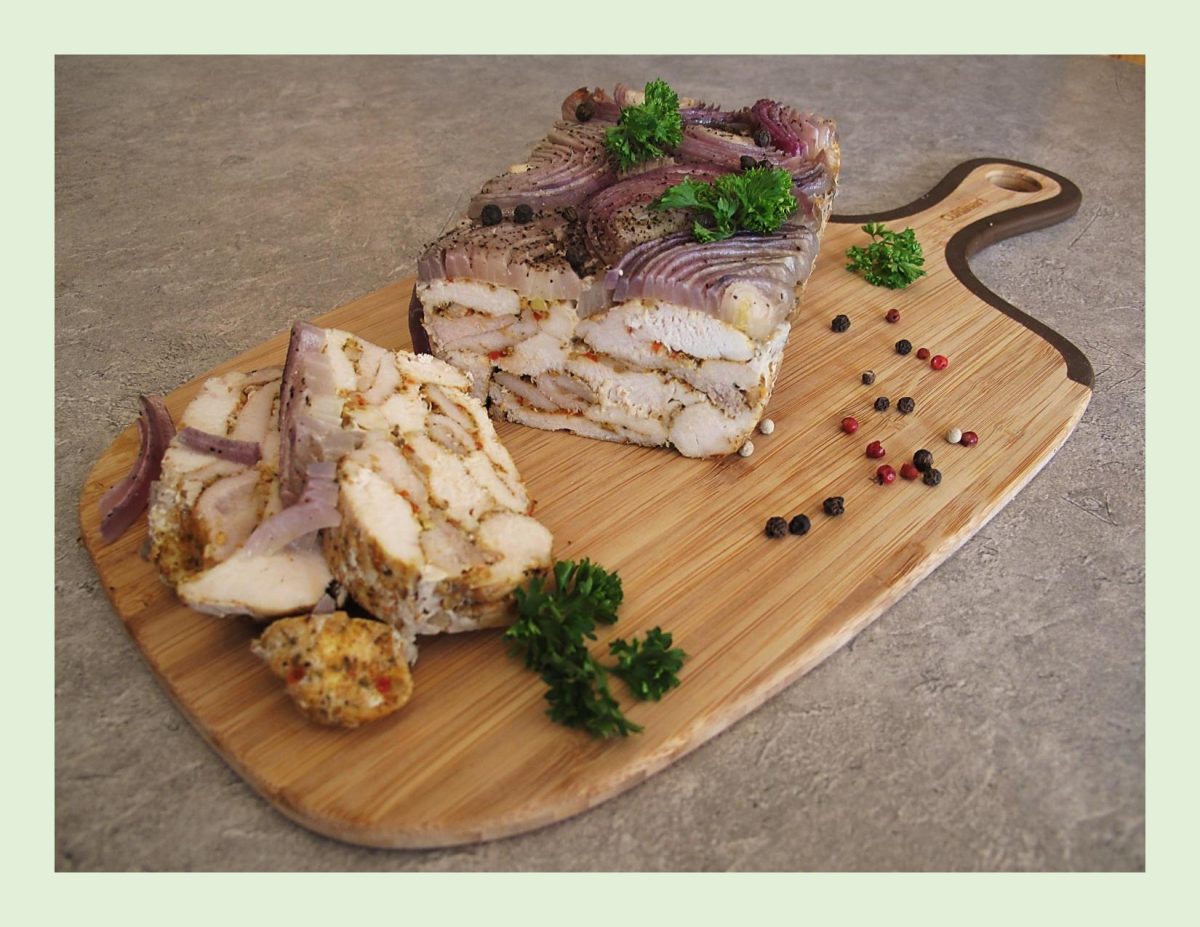
When you think of spiced chicken loaf, a mixture of ground chicken combined with a lot of hot spices and baked in a loaf pan comes to mind. In this particular chicken loaf, you use boneless/skinless chicken pieces along with an assortment of spices which are roasted together in a loaf form. Once baked, slices of the chicken loaf become a tasty filling served in pita bread.

The pockets in pita bread make them perfect for making sandwiches, wraps or other types of recipes you can hold in your hand.

Traditional pita bread is a round bread with a pocket in the middle. Pita bread must be cooked in ovens that can get extremely hot (at least 500° F). The pocket in a pita is made by steam, which puffs up the dough during the baking process. When the bread cools, it becomes flat again, but a pocket is left in the middle of the bread.

Print Recipe
Spicy Chicken Loaf
Votes: 1
Rating: 5
You:
Rate this recipe!
Course Lunch
Cuisine American
Servings
Votes: 1
Rating: 5
You:
Rate this recipe!
Instructions
  1. Combine spices in a bowl. Slice chicken into strips & place in a plastic bag. Add spices & toss to coat chicken well.
  2. Line a glass 8 x 4-inch loaf pan with parchment paper & place the chicken in layers one on top the other, alternating dark & white meat. Cover with plastic wrap & refrigerate for a few hours or overnight.
  3. When you are ready to cook the chicken, preheat oven to 350 F.
  4. Place onion semi-circles & hot green pepper (if using) over the chicken. Drizzle with olive oil & sprinkle with black pepper.
  5. Roast for about 1 -1 1/2 hours. Remove the loaf & pour off the liquids that have accumulated in the pan. It is important that the loaf be 'dry', without liquids.
  6. Remove from the pan, transfer to a cutting board & slice. Serve as part of a pita bread filling.

Pulled Pork Naan Pizza w/ Peach Onion Chutney

CELEBRATING HERITAGE DAY!

In 1974, the first Monday of August was made an official provincial holiday to recognize and celebrate the varied cultural heritage of Albertans.

The Heritage Festival in our city of Edmonton, Alberta Canada is one of the world’s largest three-day multicultural events, taking place every August. The festival showcases a diversity of cuisine, entertainment, interpretive materials, and crafts worldwide. There is no admission to enter or to watch the many cultural dances and folk music shows throughout the day. Attendees will be able to purchase various food made by the pavilions. Due to the renovations currently happening at William Hawrelak Park, the festival has been relocated to the Edmonton Exhibition Lands and Borden Parks. 

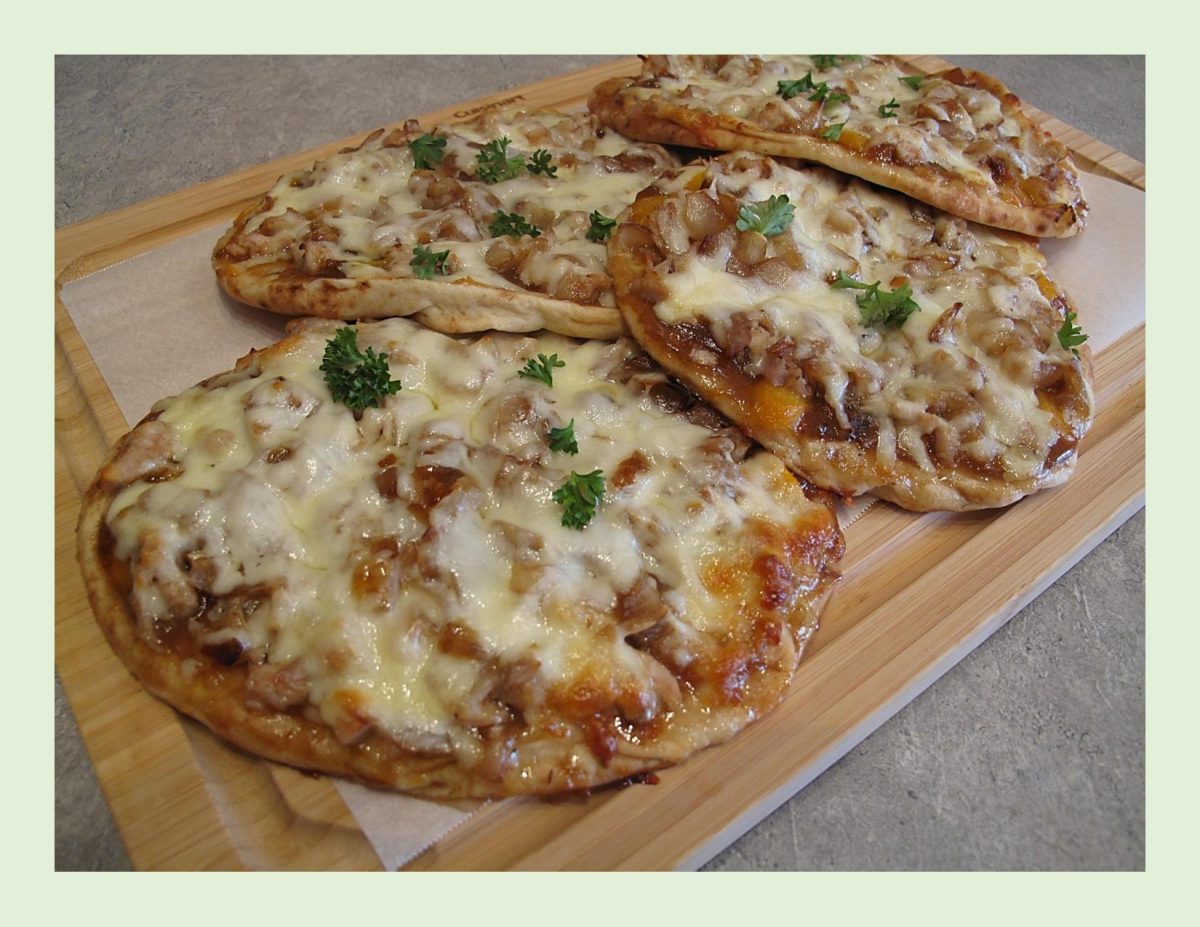
Today, I’m doing a savory version with some pulled pork with a seasonal fresh peach and onion chutney. Chutney is a condiment that originated in India that can add an extra zing to your meal. A chutney may be sweet and spicy or sweet and savory, depending on the spices and other ingredients used. Often served with meats, such as chicken, pork, or ham, as well as fish.

You’ve likely eaten naan bread at some time. The tasty Indian flatbread is traditionally cooked in the tandoor, carries a slight smoky aroma, and has a soft texture with pillow-like pockets studded over the top. Puffed flatbread has the power to move beyond a dinner accompaniment. It’s worthy of a role far better — like actually being the main course.

It proves to be super versatile — naan is soft and sturdy enough to take the place of bread, thin enough to be used as a flatbread or pizza dough, and pliable enough to work as a tortilla. It can be soaked, baked, fried, and folded to take on some surprising and delicious forms such as French toast, savory bread pudding, paninis, nachos or even as a dessert naan bread with bananas, strawberries & chocolate.

Ever since Brion & I got ‘tuned in’ to savory naan bread pizzas, we love them no matter what the topping is. Should be a good meal for today!

Print Recipe
Pulled Pork Naan Pizza w/ Peach Onion Chutney
Votes: 1
Rating: 5
You:
Rate this recipe!
Servings
Ingredients
Peach Onion Chutney
Caramelized Onions
Servings
Ingredients
Peach Onion Chutney
Caramelized Onions
Votes: 1
Rating: 5
You:
Rate this recipe!
Instructions
Peach Onion Chutney
  1. In a large heavy pot, combine sugar, vinegar, ginger, cumin, cinnamon & pepper flakes. Bring to a simmer over low heat, stirring until sugar dissolves. Add peaches & onion; increase heat to medium high & cook until peaches are tender & mixture thickens. Cool. ( I prefer to make this a day ahead).
Caramelized Onions
  1. In a skillet, heat oil until hot. Add onion & sprinkle with salt. Cook & stir about 15 minutes or until moisture has evaporated & onion is soft. Reduce heat, sprinkle with vinegar. Cook & stir until golden. Add brown sugar, stirring until caramel in color. Remove from heat & cool.
Assembly
  1. Preheat oven to 375 F.
  2. On a large sheet of parchment paper, place 4 Naan breads & place on a baking sheet.
  3. Carefully spread peach onion chutney liberally over each Naan bread. Sprinkle each with a bit of grated cheese.
  4. Layer with pulled pork & caramelized onions. Top with remaining cheese & bake 15-20 minutes or until hot & bubbly. Remove from oven & serve.

Grilled Salmon w/ Mango Avocado Salsa

When it comes to favorite summer condiments, salsa is top of the list. For many North Americans, salsa is almost considered a basic food group, and not just as a nutritious dipper for corn chips. Packed with garden-fresh fruits, herbs and vegetables that are easy to get your hands on, it’s as terrific a topping for chicken, beef, or seafood as it is a colorful add-in for pasta, rice and salad. Plus, it requires virtually no cooking, making it the perfect dish to throw together when summer heat and humidity make you feel like you’re melting.

The history of salsa sauce originated with the Inca people. Salsa, which has typically been a combination of chilies, tomatoes and other spices, can be traced to the Aztecs, Mayans and Incas. In recent years, the use of different fruits combined with vegetables makes for a spicy fruit salsa.

Modern North American cooking has become a fusion of traditions, flavors and dishes from virtually every part of the globe. The tradition of eating tomato-based salsa was likely regional until the practice of eating Mexican food spread throughout the continent. Exactly how mango salsa reached North America isn’t really known, but it was likely brought from the Caribbean by travelers. Modern North American salsas are still primarily tomato based, but many people appreciate the sweet, salty, sour and spicy combinations of flavors in a well-balanced mango salsa.

Versatility and adaptability are salsa’s biggest selling point. Chunky or finely diced, spicy or mild, crafted with fruit or vegetables, and sometimes both, salsa is unlimited with possibility.

The salsa that Brion & I are having with our salmon today is an interesting mix of avocado, mango, grape tomatoes & red onion marinated in lime juice. Should be good!

Print Recipe
Grilled Salmon w/ Mango Avocado Salsa
Instructions
Salmon
  1. In a small bowl, mix melted butter & all other salmon ingredients. Rub the spice mix all over salmon in foil ( mainly on the no-skin side but getting a little on the other side as well). Leave at room temperature while the grill heats up. Preheat the grill to medium-high heat.
Salsa
  1. In a bowl, combine salsa ingredients & refrigerate until salmon is ready.
Grilling
  1. Grill the salmon wrapped in foil for about 15 minutes or to your liking. Salmon should flake easily & not be overcooked.
  2. Serve hot on a bed of rice with the mango salsa on top.