CELEBRATING LABOR DAY!
Once again, the last long weekend of summer has arrived. Here in Canada, families with school age children, take it as the last chance to travel before the end of summer. Others enjoy the company of family and friends at barbecues, picnics, fairs, festivals and fireworks displays. Canadian football fans may spend a large portion of their weekend watching the Labor Day Classic matches live on television. Whatever your choice of relaxation is, you know good food will be a part of the holiday.
The point of stuffed bread is that it makes great, portable convenience food. Eaten directly out of the oven, it makes a satisfying breakfast, lunch, or dinner. Or pulled out of the oven and wrapped up, it’s great on road trips (where a knife and fork aren’t always a good option), or at work, or Labor Day picnics or any time at all.
Chicken bacon ranch stuffed bread is amazing! Its huge flavor packed into a loaf of bread…. think chicken, bacon, cheese & ranch dressing all baked together in the ultimate stuffed bread. Great for the Labor Day get-together!
Print Recipe
Chicken Bacon Ranch Stuffed Bread
Votes: 1
Rating: 5
You:
Rate this recipe!
|
|
Votes: 1
Rating: 5
You:
Rate this recipe!
|
Instructions
-
Cut loaf of French bread in half lengthwise. Hollow out the inside of bread halves, leaving a shell about 1/2-inch thick. Save soft inside bread for another use such as stuffing or croutons.
In a large bowl, mix the shredded chicken, bacon, ranch dressing, 1 1/2 cups cheese, green onions, tomatoes & parsley.
Spoon the chicken mixture into the hollowed out bread halves. Top with remaining cheese. Butter the cut edges of each bread half to keep them from drying out while in the oven.
Place stuffed bread halves on a baking sheet & bake for about 20-25 minutes or until cheese is melted & bubbly. Remove from oven & allow to cool for a few minutes before slicing & serving.

The concept of the ‘rice bowl’ in restaurants, referring to a bowl of rice topped with various ingredients, is not attributed to a single individual or restaurant. It’s a concept with deep historical roots and although it’s hard to say exactly where and when rice bowls first appeared, it’s widely believed that they originated in Japan and made their way through Korea, China, and later other parts of Asia.
These dishes, featuring rice topped with ingredients, have been enjoyed for centuries. The modern ‘bowl’ trend, however, has been influenced by various culinary traditions and the increasing popularity of customizable and convenient meal options.
A rice bowl marries simplicity with versatility, a celebration of flavor and creativity. Rice bowls can be as straightforward or as elaborate as one chooses to make them. The ingredients are usually cooked and seasoned, providing a balanced and flavorful meal.
This shrimp bowl is quick and easy to prepare, making it an ideal choice for a busy weeknight dinner or a hearty, nourishing lunch. The shrimp is marinated in Mexican spices and fresh lime juice, then cooked and served with rice and fresh veggies. Brion & I just love this meal!
Print Recipe
Shrimp Rice Bowl
Votes: 1
Rating: 5
You:
Rate this recipe!
|
|
Votes: 1
Rating: 5
You:
Rate this recipe!
|
Instructions
Shrimp Marinade
Start by marinating shrimp. Add the oil, lime juice, spices & cilantro to a medium bowl. Pat shrimp dry, then add them to the marinade & toss to fully coat. Cover & marinate in the fridge for 15 minutes.
Dressing
In a small blender, whisk all dressing ingredients together until creamy. Set aside.
Other Ingredients
Cook rice according to package directions & divide between 2 serving bowls.
In a microwave steam dish, cook shucked corn ear for 7 minutes. If you wish, at this point, heat 1 Tbsp of olive oil in a saucepan & sauté corn cob for a few minutes until golden on all sides. Allow corn to cool & then cut corn off the cob. This step is purely up to you.
Dice red onion, slice green onion, slice olives (if using), halve cherry tomatoes, slice avocado & grate cheese (if using).
To cook shrimp, heat a medium skillet over medium-high heat (no oil needed). When it's hot, add the shrimp to the skillet in an even layer & cook for 2-3 minutes on one side, flip & cook for another 2-3 minutes on the other side. The shrimp will turn an opaque & pink color when its done. Remove the shrimp from the heat & stir to fully coat it in any sauces that are in the pan.
Assemble Bowls
Top the rice in each serving bowl with shrimp, corn, avocado, onions, cherry tomatoes, olives & sprinkle with cheese. Drizzle with prepared dressing & serve.
Recipe Notes
• There are numerous bottled dressings that would be suitable if you prefer not to make your own such as Cilantro Ranch.

A calzone is a savory Italian turnover. It traditionally consists of a cheesy filling in a leavened dough and is served with marinara sauce on the side. The calzone originated in Naples in the 18th century.
The best results come when the filling is not too moist because it can make the dough soggy. Like with a stir-fry, it is also better to have a filling where the ingredients are broken down into bite-size pieces, so the filling is easy to eat.
There is nothing better this time of year than fresh corn and tomatoes. This easy corn, tomato & bacon calzone is the perfect way to celebrate fresh summer produce! Don’t overload the filling with ingredients; make your point with a mixture of a few simple flavors then load it with cheese!
Eating vegetables during their seasons really gives you the best flavors.
Print Recipe
Summer Calzones w/ Corn, Tomatoes & Bacon
Votes: 1
Rating: 5
You:
Rate this recipe!
Ingredients
Filling
- 4 slices bacon, chopped
- 1 shallot, minced
- 2 cloves garlic, minced
- 2 ears corn, husked & kernels cut from cobs
- 1 cup cherry tomatoes, halved
- 4 large mushrooms, sliced & sauteed
- 1/4 cup fresh basil, chopped
- 1 tsp red pepper flakes
- salt & pepper to taste
- 125 gm ricotta cheese
- 150 gm (about 1 1/2 cups) monterey jack cheese, grated
- Cornmeal for sprinkling, optional
- Marinara sauce, for serving
Ingredients
Filling
- 4 slices bacon, chopped
- 1 shallot, minced
- 2 cloves garlic, minced
- 2 ears corn, husked & kernels cut from cobs
- 1 cup cherry tomatoes, halved
- 4 large mushrooms, sliced & sauteed
- 1/4 cup fresh basil, chopped
- 1 tsp red pepper flakes
- salt & pepper to taste
- 125 gm ricotta cheese
- 150 gm (about 1 1/2 cups) monterey jack cheese, grated
- Cornmeal for sprinkling, optional
- Marinara sauce, for serving
|
Votes: 1
Rating: 5
You:
Rate this recipe!
|
Instructions
Dough
In a large bowl, place lukewarm water, honey & yeast; allow to stand for a few minutes until frothy. In another bowl, flour & salt.
When yeast is ready, add the 2 Tbsp of oil. Add flour, mixing with a fork until a shaggy dough forms. Turn onto a work surface & knead dough for about 5-8 minutes, until smooth & elastic. Place dough ball in a lightly greased bowl, cover with plastic wrap & let rise in a warm place until doubled in size while you prepare filling.
Filling
In a large skillet, cook the bacon until crispy. Remove the bacon from the pan & set aside to drain on a plate lined with paper towels.
To the bacon drippings, add the mushrooms, shallot & garlic. Sauté over medium heat for a few minutes then add the corn, red pepper flakes & a pinch of salt & pepper.
Cook for a few minutes then add the halved cherry tomatoes & basil. Cook, stirring frequently, for a couple minutes. You want the tomatoes to just warm through, not to completely break down. Stir in the crisped bacon & remove the pan from the heat so the mixture can cool to room temperature.
Assembly/Baking
On a lightly greased work surface, divide the risen dough into 8 even balls. Roll each ball into an OVAL shape, about 7 x 6-inch size. Divide filling into 8 portions.
On each oval, spoon a couple tablespoons of the ricotta in a straight line on the middle of the dough. Next, spoon a couple tablespoons of the corn-tomato filling on top of the ricotta. Finally, add about 2-3 tablespoons of grated Monterey Jack cheese.
Keep one side free & cut the other side of the dough into thin strips using a knife. Fold the uncut side over the filling first, then continue rolling over the cut side.
Line a large baking sheet with parchment paper & place the ‘calzones’ on it, curving them into a C shape. (Place the side with the ‘strips’ curving to the outside). Brush calzones lightly with egg wash, sprinkle with cornmeal if you wish. Cover with plastic wrap & allow to rise for about 20 minutes.
-
Bake for 25 minutes or until the dough is golden and crisp and the filling is gooey. Allow to cool slightly before serving with warmed marinara sauce.

While the ingredients for breakfast sandwiches have been common elements of breakfast meals in the English-speaking world for centuries, it wasn’t until the 19th century in the United States that people began regularly eating eggs, cheese and meat in a sandwich. The first known published recipe for a ‘breakfast sandwich’ appeared in an 1897 American cookbook.
‘Baked egg boats’ became popular almost a decade ago and have been duplicated in many ways ever since! Basically, a quiche that uses a hollowed-out baguette as its base instead of a buttery pie crust. The egg filling is poured into the hollowed-out baguette and baked until the eggs have set, and the baguette is toasted.
This breakfast recipe can be scaled up to feed a larger crowd and is also very portable with endless variations and possibilities! It’s a simple, versatile breakfast at its best!
Print Recipe
Bacon & Egg Breakfast Boats
Votes: 1
Rating: 5
You:
Rate this recipe!
|
|
Votes: 1
Rating: 5
You:
Rate this recipe!
|
Instructions
-
With a knife, cut out the middle of each baguette, making sure not to cut through the bottom. Take the cut part out. You should end up with a boat-like shape. The empty space should be deep enough & wide enough for filling.
Place baguettes onto a baking tray lined with baking parchment. Set aside.
In a mixing bowl, beat the eggs with a fork. Add in cherry tomatoes, green onion, half of the shredded cheese, bacon, salt, pepper and oregano. Mix well. Pour the mixture into the hollowed-out center of both baguettes.
Transfer the tray into the oven & bake at 325 F. for 30 minutes or until eggs are set & puffed. Remove from oven & sprinkle with the remaining cheese. Bake for another 5 minutes.
Allow to cool for a few minutes before serving.

July in Canada is the ‘everything goes better with corn’ season, and that includes seafood.
Scallops, those sweet and tender ocean gems, have a flavor profile that’s both briny and subtly sweet but never too fishy. Then there’s corn, that sunny yellow kernel-packed treasure. It’s like summer in vegetable form, with a satisfying crunch and natural sweetness.
This is an easy summer dish, perfect for any night of the week, but make no mistake, it’s also worthy of a weekend dinner with friends. Pair it with some small, boiled new potatoes tossed in parsley and butter. Yum!
Brion & I love both seafood and corn, so this kind of meal certainly works for us.
Print Recipe
Baked Scallops w/ Creamy Corn, Tomatoes & Chives
Votes: 1
Rating: 5
You:
Rate this recipe!
|
|
Votes: 1
Rating: 5
You:
Rate this recipe!
|
Instructions
Corn, Tomatoes & Chives
In a large skillet, heat oil. Add corn kernels & season with 1/4 tsp salt. Cook until just about tender, 2-3 minutes. Add Boursin cheese & water; cook 1-2 minutes more while stirring. Remove from heat, stir in the halved tomatoes. Keep warm while scallops are baking.
Scallops
-
Pour melted butter into an 11 X 7-inch baking dish; add scallops & spread to form an even layer. In a small bowl, combine breadcrumbs, parmesan cheese, minced garlic, onion powder, paprika & dried parsley. Sprinkle over scallops. Bake scallops about 15-20 minutes.
Serving
Divide corn/tomato mixture on 4 serving plates. Top with scallops & fresh chives or green onions for garnish.

Summer vegetable quiche is all about the transformation of humble ingredients into a tasty, satisfying meal. Quiche is at once fancy, yet deeply practical, using whatever vegetables you happen to have available. Okra can be an interesting addition to a quiche. Its unique texture and flavor can complement other ingredients.
Okra has a fascinating history that spans continents and centuries. Its journey from the Abyssinia region of Africa, the area we now know as Ethiopia to various corners of the world reflects its adaptability and importance in diverse culinary traditions. Because this mountainous region was so isolated for centuries, little is known about the cultivation and uses there. Eventually, however, okra made its way throughout North Africa and the eastern Mediterranean regions, before eventually moving on to the rest of the world.
Admittedly, okra isn’t everyone’s cup of tea. Its silky, slippery consistency doesn’t exactly appeal to everyone. Luckily enough, there are ways of reducing that ‘sliminess’ when cooking okra, in order to make it more appealing!
Okra is a plant that many cultures regard as a culinary treasure. This plant is particularly famous in the Southern regions of the United States, where it’s a thickening agent for their treasured gumbos. Whether in gumbo, curries, or stir-fries, okra continues to be a beloved ingredient in global cuisine.
Print Recipe
Summer Quiche w/ Veggies & Sausage
Votes: 1
Rating: 5
You:
Rate this recipe!
Ingredients
Filling
- 1 large egg, separated (use the white on the pie crust & the yolk mixed into the filling)
- 2 Tbsp butter or olive oil
- 1 small red onion, cut into wedges
- 8 (130 gm) okra
- 1/2 - 3/4 tsp sea salt
- 1/2 tsp EACH smoked paprika, garlic powder, black pepper, onion powder, oregano & thyme
- 3/4 cup corn kernels use fresh corn if possible.
- 500 gm Fire-Roasted Red Pepper chicken sausages, casings removed OR substitute with some Italian chicken sausages.
- 200 gm white, extra old cheddar cheese, grated
- 3 large eggs
- 3/4 cup half & half cream
- 8 cherry tomatoes, halved
Ingredients
Filling
- 1 large egg, separated (use the white on the pie crust & the yolk mixed into the filling)
- 2 Tbsp butter or olive oil
- 1 small red onion, cut into wedges
- 8 (130 gm) okra
- 1/2 - 3/4 tsp sea salt
- 1/2 tsp EACH smoked paprika, garlic powder, black pepper, onion powder, oregano & thyme
- 3/4 cup corn kernels use fresh corn if possible.
- 500 gm Fire-Roasted Red Pepper chicken sausages, casings removed OR substitute with some Italian chicken sausages.
- 200 gm white, extra old cheddar cheese, grated
- 3 large eggs
- 3/4 cup half & half cream
- 8 cherry tomatoes, halved
|
Votes: 1
Rating: 5
You:
Rate this recipe!
|
Instructions
Pastry
In a large bowl, whisk together flour & salt. Work the butter with your finger tips or a pastry cutter until it is a shaggy mixture full of pea-sized lumps. Stir enough cold water with a fork until the pastry just comes together. Gather into a ball & press into a disk. Wrap tightly & refrigerate for at least an hour.
Filling/Assembly
Preheat oven to 375 F. Roll out the dough on a lightly floured surface into a large round. Fit it into a 9-inch deep dish pie pan. Prick the bottom of the pastry with a fork several times. Lay a sheet of parchment over the pastry & fill with pie weights (or dried beans). Bake until crust is set & pale golden. Remove the pie weights & brush the crust all over with egg white.
In a saucepan, melt the butter & sauté the onions until translucent. Add chopped okra & seasonings. Cover & cook until the okra is soft but not OVERCOOKED. Remove mixture from saucepan & set aside.
Place corn kernels in saucepan with chopped sausage meat. Cook over moderate heat, stirring occasionally, until corn is crisp tender, 5-8 minutes. Gently combine with onion/okra mixture. Set aside.
Whisk together cream & eggs. Sprinkle half of the cheese over the baked pastry shell, then spoon the filling mixture over top. Sprinkle with remaining cheese over all. Lay halved cherry tomatoes over the cheese & then carefully pour the egg mixture evenly over everything.
Transfer to the oven & bake until custard is set, 55-60 minutes. Remove from the oven & allow to cool for at least 15 minutes before cutting & serving.

Summer equates to fresh produce so why not make the most of it in a vegetable pizza? When it comes to veggies the key word here is ‘ROASTED’. The veggies go in the oven with a little oil, herbs & spices until they start to brown up which brings out a little caramelization of their natural flavors and transforms them into little nuggets of vegetable GOLD.
Roasting vegetables brings out a depth of flavor with a hint of sweetness that lets the vegetables shine through in a truly magical way. Any combination of your favorite vegetables will work, so there is a lot of flexibility here.
Print Recipe
Roasted Vegetable & Smoked Cheddar Pizza
Votes: 1
Rating: 5
You:
Rate this recipe!
|
|
Votes: 1
Rating: 5
You:
Rate this recipe!
|
Instructions
Roasted Vegetables
-
In a large bowl, TOSS all roasted vegetable ingredients, combing well. Spread veggies onto a parchment lined baking sheet & roast for 20 minutes, stirring once half way through baking.
Herb Sauce
In a saucepan, combine all sauce ingredients. Heat & stir over medium heat until cream cheese is melted & sauce becomes thick & creamy. Grate smoked cheddar cheese.
Assembly/Baking
When vegetables are roasted, lower oven temperature to 375 F.
Divide herb sauce evenly between the 4 Naan breads & spread over each. Next, divide the roasted vegetables between the 4 pizzas. Top with grated smoked cheddar cheese.
Bake pizzas for 10-15 minutes or until veggies are nicely roasted & edges are crispy. Remove from oven & serve.

Guacamole is everywhere these days. Hailed as a nutrient-dense superfood and mixed into everything from omelets to smoothies, prior to the 16th century, avocados were unknown to all but a select few.
When the conquistadors landed in present-day Mexico, they found the native Aztecs eating a green dish called ahuacamolli, made with a never-before-seen fruit. Five hundred years later, it’s found at every Super Bowl party and Cinco de Mayo celebration.
Mexico continues to be the world’s largest producer of avocados. They remain a staple of Mexican cuisine, with slices often accompanying traditional dishes like tacos. But avocados are perhaps best known for being mashed, spiced, tossed together with tomatoes and onions, and scooped up with tortilla chips as ‘guacamole’.
Which brings me to another idea — savory guacamole muffins! This recipe is interesting in that it incorporates all the things you would use to make guacamole in a muffin. They not only make a stand-alone tasty snack but can also be paired with some cheesy scrambled eggs, salmon or cured meats, especially if you’re aiming for a comfort-food-type meal.
Print Recipe
Savory Guacamole Muffins
Votes: 1
Rating: 5
You:
Rate this recipe!
|
|
Votes: 1
Rating: 5
You:
Rate this recipe!
|
Instructions
Preheat oven to 375 F. Line 9 muffin cups with paper liners.
Place avocado in a bowl. Using a fork, roughly mash. Add butter, egg, milk & cheese. Stir to combine.
Sift flour, chili powder & baking powder into a bowl. Add avocado mixture. Stir until just combined.
Spoon mixture into prepared pan. Bake for 20-25 minutes or until golden & scones spring back when lightly touched.
Cool in pan for 5 minutes. Transfer to a wire rack to cool completely. Serve.
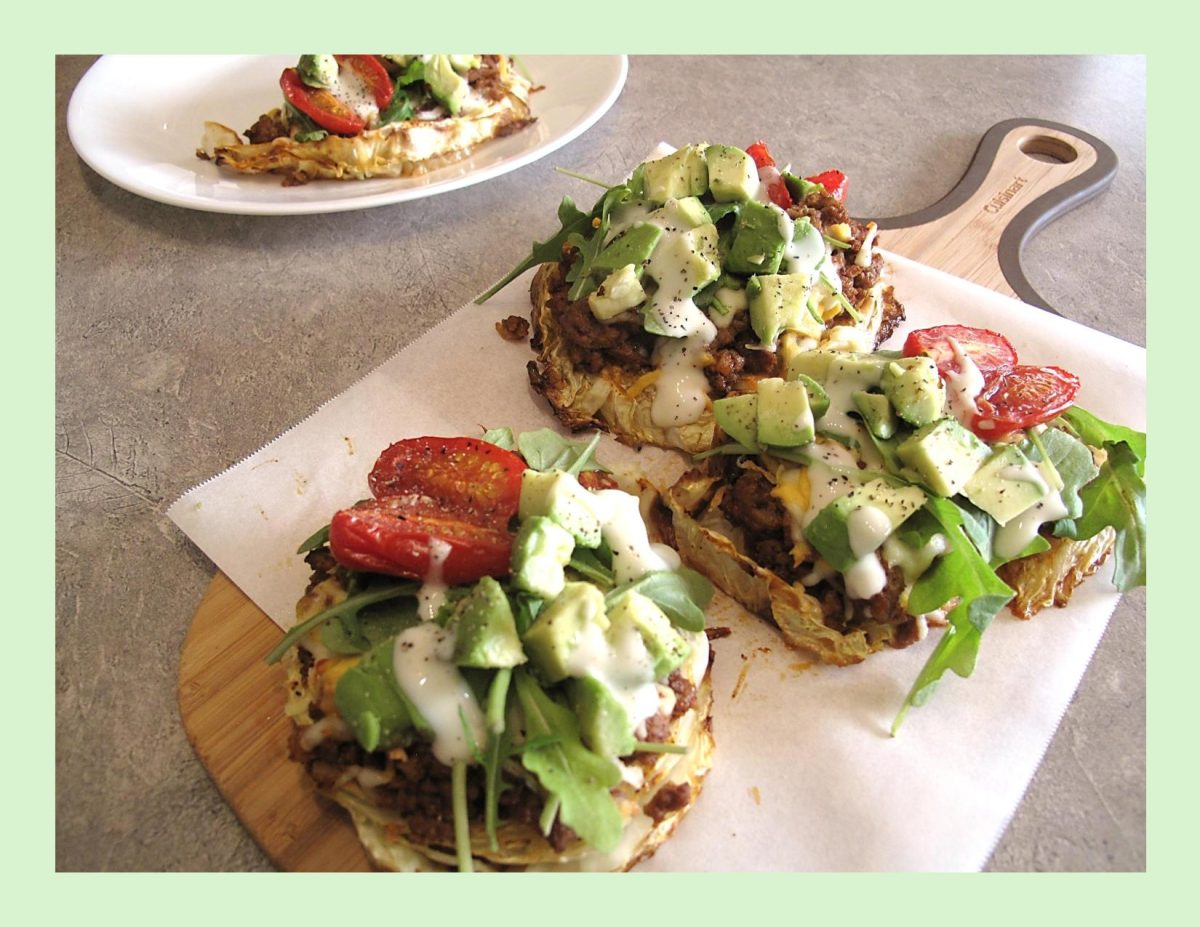
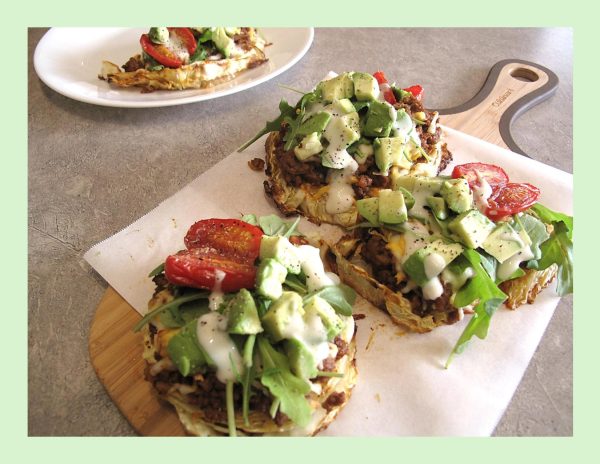
The concept of ‘loaded cabbage steaks’ is an interesting twist on traditional cabbage dishes and are a tasty alternative to traditional tacos.
Sometimes it’s hard to get excited about cabbage but I think this recipe will change your mind a little bit. Roasting the cabbage provides a subtly sweet flavor. Cabbage is very affordable, mildly flavored and easy to prepare. This recipe involves roasting thick slices of green cabbage with olive oil, salt, and taco seasonings. You can top them with either ground meat or black beans, shredded cheese, diced avocado, sliced cherry tomatoes, and chopped cilantro. Lime crema adds a zesty finish.
It’s time to elevate cabbage from a humble vegetable side dish to the main attraction with these loaded cabbage steaks!
Print Recipe
Loaded Taco Cabbage Steaks
Votes: 1
Rating: 5
You:
Rate this recipe!
|
|
Votes: 1
Rating: 5
You:
Rate this recipe!
|
Instructions
Taco Seasoning
In a small dish, combine all ingredients & mix well.
Lime Crema
Whisk together the ingredients using milk to thin out the sauce to your desired consistency. Set aside.
Cabbage Steaks
Preheat oven to 425 F. Line a large rimmed baking sheet with parchment paper.
Keep your cabbage core INTACT, slice your cabbage in half first then into thick slices – ending up with 6-7 slices. Place them on your baking tray & brush both sides of each slice with olive oil. Season with 1/2 of the prepared 'taco seasoning' Roast for 30-35 minutes or until golden.
Ground Meat or Beans
In a large skillet, heat the oil & sauté onion for 2 minutes. Add in the ground meat, using a wooden spoon break everything up until no longer pink & cooked through. Season with remaining taco seasoning. Divide the meat between the roasted cabbage slices then top with the cheese & pop back into the oven until melted – about 5 minutes.
If you're using the beans, simply top the cooked cabbage steaks equally with some beans, covering the cabbage & then top with the shredded cheese. Pop back into the oven until the cheese has melted – 5 minutes.
Remove cabbage steaks from oven & top with tomatoes, avocado & arugula. Drizzle with lime crema & serve hot.
While there’s still time to enjoy summer, it’s definitely prime time for eating some satisfying summer squash.
Zucchini, also known as courgetti, belongs to the same family as pumpkin. The most widely known version is green, though golden varieties exist too, which are yellow or orange.
While zucchini is treated as a vegetable in the culinary sphere, it’s technically the fruit of the zucchini flower (which can also be consumed).
Scallops are buttery, delicious, and easily likeable. This special kind of seafood has won our hearts in the casual and fine dining setting. We continue to ask ourselves how we can enhance the flavor of this seafood treat even more. Since scallops are briny and sweet with a relatively subtle flavor profile, they’ll complement everything from crunchy sweet corn to zippy citrus salads and summer or winter squash.
They’re one of the more sustainably sourced seafood because they are typically harvested from places, they are endemic to. This means that scallops don’t feed off other marine life unnaturally and they’re not placed in areas foreign to them.
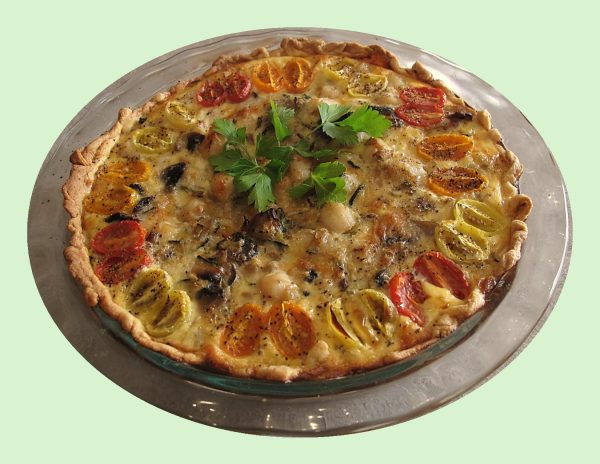
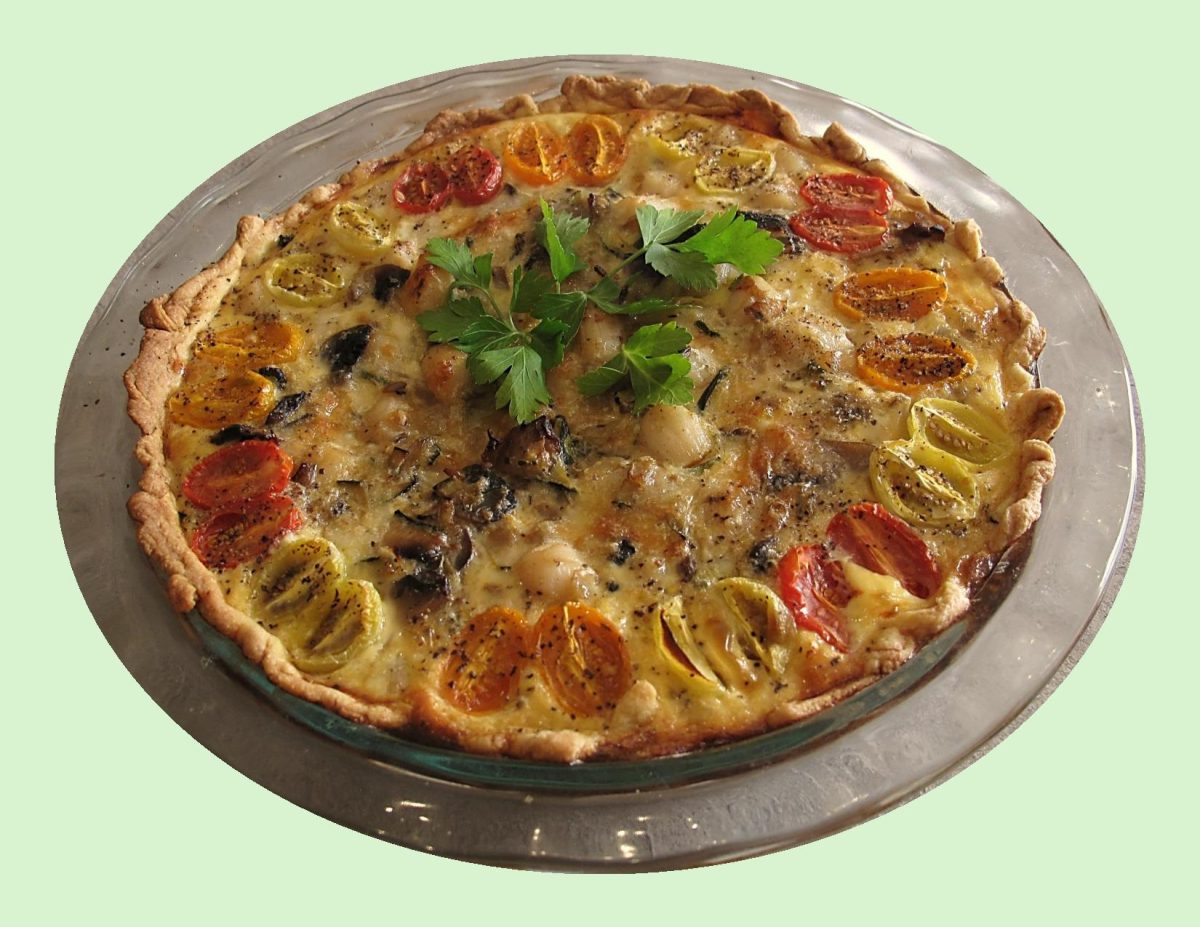
I think you will find this scallop and zucchini quiche is nice served as a hot or cold summer entrée.
Print Recipe
Scallop & Zucchini Quiche
Votes: 1
Rating: 5
You:
Rate this recipe!
Ingredients
Scallop & Zucchini Filling
Ingredients
Scallop & Zucchini Filling
|
Votes: 1
Rating: 5
You:
Rate this recipe!
|
Instructions
Pastry
In a small bowl, combine sour cream & ice water; set aside. In a large bowl, whisk together flour, cornmeal, sugar & salt. Using a pastry blender or fingertips, cut in butter until mixture resembles both coarse crumbs & small peas. Sprinkle the cold sour cream mixture over dough, 1 Tbsp at a time, tossing with a fork to evenly distribute it.
After you have added all the sour cream mixture, dough should be moist enough to stick together when pressed; if not add additional cold water, 1 tsp at a time. DO NOT overwork dough. Press dough into a disk & wrap in plastic wrap. Refrigerate for at least 2 hours.
Filling
In a saucepan, fry bacon until cooked but not real crisp. Remove bacon & place on paper towel to drain. In the same saucepan, sauté onions, zucchini mushrooms & garlic in remaining bacon drippings until tender but not over cooked. Add scallops during the last few minutes of sautéing. Remove from pan & combine with bacon; cool slightly.
-
Grate cheese. Whisk together eggs, milk, Old Bay seasoning, salt & pepper. Halve the cherry tomatoes.
Roll out pastry to fit a 9-inche quiche pan. Line the crust with parchment paper and fill with uncooked beans or rice. Bake for 10 minutes, then remove from the oven, remove the beans (or rice) & paper. Sprinkle half of the grated cheddar on the quiche shell. Place filling mixture on top; form a ring of tomato halves around the outside edge. Sprinkle with remaining cheese then pour milk mixture over the quiche.
Sprinkle half of the grated cheddar on the quiche shell. Place filling mixture on top; form a ring of tomato halves around the outside edge. Sprinkle with remaining cheese then pour milk mixture over the quiche.
Bake for about 45 minutes or until set.