
Its only March, so BBQ season is till a few months away. Some would claim that good ‘barbecued’ food can only come from the grill, not the oven. But what about during our winter months or times when you just don’t feel like firing up the grill or you’re out of propane? Let’s face it, nothing can replace a good outdoor barbecue, but..
The key to oven BBQ chicken is to start with bone-in pieces. Chicken leg quarters are fairly fatty in comparison to chicken breast so it takes a lot to dry a chicken leg out. Which brings me to a recipe I clipped from a newspaper back in 1970 for OVEN BARBECUED CHICKEN. The ingredient list is rather lengthy but all pretty common place items. Brion likes this meal served with roasted potatoes.
In the month of March our family celebrates three birthdays. Today, March 21st would have been my Dad’s. He passed away at the age of 92, 12 years ago. Our Dad was a man of discipline; love was closely associated with duty and commitment for him. He was confident in who he was and didn’t demonstrate any need to conform to what we might have wanted him to do. Everything he undertook was driven by his commitment to honor and provide for the family that he loved.
IT IS WITH MUCH LOVE OUR FAMILY IS HONORING THIS DAY IN THE MEMORY OF OUR WONDERFUL DAD
Print Recipe
Oven Barbecued Chicken
Just right for one of those 'meat & potatoes' kind of meals.
Votes: 1
Rating: 5
You:
Rate this recipe!
|
|
Votes: 1
Rating: 5
You:
Rate this recipe!
|
Instructions
Preheat oven to 375 F. Have available a large baking dish that will hold chicken in a single layer. Combine flour, 1 tsp salt, paprika & 1/4 tsp pepper in a heavy plastic bag. Place chicken in bag & shake to coat evenly. In a heavy, large skillet, heat margarine & oil.
Add chicken & brown slowly on all sides; place in baking dish. Add onion & garlic to pan; cook gently for 3 minutes. Add all remaining ingredients, cover & simmer 10 minutes.
Pour this mixture over chicken, cover the pan & bake 15 minutes. Turn chicken legs, cover again & bake about 15 minutes more. Remove cover & continue baking until legs are tender, basting often with sauce, about 20 minutes.

When you think of sticky rolls, yeast dough comes to mind. Yeast with its long, slow rise, adds that wonderful flavor to breads of all kinds. But there are always those times when you need a quick ‘homespun’ dessert. This is where we can turn to baking powder and baking soda, those little white powders baker’s simply can’t live without.
I have always had a love for mangoes. In our part of the country they are quite expensive. Using the ‘individually quick frozen’ (IQF) mangoes seems to be the most economical way to buy them.
Adding a bit of cardamom spice to these Glazed Mango Pinwheels gives them such a flavor boost. My blog photo shows them when they first came out of the oven. After you invert them on a platter that nice sticky glaze runs down the sides ….. yum!
Print Recipe
Glazed Mango Pinwheels
Old fashioned goodness with a new twist on sticky buns!
Votes: 1
Rating: 5
You:
Rate this recipe!
|
|
Votes: 1
Rating: 5
You:
Rate this recipe!
|
Instructions
Mangoes & Syrup
Thaw & coarsely chop mangoes; toss with lemon juice; set aside. In a saucepan, combine syrup ingredients. Bring to a boil, stirring occasionally, then simmer 3 minutes; set aside.
Dough
In a bowl, combine flour, baking powder & salt; cut in 1/2 cup margarine until mixture resembles coarse crumbs. Make a well in the dry ingredients, add milk & mix lightly with a fork to make a stiff dough. Knead 10 seconds on a floured surface then roll out to a 12 x 10 -inch rectangle. Preheat oven to 375 F. Spread dough with 2 tbsp margarine; sprinkle with sugar & cardamom spice.
Spread mango pieces over dough, leaving a 1-inch border all around. Roll up in a jelly roll fashion; cut into 8 slices. Place cut side down in a 9 x 9-inch baking dish, leaving space between rolls. Bake about 20-25 minutes. Reheat syrup glaze until hot then pour over & around pinwheels. Allow to sit for about 5-10 minutes then invert onto serving platter.
Recipe Notes
- If you prefer more glaze, nothing says you can't double that part. No doubt, they will probably be even better!

The Christmas season makes us reflect on many different things; to live life a little more grateful, more hopeful and a little more peaceful. It is a time to connect with friends and loved ones to enjoy the traditions we grew up with.
Today, December 25th, our family celebrates my sister Rita’s birthday as well as Christmas. I have fond memories of her Christmas Eve family birthday ‘parties’. On the eve of Christmas, our family would go to church. After returning home, we were joined by some family friends to have birthday cake and homemade rootbeer. My parents wanted my sister to always have this special time to honor her birthday apart from the Christmas festivities.
As I write about this memory, something else comes to mind. Our church at that time, was a small, old building. For the choir it had a small loft. As long as I can remember, the same lady played the organ as well as directing the choir members in song. She in turn, had a teenage daughter gifted with an unbelievable voice. One of the highlights of the Christmas service was to hear her sing a solo version of ‘Oh Holy Night’. You could hear a pin drop, it was breathtaking how angelic and beautiful her voice was. I get emotional even now remembering it.
Brion and I have spent many Christmas seasons in other parts of the world. One of the many ‘scenes’ that has left a lasting memory was in Italy, in the town of Assisi. We arrived in late afternoon with the Trafalgar group. The town sits atop one of the rolling hills in the region. The Basilica is a massive structure that dates back to the 13th century. By the time we finished visiting the Basilica the sun was setting. Brion and I stepped outside and in the meadow of the church stood a huge nativity scene with human size, terracotta figures. It was just an amazing sight to see and especially right at that time of day.
As much as I love to look at and appreciate the beauty of seasonal decorations, I’ve never been one who gets to involved with that aspect of the season. Food preparation has always been my calling and probably always will be. I hope you have enjoyed my pre-Christmas blogs as well as found them useful. I’m keeping it simple today with just two recipes. One is SAVORY STUFFING for your bird. This recipe is my best effort at a ‘taste of a memory’ from my mother’s stuffing. The second recipe is for MINI CHEESECAKES. These are my virtual ‘birthday cakes’ for you Rita. HAPPY BIRTHDAY –we love you — enjoy your day!
SEASON’S GREETINGS to anyone reading my blog.
THE SPIRIT OF CHRISTMAS IS FOUND ANYTIME SOMEONE’S
DREAM BECOMES REAL BY THE KINDNESS ANOTHER EXTENDS!
Print Recipe
Savory Stuffing / Mini Cheesecakes
Votes: 1
Rating: 5
You:
Rate this recipe!
Ingredients
Base for 3 dozen Mini Cheesecake Cups
Lemon Cheesecake (1 Dozen Minis)
Chocolate Cheesecake (1 Dozen Minis)
Orange Cheesecake (1 Dozen Minis)
Ingredients
Base for 3 dozen Mini Cheesecake Cups
Lemon Cheesecake (1 Dozen Minis)
Chocolate Cheesecake (1 Dozen Minis)
Orange Cheesecake (1 Dozen Minis)
|
Votes: 1
Rating: 5
You:
Rate this recipe!
|
Instructions
Savory Stuffing
In a saucepan, boil potatoes; drain & mash. Set aside. Saute onion, celery, garlic, mushrooms & seasonings in margarine. Remove from heat. Combine with bread cubes, mashed potatoes & broth. ADD ONLY ENOUGH BROTH TO MAKE A PROPER STUFFING CONSISTENCY. You may not need the full amount of broth. This will make sufficient stuffing for a 4 - 4.5 kg (9 - 10 lb) turkey.
Base for Mini Cheesecakes
Combine crumbs, sugar & margarine. In each of 36 paper-lined, mini tart pans (2 1/4" dia.), press 1 Tbsp of crumb mixture. Bake at 325 F. for 5 minutes.
With an electric mixer on medium speed, combine cream cheese, sugar, zest, juice & vanilla until well blended. Beat in egg; fill cups. Bake for about 25 minutes. Cool before removing from pan. Chill. Garnish as desired before serving. For the chocolate cheesecakes, blend beaten egg & vanilla with cooled chocolate before beating in cream cheese & sugar so the chocolate does not harden into lumps.

The second Monday of October has been the day Canada has celebrated Thanksgiving since 1957. We have now entered into our Autumn season with all it’s breathtaking fabulous fall foliage. Part of Canada’s appeal is it’s four seasons that offer changing landscapes and temperatures.
I, for one, have always loved the changing seasons. That’s not to say that I like freezing cold and slippery roads but that I have come to understand the important role each one plays in the ‘big picture’. When Brion and I initially landscaped our property, careful consideration was given to what plants were planted. Over the years it has developed into a beautiful tapestry of color through our growing season.
Growing up on the farm, Fall was an especially busy time with the grain crops being harvested, garden vegetables being canned, frozen or just stored for use over the coming months. So much needed to be done before winter would set in. As a teenager it all just seemed like a lot of work. Even as hard as my parents worked at making a living from farming, I think they felt a real sense of satisfaction in what they were able to achieve. I realize now that even without being aware of it the visual beauty of the farmland at harvest was imprinted on me forever.
Thanksgiving Day in Canada is linked to the European tradition of harvest festivals. A common image seen at this time of year is a cornucopia, or horn, filled with seasonal fruit and vegetables. The cornucopia, which means ‘Horn of Plenty’ in Latin, was a symbol of bounty and plenty in ancient Greece. Turkeys, pumpkins, ears of corn and large displays of food are also used to symbolize Thanksgiving Day.
Over the years, Brion and I have chose to have a variety of different meats for our Thanksgiving meal. Turkey is always the tradition for our Christmas dinner and since the two holidays come fairly close together, why not! All that being said though, we decided this year to roast just the turkey breast with stuffing. I also incorporated some of that wonderful Butternut squash with cranberries into the meal as well. For dessert we are having some pumpkin chiffon tarts. As a ‘kid’, I remember having a great dislike for the regular pumpkin pie — you know the kind –‘solid’. Then one year my mother made pumpkin ‘CHIFFON‘ pie. Well, now that was glorious and I have loved it ever since.
Today in my recipes I have only included the Butternut Squash with Cranberries and Pumpkin Chiffon Tarts. I thought I’d get into the turkey and stuffing recipes later in the season.
Happy Thanksgiving Day!
Print Recipe
Butternut Squash with Cranberries / Pumpkin Chiffon Tarts
Votes: 1
Rating: 5
You:
Rate this recipe!
Ingredients
Butternut Squash with Cranberries
Pumpkin Chiffon Tart Filling
Ingredients
Butternut Squash with Cranberries
Pumpkin Chiffon Tart Filling
|
Votes: 1
Rating: 5
You:
Rate this recipe!
|
Instructions
Butternut Squash with Cranberries
Preheat oven to 375 F. Split squash in half; place hollow side down on a lightly buttered baking sheet. Bake for about 45 minutes or until completely soft to the touch.
In a small skillet, saute celery & onion in margarine until tender. Add the apple, salt, lemon juice & pepper. Cook, uncovered, over medium-low heat until apple is tender, stirring occasionally. Stir in cranberries, sugar & water. Cook & stir until berries pop & liquid is syrupy. If you prefer, you could process this mixture for a couple of seconds in a food processor.
Remove seeds & membrane from cooked squash; mash well. Add cinnamon, nutmeg, balsamic vinegar & maple syrup. Place some squash in individual custard dishes. Make a hollow in the center for the cranberry 'filling'. Add cranberries & serve.
Pumpkin Chiffon Tart Filling
In a medium saucepan, combine first 7 ingredients; mix well. Add pumpkin, evaporated milk, regular milk & egg yolks; combine well. Cook, stirring constantly, until mixture thickens to a heavy custard. Boil 2 minutes, add 1 Tbsp margarine. Place wax paper over custard to prevent a 'skin' from forming. Let custard become cold (it can be refrigerated overnite at this point, finishing it the following day) then stir in 1/4 cup orange juice.
Whip envelope of dessert topping with 1/2 cup milk & 1/2 tsp vanilla until stiff peaks form. It should yield about 2 cups. Put aside the amount you need to garnish tarts with. Fold remaining whipped dessert topping into custard. Spoon custard into a large pastry bag with a large 'star' tip. Fill baked mini tart shells. Decorate with a small dollop of dessert topping.
Pastry
Sift together flour, baking soda, baking powder & salt. Cut in white & yellow Crisco shortening. In a 1 cup measuring cup place egg & vinegar; beat well. Add enough COLD water to fill cup. Pour all at once over flour mixture, mixing until pastry pulls away from sides of bowl. This should only take a couple of minutes, making sure not to over mix pastry. Roll out on floured surface. Using the bottom side of tart pans, cut pastry circles & place over each 'cup'. Bake at 350 F. until golden. Cool on wire rack before filling with pumpkin custard. If your using purchased shells follow baking instructions & cool before filling as well.
Recipe Notes
- This pastry & pumpkin chiffon custard recipe was one I started using many years ago while working in the food industry. They were some of my favorites because they were pretty much 'fail proof'. If you want to make a double batch of each it will give you 4 - 9-inch pies. You can make them up to the point of decorating. Freeze until needed then just bring them out & thaw, decorate and you got a nice little homemade dessert just like that!

Today, July 25th, we celebrate my sister Loretta’s birthday.
‘To have a sister like you is like finding a treasure in ones life’. ‘HAPPY BIRTHDAY, LORETTA’, you deserve all the best!’
In the fall of 2001, Brion & I, joined by Loretta, made our first trip to Europe. Before that our holidays had pretty much been in the USA. This was a whole new learning curve that has forever changed the meaning of travel for us. Our destination was France, starting out in Paris, then renting a car and driving to the west coast then on down through southern France.
The hotel we were staying at in Paris looked out over a ‘pedestrian only’ street. When we arrived it was evening and the street was dark and pretty much deserted. The next morning we heard a lot of hustle-bustle in the street below. When we looked out, the sight was just incredible! The street was lined with shops which were now open for business. It was the most beautiful sight to look down on with all its colors and activity. During the next few days we enjoyed everything Paris to the fullest.
Down from our hotel we came upon a little street vendor selling crepes of all things. The taste was amazing! Fifteen years later, they have joined our ‘taste of a memory’ food list, knowing that so much of it was time & place.
Crepes are such a great meal. Simple to make with so many options whether it is a savory or sweet version. One of our favorite savory choices is a Seafood Crepe, which I feature in my ebook, ‘LIVING LARGE ON A LEAN FOOD BUDGET’. For a sweet treat, you might enjoy to try these Strawberry-Citrus Crepes.
Print Recipe
French Crepes
Crepe batters can be stored in the fridge for a day ---- cooked crepes in the freezer.
Votes: 1
Rating: 5
You:
Rate this recipe!
Ingredients
Parmesan Herb Crepe; add to ingredients of Basic Crepe batter
Chocolate Dessert Crepe; add toingredients of Basic Crepe batter
Basic Dessert Crepe; decrease milk in Basic Crepe to 1 1/3 cups & add the following
Seafood Filling
- 340 grams shrimp/scallop combo, raw
- 2 Tbsp oil
- 1 medium zucchini, diced small
- 4 green onions, sliced
- 1 tsp garlic, minced
- 1 cup fresh mushrooms, sliced, sliced
- 1 small green or red pepper, diced
- 1/2 cup water chestnuts, finely diced (optional)
- 1/4 tsp ginger, ground
- 4 1/2 tsp soy sauce
- 2 Tbsp water
- 2 Tbsp sesame seeds, toasted (optional)
Gouda Sauce for Seafood Crepes
Strawberry-Citrus Filling
|
Votes: 1
Rating: 5
You:
Rate this recipe!
|
Instructions
Crepes
Place all ingredients in blender; whirl for 1 minute at high speed. Scrape down sides, whirl for another 15 seconds. Pour into a bowl & cover; refrigerate 1 hour. Heat a non-stick griddle to 350 F. Measure about 3 Tbsp of batter per crepe onto griddle. With back of spoon form batter into an 8-inch circle. Cook until golden on each side then lay on a wire rack to cool.
Gouda Crepe Sauce
In a small saucepan, melt margarine; sprinkle with flour & seasonings. Mix well; add milk & broth, stirring until sauce becomes thickened. Add cheese & blend.
Seafood Filling
In a large skillet, saute zucchini, onion & garlic in oil for several minutes. Add mushrooms, green pepper & water chestnuts; cook 1 more minute. Combine ginger, soy sauce & water in a cup; add to vegetable mixture along with seafood. Gently stir fry ONLY until seafood is cooked. Reserve 1/2 cup Gouda sauce & add the rest to mixture.
Divide filling between crepes; roll crepes & place on serving plates. Spoon remaining sauce over each of the filled crepes. Place each meal in microwave (covered) for 15 - 20 seconds on high. Sprinkle with toasted sesame seeds if desired. Serve immediately.
Strawberry-Citrus Filling
In a small saucepan, combine water, cornstarch, lemon juice, orange juice & sugar; blend well. Over medium heat, bring to a boil, stirring constantly until mixture thickens & becomes clear. Remove from heat & set aside to cool. Slice strawberries either by hand or using an egg slicer. In a small dish, combine yogurt & honey.
In a large bowl, gently fold about 1 1/2 cups citrus glaze together with sliced strawberries (I used about 3 large strawberries per crepe). Lay 12 crepes on work surface & place equal amounts of strawberry/glaze mixture on one half of each crepe. Fold over opposite side then fold in half again. Place 3 crepes on each of four serving plates. Sprinkle with powdered sugar if desired. Serve Honey/Yogurt on the side as well as any extra citrus sauce you have left from filling.
Recipe Notes
- I have been making crepes for a long time but have never bothered to buy a 'crepe' pan to cook them in. A non-stick griddle has always worked great for me. Using a 1/4 measuring cup, first to pour a circle of batter on the griddle then with the bottom of it, keep enlarging the crepe to the size you want.
- Being able to make all your crepe ingredients the day before then putting it all together on the day served is such a bonus.

The quintessential summer BBQ dessert! Fruit pizza is like a giant cookie, covered with luscious cream, layered with colorful fresh fruit, topped with glaze and a drizzle of chocolate, if you please.
If you have been following my blogs, you have probably already noticed, choice is something I’m big on. Fruit pizza is a classic dessert with so many possibilities. I have always enjoyed to start with the original idea of a recipe and see how many ways I can vary it without getting too involved or requiring a lot of extra ingredients and time.
Since CANADA DAY celebrations are right around the corner I thought it was a good time to enjoy Fruit Pizza ‘personalized’. Here are some ideas to mix and match to your liking.
Print Recipe
Fresh Fruit Pizza
Personalize not only with ingredient choices but the design as well
Votes: 1
Rating: 5
You:
Rate this recipe!
Ingredients
Classic Shortbread or Pecan Shortbread Crust
Frozen Puff Pastry OR Crescent Roll Dough
Cool Whip / Custard Topping
Fresh Fruit (use whatever fruit you prefer)
Chocolate Drizzle (optional)
Ingredients
Classic Shortbread or Pecan Shortbread Crust
Frozen Puff Pastry OR Crescent Roll Dough
Cool Whip / Custard Topping
Fresh Fruit (use whatever fruit you prefer)
Chocolate Drizzle (optional)
|
Votes: 1
Rating: 5
You:
Rate this recipe!
|
Instructions
For Shortbread & Oatmeal Crusts
Preheat oven to 350 F. Lightly grease a 12-inch pizza pan or cookie sheet. In a large bowl, cream butter & sugar until light. Add any flavorings. In another bowl, combine dry ingredients; gradually add to creamed mixture. Mix with a wooden spoon or hand mixer until well blended. Press dough into pan & prick with a fork. Bake 10-15 minutes until golden. Allow to cool completely.
Frozen Puff Pastry
Follow package directions. Cool completely & place on serving tray.
Crescent Roll Dough
Preheat oven to 350 F. Pinch together crescent roll dough as you press into a 12-inch pizza pan. Sprinkle with 1 Tbsp sugar. Bake 10-12 minutes or until golden. Cool completely.
Cream Cheese Topping
In a small bowl, beat cream cheese, lime juice concentrate & sugar until smooth.
Cool Whip/Custard Topping
In a large bowl, whisk together dry pudding mix & milk for 2 minutes. Fold in Cool Whip.
Honey - Yogurt Topping
In a small bowl, whisk together yogurt & honey.
Citrus & Pineapple Glaze
In a small saucepan, combine ingredients. Cook over medium heat until thickens. Remove from heat & cool slightly. Using a pastry brush, gently brush the fruit with glaze. FOR PRESERVE GLAZE: mix preserves with water & brush onto fruit.
TO ASSEMBLE FRUIT PIZZA
Spread topping of choice onto cooled crust & arrange fruit onto. Brush with glaze of choice. Melt chocolate in a bowl over boiling water. Dip a large spoon into chocolate; drizzle, quickly letting the chocolate fall in thin ribbons from the end of the spoon. If chocolate seems to stiff, add a drop of vegetable oil. Let pizza stand until chocolate is firm.

No barbecue is complete without adding a few salads. More than just greens topped with a dressing, there are many versions of coleslaw and pasta salads as well as vegetable and gelatin salads. Without a doubt, you can make them as simple or fancy as you like or have the time for.
Every family seems to develop its own salad favorites. For our family, it was my mother’s ‘German’ version of potato salad. This was not the ‘Hot German Potato Salad’ which you most often see in recipe books. Her’s was a very basic potato salad, not a lot of ingredients, but the dressing was what made it special to us. Like so many German recipes it had that sweet-sour taste.
Over the years, either in the commercial food industry or at company barbecues, etc. I have used and shared her recipe many times. It has never failed to draw great reviews but strangely enough I think my husband is the only person I’ve known who didn’t care for potato salad in any fashion.
There are endless ideas for barbecue salads. In today’s blog I thought it would be nice to post a medley of five different kinds. I think you will find they are reasonably quick and easy to prepare as well as good accompaniments to most any meat being barbecued.
Potato Salad – Chick Pea Pasta Salad – Candied Nut & Gorgonzola Salad Barley, Corn & Pepper Salad – Fresh Spinach & Vegetable Salad
Print Recipe
Barbecue Salads x Five
Votes: 1
Rating: 5
You:
Rate this recipe!
Ingredients
Chick Pea Pasta Salad
- 150 grams wholewheat Penne pasta, uncooked
- 426 ml chick peas, rinsed & drained
- 426 ml black beans, rinsed & drained
- 1/2 cup black olives, whole, pitted
- 1/3 cup carrot, finely diced
- 1/3 cup celery, finely diced
- 1/2 cup red bell pepper, chopped
- 2 green onions, sliced
- 57 grams Asiago cheese, 1/4" cubes
- Mixed or Spinach greens
- FIG BALSAMIC VINAIGRETTE DRESSING, bottled
Candied Nut & Gorgonzola Salad
Barley, Corn & Pepper Salad
Fresh Spinach & Vegetable Salad
|
Votes: 1
Rating: 5
You:
Rate this recipe!
|
Instructions
Potato Salad
Cook potatoes in salted water. Cool, peel & cube. Combine potatoes, eggs, & onion. Blend together dressing ingredients & pour over potato mixture; mix well. Cover & refrigerate for several hours. Just before serving time, add sliced radishes & more salt if necessary. Mix well.
Chick Pea Pasta Salad
Cook pasta according to pkg. directions. Drain & rinse under cold running water until cold. Combine pasta with next 8 ingredients in a medium bowl. Pour dressing over salad; toss to coat evenly. Cover & refrigerate for several hours. Arrange greens on serving plate & top with chick pea mixture or mix greens into salad, your choice.
Candied Nut & Gorgonzola Salad
In a skillet over medium heat, melt sugar stirring constantly. Add nuts, stir until nuts are coated. Remove nuts from skillet; spreading them out on a sheet of aluminium foil to cool. In a large bowl, combine greens, dried fruit & Gorgonzola cheese; refrigerate. At serving time, combine salad with dressing, toss gently; add candied nuts & toss again.
Barley, Corn & Pepper Salad
Cook barley to desired tenderness. Drain; rinse with cold water. In a large bowl, combine all salad ingredients; toss well. In a jar with a tight-fitting lid, combine all dressing ingredients; shake well. Pour dressing over salad; toss to combine. Serve at room temperature or chilled.
Fresh Spinach & Vegetable Salad
Combine first 8 ingredients in a large bowl. At serving time, drizzle with dressing choice & top with toasted seeds.
Recipe Notes
- If you like raw cauliflower, try adding a cup of it sliced along with some crisp, crumbled bacon bits to your potato salad. It adds a whole new dimension to an old favorite.
In the quest for a real good fish burger I turned my thoughts to using ground ‘fresh’ salmon. Living in the ‘prairie’ Province of Alberta, here in Canada, the most economical way to buy fish is either canned, frozen or smoked. The fresh fish we buy in our grocery stores here has to travel somewhat before it gets to us. Definitely, it goes without saying that the flavor is not going to be what people living on the coast experience. Nevertheless, with a little ingenuity we make it work. Brion and I both enjoy to have fish or seafood at least a couple of times a week.
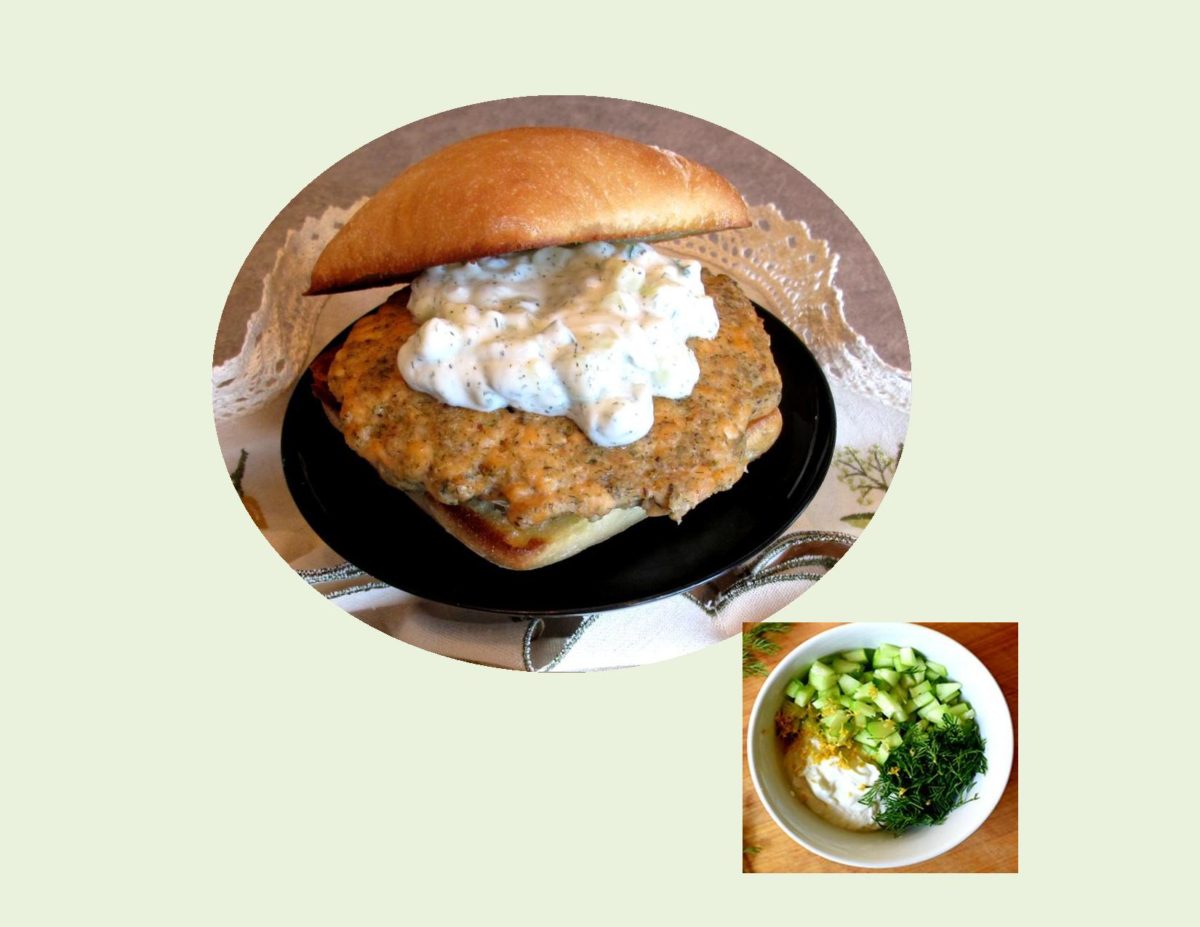
To complete my ‘stuffed burger series’, I’ve made a a serious attempt to come up with a Mushroom-Cheese Stuffed Salmon Burger. I like the idea of putting a filling in between the salmon meat patties. So often fish burgers are deep-fried and overcooked, resembling the taste of what I imagine cardboard would taste like. Using fresh mushrooms and cheese certainly makes for a nice moist burger. Then just to make it a little more ‘gourmet’, top it off with a dollop of Fresh Cucumber-Dill Sauce.
Hopefully, out of the seven options, you were able to find at least one that will become a favorite at your house. By using some of these strategies to save you time, effort and money you will be able to get the most out of those wonderful days of summer ahead.
Print Recipe
Stuffed Salmon Burgers with Fresh Cucumber-Dill Sauce
A flavorful moist stuffing compliments the fresh salmon in this burger which is equally as good served with rice instead of a bun.
The cucumber-dill sauce works as a good condiment in either case.
Votes: 1
Rating: 5
You:
Rate this recipe!
|
|
Votes: 1
Rating: 5
You:
Rate this recipe!
|
Instructions
Cucumber-Dill sauce
In a small bowl, combine all sauce ingredients. Refrigerate until ready to serve.
Mushroom-Cheese Stuffing
In a saucepan, melt butter & saute mushrooms with onions until golden. Add the garlic & saute for one more minute. Season with thyme, salt & pepper. Remove from heat, drain any excess liquids from sauteed mushrooms; chop the cooked mushrooms into small pieces. Add bread & cheese to mixture. Set aside.
Salmon Patties
In a bowl, combine all salmon patty ingredients; mix well. Shape into 12 patties. Divide filling among half of the patties. Top with remaining 6 patties & press gently to seal edges enclosing all the filling.
Preheat barbecue grill to a medium heat. Place salmon burgers on a sheet of greased aluminum foil or in a foil baking dish. Set pan on barbecue & cook for 6-8 minutes on each side or until burger is cooked through. Serve on lightly grilled Ciabatta buns with Cucumber-Dill sauce.
Recipe Notes
- Like in the case of some of the other burger choices, I made up a double recipe of the salmon patties ahead of time. Scoop them into an air-tight plastic container; cover them well with plastic wrap & freeze. When you want to serve, make the stuffing & sauce for however many your cooking, thaw some salmon 'scoops' & flatten into patties. Fill & cook as directed. Fast & easy, works for me!

For as long as I can remember, I personally have had a love affair with the ‘Big Sur’ coastline in California, USA. The spectacular beauty of this rugged 145 km (90 mile) coastline, with the natural drama playing out between land and sea is breathtaking.
Over the years many of our vacations have either been in this area or it has made a fabulous ending to a long flight coming back from Europe, before returning home to Canada.
One of the special memories I have from this vicinity was the quaint little European-style village of Carmel-by-the-Sea, located about 190 km (120 miles) from San Francisco.
Some 30 years ago, actor Clint Eastwood, was elected mayor of Carmel for a two-year term. During that time he opened a restaurant/bar there called the ‘Hogs Breath Inn’. You had to enter it through a long , cobblestone alley corridor. The outdoor patio was nestled between the restaurant and the bar. A massive wall mural and numerous stone fireplaces all added tremendously to the wonderful ambiance. It was here that I first tasted a Portobello Mushroom Burger.
Every time Brion and I have returned to Carmel, we have made a point of eating lunch at the Hogs Breath Inn, just so I could taste that burger again. The Portobello mushroom seemed to have been marinated and then grilled on a barbecue. On top of it were some battered onion rings, lettuce and tomato. All of this came in a grilled Ciabatta bun with pickles and a side dish of your choice.
Of course, never having been someone who could just leave it at that, I had to see if I could push this idea just a bit further. Along came some more recipes for the ‘Stuffed Burger Series’. If you like these ingredients, I think you will really enjoy them.
Print Recipe
Portobello Mushroom Burgers
Votes: 1
Rating: 5
You:
Rate this recipe!
Ingredients
Seafood-Avocado Portobello Mushroom Burgers
- 2 Tbsp butter,
- 2 leeks, finely chopped all of white & part of green
- 1 garlic clove, minced
- 2 avocados, large, peeled & mashed
- 1/4 tsp garlic powder
- 1/4 tsp salt
- 1/2 tsp lemon juice
- 1/4 cup onion, minced
- 2 pieces sun-dried tomato, chopped fine
- 120 grams crabmeat
- 120 grams shrimpmeat
- 1/4 cup Zesty Italian dressing
- 30 grams Parmesan cheese
- 55 grams Asiago cheese, shredded
- 30 grams mozzarella cheese, shredded
- 6 Portobello mushrooms, large
- 6 Ciabatta buns or your choice
Spinach-Cheese Portobello Mushroom Burgers
|
Votes: 1
Rating: 5
You:
Rate this recipe!
|
Instructions
Seafood-Avocado Filling
Remove brown gills from the undersides of mushrooms using a spoon; discard gills. Remove stems, reserve for another use if desired. Melt butter in a large skillet over medium heat; add leek & garlic, & saute until tender. Remove from heat; cool.
Gently combine mashed avocado with next 7 ingredients in a medium bowl; stir into cooled leek mixture.
Dip round side of mushroom caps into Italian dressing; drain slightly. Arrange rounded sides down in a foil baking dish. Sprinkle parmesan cheese evenly into mushroom caps; then top evenly with seafood/avocado mixture, pressing filling to compact slightly. (Can be made 6 hours ahead. Cover & refrigerate if making in advance.)
Preheat oven or barbecue to 350 F. Combine Asiago & mozzarella cheese; sprinkle mushrooms with cheese mixture. Place foil baking dish with mushrooms in oven or on barbecue. Bake until tender & filling begins to brown, about 35 minutes. If necessary, cover loosely with aluminum foil so tops don't burn. Serve on slightly grilled Ciabatta buns. Serves 6
Spinach-Cheese Filling
Remove brown gills & stems from mushrooms. Dip round side of mushroom caps in Italian dressing; arrange, rounded side down, in a foil baking pan. Preheat oven or barbecue grill to 400 F.
Place spinach in a microwave safe bowl, sprinkle with a few drops of water & microwave on high for one minute. Chop cooked spinach; mix with cheddar & cottage cheese, garlic powder, onion powder, red pepper flakes, salt & pepper. Spread spinach mixture onto prepared mushroom caps.
Bake in oven or on barbecue until mushrooms are tender, about 12 minutes. Nice served on slightly grilled wholewheat buns. Serves 4

")


")