CELEBRATING LABOR DAY!
Once again, the last long weekend of summer has arrived. Here in Canada, families with school age children, take it as the last chance to travel before the end of summer. Others enjoy the company of family and friends at barbecues, picnics, fairs, festivals and fireworks displays. Canadian football fans may spend a large portion of their weekend watching the Labor Day Classic matches live on television. Whatever your choice of relaxation is, you know good food will be a part of the holiday.
The point of stuffed bread is that it makes great, portable convenience food. Eaten directly out of the oven, it makes a satisfying breakfast, lunch, or dinner. Or pulled out of the oven and wrapped up, it’s great on road trips (where a knife and fork aren’t always a good option), or at work, or Labor Day picnics or any time at all.
Chicken bacon ranch stuffed bread is amazing! Its huge flavor packed into a loaf of bread…. think chicken, bacon, cheese & ranch dressing all baked together in the ultimate stuffed bread. Great for the Labor Day get-together!
Print Recipe
Chicken Bacon Ranch Stuffed Bread
Votes: 1
Rating: 5
You:
Rate this recipe!
|
|
Votes: 1
Rating: 5
You:
Rate this recipe!
|
Instructions
-
Cut loaf of French bread in half lengthwise. Hollow out the inside of bread halves, leaving a shell about 1/2-inch thick. Save soft inside bread for another use such as stuffing or croutons.
In a large bowl, mix the shredded chicken, bacon, ranch dressing, 1 1/2 cups cheese, green onions, tomatoes & parsley.
Spoon the chicken mixture into the hollowed out bread halves. Top with remaining cheese. Butter the cut edges of each bread half to keep them from drying out while in the oven.
Place stuffed bread halves on a baking sheet & bake for about 20-25 minutes or until cheese is melted & bubbly. Remove from oven & allow to cool for a few minutes before slicing & serving.

CELEBRATING HERITAGE DAY!
In 1974, the first Monday of August was made an official provincial holiday to recognize and celebrate the varied cultural heritage of Albertans. Businesses can choose whether or not to recognize the day as a general holiday, which most do.
The Heritage Festival held in our city of Edmonton, Alberta Canada is a three-day event to sample delicious food, see creative performances and celebrate Canada’s multiculturalism. Thousands of visitors come to enjoy the tastes, smells and sounds of different nations around the world.
Even though many people will take in the day’s events and cultural food at the festival, some choose to pack a picnic lunch and take a drive somewhere just to relax.
I am posting a seafood stromboli today that should work well with that idea.
Heritage Festival in our city of Edmonton, Alberta Canada is one of the world’s largest multicultural events, taking place every August. It features over 70 pavilions representing almost 100 countries set up in William Hawrelak Park. All ethnic minorities of Canada come together to exchange experiences, entertainment, cultures and to celebrate Canada’s diversity. Thousands of visitors come to enjoy the tastes, smells and sounds of different nations around the world.
Print Recipe
Everything Bagel Seafood Stromboli
Votes: 1
Rating: 5
You:
Rate this recipe!
Ingredients
Everything Bagel Seasoning
Ingredients
Everything Bagel Seasoning
|
Votes: 1
Rating: 5
You:
Rate this recipe!
|
Instructions
Seasoning
Mix everything bagel seasoning ingredients together & set aside.
Seafood Filling
In a large saucepan, heat olive oil over medium heat. Sauté onion, garlic, mushrooms & seasonings in the oil. When onions are slightly softened, stir in shrimp & scallops. Let simmer uncovered for 5 minutes, stirring occasionally.
Add alfredo sauce & cheese, stirring until cheese is melted. Let simmer uncovered for another 5 minutes Taste & add salt & pepper if necessary. Remove from heat & let cool for 10 minutes or until ready to use.
Dough
In large bowl, dissolve sugar in warm water. Sprinkle yeast into water & let sit until frothy. In a separate bowl, combine flour, Italian seasoning & salt.
Stir oil into yeast mixture. Add flour & with a fork, combine into a shaggy dough. When dough is completely combined, turn dough out onto a work surface & knead dough for about 5 minutes, until smooth and elastic. Place dough in a lightly greased bowl, cover with plastic wrap & let rise in a warm place until doubled in size, about 1 hour.
Assembly/Bake
-
Remove risen dough from bowl, turn onto a large piece of parchment paper. Roll dough out to about a 12" X 14" rectangle. With a straight edge, make parallel horizontal cuts in the dough at 1" intervals down both sides. Your strips should be cut in 4" from outer edge on both sides, leaving a 1" border at the top and bottom.
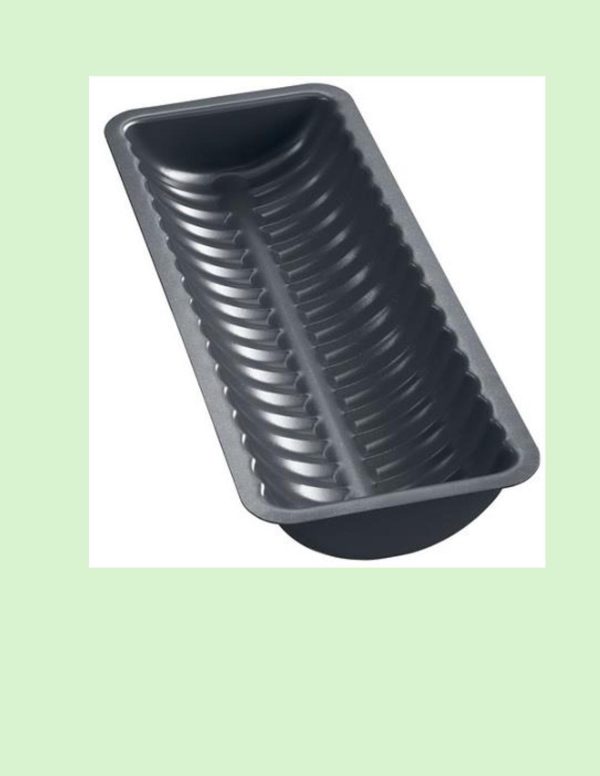
Leaving the pastry on the parchment, move it to an 11 3/4 x 4-inch ribbed semi-circle bread pan. The strips will now be hanging down the sides of the pan. Gently press the pastry to conform to the shape of the pan making sure your pastry comes all the way to the top of the pan at the ends.
Place filling in the pastry. Starting with the top right-hand strip of dough, fold it over the filling. Cross the top left-hand strip over the filling. Continue alternating strips to create a braided effect.
Make sure both ends are sealed well then brush the top of stromboli with egg wash & sprinkle with bagel seasoning.
Bake 45 minutes until golden brown.
Recipe Notes
• For this seafood stromboli I used a European ribbed semi-circle bread/cake pan. The size is bigger than a 9 x5-inch loaf pan so it is quite easy to fit dough/filling into it. If a ribbed pan is not available just go with the contemporary style of rolling the stromboli.
• Brush a simple egg wash over the exposed edges of the dough to help ensure the stromboli seals well & doesn’t burst open as it bakes. To fold, tuck the short sides towards the center, then fold the long side with the thinner border towards the side with the wider border. Aim to fold the stromboli twice, creating 3 layers.
• Once assembled, carefully transfer to a parchment-lined baking sheet. Brush the tops with egg wash for a golden finish, then place in the oven. Be sure to rest the baked stromboli a few minutes before slicing & serving!

The concept of the ‘rice bowl’ in restaurants, referring to a bowl of rice topped with various ingredients, is not attributed to a single individual or restaurant. It’s a concept with deep historical roots and although it’s hard to say exactly where and when rice bowls first appeared, it’s widely believed that they originated in Japan and made their way through Korea, China, and later other parts of Asia.
These dishes, featuring rice topped with ingredients, have been enjoyed for centuries. The modern ‘bowl’ trend, however, has been influenced by various culinary traditions and the increasing popularity of customizable and convenient meal options.
A rice bowl marries simplicity with versatility, a celebration of flavor and creativity. Rice bowls can be as straightforward or as elaborate as one chooses to make them. The ingredients are usually cooked and seasoned, providing a balanced and flavorful meal.
This shrimp bowl is quick and easy to prepare, making it an ideal choice for a busy weeknight dinner or a hearty, nourishing lunch. The shrimp is marinated in Mexican spices and fresh lime juice, then cooked and served with rice and fresh veggies. Brion & I just love this meal!
Print Recipe
Shrimp Rice Bowl
Votes: 1
Rating: 5
You:
Rate this recipe!
|
|
Votes: 1
Rating: 5
You:
Rate this recipe!
|
Instructions
Shrimp Marinade
Start by marinating shrimp. Add the oil, lime juice, spices & cilantro to a medium bowl. Pat shrimp dry, then add them to the marinade & toss to fully coat. Cover & marinate in the fridge for 15 minutes.
Dressing
In a small blender, whisk all dressing ingredients together until creamy. Set aside.
Other Ingredients
Cook rice according to package directions & divide between 2 serving bowls.
In a microwave steam dish, cook shucked corn ear for 7 minutes. If you wish, at this point, heat 1 Tbsp of olive oil in a saucepan & sauté corn cob for a few minutes until golden on all sides. Allow corn to cool & then cut corn off the cob. This step is purely up to you.
Dice red onion, slice green onion, slice olives (if using), halve cherry tomatoes, slice avocado & grate cheese (if using).
To cook shrimp, heat a medium skillet over medium-high heat (no oil needed). When it's hot, add the shrimp to the skillet in an even layer & cook for 2-3 minutes on one side, flip & cook for another 2-3 minutes on the other side. The shrimp will turn an opaque & pink color when its done. Remove the shrimp from the heat & stir to fully coat it in any sauces that are in the pan.
Assemble Bowls
Top the rice in each serving bowl with shrimp, corn, avocado, onions, cherry tomatoes, olives & sprinkle with cheese. Drizzle with prepared dressing & serve.
Recipe Notes
• There are numerous bottled dressings that would be suitable if you prefer not to make your own such as Cilantro Ranch.

I had no idea when I completed my studies in the commercial food industry that there would be some food items, I would make so many times. One such item was an omelet.
In the early years of my career, my first position was a short order chef. It all sounded pretty easy until it came to the weekends. On Sunday morning alone, you could use anywhere from 90-120 DOZEN eggs. A large percentage of them were made into omelets with various fillings. All this would be made and served in the course of 4-5 hours as individual breakfasts in the hotel restaurant. That job definitely taught you the perseverance you would need to survive in the industry.
Omelets have a long history dating back to 16th century France. Most are made with just simple egg and dairy ingredients. The fluffiest omelets use whole eggs or all egg whites, which are beaten with a small measure of cream, milk or water. I even recall adding just a tiny bit of pancake batter to give them more body.
Legend has it that when Napoleon and his army were travelling through the south of France, they spent one night near Bessieres. Napoleon ate an omelet prepared by a local cook and enjoyed it so much that he ordered the townspeople to gather all the eggs in the village and prepare a gigantic omelet for his army the next day. Since 1973, every year on the Monday following Easter, people in Bessieres, France make a giant omelet, using 15,000 fresh eggs.
I have added some pictures of this huge omelet as well as one of a cook dumping eggshells in a pile.
The recipe I am including has everything it takes to make a great flavored omelet.
Print Recipe
Omelet w/ Veggies, Bacon & Cheddar
Votes: 1
Rating: 5
You:
Rate this recipe!
|
|
Votes: 1
Rating: 5
You:
Rate this recipe!
|
Instructions
On a large griddle, place frozen hashbrowns & spray with cooking spray. Cover with a lid & cook until golden then flip over & fry a little longer. Remove from griddle & set aside.
Place bacon on griddle & cook until crispy. Set on paper towels to drain the grease then chop into crumbles. Set aside.
Place the onions & mushrooms on the griddle in the bacon drippings & cook on medium-high for 10 minutes or until the mushrooms are golden brown & the onion is tender. Remove from pan & set aside.
Using an 8-inch baking dish turned upside down, form 2 'foil pans' with aluminum paper. Spray the inside of each one with cooking spray.
In a bowl, whisk eggs, cornstarch & milk until well blended; season with sea salt & pepper, to taste. Set 'foil pans' on the medium-high heated griddle. Divide the egg mixture into each of the 'foil pans', swirling so the pan is evenly coated with the egg.
Once the egg is starting to set, sprinkle a small amount of cheese on top of each egg mixture then divide the hashbrowns & refried beans & spoon over each omelet. Next, top each omelet with half of the onion/mushroom mixture & a sprinkle of green onions & a bit more cheese.
'Cover' The griddle with a large baking sheet to help 'steam' the omelets. This will only take a few minutes. Remove each 'foil pan' & place the omelets on serving plates. Roll into customary omelet shape if preferred.
Top each with remaining cheese & green onion if preferred. Serve immediately.
Recipe Notes
- Omelet is the standard spelling in American English. The British spelling, omelette, is actually the modern French spelling.

Yaki Udon is a wok-fried Japanese udon noodle dish. Born from postwar ingenuity, Yaki Udon (literally ‘fried udon’) is a celebrated Japanese stir-fry dish with a history rooted in the resourcefulness of the mid-1940s.
The dish’s creation is widely attributed to a small restaurant named Darumado in Kokura (modern-day Kitakyushu), shortly after World War II. In 1945, food was scarce across Japan. The owner of Darumado wanted to serve yakisoba (fried buckwheat noodles), but proper soba noodles were unavailable due to rationing and shortages, so he decided to use dried udon noodles (which were more readily available) as a substitute for the missing soba.
The improvised dish, stir-fried with meat and vegetables in a soy-based sauce, was an instant hit with locals and eventually became a staple of the region.
While the original version used dried noodles, modern yaki udon is typically made with thick, chewy fresh or frozen udon noodles. Over the decades, it evolved from a ‘desperation’ meal into a popular Japanese pub snack and a standard festival street food.
Shrimp yaki udon is a staple of Japanese comfort food and a global favorite primarily because of its combination of fast, one-pan preparation, addictive textures, and a savory, rich flavor profile that is both comforting and customizable.
Just recently I’ve started incorporating these unique udon noodles into some of our meals and we really have enjoyed them.
Print Recipe
Yaki Udon w/ Shrimp
Votes: 1
Rating: 5
You:
Rate this recipe!
|
|
Votes: 1
Rating: 5
You:
Rate this recipe!
|
Instructions
Shrimp
Marinate shrimp in a bowl & set aside.
Sauce
Whish together stir-fry sauce ingredients in a small bowl & set aside.
Udon Noodles
Place udon noodles in a bowl & fill it with hot or boiling water. Let noodles sit until they are easy to detangle. Then drain & set aside.
Cooking
Preheat half of the vegetable oil in a saucepan over medium heat. Sear the shrimp until they are cooked through (5-8 minutes depending on the size). Remove them from the pan & set aside.
Add more oil to the pan & sauté garlic & green onions until fragrant. Add the cabbage, carrots, mushrooms & peas. Sauté until vegetables start to soften.
Add the udon noodles, cooked shrimp & stir-fry sauce to the pan, Toss & sauté for another 2-3 minutes. Serve.

While the ingredients for breakfast sandwiches have been common elements of breakfast meals in the English-speaking world for centuries, it wasn’t until the 19th century in the United States that people began regularly eating eggs, cheese and meat in a sandwich. The first known published recipe for a ‘breakfast sandwich’ appeared in an 1897 American cookbook.
‘Baked egg boats’ became popular almost a decade ago and have been duplicated in many ways ever since! Basically, a quiche that uses a hollowed-out baguette as its base instead of a buttery pie crust. The egg filling is poured into the hollowed-out baguette and baked until the eggs have set, and the baguette is toasted.
This breakfast recipe can be scaled up to feed a larger crowd and is also very portable with endless variations and possibilities! It’s a simple, versatile breakfast at its best!
Print Recipe
Bacon & Egg Breakfast Boats
Votes: 1
Rating: 5
You:
Rate this recipe!
|
|
Votes: 1
Rating: 5
You:
Rate this recipe!
|
Instructions
-
With a knife, cut out the middle of each baguette, making sure not to cut through the bottom. Take the cut part out. You should end up with a boat-like shape. The empty space should be deep enough & wide enough for filling.
Place baguettes onto a baking tray lined with baking parchment. Set aside.
In a mixing bowl, beat the eggs with a fork. Add in cherry tomatoes, green onion, half of the shredded cheese, bacon, salt, pepper and oregano. Mix well. Pour the mixture into the hollowed-out center of both baguettes.
Transfer the tray into the oven & bake at 325 F. for 30 minutes or until eggs are set & puffed. Remove from oven & sprinkle with the remaining cheese. Bake for another 5 minutes.
Allow to cool for a few minutes before serving.

HAPPY THANKSGIVING!
Here in Canada, we are in the autumn season of our year. Autumn is not to be taken lightly with its stunning foliage. It’s really quite a magical season that’s often overlooked. Ancient cultures, science and astrology have associated many aspects of this beautiful season to human life. These symbolic associations are powerful reminders that Mother Nature has an incredible influence on our lives. Soon most of the fall colors will disappear and slowly but surely, frosty white will take its place. I think it’s so important to take time to recognize these beautiful moments in our imperfect world.
For our holiday meal I am preparing a stuffed pork tenderloin. Pork tenderloin is incredibly tender since it is essentially the ‘filet’. Because there is very little fat in a tenderloin, it’s perfect to stuff with all sorts of tasty things to bring in both moisture and flavor. A little prosciutto, shallot, dried figs and fig balsamic Boursin cheese make a really delicious combination that pairs perfectly with pork tenderloin adding a unique twist to the classic recipe.
Print Recipe
Fig & Boursin Pork Wellington
Votes: 1
Rating: 5
You:
Rate this recipe!
|
|
Votes: 1
Rating: 5
You:
Rate this recipe!
|
Instructions
In a bowl, combine green onion, figs & Boursin cheese.
Cut away and discard the silver skin from the pork tenderloin. Butterfly the pork by cutting a slit down the tenderloin lengthwise, but don't quite slice it all the way through. The 2 sides should remain attached.
Open the pork tenderloin flat like a book and cover it with a large sheet of plastic wrap. Lightly pound it to an even thickness. Spoon the cheese/fig mixture evenly on the cut side of the pork.
Starting with a long edge, roll it up jelly-roll style. Lay out the prosciutto slices on a piece of parchment paper so that they overlap slightly on the edges. Then place the stuffed tenderloin at one end and roll the whole thing up in prosciutto.
Once rolled in prosciutto, heat a large skillet to medium-high heat. Carefully add the tenderloin to the skillet & sear it all over, about 1 or 2 minutes per side, carefully turning the tenderloin. Remove from heat & set aside to cool.
-
Place puff pastry sheet onto a large piece of parchment paper on a baking sheet. Cut out a few designs down the center then place the tenderloin at one edge of the pastry & roll it up. Start by rolling it lengthwise & then folding over any excess pastry at either end after you are done rolling. Press down gently on seams to create a good seal.
Beat together egg & water to make an egg wash. Using a pastry brush, liberally cover the puff pastry.
Place the wellington into the oven on the lower third rack & bake for about 40 minutes.
After 35 minutes check the internal temperature using a meat thermometer. The pastry should look a nice golden brown & the thermometer should read between 150 & 160 F.
Allow the wellington to sit for at least 10 minutes before slicing using a long, sharp, serrated knife. Plate & serve immediately. We really enjoyed this meat with a cranberry/raspberry sauce.
Recipe Notes
- Simple Cranberry-Raspberry Sauce:
- 348 ml whole cranberry sauce
- 1 1/2 cups raspberries, fresh or frozen unsweetened
- 1/4 cup sugar
- 1 Tbsp orange zest
- In a saucepan, combine whole berry sauce with raspberries, sugar & orange zest
- Cook over medium heat, stirring often, until the sauce thicken slightly & is bubbly
- Remove from heat & allow to cool.

Salmon isn’t the first thing that comes to mind in regard to cabbage rolls. But salmon and cabbage are actually one of those amazing culinary combinations – the textures, the colors, the flavors, its all perfect together.
Cabbage rolls make for the ideal self-contained fall and winter meal, a filling of some kind wrapped up tightly in a cabbage leaf and then cooked to form a complete edible parcel you don’t even need to unwrap to enjoy. Much like other wrapped foods, including tamales or dumplings, cabbage rolls are an excellent way to use extra bits in your fridge to reduce waste, which is perhaps why the food first became popular.
Cabbage rolls are a classic comfort food. They can be served as an appetizer, side dish, or main course, but what really makes cabbage rolls stand out is their delicious sauces. From creamy cheese sauces to tangy tomato-based ones, there are so many options that you can choose from.
This particular recipe uses canned wild salmon, but feel free to use fresh if its available where you live.
The combination of salmon and cabbage has a rich and diverse heritage, transcending borders and satisfying taste buds around the world.
Print Recipe
Salmon Cabbage Rolls
Votes: 1
Rating: 5
You:
Rate this recipe!
|
|
Votes: 1
Rating: 5
You:
Rate this recipe!
|
Instructions
-
Drain the canned salmon, discarding the liquid. Remove any skin and bones, if wished, then break the salmon into chunks.
Cook the rice in boiling water for about 15 to 20 minutes or until cooked, adding the vegetable stock powder to the cooking water to give the rice extra flavor.
Meanwhile, fry the bacon in a non-stick frying pan for 4 to 5 minutes, until crispy. Add the spring onions & mushrooms & cook for a further 4 to 5 minutes until softened. Mix with cooked rice, salmon chunks, herbs & seasoning.
Take eight large leaves from the head of cabbage & remove the thick stalk. Cook in boiling water until softened. Drain thoroughly. Lay the cabbage leaves on a work surface & divide the rice mixture between them, roll up leaves tightly (like a burrito).
Place a small amount of tomato sauce on the bottom of a 9 x 13-inch baking dish. Place rolls seam-side down in baking dish. Top with remaining tomato sauce. Cover with foil & bake for 10 to 15 minutes, until piping hot.
Remove from oven & sprinkle the grated cheese over the cabbage rolls. Return to oven for another 5 minutes or until cheese has melted. Remove from oven & serve with crusty rolls.

Baked stuffed shrimp is just as perfect served as an hors d’oeuvre on special occasions and holiday parties as it is for family dinners. Stuffed shrimp may seem like a dine-out-only kind of dish, but rest assured, it’s not. Preparing it at home is not that big of a deal.
Shrimp, one of the most popular seafoods in North America, can be stashed in the freezer and thawed in the fridge the night before or in minutes under cold water to create a quick weeknight meal that the whole family will love. Add a few spices, some veggies, or pasta and you can have dinner on the table in minutes. Some like it sautéed with lemon and butter. Others prefer it coated in a crispy breading and fried to a golden brown. Shrimp is quite a versatile seafood that can be prepared in a variety of ways, drawing people in with its tender texture and mildly sweet, salty flavor.
A seasoning Brion & I have really come to enjoy especially with shrimp is the Old Bay Seasoning. With savory, salty, spicy, and herby notes, Old Bay Seasoning is something truly special in the culinary world. It was originally meant for seafood, but quickly became a beloved seasoning for everything from crab and shrimp to veggies, meats, and even popcorn!
If you are a seafood lover, crab-stuffed shrimp has an amazing flavor combination you will really enjoy.
Print Recipe
Crab Stuffed Shrimp
Votes: 1
Rating: 5
You:
Rate this recipe!
|
|
Votes: 1
Rating: 5
You:
Rate this recipe!
|
Instructions
Stuffing
In a saucepan over medium heat, add butter & allow to melt. Add onions, celery, garlic, green onions & seasoning & sauté for 6-8 minutes. Transfer mixture to a mixing bowl, add panko crumbs & drained crab meat. Fold in with a spatula until blended.
Shrimp
Clean, devein & butterfly shrimp. Set aside in refrigerator.
Lemon Pepper Butter
In a small saucepan, combine water, lemon juice, flour & seasonings. Whisk until mixture thickens. Remove from heat; add softened butter & blend in well.
Assembly
-
In a round glass pie dish, place opened butterflied shrimp. Top each with a small scoop of stuffing. Next, place a tsp of lemon butter on each shrimp.
Bake 20-25 minutes or until crab meat filling begins to get golden brown. Serve hot fresh broccoli.

Decadent isn’t often a word used to describe vegetables, but the rules change when cheese gets involved. While loaded cauliflower is a great side dish next to roast chicken or steak, it’s hearty enough to be a main — thanks to the cheddar and bacon. It’s inspired by loaded potatoes but calls for roasted cauliflower as the base.
The term ‘loaded’ refers to the generous amount of toppings that are piled onto the potato, transforming it into a complete hearty and indulgent dish. Loaded roasted cauliflower is a delightful twist on the classic loaded potato. In this recipe, tender, caramelized roasted cauliflower is loaded with tangy ranch, crisp bacon, fresh green onions and sharp cheddar cheese in a totally addicting side dish!
Print Recipe
Loaded Roasted Cauliflower
Votes: 1
Rating: 5
You:
Rate this recipe!
|
|
Votes: 1
Rating: 5
You:
Rate this recipe!
|
Instructions
In a medium skillet, cook the bacon over medium-high heat until crisp. Transfer the bacon to a paper towel-lined plate to cool & set aside. Reserve 1/4 cup of bacon grease.
Preheat oven to 425 F. Line a baking sheet with parchment paper. Set aside.
In a large bowl, combine the cauliflower, bacon grease, garlic powder & black pepper. Toss to combine.
Spread cauliflower on the prepared baking sheet, then bake for 18-22 minutes, flipping once halfway through. The cauliflower should be tender & golden brown when ready.
Sprinkle the cheddar cheese on top of the cauliflower & bake an additional 2-3 minutes to melt the cheese.
Remove from oven & top the cauliflower with the crumbled bacon & green onions. Drizzle with ranch dressing. Serve immediately.