Shrimp Rice Bowl

The concept of the ‘rice bowl’ in restaurants, referring to a bowl of rice topped with various ingredients, is not attributed to a single individual or restaurant. It’s a concept with deep historical roots and although it’s hard to say exactly where and when rice bowls first appeared, it’s widely believed that they originated in Japan and made their way through Korea, China, and later other parts of Asia.

These dishes, featuring rice topped with ingredients, have been enjoyed for centuries. The modern ‘bowl’ trend, however, has been influenced by various culinary traditions and the increasing popularity of customizable and convenient meal options. 

A rice bowl marries simplicity with versatility, a celebration of flavor and creativity. Rice bowls can be as straightforward or as elaborate as one chooses to make them. The ingredients are usually cooked and seasoned, providing a balanced and flavorful meal.

This shrimp bowl is quick and easy to prepare, making it an ideal choice for a busy weeknight dinner or a hearty, nourishing lunch. The shrimp is marinated in Mexican spices and fresh lime juice, then cooked and served with rice and fresh veggies. Brion & I just love this meal!

Print Recipe
Shrimp Rice Bowl
Instructions
Shrimp Marinade
  1. Start by marinating shrimp. Add the oil, lime juice, spices & cilantro to a medium bowl. Pat shrimp dry, then add them to the marinade & toss to fully coat. Cover & marinate in the fridge for 15 minutes.
Dressing
  1. In a small blender, whisk all dressing ingredients together until creamy. Set aside.
Other Ingredients
  1. Cook rice according to package directions & divide between 2 serving bowls.
  2. In a microwave steam dish, cook shucked corn ear for 7 minutes. If you wish, at this point, heat 1 Tbsp of olive oil in a saucepan & sauté corn cob for a few minutes until golden on all sides. Allow corn to cool & then cut corn off the cob. This step is purely up to you.
  3. Dice red onion, slice green onion, slice olives (if using), halve cherry tomatoes, slice avocado & grate cheese (if using).
  4. To cook shrimp, heat a medium skillet over medium-high heat (no oil needed). When it's hot, add the shrimp to the skillet in an even layer & cook for 2-3 minutes on one side, flip & cook for another 2-3 minutes on the other side. The shrimp will turn an opaque & pink color when its done. Remove the shrimp from the heat & stir to fully coat it in any sauces that are in the pan.
Assemble Bowls
  1. Top the rice in each serving bowl with shrimp, corn, avocado, onions, cherry tomatoes, olives & sprinkle with cheese. Drizzle with prepared dressing & serve.
Recipe Notes

• There are numerous bottled dressings that would be suitable if you prefer not to make your own such as Cilantro Ranch.

Saskatoon Pie w/ Grated Pastry Topping

MEMORIES OF LORETTA!

Today, July 25, my sister Loretta, would have celebrated her 83rd birthday. Over the years I have shared many experiences on the blog that I had enjoyed with Loretta. She was an avid follower of the blog and always encouraged me to keep writing. In February of 2023, Loretta’s time on this earth ended. She was always a constant in my life during her lifetime. Loretta was so much more than just a sister to me. Her passing has left such an empty place in my heart. The thing nobody tells you about losing a loved one is that you do not just lose them on the day they leave. You lose them over and over again, in every moment they were supposed to still be a part of.

There is something very special about having an older sibling. For me, I just wanted to be with her and do everything and anything she could think of. For her, it was probably not quite as much fun having this ‘brat’ tagging along all the time asking questions.

There are endless memories that replay over and over in my mind. Life in the fifties had a such a gentle rhythm to it …. what a pleasure it was to be a kid at that time and be a part of it all.

Loretta was a very kind, gentle soul. She was a sister, mother, grandmother, great grandmother, friend and professional health care worker as well as many other things she did with such love and compassion.

Loretta lived in many places during her life, including California and Vancouver Island, but was particularly drawn to the Peace Country in Northern Alberta. She worked as an LPN for 25 years north of Grand Prairie for Central Peace Hospital in Spirit River and Fairview General Hospital.

Loretta had a love for music, gardening, crafting, and reading. She cared for all animals big and small which included one little precious Dachshund dog named Amigo.

Loretta & Amigo spent a lot of time after she retired with Brion & I. For many years they would come and look after our home while we were away on vacation. Of course, that always included some time after we came home so we could enjoy their company. The three of us loved Amigo so it was great being together.

Saskatoon berries are very high on my list of nostalgic memories from my childhood. How these little berries can evoke such a flood of treasured thoughts is amazing. Our family farm was located in Southern Alberta, (Canada). If you were to stand on our farmhouse, west veranda, the sight of the ‘foothills’ came into view (foothills are an upland area that flank the eastern side of the Rocky Mountains).

How wonderful it was to be able to pack a picnic lunch on a Sunday afternoon and be able to drive there. It was like a whole different world. A landscape of long ridges and rolling hills covered in native lodgepole pine, aspens and spruce trees. The small streams wound their way through meadows of dwarf birch, willow and prairie grasses. You could easily come across some of the beautiful wildlife such as elk, moose or deer that lived there.

This is where our family would go to pick saskatoon berries. Very often we were accompanied by family friends or relatives. It was such a great time, everyone picking berries together, eating Mom’s fabulous fried chicken and potato salad (etc. etc.) for our picnic lunch. I was looking at some pictures from those times. We must have had some hot dogs on one occasion, and I burnt my mouth it seems. What priceless memories!

With ‘saskatoon season’ in full swing I thought it would be a good time to make some saskatoon pie. Most often the pie is made with a top crust of pastry or designs cut out and laid over the fruit. Other ideas would be to use a nice streusel topping or as I have done on mine, grated pastry sprinkled with coarse sugar. This is such a great summer dessert served, of course, with ice cream! I know it would be something Loretta would have enjoyed.

As we remember Loretta today, we hold on to those precious memories she left with us that will never fade from our minds.

Print Recipe
Saskatoon Pie w/ Streusel Topping
Votes: 1
Rating: 5
You:
Rate this recipe!
Servings
Votes: 1
Rating: 5
You:
Rate this recipe!
Instructions
Pastry
  1. In a large bowl, whisk together flour, baking soda, baking powder & salt. With a pastry blender or finger tips, cut in white & yellow Crisco shortening. In a measuring cup, place the egg & vinegar then add enough COLD water to make 1 cup; whisk together.
  2. Make a well in center of flour & pour ALL liquid in. With hands combine quickly but do NOT over mix.
  3. This recipe will should give you enough for about 3 - double crust 10-inch pies. Whatever you don't use, freeze for later use. This is so handy when time is short & dessert is needed.
  4. At this time, roll out a DEEP DISH 9-inch bottom pie shell, place in pie pan & refrigerate until ready to fill.
  5. Take the same amount of pastry, form it into a ball, wrap in plastic wrap & place it in the freezer. When you are ready for the top pastry on your saskatoon pie, remove the ball from the freezer & GRATE it over the top of the fruit.
Filling
  1. In a saucepan over medium heat, cook the saskatoon berries & the lemon juice (and water, if using frozen berries), stirring often, until the berries release some of their juices & shrink a bit, about 5 minutes. In a small bowl, stir together the sugar & the cornstarch until they are well combined. Pour into the berries & bring them to a boil, stirring often.
  2. Once they boil, cook the pie filling until it is thickened, about 30 seconds. Stir in the almond extract. (If you used frozen berries, the filling may look quite thick at this point, but the berries will release more juice as the pie bakes.)
  3. Remove the saskatoon pie filling from the heat & allow it to cool completely. At this point, the filling can be refrigerated for up to 5 days before being used in a pie.
Assembly
  1. Preheat oven to 400 F.
  2. Place filling into chilled pie shell, using the large holes on a box grater, grate the ball of pastry (from freezer) directly over the fruit, as you would a block of cheese. Using a fork, gently move the gratings here & there for an even covering. Sprinkle with coarse sugar.
  3. Bake pie on center rack for 30 minutes. Reduce heat to 375 F. rotating pie for even baking. Bake about 25-30 minutes more or until to is golden brown & juices are bubbly & thick around the edge. Remove from oven. Serve warm with ice cream.

Blackberry Rhubarb Streuseltaler

I love making these German streuseltaler pastries because the flavor combination possibilities are endless. Switch up the ingredients in the filling and the streusel by adding different spices, nuts, and fruits. I posted various versions on the blog such as rhubarb, pumpkin, black forest and today I’m making blackberry/rhubarb.

The name of today’s pastry was inspired by the round shape of the ‘taler’, a silver coin used throughout Europe for almost four hundred years. Its name lives on in the currency called ‘dollar’.

Taler is a German word for ‘coin’, so the name of the dessert literally translates to ‘streusel coin’. Basically, a free form tart made with a yeast dough topped with a huge amount of streusel, sometimes filled with custard and often with a sugar glaze.

A traditional German streusel (streusel meaning something ‘strewn or scattered’ in German) bakes up into shortbread balls. It makes a crunchy, cookie-like top but is soft on the bottom where it meets the cake or fruit.

Streusel was first popularized in Germany. In its simplest form, it consists of flour, sugar and butter but gets even better with the addition of oatmeal, cinnamon and nuts …. just my opinion of course!

I can’t tell a lie; Brion & I love streuseltaler so I’m sure I’ll keep on coming up with another flavor combination to try.

Print Recipe
Blackberry Rhubarb Streuseltaler
Votes: 1
Rating: 5
You:
Rate this recipe!
Servings
ROLLS
Ingredients
Blackberry/Rhubarb Compote
Streusel Topping
Servings
ROLLS
Ingredients
Blackberry/Rhubarb Compote
Streusel Topping
Votes: 1
Rating: 5
You:
Rate this recipe!
Instructions
Blackberry / Rhubarb Compote
  1. Place the rhubarb, blackberries, sugar, salt, & vanilla into a medium pan & simmer over medium-low heat for about 30-40 minutes, stirring often, until the rhubarb & blackberries have broken down & the compote has thickened. The compote will cling to a wooden spoon when it is done. Remove from the heat & allow to cool to room temperature. (Taste your compote – if it is a little flat, you can add a squeeze or two of lemon juice – about 1/2 teaspoon at a time, until it brightens the flavor.)
Streusel Topping
  1. In a bowl, place COLD, cubed butter, add flour, cinnamon, sugar & vanilla. With your fingertips work streusel until crumbles form. Spread out on a large tray & set aside in freezer until ready to use.
Dough
  1. In a small dish, combine yeast with lukewarm water & 1 teaspoon of sugar. Allow to sit for a few minutes until frothy.
  2. In a large bowl, slightly melt butter; cool for a couple of minutes then whisk in egg. In another bowl, whisk together flour, salt & remaining sugar. Add yeast mixture to butter mixture, whisking together. Add flour mixture, combine then turn on a floured work surface & knead for about 5 minutes. Dough will be very soft but not sticky.
  3. Lightly grease bowl, place dough ball in it & cover with a towel. Place in a draft-free place & allow to rise for about 20 minutes.
  4. Line a baking sheet with parchment paper.
  5. Place dough on a lightly floured work surface & divide into 12 pieces. Form each piece into a ball & allow it to rest for about 5 minutes.
  6. Space out the balls on parchment lined baking sheet. With fingertips, press out each ball to about 4-inch diameter. Add about 1 Tbsp of blackberry/rhubarb compote to each dough piece & spread leaving a border around the outside.
  7. Divide streusel topping evenly between the pastries & allow to rise for about 15-20 minutes.
  8. Preheat oven to 350 F.
  9. Bake for about 10-12 minutes. Allow to cool completely on a wire rack. In the meantime, you can prepare the glaze.
Glaze
  1. In a small dish, whisk powdered sugar & lemon juice to a thick glaze. When streuseltaler are cooled, drizzle with glaze.
Recipe Notes
  • Being lovers of cardamom spice, I dusted our streuseltaler with it using a wire mess strainer.
  • I should mention, making the compote the day before needed will speed up your baking process.
  • These streuseltaler are incredibly soft & so good!

Cinnamon Roll Variety Pack

Baking a variety pack of four different cinnamon roll flavors transforms a single-flavor tray into a versatile, gourmet experience. A visually appealing experience that blends the comfort of a homemade dessert with the excitement of modern flavor experimentation. It caters to different tastes within a single batch, making it an ideal choice for brunch, gifts, or, as some suggest, sharing. 

Moving beyond the classic brown sugar and cinnamon, you can incorporate modern, diverse fillings and toppings. Examples include raspberry-lemon, apple pie, salted caramel, chocolate-hazelnut, orange zest, carrot cake, cardamom, pumpkin or even cream cheese icing variations.

Use one consistent, high-quality yeasted dough for all four variations to ensure even baking times. By packing them together in a small pan, they stay soft and pillowy, a common goal in high-quality homemade baking.

Who doesn’t love a tray of warm, gooey rolls? If you’re a fan of the variety pack, you’re likely drawn to the balance of textures and the social, flexible nature of the format.

 It caters to different palates. While some people crave the classic ‘ooey-gooey’ cinnamon, others might prefer more adventurous toppings.

Including plain rolls in a variety pack ensures that even if you don’t love the experimental flavors, you still have the ‘good ole plain’ ones to fall back on.

Recently, Brion & I had to make a trip out to BC. While waiting in the airport I picked up a magazine to look at and came across a great looking cinnamon roll recipe I thought I should try. For something different I thought it would be nice to do a variety pack instead of just one filling. This is what developed from that idea.

Print Recipe
Cinnamon Roll Variety Pack
Votes: 1
Rating: 5
You:
Rate this recipe!
Course dessert
Cuisine German
Servings
Votes: 1
Rating: 5
You:
Rate this recipe!
Instructions
  1. In a small bowl, combine lukewarm milk, & 2 Tbsp of the sugar; stir until sugar is dissolved. Add in the yeast & allow to sit until frothy.
  2. In a large bowl, combine mashed potatoes, eggs, salt & butter. When yeast mixture is proofed, add to potato mixture, combining well.
  3. In another bowl, whisk together flour & remaining sugar. Combine with wet mixture until dough forms a ball. Knead on a work surface for about 10 minutes then place in a greased bowl.
  4. Cover with plastic wrap & a towel. Allow to rise in a draft-free place for about 1 1/2 hours or until doubled in size.
  5. While the dough rises, make fillings so they have time to chill before using them. IF YOU FEEL THEY WILL NOT BE CHILLED ENOUGH, PREPARE THEM A DAY AHEAD & KEEP IN THE REFRIGERATOR. TAKE FILLINGS OUT WHILE THE DOUGH IS RISING.
  6. RASPBERRY & BLUEBERRY FILLING: Add the raspberries (or blueberries), sugar, cornstarch, lemon juice, lemon zest & salt to a saucepan over low heat. Keep stirring until they begin to break down. Once the berries have broken down & released their juices, turn the heat to medium & allow the mixture to boil, stirring for around 4-5 minutes. As the mixture boils, it will thicken & become jelly-like. Make sure to keep stirring so it doesn't burn. Once thick, remove it from the heat, scrape it into a bowl & allow to cool.
  7. CINNAMON FILLING: In a small bowl stir together brown sugar & cinnamon. Measure out 1/4 cup softened butter for spreading.
  8. LEMON CURD FILLING: In a medium saucepan, whisk together the eggs, sugar, cornstarch, if using, lemon juice, zest, & salt until smooth. Place the pan over medium-low heat. Stir constantly with a wooden spoon or silicone spatula, making sure to scrape the corners of the pan to prevent scrambling. Cook for 5–8 minutes until the mixture thickens & coats the back of the spoon. It should just begin to bubble. Remove from heat immediately. Stir in the cold, cubed butter one piece at a time until completely melted and smooth. Pour the curd through a fine-mesh strainer into a jar or bowl to remove any bits of zest or egg. Press plastic wrap directly onto the surface of the curd to prevent a skin from forming. Refrigerate for at least 1 hour, or until completely cold and firm.
  9. Lightly grease a 9 x 9 x 2-inch baking pan; set aside. Punch down the dough. On a lightly floured surface, roll dough into an 18 x 12-inch rectangle & cut into four sections. Apply the 4 different fillings, tightly roll up filled rectangles into spirals. Pinch dough to seal seams.
  10. Cut each roll into 3 slices; arrange in prepared baking pan. Cover; let rise in a warm place until nearly double in size (30 minutes).
  11. Preheat oven to 350 F.
  12. Bake for 25-30 minutes or until golden brown & done in center. While rolls are baking prepare cream cheese drizzle.
  13. CREAM CHEESE DRIZZLE: In a bowl, beat softened cream cheese, softened butter & vanilla with a mixer on medium until combined. Gradually beat in powdered sugar until smooth. Beat in enough milk, 1 tsp at a time, to reach drizzle consistency.
  14. Cool in pan on a wire rack for 10 minutes. Using a small spatula, loosen rolls from pan. Place a wire rack on top of pan; place one hand on top of rack & other hand under pan & carefully invert pan with rack (use pot holders to protect your hands). Lift pan off rolls.
  15. Drizzle as many of the rolls as you wish. Serve warm.
Recipe Notes

For the mashed potato, prick a 10-ounce unpeeled potato all over with a fork. Microwave on 100% power (high) for 5 to 7 minutes or until tender. Halve potato and scoop pulp out of skin into a small bowl; discard skin. Mash the potato pulp with a potato masher or an electric mixer on low speed.

Celebrating 10 Years of Blogging!

Today, February 14th 2026, is the tenth anniversary of the blog ‘Good Food & Treasured Memories’. Ten years ago, I decided to start writing a food blog. Brion and I had just spent three months in Ecuador. Prior to going, I needed to have a shoulder replacement operation. After we returned, I had the operation and with Brion’s help recovered successfully. The only thing was, even though my shoulder was much improved, it pretty much took me out of the workforce as I had known it before. After having been so busy in the previous years, it took a lot of ‘regrouping’ to settle it with myself that I had reached a different phase of my life. Prior to our time spent in Ecuador I had written and with Brion’s technical savvy, published two books.

In 2014, Good Food & Treasured Memories, my first ‘print’ copy memorabilia/cookbook was published with good success in Northern Alberta. It was followed by a second book in 2015 titled ‘The Taste of a Memory’. This book was written in memory of my parents, which took its readers back to a gentler time with some personal childhood memories. The book also contains a sweet and savory collection of at least 160 recipes about the ultimate ‘comfort food’ – bread pudding!

With the turndown in our economy, I wrote my first eBook, Living Large on a Lean Food Budget’, which outlines smart strategies for navigating a realistic food budget to keep ‘life in balance’. It was published on Amazon.com in March 2016 and is still available today.

With these projects finished, it seemed only natural to continue this passion for food and writing in the form of a food blog. Once again, Brion’s technical abilities came into play as I needed a very specific site to work with. I wasn’t interested in working with lots of sponsors that required me to advertise their products, etc. The whole purpose of the site was to post interesting articles along with some great food. Having spent 35 years in the food industry, food and food history is something I always gravitate to.

With much time and effort, Brion built a website with a clean, precise format I could work with. We decided to use the ‘Good Food & Treasured Memories’ name again as it was so fitting of its content.

With blogs, it’s not only the award winning sites that have something to offer; its the blogs written by people in their pajama’s at late hours of the night, created because those writers are dying to make something, to publish something, to give a voice to all the thoughts in their head, its the blogs written by people who don’t want to forget their recipes, who want them recorded somewhere for their friends and their nieces and nephews and their kids, its the blogs pursed for no other reason than because they’re fun.

Over the course of ten years I have enjoyed the many aspects of writing a food blog. In order to write about food and its history, I have done many hours of research to keep my articles accurate and interesting. Recipe development is and has always been something I love doing, so creating relevant recipes for each blog article put the icing on the cake so to speak.

Each year, at least 120 blogs with new articles and recipes have been added. When I first started writing the blog I had no idea how time consuming it would be. When I would look at other personal blogs and see they had only kept them up for a few years I wondered why. After ten years of blogging I now understand why. It definitely takes commitment to keep it current but I have also learned that good organization still allows you lots of time to do the other things that make life enjoyable such as spending time with my husband Brion.

With the website being available online at Google, Pinterest, Instagram as well as Facebook it is being read around the world. It has been so unique and rewarding receiving feed back from readers worldwide.

Thanks to everyone who has read and enjoyed the blog for the last ten years. It has been an incredible journey for me and I hope to continue blogging for many more.

Alice & Brion

Since it’s Valentines Day, I thought this strawberry rhubarb cake would be a fitting dessert for the occasion as well.

Print Recipe
Strawberry Rhubarb Crumble Cake
Instructions
Cake
  1. Preheat your oven to 325 F. Spray two 9 x 13 baking pans with nonstick spray, line the bottom of each pan with parchment paper and spray again. Set aside.
  2. In a medium bowl or measuring cup, whisk together the egg whites, whole egg, and vanilla. Set aside.
  3. In a bowl of an electric mixer, fitted with a paddle attachment, combine the dry ingredients together on low speed for 30 seconds.
  4. Add the butter one piece at a time, about every 10 seconds. Once all the butter is added, pour in the buttermilk and mix on low for about 1 minute, until the ingredients are incorporated.
  5. Scrape down the sides of bowl and begin to add the egg mixture in 3 separate batches, mixing on medium-low until light and fluffy, about two minutes. Fold once or twice to ensure the batter at the bottom of the bowl is incorporated and mix for another 20 to 30 seconds.
  6. Scrape down the sides of bowl and begin to add the egg mixture in 3 separate batches, mixing on medium-low until light and fluffy, about two minutes. Fold once or twice to ensure the batter at the bottom of the bowl is incorporated and mix for another 20 to 30 seconds.
  7. Divide batter evenly between the 2 pans (about ------- ounces of batter in each of the two 9 x 13 pans), spreading evenly with a small offset palette knife.
  8. Bake for about 25 to 30 minutes. Check cake around 23 to 25 minutes and then set the timer for 2-to-3-minute intervals if the cake needs to bake longer. You're looking for a few moist crumbs to come out on the toothpick when inserted into the center of the cake.
  9. Let the cake layers cool on racks for 10 minutes before inverting onto greased wire racks. Gently turn the cakes back up so the tops are up and cool completely. Once the cakes are cooled completely, level the tops if needed.
  10. Wrap each cake layer with plastic wrap and chill in freezer for at least an hour before using. The cake layers can be stored for up to a few days wrapped once in plastic wrap and frozen. To store longer than a few days, wrap twice in plastic wrap, then in foil, and seal in a zip-lock bag.
Compote
  1. In a medium size saucepan, combine the strawberries, rhubarb, sugar & vanilla over medium heat. Bring to a boil. Once the mixture is boiling, reduce the heat to low & let simmer, stirring occasionally, until the fruit is tender. Let cool completely before using in the cake. Can be made ahead of time and stored in an airtight container for up to a week.
Crumble
  1. Preheat your oven to 375 F. Line a baking sheet with parchment paper. Set aside.
  2. In a medium size bowl, combine the flour, sugar, salt & cinnamon. Whisk to blend. Add the cubes of butter & rub in with your fingertips. The mixture will stick together like clumps. Mix in the oats & nuts.
  3. Bake for 8 to 10 minutes, stirring the crumble halfway through. Let cool completely before using in the cake.
Buttercream
  1. In the bowl of a stand mixer fitted with the paddle attachment beat the butter on medium speed for about 2 to 3 minutes, until the mixture is light and fluffy. Adjust the mixer to low speed, slowly add the powdered sugar, followed by the heavy cream, clear vanilla extract & a dash of salt. Continue to beat the buttercream on medium-high speed for an additional 3 to 5 minutes. Before frosting your cake, mix the frosting by hand with a wooden spoon to push out the air pockets.
Assembly
  1. Place the first cake layer, top side up, on a cake board. Using an offset icing spatula, spread a thin layer of frosting over the cake layer. This creates a barrier between the cake and fruit filling, so the cake doesn't become soggy.
  2. Pipe a rim of frosting around the edge of the cake layer. This will help support the cake layers and prevent the fruit filling from spilling out. 2. Spread about 1/2 cup of the fruit filling on the cake layer. 3. Sprinkle about half of the crumble over the fruit filling. 4. Gently place the second cake layer top side down on the filling and crumble.
  3. Spread about 1/2 cup of the fruit filling on the cake layer. Sprinkle crumble over the fruit filling. Gently place the second cake layer top side down on the filling and crumble.
  4. Freeze the cake for about 10 minutes to help set the frosting and filling, making it a bit more stable for when you frost.
  5. After the filling is set, use a small amount of frosting to apply a crumb coat around the entire cake. Freeze the cake again for another 10 minutes to set the crumb coat.
  6. After the crumbs are locked in, continue to frost and decorate the cake.

Rice Pudding Tarts w/ Port Pears

A sure sign of summer leaving us is the arrival of the pear season, stretching from now until the end of December.

These rice pudding tarts with port pears are a combination of textures and flavors. Bosc pears are beautiful; they have a crisp, dense, slightly grainy texture with a sweet flavor and subtle hints of fall spices. Port wine is a sweet, red, fortified wine that pairs wonderfully with pears. What’s not to like??

Budino di riso: a kind of soft rice cupcake or vanilla-scented rice pudding baked in short pastry and sprinkled with icing sugar. Named after the principal ingredient used in the filling, budini di riso is a typical pastry coming from Siena, a medieval city in the region of Tuscany, located in the north of Italy.

Every summer, from May to July, until the 1960’s (and even 1970’s in some places), thousands of female seasonal workers would make their way to the Po Valley in northern Italy. Here, in the rice fields, they went to work as ‘mondine’. Their task was to remove weeds that could stunt the growth of the rice plants.

The compensation of these women consisted not only in money but also 1 kg of rice for each day of work. Hence the widespread use of rice throughout the region in both savory and sweet preparations.

This rice custard tart is a combination of a creamy, vanilla scented rice pudding with a caramelized top, all baked in a crisp shortbread pastry crust. There are many variations for this Italian classic. Some like to make it with a crust, others prefer it without. Other recipes may also add fresh squeezed lemon juice for a citrus flavor.

Today, rice is the world’s most widely consumed cereal grain, which means that virtually every culture has a rice pudding they call their own.

Part pie … part rice pudding, these little tarts can be eaten for (an elegant) breakfast, as an afternoon snack or for dessert, they are just plain good anytime.

Print Recipe
Rice Pudding Tarts w/ Port Pears
Votes: 1
Rating: 5
You:
Rate this recipe!
Servings
Ingredients
Pastry
Rice Pudding Filling
Poached Pears
Servings
Ingredients
Pastry
Rice Pudding Filling
Poached Pears
Votes: 1
Rating: 5
You:
Rate this recipe!
Instructions
Pastry
  1. In a bowl, sift together flour, rice flour, powdered sugar, salt & baking powder. Add butter & rub together with fingertips to make soft crumbles.
  2. In a small bowl, beat egg; add to flour mixture & work into a smooth ball of dough. DO NOT OVERMIX. Flatten dough ball & wrap in plastic wrap; chill in refrigerator.
Rice Pudding Filling
  1. Place rice in a saucepot. Cover with water & bring to a boil. Rinse rice; return blanched rice back in saucepot & cover with milk. Add cinnamon stick & lemon zest. Cook over low heat, stirring often until rice has absorbed most of the milk & rice mixture becomes soupy.
  2. Remove rice/milk mixture from heat & add butter; stir well. Place rice mixture in a bowl to cool. Stir & cool for about 20 minutes. In a bowl, whisk together eggs, sugar & vanilla; add to cooled rice mixture.
Assembly
  1. Preheat oven to 350 F.
  2. Remove pastry from refrigerator & divide evenly into 8 pieces. Form into balls & roll each one lightly in flour then using a rolling pin flatten into a small circles. Line 8 paper cups with pastry & place them in a muffin pan.
  3. Spoon the rice pudding into the pastry shells & bake about 30 minutes or until golden brown on the edges & they test done with the tip of a knife. Do NOT OVERBAKE as they will become quite dry. Prepare poached pears.
Poached Pears
  1. Peel, halve & core pears.
  2. Place wine & cinnamon in a skillet. Bring to a boil over high heat; add pears. Reduce heat to low; cover & poach for 10 minutes. Turn pears; poach 5 more minutes or until tender. Remove pears from wine & set aside. When cooled, place cut side down on a cutting board & slice lengthwise into 1/4-inch slices Then into pieces to fit tart tops. RESERVE POACHING WINE for sauce.
Port Wine Sauce
  1. In a small saucepan, place reserved cooled poaching wine PLUS enough extra port wine to make 2 cups. Whisk in sugar to taste & cornstarch. Heat to a gentle boil, whisking constantly until mixture forms a nice gel consistency. Remove from heat. Cool slightly.
Serving
  1. Top each rice tart with a small fan of poached pears then spoon wine sauce over each. Nothing says you can't add a dollop of whipped topping as well!
Recipe Notes

You will probably have some of the pears left over. I just diced them up & added them to the sauce.

Wool Roll Bread w/ Apricot Filling

Today, March 28th, is my mother’s birth date. As we honor her beautiful memory, I’m sure each of my siblings will reflect on special times we shared with her. Forty-seven years after her passing, I find myself still doing many things in her likeness. Baking was a shared passion for my mother and I. We liked nothing better than to bake something together. After I moved from ‘home’ and would return for a visit, instead of having a coffee and visit we would get busy and bake something while we talked. Such great memories!

When I was thinking about what I wanted to post today, my mind drifted to the recipe archive that lives in my head, eventually making its way to the yeast breads. This is an area my mother had mastered down to a science.

Bread is so simple but a staple in almost every culture. Just flour, water and yeast, yet despite those few ingredients, there are hundreds of different types of bread across the world. And every culture has some sort of bread product.

It seems that the Wool Roll Bread become trendy in 2021 because of a Malaysian YouTuber. It also resembles some Middle Eastern breads such as shoreek and other European creations, such as Polish babka and Slovenian Belokranjska povitica. The pillowy yeast dough can be stuffed (or not) with a sweet or savory filling, then sliced, rolled and stacked in a round pan, so as the dough rises and bakes, the final result resembles rolls of wool or thick yarn.

The most popular fillings for wool roll bread are dried fruit, nuts, cinnamon, custard, hazelnut, chocolate, and cheese as well as some Asian favorites such as red mung bean paste, ube or purple yam, coconut or coconut jam, and meat. Sometimes the dough is made in different flavors and colors like chocolate, strawberry, and pandan.

There is some kind of magic in seeing the result of these baked bread rolls that come together to form a Bundt-like cake shape, puffed up in a ring of pull-apart bread.

I’ve chosen to fill our wool roll bread with an apricot cream cheese filling which should be a nice compliment to the soft dough.

Print Recipe
Wool Roll Bread w/ Apricot Filling
Votes: 1
Rating: 5
You:
Rate this recipe!
Servings
Ingredients
Apricot Filling
Cream Cheese Filling
Bread Dough
Servings
Ingredients
Apricot Filling
Cream Cheese Filling
Bread Dough
Votes: 1
Rating: 5
You:
Rate this recipe!
Instructions
Apricot Filling
  1. In a small saucepan, combine dried apricots, orange juice, lemon juice & sugar. Bring to a simmer over medium low heat. Simmer uncovered for 10-15 minutes, stirring occasionally, until the apricots soften & the liquid is reduced by half. Once cool, transfer the mixture to a food processor & process until a puree forms. Set aside until room temperature.
Cream Cheese Filling
  1. In a small bowl, beat the cream cheese & sugar until smooth. Add egg yolk & vanilla, beat to combine. Set aside in refrigerator until ready to use.
Bread
  1. In a small bowl, combine warm milk, sugar & yeast. Let the mixture sit for about 10 minutes until it becomes frothy.
  2. In a large bowl, Combine flour & salt. Cut in the soft butter. Combine lukewarm water with the beaten egg & add to flour/butter mixture. Add the yeast mixture & mix until a dough forms.
  3. Knead the dough for about 10 minutes or until it becomes smooth & elastic. Once the dough is kneaded, place it in a greased bowl, cover with a damp cloth & allow to rise in a draft-free place for about 1 hour or until doubled in size.
  4. Lightly oil a work surface with olive oil. Gently deflate the dough, divide it into four equal pieces & shape each piece into a ball. Cover the dough & let rest for 10 minutes.
  5. Line a 9" springform pan (at least 2" deep) with parchment paper.
  6. Roll out each piece of dough (on the lightly oil surface) into a 6" x 12" rectangle. On the top HALF of each rectangle, spread the cream cheese filling across the entire width of the rectangle (leaving about 1/4" bare on each side) & down about 6" leaving the bottom 6" bare. Next, spread a good sized dollop of apricot filling over the cream cheese filling. Use a fork so you can do this gently.
  7. Using a sharp knife, cut the uncovered dough at the bottom into very thin strips about 1/8" wide. Starting from the filling covered top & rolling toward the uncovered strips, roll the dough into a log about 6" long.
  8. Place each log, seam-side down, into the bottom of the pan so they are snuggled up against the pans outside edge to form a complete circle.
  9. Preheat to the to 350 F.
  10. Brush the rolls lightly with milk, being careful not to deflate the delicate dough. Cover the 'wool rolls' & let them rise for about 60-75 minutes, until puffy.
  11. Bake for 28-32 minutes, until golden brown on top. Remove the roll from the oven & cool it in the pan until you can transfer it safely to a rack to cool completely. Slice & serve.

Strawberry Cheesecake w/ Danish Rum Balls

HAPPY VALENTINES DAY!

In keeping with Valentines Day, I’m pairing the classic duo of strawberry & chocolate today. At some point, in the many years I spent in the commercial food service industry, I learned the history of the iconic Danish Rum Balls or ‘Romkugler’. These legendary little sweets came about due to leftovers and day old cake that Danish bakers couldn’t sell. Even though they did their best to make the right amount of baked goods so that it would all be sold during the day, they always had leftovers which would not be fresh enough to be sold the day after. They came up with an idea to add jam & rum extract to the day old chocolate cake and the classic rum ball was created.

Today, the rum ball is not considered an unwanted leftover or solely made to avoid food waste. Instead, these little ‘cakes’ continue to appear on the present day bakery shelves.

I think these mini rum balls are the perfect compliment to the strawberry cheesecakes. Sweet, but heh …. its Valentines!!

Print Recipe
Strawberry Cheesecake w/ Danish Rum Balls
Votes: 1
Rating: 5
You:
Rate this recipe!
Servings
MINI CHEESECAKES
Ingredients
Cheesecake
Danish Rum Balls - Makes about 39 mini size
Servings
MINI CHEESECAKES
Ingredients
Cheesecake
Danish Rum Balls - Makes about 39 mini size
Votes: 1
Rating: 5
You:
Rate this recipe!
Instructions
Crumb Base
  1. In a small bowl, combine Oreo crumbs, sugar & melted butter (mixture should have the consistency of wet sand). Place 1 1/2 tablespoons in the bottom of each 'cup' of an individual cheesecake pan. Press the mixture down firmly to form the crust.
Cheesecake Batter
  1. Dice 150 gm strawberries. Reserve several strawberries for garnish.
  2. Process strawberries in a food processor slightly; add softened cream cheese, sugar, orange & lemon juices. Continue to process until very smooth.
  3. Soften gelatin in cold water; stir over low heat until dissolved. Beat into cheese mixture.
  4. Divide cheesecake batter between 14 individual 'cups' in cheesecake pan. Refrigerate 4 hours or overnight. Carefully remove cheesecakes from molds.
Mini Rum Balls
  1. In a food processor, process cake until crumbly. Add jam & rum then process until the dough has a uniform consistency.
  2. Roll dough into 1/2 oz. size balls. Refrigerate until chilled for about an hour..
  3. In a double boiler, melt chocolate with shortening, stirring until smooth. Roll balls in chocolate, allowing excess to drip off. Place on a piece of dry wax paper until set.
  4. When ready to serve, top each cheesecake with a rosette of whipped cream & a slice of strawberry garnished with a mint leaf. Serve with a Danish rum ball on the side.
Recipe Notes
  • If you're cheesecake pan only has 12 cups, use a mini muffin pan for the extra two cheesecakes.
  • If you want to increase the strawberry flavor in the cheesecakes add 1/2 tsp Lor Ann strawberry flavor to the batter and for some extra color, a bit of red GEL food coloring.
  • If you wish, don't hesitate to add finely chopped nuts to the rum balls or roll them in chocolate sprinkles.

Pumpkin Streuseltaler

Nothing tastes more like fall than fresh baked pumpkin goods. I love just about anything with pumpkin in it. It definitely wasn’t always that way but it’s amazing how your taste buds change as time passes.

My original thoughts were to make some German pumpkin plachinda. It was one of those wonderful things my mother used to make that got pushed into the back of my memory.

It seems most recipes you find on the internet make plachinda as individual pastry turnovers with a pumpkin filling. I think I recall my mother making it in a rectangle casserole dish with the pastry on the bottom and up the sides and the filling showing.

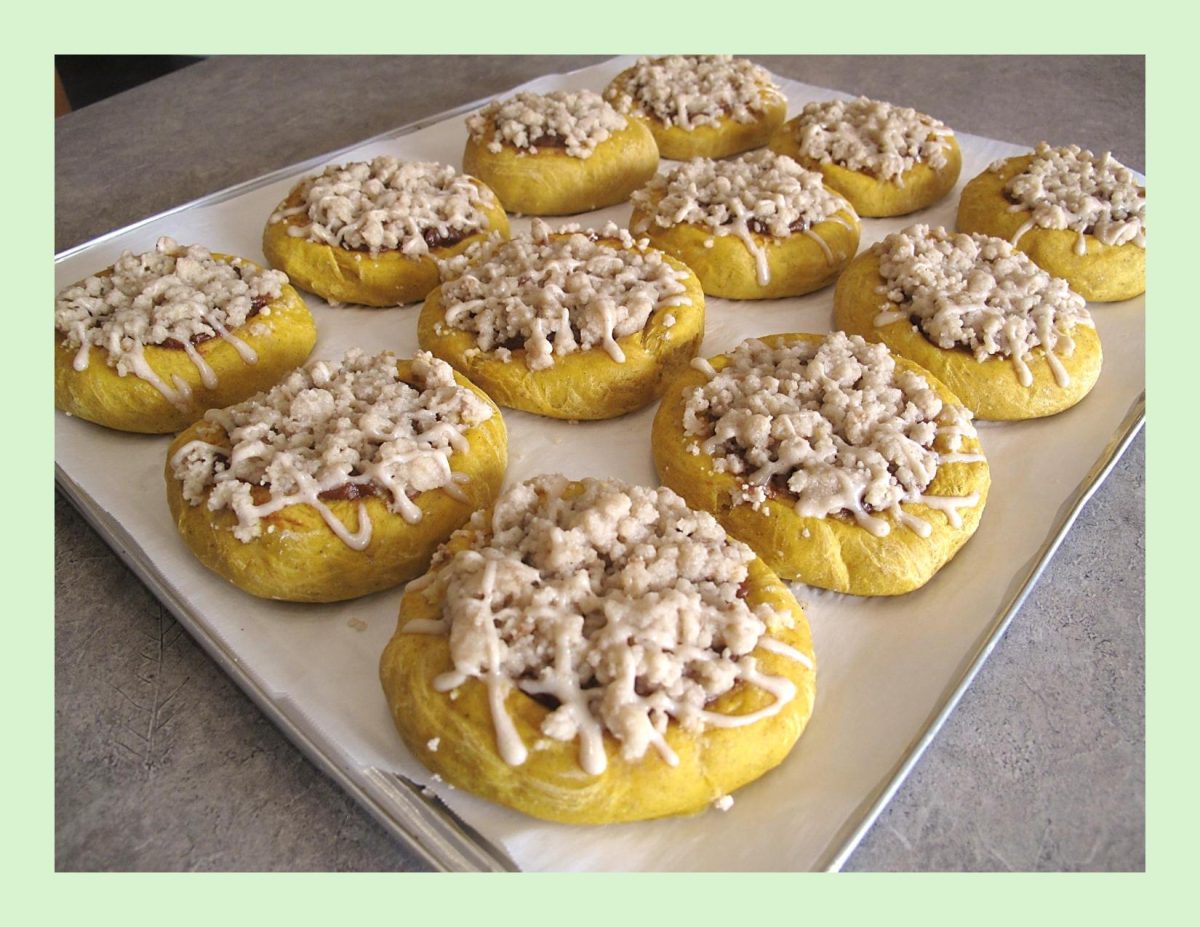
I decided to do some ‘recipe development’ and try making some German streuseltaler and top it with a sweet pumpkin (plachinda) filling.

Streuseltaler was inspired by the round shape of the taler, a silver coin used throughout Europe for almost four hundred years. Its name lives on in the currency called dollar.

Taler is a German word for coin, so the name of the dessert literally translates to streusel coin. Basically, a free form tart made with a yeast dough topped with a huge amount of streusel, sometimes filled with custard and often with a sugar glaze.

A traditional German streusel (streusel meaning something ‘strewn or scattered’ in German) bakes up into shortbread balls. It makes a crunchy, cookie-like top but is soft on the bottom where it meets the bread or fruit compote.

Streusel was first popularized in Germany. In its simplest form, it consists of flour, sugar and butter but gets even better with the addition of oatmeal, cinnamon and nuts …. just my opinion of course!

In the history of cooking, one could find recipes that have constantly changed and could be seen as a connecting link between modern times and our past. I guess this is my contribution to the evolution of plachinda.

For all of you who love pumpkin, here’s a treat you don’t want to miss!

Print Recipe
Pumpkin Streuseltaler
Votes: 1
Rating: 5
You:
Rate this recipe!
Course dessert
Cuisine German
Servings
SERVINGS
Ingredients
Pumpkin Dough
Pumpkin Filling
Glaze
Course dessert
Cuisine German
Servings
SERVINGS
Ingredients
Pumpkin Dough
Pumpkin Filling
Glaze
Votes: 1
Rating: 5
You:
Rate this recipe!
Instructions
Dough
  1. In a small bowl, add yeast, lukewarm water & 1 tsp sugar. Allow to sit about 10 minutes until frothy.
  2. In a large bowl, combine yeast mixture, butter, salt, cinnamon, eggs & pumpkin puree. Mix well. Add flour, one cup at a time, until well combined. Knead dough for about 8-10 minutes or until smooth & soft. Place dough in a greased bowl, cover with a tea towel & allow to rise for about 1 hour or until double in size.
Filling
  1. In a small dish, combine the filling ingredients, set aside.
Streusel Topping
  1. In a small bowl, combine flour, sugar, vanilla, cinnamon & salt. With a pastry blender, cut in butter until mixture resembles coarse crumbs. Set aside.
Assembly & Baking
  1. Line a baking sheet with parchment paper. Place dough on a lightly floured work surface & divide into 12 pieces. Form each piece into a ball & allow it to rest for about 5 minutes.
  2. Space out the balls on parchment lined baking sheet. With fingertips or the back of a Tbsp., press out center of each ball to about 4-inch diameter. Add about a Tbsp of pumpkin filling to each dough piece & spread leaving a border around the outside.
  3. Divide streusel topping evenly between the pastries. Allow to rise for about 15-20 minutes.
  4. Preheat oven to 350 F.
  5. Bake for about 10-12 minutes. Allow to cool completely on a wire rack. In the meantime, you can prepare the glaze.
Glaze
  1. In a small dish, whisk powdered sugar & lemon juice to a thick glaze. When streuseltaler are cooled, drizzle with glaze.
Recipe Notes
  • The picture at the bottom of the recipe is MY version of my mother's plachinda. I had posted it on a blog in October 2016. She used to serve this wonderful pastry when she made a white bean soup. At the time I thought it was an odd combination but it works! Another one of those 'taste of a memory' kind of comfort foods.

Summer Corn Salad

One of the highlights of summer is the fresh sweet corn from local roadside farm stands. Fresh corn is soooo tasty!! Corn salads are a summer classic.

How do you cook corn on the cob? There seems to be as many methods as cooks. Do you steam, boil, microwave? Do you grill and if so, in the husks or out? Or do you get fancy and pull back the husks, put butter or an ice cube inside, rewrap and proceed?

This Summer Corn Salad is the ultimate summer salad to make for a BBQ during the warmer months. The lime-y dressing and sweet grilled corn are a winning combo alongside the fresh cherry tomatoes and avocado. It would pair perfectly alongside ribs, grilled chicken, or even seafood. 

Corn on the cob is one of those foods that just gives off summer vibes and when it arrives each year, Brion & I enjoy it to the fullest.

Print Recipe
Summer Corn Salad
Instructions
Dressing
  1. Whisk all dressing ingredients together & set aside.
Salad
  1. In a microwave steam dish, cook shucked corn ears for 6 minutes. Heat grill to medium-high. Brush corn lightly with olive oil & grill for a few minutes, rotating it as it cooks, until golden on all sides.
  2. Allow corn to cool & then cut corn off of the cobs; place in a bowl. Add remaining salad ingredients & drizzle with desired amount of dressing. Gently toss to combine. Sprinkle with shredded cheese. Refrigerate until ready to serve.