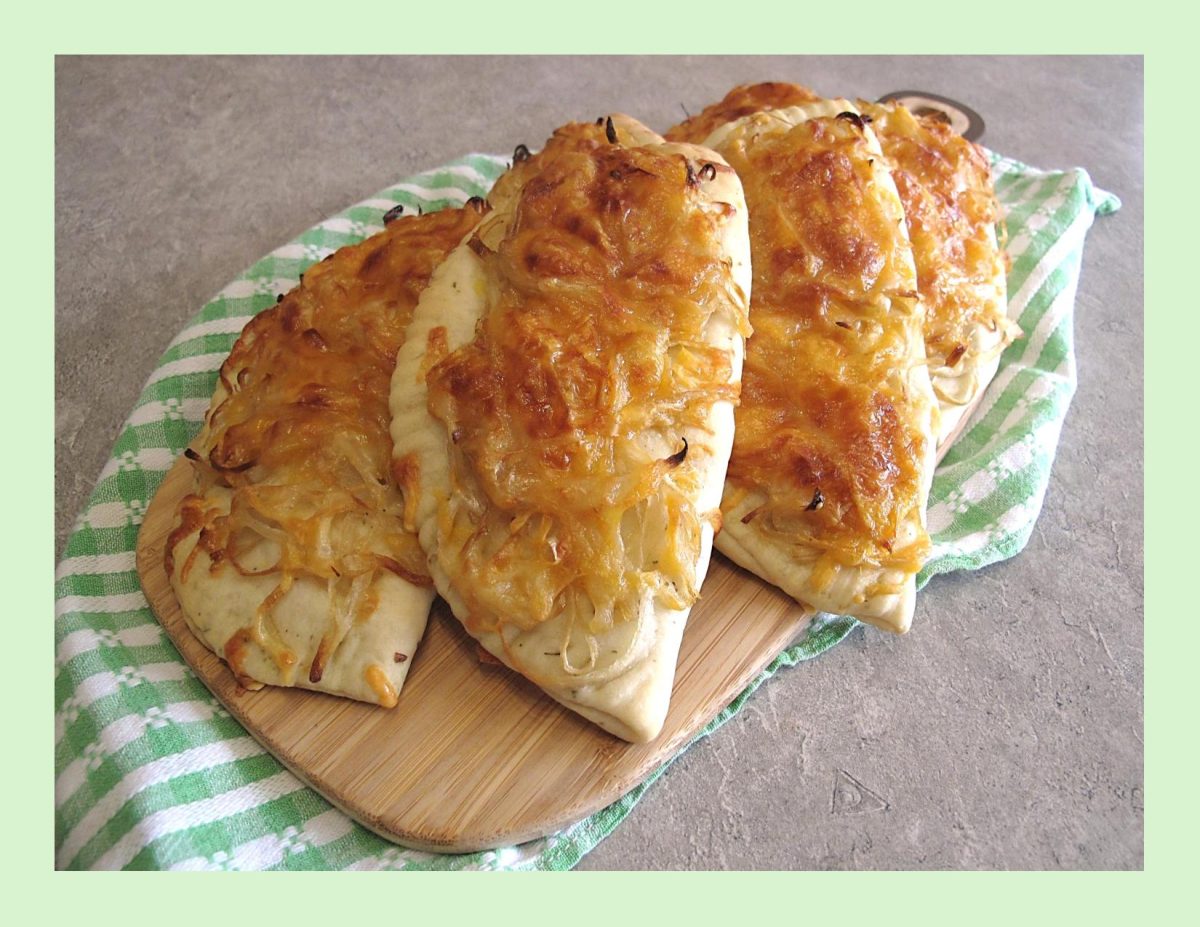
Cheesy Onion & Chicken Turnovers

Turnovers are a tasty handheld pastry stuffed with a variety of sweet or savory fillings. Depending on where you are in the world, you might know turnovers by another name. It’s a calzone in Italy, an empanada in Latin America, a pasty in England, a patty in Jamaica and a hand pie in North America.

Whether they’re made with pastry or yeast dough, these tasty morsels get their name from the folding technique used to enclose the fillings. They can be fried or baked, and the result is a convenient self-contained meal or snack.

While store-bought turnovers are readily available, there’s something uniquely special about crafting your own savory ‘pies’ at home. The aroma that fills the kitchen as the turnovers bake in the oven, the satisfaction of creating a perfectly flaky crust, and the freedom to customize the fillings to suit your taste – these are the joys that make them truly special.

During the summer months I like to have a big variety of savory turnovers in the freezer (already baked). There are so many times when you are too busy to make lunch and there they are — ready to heat and eat!

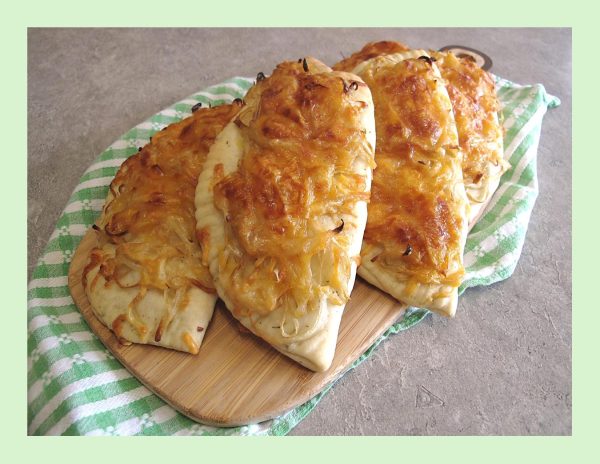
These cheesy onion and chicken turnovers were inspired by some Boursin cheese with cranberries & pepper I had waiting to be used. The total result has made them keepers!
Print Recipe
Cheesy Onion & Chicken Turnovers
Votes: 1
Rating: 5
You:
Rate this recipe!
Servings
TURNOVERS
Ingredients
Servings
TURNOVERS
Ingredients
Votes: 1
Rating: 5
You:
Rate this recipe!
Instructions
Dough
  1. Cook potato, peel & mash. In a bowl, combine yeast with lukewarm water. Allow to stand for about 3 minutes until foamy; add butter, salt, Italian seasoning, sour cream & potato & mix well.
  2. Stir in flour, one cup at a time. When dough is completely blended, turn onto a lightly floured work surface. Knead dough about 10 minutes, until smooth & elastic.
  3. Place dough in a greased bowl, cover with plastic wrap & allow to rise in a draft free place until doubled in bulk, about 1 hour.
Topping & Fillings
  1. In a skillet, heat 1 Tbsp oil. Sauté onion until caramelized & tender. In a bowl, combine shredded chicken with 1/2 of the Boursin cheese. Grate cheddar cheese.
Assembly
  1. Divide dough into 6 equal pieces & shape each piece into a round ball. On a lightly oiled surface, flatten each ball with a rolling pin to a 6-inch diameter. Spread each piece of dough with some of the remaining Boursin cheese.
  2. Divide chicken/Boursin mixture between the 6 turnovers, laying it to one side leaving a half inch border. Fold each one in half to form turnovers.
  3. Line a baking sheet with parchment paper. Place turnovers on baking sheet giving them space to rise a bit. Top each one with some caramelized onions & cheese. Cover turnovers with a tea towel & place in a draft free place to rise for about 15 minutes.
  4. Preheat oven to 350 F.
  5. Bake turnovers until a nice golden brown color. Remove from oven & allow to cool on a wire rack.

Pumpkin Streuseltaler

Nothing tastes more like fall than fresh baked pumpkin goods. I love just about anything with pumpkin in it. It definitely wasn’t always that way but it’s amazing how your taste buds change as time passes.

My original thoughts were to make some German pumpkin plachinda. It was one of those wonderful things my mother used to make that got pushed into the back of my memory.

It seems most recipes you find on the internet make plachinda as individual pastry turnovers with a pumpkin filling. I think I recall my mother making it in a rectangle casserole dish with the pastry on the bottom and up the sides and the filling showing.

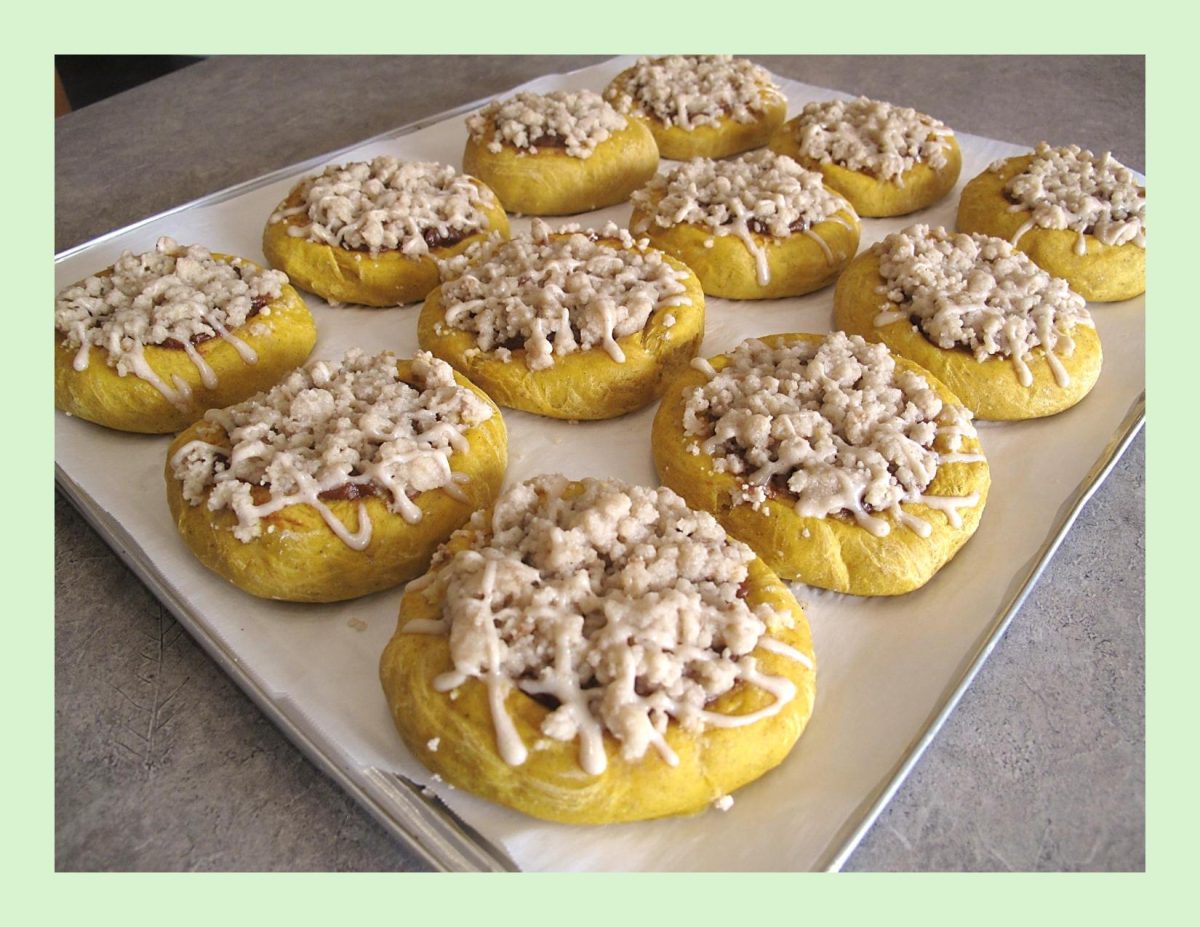
I decided to do some ‘recipe development’ and try making some German streuseltaler and top it with a sweet pumpkin (plachinda) filling.

Streuseltaler was inspired by the round shape of the taler, a silver coin used throughout Europe for almost four hundred years. Its name lives on in the currency called dollar.

Taler is a German word for coin, so the name of the dessert literally translates to streusel coin. Basically, a free form tart made with a yeast dough topped with a huge amount of streusel, sometimes filled with custard and often with a sugar glaze.

A traditional German streusel (streusel meaning something ‘strewn or scattered’ in German) bakes up into shortbread balls. It makes a crunchy, cookie-like top but is soft on the bottom where it meets the bread or fruit compote.

Streusel was first popularized in Germany. In its simplest form, it consists of flour, sugar and butter but gets even better with the addition of oatmeal, cinnamon and nuts …. just my opinion of course!

In the history of cooking, one could find recipes that have constantly changed and could be seen as a connecting link between modern times and our past. I guess this is my contribution to the evolution of plachinda.

For all of you who love pumpkin, here’s a treat you don’t want to miss!

Print Recipe
Pumpkin Streuseltaler
Votes: 1
Rating: 5
You:
Rate this recipe!
Course dessert
Cuisine German
Servings
SERVINGS
Ingredients
Pumpkin Dough
Pumpkin Filling
Glaze
Course dessert
Cuisine German
Servings
SERVINGS
Ingredients
Pumpkin Dough
Pumpkin Filling
Glaze
Votes: 1
Rating: 5
You:
Rate this recipe!
Instructions
Dough
  1. In a small bowl, add yeast, lukewarm water & 1 tsp sugar. Allow to sit about 10 minutes until frothy.
  2. In a large bowl, combine yeast mixture, butter, salt, cinnamon, eggs & pumpkin puree. Mix well. Add flour, one cup at a time, until well combined. Knead dough for about 8-10 minutes or until smooth & soft. Place dough in a greased bowl, cover with a tea towel & allow to rise for about 1 hour or until double in size.
Filling
  1. In a small dish, combine the filling ingredients, set aside.
Streusel Topping
  1. In a small bowl, combine flour, sugar, vanilla, cinnamon & salt. With a pastry blender, cut in butter until mixture resembles coarse crumbs. Set aside.
Assembly & Baking
  1. Line a baking sheet with parchment paper. Place dough on a lightly floured work surface & divide into 12 pieces. Form each piece into a ball & allow it to rest for about 5 minutes.
  2. Space out the balls on parchment lined baking sheet. With fingertips or the back of a Tbsp., press out center of each ball to about 4-inch diameter. Add about a Tbsp of pumpkin filling to each dough piece & spread leaving a border around the outside.
  3. Divide streusel topping evenly between the pastries. Allow to rise for about 15-20 minutes.
  4. Preheat oven to 350 F.
  5. Bake for about 10-12 minutes. Allow to cool completely on a wire rack. In the meantime, you can prepare the glaze.
Glaze
  1. In a small dish, whisk powdered sugar & lemon juice to a thick glaze. When streuseltaler are cooled, drizzle with glaze.
Recipe Notes
  • The picture at the bottom of the recipe is MY version of my mother's plachinda. I had posted it on a blog in October 2016. She used to serve this wonderful pastry when she made a white bean soup. At the time I thought it was an odd combination but it works! Another one of those 'taste of a memory' kind of comfort foods.

Copycat Chachi’s Cran & Brie Sandwich

Several years ago, Brion and I came across a deli we had never noticed before. It was called Chachi’s which proved to be a great find. After checking out the menu we decided on what they called a Cran & Brie Sandwich. OMG .. it was so good! Since then, we have had them numerous times so of course I had to see if I could come up with a copycat version.

Chachi’s Deli is a popular chain started in Calgary, Alberta and now has over 20 locations across BC, Alberta & Manitoba. The concept serves sandwiches with local ingredients, in a contemporary style butcher shop environment. They also serve mac ‘n’ cheese as well as other comfort food offerings. Known for sourcing high-quality ingredients from local partners, Chachi’s has built a reputation for delicious fast food and is raising the bar for ‘mall food’ although some find it a bit pricey.

In December 2006, the first Chachi’s opened in TD Square in downtown Calgary. Derek Brock and Jason Cunningham started the company because they felt there was a need in the marketplace for a premium sandwich offering, above what was being offered by the sub giants. The question that they were asking themselves was … what would happen if you made a sandwich with the best local ingredients possible? That’s how the first Chachi’s sandwich was made and that’s how the company started.

Derek Brock and Jason Cunningham first met over 20 years ago while working as managers at Starbucks Coffee. After forming a strong friendship, they partnered to open the first ever Jugo Juice in 1998. The Jugo Juice brand was a pioneer in the smoothie and juice industry and has since grown to a national chain with stores across the country.

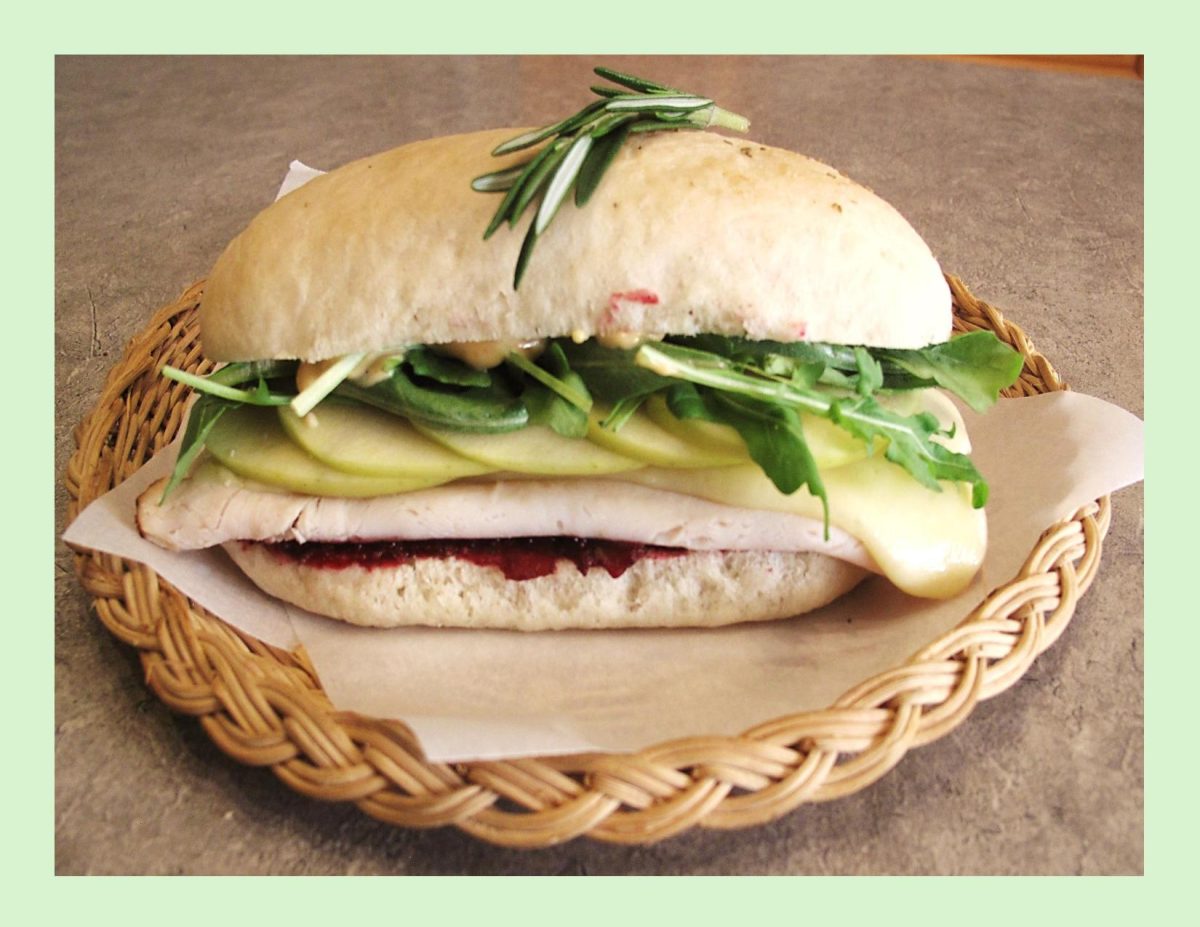
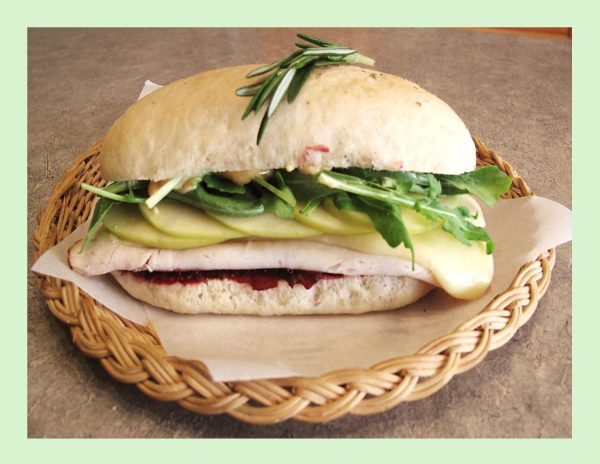
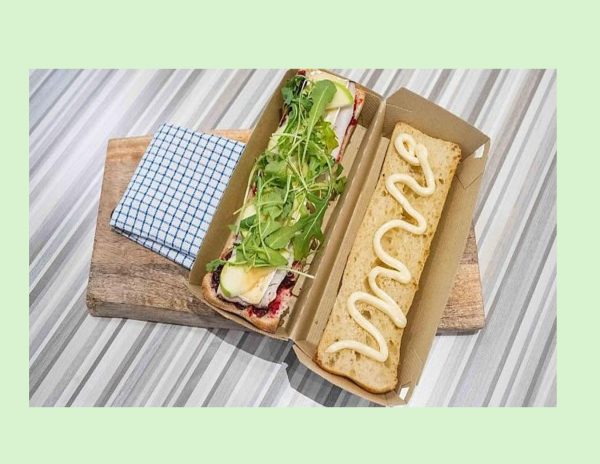
Chachi’s Cran & Brie sandwich consists of roast turkey breast, brie, cranberry chutney, mayo, arugula, granny smith apple & rosemary. Here is my copycat version which I’m sure will never quite match the original but …..

Print Recipe
Copycat Chachi's Cran & Brie Sandwich
Instructions
Ciabatta Rolls
  1. In a small bowl, combine yeast & 1/4 tsp sugar. Add lukewarm water set aside until frothy.
  2. In the bowl of your food processor or mixer (with dough hook), add flour, salt, remaining tablespoon of sugar and rosemary. Pulse once or twice to mix.
  3. When yeast is foamy, with mixer running, pour the liquid into dry ingredients. Add 3 tablespoons olive oil, continuing to mix until dough comes together in a ball. Add a little more flour if necessary, but your dough should by very sticky.
  4. Turn dough out onto floured surface & knead until smooth & elastic, about 20 times. Shape into ball & place into oiled bowl. Cover loosely & place in a draft-free, warm area.
  5. When dough has doubled in size, turn onto lightly floured surface & knead just a few times to deflate. Do not over knead. Divide dough into 6 equal pieces & shape into 6-inch long rolls. Place rolls on parchment paper. Press down & outward to flatten them to about 1-inch thickness. Cover loosely with plastic wrap which has been sprayed with cooking oil spray & set in a warm place until doubled in size.
  6. Preheat oven to 375 F.
  7. When rolls have risen & oven is hot, Remove plastic wrap, poke top of rolls with fingers to create slight indentations. Drizzle olive oil lightly & evenly over rolls. Sprinkle with coarse salt & dried rosemary if you wish.
  8. Slide parchment onto baking sheet bake for 20-25 minutes, until light golden brown.
Cranberry Chutney
  1. Place all chutney ingredients into a large saucepan. Bring to a simmer & cook on low heat until cranberries pop & fruit is soft, about 15-20 minutes. Adjust seasonings or sweetness to your taste. Remove from heat & cool slightly.
  2. Place chutney in a food processor & pulse a few times to puree ever so slightly. I like it to still have a nice texture but your not seeing specific chunks of apple.
Assembly
  1. Slice the ciabatta rolls in half lengthwise. On the bottom half of each, spread cranberry chutney & top with deli roast turkey slices. Layer brie cheese over the turkey. Next lay slices of Granny Smith apple. On the top halves of the ciabatta rolls squeeze some mayo.
  2. Place all prepared bottom & top halves of the rolls in a toaster oven to toast slightly & melt the brie cheese. When slightly toasted & brie is nice & melted, remove from toaster oven & top with arugula & bits of fresh rosemary (if you wish).
Recipe Notes
  • Brion & I used a 'smoky bacon mayo' on our sandwiches & it was real good!

Garlic Bread Meatball Bombs

HAPPY LABOR DAY!

Although, we have not officially reached the first day of fall (Sept. 23), this part of the year often begins with a tinge of melancholy. Even so, there are many ways to appreciate Canada’s most sentimental season.

Part of our country’s appeal is its four season’s: Winter, Spring, Summer & Fall. We are entering the season of the fall harvest and the leaves on the trees begin their transformation to stunning shades of orange, red and yellow.

Labor day week-end gives us an opportunity to enjoy family and friends before summer is officially over. I remember as a kid, once we arrived at the Labor Day week-end all those ‘lazy, hazy, crazy days of summer were gone’. Back to school for another year. So, whatever your choice of relaxation is, you know good food will play a big part in the week-end gatherings.

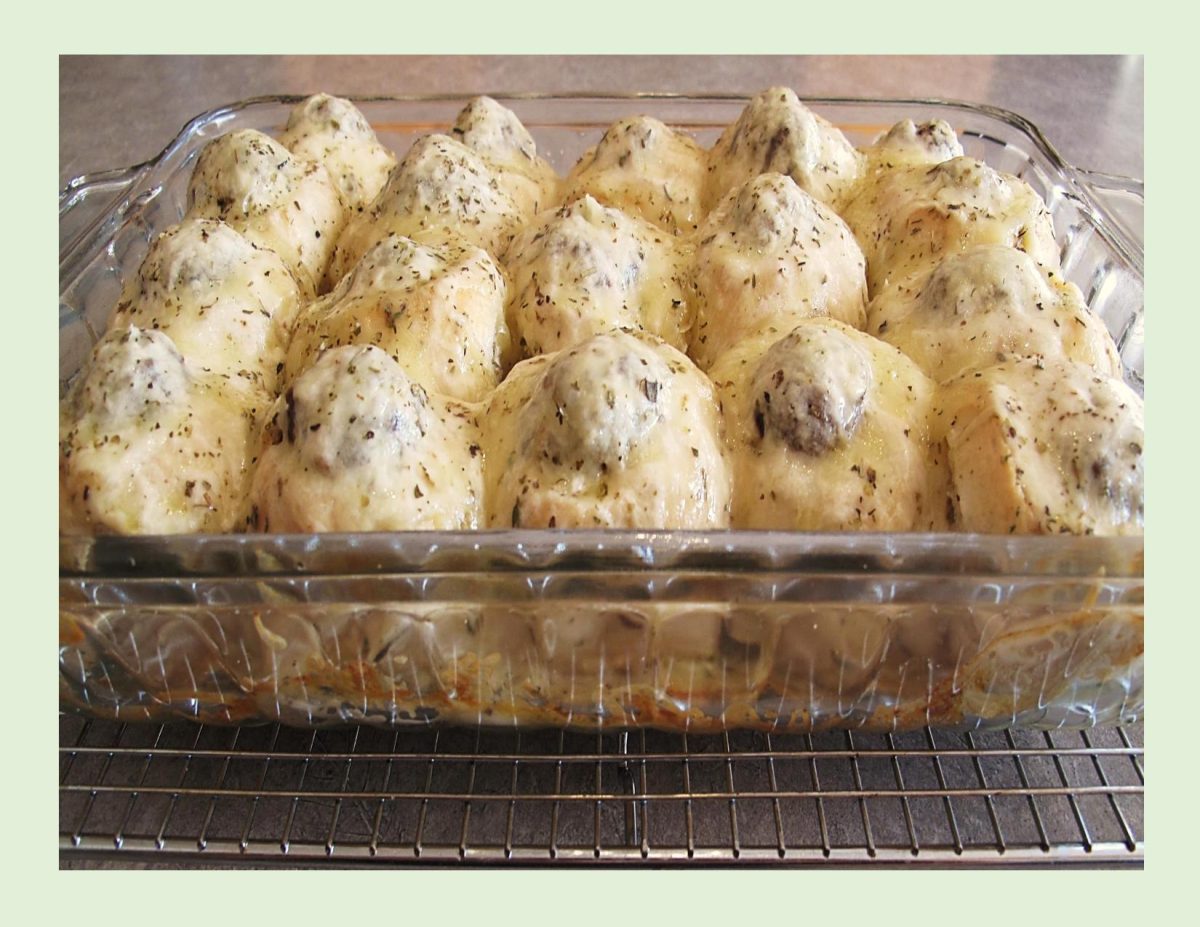
Meatball bombs are a round homemade ‘hot pocket’. They have everything in them you need to make a great tasting meal. Serve two bombs per person. That means each person gets two meatballs, two dinner rolls, lots of sauce, and some gooey, cheesy goodness. Serve these with a simple side salad to round out the entire meal.

Speaking of Hot Pockets, I’m sure most everyone has tried them at some time since they have been around for over 40 years.

Probably the one lasting memory if you have,  is you know that the first bite of the microwavable, molten-in-the-middle meal will burn at least three layers clean off the roof of your mouth.

The frozen creations known as Hot Pockets were created by two Jewish Iranian brothers Paul and David Merage, who immigrated to the United States from Tehran. In 1977, the Merage brothers founded Chef America Inc. and set out to create a portable sandwich whose dough would actually retain its crispness after a few minutes in the microwave. Their creation, which debuted in 1980, was called the Tastywich, but it didn’t last long with its original name. By 1983, after some recipe tweaking, the Tastywich had a new name and Hot Pockets officially hit the market.

History aside, if you’re looking for some flavorful garlic bread meatball bombs, this is just the dish for you! And, you have the choice to use a lot of prepared ingredients from your grocery store, or you can make them all from scratch. There are options for both types in this recipe.

Print Recipe
Garlic Bread Meatball Bombs
Votes: 1
Rating: 5
You:
Rate this recipe!
Servings
Ingredients
Dinner Rolls
Garlic Butter
White Sauce
Servings
Ingredients
Dinner Rolls
Garlic Butter
White Sauce
Votes: 1
Rating: 5
You:
Rate this recipe!
Instructions
Dinner Rolls
  1. Dissolve yeast & sugar in lukewarm water & allow to sit a few minutes until frothy. Add oil, salt, & 2 1/2 cups flour, beat until smooth. Stir in enough remaining 1/2 cup flour to form a stiff dough..
  2. Turn onto a floured surface; knead until smooth and elastic, 6-8 minutes. Place in a greased bowl, turning to grease the top. Cover: let rise in a warm place until doubled, about an hour.
  3. Punch down the dough. Divide the dough into 18 pieces. Pinch the ends of each dough piece together in the center. Place seam side down. Use the palm of your hand to gently roll each dough ball until smooth and round.
  4. Place the dough balls in a parchment lined baking dish. Cover & allow rise until doubled in size, about 30 minutes.
  5. Preheat the oven to 350F.
  6. Lightly brush with egg wash. Bake until golden brown, 20-25 minutes. Remove rolls to a wire rack.
Meatballs
  1. Preheat oven to 350 F.
  2. In a large bowl, combine all ingredients for the meatballs & mix well. Divide mixture into 18 meatballs & place on a foil lined baking tray. Bake 35 minutes or until meatballs are cooked through. Remove from oven & set aside.
White Sauce
  1. In a saucepan, cook butter & flour until bubbly. Slowly add broth & cream; boil for a FEW minutes, add soy, salt & pepper. Set aside.
Assemble & Bake
  1. Hollow out the top of each roll with a sharp knife. The hole will need to be slightly bigger than the meatballs, but not so deep that you puncture the bottom.
  2. Set the rolls into a 9×13" baking pan which has been coated with non-stick cooking spray. Set aside.
  3. Whisk together garlic butter ingredients. Using the back of a teaspoon, liberally smear the holes of the dinner rolls with the garlic butter. Use all of the butter evenly into each dinner roll.
  4. Spoon about a tablespoon of the prepared sauce into each of the hollowed out dinner rolls. Place a cooked meatball into each hole. Top each meatball with the remaining sauce mixture. Evenly distribute the cheese over each of the dinner rolls. Sprinkle on the Italian seasoning.
  5. Bake for 10-12 minutes, or until the cheese is melted and bubbly. Remove from oven.
  6. Using a sharp knife, slice between each dinner roll. Garnish with parsley if you wish.
Recipe Notes
  • For a QUICK & EASY meal use:
  • 12 (store bought) dinner rolls
  • 12 frozen meatballs, cooked
  • FOR SAUCE: 
  • 1/2 cup dried tomato paste
  • 2 cups marinara sauce
  • 1 Tbsp olive oil
  • NOTE: I found for the original recipe it was easier to make the meatballs & sauce first, then the rolls. Just a suggestion!

Ube Pull-Apart Bread

There are a many different names for pull-apart bread such as monkey bread, Hungarian coffee cake, golden dumpling coffee cake, tear & share bread, bubble loaf just to mention a few. Pull-apart bread has both popular and deep cultural roots having originated in Hungary. Starting in 1950 and making its way across the Atlantic to Hungarian Jewish bakeries in the United States. Pull-apart bread was eventually featured in a Betty Crocker cookbook in 1972 and even became a staple in the Regan White House of the 1980s.

Imagine a bread so soft and buttery that it pulls apart into tender pieces at the slightest touch. Pull-apart bread’s first North American incarnation was as a mass of buttery dinner rolls, baked together so they could be pulled apart at the table.

Home bakers have remained captivated by pull-apart bread, having come up with numerous versions such as maple bacon brie, garlic & herb, pepperoni, spinach artichoke. Of course, the classic with the sandy-sweet filling of a cinnamon roll, crunchy pecans topped with a rich caramel glaze will never go out of voque.

Pull-apart bread makes the ultimate baked good, perfect for a family or holiday brunch. Delicious cut into slices or simply torn into chunks, this Ube Pull-Apart Bread makes the perfect dessert for barbecues and picnics or just any time.

Ube (pronounced OO-bay), is a purple yam native to the Philippines and other areas of Southeast Asia. Ube is a very versatile ingredient. It is not a purple sweet potato or taro, it is a purple yam. Its special taste reminds one of vanilla, pistachios or chestnuts. The vibrant purple color inside and out is uniquely photogenic.

Ube has been used for decades in Filipino cuisine and has now caught on in North America, especially in the form of desserts. I fell in love with the flavor of ube jam many years ago so I’m always looking for another way to use it.

Print Recipe
Ube Pull-Apart Bread
Votes: 1
Rating: 5
You:
Rate this recipe!
Course dessert
Cuisine American, Filipino
Servings
THICK SLICES
Ingredients
Ube Halaya (Jam)
Bread Dough
Course dessert
Cuisine American, Filipino
Servings
THICK SLICES
Ingredients
Ube Halaya (Jam)
Bread Dough
Votes: 1
Rating: 5
You:
Rate this recipe!
Instructions
Ube Halaya (Jam) Best to make a DAY AHEAD of using
  1. In a medium, heavy saucepan, melt butter. Add coconut & condensed milks; stir until heated. Add thawed, grated ube & combine well. Cook over a low heat. It is important to stir the mixture often during cooking to prevent it from forming a ‘crust’. This process takes about 40-50 minutes until the ube is cooked. The mixture should be thick & sticky. Transfer the ube jam to a container & set aside.
Dough
  1. In a small bowl, whisk together lukewarm water, sugar & yeast & allow to sit until frothy.
  2. In a small saucepan, heat the butter with milk & vanilla. Cool slightly.
  3. Pour the butter mixture into the yeast mixture and whisk together until just combined. Add the egg and beat until just combined. Slowly add the flour & salt, reserving 2 tablespoons for adjusting later.
  4. Knead the dough until you have a smooth, slightly sticky dough. Add some or all of the remaining 2 tablespoons of flour if necessary. Shape the dough into a ball and place it in an oiled bowl. Turn the dough to oil the top. Cover and let rise until doubled in size about an hour.
  5. Line an 8 1/2 inch by 4 1/2-inch bread pan with parchment paper.
  6. Turn the dough out onto a lightly floured work surface and press or roll into a 16 x 11-inch rectangle. Spread about 1 1/4 cups (about 300 gm) ube jam filling mixture evenly across the top of dough going right to the edges. On the longest side, cut the dough vertically into six strips. Stack 3 of the strips on top of one another, making 2 layers of 3 strips each. Then, using a sharp knife, carefully cut the stacks into 4 squares.
  7. Layer the 8 'piles' of squares into the loaf pan vertically. Sometimes it helps to hold the pan vertically as you are stacking. Cover pan with greased plastic wrap & a tea towel. Allow to rise until doubled, about 45 minutes to an hour.
  8. Preheat the oven to 350 F.
  9. Brush bread with egg wash & sprinkle with Edam cheese. Bake for 15 minutes and then tent with foil in the oven. Bake for an additional 25 to 30 minutes.
  10. Allow to cool in the pan for 15 minutes. Remove from the pan & sprinkle with more cheese if you wish. Serve with extra ube jam if desired.
Recipe Notes
  • I find making the Ube Halaya a day ahead is a good idea!
  • You will only need part of the amount of ube jam this recipe makes. I never have a hard time putting it to good use in other recipes or just using it as a 'jam'.
  • On my blog site there are numerous recipes such as ube cheesecakes, buns, cruffins, cake roll w/ cheese streusel, etc.

Cinnamon Beet Rolls

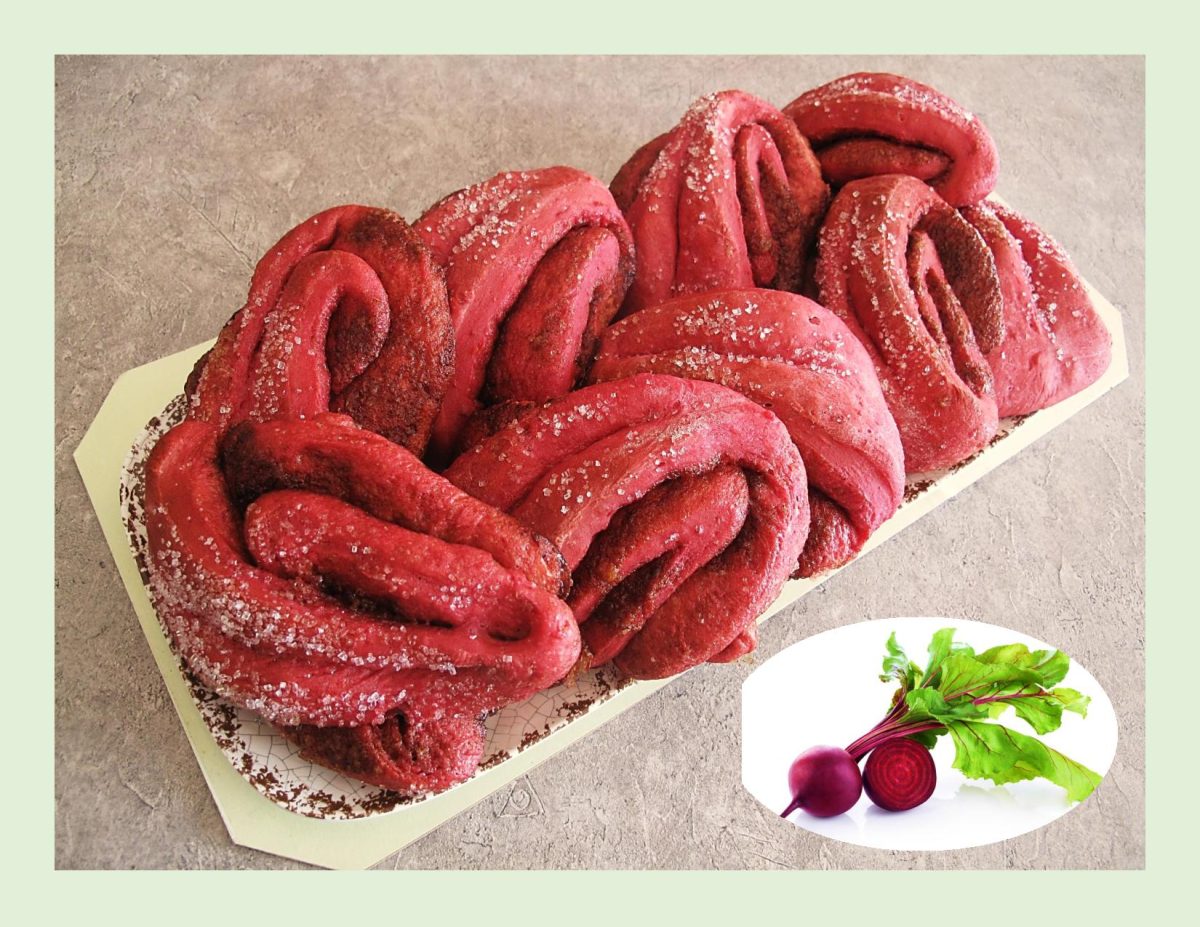
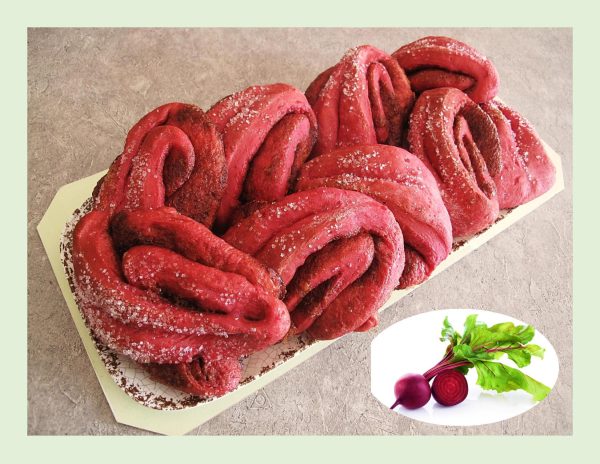
I always think of beets as a love-them-or-hate-them food.  You’re either all in or all out! People have been using vegetables in baking for quite some time. Think about some of the classics: carrot cake, pumpkin pie, banana bread, and zucchini loaf. Beets add moisture to baked goods along with a natural sweetness. 

In yeast breads, roasted beet puree makes for an incredibly tender crumb and moist interior thanks to the added hydration of the purée (similar to potato bread!) and a delicate crust, since the natural sugar in the beets creates more caramelization. Ultimately, the beets add a pleasantly earthy, subtly sweet flavor that enhances the rolls without overpowering them. 

The best-known baked treat made with beets is probably the Red Velvet Cake, but beets can add their deliciousness to cookies, muffins, pies and other baked goods like cinnamon rolls.

The idea of using beets to bulk up bread dough is said to have originated in Paris or Vienna or Germany.

Today the nutrition-packed beet is considered a ‘super food’, credited with everything from lowering blood pressure and increasing energy to fighting inflammation and detoxifying the body.

With that in mind, it seems like a good reason to make some cinnamon beet rolls.

Print Recipe
Cinnamon Beet Rolls
Votes: 1
Rating: 5
You:
Rate this recipe!
Course dessert
Cuisine American
Servings
Ingredients
Dough
Course dessert
Cuisine American
Servings
Ingredients
Dough
Votes: 1
Rating: 5
You:
Rate this recipe!
Instructions
Dough
  1. In a small bowl, add yeast, lukewarm water & 1 tsp sugar. Allow to sit about 10 minutes until frothy.
  2. In a large bowl, combine yeast mixture, 1/3 cup sugar, butter, salt, cinnamon, eggs & beet puree. Mix well. Add flour, one cup at a time, until well combined. Knead dough for about 8-10 minutes or until smooth & soft. Place dough in a greased bowl, cover with a tea towel & allow to rise for about 1 hour or until doubled in size.
Filling
  1. In a small dish, combine filling ingredients, set aside.
Assembly/Baking
  1. On a lightly floured surface, roll dough into a rectangle about 13” x 20”. Spread softened butter on rectangle & sprinkle with cinnamon sugar mixture, leaving a 1/2 -inch border around the edges.
  2. Roll up dough lengthwise into a tight roll, pinch seams shut & place roll seam side down. Cut into 12 pieces, rotating cuts on the diagonal. Press the handle of a wooden spoon firmly on the top & center of each roll to shape.
  3. Place rolls at least 2-inches apart on parchment lined baking sheets. Lightly cover the rolls with buttered plastic wrap & a tea towel. Set aside in a warm place for 20 minutes to rise.
  4. Preheat oven to 350 F.
  5. Brush with egg wash & sprinkle with coarse sugar.
  6. Bake for about 20 minutes or until golden. Serve warm.
Recipe Notes
  • To Roast Beets: wrap individually in foil & place directly on the rack of a preheated 400 F. oven. Bake until they're fork tender but not mushy; the total time will vary depending on the size of the beets. Allow beets to cool in foil, then rub off all the skin & any rough exterior pieces. Puree beets in a food processor or with an immersion blender.
  • Alternately, you can just boil, peel & puree if you are short on time.

Flammekueche – Alsatian Pizza w/ Onions & Bacon

Nestled on the border of France and Germany is a little area known as the Alsatian (All-Say-Shun) region. There, cultures have collided, blended, and meshed to create some of the most unique culinary experiences. One such specialty is the Flammekueche, also known as the Alsatian Pizza, or Tarte Flambée. A combination of baked flat dough topped with fresh cheese known as fromage blanc, bacon, and onions. All of this is baked to a crisp perfection.

The most underrated and underused topping in every pizzeria is the onion. The flavor potential of this glorious root can be either bold or a sublime succulent whisper, but it is usually taken for granted.

Known as flammekueche in Alsatian and flammkuchen in German, tarte flambée is pure and uncomplicated. Typically made on a piece of thin, rolled-out bread dough, it has only three or four other main ingredients: the sour cream, cheese, onion and the bacon.

But don’t let the few ingredients fool you because they’re wonderfully paired. The creamy, slightly sharp sour cream is tamed by the sweet onions and salty bacon.

Print Recipe
Flammekueche - Alsatian Pizza w/ Onions & Bacon
Votes: 1
Rating: 5
You:
Rate this recipe!
Servings
Ingredients
Potato Pizza Crust
Caramelized Onions
Servings
Ingredients
Potato Pizza Crust
Caramelized Onions
Votes: 1
Rating: 5
You:
Rate this recipe!
Instructions
Pizza Crust
  1. Cook potato, peel & mash. Combine yeast with lukewarm water; whisk until yeast is dissolved. Let stand about 3 minutes until foamy. Add butter, salt, sour cream & potato; mix well. Stir in flour, one cup at a time. When dough is completely blended, turn onto a lightly floured surface. Knead dough about 10 minutes, until smooth & elastic. Place dough in a lightly greased bowl, cover with a tea towel & allow to rise in a warm place until doubled in bulk, about 1 hour.
Caramelized Onions
  1. In a large skillet, heat oil. Add onion & sprinkle with salt. Cook & stir about 15 minutes or until moisture is evaporated & onion is soft. Reduce heat, sprinkle with vinegar. Cook & stir until golden. Stir in brown sugar; cook & stir until caramel brown in color. Remove from skillet & set aside.
Bacon / Cheese
  1. In skillet, sauté bacon until it is halfway to crisp, 2-4 minutes. Remove bacon to drain on paper towel. Break or cut bacon into small pieces. Grate cheese.
Assembly
  1. Preheat oven to 375 F.
  2. On a large sheet of parchment paper, roll or press dough into 4 ovals. Transfer with paper to a baking sheet.
  3. Add minced garlic to sour cream & spread over crust, leaving a small border. Distribute onions & bacon evenly over sour cream. Top all with grated cheese & a sprinkling of black pepper.
  4. Bake for 15-20 minutes or until golden brown. Remove from oven & slice.

Pizza w/ Cabbage & Meatballs

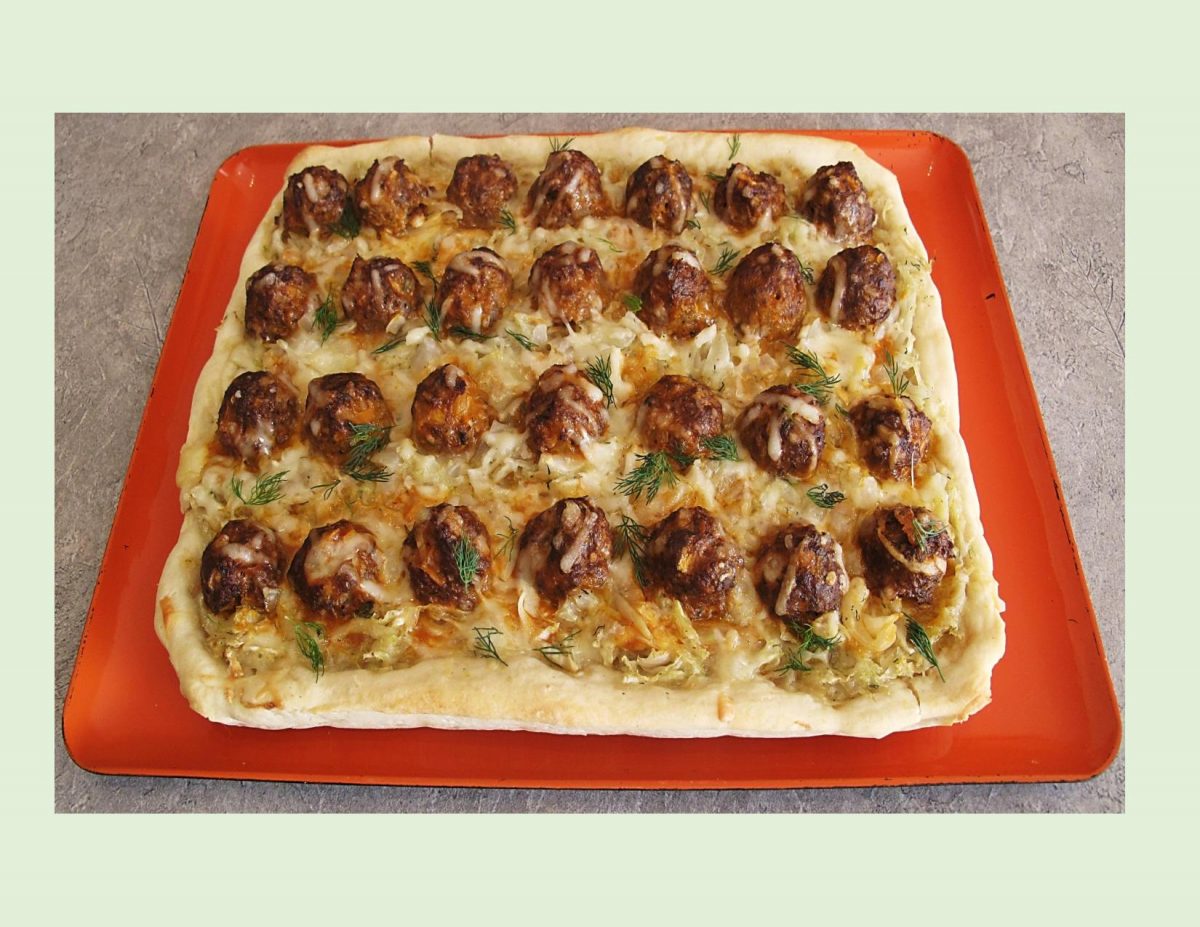
Don’t think for a moment that cabbage doesn’t belong on pizza — it definitely does. When the days grow shorter, we start to crave heartier meals. Cabbage is good … meatballs are good … cabbage/meatball pizza is double good! Here’s a new spin on the classic pizza – topping a pizza crust base with meatballs, cabbage, spices & cheese.

People have been piling ‘stuff’ on dough, and then heating it up, for thousands of years. That includes the Chinese, who some believe gave Marco Polo scallion pancakes, leading to the theory that he introduced pizza to Italy.

Others point to the ancient Greeks, who covered their flatbreads with herbs, oil, and cheese. But no matter who is responsible for pizza, there is no denying that it has serious global appeal.

Cabbage is an unsung kitchen hero. It’s actually one of the most versatile veggies in your arsenal. If you’re just reserving it for slaws and salads, it’s time to broaden your horizons and discover some of the amazingly delicious things a simple head of cabbage can do.

While the dough is pretty critical, the toppings are just as important to get right. Specific toppings will come down to personal preference.

The duo of sautéed cabbage & meatballs makes for a hearty, satisfying topping perfectly suited for crisp autumn weather. 

Print Recipe
Pizza w/ Cabbage & Meatballs
Votes: 1
Rating: 5
You:
Rate this recipe!
Servings
Ingredients
Potato Pizza Crust
Cabbage
Cheese
Sauce
Servings
Ingredients
Potato Pizza Crust
Cabbage
Cheese
Sauce
Votes: 1
Rating: 5
You:
Rate this recipe!
Instructions
Pizza Crust
  1. Cook potato, peel & mash. In a bowl, combine yeast with lukewarm water. Allow to stand for about 3 minutes until foamy; add butter, salt, sour cream & potato & mix well. Stir in flour, one cup at a time. When dough is completely blended, turn onto a lightly floured work surface. Knead dough about 10 minutes, until smooth & elastic. Place dough in a greased bowl, cover with plastic wrap & allow to rise in a warm draft free place until doubled in bulk, about 1 hour.
Cabbage
  1. In a large pot, place thinly sliced cabbage, water, sugar & salt. Cover & simmer for a few minutes until cabbage is soft & has reduced in volume. Place cabbage in a dish. Melt butter & oil in pot then add flour & cumin to make a roux. Cook for 1-2 minutes, stirring so that there are no lumps as it thickens. Add cabbage to roux & cook for a couple of minutes. Remove from stove & stir in fresh dill & chives; set aside.
Meatballs
  1. Preheat oven to 350 F.
  2. In a bowl, combine all meatball ingredients & mix well. Form into 28 balls & place on foil lined baking sheet that has been lightly greased. Bake for about 10-15 minutes, until JUST cooked. do not OVERBAKE as they will bake some more when they are on the pizza.
Assembly
  1. Line a 9 x 11-inch baking pan with parchment paper. Press out pizza dough over the bottom & up the sides of the pan. Sprinkle a bit of the smoked cheese on the crust, then place a layer of half the cabbage mixture & lightly drizzle with a small amount of tomato soup (sauce). Repeat again with cheese, cabbage & sauce. Roll cooked meatballs in remaining tomato sauce. Place meatballs, in rows on top, then sprinkle with remaining cheese.
  2. Bake for 40 minutes or until crust is golden. Garnish with fresh dill, slice & serve.

Chicken & Leek Calzones

Like their Italian cousin pizza, calzones originated in Naples, Italy during the 18th century. The calzone’s original purpose was to serve as a ‘walk around pizza‘ that were not meant to be eaten with utensils. This Italian style turnover is created by folding a pizza in half. When correctly prepared, the calzone’s outer crust is baked to crispy perfection while the inside filling contains a warm, gooey blend of ricotta and mozzarella cheeses along side an assortment of hearty meats and vegetables. The crust of calzones, traditionally made with yeast, olive oil, water, flour, and salt, makes them extremely portable. Calzones, are always baked.  The original calzones of Naples, were most likely much smaller than the modern calzones seen in North American restaurants today, because the pizzas created in 18th century Italy were for a single person to enjoy.

Calzones are similar to stromboli and the two are sometimes confused. Unlike calzones, which are always stuffed and folded into a crescent shape, a stromboli is typically rolled and folded into a cylinder. Both are pizza derivatives. They utilize the same ingredients to achieve different versions of a sealed, portable meal. Calzones are traditionally stuffed with cheese, tomatoes, and marinara. But much like the pizza, any sort of toppings can be added inside the calzone.

Today, I wanted to put a bit of a different spin on the calzone idea. I’m making a potato/leek yeast dough, filling them with chicken & mushrooms & adding a bit of pizazz to the shape. What’s old is new again!

Print Recipe
Chicken & Leek Calzones
Votes: 1
Rating: 5
You:
Rate this recipe!
Course Lunch
Cuisine American
Servings
Course Lunch
Cuisine American
Servings
Votes: 1
Rating: 5
You:
Rate this recipe!
Instructions
Leeks
  1. Rinse & slice leek. In a skillet, place oil, sliced leek, sage leaves, garlic, salt & pepper. When the garlic is fragrant & the leek is tender, turn off heat & transfer to a dish to cool.
Dough
  1. In a small dish, combine yeast with lukewarm water; allow to stand for a few minutes until frothy. In a large bowl, combine butter, salt, sour cream, cooked, mashed potato & 1/2 of the leek mixture. Beat together well.
  2. When yeast is ready, add it to the wet mixture. Mix in flour, one cup at a time. When dough is blended, turn onto a lightly buttered work surface. Knead dough about 10 minutes, until smooth & elastic. Place dough ball in a lightly greased bowl, cover with plastic wrap & let rise in a warm place until doubled in size, about 1 1/2 hours. While dough is rising prepare filling.
Filling
  1. In a skillet, fry bacon to a cooked but not real crisp stage. Transfer to a paper towel, reserving bacon drippings to sauté mushrooms in. When mushrooms have cooked & released most of their moisture, remove from heat.
  2. In a bowl, combine remaining other half of cooked leek mixture, bacon, cooked chicken (or turkey), & mushrooms. Add Ranch dressing & salt to taste. Set aside.
Assembly & Baking
  1. On a lightly greased work surface, divide risen dough into 8 balls. Roll each ball into an OVAL shape, about 7 x 6-inch size. Divide filling into 8 portions. On each oval, place a portion of the filling in a straight line on the middle of the dough.
  2. Keep one side free & cut the other side of the dough into thin strips using a knife. Fold the uncut side over the filling first, then continue rolling over the cut side.
  3. Line a large baking sheet with parchment paper & place the 'calzones' on it, curving them into a C shape. (Place the side with the 'strips' curving to the outside). Brush calzones lightly with egg wash; cover with plastic wrap & allow to rise for about 20 minutes.
  4. Preheat oven to 350 F.
  5. Bake calzones for 40 minutes until a golden brown. Serve hot or room temperature.

Savory Sweet Potato Toast w/ Avocado & Poached Egg

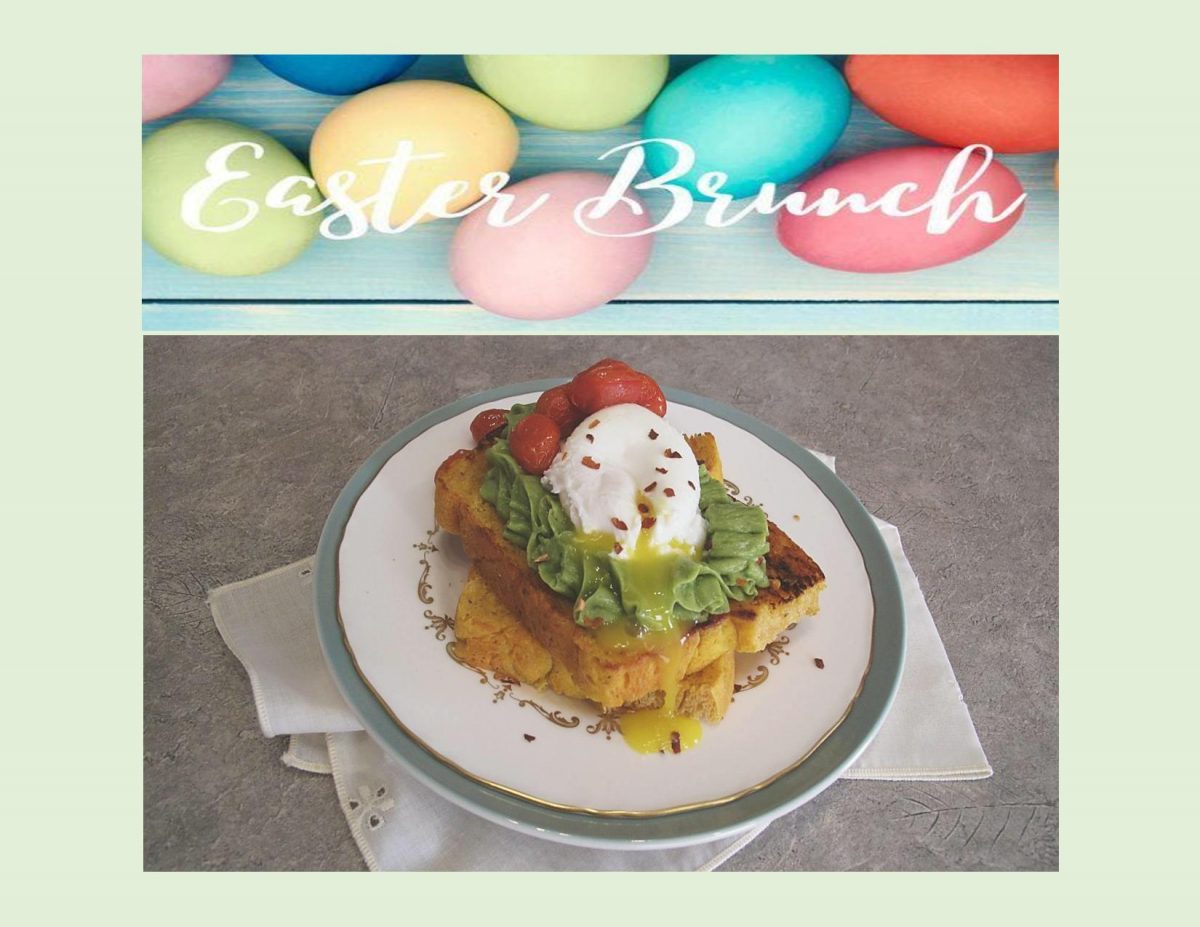
Its hard to believe its already Easter Sunday. In North America, many of us like to enjoy or host an Easter brunch. Traditional favorites very often include glazed baked ham, quiche, frittata & French toast casseroles. Of course, there are the classic hard boiled eggs that have been dyed & decorated for the occasion. Many countries make their own signature Easter breads ands buns. The one thing that I always loved about Easter was it signified the coming of ‘Spring’ in our part of the world. Plants were coming to life in the garden, the birds were singing their cheery, little tunes & the stores were filled with beautiful pastel colored Easter ‘things’.

I wanted to come up with something unique for our Easter brunch this year. French toast is always good but I was thinking more along the savory line. Sweet potatoes seem to be one of those polarizing food items, people either love or hate. For most part, I think its the memory of the overly sweet casserole most of us remember from our childhoods. But have you ever thought about using them in a savory context?

I had seen an idea using grated sweet potato patties with avocado and poached eggs. The temptation to kick it up a notch and make a savory sweet potato ‘toast’ for a base become a wonderful Easter brunch for Brion & I.

Print Recipe
Savory Sweet Potato Toast w/ Avocado & Poached Egg
Votes: 1
Rating: 5
You:
Rate this recipe!
Servings
Ingredients
Savory Sweet Potato Bread
Servings
Ingredients
Savory Sweet Potato Bread
Votes: 1
Rating: 5
You:
Rate this recipe!
Instructions
Bread
  1. Pierce sweet potato several times, and wrap in a paper towel. Microwave the wrapped potato 4 - 6 minutes, or until it is soft to the touch & cooked through. Remove from oven, cool slightly, peel & mash. Measure correct amount needed for bread & reserve the rest for another use.
  2. In a small bowl, combine water, milk, sugar & yeast . Allow to sit until yeast is frothy.
  3. In another bowl, whisk together flour & salt.
  4. In a large bowl, combine sweet potato, butter, black pepper, cumin, coriander, thyme & sage. Taste & adjust seasonings if desired. Add yeast & flour mixtures. Combine well but don't overmix.
  5. Turn dough out onto a lightly floured surface & knead until dough is smooth & elastic. Place dough in a lightly oiled bowl, cover with plastic wrap, & set in a draft free place until doubled in bulk.
  6. Turn the dough out onto a flat work surface lightly dusted with flour. Leave to rest about 10 minutes. Grease a 9 x 5-inch loaf pan. Flatten, shape into a loaf & set inside of pan. Cover loosely with plastic wrap & set aside to rise.
  7. Preheat oven to 375 F. When dough is about an inch over the top of pan, place in oven & bake about 45 minutes, rotating pan about half way through baking time. Remove from oven & allow to cool completely before slicing. It is a good idea to make bread the day before you want to serve it.
Additional Preparation
  1. Preheat oven to 350 F. Place cherry tomatoes in an oven proof dish. Drizzle with 1 Tbsp olive oil & roast for about 15 minutes.
  2. Cut avocados in half & peel off skin. Lay one half of the avocado, cut side down, & slice the avocado thinly. Fan out avocado slices so that they form a long line with the slices overlapping each other. Starting from one end, curl avocado slices toward center. Continue curling the avocado slices until you have a 'rose'. Repeat with remaining 3 halves.
  3. Heat a griddle to 350 F. Slice sweet potato bread to your desired thickness. Lightly butter bread slices on both sides. When grill is heated, grill bread on both sides. Place on serving plates, cover & keep warm.
  4. Bring some water to a boil then poach the eggs for about 2 minutes. Drain.
  5. Top grilled savory bread with avocado roses, poached eggs & roasted cherry tomatoes. Sprinkle with red pepper flakes, salt & pepper.
Recipe Notes
  • This dough is very soft so it is a bit tricky to work with. I would imagine if you prefer it to be firmer you could you less yeast. 
  • When working with it , I used a buttered spatula.