Wool Roll Bread w/ Apricot Filling

Today, March 28th, is my mother’s birth date. As we honor her beautiful memory, I’m sure each of my siblings will reflect on special times we shared with her. Forty-seven years after her passing, I find myself still doing many things in her likeness. Baking was a shared passion for my mother and I. We liked nothing better than to bake something together. After I moved from ‘home’ and would return for a visit, instead of having a coffee and visit we would get busy and bake something while we talked. Such great memories!

When I was thinking about what I wanted to post today, my mind drifted to the recipe archive that lives in my head, eventually making its way to the yeast breads. This is an area my mother had mastered down to a science.

Bread is so simple but a staple in almost every culture. Just flour, water and yeast, yet despite those few ingredients, there are hundreds of different types of bread across the world. And every culture has some sort of bread product.

It seems that the Wool Roll Bread become trendy in 2021 because of a Malaysian YouTuber. It also resembles some Middle Eastern breads such as shoreek and other European creations, such as Polish babka and Slovenian Belokranjska povitica. The pillowy yeast dough can be stuffed (or not) with a sweet or savory filling, then sliced, rolled and stacked in a round pan, so as the dough rises and bakes, the final result resembles rolls of wool or thick yarn.

The most popular fillings for wool roll bread are dried fruit, nuts, cinnamon, custard, hazelnut, chocolate, and cheese as well as some Asian favorites such as red mung bean paste, ube or purple yam, coconut or coconut jam, and meat. Sometimes the dough is made in different flavors and colors like chocolate, strawberry, and pandan.

There is some kind of magic in seeing the result of these baked bread rolls that come together to form a Bundt-like cake shape, puffed up in a ring of pull-apart bread.

I’ve chosen to fill our wool roll bread with an apricot cream cheese filling which should be a nice compliment to the soft dough.

Print Recipe
Wool Roll Bread w/ Apricot Filling
Votes: 1
Rating: 5
You:
Rate this recipe!
Servings
Ingredients
Apricot Filling
Cream Cheese Filling
Bread Dough
Servings
Ingredients
Apricot Filling
Cream Cheese Filling
Bread Dough
Votes: 1
Rating: 5
You:
Rate this recipe!
Instructions
Apricot Filling
  1. In a small saucepan, combine dried apricots, orange juice, lemon juice & sugar. Bring to a simmer over medium low heat. Simmer uncovered for 10-15 minutes, stirring occasionally, until the apricots soften & the liquid is reduced by half. Once cool, transfer the mixture to a food processor & process until a puree forms. Set aside until room temperature.
Cream Cheese Filling
  1. In a small bowl, beat the cream cheese & sugar until smooth. Add egg yolk & vanilla, beat to combine. Set aside in refrigerator until ready to use.
Bread
  1. In a small bowl, combine warm milk, sugar & yeast. Let the mixture sit for about 10 minutes until it becomes frothy.
  2. In a large bowl, Combine flour & salt. Cut in the soft butter. Combine lukewarm water with the beaten egg & add to flour/butter mixture. Add the yeast mixture & mix until a dough forms.
  3. Knead the dough for about 10 minutes or until it becomes smooth & elastic. Once the dough is kneaded, place it in a greased bowl, cover with a damp cloth & allow to rise in a draft-free place for about 1 hour or until doubled in size.
  4. Lightly oil a work surface with olive oil. Gently deflate the dough, divide it into four equal pieces & shape each piece into a ball. Cover the dough & let rest for 10 minutes.
  5. Line a 9" springform pan (at least 2" deep) with parchment paper.
  6. Roll out each piece of dough (on the lightly oil surface) into a 6" x 12" rectangle. On the top HALF of each rectangle, spread the cream cheese filling across the entire width of the rectangle (leaving about 1/4" bare on each side) & down about 6" leaving the bottom 6" bare. Next, spread a good sized dollop of apricot filling over the cream cheese filling. Use a fork so you can do this gently.
  7. Using a sharp knife, cut the uncovered dough at the bottom into very thin strips about 1/8" wide. Starting from the filling covered top & rolling toward the uncovered strips, roll the dough into a log about 6" long.
  8. Place each log, seam-side down, into the bottom of the pan so they are snuggled up against the pans outside edge to form a complete circle.
  9. Preheat to the to 350 F.
  10. Brush the rolls lightly with milk, being careful not to deflate the delicate dough. Cover the 'wool rolls' & let them rise for about 60-75 minutes, until puffy.
  11. Bake for 28-32 minutes, until golden brown on top. Remove the roll from the oven & cool it in the pan until you can transfer it safely to a rack to cool completely. Slice & serve.

Raspberry Crumble Cookies

Raspberry Crumble Cookies are no ordinary treat. Half tart, half cookie, they offer a perfect balance between a soft, melt-in-your-mouth texture and a crumbly, cookie-like crust. Made with a homemade tangy raspberry compote, these cookies are a delectable balance of sweet and tart flavors with a burst of fruity goodness in every bite.  

I have wondered where this crumb (or crumble) cake/cookie idea came from. Its origins speak of its German heritage. The origin of crumb cake was called ‘streuselkuchen,’ and today’s modern crumb cake is fairly similar to its forebear. Streuselkuchen ‘crumb cake’ is often referring to a cake made of a sweet yeast dough covered with a crumb topping that is called ‘streusel.’ Today, we make crumble cakes with baking soda or baking powder for leavening. One thing that has not changed is the signature thick layer of crumb topping where the crumbs are made simply of sugar, butter, and flour and allowed to have a roughly unfinished look. The crumb topping is sprinkled with powdered sugar to add interest to the look of the uneven top.

What we know today as crumb or crumble cake/cookies is most likely the adaptation of coffee cake recipes by German bakers who came to North America. The cake does bear a passing resemblance to many of the streusel topped kuchen recipes, a popular coffee-friendly cake from Germany.

Raspberry Crumble Cookies are baked in a muffin tin and look like mini pies! The dough does double duty as the base of the butter cookies and the crumble topping.

Print Recipe
Raspberry Crumble Cookies
Votes: 1
Rating: 5
You:
Rate this recipe!
Course dessert
Cuisine European
Servings
Ingredients
Cookies
Course dessert
Cuisine European
Servings
Ingredients
Cookies
Votes: 1
Rating: 5
You:
Rate this recipe!
Instructions
Raspberry Compote
  1. Place rasp[berries, sugar, lemon juice, zest & vanilla in a small saucepan over medium heat. Bring to a boil, stirring frequently. Reduce heat & simmer for 7-10 minutes. Remove from heat & pour through a sieve. Press through sieve with a spatula to take out as many of the seeds as possible. Set aside.
Cookies
  1. Preheat oven to 350 F. Spray 24 mini tart or mini muffin tins with cooking spray. Set aside.
  2. In food processor, place flour, sugar & butter. Pulse a few times until mixture is crumbly; set aside 1/2 cup of the mixture. To remainder add baking powder, baking soda & nuts. Place mixture in a large bowl.
  3. In a small bowl, beat egg slightly then stir in sour cream & lemon zest. Add to dry ingredients; stir until just moistened.
  4. Divide batter between the 24 mini tins. With the back of a small scoop that has been dipped in flour, press batter to go over the bottom & up the sides. Spoon about 1 tsp raspberry compote in the indented area of the cookie. Sprinkle each cookie with some of the reserved crumb mixture.
  5. Bake 15-18 minutes or until done. Remove from oven & allow to cool in pans for at least 10 minutes. At this time the cookies should pop out easily. Store in an airtight container at room temperature.

Pulled Pork w/ Swiss Mac & Cheese

The exact origin of the classic ‘macaroni and cheese’ is unknown, though it likely hails from northern Europe. Although there were French dishes with pasta and cheese as early as the 14th century, it was an English writer and businesswoman called Elizabeth Raffald who first wrote the recipe for what we would recognize as macaroni and cheese in 1769. Elizabeth’s recipe was for macaroni, cooked in a béchamel sauce with cheddar cheese added and sprinkled with parmesan.

Many countries have a profound love and deep historical connection to a version of this dish including the USA, Canada, the United Kingdom, France and of course Italy where pasta was first popularized in Europe. It is also possible that some of its origins may trace back to the Alps of Switzerland.

In Swiss-German, mac and cheese is called Älplermagronen, which roughly translates as alpine macaroni. It is the Swiss version of the American macaroni and cheese, but heartier and with bolder flavors.

Alpine macaroni is essentially Swiss mac and cheese with potatoes. Macaroni and cubed potatoes collectively drown in a decadent cheese sauce! This classic is topped with caramelized onions and crispy bacon pieces, served with a side of applesauce. The recipe was invented back in the 1930s and is comprised of ingredients easily available to herdsman keeping an eye on their cows grazing in the Alps.

This humble pasta w/ cheese dish has become an ultimate comfort food in a plethora of cultures and countries around the world. There have been many inventive twists put on this classic. The 1953 edition of the Better Homes & Gardens cookbook, calls for a sauce made from Velveeta, onion and cream of mushroom soup. Other variations sub in Brie, figs, rosemary and mushrooms for the traditional cheddar-based sauce.

In our meal today, I’m putting my own twist on this version of Swiss Älplermagronen by omitting the potatoes and bacon and adding some pulled pork. Instead of serving the applesauce on the side, I’m adding it to the cheese sauce. Applesauce might sound like a weird addition, but it works. Just like cheddar melted over a piece of apple pie is an unexpectedly delicious treat.

Print Recipe
Pulled Pork w/ Swiss Mac & Cheese
Votes: 1
Rating: 5
You:
Rate this recipe!
Cuisine European
Servings
Votes: 1
Rating: 5
You:
Rate this recipe!
Instructions
  1. Bring a pot of salted water to a boil & cook macaroni (or orecchiette pasta) according to package directions. When cooked to al dente stage, drain well, RESERVING pasta water. Drizzle pasta with 1 Tbsp olive oil. Shake it around a bit in the colander to keep it from sticking together.
  2. In same pot used to cook pasta, melt butter & sauté onion until tender crisp then whisk in flour. Cook mixture for 2 minutes, whisking all the while then whisk in milk & applesauce. Cook for 2 more minutes continuing to whisk while the mixture is thickening.
  3. Preheat oven to 375 F. Lightly butter a 9 x 9-inch baking dish, set aside.
  4. Remove from heat & stir in salt, pepper, sage, Gruyere, cheddar & pulled pork. Combine then add cooked pasta & stir until pasta is evenly covered with sauce. If mixture is too thick, adjust consistency with some reserved pasta water.
  5. Place in a baking dish & bake uncovered for 30-40 minutes or until pasta begins to turn slightly golden brown.

Strawberry Cheesecake w/ Danish Rum Balls

HAPPY VALENTINES DAY!

In keeping with Valentines Day, I’m pairing the classic duo of strawberry & chocolate today. At some point, in the many years I spent in the commercial food service industry, I learned the history of the iconic Danish Rum Balls or ‘Romkugler’. These legendary little sweets came about due to leftovers and day old cake that Danish bakers couldn’t sell. Even though they did their best to make the right amount of baked goods so that it would all be sold during the day, they always had leftovers which would not be fresh enough to be sold the day after. They came up with an idea to add jam & rum extract to the day old chocolate cake and the classic rum ball was created.

Today, the rum ball is not considered an unwanted leftover or solely made to avoid food waste. Instead, these little ‘cakes’ continue to appear on the present day bakery shelves.

I think these mini rum balls are the perfect compliment to the strawberry cheesecakes. Sweet, but heh …. its Valentines!!

Print Recipe
Strawberry Cheesecake w/ Danish Rum Balls
Votes: 1
Rating: 5
You:
Rate this recipe!
Servings
MINI CHEESECAKES
Ingredients
Cheesecake
Danish Rum Balls - Makes about 39 mini size
Servings
MINI CHEESECAKES
Ingredients
Cheesecake
Danish Rum Balls - Makes about 39 mini size
Votes: 1
Rating: 5
You:
Rate this recipe!
Instructions
Crumb Base
  1. In a small bowl, combine Oreo crumbs, sugar & melted butter (mixture should have the consistency of wet sand). Place 1 1/2 tablespoons in the bottom of each 'cup' of an individual cheesecake pan. Press the mixture down firmly to form the crust.
Cheesecake Batter
  1. Dice 150 gm strawberries. Reserve several strawberries for garnish.
  2. Process strawberries in a food processor slightly; add softened cream cheese, sugar, orange & lemon juices. Continue to process until very smooth.
  3. Soften gelatin in cold water; stir over low heat until dissolved. Beat into cheese mixture.
  4. Divide cheesecake batter between 14 individual 'cups' in cheesecake pan. Refrigerate 4 hours or overnight. Carefully remove cheesecakes from molds.
Mini Rum Balls
  1. In a food processor, process cake until crumbly. Add jam & rum then process until the dough has a uniform consistency.
  2. Roll dough into 1/2 oz. size balls. Refrigerate until chilled for about an hour..
  3. In a double boiler, melt chocolate with shortening, stirring until smooth. Roll balls in chocolate, allowing excess to drip off. Place on a piece of dry wax paper until set.
  4. When ready to serve, top each cheesecake with a rosette of whipped cream & a slice of strawberry garnished with a mint leaf. Serve with a Danish rum ball on the side.
Recipe Notes
  • If you're cheesecake pan only has 12 cups, use a mini muffin pan for the extra two cheesecakes.
  • If you want to increase the strawberry flavor in the cheesecakes add 1/2 tsp Lor Ann strawberry flavor to the batter and for some extra color, a bit of red GEL food coloring.
  • If you wish, don't hesitate to add finely chopped nuts to the rum balls or roll them in chocolate sprinkles.

Spiced Persimmon & Cranberry Linzer Torte

Originating from Linz, Austria, the Linzer torte is one of the oldest tortes in the world, found in an Austrian abbey in the early 1700s.

It is made with a buttery pastry dough with a significant amount of ground nuts, typically hazelnuts, but often with almonds or walnuts. With a lattice design on the top, it is traditionally filled with red currant jam; but raspberry, apricot and plum are quite popular too.

Linzer cookies employ the same recipe as the Linzer torte but instead the dough is cut into cookies and two of them form a sandwich around the preserves.  Moreover, the top cookie has a small cutout in its center (known as Linzer eyes), thus exposing the underlying jam and adding to the visual appeal. 

When Linzer torte was brought to North America in the 19th century, it became very popular. Today the Linzer cookie is still very commonly used in celebrating Christmas and other holidays as well.

There are countless versions of Linzer tortes around showcasing different nuts, different preserves, and so on such as tahini and sesame Linzer, beets Linzer, a lemon curd Linzer and a chestnut apple Linzer just to name a few.

With my passion for ‘recipe development’, I wanted to come up with a ‘Linzer torte’ that showcased persimmons and cranberries for Christmas. This is what developed!

Print Recipe
Spiced Persimmon & Cranberry Linzer Torte
Votes: 1
Rating: 5
You:
Rate this recipe!
Servings
Ingredients
Spiced Cranberries
Cheesecake Filling
Servings
Ingredients
Spiced Cranberries
Cheesecake Filling
Votes: 1
Rating: 5
You:
Rate this recipe!
Instructions
Crust
  1. In a bowl, sift together flour & salt. Set aside. In a large bowl, cream butter, sugar & vanilla until light & fluffy. Beat in as much flour mixture as possible. Mix in the rest & gently knead till dough comes together. Form into a disk & wrap in plastic wrap. Chill for at least 30 minutes.
Cranberries
  1. In a saucepan, combine whole berry sauce, raspberries, sugar, orange zest & cinnamon. Cook over medium heat, stirring often, until the sauce thickens & is bubbly. Remove from heat & allow to cool. The sauce will thicken slightly as it cools.
Persimmons
  1. Place the melted butter in a large bowl & stir in the honey & spices. Stir well, then add persimmon slices. Toss to coat each slice well.
Cheesecake Filling
  1. Using a mixer, beat cream cheese until smooth then add sugar & blend well. Add eggs & vanilla, beat until smooth.
Baking
  1. Preheat oven to 350 F.
  2. Between 2 sheets of parchment paper, roll out 2/3 of pastry into a 10-inch circle. Place in an 8-inch springform pan. From the remaining 1/3 of the pastry cut a 5-inch circle. In the center of this circle cut a 3-inch circle (this should resemble a Linzer cookie). If you wish you can cut out a few 'stars' for decorations. Lay pastry ring & stars on parchment paper & place on a baking sheet. Blind bake pastry in the springform pan for 8 minutes or until barely set. Bake the ring & stars until golden.
  3. Remove springform pan from oven & pour cream cheese mixture over warm crust. Bake for 20 minutes or until crust is lightly golden & cheesecake tests done. Set aside to cool.
Assembly
  1. When cheesecake has cooled, place the slices of persimmon, overlapping each other to form 2 circles around the outer edge. Spoon spiced cranberries in the middle of the persimmons.
  2. Sprinkle baked pastry ring & stars with powdered sugar & place on top of cranberries. Press down slightly. Your torte should resemble a large Linzer cookie when finished.
Recipe Notes
  • You will have extra cranberry sauce which can be easily used over the holiday season I found. Brion & I liked them so much we added extra to our slices of torte.

Mincemeat Tart

Decorated trees, lights, candles, poinsettias, holly, special baked goods– there are some things that just define Christmas. When I was growing up, Christmas baking was such a major event my mother undertook. Although she put many hours of work into her baking, I think she really enjoyed it. Many of the ingredients for the special things she would bake at this time of the year were just too expensive to have on hand all the time. Somehow, she would work her magic and make that grocery money stretch to include these things. During my childhood fruit mincemeat was a pie or tart that we looked forward to having. Today, it seems – not so much.

As with many traditional recipes, especially the ones we make and enjoy around big holidays or life events, mincemeat pies are steeped with tradition and customs. Mincemeat would often be made on ‘stir-up’ Sunday along with the Christmas pudding, the last Sunday before Advent. Stirring the mincemeat was quite an event, and English tradition dictates that it should only be stirred clockwise. Stirring the mincemeat anti-clockwise would lead to bad luck and poor fortune in the coming 12 months. To spread the joy, it was tradition in England that each member of the family gave the mixture a stir, while making a wish. And if you wanted to be ensured good health and happiness in the upcoming year, you should eat one mince pie every day for the Twelve Days of Christmas, from Christmas Eve until the 5th of January. 

Today’s modern mincemeat is a boozy, sweet, fruit filling for tarts and pies as well as a variety of other desserts. While mincemeat often plays a supporting role to the apple pie here in North America, the English mincemeat pie is only a two-bite size.

Both Brion & I still enjoy the taste of mincemeat. It just wouldn’t seem like Christmas if we didn’t have some version of it.

Print Recipe
Mincemeat Tart
Votes: 1
Rating: 5
You:
Rate this recipe!
Course dessert
Cuisine European
Keyword mincemeat tart
Servings
SERVINGS
Ingredients
Pastry
Crumble Topping
Course dessert
Cuisine European
Keyword mincemeat tart
Servings
SERVINGS
Ingredients
Pastry
Crumble Topping
Votes: 1
Rating: 5
You:
Rate this recipe!
Instructions
Pastry
  1. In a medium bowl, cream butter with sugar, salt & vanilla; add the egg yolk. In a small bowl, whisk together flour & baking powder; add to creamed mixture. Blend well. Press into a 13 3/4" x 4 3/8" (35 x 11 cm) tart pan. Cover with plastic wrap set aside in freezer or refrigerator until needed.
Filling
  1. In a large baking dish, combine all the ingredients except the alcohol, stirring well to make sure they're evenly distributed. Cover with a tea towel & leave overnight for the flavors to marinate together.
  2. Preheat the oven to 230 F.
  3. Remove towel & cover the pot with foil & place in the oven for 2 1/2 hours. Remove from oven & stir mincemeat mixture well. Set aside to cool, stirring occasionally. The stirring is essential to distribute the fruit as the mixture cools.
  4. Once cooled, stir the mincemeat again, add the alcohol & stir one more time. Spoon into pastry shell & level out gently.
Crumble Topping
  1. Beat butter, brown sugar & salt in a bowl with mixer on high speed until light & fluffy. Blend in flour & oatmeal just until crumbly. Crumble streusel mixture over filling.
  2. Bake on bottom rack for 50 minutes or until crust is golden brown & filling begins to bubble. If topping is getting brown too fast, cover with foil. Cool completely on wire rack.
Recipe Notes
  • SPICE COMBO
  • 2 Tbsp ground cinnamon
  • 1/2 tsp ground ginger
  • 1/2 tsp ground cardamom
  • 1/4 tsp ground cloves
  • 1/4 tsp ground allspice
  • This amount will be enough for 2 recipes of mincemeat filling in case you want to make a dozen tarts as well!

Pork & Apple Bedfordshire Clanger w/ Cheddar-Sage Pastry

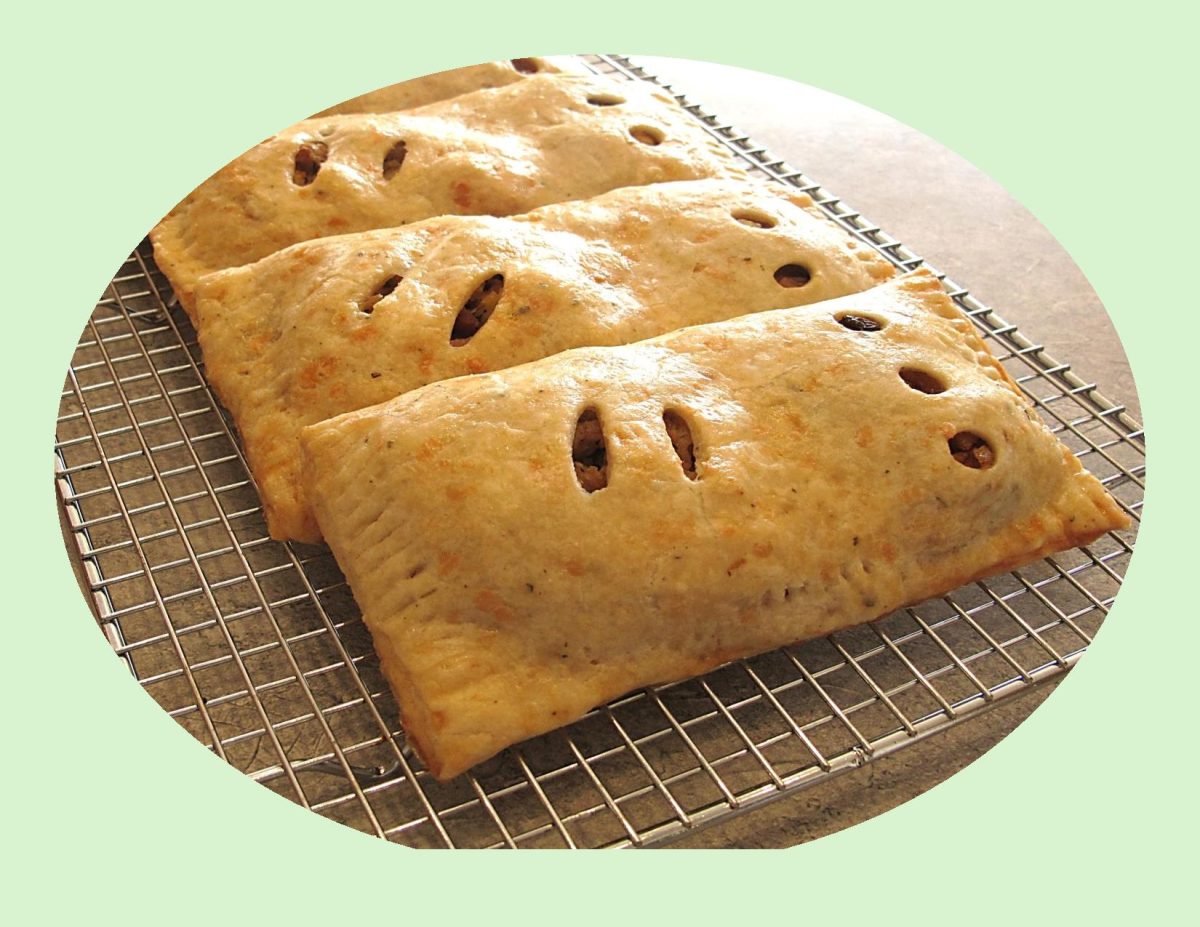
The Bedfordshire Clanger is a very unique and little-known meat pie recipe from England, specifically (not surprisingly) from the county of Bedfordshire, a small, low-lying and predominantly agricultural county nestled in the east of England.

In centuries past many of the working husbands of the area used to toil in the fields there. Their wives, knowing their husbands would need lots of protein and carbohydrate sustenance, came up with the brilliant idea of a doubled, loaf-shaped pie. One end contained a savory filling that used the famed pork of the area while the other end was filled with stewed apples (made from the famed local apples) as dessert. So, the two fillings didn’t combine, there was a ‘pastry wall’ in between blocking any flavors from mixing. A ‘secret code’ denoted which end was meat and which was dessert: two knife slits on one end of the pastry top means meat, three small holes on the other shows the sweet. This was brilliant, an entire meal for the hard-working man – handheld, portable and delicious

I guess you could say, the Bedfordshire clanger is not only a tasty treat but also a piece of culinary history that has stood the test of time!

Print Recipe
Pork & Apple Bedfordshire Clanger w/ Cheddar-Sage Pastry
Votes: 1
Rating: 5
You:
Rate this recipe!
Servings
CLANGERS
Votes: 1
Rating: 5
You:
Rate this recipe!
Instructions
Pastry
  1. In a medium bowl, whisk together the flour, sage & salt. Sprinkle the butter cubes over the flour mixture & use your fingers to work them in. Alternately you could use a pastry cutter to do this.
  2. When the mixture resembles cornmeal with pea-sized bits of butter remaining, stir in cheese with a fork until evenly distributed. Sprinkle 6 Tbsp ice water over mixture & stir with a fork until dough begins to come together. If needed, add an additional Tbsp or two of ice water.
  3. Turn the dough out onto a lightly floured surface & knead for about three times. Gather the dough into a disk & wrap in plastic wrap. refrigerate for at least 30 minutes or overnight.
Pork Filling
  1. Bake potato in microwave, peel & cut into small cubes. Set aside.
  2. Heat oil in a skillet & sauté celery, onion, garlic & bacon together on medium heat until veggies are soft & bacon is cooked. Add ground pork, breaking it up well. Stir in dried herbs & spices. Cover & simmer for about 10 minutes.
  3. Remove from heat & stir in cooked potato & cheese. Set aside to cool.
Apple Filling
  1. In a small saucepan, combine butter, water, cinnamon & brown sugar. Bring to a simmer then add diced apples, raisins, lemon zest & juice. Gently simmer for 5 minutes. Remove from heat & allow to cool.
Assembly/Baking
  1. Divide pastry into 5 equal pieces. On a lightly floured surface (or dry wax paper) roll out each piece of pastry into 7 x 7 1/2-inches. The excess trimmed from the sides will be used for little pastry ‘walls’ dividing the sweet & savory fillings. Roll the excess into a 3-inch length.
  2. From the top of each piece, LIGHTLY make a line across your pastry 4-inches from outside edge. This will help to place your fillings properly.
  3. On the 3-inch wide section of the pastry, place savory filling to cover 2/3 of the area. Place one of the rolled strips after that then place sweet filling on the remaining 1/3 to complete the 'clanger'. The little rolled piece of pastry divides the savory & sweet filling.
  4. On the sweet side make 3 holes for vents & on the savory side make 2 slashes. This is the 'code' to let the person eating the clanger which was savory or sweet.
  5. Preheat oven to 350 F.
  6. Brush the edges of each pastry with egg wash. Lift the pastry from the opposite side over the fillings & seal the edges with a fork.
  7. Brush clangers with remaining egg wash & bake for about 30-35 minutes or until golden.

Stuffed Roasted Romas

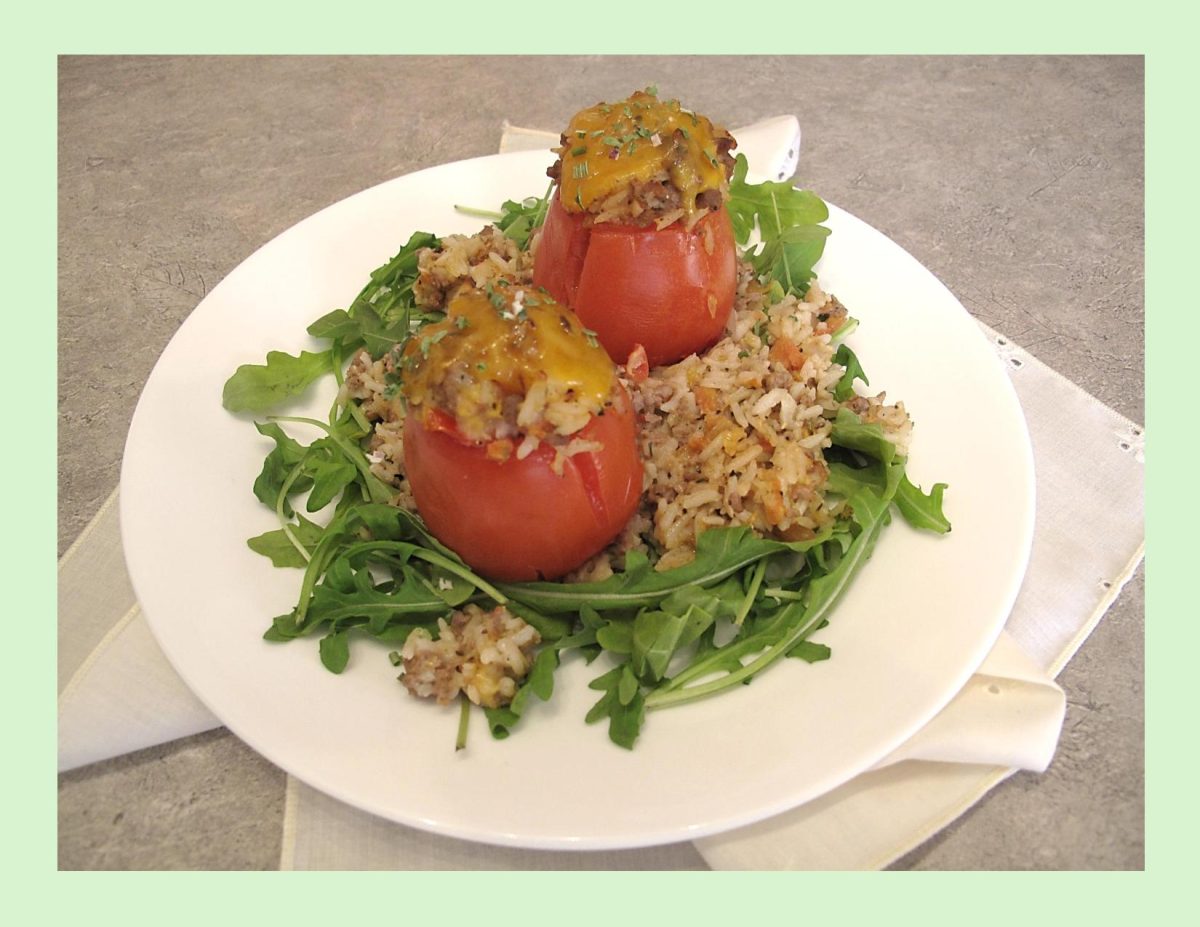
Anyone growing a vegetable garden will now be reaping the benefits of all your hard work. Have you ever stopped and thought about how many summer vegetables are fantastic for hollowing out and stuffing? Any vegetable with a fairly sturdy shape can become an edible vessel for dinner. All we need to do is scoop out the middle and fill the inside with a stuffing of our choice. A little time in the oven until everything is heated through and dinner is ready!

When my siblings and I were growing up, my mother had many unique ways of teaching us how to take responsibility. On one side of her huge farm vegetable garden, she designated a ‘strip’ each for the three of us older siblings. The strips were each about 4 feet (1.22 m) wide and the length of her garden. The deal was that we could grow whatever we choose to, but it was ours to weed and care for all summer. At the end of the season, it was fun to see who had the most success. One of my sisters absolutely loved to grow pumpkins as they grew fast and large. I can’t really remember my mother stuffing a lot of vegetables but the idea of stuffing ‘things’ always appeals to me.

It’s hard to beat a summer tomato. They’re plump and juicy and filled with sweet and savory notes. You can certainly eat tomatoes in the wintertime, but this is one of those vegetables that showcases its best aromas and flavors in the summertime.

Aside from the visual presentation of a stuffed tomato, there’s the matter of flavor. I think the real beauty of a stuffed tomato is what you put inside it. And to be honest, the sky’s the limit. Any manner of meats, cheeses, carbs, and veggies can make for  great choices. The blended flavors make for some pretty tasty meals.

Whether it’s stuffed cabbage, stuffed zucchini or these stuffed tomatoes, food just tastes better when it comes in an edible package!

Print Recipe
Stuffed Roasted Romas
Votes: 1
Rating: 5
You:
Rate this recipe!
Servings
Votes: 1
Rating: 5
You:
Rate this recipe!
Instructions
  1. In a large saucepan, heat olive oil & add ground meat, breaking up the meat with a spatula. Cook for 5-6 minutes or until meat is browned. Drain off any excess grease then add the onion, Italian seasoning & salt to the pan. Cook 3-4 minutes or until translucent. Add the garlic & cook for 30 more seconds.
  2. Preheat oven to 350 F. Lightly butter an 8-inch baking dish.
  3. Turn tomatoes blossom side down to give you a flat bottom. Trim a thin slice off the 'top'. Hollow out the insides of the tomatoes with a knife or grapefruit spoon. Chop pulp finely to be used in filling.
  4. Stir the rice, most of the cheeses (save a bit to top tomatoes with) & tomato pulp into meat mixture. Season to taste with salt & pepper.
  5. Mound the filling mixture evenly into tomato shells. Place remaining filling in the baking dish. Nestle the stuffed tomatoes into it so they will stay upright during baking time.
  6. Bake tomatoes about 15-20 minutes then top with remaining grated cheese. Bake for another couple of minutes until cheese is melted.
  7. Place a bed of arugula on serving plate & top with loose baked ground meat mixture. Place the roasted Romas on top & serve hot.

Chai Spiced Hot Cross Bread Pudding w/ Vanilla Sauce

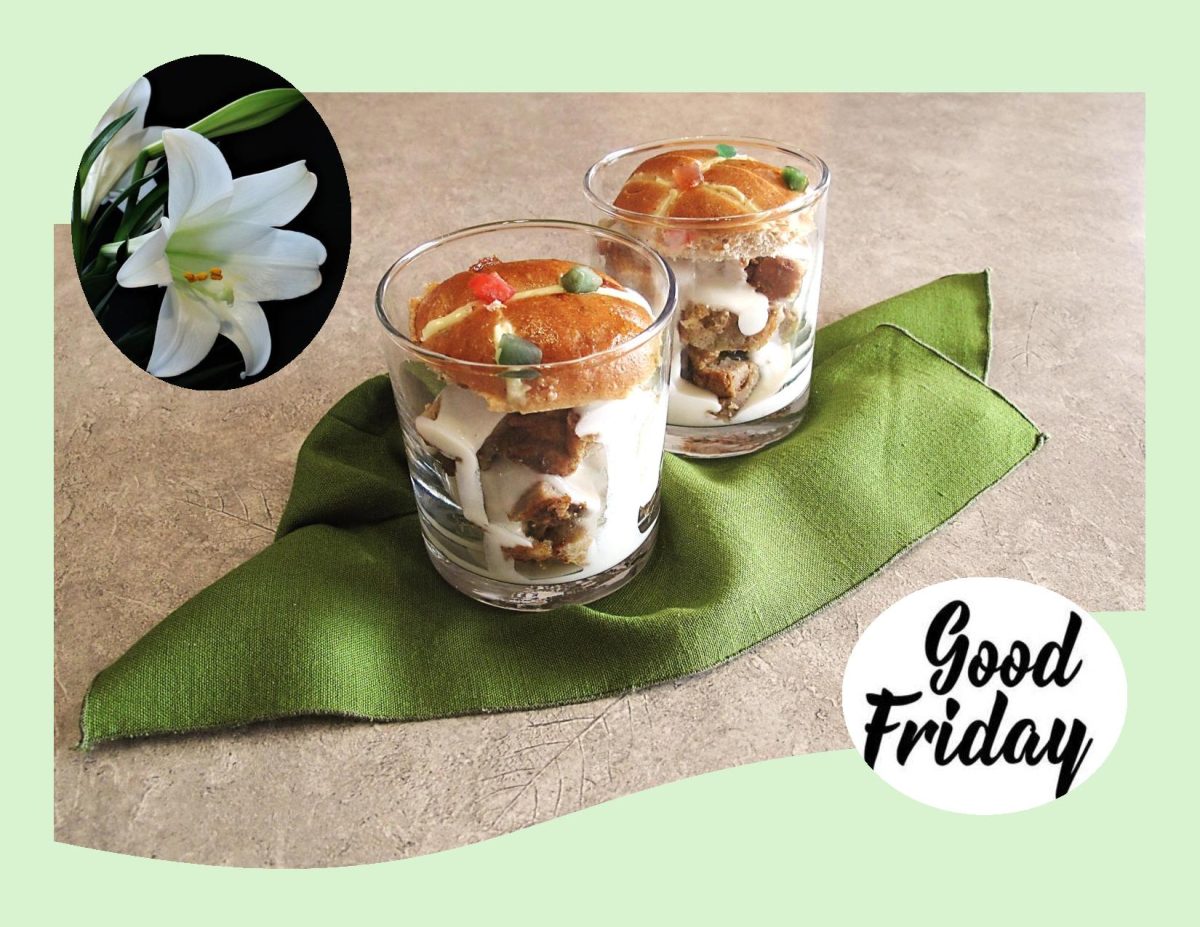
CELEBRATING GOOD FRIDAY!

Bread pudding always gives me reason to remember good things. Truly a comfort food for those of us that recall it from childhood days. It’s not that the dish was invented here — that honor likely goes to clever medieval or even ancient cooks in Europe and the Middle East who had a surplus of stale bread on their hands. The perfect embodiment of the virtues of frugality and indulgence: day old bread, too precious to waste, is bathed in a mixture of milk and eggs and made into either a sweet or savory bread pudding (with a few other additions) and baked into something sublime. What makes it special is the blend of spices mixed into it and the sauce.

The chai spice baking blend, which is sometimes overlooked, adds a distinct warm flavor and depth. It can include a number of different spices. Cardamom is the most common ingredient, followed by some mixture of cinnamon, ginger, star anise and cloves. Pepper, coriander, nutmeg and fennel are also used but they are slightly less common.

This bread pudding combines hot cross buns with spices inspired by the world’s love affair with Indian chai. The origins of hot cross buns may go back as far as the 12th century. According to the story, an Anglican monk baked the buns and marked them with a cross in honor of Good Friday. Over time they gained popularity, and eventually became a symbol of Easter weekend.

Bread pudding, when done right, should have the perfect balance of gooey goodness and chewy texture. That’s why stale bread/buns are important. The bread needs a degree of crunch otherwise you will have ‘mush pudding’. For additional flavor, the pudding is served with a vanilla sauce. Who says bread pudding has to be boring!

Print Recipe
Chai Spiced Hot Cross Bread Pudding w/ Vanilla Sauce
Votes: 1
Rating: 5
You:
Rate this recipe!
Servings
Ingredients
Bread Pudding
Vanilla Sauce
Servings
Ingredients
Bread Pudding
Vanilla Sauce
Votes: 1
Rating: 5
You:
Rate this recipe!
Instructions
Bread Pudding
  1. Place cubed hot cross buns in a greased 9 x 9-inch baking dish.
  2. In a large bowl, combine the milk, brown sugar, eggs, vanilla, spices & salt. Pour over buns, making sure that the bread is completely covered by the milk mixture.
  3. Cover & refrigerate for at least an hour or overnight.
  4. Set out the chilled bread pudding while you preheat the oven to 350 F.
  5. Bake 40 - 45 minutes, or until a knife inserted into the center of the pudding comes out clean. Remove from oven & serve with vanilla sauce.
Vanilla Sauce
  1. In a small saucepan, melt butter & add flour. Stir until mixture has a nutty aroma.
  2. Add salt, cream & sugar; stir until mixture becomes thick. Remove from heat & stir in vanilla.
  3. Spoon over servings of warm bread pudding.
Recipe Notes
  • You will notice I have only used 2 Tbsp sugar in the vanilla sauce to offset the sweetness of the pudding.

Creamy Orzo w/ Bay Scallops, Broccoli & Parmesan

Oblong and common in Mediterranean cooking, orzo has a look of rice and the texture of pasta. While orzo’s origins lie in Italy, it is now a staple in cooking across Europe, especially Greece, and the Middle East. Its use in North America can be traced to the mid-20th century or even earlier. It seems there are recipes that date back to the early 1950s like orzo pasta salad, orzo stuffed tomatoes and Betty Crocker’s Chicken Orzo Soup.

The pasta itself is made from durum semolina wheat… a particularly hard variety of wheat. It holds up perfectly during the cooking process and has a very pleasant clear flavor and chewy ‘mouthfeel’. The name is somewhat misleading though as orzo actually means barley in Italian, but there is no barley in it. Instead, the pasta derives its name from its shape, which closely resembles the grain.

Orzo has been around a long time… and stands on its own as a versatile and tasty pasta in a supporting role as a side dish, or as the star in a main dish. Because of its size, and ability to absorb flavors very well, orzo can be combined with other ingredients and become a perfect filler for things like stuffed peppers and squash.

Orzo pasta also comes colored, and flavored with vegetables. Spinach is common, but it can also be mixed with beets, carrots and other vegetables. Rainbow orzo pasta combines several different vegetables to create a highly colorful take on this wonderful, and versatile pasta.

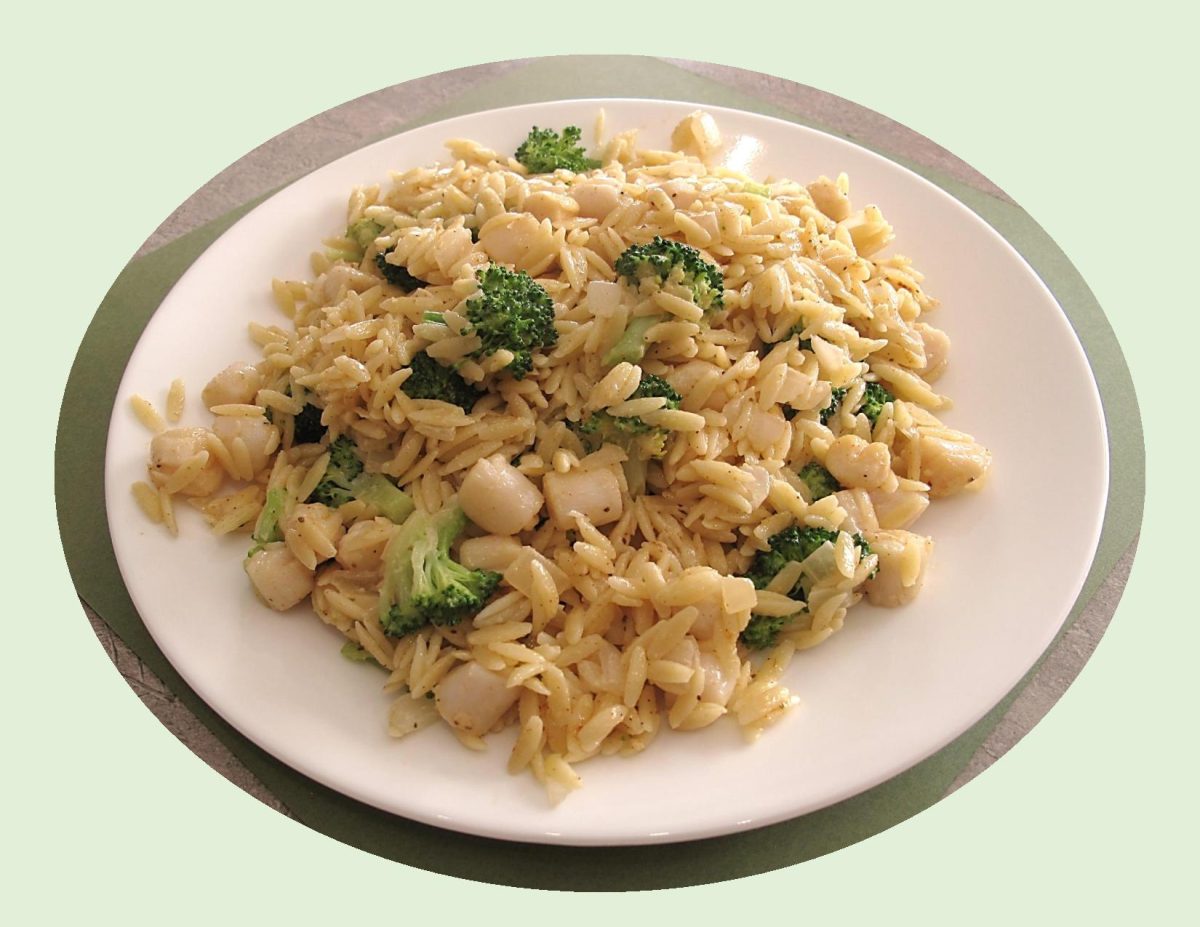
Today, I’m pairing it with bay scallops and broccoli in a nice cheesy parmesan sauce. Yum!

Print Recipe
Creamy Orzo w/ Bay Scallops, Broccoli & Parmesan
Instructions
  1. Rinse scallops & pat dry. Set aside.
  2. Melt 1 Tbsp of the butter in a large skillet over medium heat. Add the onion & sauté until soft, about 4 - 5 minutes. Remove the onions to a plate. Set aside.
  3. Add 2 Tbsp of the butter to the skillet & melt over medium heat. Add the prepared scallops & sauté for 4 - 5 minutes. Place scallops on a heated platter & cover with foil.
  4. Fill a large sauce pan of water with 4-6 quarts of water & bring to a boil. Add the orzo & stir.
  5. After the orzo has been boiling for 5 minutes, add the broccoli florets to the same pot and continue to cook for 5 additional minutes. Once the orzo & broccoli are cooked and tender, drain well and pour into a large mixing bowl.
  6. Quickly add the parmesan cheese & the final 2 Tbsp of butter to the orzo & broccoli mixture. Stir thoroughly, allowing both the cheese & butter to melt. Slowly add the cream, while stirring. Next, add the sautéed onions, scallops. Mix well. Season with salt and pepper. Garnish with parsley if you wish. Serve immediately