
Ordering a lasagna Bolognese in Italy might leave some North Americans a bit surprised by the dish placed before them. The traditional recipe layers lasagna noodles with a meaty ragù and creamy, white béchamel sauce, a very different recipe than the lasagna Bolognese served in North America where the layers of noodles alternate with tomato sauce, meat, mozzarella, and ricotta cheese.
A while back Brion and I were in an Asian Supermarket, and I became very interested in some of the desserts made with sweet red adzuki bean paste. In October (2023), I used it in some ‘Anpan Buns’ that I posted on the blog. We really enjoyed them so I wanted to explore the savory side of this bean.
Adzuki beans have a unique and distinct taste that can be described as mildly sweet and nutty with a slightly earthy undertone. The flavor is not overpowering and is often described as more delicate compared to other beans like black beans or kidney beans. The sweetness is subtle, making adzuki beans particularly suitable for both sweet and savory dishes.
In North America they often are put to savory use, mixed into salads, cooked with rice and dropped into soups. Like other beans, adzuki are a good source of protein. Unlike many other dried legumes, they don’t have to be soaked before cooking.
Getting back to today’s lasagna, I thought if I added some cooked adzuki beans to the Bolognese sauce might just make this classic dish even better.
Print Recipe
Beef & Adzuki Bean Lasagna
Votes: 1
Rating: 5
You:
Rate this recipe!
|
|
Votes: 1
Rating: 5
You:
Rate this recipe!
|
Instructions
Bolognese Sauce
Heat a large pot over medium heat. Add oil, garlic & onions. Sauté until fragrant, for a minute or two, avoid browning. Then add ground meat.
Sauté the ground meat until it is no longer pink. Add carrot & celery & sauté for about one minute.
Add the liquids – seasoned, diced tomatoes & tomato paste & cooked adzuki beans. Stir to combine. Heat it on medium high heat & let it come to a boil.
Add the rest of the seasonings – basil, oregano, beef bouillon, salt & pepper. Stir to combine. Lower heat to medium heat & let it cook for another ~10 minutes, or until sauce thickens.
Remove from heat & set aside.
Béchamel Sauce
Add butter to a medium pot & heat over medium heat. Once butter is melted (avoid browning butter), add flour to pot. Using a whisk, whisk to combine. Mixture will be slightly clumpy.
Immediately add milk into the pot and bring to medium high heat so that it comes to a boil. Whisk continuously until mixture is smooth & thickens.
Once mixture reaches desired thick consistency, add salt & pepper. Stir to combine, then remove from heat.
Assembly/Bake
-
Place a thin layer of Bolognese sauce on the bottom of a deep 9 x 13-inch baking dish.
Start layering with 2 of the rectangular lasagna sheets, then add 1/4 of the Bolognese sauce, and then 1/4 of the béchamel sauce & cheese.
Repeat 3 more times. There should be a total of four sets of lasagna sheets/Bolognese sauce/béchamel sauce & cheese layers. Sprinkle it with remaining cheese to top it off.
Place casserole dish in the oven & place a cookie sheet under the casserole dish to catch any potential drippings. Bake for 45 minutes, then (optional) broil for 2 minutes to brown the top.
Remove dish from oven and let it sit for 20 minutes before cutting into lasagna. Garnish with parsley & serve!
Recipe Notes
- This recipe will easily serve 8-10 people. With just 2 of us, I still like to make the full recipe so I can freeze the rest for future meals.
- On the other hand, the recipe can be easily halved if you wish.
- To cook the adzuki beans:
- Use a strainer to rinse the dried beans under cold water. Remove any debris, stones or deformed beans from the mix and thoroughly drain the beans afterward.
- Fill a pot with water, add the beans and bring it to a boil. After the water has started to boil, reduce the heat to a simmer, and continue cooking the beans for about 45-60 minutes. The adzuki beans will be ready once the beans are fork tender. Drain.

If you’ve never had oyster stew, you’re definitely missing out. It’s similar to clam chowder with its rich, silky, luxurious and full of briny umami flavor. If you like oysters, this is the dish for you!
Some versions are essentially just oysters and cream, but I like to add bacon, potato or even other creative additions but it is generally agreed that as soon as you add these ingredients you’ve crossed the line from oyster stew to chowder.
The star of this recipe is the smoked oysters. The smoked oysters added a smokey richness to this stew/chowder recipe that is hard to duplicate. It cooks up quickly and is hearty enough to be a main meal.
If you aren’t accustomed to eating smoked oysters, they are delicious and packed full of healthy nutrients. Oysters are a shellfish that have vitamin C, zinc, protein, iron, and selenium. (Selenium is great for keeping your brain happy!)
Serve this rich and creamy stew/chowder with some focaccia bread, traditional oyster crackers or saltine crackers. Love it!
Print Recipe
Smoked Oyster Stew w/ Bacon, Potatoes & Onions
Votes: 1
Rating: 5
You:
Rate this recipe!
|
|
Votes: 1
Rating: 5
You:
Rate this recipe!
|
Instructions
Cut up unpeeled potatoes into bite-sized cubed & boil in water with vegetable bouillon powder until tender in a small saucepan. Drain & reserve broth. Set potatoes aside.
In a saucepan, fry bacon until cooked but not crisp. Blot on paper towel. In bacon drippings, sauté onions until nearly tender then add mushrooms & garlic. Cook until mushrooms have released their moisture.
Add reserved vegetable broth, flour, half & half, Italian parsley, smoky ranchero seasoning, seafood seasoning, veg salt. Simmer until boiling. Cook until sauce thickens then add potatoes, chopped bacon & oysters. Carefully combine all ingredients, Serve with your choice of crackers or focaccia bread.

Lasagna noodles aren’t just for layering. Lasagna, the casserole, is without a doubt the most famous use for the unique lasagna pasta shape. The shape and length of lasagna noodles makes them perfect for rolling up with all manner of fillings.
When it comes to comfort food, we often think of a hearty, gooey pasta dish that will feed an army, lasagna comes to mind. The traditional lasagna you’re used to eating combines layers of tomato sauce, cheese, and meat. While the traditional portion of lasagna is wonderful, you know how filling it is. For the nights when you want to create easy, individual portions, try making some roll-ups.
The unique flat, wide shape of lasagna pasta makes an interesting canvas for culinary creations such as these chicken portobello mushroom roll-ups.
Print Recipe
Chicken Portobello Mushroom Roll-Ups
Votes: 1
Rating: 5
You:
Rate this recipe!
|
|
Votes: 1
Rating: 5
You:
Rate this recipe!
|
Instructions
Noodles
Cook noodles in boiling water & salt in a large pot for 10-12 minutes, stirring occasionally, until tender but firm. Drain. Rinse & drain well.
Chicken Mushroom Filling
Heat olive oil in a large skillet. Add chicken, onion & garlic. Scramble fry for about 7 minutes until onion is softened & chicken is no longer pink.
Add next 4 ingredients. cook, stirring often, until most of the liquid is evaporated. Sprinkle with flour. Stir; add broth & herbs. Heat & stir until boiling & thickened. Transfer to a medium bowl. Let stand for about 15 minutes until cool.
Spread 1/4 cup filling down length of each noodle. Roll up, jelly-roll style. Place rolls in a greased 8-inch pan
Parmesan Cheese Sauce
-
Stir milk into flour in a small saucepan until smooth. Heat & stir on medium for about 8 minutes until boiling & thickened. Add cheese, salt & basil paste. Stir. Pour over noodle rolls. Sprinkle shredded, smoked cheddar cheese over all.
Cover with greased foil & bake for 30 minutes. Remove foil & broil, uncovered (if you wish) for 10 minutes until bubbling & golden. Serve.

Some of you may recall Bisquick’s ‘Impossible Pie’ recipes published back in 1978. They were called ‘impossible’ because it made its own crust as it baked. There was no need to make a separate bottom crust before adding the main ingredients, and the Bisquick mix. Baking in a hot oven, this concoction magically became a glorious, thick quiche-like pie with a golden surface. Once out of the oven and cooled a bit, it sliced cleanly and released from the pan flawlessly.
The headline on their newsletter at the time read: ‘Bisquick Makes the Impossible Possible’. It wasn’t long before the number of impossible pie recipes grew to more than 100, including everything from beef, chicken/turkey, ham, sausage & bacon, fish & seafood, meatless to fruit pies. In 1997, the name was changed to ‘Impossibly Easy Pie’ in an effort to reach a new generation of cooks.
At some point in time, the original recipe was evidently removed from the Bisquick box. By the 1980s the North American diet was undergoing dramatic changes. In keeping with the low-fat diet recommendations that became so popular in the early ’80s, recipes for the heavy, rich foods we had previously favored were forgotten.
Nevertheless, quiche is supreme. This self-crusting, asparagus quiche made with gouda cheese and topped with prosciutto does not use the Bisquick mix but follows the same theory. Quick, easy & delicious!
Print Recipe
Asparagus & Prosciutto Self Crusting Quiche
Votes: 1
Rating: 5
You:
Rate this recipe!
|
|
Votes: 1
Rating: 5
You:
Rate this recipe!
|
Instructions
Preheat oven to 375 F. Butter a 9-10-inch pie plate or ceramic quiche dish. Set aside.
Use a veggie peeler to trim away the outer skin of the asparagus spears. Trim away the bottom 2-inches of each spear. Slice on the diagonal into 1-inch pieces, leaving tips intact. Set the tips aside.
Grate cheese & toss in a bowl with 1 Tbsp flour making sure to evenly coat as this will help suspend it in the custard as opposed to having it all settle to the bottom.
Whisk eggs, milk & cream together until frothy in a medium bowl. Season with thyme, salt & pepper.
Spoon 1/2 of the sliced asparagus spears all over the bottom of the dish. Scatter 1/2 of the scallion slices over asparagus. Scatter 1/3 of the cheese over all veggies. Sprinkle 1/2 tsp chili flakes over this (if using). Scatter 1/3 of prosciutto slices over the cheese.
Repeat with remaining veggies & another 1/3 of the cheese & prosciutto.
Pour the egg mixture gently over the veggies & cheese. Top with the remaining cheese & the dill.
Add the remaining prosciutto pieces & the asparagus tips over the cheese at this point as well, so that they will be slightly elevated, for presentation. You can use the extra slices of prosciutto slices to make prosciutto 'roses' for extra eye appeal by folding them in half lengthwise & rolling the up in rolls. Gently fold the edges out & down, to create the look of a rose.
Place on a baking sheet & bake for 35-40 minutes or until golden brown & set. The center can still be ever so slightly giggly, but it shouldn't be soggy soft.
Remove & allow to sit for a good 20 minutes to let the residual heat continue cooking the eggs. We enjoyed this quiche with a warm piece of focaccia bread.
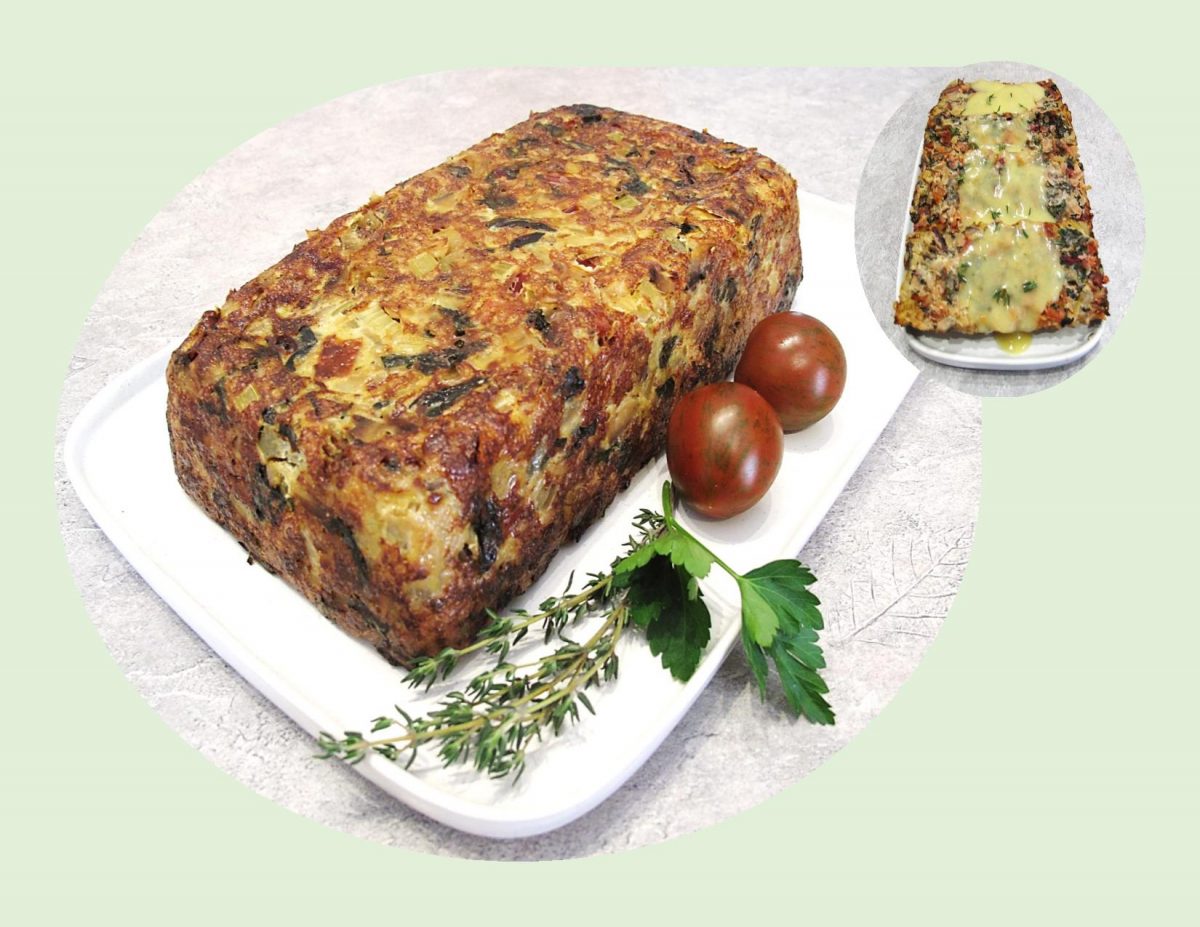
Veggie loaf, who thought of this? It seems it was one of many recommended meals during WWII to help housewives provide nutritious and varied meals while being faced with food shortages and strict rations.
The veggie loaf was meant to achieve several purposes – use leftovers (veggies & stale bread), replace meat, provide variety and use ingredients that were readily available and economical such as beans and carrots.
From what I recall, there were few vegetarian loaf recipes until the late ’60s. By the end of the 1970s, however, there was at least one veggie loaf recipe in every natural food’s cookbook. Over the years, though, vegetarian loaves gained a bad reputation. Sadly, many early recipes came out of the oven resembling bricks and were just about as appetizing. If you followed a typical recipe as it was written, you wouldn’t have to worry about not having enough food to go around. No one wanted a second helping. Times have definitely changed, with the increased interest in the vegetarian lifestyle of today.
Even though Brion & I are not vegetarians, I have always loved vegetables, so incorporating a veggie loaf into a meal with meat works for me.
Print Recipe
Mushroom, Chard & Brown Rice Loaf w/ Mustard Sauce
Votes: 1
Rating: 5
You:
Rate this recipe!
|
|
Votes: 1
Rating: 5
You:
Rate this recipe!
|
Instructions
Vegetable Loaf
In a small pot, bring 1 cup water & a pinch of salt to a boil. Add rice, lower heat to a simmer & cook rice until water has been absorbed & rice is tender. Set aside.
In a large skillet, heat olive oil over medium heat. Add onions & cook until translucent. Stir in garlic & celery; season with salt & pepper. Cook until vegetables are soft, about 5 minutes.
Add mushrooms & herbs; cook until mushrooms release their juices & the liquid evaporates, about 5 more minutes. Add chard & cook until wilted. Stir in sun dried tomatoes, then remove from heat & let cool slightly.
Preheat oven to 375 F. Generously grease a loaf pan with olive oil.
In a large bowl, whisk together eggs, mustard & broth. Add vegetable mixture & rice; stir to combine. Pour vegetable mixture into loaf pan & smooth flat with a spatula.
Bake for 40-45 minutes, until edges are nicely browned. While the vegetable loaf is baking, prepare mustard sauce.
Allow to cool slightly, then run a knife along the edges & flip onto a serving platter & slice. Serve with mustard sauce.
Mustard Sauce
In a small pot, melt butter then add flour to form a roux. Cook until bubbly & flour is lightly browned, stirring constantly. Add vegetable broth & mustard. Bring to a simmer & cook for about 5 -10 minutes. Remove from heat & serve with vegetable loaf.

All onions are not created equal so using the best onion for the job can really add a depth of flavor to your meals.
Onions are the workhorses of the kitchen and the foundation of so many billions of dishes across the globe that we forget how lovely and delicious they are all by themselves.
For most of the year, you’ll find red storage onions at the supermarket, which are pungent and spicy. In the summer months, you’ll often find fresh red onions, which are much milder, and lack a bit of the ‘onion-y’ flavor you’ll find in their yellow and white cousins.
The main difference between red onion and white onion is that red onions are a little spicy in taste while the white are comparatively sweeter and less mild.
It is a well-known fact that almost all dishes feel and taste incomplete without the presence of onion in them. Stuffed onions are an impressive side dish and a perfect complement to any main dish.
Print Recipe
Creamy Roasted Red Onions
Votes: 1
Rating: 5
You:
Rate this recipe!
|
|
Votes: 1
Rating: 5
You:
Rate this recipe!
|
Instructions
Onions
-
Peel onions, trim the root ends so they will sit upright & cut about 1/2-inch from tops. Rub onions with olive oil & season with salt. Bake for 50 minutes. Remove from oven & allow to cool slightly.
Gently remove the centers leaving a shell of about 2-3 layers. Return a slice of the center to form a bottom. Coarsely chop onion centers.
Filling
In a bowl, combine cream cheese, sour cream, salt, herbs de Provence, garlic powder, minced garlic & chopped onions. Spoon filling into onion shells.
Topping
In a small bowl, combine Panko, butter, cooked bacon & parsley. Spoon carefully over onions.
Bake for 30 minutes or until filling is heated through & bread crumbs start to brown. Serve immediately.

Timbale is derived from the French word for ‘kettledrum’, also known as timballo, can refer to either a kind of pan used for baking, or the food that is cooked inside such a pan. The crust can be sheet pastry, slices of bread, rice, even slices of vegetable.
This dish is much hardier than soufflé, and is often likened to a crustless quiche, because it is less likely to fall after being removed from the oven. A timbale is different from souffle in several ways; to begin with, the eggs are not separated, but beaten together. Timbale also incorporates breadcrumbs for body, and frequently uses milk rather than cream. It is made with a variety of cheeses.
Common ingredients in timbale include ham or other meats, along with vegetables. It can make a hearty meal or an excellent accompanying side dish, and is also delicious when served cold. Timbale is usually cooked in a tray of water, because the steam helps the custard to set.
Timbale dishes are made from a variety of materials, including enameled metal and ceramic. They are designed to be partially submerged in water during cooking, and are usually capable of standing up to extreme temperatures, since they are used in the oven. They come in a wide variety of shapes, although round dishes are most common. Timbale is often prepared in individual ramekins. Most are attractive enough to be brought directly to the table for service, although many timbales are unmolded and plated so that they can be dressed with a creamy sauce.
For our timbale, I decided to make it without eggs & make a nice cheesy sauce instead. To make it a full meal deal, I added some ground pork but stayed with the original concept of layering everything. It not only tastes great but makes a nice plate presentation.
Print Recipe
Timbale of Zucchini & Sausage
Votes: 1
Rating: 5
You:
Rate this recipe!
|
|
Votes: 1
Rating: 5
You:
Rate this recipe!
|
Instructions
Béchamel Sauce
Heat oil in a saucepan over medium heat. Sauté garlic & mushrooms for 2 minutes. Add flour & cook 1 minute, stirring to combine. Remove from heat & gradually add the milk, stirring constantly, then return to the heat & cook, stirring until thickened.
Add Italian seasoning, salt, pepper, Dijon mustard & 3/4 cup of the combined parmesan & smoked cheddar cheese (reserving 1/4 cup), stirring until the cheese melts. Remove from the heat & stir in the parsley.
Sausage & Veggies
In a saucepan, scramble fry ground pork until cooked. Drain on paper towels. Sauté mushrooms until moisture evaporates.
Slice zucchini thinly & lay on paper towel. Sprinkle with salt to help draw the moisture out; pat dry. Slice potato thinly, leaving skin on.
Preheat oven to 400 F. Line 2 – 5-inch round pans with removable bottoms with foil paper to prevent leaking.
DIVIDE veggies, sausage & sauce BETWEEN THE 2 BAKING PANS. In the bottom of each pan place a layer of potato slices, overlapping slightly. Next layer some leeks & mushrooms, top with a bit of sauce then layer sausage (sprinkle sausage with smoked paprika) & zucchini. Spoon a bit more sauce over all & repeat with a second layer.
Cover with foil & bake for 45 minutes, then remove the foil & bake for a further 5-10 minutes. Sprinkle with reserved 1/4 cup grated cheese. Allow the timbale to stand 10 minutes before serving. Serve with remaining 1/4 of sauce on the side.
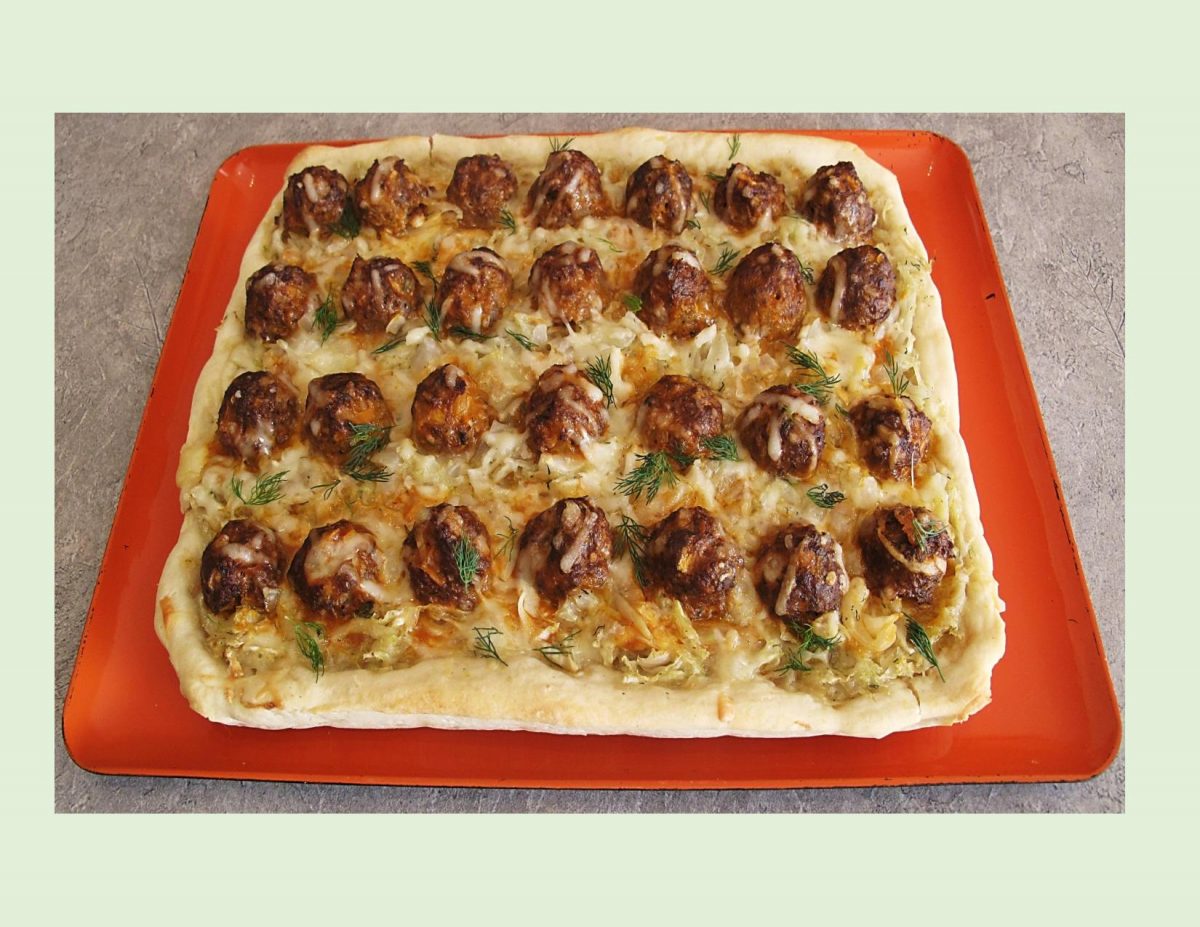
Don’t think for a moment that cabbage doesn’t belong on pizza — it definitely does. When the days grow shorter, we start to crave heartier meals. Cabbage is good … meatballs are good … cabbage/meatball pizza is double good! Here’s a new spin on the classic pizza – topping a pizza crust base with meatballs, cabbage, spices & cheese.
People have been piling ‘stuff’ on dough, and then heating it up, for thousands of years. That includes the Chinese, who some believe gave Marco Polo scallion pancakes, leading to the theory that he introduced pizza to Italy.
Others point to the ancient Greeks, who covered their flatbreads with herbs, oil, and cheese. But no matter who is responsible for pizza, there is no denying that it has serious global appeal.
Cabbage is an unsung kitchen hero. It’s actually one of the most versatile veggies in your arsenal. If you’re just reserving it for slaws and salads, it’s time to broaden your horizons and discover some of the amazingly delicious things a simple head of cabbage can do.
While the dough is pretty critical, the toppings are just as important to get right. Specific toppings will come down to personal preference.
The duo of sautéed cabbage & meatballs makes for a hearty, satisfying topping perfectly suited for crisp autumn weather.
Print Recipe
Pizza w/ Cabbage & Meatballs
Votes: 1
Rating: 5
You:
Rate this recipe!
|
|
Votes: 1
Rating: 5
You:
Rate this recipe!
|
Instructions
Pizza Crust
Cook potato, peel & mash. In a bowl, combine yeast with lukewarm water. Allow to stand for about 3 minutes until foamy; add butter, salt, sour cream & potato & mix well. Stir in flour, one cup at a time. When dough is completely blended, turn onto a lightly floured work surface. Knead dough about 10 minutes, until smooth & elastic. Place dough in a greased bowl, cover with plastic wrap & allow to rise in a warm draft free place until doubled in bulk, about 1 hour.
Cabbage
In a large pot, place thinly sliced cabbage, water, sugar & salt. Cover & simmer for a few minutes until cabbage is soft & has reduced in volume. Place cabbage in a dish. Melt butter & oil in pot then add flour & cumin to make a roux. Cook for 1-2 minutes, stirring so that there are no lumps as it thickens. Add cabbage to roux & cook for a couple of minutes. Remove from stove & stir in fresh dill & chives; set aside.
Meatballs
-
In a bowl, combine all meatball ingredients & mix well. Form into 28 balls & place on foil lined baking sheet that has been lightly greased. Bake for about 10-15 minutes, until JUST cooked. do not OVERBAKE as they will bake some more when they are on the pizza.
Assembly
Line a 9 x 11-inch baking pan with parchment paper. Press out pizza dough over the bottom & up the sides of the pan. Sprinkle a bit of the smoked cheese on the crust, then place a layer of half the cabbage mixture & lightly drizzle with a small amount of tomato soup (sauce). Repeat again with cheese, cabbage & sauce. Roll cooked meatballs in remaining tomato sauce. Place meatballs, in rows on top, then sprinkle with remaining cheese.
Bake for 40 minutes or until crust is golden. Garnish with fresh dill, slice & serve.

Whether broiled, fried, baked or pan-seared, fresh, wild-caught scallops are an excellent stand-alone dish or will compliment a salad or pasta with their sweet flavor and delicate texture.
Sea scallops are widely known for their iconic, beautiful shape …. a fan-like shell with fluted grooves. Different varieties are found in oceans all over the world and come in many sizes. For commercial purposes they are labeled similar to shrimp. A number is used to designate how many scallops of a given size it would take to constitute a pound. The label 20/30 means it would take 20/30 scallops to make up a pound and labels like U10 means it would take less than (‘under’) 10 to make a pound.
Scallops are bivalve mollusks (meaning having 2 shells- usually united by a hinge) that have a reddish-pink, upper shell and white or cream colored, lower shell.
Brion & I love seafood so this meal definitely works for us.
Print Recipe
Parmesan Baked Scallops over Egg Noodles
Votes: 2
Rating: 4.5
You:
Rate this recipe!
|
|
Votes: 2
Rating: 4.5
You:
Rate this recipe!
|
Instructions
Gouda Sauce
In a saucepan, melt butter; whisk in flour & cook, stirring until frothy. Add milk, whisking until sauce comes to a boil & starts to thicken. Add cheese & spices & continue to cook a few more minutes, stirring constantly. Remove from heat; set aside.
Parmesan Scallops
-
In a 9-inch square baking dish, melt butter & toss scallops in it. In a bowl, combine next 5 ingredients & sprinkle over scallops. Gently stir to spread them out in one layer. Bake about 15-20 minutes.
Egg Noodles
In a pot of salted, boiling water cook egg noodles until al dente. Drain. Reheat sauce & combine with pasta. Divide between two serving plates & top each with baked scallops.


