Chocolate Rhubarb Brownies

While I’ll never grow tired of the classic pairing of strawberries and rhubarb, I love rhubarb too much to let it simply be a sidekick to those sweet berries. Not only can it hold its own, but it also begs to be matched up with many other flavors that give it new life.

Eating seasonally doesn’t have to be difficult when it tastes so delicious. Finding inventive ways to incorporate locally grown, seasonal fruits and vegetables into breakfast, lunch, and dinner dishes is actually a very easy task.

When making desserts, chocolate and rhubarb bring very different flavors to the table. The result makes a perfect balance. High-cacao chocolate is rich, subtly sweet, and creamy. Fresh rhubarb, meanwhile, is tart and comes into its own when offset by a dash of sweetness.

Celebrate rhubarb season with a stellar dessert like fudgy rhubarb brownies.

Print Recipe
Chocolate Rhubarb Brownies
Votes: 1
Rating: 5
You:
Rate this recipe!
Servings
Ingredients
Servings
Ingredients
Votes: 1
Rating: 5
You:
Rate this recipe!
Instructions
  1. Preheat oven to 375 F. Line an 8 x 8-inch baking pan with parchment paper.
  2. In a medium-sized bowl, whisk sugar, butter, eggs & vanilla.
  3. In a large bowl, whisk flour, cocoa powder, baking powder & sea salt.
  4. Stir the wet ingredients into the dry ingredients & mix until they are just incorporated. Add the rhubarb, chocolate chips & nuts. Mix only until they are combined. The batter will be quite thick. Pour batter into baking pan & spread it out so that it is even.
  5. Bake for 20-25 minutes or just until a toothpick inserted into the middle comes out clean. DO NOT OVERBAKE.
  6. Remove brownies from the oven & allow to cool for at least 10 minutes. Slice into squares.

Roasted Fruit Tart w/ Cinnamon Crust

Since stone fruit is so gorgeous when in season, why not make a fruit tart? Not just an ordinary fruit tart, but one bursting with an array of colorful fruit and roasted to bring out all the natural sweetness.

I like this tart in the fall made with apples, but since we can enjoy the seasons stone fruit bounty right now, let’s take advantage of it. When we were shopping for fruit, we came across some apricots called raspberry apricots. Their flavor is absolutely incredible. Of course the plum/apricot cross (pluots) is pretty special as well. I decided on a nice cinnamon-y pastry to highlight all these wonderful fruit flavors!

 Roasting stone fruits concentrates their sweetness and flavor, creating a depth of taste unrivaled by a regular fruit salad.
The cornstarch in the filling acts as a thickener to prevent the fruit juices from making the base soggy while it bakes. And the open-faced top exposes the fruit to the oven’s heat, allowing it to caramelize and concentrate its flavor. What’s not to love!

Print Recipe
Roasted Fruit Tart w/ Cinnamon Crust
Votes: 1
Rating: 5
You:
Rate this recipe!
Servings
Ingredients
Cinnamon Crust
Filling
Servings
Ingredients
Cinnamon Crust
Filling
Votes: 1
Rating: 5
You:
Rate this recipe!
Instructions
Crust
  1. In a bowl, combine flour, sugar, cinnamon & salt. Cut in butter with a fork or finger tips to form a crumbly mixture. Drizzle in beaten egg & combine until mixture just begins to come together. Lightly press mixture into the bottom & up the sides of a 14 x 4 x 1-inch tart pan. Chill until firm while you prepare the filling.
Filling
  1. Toss prepared fruit with sugar, cornstarch, lemon zest & juice, vanilla & salt.
Assembly
  1. Preheat oven to 400 F.
  2. Arrange fruit mixture over pastry in pan. Press down slightly into pan.
  3. Bake until the fruit is soft & cooked through, the fruit juices are bubbling & the crust is a golden brown about 40-50 minutes. Remove from oven & allow to cool for about 20-30 minutes.

Spiced Upside Down Peach Crisp

Fruit crisp is a classic dessert that has been around for centuries. The first known recipe was published in an 1828 cookbook. The recipe used frozen fruit instead of fresh and while fresh fruit is often used in baking, frozen fruit is a great alternative. 

Fresh fruit always has such appeal. It brightens the fridge and counter with cheery colors and sweet scents. Frozen fruit allows for some flexibility by extending a typically short shelf life. Both have their place in the kitchen.

 Frozen fruit may not have the same crispness or texture as it’s fresh counterpart but there are some great benefits to using it.

  • It’s available all year round
  • You can use it straight from the freezer
  • Convenience – it’s already washed and ready to go
  • Frozen fruit is generally quick-frozen at its peak and as soon as it’s picked

This peach crisp is amazing! The frozen peaches are enhanced with fresh lemon juice and flavorings and the spiced oatmeal topping has toasted pecans to add a little crunch. Yum!

Print Recipe
Spiced Upside Down Peach Crisp
Votes: 1
Rating: 5
You:
Rate this recipe!
Course dessert
Cuisine American
Servings
Ingredients
Crisp Topping
Spiced Cream Topping
Course dessert
Cuisine American
Servings
Ingredients
Crisp Topping
Spiced Cream Topping
Votes: 1
Rating: 5
You:
Rate this recipe!
Instructions
Fruit
  1. Preheat oven to 350 F. Line & lightly grease a 9-inch spring form baking pan with foil.
  2. In a large bowl, combine thawed & drained peaches, lemon juice, sugar, cornstarch, vanilla, almond extract & salt. Set aside.
Crisp Topping
  1. In a large bowl, whisk together brown sugar, flour, oats, pecans & spices. Add butter & mix with a wooden spoon until topping is crumbly.
Assembly
  1. Into prepared baking dish pour peach mixture. Sprinkle the crisp topping evenly over the peaches. Bake for 40 - 45 minutes or until top is golden brown. Remove from oven & allow to cool. When cool enough to handle, remove outside ring from pan then flip crisp over on a serving plate & slice.
Spiced Cream Topping
  1. Add heavy cream to a chilled bowl & beat until stiff peaks are just about to form. Beat in vanilla, sugar & spices until peaks form.
  2. Serve crisp with spiced cream topping or vanilla ice cream if you would rather.
Recipe Notes
  • Since there are just two of us, I made only half of the recipe, that's why mine is quite thin in the picture. Still gave us 10 pieces!
  • I baked it long enough to really caramelize the peaches. Yum!

French Toast Board

HAPPY MOTHER’S DAY!

Today as we celebrate Mother’s Day, many special memories come to mind. My mother passed away in 1978 but even after 44 years, time has changed nothing. I still miss the sound of her voice, the wisdom in her advice, the stories of her life and just being in her presence. I miss her today as much as the day she left us. At the time of her passing a friend said to me, ‘your mother is always with you’. At the time, I didn’t quite understand what she had meant but as the years have passed it has become clear to me.

We are fortunate to still have Brion’s mother, Dolores, in reasonable health. It is with loving thoughts we celebrate her today for her loving and kind ways.

On this Mother’s Day, I would also like to acknowledge my sisters Marilyn & Rita, who give so much of themselves to be the great mom’s they are.

French toast breakfast board for Mother’s Day is the perfect way to celebrate mom this year. Brunch boards make a beautiful display of food while inviting guests to casually graze at their leisure.

Breakfast boards are a lot like charcuterie boards: they include a variety of different tastes, textures, and flavors from a simple brunch menu. The variety and options are endless and there’s something for everyone to enjoy from it.

French toast is so simple to make and must be one of the most comforting breakfast carbs with its crispy, golden exterior and creamy, fluffy interior. Overnight French toast is a recipe that is simple and indulgent. When you make it the day before, the morning meal is tasty and effortless! Just bake it in the oven on Mother’s Day morning to complete your French toast board. Thanks to a long overnight soak in a heavy cream-infused custard, which transforms the sliced challah into a pudding-y delight. A French toast board usually consists of:

*French toast- thick slice bread such as challah, brioche or French

*French toast toppings – such as candied pecans, powdered sugar, maple syrup, chocolate chips and cinnamon/sugar mixture.
*Fruit – 
strawberries, blueberries, caramelized or natural bananas, kiwi, blood oranges for extra color or any personal choices you have.
*Butter –
always a staple.
*Something savory –
bacon, sausage, hashbrowns and/or scrambled eggs.

Print Recipe
Overnight French Toast
Votes: 1
Rating: 5
You:
Rate this recipe!
Course Brunch
Cuisine American
Servings
Votes: 1
Rating: 5
You:
Rate this recipe!
Instructions
Night Before
  1. Slice bread into 1" thick slices & let dry on the counter for a couple of hours (or place in a 300°F oven for 10 minutes using caution not to brown the bread).
  2. Place melted butter, brown sugar, & cinnamon on a large rimmed baking sheet about 17" x 12". Mix well and spread on the bottom of the pan.
  3. Arrange bread in the pan over the brown sugar mixture.
  4. Combine eggs, milk, vanilla & maple/rum extract.
  5. Gently pour half of the egg mixture over the bread ensuring all of the bread is soaked. Flip the bread & pour the remaining egg mixture over top.
  6. Sprinkle with chopped nuts (if using) & 1 teaspoon of cinnamon. Cover the pan with plastic wrap & refrigerate overnight.
In the Morning
  1. Remove the pan from the refrigerator and let it sit on the counter for 20 minutes
  2. Preheat the oven to 350°F.
  3. Bake for 30 minutes until a GOLDEN brown.
  4. Serve with butter & other items on your French Toast Board.

Pumpkin Angel Food Mini Bundt Cakes

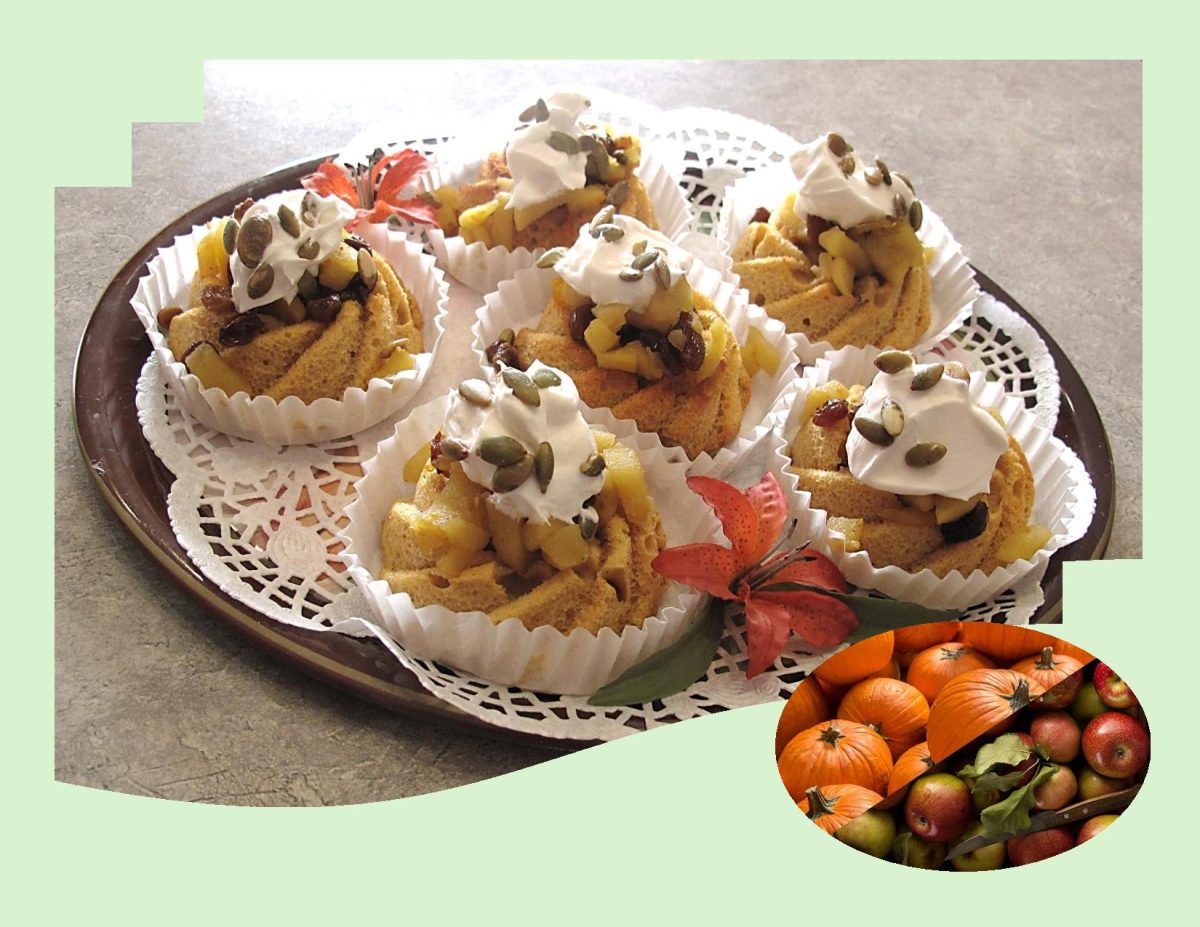
Pumpkin angel food?! That’s probably not what you’d expect when you think of angel food cake or pumpkin, but this recipe is actually a very tasty combo. 

Of course, pumpkin-based desserts are a traditional fall dessert, so I am sure that you will be surprised that I am posting this pumpkin angel food cake recipe in April. It seems I have some pumpkin puree that’s in the freezer just waiting to be used before we get too far into the spring and summer season.

Brion has always loved angel food, so I thought why not add the pumpkin puree to kick it up a notch. Pairing it with the right fruits can also enhance its flavors. Instead of frosting or a whipped topping I am making some caramelized apples and raisins spiced with anise and cardamom.

  • Anise has a distinct licorice-like flavor. It adds depth and enhances the overall aromatic profile of the compote.
  • Cardamom is a fragrant spice with citrusy and herbal notes. It adds warmth and sophistication and complements pumpkin beautifully.

For a cake that’s quite sweet, some salted pepita seeds sprinkled on top are a bit of necessary and delicious balance.

Simply put, it’s an easy cake mix recipe dressed up with warm spices and pumpkin purée served with caramelized apples, raisins and salted pepita seeds. Yum!

Print Recipe
Pumpkin Angel Food Mini Bundt Cakes
Votes: 1
Rating: 5
You:
Rate this recipe!
Servings
MINI BUNDT CAKES
Ingredients
Pumpkin Angel Food Mini Bundt Cakes
Caramelized Apples & Raisins
Servings
MINI BUNDT CAKES
Ingredients
Pumpkin Angel Food Mini Bundt Cakes
Caramelized Apples & Raisins
Votes: 1
Rating: 5
You:
Rate this recipe!
Instructions
Cake
  1. Preheat oven to 350 F.
  2. In a large mixing bowl combine everything except the Angel Food Cake mix and ingredients to prepare cake. Mix until combined. Set aside.
  3. In a different bowl combine the Angel Food Cake mix and ingredients required to make the cake. Carefully fold in 1/4 of the batter into the pumpkin mixture. Then gently fold in the rest of the batter.
  4. Carefully pour or spoon into an 24 ungreased mini bunt cake pans. Place pans in oven on the middle rack.
  5. Bake for 15 -20 minutes or until cake is golden brown and springs back. Immediately invert pans onto a wire rack.
  6. Cool for 10 minutes.
  7. Serve with caramelized apples & raisins & a dollop of whipped topping. Sprinkle with salted pepita seeds.
Apples & Raisin Compote
  1. In a medium saucepan, melt butter then add water & sugar. When the caramel is golden brown, add the raisins, swirling them into the caramel.
  2. When raisins begin to plump, add apples & orange zest, then sprinkle with spices. Lower heat & simmer 5-10 minutes to thicken.
  3. Do not overcook compote as it will thicken when cooled.

Banana Cream Pie Cookie Cups

It’s hard to pin down the origin of banana cream pie, but it seems adding bananas to the pie happened around the end of the 19th century, when bananas went from exotic to commonplace. Until then, most North Americans have never seen, never mind eaten, a banana.

The turning point in the banana business came with technological advances in transportation and refrigeration. Steamships and railroad cars brought the fruit to market faster, and refrigeration slowed the ripening process. The combination was a bonanza for the industry.

One of the earliest known published recipes for banana cream pie called for sliced bananas and powdered sugar placed in a pre-baked pie shell. The ‘Woman’s Exchange Cook Book’ from 1901 advises cooks to then put the filled pie in the oven for a few minutes and then remove it once the bananas have been softened. After the pie is removed from the oven, the cookbook instructs the cook to cover the filling with whipped cream and to flavor it with lemon juice.

A recipe published just five years later in ‘The Blue-Ribbon Cookbook’ provided a banana and custard filling, but the two were not blended together into today’s familiar, creamy banana filling. Instead, sliced bananas lined the bottom of the crust, and the custard was poured over it. By 1950 we get a version covered with whipped cream and toasted coconut.

An old fashioned dessert , but one of the most comforting treats, banana cream pie offers a rich, sweet and velvety filling. If you like bananas like I do, it’s one of those desserts where you put a spoonful in your mouth and can’t help but lean back and close your eyes as you savor the buttery crust and creamy filling.

Print Recipe
Banana Cream Pie Cookie Cups
Votes: 1
Rating: 5
You:
Rate this recipe!
Servings
Ingredients
Banana Cream Mousse Filling
Servings
Ingredients
Banana Cream Mousse Filling
Votes: 1
Rating: 5
You:
Rate this recipe!
Instructions
Base
  1. Preheat oven to 350° F. Line 12 muffin tins with paper cups.
  2. Use a food processor to grind gingersnap cookies into a fine crumb. Melt butter in a microwave-safe bowl until melted. Combine melted butter with cookie crumbs and stir until there are no dry crumbs left. Divide ginger snap crumbs between the 12 muffin cups. Press down with a spoon or tart shaper.
Banana Cream Mousse Filling
  1. While the cookie cups are cooling, prepare the banana cream mousse filling. Whisk together the box of dry pudding mix and the milk. Add in the whipped topping and stir GENTLY until combined. Transfer to a pastry bag or a zip lock bag and store in the fridge until the cookies are fully cool.
  2. Take cookie cups out of muffin tin. Pipe banana cream mousse into each cup and top with a slice of banana. Sprinkle with a small amount of gingersnap cookie crumbles.
  3. Store in the refrigerator.

Adzuki Sweet Red Bean Scones

I have made all sorts of scones in my life. On the blog I have posted at least twenty different kinds using various fruits, flours and spices. Just recently, I became interested in the sweetened adzuki red bean paste.

Red bean paste, also known as ‘Anko’ in Japanese, is a popular ingredient used in many traditional Asian dishes. It is made from adzuki red beans that have been boiled, mashed, and sweetened with sugar and smoothed by oil, butter or shortening. The texture of red bean paste can range from thick and smooth to slightly chunky. Commercial ready-to-use red bean paste is available in most Asian stores and is super convenient. If you have the time and prefer to make your own, look for canned, ready-to-eat adzuki beans which allow you to skip the lengthy process of cooking the beans and go straight to the last step of mashing the paste. A wonderful time saver.

There are two most common types of red bean paste:

  • Tsubuan – the paste has a chunky texture with bean shapes still intact.
  • Koshian – the paste has a fine, smooth texture.

With my scones today, I divided the scone batter in half, topped it with red bean paste then added the rest of the batter creating a ‘sandwich’ look. It’s the perfect blend of a classic North American pastry and the most popular Korean red bean filling.

Print Recipe
Adzuki Sweet Red Bean Scones
Votes: 1
Rating: 5
You:
Rate this recipe!
Course dessert
Cuisine Asia
Servings
Ingredients
Course dessert
Cuisine Asia
Servings
Ingredients
Votes: 1
Rating: 5
You:
Rate this recipe!
Instructions
  1. Preheat oven to 375 F. Line an 8-inch round pan with parchment paper.
  2. In a large bowl, combine sugar, flour, ginger, baking powder & salt.
  3. Cut in cold butter with a pastry cutter until the dough resembles coarse crumbs. Set aside.
  4. Whisk together eggs, sour cream & vanilla. Mix the wet ingredients with the dry ingredients, mixing until just combined.
  5. Spoon half of the dough into prepared baking pan. With a fork slightly pat evenly over pan. Top with spoonful's of red bean paste then distribute it evenly over dough. Place the remaining dough on top of beans & distribute evenly. Sprinkle with black sesame seeds.
  6. Bake for 25 -30 minutes or until golden & tests done with a wooden pick. Remove from oven & cool on a wire rack. Slice in wedges & serve.

Fudgy Valentine Brownie Cake

HAPPY VALENTINES DAY!

It seems one of the most common symbols associated with Valentine’s Day are heart shapes, used to decorate cards, gift boxes, wrapping paper, cakes, cookies, candies, etc. etc.

Chocolate not only adds a touch of decadence but is one of the quintessential Valentine treats. This little chocolate fudge cake is kind of reminiscent of the ‘hot fudge pudding cakes’ from the 1960’s.  Easy to make, you don’t need any special equipment, just a bowl, a whisk and a few simple ingredients. The big thing is it tastes like pure unadulterated fudge.

Brion & I have never felt the need to give gifts on ‘occasions’ but rather just a card with a loving and sincere verse. As we grow older, it becomes clearer every day, the special privilege is to simply have each other to share life with. This year my valentine card for Brion is this edible chocolate heart. The bonus is I’ll get to share it with him!

Print Recipe
Fudgy Valentine Brownie Cake
Votes: 1
Rating: 5
You:
Rate this recipe!
Servings
Servings
Votes: 1
Rating: 5
You:
Rate this recipe!
Instructions
  1. Preheat oven to 350 F.
  2. In a pot, melt butter over medium heat. Remove from heat & whisk in sugar. Add eggs & vanilla; whisk well.
  3. Add flour, cocoa powder & salt; whisk just until combined. Fold in chocolate chips & nuts (or seeds).
  4. Bake about 18 minutes. For a real fudgy texture, slightly UNDER BAKE it. This makes it sooo.. good!
  5. Write your valentine greeting on when cooled & give to your special someone.

Sour Cream Rice Pancakes

ENJOYING SHROVE TUESDAY!

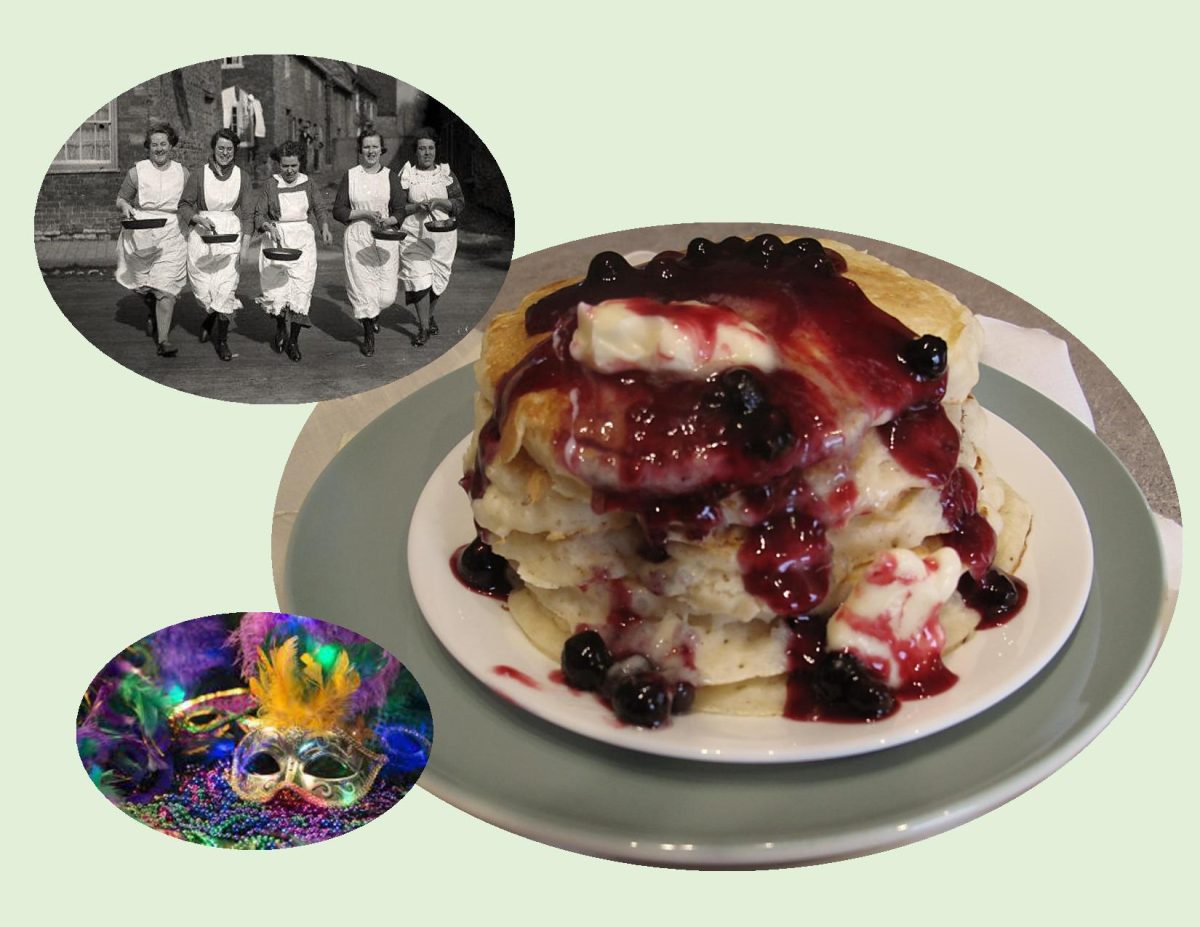
Whether you call it Shrove Tuesday, Mardi Gras, or Pancake Day, Tuesday is the day of feasting and celebration before 40 days of fasting known as Lent. Celebrated by Anglo-Saxon Christians, participants would attend confession in order to be ‘shriven’ (forgiven for their sins). A bell rang to call everyone to church. This bell came to be known as the Pancake Bell and is still rung today.

Shrove Tuesday was the last day to use up eggs, sugar and fats before the fast, and making pancakes was the perfect way to do it! The ingredients of pancakes also symbolize four pillars of the Christian Faith. Flour for sustenance, eggs for creation, salt for wholesomeness, and milk for purity.

While other countries celebrate Shrove Tuesday, or Mardi Gras, with extravagant and exotic parades, in England, people race around towns and villages wielding frying pans that hold pancakes. The tradition was created in 1445 when a woman of Olney, Buckinghamshire was making pancakes when she heard the bell summoning her to church. In a rush to get to church, she ran, still in her apron and holding her frying pan. The Olney Pancake Race is now the most popular pancake race in the world. Participants must be local housewives and they must wear an apron. The goal of the race is to run while carrying a frying pan with a cooked pancake inside flipping it as you run. In order to win, the woman must successfully toss the pancake three times throughout the race, reach the church and serve the pancake to the bell ringer. Hundreds of people gather every year to participate in this fun tradition!

Mardi Gras, which translates to Fat Tuesday in French, is largely celebrated in the city of New Orleans, Louisiana. Parades, parties, and feasts dazzled in colors of green, gold, and purple fill the city for two weeks leading up to Fat Tuesday.

Personally, I have always liked pancakes, so in keeping with the Shrove Tuesday tradition Brion & I will be enjoying some today. Although I can’t quite picture myself running in a pancake race, I’m making some sour cream rice pancakes … if you like rice pudding as well as pancakes, these are for you!

Print Recipe
Sour Cream Rice Pancakes
Votes: 1
Rating: 5
You:
Rate this recipe!
Course Main Dish
Cuisine American
Servings
Ingredients
Pancakes
Blueberry Sauce
Course Main Dish
Cuisine American
Servings
Ingredients
Pancakes
Blueberry Sauce
Votes: 1
Rating: 5
You:
Rate this recipe!
Instructions
Pancakes
  1. In a large bowl, whisk together eggs, sugar, milk, sour cream, butter & vanilla.
  2. In a separate bowl, combine flour, cooked rice, baking powder, baking soda & salt.
  3. Add the flour mixture to the liquid mixture & whisk together. Let batter sit for 15 minutes.
  4. Heat a nonstick griddle to medium-low heat. Spray with oil. Using a 1/4 cup measure, portion out batter on griddle. Cook for about 2 minutes per side.
  5. Serve immediately garnished with blueberry sauce or your choice of topping.
Blueberry Sauce
  1. In a small saucepan, combine cornstarch, sugar & salt. Add water & blueberries & cook until 'clear' & bubbling. Remove from heat & stir in butter & lemon juice. Serve warm over pancakes.

Cranberry-Raspberry Tartlets

So many of our berries can be used to make excellent dessert sauces as their naturally tart flavor pairs so well with rich sweet desserts. Cranberry-raspberry sauce is one such sauce. It is made with a combination of whole cranberry sauce and fresh or frozen raspberries, along with a bit of sugar and a little lemon or orange zest. Everything is cooked over medium low heat until the sauce thickens with the end result being a glistening red sauce with a sweet and tangy flavor that is especially nice atop these mini cheesecake tarts. It can also be used as a filling for cakes or trifles, or for a quick dessert, it can be poured over a bowl of vanilla ice cream.

Tarts are the epitome of elegance in the world of desserts. They showcase a perfect harmony of flavors, with their flaky or crispy crust and luscious fillings. But one key factor in achieving the ultimate tart is having a crisp, clean edge on the tart shell, which not only elevates the appearance but also enhances the texture. A well-defined edge results in a satisfying contrast between the tender, flaky layers, and the smooth filling.

Since the Christmas season is upon us, I thought of using some ‘tart rings’ to give these little tarts more of an upscale look. Using rings instead of tart pans makes for such a clean look. Being perforated allows for the ring to heat up quicker (along with it being very thin), which allows for better baking. This also allows steam to escape from the crust, which keeps your crust nice and crispy.

Baking is a passion for many because of the immersion between art and science. For me, I’m always in pursuit of another way to make an old idea new again or as they say, ‘the same only different’.

Print Recipe
Cranberry-Raspberry Tartlets
Votes: 1
Rating: 5
You:
Rate this recipe!
Servings
TARTLETS
Ingredients
Pastry
Cheesecake Filling
Servings
TARTLETS
Ingredients
Pastry
Cheesecake Filling
Votes: 1
Rating: 5
You:
Rate this recipe!
Instructions
Pastry
  1. Combine the flour, powdered sugar, cornstarch, salt, & vanilla in a large bowl. Add the butter and mix with your hands until the butter is broken down into pieces the size of peas and the ingredients are well combined. Add the egg and mix with a spatula until the dough is smooth and the egg is fully incorporated. Don’t overmix.
  2. Turn the dough out onto a large piece of plastic wrap and gently shape it into a ball. Wrap the dough in the plastic wrap and flatten it into a disc. Refrigerate for at least 30 minutes or overnight, until cold but still pliable. It should have the texture of clay.
  3. When the dough has chilled, unwrap the dough and place it on a silicone baking mat on your work surface. Roll it out into a rectangle about 1⁄8 inch thick, using a second silicone sheet on top. The silicone mat makes it easier to lift the rolled-out dough onto the sheet pan later. Make sure to work quickly so the dough doesn’t get too warm.
  4. Place the silicone mat with the dough on a baking sheet.
  5. Using the tart rings, cut out 18 circles of dough. Remove the rest of the dough from around the rings.
  6. Reroll remaining dough between 2 sheets of parchment. Using a sharp knife, slice strips about 10 inches long & 1- inch thick. These strips will make the sides of each tartlet.
  7. Working with one at a time, transfer a strip of dough to one of the tart rings and press it to the sides. Use your fingers to slightly push the bottom of the sides to the dough circle (to seal it). Repeat with the remaining strips of dough. Use a small knife to cut the edge to the rim of the rings.
  8. Transfer the baking sheet containing the tartlet shells to the freezer & freeze for at least 20 minutes.
  9. Preheat oven to 350 F.
  10. Bake tart rings for 8 minutes or until barely set (crust will complete baking with the filling in). Remove from oven.
Filling
  1. Using a mixer, beat cream cheese until smooth then add sugar & blend well. Add eggs & vanilla, beat until smooth. Pour cream cheese mixture over warm crust.
  2. Bake for 20 minutes or until the crust is firm & BARELY browned. Set aside to cool.
Topping
  1. In a saucepan, combine whole berry sauce & 1 ½ cups fresh or frozen unsweetened raspberries, orange zest & sugar.
  2. Cook over medium heat, stirring often, until the sauce thickens & is bubbly. Remove from heat & let cool. The sauce will thicken as it cools.
  3. Place a dollop of sauce over each tartlet. Decorate & serve chilled.
Recipe Notes
  • I made these tartlets in 3 sizes from 2 3/4-inch to 2-inch.
  • If you find the dough is to soft to work with just add a small amount of flour, just enough to make it easier to handle.
  • This is a real nice crispy pastry dough. When its baked it would give the impression of being real hard but instead its crisp and so nice to bite into.