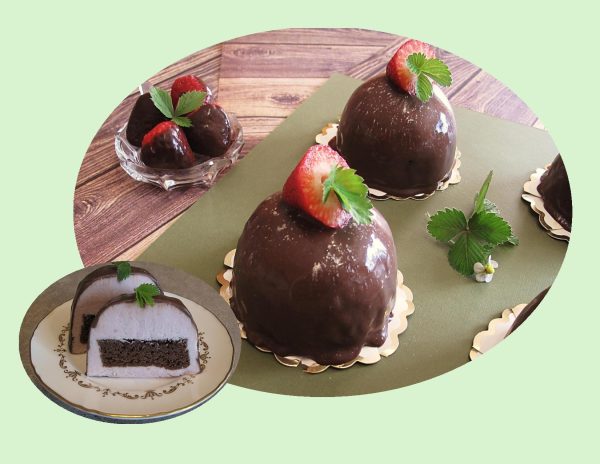
Chocolate Covered Strawberry Mousse Domes

Strawberries — loved for their sweet taste and heart shape, have symbolized purity, perfection, love and passion throughout the ages. It is very common for us to give little thought to where our food comes from and the back breaking labor that it took to get it to our various parts of the country.

Travel can always be filed under the category ‘learning experience’. I find it so important to set oneself outside our ‘bubble’ to fully understand and not become complacent about the many things we take for granted.

Over the years, Brion and I have spent many holiday hours travelling along the Big Sur coast of California, USA. While there we would use Monterrey as our ‘home base’ and make little day trips to the surrounding area. Just inland from Monterrey is the agricultural jewel known as the Salinas Valley. This is one of the major valleys and most productive agricultural regions of California. Having a unique coastal environment with its western ocean exposure (less than 10 miles away) provides moderate temperatures year-round. Warm sunny days and cool foggy nights are the perfect combination for growing strawberries.

I find myself going back to those years I was raised on the farm when Brion & I were driving along looking at the fields of produce growing. I have often felt much appreciation and compassion for the farm workers standing, bent over in the heat of the blazing sun for hours tending these crops.

I have many memories of my own parents working long, hard hours to provide for us on our family farm. I am grateful to have learned to appreciate the efforts of others that make life good.

These strawberry mousse ‘domes’ celebrate those wonderful strawberries as well as satisfying the chocolate lover.
Print Recipe
Chocolate Covered Strawberry Mousse Domes
Votes: 1
Rating: 5
You:
Rate this recipe!
Servings
Ingredients
Servings
Ingredients
Votes: 1
Rating: 5
You:
Rate this recipe!
Instructions
Brownie
  1. Preheat oven to 350 F.
  2. Lightly butter a 9 x 5-inch loaf pan & line with a 9-inch strip of parchment paper (the two short ends will be uncovered); lightly butter parchment.
  3. Melt butter in a medium saucepan. Remove from heat & add chopped chocolate, stirring until smooth (the residual heat from the pan should be plenty to melt the chocolate.)
  4. Stir in sugar; mixture should be lukewarm, no longer hot to the touch. If it's still pretty warm, let it cool for a minute or two.
  5. Whisk in eggs until batter is smooth & shiny.
  6. Sift together flour, cocoa powder, baking powder & salt in a small bowl. Sprinkle over chocolate mixture & fold with a spatula until just incorporated.
  7. Pour batter into prepared pan & spread into an even layer. Bake for about 20 minutes or until top is set & a toothpick inserted near the middle comes out with moist crumbs (not gooey batter). Set pan on a wire rack & let cool completely. The brownie layer can be made a day ahead of time; once cool, cover pan tightly and refrigerate overnight until ready to use.
  8. Lift the cooled brownie out of the pan using the parchment overhang as handles. Cut off the edges, then cut into six 2-inch squares.
Strawberry Mousse
  1. Place water in a small dish; sprinkle gelatin over top & set aside to bloom for at least 5 minutes.
  2. Heat milk in a small saucepan set over low heat until it just starts to steam (try not to let it boil).
  3. Mix together egg yolk & sugar in a bowl until it forms a thick paste. Slowly spoon some of the hot milk into the yolk mixture, whisking constantly until the paste thins out a bit. Drizzle in the remaining milk & whisk until smooth.
  4. Return mixture to the saucepan & return to low heat & cook, stirring & scraping the bottom of the pan consistently, until the mixture thickens slightly to coat the back of a spoon.
  5. Remove from heat & whisk in gelatin until smooth. Transfer to a medium-large bowl & set aside.
  6. Meanwhile, purée strawberries & lemon juice in a blender or food processor until smooth. Transfer to a liquid measuring cup (you should have about 1/2 cup purée, if you have more than that save the excess for another use). Whisk strawberry purée into lukewarm custard mixture, then place bowl in refrigerator while you whip the cream.
  7. In a clean bowl or the bowl of a stand mixer, beat heavy cream until it holds soft peaks. Add 1/3 of cream to the cooled strawberry mixture & fold to lighten, then add remaining cream & fold until fully incorporated & no white streaks or lumps remain.
  8. To assemble your cakes, spoon or pipe the mousse into 5- (4 oz) silicone dome molds (they’re just over 3 inches in diameter), about 2/3 of the way full. Gently press a brownie square into the top of each mousse-filled mold. Scrape with an offset spatula to make the top perfectly level with the top of the mold. Freeze at least 3 hours or overnight until completely firm.
  9. Before you make the glaze, remove cakes from molds and place on a frozen cookie sheet lined with parchment paper. Return to freezer until just before glazing.
Glaze
  1. Place chopped chocolate in a medium-sized, heat-proof bowl and set aside.
  2. Heat cream & corn syrup in a small saucepan until it just starts to bubble (do not let it boil).
  3. Pour over chopped chocolate & let sit for 30 seconds, then gently whisk, starting in the center & moving in gentle concentric circles until an emulsion forms, then working your way out to the edges until the entire mixture is smooth & emulsified.
  4. Remove cakes from freezer & place on a cookie sheet, elevated off the sheet using small jars or cookie cutters (ideally something smaller in diameter than the cake itself so the glaze can drip off). You may also want to cut out small rounds of parchment to place under each cake to make them easier to transfer.
  5. Pour glaze generously over cakes, taking care to ensure there are no bare spots left. Gently scrape the edges to remove any remaining drops, then carefully transfer cakes using a small offset spatula to cardboard cake rounds or small pieces of cardboard for easy movement. Any leftover glaze can be scraped up & refrigerated in an airtight container for another use.
  6. Glazed cakes will keep in the refrigerator for up to 3 days. Let come to room temperature before serving.

Crab Stuffed Shrimp

Baked stuffed shrimp is just as perfect served as an hors d’oeuvre on special occasions and holiday parties as it is for family dinners. Stuffed shrimp may seem like a dine-out-only kind of dish, but rest assured, it’s not. Preparing it at home is not that big of a deal.

Shrimp, one of the most popular seafoods in North America, can be stashed in the freezer and thawed in the fridge the night before or in minutes under cold water to create a quick weeknight meal that the whole family will love. Add a few spices, some veggies, or pasta and you can have dinner on the table in minutes. Some like it sautéed with lemon and butter. Others prefer it coated in a crispy breading and fried to a golden brown. Shrimp is quite a versatile seafood that can be prepared in a variety of ways, drawing people in with its tender texture and mildly sweet, salty flavor.

A seasoning Brion & I have really come to enjoy especially with shrimp is the Old Bay Seasoning. With savory, salty, spicy, and herby notes, Old Bay Seasoning is something truly special in the culinary world. It was originally meant for seafood, but quickly became a beloved seasoning for everything from crab and shrimp to veggies, meats, and even popcorn! 

If you are a seafood lover, crab-stuffed shrimp has an amazing flavor combination you will really enjoy.

Print Recipe
Crab Stuffed Shrimp
Votes: 1
Rating: 5
You:
Rate this recipe!
Course Main Dish
Cuisine American
Servings
Ingredients
Lemon Pepper Butter
Course Main Dish
Cuisine American
Servings
Ingredients
Lemon Pepper Butter
Votes: 1
Rating: 5
You:
Rate this recipe!
Instructions
Stuffing
  1. In a saucepan over medium heat, add butter & allow to melt. Add onions, celery, garlic, green onions & seasoning & sauté for 6-8 minutes. Transfer mixture to a mixing bowl, add panko crumbs & drained crab meat. Fold in with a spatula until blended.
Shrimp
  1. Clean, devein & butterfly shrimp. Set aside in refrigerator.
Lemon Pepper Butter
  1. In a small saucepan, combine water, lemon juice, flour & seasonings. Whisk until mixture thickens. Remove from heat; add softened butter & blend in well.
Assembly
  1. Preheat oven to 400 F.
  2. In a round glass pie dish, place opened butterflied shrimp. Top each with a small scoop of stuffing. Next, place a tsp of lemon butter on each shrimp.
  3. Bake 20-25 minutes or until crab meat filling begins to get golden brown. Serve hot fresh broccoli.

Raspberry Crumble Cookies

Raspberry Crumble Cookies are no ordinary treat. Half tart, half cookie, they offer a perfect balance between a soft, melt-in-your-mouth texture and a crumbly, cookie-like crust. Made with a homemade tangy raspberry compote, these cookies are a delectable balance of sweet and tart flavors with a burst of fruity goodness in every bite.  

I have wondered where this crumb (or crumble) cake/cookie idea came from. Its origins speak of its German heritage. The origin of crumb cake was called ‘streuselkuchen,’ and today’s modern crumb cake is fairly similar to its forebear. Streuselkuchen ‘crumb cake’ is often referring to a cake made of a sweet yeast dough covered with a crumb topping that is called ‘streusel.’ Today, we make crumble cakes with baking soda or baking powder for leavening. One thing that has not changed is the signature thick layer of crumb topping where the crumbs are made simply of sugar, butter, and flour and allowed to have a roughly unfinished look. The crumb topping is sprinkled with powdered sugar to add interest to the look of the uneven top.

What we know today as crumb or crumble cake/cookies is most likely the adaptation of coffee cake recipes by German bakers who came to North America. The cake does bear a passing resemblance to many of the streusel topped kuchen recipes, a popular coffee-friendly cake from Germany.

Raspberry Crumble Cookies are baked in a muffin tin and look like mini pies! The dough does double duty as the base of the butter cookies and the crumble topping.

Print Recipe
Raspberry Crumble Cookies
Votes: 1
Rating: 5
You:
Rate this recipe!
Course dessert
Cuisine European
Servings
Ingredients
Cookies
Course dessert
Cuisine European
Servings
Ingredients
Cookies
Votes: 1
Rating: 5
You:
Rate this recipe!
Instructions
Raspberry Compote
  1. Place rasp[berries, sugar, lemon juice, zest & vanilla in a small saucepan over medium heat. Bring to a boil, stirring frequently. Reduce heat & simmer for 7-10 minutes. Remove from heat & pour through a sieve. Press through sieve with a spatula to take out as many of the seeds as possible. Set aside.
Cookies
  1. Preheat oven to 350 F. Spray 24 mini tart or mini muffin tins with cooking spray. Set aside.
  2. In food processor, place flour, sugar & butter. Pulse a few times until mixture is crumbly; set aside 1/2 cup of the mixture. To remainder add baking powder, baking soda & nuts. Place mixture in a large bowl.
  3. In a small bowl, beat egg slightly then stir in sour cream & lemon zest. Add to dry ingredients; stir until just moistened.
  4. Divide batter between the 24 mini tins. With the back of a small scoop that has been dipped in flour, press batter to go over the bottom & up the sides. Spoon about 1 tsp raspberry compote in the indented area of the cookie. Sprinkle each cookie with some of the reserved crumb mixture.
  5. Bake 15-18 minutes or until done. Remove from oven & allow to cool in pans for at least 10 minutes. At this time the cookies should pop out easily. Store in an airtight container at room temperature.

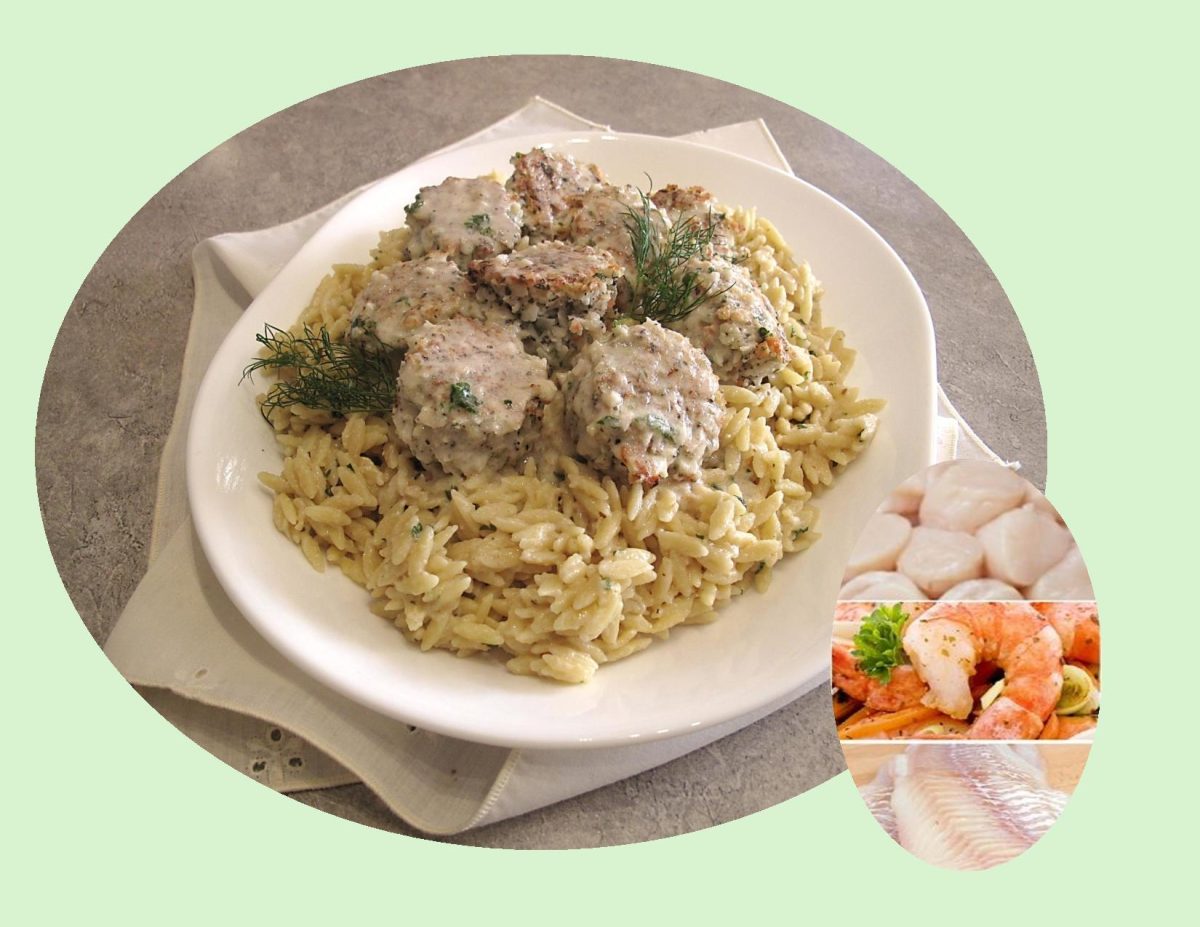
Seafood Meatballs w/ Orzo

Meatballs have become a beloved culinary delight in various cuisines around the world. The concept of combining ground meat with other ingredients to form compact balls can be traced back to ancient civilizations.

While commonly associated with Italian cuisine, the origin of meatballs is a tale that stretches across time and cultures.

Sweden has made its mark on the global meatball scene with its distinctive version, known as köttbullar. Swedish meatballs gained international recognition, thanks in part to the association with the popular furniture retailer, IKEA.

The Middle East boasts its own variation of meatballs, known as kofta. Kofta has a long history in the region and can be found in various Middle Eastern and Mediterranean countries, including Turkey, Lebanon, Egypt, and others.

Meatballs have traveled the world, adapting and evolving to suit different tastes and ingredients.

Asian cuisines have their own variations of meatballs. In Thailand, fish balls are popular street food made from a paste of minced fish, mixed with herbs, spices, and sometimes starch to achieve a firm texture. They are usually served in soups, stir-fries, or on skewers with dipping sauces.

As immigrants from various countries arrived in North America, they brought with them their culinary traditions, including their beloved meatball recipes.

In recent years, the popularity of global cuisine has further fueled the creativity and innovation around meatballs in North America. Food trucks and trendy restaurants offer inventive variations, such as fusion meatballs with a blend of different cultural flavors or vegetarian and vegan alternatives made with plant-based ingredients like lentils, mushrooms, or chickpeas.

Today, meatballs in North America can be found in a variety of forms and flavors, reflecting the country’s multicultural heritage.

Whether enjoyed in a tomato-based sauce with pasta, in a creamy gravy with lingonberry sauce, or alongside aromatic rice and fragrant spices, meatballs continue to satisfy appetites. The enduring popularity of meatballs is a testament to their versatility and the universal appeal of a simple, comforting dish.

Print Recipe
Seafood Meatballs w/ Orzo
Votes: 1
Rating: 5
You:
Rate this recipe!
Servings
MEATBALLS
Votes: 1
Rating: 5
You:
Rate this recipe!
Instructions
Orzo
  1. Bring 2 1/2 cups vegetable broth to a boil & cook orzo until tender. Drain excess vegetable broth from orzo & reserve. Set orzo & reserved water aside.
Sauce
  1. In a saucepan over medium heat, melt butter & add the garlic. Cook 3-4 minutes while stirring. Whish in remaining sauce ingredients. Simmer 4-5 minutes, stirring until sauce slightly thickens. Remove from heat.
Seafood Meatballs
  1. In a small bowl, mix the eggs & lemon juice. Place all meatball ingredients (except the olive oil) in the bowl of a food processor & pulse until combined.
  2. In a large saucepan, heat olive oil over medium-low heat. Scope seafood mixture (makes 20 balls) into saucepan. Using a large spoon, continuously turn the meatballs until all sides obtain a golden brown color. Place meatballs on a plate lined with paper towel.
Serving
  1. On a large platter, place orzo & top with seafood meatballs. Drizzle sauce over all. Place in the microwave for a couple of minutes just to ensure everything is hot for serving.

Pork & Apple Bedfordshire Clanger w/ Cheddar-Sage Pastry

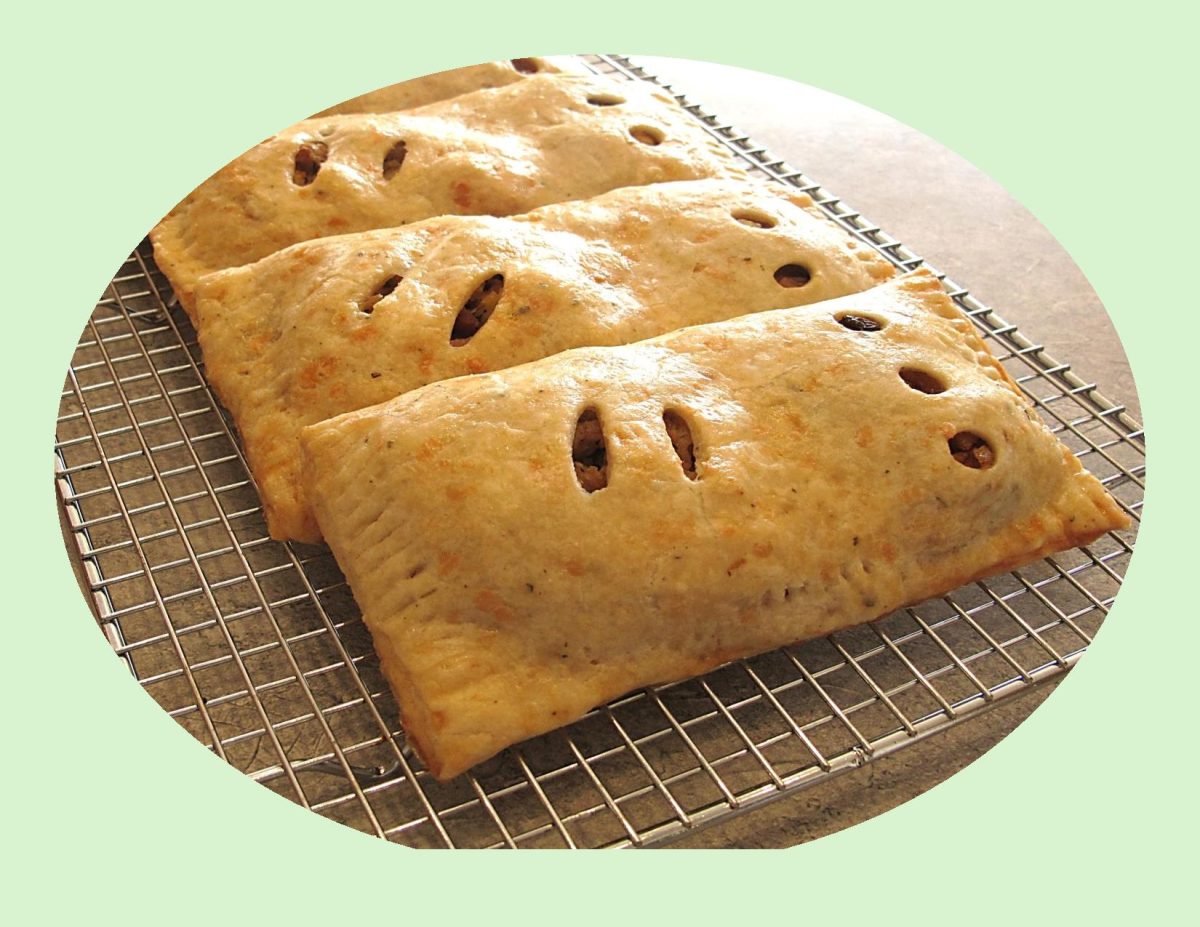
The Bedfordshire Clanger is a very unique and little-known meat pie recipe from England, specifically (not surprisingly) from the county of Bedfordshire, a small, low-lying and predominantly agricultural county nestled in the east of England.

In centuries past many of the working husbands of the area used to toil in the fields there. Their wives, knowing their husbands would need lots of protein and carbohydrate sustenance, came up with the brilliant idea of a doubled, loaf-shaped pie. One end contained a savory filling that used the famed pork of the area while the other end was filled with stewed apples (made from the famed local apples) as dessert. So, the two fillings didn’t combine, there was a ‘pastry wall’ in between blocking any flavors from mixing. A ‘secret code’ denoted which end was meat and which was dessert: two knife slits on one end of the pastry top means meat, three small holes on the other shows the sweet. This was brilliant, an entire meal for the hard-working man – handheld, portable and delicious

I guess you could say, the Bedfordshire clanger is not only a tasty treat but also a piece of culinary history that has stood the test of time!

Print Recipe
Pork & Apple Bedfordshire Clanger w/ Cheddar-Sage Pastry
Votes: 1
Rating: 5
You:
Rate this recipe!
Servings
CLANGERS
Votes: 1
Rating: 5
You:
Rate this recipe!
Instructions
Pastry
  1. In a medium bowl, whisk together the flour, sage & salt. Sprinkle the butter cubes over the flour mixture & use your fingers to work them in. Alternately you could use a pastry cutter to do this.
  2. When the mixture resembles cornmeal with pea-sized bits of butter remaining, stir in cheese with a fork until evenly distributed. Sprinkle 6 Tbsp ice water over mixture & stir with a fork until dough begins to come together. If needed, add an additional Tbsp or two of ice water.
  3. Turn the dough out onto a lightly floured surface & knead for about three times. Gather the dough into a disk & wrap in plastic wrap. refrigerate for at least 30 minutes or overnight.
Pork Filling
  1. Bake potato in microwave, peel & cut into small cubes. Set aside.
  2. Heat oil in a skillet & sauté celery, onion, garlic & bacon together on medium heat until veggies are soft & bacon is cooked. Add ground pork, breaking it up well. Stir in dried herbs & spices. Cover & simmer for about 10 minutes.
  3. Remove from heat & stir in cooked potato & cheese. Set aside to cool.
Apple Filling
  1. In a small saucepan, combine butter, water, cinnamon & brown sugar. Bring to a simmer then add diced apples, raisins, lemon zest & juice. Gently simmer for 5 minutes. Remove from heat & allow to cool.
Assembly/Baking
  1. Divide pastry into 5 equal pieces. On a lightly floured surface (or dry wax paper) roll out each piece of pastry into 7 x 7 1/2-inches. The excess trimmed from the sides will be used for little pastry ‘walls’ dividing the sweet & savory fillings. Roll the excess into a 3-inch length.
  2. From the top of each piece, LIGHTLY make a line across your pastry 4-inches from outside edge. This will help to place your fillings properly.
  3. On the 3-inch wide section of the pastry, place savory filling to cover 2/3 of the area. Place one of the rolled strips after that then place sweet filling on the remaining 1/3 to complete the 'clanger'. The little rolled piece of pastry divides the savory & sweet filling.
  4. On the sweet side make 3 holes for vents & on the savory side make 2 slashes. This is the 'code' to let the person eating the clanger which was savory or sweet.
  5. Preheat oven to 350 F.
  6. Brush the edges of each pastry with egg wash. Lift the pastry from the opposite side over the fillings & seal the edges with a fork.
  7. Brush clangers with remaining egg wash & bake for about 30-35 minutes or until golden.

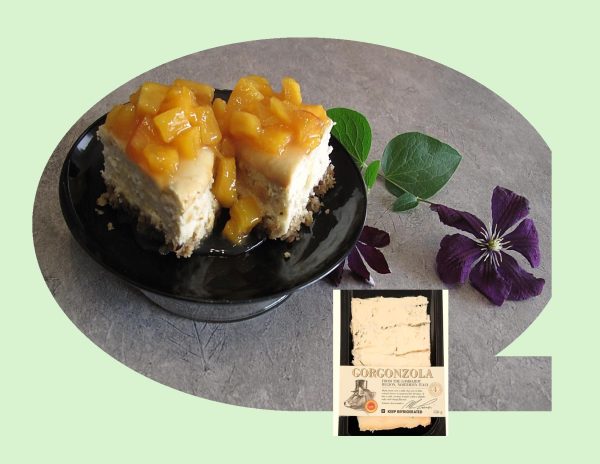
Savory Gorgonzola Cheesecake w/ Peaches & Hemp Heart Granola Crust

Cheese might not be the first thing that comes to mind if you’re looking for a satisfying, easy, elegant way to end your meal, but it makes for a fabulous dessert. Europeans have long served dessert cheese, either after the salad or after the main course.

While a sweet cheesecake can be a thing of great joy and incredibly versatile; there are various regional styles, easy no-bake versions for when you don’t want to turn on the oven, and many ways to make it suited to all seasons by switching up the flavor. But there’s a whole other avenue to explore too: savory cheesecakes, a great appetizer option for any party, or even weekday dinner for your family. If it sounds a little weird, think of it like a cheesier, less eggy version of quiche.

As with sweet cheesecakes, there are both baked and no-bake versions of savory cheesecake, some with crusts and some without, but crusted and baked seems to be the most prevalent sort, and the vast majority of those follow a similar formula.

Brion & I have never been much for ‘blue cheese’ but when it comes to Gorgonzola, that’s a whole different story. Gorgonzola is a type of blue cheese produced in Northern Italy. It’s creamy and crumbly and has streaks of blue mold that give it a strong, piquant flavor. This savory Gorgonzola cheesecake could be served as a cheese or dessert course with fresh fruit to end a nice summer evening meal.  A simple recipe with a taste that lingers long in the memory.

Print Recipe
Savory Gorgonzola Cheesecake w/ Peaches & Hemp Heart Granola Crust
Votes: 1
Rating: 5
You:
Rate this recipe!
Servings
Ingredients
Servings
Ingredients
Votes: 1
Rating: 5
You:
Rate this recipe!
Instructions
Base
  1. Line 2 - 5-inch springform pans with parchment paper. Place granola in a food processor; process until fine crumbs form.
  2. In a bowl, mix crumbs & melted butter until well combined. Divide crumb mixture between the two lined pans; press into the bottom to form the crust. Set aside.
Peach Topping
  1. Add peaches to a medium saucepan over medium-high heat; stir in lemon juice, water & cornstarch. Bring mixture to a rolling boil. Stir in sugar. Return to a gentle boil for 1-2 minutes, stirring frequently, until peaches thicken slightly. Remove from heat & cool completely. This can be prepared after you bake the cheesecake if you wish.
Cheesecake
  1. Preheat oven to 300 F.
  2. Using an electric mixer, beat cream cheese & Gorgonzola in a bowl until light & fluffy, about 5 minutes. Add sour cream, honey, salt & pepper; beat until blended. Add eggs one at a time, mixing well after each addition. Divide cheesecake batter, pouring over the granola base in each of the springform pans.
  3. Bake for 1 hour & 20 minutes or until set & lightly browned.
  4. Remove cheesecake from oven & cool to room temperature. Cover with plastic wrap & refrigerate for 4 hours or overnight. Spoon peach topping over cheesecake, slice & serve.
Recipe Notes
  • If you wish to make one 9-inch cheesecake, double ingredients but only use 3 large eggs. You should have enough peach topping for a 9-inch without having to double that recipe.
  • For this recipe I chose not to prebake the hemp heart base but If you wish to do so there is no problem in with that.

Bedfordshire Clangers w/ Variations

July is such a wonderful month. The weather’s warm, there’s still plenty of summer left, and the produce is literally amazing.

Midsummer means the farmer’s markets are brimming with great fruit & veggies. With such a colorful bounty of goods, we can settle into our summer cooking routines with tasty meals hot or cold.

But, even in summer, we sometimes crave ‘comfort food’ such as a ‘hand pie’. The humble hand pie goes by many different names: call it a pasty, a turnover, an empanada, or a ‘Bedfordshire clanger’….

A Bedfordshire Clanger dates back to at least the 19th century. It was typically made for agricultural workers to take with them to work as their lunch. The original pastry was made from suet and cooked by a boiling method. There is a theory that the pastry crust was not originally intended for consumption but as a vessel in which to protect the filling from the soiled hands of the workers.

The clanger originated from the county of Bedfordshire, a small, low-lying and predominantly agricultural county nestled in the east of England and adjacent counties, including Buckinghamshire and Hertfordshire. 

The name is as intriguing as the food itself. The word clanger, it had been suggested, referred to the mistake of mixing sweet and savory fillings. But a more likely explanation was that in nearby Northamptonshire dialect, ‘clang’ means to eat voraciously.

Knowing their husbands would need lots of protein and carbohydrate sustenance, homemakers came up with the brilliant idea of a doubled, loaf-shaped pie. One end contained a savory filling that used the famed pork of the area while the other end was filled with stewed apples (made from local apples) as dessert. So, the two fillings didn’t combine, there was a ‘pastry wall’ in between blocking any flavors from mixing. A ‘secret code’ denoted which end was meat, and which was dessert: two knife slits on one end of the pastry top means meat, three small holes on the other shows the sweet. This was brilliant, an entire meal for the field workers – handheld, portable and delicious.

The version we have today is not its beginnings but its evolution. Once you’ve nailed this basic Bedfordshire clanger recipe you can experiment with all sorts of flavor combos, there’s really no limit to what you can combine in this savory/sweet pastry.

Since Brion takes lunch to work, I became intrigued with the idea and decided to get creative with the fillings. That way I could make a variety and freeze them and use as needed. These tasty little ‘clangers’ can be served as the main course for a warm-weather picnic or for a hand-held, backyard meal with the addition of a nice fresh salad at home.

Print Recipe
Bedfordshire Clangers w/ Variations
Votes: 1
Rating: 5
You:
Rate this recipe!
Servings
Ingredients
Chicken w/ Caramelized Onions
Raspberry / Nectarine Filling
Blueberry Filling
Apple / Apricot Filling
Plum / Rhubarb Filling
Rhubarb / Apple Filling
Servings
Ingredients
Chicken w/ Caramelized Onions
Raspberry / Nectarine Filling
Blueberry Filling
Apple / Apricot Filling
Plum / Rhubarb Filling
Rhubarb / Apple Filling
Votes: 1
Rating: 5
You:
Rate this recipe!
Instructions
Pastry
  1. In a medium bowl, whisk together the flour, sage & salt. Sprinkle the butter cubes over the flour mixture & use your fingers to work them in. Alternately you could use a pastry cutter to do this.
  2. When the mixture resembles cornmeal with pea-sized bits of butter remaining, stir in cheese with a fork until evenly distributed. Sprinkle 6 Tbsp ice water over mixture & stir with a fork until dough begins to come together. If needed, add an additional Tbsp or two of ice water.
  3. Turn the dough out onto a lightly floured surface & knead for about three times. Gather the dough into a disk & wrap in plastic wrap. refrigerate for at least 30 minutes or overnight.
Pork Filling
  1. Bake potato in microwave, peel & cut into small cubes. Set aside.
  2. Heat oil in a skillet & sauté celery, onion, garlic & bacon together on medium heat until veggies are soft & bacon is cooked. Add ground pork, breaking it up well. Stir in dried herbs & spices. Cover & simmer for about 10 minutes. Remove from heat & stir in cooked potato & cheese. Set aside to cool.
Spiced Meat Combo
  1. In a saucepan, sauté onion & garlic. Add ground meat, basil, thyme, cardamom & salt & pepper. Scramble fry until cooked, remove from heat & add parmesan & potato. Place in a dish.
  2. In the saucepan, melt butter; add flour to make a roux. Cook, stirring constantly for 2-3 minutes. Slowly add beef broth, stirring until sauce thickens. Season to taste. Add to ground meat mixture & combine to form filling. Set aside until ready to use.
Turkey Filling
  1. In a skillet, cook bacon until just crisp, then remove to a paper towel lined plate to drain; chop when cooled. Remove all but 1 Tbsp of the bacon drippings from skillet.
  2. Add butter to the skillet, sauté onions, garlic & mushrooms with herbs & spices, scraping up any brown bits, until the onions have softened & mushrooms have lost most of their size & moisture. Stir in the bacon & shredded cooked turkey, taste for seasoning. Cook for another minute or two, then remove from heat & set aside.
  3. In a saucepan, combine Boursin, milk & spices (if using). Stir until Boursin has melted. Remove from heat. Add to turkey/veg mixture.
Chicken w/ Caramelized Onions
  1. Heat butter over medium low heat in a heavy ovenproof skillet. Add the onions cook for 20 minutes or so, stirring occasionally. When the onions are a deep golden color, remove them from the pan and set aside.
  2. Preheat oven to 350 F.
  3. Combine the flour, salt, chili powder, thyme, allspice, & black pepper. Dredge each piece of chicken in the flour mixture, shaking off the excess. In the same pan as the onions, heat the oil over medium high heat. Add each piece of chicken & fry for a few minutes until golden brown; flip & cook for a few more minutes. Transfer to a plate (it will not be fully cooked at this point, just browned – it will finish cooking in the oven).
  4. Turn the heat down & let the oil cool off a little bit. Make a roux with excess oil in skillet & dredging flour. Add chicken broth & cook until a sauce forms. Add the onions & chicken to the pan. Bake for about 20 minutes longer. When chicken/onion mixture is cooked, remove from oven. Allow to cool until ready to use.
Raspberry/Rhubarb Filling
  1. In a small saucepan, whisk together sugar, cornstarch, cardamom & salt. Add water & stir then add chopped nectarines. Simmer until nectarine is slightly soft & liquid is thickened. Remove from heat & carefully fold in raspberries. Set aside to cool.
Blueberry Filling
  1. In a small saucepan, combine all ingredients except blueberries. Cook until sauce starts to thicken then gently fold in blueberries & cook a couple of minutes more. Remove from heat & set aside to cool.
Apple/Apricot Filling
  1. Peel & dice apples. Drain canned apricot juice into a small saucepan. Add sugar, cornstarch, cinnamon & salt & combine. Add apples & cook until apples are tender. Cut canned apricot halves into quarters. When apples are cooked & sauce has thickened, remove from heat & add apricots. Gently combine & set aside to cool.
Plum/Rhubarb Filling
  1. In a small saucepan, combine sugar, cornstarch, salt & lemon zest. Add rhubarb & plums. Gently stir over a low heat. When enough juice has formed, allow to simmer until rhubarb is soft & juice has thickened. Remove from heat. Set aside to cool.
Sour Cherry Filling
  1. In a small saucepan, place sugar, cornstarch & salt. Add juice/water mixture & stir to thoroughly combine. Bring to a boil over medium-high heat, stirring frequently. Simmer until thickened, about 2 minutes. Immediately remove from heat. Gradually fold in cherries. Set aside to cool.
Rhubarb/Apple Filling
  1. In a small saucepan, add the rhubarb, apples, salt & sugar. Add a drizzle of water if necessary & heat on medium. The rhubarb will begin to release liquid & break down as the apples soften. Heat the mixture until the moisture has evaporated & begins to thicken. Once the mixture is thickened, add the lemon juice, lemon zest and cinnamon. Place it in a bowl & allow to cool.
Apple/Pear Filling
  1. Heat butter in a small skillet until melted, add apples & pears & cook until fruit begins to soften, about 5 minutes. Sprinkle sugar over mixture & continue to cook stirring often until fruit begins to lose its juices. Mix together cornstarch & lemon juice & add to pan. Simmer until mixture has thickened, about 4 minutes. Remove from heat & allow to cool.
Assembly/Baking
  1. Divide pastry into 5 equal pieces. On a lightly floured surface (or dry wax paper) roll out each piece of pastry into 14 x 7 1/2-inches. The excess trimmed from the sides will be used for little pastry ‘walls’ dividing the sweet & savory fillings. Roll excess pastry into a 3-inch length.
  2. Cut each piece of pastry in half horizontally so you have (2) 7-inch long pieces from each piece of pastry. From the top of each piece, LIGHTLY make a line across your pastry 4-inches from the outside edge. This will help to place your fillings properly.
  3. On the 3-inch wide section, place savory filling to cover 2/3 of the area. Place one of the rolled strips after that then place sweet filling on the remaining 1/3 to complete the 'clanger'. The little rolled piece of pastry divides the savory & sweet filling.
  4. On the sweet side make 3 holes for vents & on the savory side make 2 slashes. This is the 'code' to let the person eating the clanger which was savory or sweet.
  5. Preheat oven to 350 F.
  6. Brush the edges of each pastry with egg wash. Lift the pastry from the opposite side over the fillings & seal the edges with a fork.
  7. Brush clangers with remaining egg wash & bake for about 30-35 minutes or until golden.
Recipe Notes
  • Due to the length of this recipe, I found making the savory & fruit fillings on one day & the pastry, assembling & baking the next, worked out well for me. Although these pastries are VERY time consuming, believe me, the are well worth it in the end, especially if your freezing some to use later. I baked them all & then wrapped them well before freezing.
  • You will probably find there will be enough savory & sweet fillings left over to make about 10 more clangers.
  • All of them will freeze well which will be a time saver for your next batch. Just make a recipe of pastry & your ready to assemble & bake.
  • If your not interested in freezing the 'leftovers', the fruit combined will make a wonderful crisp & the savory fillings can be used in quiche or casseroles.

Breakfast Cereal Mini Cakes

Since they were introduced in 1941, Cheerios have been a staple in households across North America. They remain one of the most popular breakfast cereals on the market and are now available worldwide.

Cheerios are primarily made from whole grain oats and come in an assortment of flavors. In fact, there are at least 15 varieties — with seasonal ones appearing on occasion.

A bowl of cereal is perfect for a quick breakfast. Or lunch. Or, let’s be honest, dinner. And while these are perfectly acceptable uses of cereal, there is so much more you can do with them from snacks and desserts to buttery casserole coatings that take the morning mainstay to new heights.

To enhance these cupcakes, the regular milk is switched out for ‘cereal milk’ (milk that’s been soaked in sweet cereal).

Cereal milk tastes like that dense, slightly sweet, starchy, oaty milk from the bottom of the cereal bowl, that everybody loves to enjoy at the end.

The nostalgic and comforting combination of milk and cereal combined in this cupcake recipe is really quite special. These seem like kind of a ‘kid’ thing but I’m sure it won’t take long for them to disappear.

Print Recipe
Breakfast Cereal Cupcakes
Votes: 1
Rating: 5
You:
Rate this recipe!
Servings
MINI CUPCAKES
Ingredients
Mini Cakes
Servings
MINI CUPCAKES
Ingredients
Mini Cakes
Votes: 1
Rating: 5
You:
Rate this recipe!
Instructions
Mini Cakes
  1. Preheat oven to 350 F. Line a 24 cup mini muffin pan with cupcake liners. Set aside.
  2. In a liquid measuring cup, stir together the milk & 1/4 cup Very Berry Cheerios. Microwave for 30 seconds, stir, & set aside while you prepare the batter.
  3. In the bowl of a stand mixer, cream together the butter & sugar on medium speed until light & fluffy. Add in the eggs on at the time, scraping the bowl as necessary.
  4. In a separate bowl, whisk together the flour, baking powder, & salt. Using a fork, remove the cereal from the milk. Discard the cereal. Make sure you still have 1/2 cup milk, add more if necessary. Add the honey & vanilla extract to the milk. Whisk together.
  5. Gradually add 1/3 of the dry ingredients, mix to combine. Add 1/2 of the wet ingredients, mix. Repeat, ending with dry ingredients.
  6. Divide the batter between 24 muffin cups. Bake for 8-10 minutes, or until a toothpick comes out clean. Let cool in the pan for 5 minutes, then remove to a wire rack to cool completely.
Frosting
  1. In a bowl, whip cream cheese & butter. Beat on medium-low speed until smooth & combined, 1-2 minutes, scraping the sides of the bowl as needed.
  2. Sift powdered sugar into the cream cheese mixture & add the vanilla, lemon juice & salt. Beat the frosting on a low speed to combine, then increase the speed to medium-high & beat until light & fluffy, 1-2 minutes, scraping down the sides of the bowl once or twice.
  3. Add slightly crushed cheerios & FOLD into mixture gently. Top each COOLED mini cake with a dollop of frosting then sprinkle with extra cheerios.
Recipe Notes
  • If you prefer, bake in 12 regular size muffin cups.

Lemon Chicken in Dill Cream Sauce

Dill is an herb I have always favored. Due to its tangy taste and fragrance this herb has two groups of fans: those who are enthusiastic about it and those who push the plate aside in disgust if there is even a sole leaf of dill in the meal.

The herb is native to southern Russia, western Africa and the Mediterranean region.

In the 1st century Rome, dill weed was considered a good luck symbol. Ancient Egyptians used it to ward off witches. To the Greeks, dill signified wealth. Many cultures cultivated it for medicinal qualities, particularly its ability to soothe an ailing stomach.

Dill is a unique plant in that both its leaves and seeds are used as a seasoning. The thin, feathery green leaves become the aromatic herb called dillweed, and the oval flat seeds the more pungent spice referred to as dill seed.

The flavor of dill weed resembles the licorice-like flavor of mild caraway or fennel. The plant is, in fact, often mistaken for fennel fronds.

The classic combo of fresh lemon and dill create a quick Greek-inspired pan sauce for these simple sautéed chicken thighs.

Print Recipe
Lemon Chicken in Dill Cream Sauce
Votes: 1
Rating: 5
You:
Rate this recipe!
Servings
Votes: 1
Rating: 5
You:
Rate this recipe!
Instructions
  1. Preheat oven to 375 F.
  2. Season chicken with salt & pepper to taste along with oregano, basil & garlic powder. Combine butter & oil in a large skillet. Once butter is melted add honey & stir to combine.
  3. Add chicken to pan, brown chicken 2-3 minutes on each side. Transfer chicken to a baking dish (it won't be cooked through at this point). Add butter & garlic; sauté for 1 minute until fragrant. Add chicken broth, cream & lemon juice & whisk over medium heat to form a smooth sauce.
  4. Pour sauce over chicken in baking dish & bake for 15 minutes or until chicken is cooked through. Remove from oven, sprinkle dill over the chicken & sauce. Add cracked pepper to taste & serve.
Recipe Notes
  • Being rice lovers, I cooked some long grain rice & used it as a base under our lemon chicken & dill sauce before baking it. Real tasty!

White Wine Sangria/ Strawberry Lemonade

CELEBRATING THE LONG WEEK-END!

The Victoria Day weekend is upon us. There was a point in the slushy, frigid, not-so-distant depths of February when Canada’s unofficial but unequivocal start of summer simply could not be visualized. And yet here we are, hanging flower baskets on the front porch. While many Canadians familiarly know it as May two-four weekend (often used in reference to the size of a case of beer), a few of us will be looking to bring back a little ‘Victorian-era’ glamour to this much anticipated holiday with some white wine sangria or a non-alcoholic strawberry lemonade.

No doubt, no shortage of beer will wash over the lips of Canadians as we open up our cottages, take overdue road trips — albeit with lighter wallets thanks to recent hikes in gas prices — or simply a well-deserved break from work.

Wherever you live across Canada, this May long weekend – typically marks the start of grilling season. It’s time to get outside in the sunshine, fire up the BBQ, and enjoy savory grilled food with family and friends. All you need are the barbecue essentials and some great marinated meat or veggies.

I thought it would be nice to post a white wine sangria, I’ve made many times over the years, along with a non-alcoholic strawberry lemonade to enjoy with your BBQ today.

Print Recipe
White Wine Sangria/ Strawberry Lemonade
Instructions
White Wine Sangria
  1. In a pitcher, combine sugar, lemon & lime juice; stir until sugar dissolves. Add white wine & orange flavored liqueur. Just before serving, add club soda, fruit & ice. Makes 8 cups.
Strawberry Lemonade
  1. In a blender, combine strawberries & lemon juice. Cover & blend until smooth. In a pitcher, combine strawberry mixture & sugar; stir until sugar dissolves. Add club soda. Serve over ice; garnish with strawberries & mint if desired. Makes about 8 cups.