Pork Medallions w/ Blackberry Bacon Sauce

It seems there has been a bacon explosion in North America, in more ways than one. Novelty bacon dishes and other bacon-related items have been popularized rapidly via the internet. Fast-food chains boast about double bacon burgers, and upscale restaurants are wrapping steaks in bacon — even adding it to chic desserts. It’s the old sweet and savory marriage of flavors that seems to work so well.

Bacon mania has made bacon the star ingredient. The movement has been traced to the late 1990s when high-protein foods became a more prominent diet focus due in part to the Atkins diet.

The huge popularity of bacon has also encouraged product introductions such as bacon salt, maple bacon donuts, baconnaise, bacon-infused vodka, bacon ice cream, bacon jerky and chocolate covered bacon just to name a few. Condiments are the unsung heroes of the culinary world. A finishing sauce can be an important part of every meal. Whether you’re serving pork tenderloin, pork chops, pork loin, or pork roast, a flavor-filled sauce will guarantee to take the meal from good to great. We found this blackberry bacon sauce to do exactly that.

Print Recipe
Pork Medallions w/ Blackberry Bacon Sauce
Votes: 1
Rating: 5
You:
Rate this recipe!
Servings
Ingredients
Servings
Ingredients
Votes: 1
Rating: 5
You:
Rate this recipe!
Instructions
Sauce
  1. In a saucepan, cook bacon until almost crisp, remove to a paper towel.
  2. To the bacon drippings, add sliced mushrooms & garlic, sauté until cooked. Remove to a plate, set aside.
  3. To the saucepan, add remaining sauce ingredients & bring to a boil. Once boiling, reduce heat to simmer & allow to simmer for about 30 minutes.
  4. Remove from heat & allow to cool slightly then place in a food processor & pulse a few times.
  5. Pour sauce through a wire sieve & press to get everything but the seeds for your sauce.
  6. Add bacon & mushroom/garlic mixture. Combine well & set aside.
Tenderloin
  1. Preheat the oven to 425 F.
  2. Slice the tenderloin into even, 1 1/2 inch thick, medallions, sprinkle with garlic & onion powder & the salt & pepper.
  3. Then, heat the olive oil and butter in a large heavy skillet, cast iron if you have one. Braise the pork tenderloin medallions, you may have to work in 2 batches. Cook for 2 - 3 minutes on each side, remove from the skillet and cook the remaining pork. Using 2 wooden skewers, thread meat first with one & then with the other. It should resemble the unsliced tenderloin but do leave a tiny bit of space between each piece.
  4. Place on a baking sheet & roast for 30-35 minutes.
  5. To serve, plate the tenderloins and spoon (reheated) sauce over them. Garnish with a few whole blackberries & serve any remaining sauce on the side.

Garlic Chicken over Creamy Artichoke & Lemon Ravioli

Canadians embrace food – we value family traditions, global trends, and local ingredients.  Like our food, families across Canada are evolving.  Blended, single-parent and multi-ethnic families have become part of our modern mosaic which echoes our growing tastes and preferences.  But what has stayed the same is our love of pasta.

Almost nine in ten households have pasta in their pantries or freezers. What’s more, it’s a good, simple food in an industry striving to meet the demands of today’s health-minded families. Along with being healthy, consumers have become more concerned with the origins of their food products, larger processors are typically viewed as not being local, due to the volume of ingredients they require to keep up with demand. But that’s not always the case.

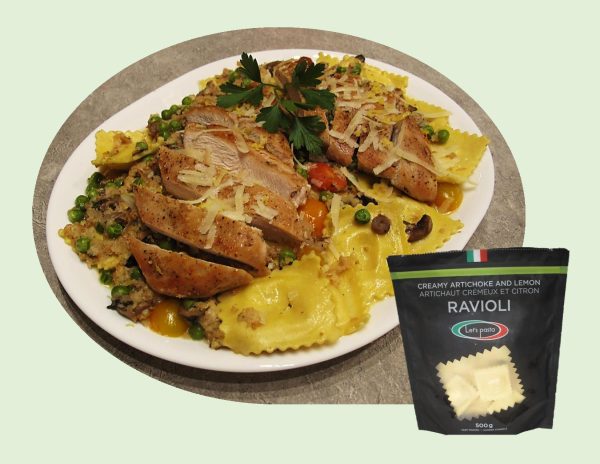
My inspiration for this meal came from some special ravioli Brion & I had picked up at our favorite Italian Store. I wanted to showcase it in an herb garlic chicken meal but I was real interested to learn that the producer of this pasta was from right here in our province of Alberta. Here is just a bit of info I learned from the ‘Let’s Pasta’ website.

Situated in Lethbridge’s industrial area, Let’s Pasta has been producing the freshest and finest pastas for the last 24 years, using exclusively Southern Alberta Durum Semolina wheat. This wheat is grown on two local farms and processed at P&H Milling, mere minutes from the pasta facility.  In fact, those wheat farmers have an actual dedicated bin at P&H Milling, so there is always a steady supply available for Let’s Pasta.  All their pastas, which include tortellini, ravioli, and gnocchi, are also made using local cage-free eggs. This connection to their local agricultural community is at the root of all their operations, driven by the firm belief of growing with their farmers while supporting sustainable agriculture for future generations to enjoy.

Let’s Pasta uses only whole, real foods in their fillings, no preservatives, no additives, no flakes, or by-products. Just good, old fashioned ingredients like potatoes, butternut squash, pork, and spinach.  Now obviously the lobster and crab they use isn’t coming from Alberta, but they are from the Canadian Atlantic, and the Pacific region.  All their fillings are made by hand in their test kitchen, where they also try out new recipes all the time to add to their lineup.

The two farms that provide the Durum Semolina Wheat for Let’s Pasta, Saunders Farms (near Taber) and Neveridle Farms (near Lethbridge), grow for a program called Shepherd’s Grain, a collective that promotes no-till, direct-seed farming so they can renew and preserve the land for generations to come – theirs and yours. Each grower is certified by Food Alliance™ for sustainability and complies with their strict standards for land improvement. They even have a traceability program that reinforces their commitment to renew the relationship between consumers and the farmers who grow their food.

From the facility, Let’s Pasta’s products make their way into retailers throughout Alberta, and across Canada.  Not only are they available at select major retailers like Safeway, Sobeys, Federated and Calgary Co-Ops in Alberta, but you can also find their products at specialty shops like The Italian Centre Shop in Edmonton and Calgary, The Italian Store (also in Calgary) and Italian Bakery’s Mercato in St Albert. 

Having lived in Lethbridge years ago, I found this all quite interesting not to mention what great ravioli it is!

Print Recipe
Garlic Chicken over Creamy Artichoke & Lemon Ravioli
Instructions
  1. Bring a large pot of salted water to a boil. Halve and peel shallot, then thinly slice lengthwise. Halve tomatoes. Zest 1 TBSP zest from lemon, then halve. Grate mozzarella on large holes of a grater. Finely chop chives.
  2. Put panko & a large drizzle of olive oil in a large pan. Place over medium-high heat. Toast, stirring, until deep golden, 3-5 minutes. Transfer to a small bowl. Wipe out pan. Heat another large drizzle of oil in same pan over medium-high heat. Pat chicken dry with a paper towel; season with salt and pepper.
  3. Add chicken to the pan and cook until done, 5-8 minutes per side. Remove from pan & let rest on a plate. Set pan aside. Place shallot and 2 Tbsp garlic herb butter in another pan. Heat over medium-high heat. Cook until softened, 2-3 minutes. Pour in milk & add 1 chicken bouillon cube . Bring to a simmer.
  4. Whisk Italian and mozzarella cheeses into pan with milk. Stir in juice from half of the lemon. Season with salt and pepper. Adjust heat to low. Meanwhile, add ravioli to pot of water, lower heat, and reduce to a simmer. Cook until al dente, 2-4 minutes. Reserve 1½ cups cooking water, then drain. Stir ravioli, tomatoes, peas, and ¾ cup cooking water into sauce in pan. Simmer until just thickened, 1-2 minutes. Season with salt and pepper.
  5. Add more cooking water as needed to loosen pasta sauce. Set aside. Place thyme sprigs, ½ cup water, and remaining chicken bouillon cube in pan used for chicken and bring to a simmer over medium-high heat. Pour in any juices released by chicken. Let reduce slightly, 1-2 minutes. Reduce heat to low and stir in remaining garlic herb butter & juice from lemon half (if you wish). Season with salt and pepper. Discard thyme sprigs.
  6. Arrange pasta mixture on a platter and sprinkle with panko, Parmesan, lemon zest, chives, & chili flakes to taste. Thinly slice chicken on a slight diagonal and arrange over pasta. Spoon pan sauce over chicken; sprinkle with remaining chives.
Recipe Notes
  • Garlic Herb Butter:
  • 1/4 cup unsalted butter
  • 1 tsp minced garlic
  • 1/4 tsp fine sea salt
  • dash of black pepper
  • 1 -1 1/2 Tbsp freshly chopped herbs (such as rosemary, thyme, chives, parsley or sage)

Shrimp Stuffed Whitefish w/ Hashbrown Crust

When you stuff fish, you expand the flavor profiles available with fish. It’s such a great way to make your fish dinner more interesting and flavorful. You can stuff a whole fish or wrap thin fillets around the stuffing and then bake or grill the fish as usual. 

Whitefish is a freshwater fish that is commonly called Atlantic Cod, Halibut or Flounder. Whitefish, when cooked, are dry and compared to other fishes, the flesh of the whitefish is completely white.

Whitefish can be classified into different, unique species that can easily be identified according to their appearance and where they live.

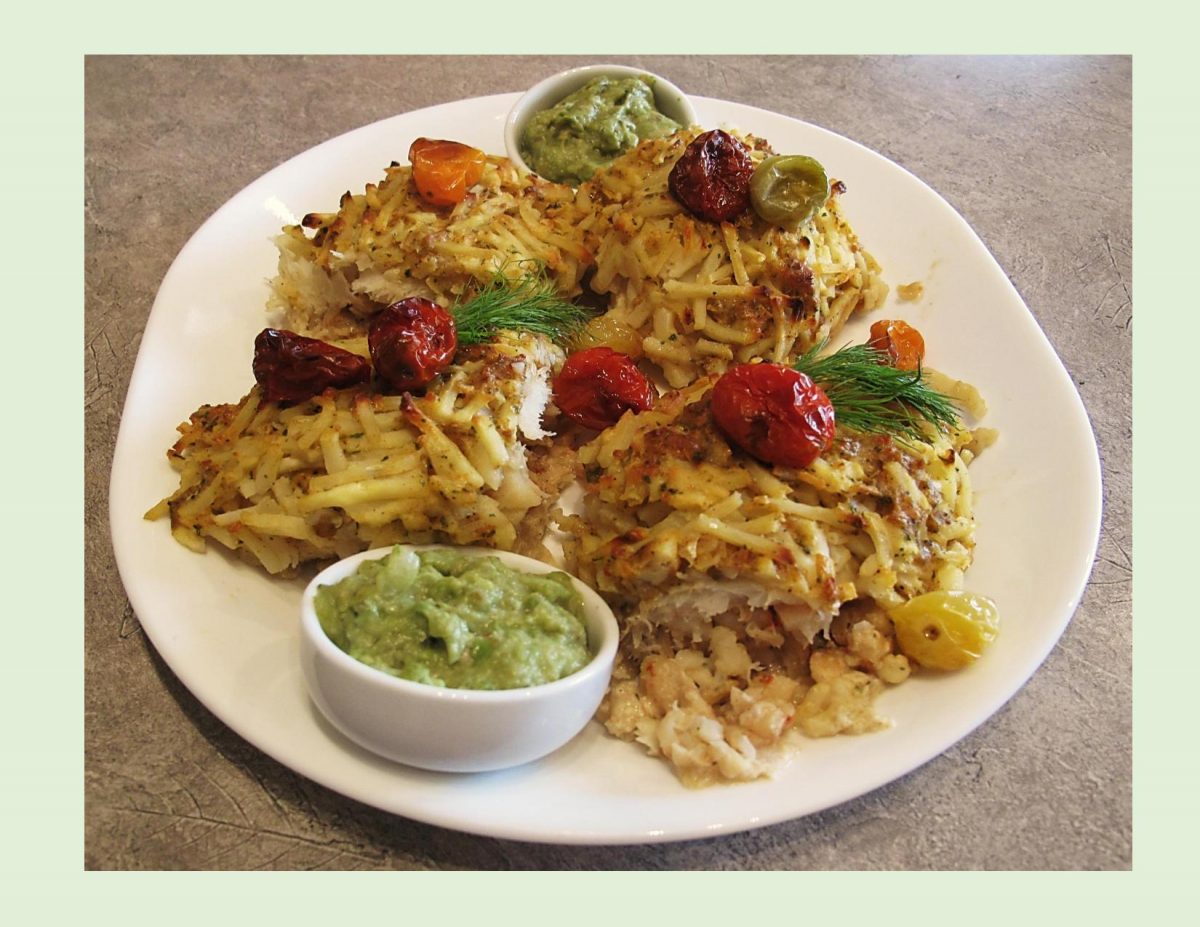
These flaky white fish fillets are stuffed with a creamy shrimp filling and flavored with onion, garlic and spices. For something different I gave them a spicy hashbrown crust. This seafood dinner is just as tasty as it is eye appealing and definitely not dry.

Print Recipe
Shrimp Stuffed Whitefish w/ Hashbrown Crust
Votes: 1
Rating: 5
You:
Rate this recipe!
Servings
Servings
Votes: 1
Rating: 5
You:
Rate this recipe!
Instructions
Spicy Hashbrowns
  1. Thaw shredded hashbrowns on a paper towel. In a bowl, place the flour, cheese, onion, garlic, coriander, smoked paprika, salt & pepper & egg. Add 'dried' shredded hashbrowns. Using a fork, mix everything until combined being careful not to break up the hashbrowns. Set aside until stuffed fish is ready to be coated with the mixture.
Stuffed Fish
  1. In a saucepan, add olive oil & heat . Add onions until they begin to soften & caramelize a bit then add garlic. Add shrimp pieces, cream cheese, seasonings & chives; stir until well incorporated. Remove mixture from heat & allow to cool.
  2. Lay out whitefish, remove all bones, skin & wash & dry thoroughly. Place fillets between two pieces of plastic wrap & pound gently to flatten a bit for easier rolling. Lay on work surface & divide shrimp mixture between the two fillets & spread until it is even.
  3. Preheat oven to 375 F.
  4. Roll up each fillet with the seam side down in a greased baking dish. Spoon hashbrown mixture over stuffed fillets. Press down coating to ensures it adheres well to top & sides of each stuffed fillet.
  5. Bake for about 45 minutes or until fish flakes easily. Cut each fillet in half to make four servings. Nice to serve with a few roasted cherry tomatoes & a side of guacamole.

‘Leftover’ Turkey & Rice Enchiladas

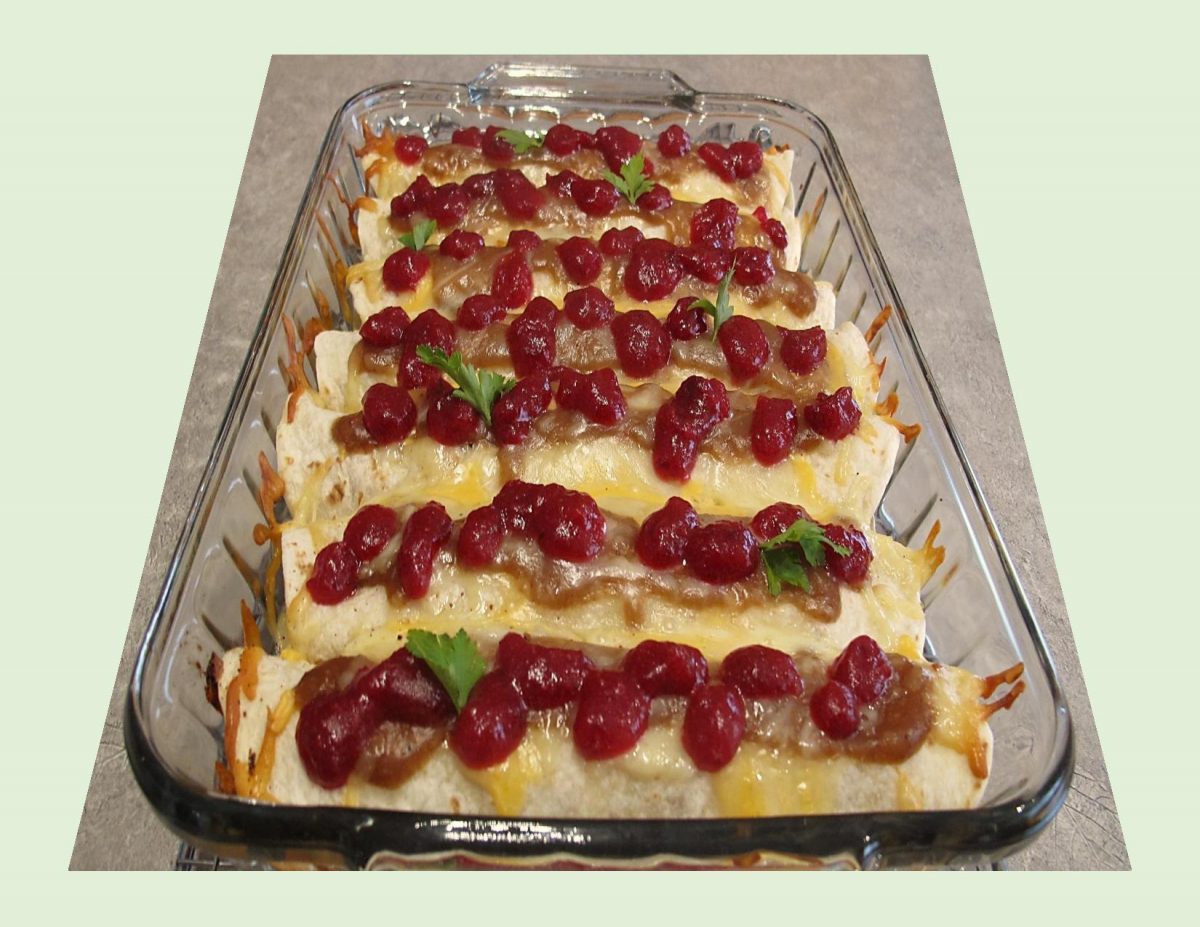
Most families have a roundup of classic holiday dishes that they make every year. Those dishes provide plenty of leftovers for days (maybe even weeks) after the holiday has passed. It follows that during the holiday season, the meals start to look the same. We love leftovers, we really do, but every meal enjoyed after Christmas Day starts to seem identical. That is, until you plan a boxing day feast with a spicy twist? These tasty enchiladas are a saucy, cheesy way to use up any leftover turkey from your Christmas dinner.

Print Recipe
Turkey & Rice Enchiladas
Votes: 1
Rating: 5
You:
Rate this recipe!
Course Main Dish
Cuisine Mexican
Servings
Ingredients
Course Main Dish
Cuisine Mexican
Servings
Ingredients
Votes: 1
Rating: 5
You:
Rate this recipe!
Instructions
  1. Preheat oven to 425 F. Coat a 9 x 13-inch baking dish with nonstick spray.
  2. Cook rice. Allow to cool slightly. Stir together rice, half the cheese, stuffing, turkey, green onions, salt and pepper in a medium bowl. Spread 1/2 cup of gravy on the bottom of prepared pan.
  3. Divide filling down the center of each tortilla. Roll each tortilla up tightly and place seam-side down in baking dish. Top with the remaining gravy and sprinkle with remaining cheese.
  4. Bake, uncovered, for 20 to 25 minutes, or until tortillas are lightly browned and the filling is heated through.
  5. Top with cranberry sauce and sprinkle with parsley.

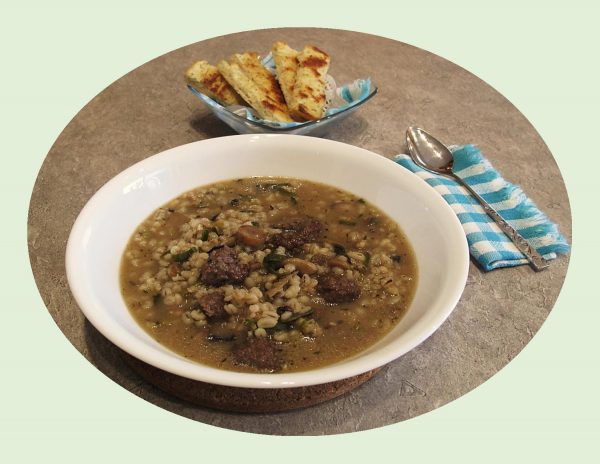
Mushroom Barley Soup w/ Mini Meatballs

Beef barley soup is a classic old-world dish, and it’s been simmering away in pots for centuries, probably as long as people have been making soup. It just makes sense ~ the little white pearls of barley add lovely texture, as well as extra nutrition and satisfying bulk, all important things when you’re trying to make dinner out of a pot of soup. For an added bonus, barley’s natural starch thickens the soup as it cooks.

Beef Barley Soup is classic comfort food that you can make on the stove or in the crock pot. The soup has roots in the Jewish communities of Eastern Europe. Mushrooms were popular in these cold-weather countries because they could be harvested, dried, and stored for later use.

Barley was also plentiful and easy to grow in the Eastern European climate, making it a common addition to hearty winter dishes like soup. Barley’s history goes back even further; in fact, it is arguably the world’s first and most ancient, cultivated grain.

As far as the meatballs, texture can be an issue. If the meatball is too wet, it will disintegrate when cooking in soups. If it is too dry, it will lose its flavor and potentially break up into pieces. Using the right amount of liquid or eggs for the mix to keep them moist, but equally so, enough breadcrumbs or flour to bind them adequately. Remember, you can never get enough seasoning, so don’t be gentle with it, and use spices and herbs liberally.

One of Brion’s favorite soups has always been mushroom beef barley, so now seems a good time to make some.

Print Recipe
Mushroom Barley Soup w/ Mini Meatballs
Votes: 1
Rating: 5
You:
Rate this recipe!
Servings
Votes: 1
Rating: 5
You:
Rate this recipe!
Instructions
  1. In a large saucepan, combine the broth, water, barley & thyme. Season with salt & pepper; bring to a boil. Cover & cook over low heat until the barley is nearly tender, about 18 minutes.
  2. In a large skillet, heat oil. Add the mushrooms & shallot, season with salt & pepper; cook over high heat until tender and browned, about 8 minutes.
  3. In a medium bowl, combine the ground beef, egg, bread crumbs, cheese, 1/2 teaspoon of salt & 1/4 teaspoon of pepper. Knead the mixture until blended, then roll it into sixteen 1-inch balls.
  4. Add the meatballs & mushrooms to the soup. Simmer over moderate heat until the meatballs are cooked through & the barley is tender, about 8 minutes. Discard the thyme. Stir the parsley into the soup & serve in bowls with sour cream.

Honey Orange Pork Medallions

Pork tenderloin, also known as pork fillet, is the leanest, most tender part of the pork loin. It is often cut into medallions, which are oval shaped steaks, made even more tender by trimming away excess fat. Pork tenderloin medallions are a versatile cut of meat, suitable for a range of different occasions. Their tender texture makes them perfect for a special dinner, but because they require short cooking times, they are quick and easy to prepare, making them an excellent choice for weeknight dinners, too.

For these honey orange medallions I’m using an ingredient called hoisin sauce. This is a Cantonese sauce that is often used both as an ingredient in dishes and as a table condiment. 

Hoisin is the English version of the sauce’s Chinese name: haixian, which means seafood or sea delicious. The word hoi translates to sea and the word sin translates to fresh or delicious. The name is somewhat misleading since hoisin sauce contains no seafood and is not typically used in or on seafood dishes though there is some evidence that the earliest versions actually did contain fermented fish. When Hoisin sauce still contained seafood, it was considered a luxury food because of this fact.

Hoisin sauce ingredients typically include soybeans, garlic, and sugar along with sesame oil and chilies. The number of ingredients and the ingredients themselves can vary from brand to brand; however, the flavor profile is generally the same. It has a similar appearance to American barbecue sauce but is much denser.

This is such a nice meal served over steamed rice or Chinese noodles.

Print Recipe
Honey Orange Pork Medallions
Votes: 1
Rating: 5
You:
Rate this recipe!
Servings
Votes: 1
Rating: 5
You:
Rate this recipe!
Instructions
Sauce
  1. In a small pot, heat oil & garlic over medium low heat for just a minute or so until the garlic has softened but not browned. Add all of the remaining ingredients for the sauce & simmer until the sauce reduces to the consistency of a glaze. Keep warm on minimum heat while the pork gets fried.
Pork Medallions
  1. Sift together the flour, salt, pepper, ginger & five spice powder.
  2. Beat together the eggs and water to make an egg wash.
  3. Heat 1/2 inch oil over medium heat in a large heavy skillet.
  4. Season the pork medallions lightly with salt & pepper. Coat the pieces in the flour mixture before dipping them in the egg wash & then back into the flour mixture again. Drop into the hot oil and cook for about 3-4 minutes, turning once, until golden brown & crispy.
  5. Toss the cooked pork medallions in the sauce, along with the vegetables of your choice. Serve over steamed rice or Chinese noodles.

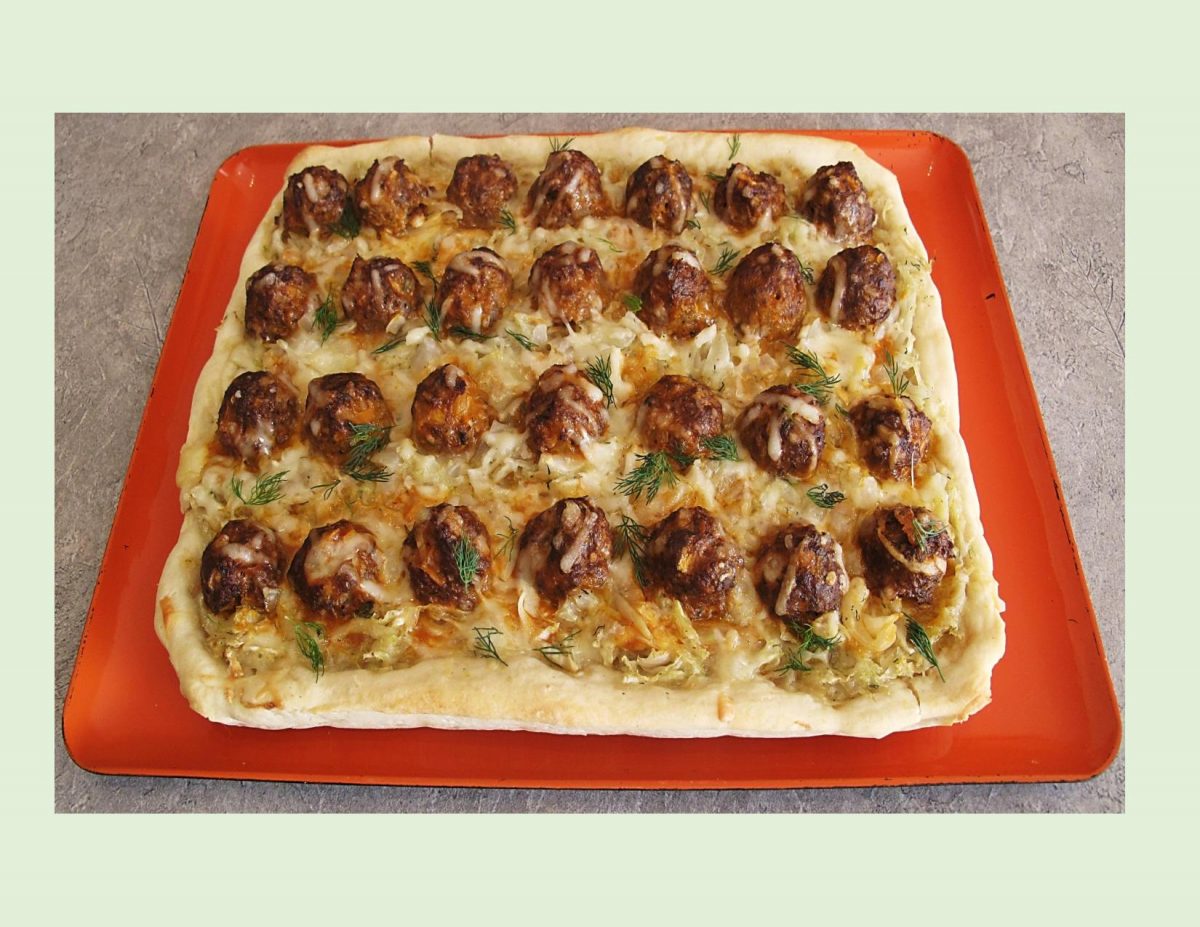
Pizza w/ Cabbage & Meatballs

Don’t think for a moment that cabbage doesn’t belong on pizza — it definitely does. When the days grow shorter, we start to crave heartier meals. Cabbage is good … meatballs are good … cabbage/meatball pizza is double good! Here’s a new spin on the classic pizza – topping a pizza crust base with meatballs, cabbage, spices & cheese.

People have been piling ‘stuff’ on dough, and then heating it up, for thousands of years. That includes the Chinese, who some believe gave Marco Polo scallion pancakes, leading to the theory that he introduced pizza to Italy.

Others point to the ancient Greeks, who covered their flatbreads with herbs, oil, and cheese. But no matter who is responsible for pizza, there is no denying that it has serious global appeal.

Cabbage is an unsung kitchen hero. It’s actually one of the most versatile veggies in your arsenal. If you’re just reserving it for slaws and salads, it’s time to broaden your horizons and discover some of the amazingly delicious things a simple head of cabbage can do.

While the dough is pretty critical, the toppings are just as important to get right. Specific toppings will come down to personal preference.

The duo of sautéed cabbage & meatballs makes for a hearty, satisfying topping perfectly suited for crisp autumn weather. 

Print Recipe
Pizza w/ Cabbage & Meatballs
Votes: 1
Rating: 5
You:
Rate this recipe!
Servings
Ingredients
Potato Pizza Crust
Cabbage
Cheese
Sauce
Servings
Ingredients
Potato Pizza Crust
Cabbage
Cheese
Sauce
Votes: 1
Rating: 5
You:
Rate this recipe!
Instructions
Pizza Crust
  1. Cook potato, peel & mash. In a bowl, combine yeast with lukewarm water. Allow to stand for about 3 minutes until foamy; add butter, salt, sour cream & potato & mix well. Stir in flour, one cup at a time. When dough is completely blended, turn onto a lightly floured work surface. Knead dough about 10 minutes, until smooth & elastic. Place dough in a greased bowl, cover with plastic wrap & allow to rise in a warm draft free place until doubled in bulk, about 1 hour.
Cabbage
  1. In a large pot, place thinly sliced cabbage, water, sugar & salt. Cover & simmer for a few minutes until cabbage is soft & has reduced in volume. Place cabbage in a dish. Melt butter & oil in pot then add flour & cumin to make a roux. Cook for 1-2 minutes, stirring so that there are no lumps as it thickens. Add cabbage to roux & cook for a couple of minutes. Remove from stove & stir in fresh dill & chives; set aside.
Meatballs
  1. Preheat oven to 350 F.
  2. In a bowl, combine all meatball ingredients & mix well. Form into 28 balls & place on foil lined baking sheet that has been lightly greased. Bake for about 10-15 minutes, until JUST cooked. do not OVERBAKE as they will bake some more when they are on the pizza.
Assembly
  1. Line a 9 x 11-inch baking pan with parchment paper. Press out pizza dough over the bottom & up the sides of the pan. Sprinkle a bit of the smoked cheese on the crust, then place a layer of half the cabbage mixture & lightly drizzle with a small amount of tomato soup (sauce). Repeat again with cheese, cabbage & sauce. Roll cooked meatballs in remaining tomato sauce. Place meatballs, in rows on top, then sprinkle with remaining cheese.
  2. Bake for 40 minutes or until crust is golden. Garnish with fresh dill, slice & serve.

Pork Chops w/ Pear Chutney

The warm notes of ginger and cinnamon paired with the sweetness of the pears & shallots are exactly what makes these pork chops go from good to wow!

Brion & I have come to really enjoy chutneys over the years. I think I could make a chutney out of just about anything. You want the perfect balance of the trinity of chutney which is sweet, sour and spicy.

Chutney originated in India as a simple fruit paste preserved in honey, eventually evolving to incorporate a variety of fruits, spices and vegetables. During the 17th century when the British colonized India, they would bring chutney back to England as a novelty good. Because of its bright and exotic flavor, chutney became a popular condiment all over the world.

As chutney made its way to various parts of the world, people adopted new preparation techniques and experimented with various flavor profiles. This cranberry pear chutney really highlights the those wonderful fall pears.

Print Recipe
Pork Chops w/ Pear Chutney
Instructions
Pear Chutney
  1. In a medium pot, combine all chutney ingredients. Bring to a slight simmer for about 6-7 minutes until pears soften, but not mushy. Remove from heat. Set aside until pork chops have been cooked. Serve chutney at room temperature or slightly warmed.
Pork Chops
  1. Heat a large skillet over medium-high heat. Pat pork chops dry and season with salt and pepper to taste. Add 1 tablespoon oil to pan and heat until shimmering. Lay 4 chops in pan and sear until golden on one side, about 3 minutes. Turn and cook 1 more minute. Remove from pan; set aside and keep warm. Repeat with remaining oil and chops. Add chutney to pan and, scrape up any brown bits from bottom using a wooden spoon. Simmer until slightly thickened. Stir in cilantro. Serve chops with chutney.

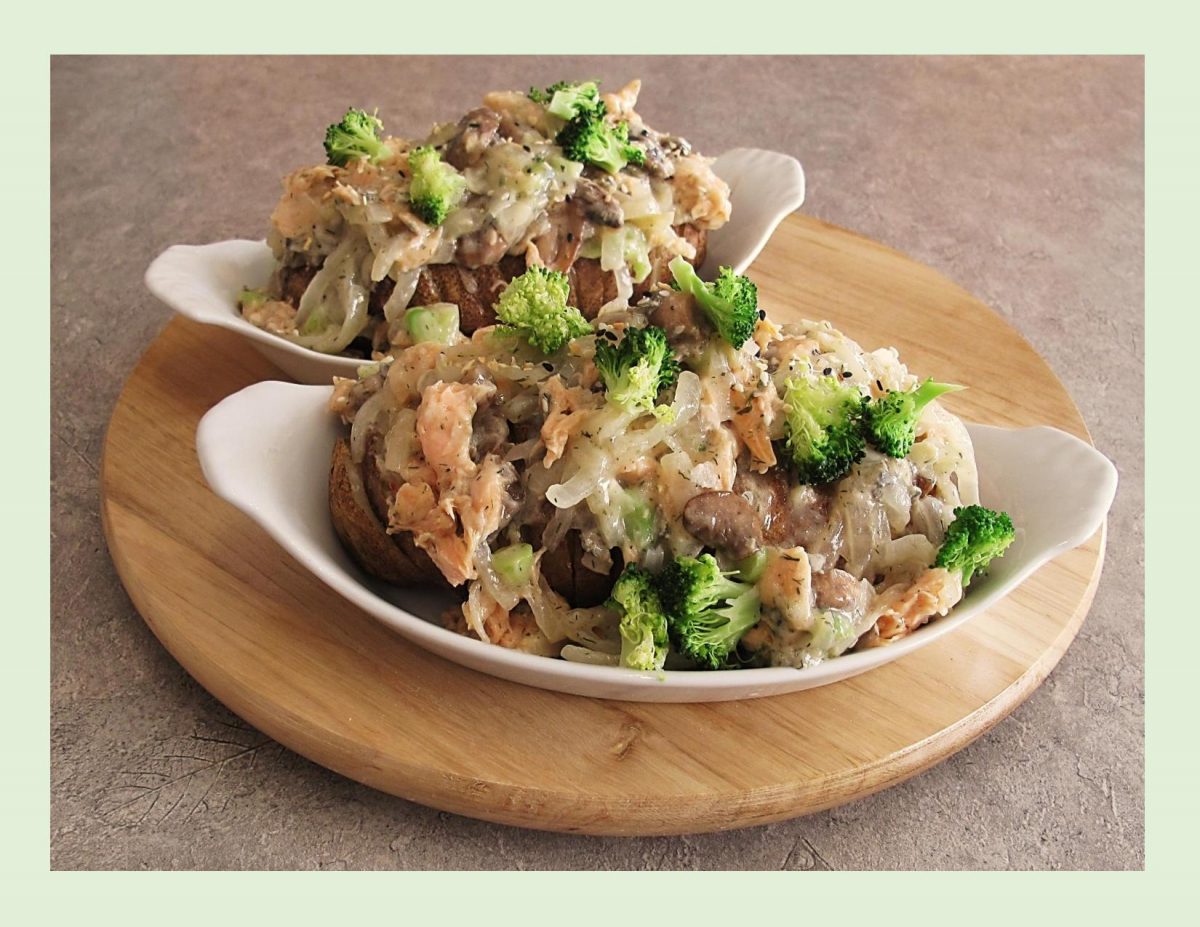
Lemon-Dill Salmon Stuffed Potato

The rustic and humble russet potato is a wonderful ingredient just waiting to be transformed in some mouthwatering and unique way. Many of my favorite recipes are those that make use of simple ingredients to create a full-blown meal filled with an abundance of coziness and comfort.

Salmon stuffed potatoes are a healthy dish that potato lovers will enjoy either for lunch or dinner. Broadening our horizons and experimenting with ‘stuffing’ that give you a whole meal in one big baked potato is well worth it. Think about it: you have veggies, protein and carbs packed into one easy-to-eat and delicious package, ideal for dining solo or serving numerous people.

Print Recipe
Lemon-Dill Salmon Stuffed Potato
Instructions
  1. Preheat oven to 400 F. Line a baking sheet with foil; place a wire rack over the baking sheet.
  2. Place the potatoes in a bowl & drizzle a bit of oil over them; sprinkle with salt & pepper. Rub oil/seasoning into their skins. Place the potatoes on the wire rack & bake for about 70 minutes or until tender when pierced with a knife. Remove from oven & allow to cool just until they can be handled. Roast salmon fillet at the same time until it flakes easily.
  3. While potatoes bake, place a large saucepan over medium-high heat. Pour about 1-2 Tbsp. veg oil in it & add the sliced onions plus a pinch or two of salt & pepper to caramelize to a deep golden brown, for about 20-25 minutes on a medium-low heat, stirring frequently.
  4. Once the onions are caramelized, remove to a dish & set aside. Add mushrooms to saucepan & sauté until moisture evaporates.
  5. Steam broccoli florets in microwave for about 3 minutes, just so they are tender-crisp. Grate cheese. Flake baked salmon.
  6. To prepare sauce, melt butter in a saucepan. Remove from heat, stir in water & sauce mix. Bring to a boil over medium heat, stirring constantly. Reduce heat & simmer 3 minutes.
Assembly & Baking
  1. Make a row of deep cuts in each potato from end to end, they should be just under 1/4-inch apart. Take care not to cut the potatoes all the way through. Place the potatoes in a casserole dish & sprinkle with salt & pepper to taste.
  2. Divide the salmon, onions, mushrooms, broccoli & cheese between the 2 potatoes. Pour the sauce evenly on top & sprinkle with smoked cheese.
  3. Lower oven heat to 350 F. Bake potatoes for about 30 minutes to combine flavors. Remove from oven. Garnish with fresh dill if you wish.
Recipe Notes
  • The secret to making hasselback potatoes is to use a large wooden spoon. Place the potato onto the spoon & cut thin slices across the potato. The edges of the wooden spoon will stop the knife from cutting all the way through the potato.

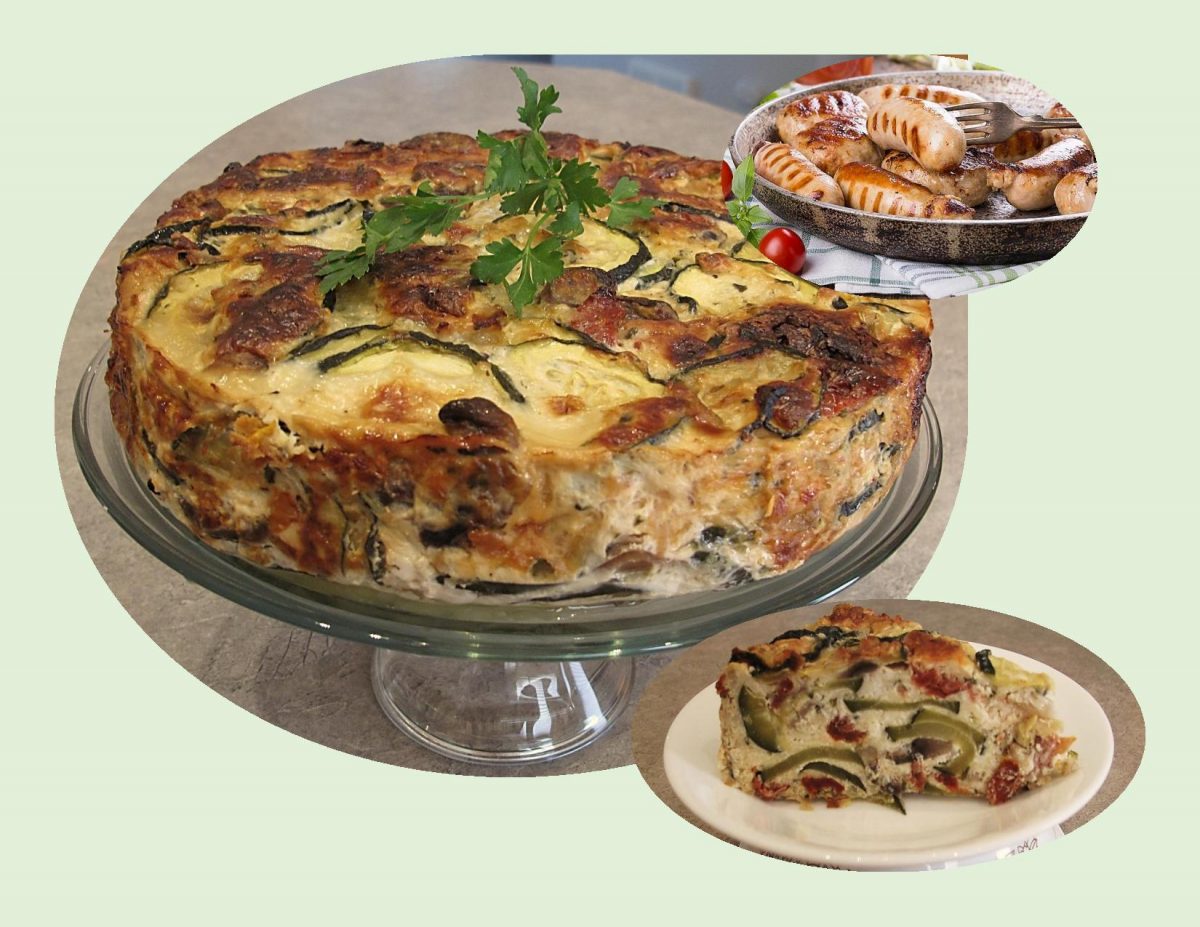
Vegetable Torte w/ Chicken/Turkey Sausage

There is so much to love about summer, not least of which is the amazing bounty of fresh produce. This summer vegetable torte is a great way to showcase flavorful late-summer vegetables and savory herbs that are available. It is similar to a crustless quiche or a frittata that makes a wonderful addition to a brunch or a backyard barbecue.  It can be served warm or cold.  Either way, it’s delicious. 

One of the baking pans I have found extremely useful over the years is the ‘springform pan’. The function of this pan is to make it possible to take out of the pan a cake which is too fragile to trust to the conventional method of turning it upside down. A pan with a removeable bottom eliminates the need to risk inverting the cake.

A cheesecake might be the best example of a cake needing such a specialty pan. This was just what the late Pierre Franey was thinking of when he introduced the springform pan to New York Times readers back in 1980.

The pan he had in mind was made by Kaiser, a German metal goods company founded in 1919 by Wilhelm Ferdinand Kaiser to provide quality equipment to avid bakers like his wife. The company claims to have invented the springform pan, which it calls ‘the intelligent round cake pan’, and is the world’s largest manufacturer of them. They make 30 types, including one with a glass bottom that can double as a serving plate.

Thinking beyond cheesecake, the springform pan works so good when used to make this torte. The high sides of the torte gives it such a special look. It bakes up firm, but still creamy and delicious. It can be served as a vegetarian main course with a side salad, or served alongside some grilled sausage as we did for our meal.

Print Recipe
Vegetable Torta w/ Chicken/Turkey Sausage
Instructions
  1. Place the zucchini in a colander and sprinkle with salt. Let sit for 30 minutes tossing occasionally. Preheat oven to 375 F. Line a sheet pan with a rack. After the zucchini sits for 30 minutes, rinse off the salt, drain and pat dry with a few paper towels. Pour the zucchini slices onto the rack and place in the preheated oven for 30 minutes. Remove and cool.
  2. Reduce oven temperature to 350 F. Brush the bottom & sides of a 9-inch springform pan with oil. Line bottom with parchment paper & brush parchment with oil. Wrap outside of pan with aluminum foil.
  3. In a skillet, heat oil & sauté onion & mushrooms until veggies are tender-crisp, about 10 minutes.
  4. In a large bowl, beat cream cheese until smooth. Beat in eggs until combined ( can still be a bit lumpy). Beat in cream or 1/2 & 1/2. Stir in garlic, basil, Italian seasoning, salt & pepper. Using a slotted spoon to drain off any liquid on sautéed veggies, then add sautéed vegetables & zucchini to egg mixture along with drained sun-dried tomatoes & marinated artichokes. Add grated Swiss cheese; stir with a rubber spatula to combine. Spread mixture in prepared pan & set pan on a baking sheet.
  5. Bake for 1 1/2-1 3/4 hours or until top is puffy & golden brown & the center no longer jiggles when shaken. Remove from oven & allow to cool for 10 minutes in pan, then run a sharp knife around edges of torte to loosen. Gently remove pan sides. Serve warm, room temperature or cold.