Sour Cream Rice Pancakes

ENJOYING SHROVE TUESDAY!

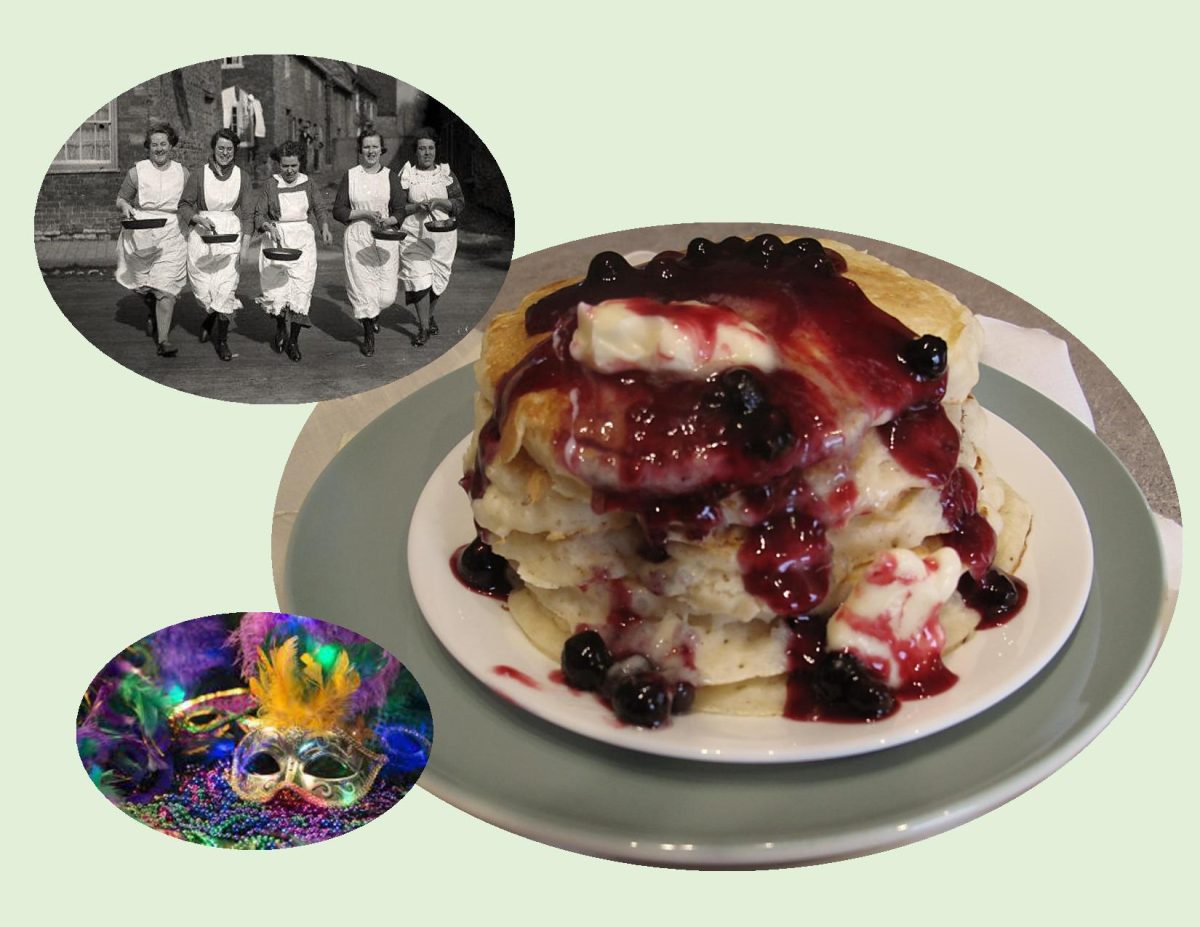
Whether you call it Shrove Tuesday, Mardi Gras, or Pancake Day, Tuesday is the day of feasting and celebration before 40 days of fasting known as Lent. Celebrated by Anglo-Saxon Christians, participants would attend confession in order to be ‘shriven’ (forgiven for their sins). A bell rang to call everyone to church. This bell came to be known as the Pancake Bell and is still rung today.

Shrove Tuesday was the last day to use up eggs, sugar and fats before the fast, and making pancakes was the perfect way to do it! The ingredients of pancakes also symbolize four pillars of the Christian Faith. Flour for sustenance, eggs for creation, salt for wholesomeness, and milk for purity.

While other countries celebrate Shrove Tuesday, or Mardi Gras, with extravagant and exotic parades, in England, people race around towns and villages wielding frying pans that hold pancakes. The tradition was created in 1445 when a woman of Olney, Buckinghamshire was making pancakes when she heard the bell summoning her to church. In a rush to get to church, she ran, still in her apron and holding her frying pan. The Olney Pancake Race is now the most popular pancake race in the world. Participants must be local housewives and they must wear an apron. The goal of the race is to run while carrying a frying pan with a cooked pancake inside flipping it as you run. In order to win, the woman must successfully toss the pancake three times throughout the race, reach the church and serve the pancake to the bell ringer. Hundreds of people gather every year to participate in this fun tradition!

Mardi Gras, which translates to Fat Tuesday in French, is largely celebrated in the city of New Orleans, Louisiana. Parades, parties, and feasts dazzled in colors of green, gold, and purple fill the city for two weeks leading up to Fat Tuesday.

Personally, I have always liked pancakes, so in keeping with the Shrove Tuesday tradition Brion & I will be enjoying some today. Although I can’t quite picture myself running in a pancake race, I’m making some sour cream rice pancakes … if you like rice pudding as well as pancakes, these are for you!

Print Recipe
Sour Cream Rice Pancakes
Votes: 1
Rating: 5
You:
Rate this recipe!
Course Main Dish
Cuisine American
Servings
Ingredients
Pancakes
Blueberry Sauce
Course Main Dish
Cuisine American
Servings
Ingredients
Pancakes
Blueberry Sauce
Votes: 1
Rating: 5
You:
Rate this recipe!
Instructions
Pancakes
  1. In a large bowl, whisk together eggs, sugar, milk, sour cream, butter & vanilla.
  2. In a separate bowl, combine flour, cooked rice, baking powder, baking soda & salt.
  3. Add the flour mixture to the liquid mixture & whisk together. Let batter sit for 15 minutes.
  4. Heat a nonstick griddle to medium-low heat. Spray with oil. Using a 1/4 cup measure, portion out batter on griddle. Cook for about 2 minutes per side.
  5. Serve immediately garnished with blueberry sauce or your choice of topping.
Blueberry Sauce
  1. In a small saucepan, combine cornstarch, sugar & salt. Add water & blueberries & cook until 'clear' & bubbling. Remove from heat & stir in butter & lemon juice. Serve warm over pancakes.

‘Leftover’ Turkey & Rice Enchiladas

Most families have a roundup of classic holiday dishes that they make every year. Those dishes provide plenty of leftovers for days (maybe even weeks) after the holiday has passed. It follows that during the holiday season, the meals start to look the same. We love leftovers, we really do, but every meal enjoyed after Christmas Day starts to seem identical. That is, until you plan a boxing day feast with a spicy twist? These tasty enchiladas are a saucy, cheesy way to use up any leftover turkey from your Christmas dinner.

Print Recipe
Turkey & Rice Enchiladas
Votes: 1
Rating: 5
You:
Rate this recipe!
Course Main Dish
Cuisine Mexican
Servings
Ingredients
Course Main Dish
Cuisine Mexican
Servings
Ingredients
Votes: 1
Rating: 5
You:
Rate this recipe!
Instructions
  1. Preheat oven to 425 F. Coat a 9 x 13-inch baking dish with nonstick spray.
  2. Cook rice. Allow to cool slightly. Stir together rice, half the cheese, stuffing, turkey, green onions, salt and pepper in a medium bowl. Spread 1/2 cup of gravy on the bottom of prepared pan.
  3. Divide filling down the center of each tortilla. Roll each tortilla up tightly and place seam-side down in baking dish. Top with the remaining gravy and sprinkle with remaining cheese.
  4. Bake, uncovered, for 20 to 25 minutes, or until tortillas are lightly browned and the filling is heated through.
  5. Top with cranberry sauce and sprinkle with parsley.

Beef Cabbage Rolls – Reconstructed

Some years ago I acquired a great little book from the Lea & Perrins Company. The main focus of the book was to promote their Worcestershire Sauce.

Worcestershire sauce was created in the heyday of the great English table sauces. In 1838, the commercial Worcestershire sauce was ‘born’. The story of the origins of the recipe for the sauce is entangled in a web of legends, but the common thread is that its place of origin was India. Versions of how the recipe came to England usually credit a member or members of the prominent Sandys and/or Grey families. Typically the stories indicate an effort to reproduce a Bengali recipe for a sauce with the assistance of chemists (pharmacists) John Wheeley Lea & William Henry Perrins of Worcester. In most editions of the tale, the first attempt is a failure, but the results are stored away; fermentation occurs and a later tasting reveals the delightful concoction now enjoyed all over the world.

The exact recipe is ‘secret’, but it is known to include both common and exotic ingredients: anchovies, shallots, chilies, cloves, tamarinds (brown pods from a tropical tree), garlic, sugar, molasses, vinegar and salt. There are about as many ways to incorrectly pronounce Worcestershire as there are ingredients in the sauce. The tremendous depth of flavor of the sauce is the result of many different ingredients being fermented individually, blended and fermented again.

Worcestershire sauce contains something for everyone …. sweetness, acidity and saltiness. This probably explains the reason we still see it on our grocery shelves 184 years after it was first created.

I’ve used this simple little recipe from the Lea & Perrins book numerous times and it always tastes great.

Print Recipe
Beef Cabbage Rolls - Reconstructed
Votes: 1
Rating: 5
You:
Rate this recipe!
Servings
Votes: 1
Rating: 5
You:
Rate this recipe!
Instructions
  1. Cook cabbage & rice: set aside. Sauté chopped onions; set aside.
  2. In a large bowl, combine beef, cooked rice, salt, Worcestershire sauce, egg & catsup (or BBQ sauce).
  3. Preheat oven to 350 F.
  4. Roll out meat mixture between 2 sheets of parchment or foil paper into an oblong 1/2-inch thick. Spread meat with cabbage & onions & sprinkle with Italian seasoning.
  5. Using the help of the bottom sheet of paper, roll up in jelly-roll fashion. Place on greased shallow baking pan.
  6. Bake for 40-50 minutes. Slice & serve as is or with a sauce of your own choice.

Leek, Turkey & Mushroom Quiche w/ Rye Crust

At one time, the typical North American pantry included a single cannister of flour. Today, supermarkets stock a host of milled options, reflecting increased consumer demand for diversity in the baking aisle. Whether you are exploring health trends, culinary interests or ethnic cuisines, when it comes to flour, there are more choices than ever.

I chose a mixture of rye and all purpose for my crust today because I think rye pairs well with these quiche ingredients. Rye flour is almost malty and sweet in flavor with hints of molasses. Rye also has the benefit of being lower in gluten than wheat flour, which means the dough can be handled longer before becoming tough as compared to traditional pastry. Rye pastry, besides being flavorsome and flaky, is great paired with both sweet and savory fillings.

One of the things I find most fascinating about working with food, is that even if you’ve been doing it for a long time, there’s always something new to try, or a new way to try something you’ve already perfected. Food is amazing!

Print Recipe
Leek & Mushroom quiche w/ Rye Crust
Votes: 1
Rating: 5
You:
Rate this recipe!
Servings
Ingredients
Rye Pastry
Servings
Ingredients
Rye Pastry
Votes: 1
Rating: 5
You:
Rate this recipe!
Instructions
Rye Pastry
  1. In a small bowl, whisk together flours & salt. Using your fingertips, rub in butter until coarse meal forms & small lumps remain. Slowly sprinkle dough with cold water, 1 Tbsp at a time, quickly stirring with a fork or your fingers until the dough becomes sticky & begins to clump together.
  2. Form dough into a disk & wrap in plastic wrap; refrigerate for at least one hour. Once chilled, roll out dough on a lightly floured surface. Carefully transfer the dough to a quiche pan & neaten edges.
  3. To avoid a soggy quiche crust, prebake the crust on 400 F. Using a fork, lightly prick the bottom of the crust. Take a sheet of aluminum foil & layer it on top of the pie crust, gently nudging it down so its snug on the bottom & the sides. Fill the foil covered crust with pie weights to hold it in place. Bake 10-15 minutes. Remove from oven & remove pie weights & foil.
Filling
  1. Cook rice; set aside. In a skillet, brown ground turkey. Transfer to a plate & set aside.
  2. Wash & trim leeks well. Dry with paper towel & slice thinly. In the skillet, heat oil & butter combo. Add the leeks & a pinch of salt. Cook, stirring, until they begin to soften, about 5 minutes. Add garlic & mushrooms & saute until browned.
  3. Preheat oven to 350 F. In a bowl, whisk together eggs, milk & seasonings. Grate cheese.
  4. Place cooked ground turkey on bottom of crust. Top with cooked rice & a small bit of the cheese. Next add the leek/mushroom mixture. Sprinkle the remaining cheese on top. Carefully pour egg/milk mixture over the entire quiche.
  5. Bake for 30 minutes or until set & just beginning to brown on top. Remove from oven & allow to sit for at least 15 minutes before serving.
Recipe Notes
  • I divided my pastry & made 2 individual quiches instead of one 9-inch size. Just a matter of personal preference.

Stuffed Pork Medallions w/ Cabbage & Apples

Tenderloin has always been one of my favorite ‘go to’ meats. Lean, tender, tastes great, so what more could you ask for?! I’m forever pairing it with another kind of stuffing or roasting it with different glazes or marinades.

Today I wanted to roast it with the classic combo of cabbage and apples. The perfect accompaniment probably because you really don’t need to add much else to the meal to make it taste great.

Cabbage isn’t glamorous. It doesn’t have a fancy name but it is common, versatile and lasts forever in the refrigerator. Even the smallest head yields enough for at least two or three meals.

When cabbage is roasted, a caramelized sweetness comes out, giving it such a nice flavor and especially when paired with apples.

Sometimes, cabbage is avoided because when cooked, the sulfur that it contains multiplies, giving off an unflattering odor. It helps to avoid using aluminum pans when preparing cabbage; aluminum reacts strongly to the sulfur present in the leaves. Stainless pots make a much better choice.

You can neutralize the odor by adding 1 teaspoon of white vinegar or lemon juice. Certain ingredients will also help absorb the odor. Try adding a bay leaf or a couple of ribs of celery to sautéed cabbage. The sulfur odor will be absorbed without changing the taste of the cabbage. Simply discard the bay leaf or celery before serving.

No doubt about it, the flavor in this meal doesn’t lack for anything.

Print Recipe
Stuffed Pork Medallions w/ Cabbage & Apples
Instructions
Tenderloin Stuffing
  1. Cook rice. Place in a bowl & set aside. In a skillet, heat oil & sauté onions until tender crisp. Add garlic & mushrooms & sauté for another 3-4 minutes. Add all herbs & spices; cook another minute than transfer to bowl with rice. Add Panko crumbs & egg, stirring to combine.
  2. Remove silver skin from tenderloins. Cut a slit all the way down the long end of your tenderloin, making sure not to cut all the way through. Open the tenderloins like a book, cover with a sheet of plastic wrap & pound with a meat mallet until they are about 1/2-inch thickness.
  3. Divide filling mixture between the two tenderloins & spread evenly over the surface of the tenderloins, leaving 1/2-inch at the borders. Roll tightly starting with the long end & secure the ends with toothpicks. Season all over with salt & pepper.
  4. Preheat oven to 400 F. Heat a large oven proof skillet with 2 Tbsp oil. Once oil is hot, place tenderloins in the skillet & sear about 2 minutes per side. Transfer the skillet with the tenderloins to the oven & bake for about 18-20 minutes or until thermometer reads 145-150 F. in the thickest portion of the meat. Transfer to a cutting board, brush with pan drippings. Cover loosely with foil & allow to rest 10 minutes before slicing.
Cabbage & Apples
  1. While tenderloin is roasting, prepare cabbage/apple mixture. In a large skillet over medium heat, cook onion in butter until soft & translucent, 3-4 minutes. Add garlic & continue cooking just until fragrant, 1 minute more.
  2. Add the cabbage & continue cooking until wilted, 6-8 minutes. Season to taste with salt & pepper. Continue cooking until cabbage begins to caramelize, 4-5 minutes longer.
  3. Add the cubed apple, cider, mustard & brown sugar; carefully combine. Cover & cook until any liquid has evaporated & apples are soft. Place on a serving platter. Top with sliced tenderloin medallions & serve. If you wish, you could also serve the tenderloin with some mashed potatoes & oven roasted carrots.

Stuffed Acorn Squash w/ Turkey & Rice

Squash is one of those quintessential autumn foods that we have come to recognize. Even though it is considered a winter squash, acorn squash belongs to the same species as all summer squashes including zucchini and yellow crookneck squash. The main difference between the classifications is that summer squashes have soft skins and tender seeds and are fairly perishable, while the winter types have hard shells, fully formed seeds and are very suited to long storage.

For all their many splendored shapes and colors, squash is not something most of us crave, although they are an integral part of the cuisine in scattered points of the globe, such as South and Central America, the West Indies, India and Japan.

The acorn squash is similar in flavor to the butternut squash yet has a bit of a nutty taste to it as well. Resembling its name in shape, the acorn squash usually weigh between 1-2 pounds and generally grow between four and seven inches long.

Roasting them partially before stuffing makes the squash a lot more tender and easier to eat. I am always aware of the concept of ‘seasonal eating’. I was born in September, so I figure its totally natural to love fall food (& colors) such as squash, pumpkin, apples and cranberries.

The large cavity of acorn squash just begs to be filled. In this recipe, seasoned ground turkey and smoked Gouda cheese join forces in the savory stuffing. One squash the size of a grapefruit or a little larger is usually enough for two people.

Print Recipe
Stuffed Acorn Squash w/ Turkey & Rice
Votes: 1
Rating: 5
You:
Rate this recipe!
Servings
Votes: 1
Rating: 5
You:
Rate this recipe!
Instructions
  1. Preheat oven to 400 F. Spray the fleshy part of the seeded, acorn squash & place halves on a baking sheet, cut side down. Bake for about 20 minutes, or until flesh is slightly tender. Cook rice & grate cheese, set aside
  2. In a skillet, heat 1 Tbsp of oil. Sauté garlic & shallots for 2 minutes. Add the mushrooms, cumin & thyme & sauté another 3 minutes. Remove veggies from pan & set aside in a large mixing bowl.
  3. Add the remaining Tbsp of oil to skillet & brown the ground turkey for about 5 minutes or until no longer pink. Drain if necessary & add to mixing bowl along with cooked rice. Stir to combine well.
  4. Using a spoon, take equal portions of the filling & place into the cavity of each acorn squash half. Place the baking tray back into the 400 F oven & bake for 20 minutes.
  5. Top each acorn squash half with sprinkles of the shredded cheese. Place back in the oven & bake for another 5 minutes or until the cheese is bubbly.
  6. When ready to serve, garnish with sliced green onion.
Recipe Notes
  • To make it easier, microwave the acorn squash for a few minutes, just to soften a bit before attempting to slice in half.

Shrimp Quiche Casserole

Quiche has always been an incomparable, one dish meal in my opinion. It’s kind of a whole food with protein, vegetables, dairy and carbohydrates. Quiche’s convenience wins hands down. After mixing the basics … eggs, milk or cream … any ingredients will work from leftovers to freshly cooked. You can use just about anything that you have in the refrigerator.

While some recipes are crust-free, most quiches have some kind of foundation. Potatoes, rice, cauliflower all make nice ‘crust’ options. Quiche makes a great choice for breakfast, lunch or dinner. To keep it interesting, I’m always trying to find ways to tweak the ingredients to make it taste just a bit different each time.

Two of Brion’s favorite foods are broccoli and rice. I decided to make a rice/cheese crust, which I pre-baked so it would get a little crispy. Then, when it bakes with the filling, it holds together quite nicely. The seasoning plays a crucial part in the quiche.

Print Recipe
Shrimp Quiche Casserole
Votes: 1
Rating: 5
You:
Rate this recipe!
Course Lunch, Main Dish
Cuisine American, French
Servings
Votes: 1
Rating: 5
You:
Rate this recipe!
Instructions
Rice Crust
  1. Preheat oven to 350 F. Blend crust ingredients. Using the back of a large spoon, press into a greased 8-inch round baking dish & bake for 15-20 minutes.
Filling
  1. In a skillet, melt 1 Tbsp butter; saute garlic & mushrooms, stirring for about 5 minutes. Stir in onions, cook for another 2 minutes. Transfer to a large bowl.
  2. Pour 2 cups water into skillet & bring to a simmer. Cook shrimp for about 1 minute or JUST until pink. Reserving 1 cup of the liquid, rinse shrimp under cold running water. Shell & devein shrimp; arrange over rice in baking dish.
  3. Preheat oven to 325 F. (If you have turned it off after pre-baking crust). In a heavy saucepan, melt remaining butter & stir in flour. Cook, stirring, for about 2 minutes, without browning; gradually whisk in reserved liquid & milk. Cook, stirring, for about 20 minutes or until thickened.
  4. Remove from heat; stir in 1/2 cup of the cheese, lemon zest & spices until cheese is melted. Stir into vegetable mixture & pour over shrimp in rice crust.
  5. In a small bowl, stir together remaining 1/4 cup cheese & bread crumbs. Sprinkle evenly over 'quiche'. Bake for about 40 minutes or until quiche is 'set'. Cut into wedges & serve.

Savory Layered Puff Pie

That expression, ‘what’s old is new again’, definitely can be applied to so many things in today’s world. Very often, when you think you have come up with a new idea its really just a modernized version of an old one.

As I’ve probably mentioned before, Brion & I really enjoy casseroles. I happened to recall a casserole that was published in Good Housekeeping in 1958. My mother made a version of it at that time. Being mostly vegetables, it had such a nice flavor. It was called Seven Layer Casserole consisting of vegetables, rice, tomato soup and sausage or ground meat.

With that ‘taste of a memory’ in mind, my recipe development turned into a savory layered casserole. I used vegetables, rice, cheese and ground pork with a layer of puff pastry. When you prepare it, the sheet of puff pastry is on top so it gets crispy, but when it is baked, you flip it over and it becomes a bottom crust.

Of course, we are talking about frozen puff pastry here. It seems it has become a supermarket staple, delivering all the glories of puff pastry without all the hard hours of work. This is a convenience food that’s perfectly useful for cooks of all skill and commitment levels.

All this talk of frozen puff pastry probably seems odd coming from someone who has made a living in the food industry. But lets face, to make it from scratch is either a labor of love or a sign of madness depending on who you are. So here’s my remake of that vintage 7-layer casserole.

Print Recipe
Savory Layered Puff Pie
Instructions
  1. Cook rice. In a skillet, saute onion in 1 Tbsp butter for a few minutes. Add ground pork, water & seasonings; scramble-fry until cooked. Drain well & remove from skillet. Add another Tbsp of butter to skillet & saute drained mushrooms then blot on paper towel.
  2. Grate cheese combo of choice. Preheat oven to 375 F. Line casserole baking dish with foil & butter.
  3. Start layering with mushrooms, cheeses, rice, meat/onion combo & frozen green beans. Top with puff pastry. Cut a few slits in the pastry for vents. Brush with egg wash.
  4. Bake for about 30-40 minutes or until pastry is golden. Remove from oven & allow to stand for about 15-20 minutes then invert on a serving plate. Remove foil paper & cut into serving pieces. If you wish, serve the casserole with a brown gravy.

Cheesy Shrimp & Rice Casserole

One of the first things Brion and I noticed when we lived in Ecuador for three months, was how much rice the grocery store had on its shelves. Brion is a true rice lover, so when we went grocery shopping, it was definitely on the ‘list’. To our amazement there was an entire isle, from top to bottom, dedicated to rice alone.

Rice has been a staple of the Ecuadorian diet forever, both along the coastal regions and in the mountainous areas. A large scoop of white, starchy rice accompanies most meals. In stores, you can buy brown rice, white ‘new rice’, aged rice (but not minute rice).

Shrimp rice is a classic Ecuadorian and Latin American dish. The fact that Ecuadorians love rice, anything you can think of, there is a rice-based dish for it, especially if it concerns any type of seafood. Because of the fertile soils and the humid, tropical climate of the coast, Ecuador also produces a stunning variety of fruits and vegetables, most notably bananas, melons and other exotic fruits like guava and passion fruit.

This is a short cut version of their ‘arroz con camarones’ (rice & shrimp) dish. Great little meal!

Print Recipe
Cheesy Shrimp & Rice Casserole
Votes: 3
Rating: 4.33
You:
Rate this recipe!
Servings
Votes: 3
Rating: 4.33
You:
Rate this recipe!
Instructions
  1. In a large skillet, saute onions, peppers & garlic in oil until tender-crisp, about 5 minutes. Stir in tomato sauce & salsa; simmer 2 minutes, stirring occasionally. Stir in shrimp & corn; simmer 2 minutes. Stir in bacon.
  2. Preheat oven to 375 F. Spoon cooked rice in a buttered, 9 X 13-inch baking dish; top with shrimp mixture & cheese. Cover with foil. Bake casserole, covered, 35 minutes or until heated through, uncovering the last 20 minutes.

Basil Chicken Stuffed Eggplant

It goes without saying, eggplant is beloved in many cuisines. It has been considered the ‘queen of the garden’ with it’s almost purple-black, glossy skin and cap-like crown.

Eggplants are bitter when raw but develop a savory and complex flavor when cooked. The texture of the flesh is meaty and easily absorbs sauces and cooking liquids.

Native to the Indian subcontinent and the Himalayan area, they have been cultivated in Southeast Asia since prehistoric times. Cultivars in the 18th century were white to pale yellow in color and resembled hen’s eggs which explains the reason this fruit is called ‘eggplant’. There are dozens of eggplant subspecies grown throughout the world in many shapes and sizes. 

The most popular one we see here in North America is the dark purple ‘globe’ eggplant which ranges in weight from 1-5 pounds. When buying them, look for ones with smooth, firm, unwrinkled skin and a fresh looking green stalk or cap. Eggplant is commonly used in ratatouille, pasta dishes, spreads, dips, moussaka or stuffed and roasted.

Today, I’m making a stuffed version with an interesting fresh basil-chicken filling.


Print Recipe


Basil Chicken Stuffed Eggplant

Votes: 1
Rating: 5
You:
Rate this recipe!

Servings

Votes: 1
Rating: 5
You:
Rate this recipe!


Instructions
  1. Preheat oven to 375 F. Cut eggplant in half lengthwise; carefully hollow out each half. Roughly chop the removed flesh.

  2. In a large skillet, heat 2 Tbsp. olive oil & saute onion until tender, about 5-6 minutes. Add the chopped eggplant, mushrooms & garlic. Cook until eggplant is tender, about 7-8 minutes. Add ground chicken, oregano, salt & pepper. Cook until chicken is no longer pink, about 10 minutes.

  3. Stir in in roasted red peppers, cooked rice & fresh basil; remove skillet from the heat. Place eggplant halves in a baking dish & fill with chicken/rice mixture. Sprinkle with sunflower seeds; drizzle with remaining olive oil & bake 30-35 minutes until tender.

  4. Remove eggplant from oven & top with grated cheeses.