Pumpkin spice – the festive blend can be found flavoring absolutely everything at this time of year. From late summer to early January, coffee drinks like lattes and cold brews, baked goods such as cookies, muffins, and pies, and various breakfast items like pancakes and oatmeal. It’s also found in cereals, creamers, and even some savory dishes, while non-food products like candles and soaps are popular as well. Its associated spices have become laden with nostalgia during the fall season.
The modern demand for all things pumpkin spice can be traced to Starbucks’ introduction of the Pumpkin Spice Latte (PSL) in 2003. The PSL’s success cemented the combination of cinnamon, nutmeg, ginger, and cloves as the quintessential flavor of autumn.
The flavor itself is much older. Spice companies like McCormick began selling pre-mixed ‘pumpkin pie spice’—a blend of cinnamon, ginger, nutmeg, and cloves—in the 1930s. This made the seasonal flavor more accessible to home bakers.
The history of pumpkin spice cream cheese cookies is a recent development, emerging in the 2020s. The cookie gained popularity by combining the established autumn tradition of pumpkin spice with the widespread appeal of cream cheese-filled, ‘bakery-style’ cookies.
These pumpkin spice cream cheese cookies feature a vanilla dough with a pumpkin-spiced filling swirled together in a spiral of simple sweetness and aromatic spice. I guess you could say, ‘the same only different’.
Print Recipe
Pumpkin Spice Cream Cheese Cookies
Votes: 1
Rating: 5
You:
Rate this recipe!
Ingredients
Pumpkin/Cream Cheese Filling
Ingredients
Pumpkin/Cream Cheese Filling
|
Votes: 1
Rating: 5
You:
Rate this recipe!
|
Instructions
Cookie Dough
In a bowl, whisk together flour, baking powder & salt. Set aside.
In a large bowl, beat softened butter & sugar until light & fluffy, approx. 2 minutes. Add the egg, egg yolk & vanilla. Mix until well combined, about 1 minute.
Gradually add the flour mixture to the wet ingredients, mix on low speed until a thick, sticky dough forms.
Divide dough into 2 equal pieces & chill for at least 2 hours.
Filling
In a bowl, beat cream cheese until smooth. Add powdered sugar, pumpkin puree, spices & vanilla. Beat until smooth & creamy. Set aside but do not refrigerate.
Assembly
Once dough has chilled, roll out one piece of dough at a time between 2 large pieces of parchment paper about 1/4 inch thickness. Divide filling mixture between the two rolled out pieces of dough.. Using the parchment paper, roll each tightly into a log. Cover with plastic wrap & place in freezer overnight.
Baking
Remove dough from freezer & allow to sit at room temperature only long enough so you can slice it as this is a very soft dough.
Preheat oven to 350 F. Line 2 baking sheets with parchment paper.
Slice logs (I like to use floss for slicing to make a clean cut) into 1/4"-1/2" thick cookies. Sprinkle with pepita seeds. Arrange on cookie sheets & bake for 10-12 minutes.
Allow to cool for 2-5 minutes on the pan then remove them to a cooling rack.
Recipe Notes
These are a soft cookie & are best eaten within a few days. We enjoyed them so much that wasn't a problem!

Many cultures have embraced the apple pie and put their own spin on it, so why is it known as the quintessential American dessert. German immigrants brought over the modern hamburger and Italians were the first to combine cheese with macaroni. Apple pie—a dish that commonly follows the words ‘American as’ —has a reputation for being one of the rare dishes the country can fully claim. But as it turns out, the history of the iconic American dessert isn’t so simple.
The phrase ‘as American as apple pie’ emerged in the early 20th century. It gained widespread popularity during World War II, when soldiers were asked what they were fighting for. The response often included apple pie, alongside other symbols of American life like mom and baseball. This association cemented apple pie’s status as a quintessential American food.
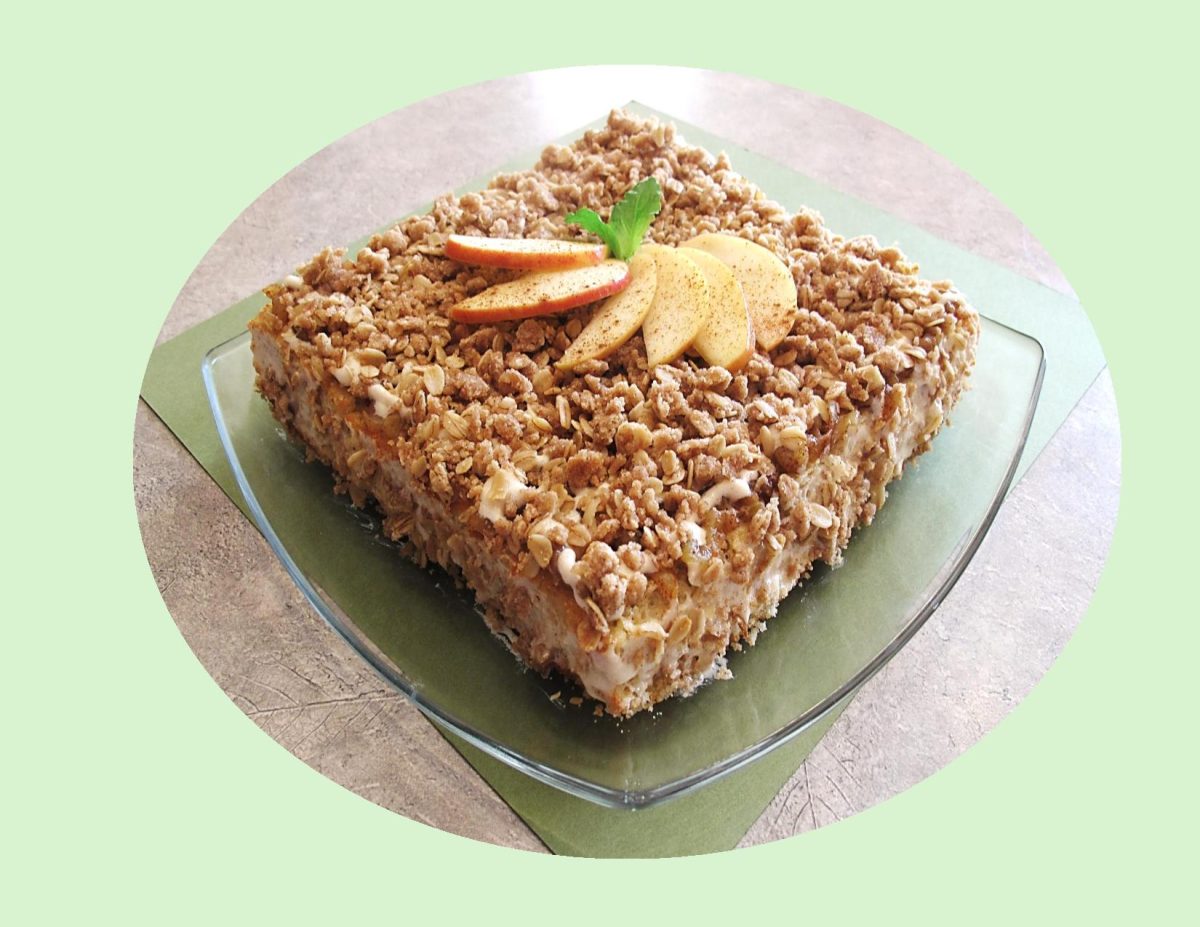
For some cooks, grated apple pie was a practical alternative to the traditional sliced version. Grating or shredding the apples creates a pie with a tender, uniform, and almost custard-like filling, unlike the chunkier texture of a standard pie. Shredding the fruit reduces the cooking time required to soften the apples, which was an advantage for home bakers. As shown in some historic recipes, eggs and melted butter were often mixed into the grated apples, creating a richer filling.
This pie reminds me of an experience I had that seems quite comical when I think of it now. Before I had ever studied in the commercial food industry or made any number of pies, a friend gave me a recipe for a ‘Swiss’ apple pie. Her instructions were to place the shredded apple in a pastry lined pie pan. Next, pour vanilla pudding over the apples and bake. It sounded great! I purchased a box of Jell-O brand vanilla pudding & pie filling, made a crust and filled it with shredded apples. I assumed you were supposed to cook the pudding before covering the apples with it for some reason. Wrong!! What resulted was apples baked in a pastry shell with a ‘rubber top’. I guess we all have to start somewhere, right?!
Today, I wanted to revisit the grated apple pie idea being fall with all the wonderful apples that are in season right now.
Print Recipe
Grated Apple Pie w/ Salted Carmel Topping
Votes: 1
Rating: 5
You:
Rate this recipe!
|
|
Votes: 1
Rating: 5
You:
Rate this recipe!
|
Instructions
Pastry
Sift flour, sugar & baking powder into a bowl. Add salt & rub butter into flour with fingertips until it resembles breadcrumbs. In a small bowl, whisk together the egg, vinegar & water. Sprinkle the egg/water mixture over the flour mixture & combine ONLY until dough comes together. DO NOT OVERMIX. Wrap the dough in plastic wrap & refrigerate for 30 minutes.
Apple Pie
-
Grate apples & combine with lemon juice.
Line a 9-inch pie plate with chilled pastry. In a bowl, mix together the sugar, flour, cinnamon, nutmeg & salt. Sprinkle 3 Tbsp evenly in the bottom of the crust & set the rest aside.
In a mixing bowl, beat the butter until creamy. Add the remaining sugar mixture & beat until incorporated. Add the vanilla & eggs. Beat until mixed well & the mixture turns lighter. Stir in the apples.
Pour the filling mixture into the crust & spread out evenly. Place a pie ring or one made out of aluminum foil around the edges of the crust.
Bake at 450 F. for 15 minutes then reduce heat to 350 F. & bake for an additional 30-35 minutes. If the crust is not brown enough, remove the pie ring for the last 10 minutes of the cooking time.
Salted Caramel Sauce
Place the sugar & water into a large heavy bottomed saucepan. Cook, stirring, over a low heat until sugar has dissolved. Increase heat & bring to a boil for 5-7 minutes, stirring occasionally, until you get a deep amber color.
Remove from heat & immediately add the heavy cream & stir. Be careful as it will bubble up quite a lot. Once the caramel has dissolved into the cream, add the butter & salt. Place in a small blender & blend for a few seconds until mixture comes together nicely. Place into a small container & cool.
Finish
Once pie is at room temperature, brush or drizzle sauce over the apple filling. Chill further & serve.
Recipe Notes
The purpose of putting some of the sugar mixture into the bottom of the pie crust is to absorb some of the liquid that forms when sugar & fruit are mixed together.
If the apples produce a lot of juice, drain them BEFORE adding them to the batter. If you pour off the juice after adding the apples to the batter, you will lose a lot of the spice flavor.
Using a deep dish will help avoid it from running over in the oven.

Eggnog, which is actually a drinkable form of custard, began in England, where eggnog was the trademark drink of the upper class. There was no refrigeration, and the farms belonged to the big estates. Those who could get milk and eggs to make eggnog mixed it with brandy or Madeira or even sherry. But it became most popular in North America, where farms and dairy products were plentiful, as was rum. The name, ‘eggnog,’ is a combination of ‘noggin,’ a wooden cup, and ‘grog,’ a strong beer.
Throughout Canada, the United States and some European countries, eggnog is traditionally consumed over the Christmas season, from late October until the end of the holiday season.
The eggnog tradition kind of reminds me of the fall ‘pumpkin spice’ craze. What started out as a drink is now added to ice cream, cookies, cake, coffee, protein powder, latte, etc. etc.…
These cookies are soft and pillow-y, filled with chai spices and topped with a spiced rum glaze. The warmth of the cinnamon and nutmeg brings out the eggnog flavor in the cookies, making the traditional holiday drink the main flavor.
The holidays are a time for tradition. For a lot of people, that tradition consists of baking …. baking cookies…. lots and lots of cookies!!
Print Recipe
Eggnog Chai Cookies w/ Spiced Rum Glaze
Votes: 1
Rating: 5
You:
Rate this recipe!
|
|
Votes: 1
Rating: 5
You:
Rate this recipe!
|
Instructions
Cookies
Preheat oven to 325 F. Line cookie sheets with parchment paper.
In a large bowl, whisk together flour, baking powder, salt, cinnamon, nutmeg, ginger, cloves, cardamom & black pepper. Set aside.
In another bowl, using a mixer, cream together butter & sugars. Add egg yolks & vanilla. Beat until creamy. Carefully beat in eggnog.
Add dry ingredients to wet ingredients & beat until just combined.
Fit a piping bag with a large star tip nozzle & fill with cookie dough. Make 30 cookie swirls on parchment paper. Bake for 15-20 minutes or until the bottoms just start to turn golden brown.
Immediately transfer cookies to a paper towel covered flat surface. Allow to cool.
Glaze
Whisk together powdered sugar & cinnamon. Add vanilla, eggnog & spiced rum. Whisk until smooth.
Drizzle over cooled cookies & serve.
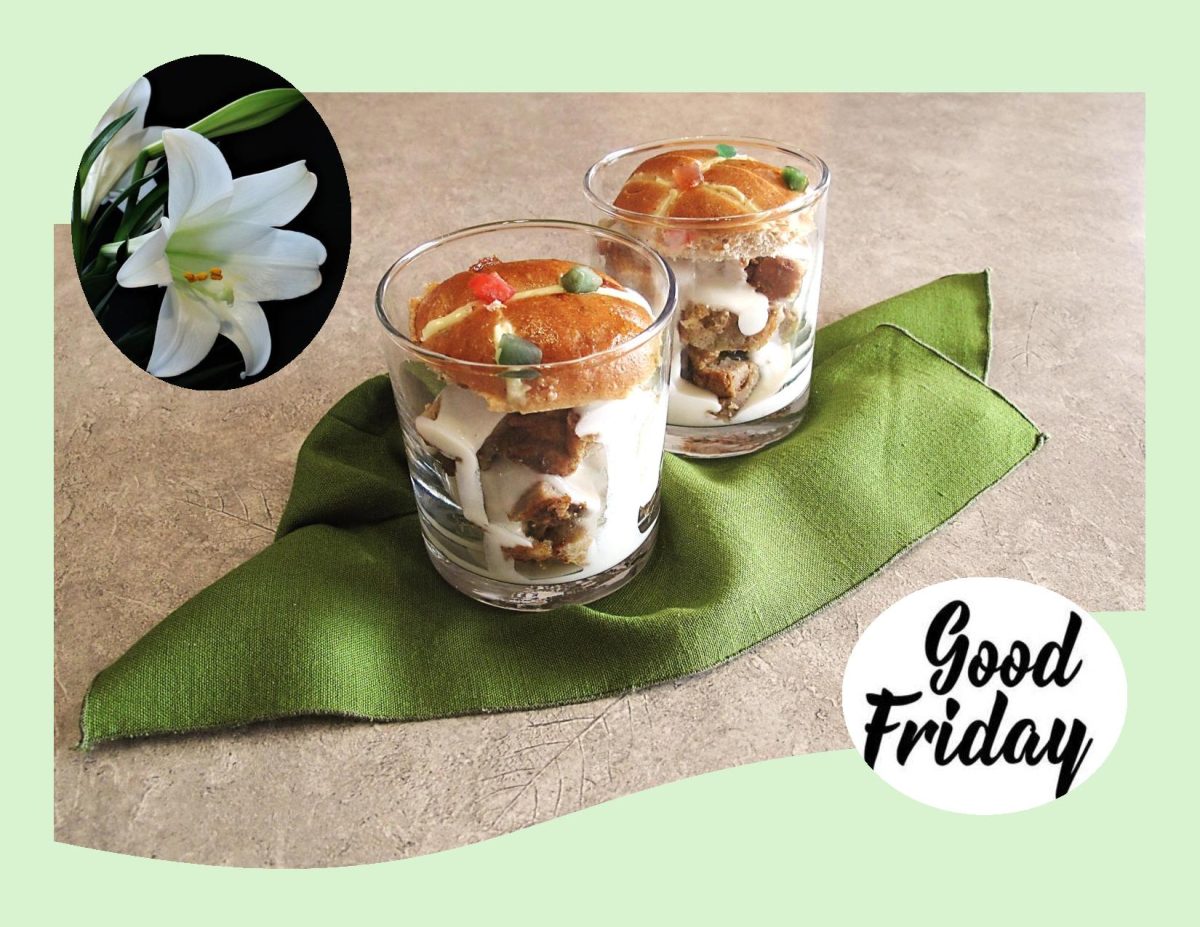
CELEBRATING GOOD FRIDAY!
Bread pudding always gives me reason to remember good things. Truly a comfort food for those of us that recall it from childhood days. It’s not that the dish was invented here — that honor likely goes to clever medieval or even ancient cooks in Europe and the Middle East who had a surplus of stale bread on their hands. The perfect embodiment of the virtues of frugality and indulgence: day old bread, too precious to waste, is bathed in a mixture of milk and eggs and made into either a sweet or savory bread pudding (with a few other additions) and baked into something sublime. What makes it special is the blend of spices mixed into it and the sauce.
The chai spice baking blend, which is sometimes overlooked, adds a distinct warm flavor and depth. It can include a number of different spices. Cardamom is the most common ingredient, followed by some mixture of cinnamon, ginger, star anise and cloves. Pepper, coriander, nutmeg and fennel are also used but they are slightly less common.
This bread pudding combines hot cross buns with spices inspired by the world’s love affair with Indian chai. The origins of hot cross buns may go back as far as the 12th century. According to the story, an Anglican monk baked the buns and marked them with a cross in honor of Good Friday. Over time they gained popularity, and eventually became a symbol of Easter weekend.
Bread pudding, when done right, should have the perfect balance of gooey goodness and chewy texture. That’s why stale bread/buns are important. The bread needs a degree of crunch otherwise you will have ‘mush pudding’. For additional flavor, the pudding is served with a vanilla sauce. Who says bread pudding has to be boring!
Print Recipe
Chai Spiced Hot Cross Bread Pudding w/ Vanilla Sauce
Votes: 1
Rating: 5
You:
Rate this recipe!
|
|
Votes: 1
Rating: 5
You:
Rate this recipe!
|
Instructions
Bread Pudding
Place cubed hot cross buns in a greased 9 x 9-inch baking dish.
In a large bowl, combine the milk, brown sugar, eggs, vanilla, spices & salt. Pour over buns, making sure that the bread is completely covered by the milk mixture.
Cover & refrigerate for at least an hour or overnight.
Set out the chilled bread pudding while you preheat the oven to 350 F.
Bake 40 - 45 minutes, or until a knife inserted into the center of the pudding comes out clean. Remove from oven & serve with vanilla sauce.
Vanilla Sauce
In a small saucepan, melt butter & add flour. Stir until mixture has a nutty aroma.
Add salt, cream & sugar; stir until mixture becomes thick. Remove from heat & stir in vanilla.
Spoon over servings of warm bread pudding.
Recipe Notes
- You will notice I have only used 2 Tbsp sugar in the vanilla sauce to offset the sweetness of the pudding.
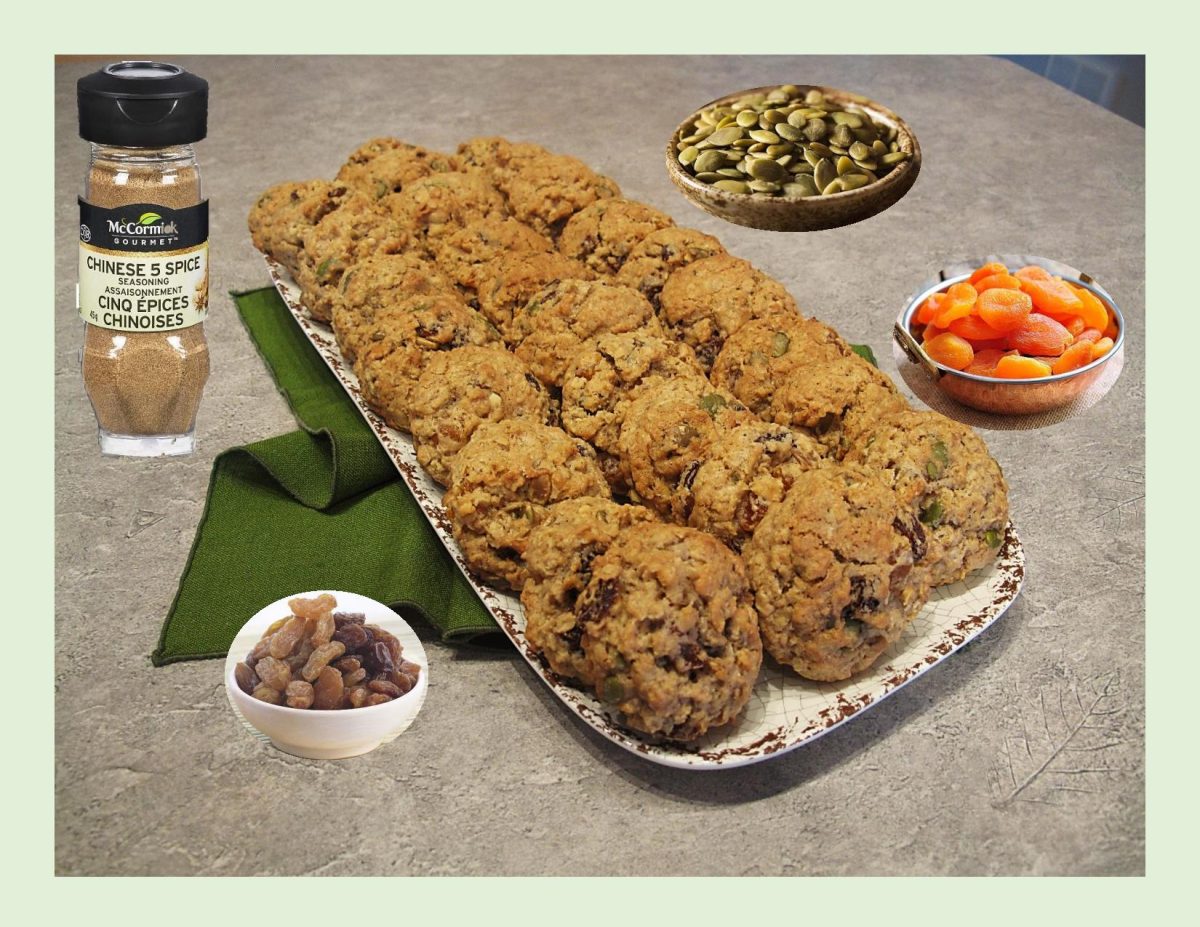
I’ve always been a huge fan of Chinese 5-spice. The aroma and flavor are just pure magic. This peppery-sweet mixture provides endless options for its use.
Perhaps the most amazing thing about this spice blend is how well it compliments both sweet and savory dishes.
In this recipe, the apricots offer a subtle sweetness to these cookies, while the Chinese 5- spice adds a spicy perspective and chopped pepitas add a nutty crunch. Blend that all together with oatmeal & raisins and you get a nice range of flavors.
Print Recipe
Apricot Raisin Five-Spice Oatmeal Cookies
Votes: 1
Rating: 5
You:
Rate this recipe!
|
|
Votes: 1
Rating: 5
You:
Rate this recipe!
|
Instructions
Cream butter & sugars together well. Add egg & vanilla; beat until light & fluffy.
Sift together flour, five-spice powder, nutmeg, salt & baking soda.
Fold the dry ingredients into the creamed mixture. When the dry ingredients are almost incorporated, add the oatmeal, raisins, apricots & seeds.
Chill the dough for about an hour before baking for best results.
-
Scoop onto parchment lined cookie sheet about 2 1/2 inches apart. Bake for about 10 minutes. Do not over bake or the cookies will lose their chewy texture.
-

Although, avocados are most traditionally used as a main ingredient in guacamole or to top a salad or sandwich, used in baking they are amazing.
When adding them into yeast bread recipes, you can replace all the butter with equal amounts of room temperature, mashed, ripe avocado. The ripeness of the avocado is very important as it needs to be very soft for it to work perfectly.
In addition to their creamy texture and mild flavor, avocados have a high water content so they can help to make baking softer, chewier and less likely to crumble.
You can freeze mashed, fresh, ripe avocados if you want to have an ’emergency supply’ on hand. To freeze, mash the avocados with a fork or blender. Add some lime juice and mix well. For every avocado use about 1 tablespoon of lime juice to prevent them from browning. Fill a freezer weight zip-lock bag with this puree. Remove the air from the bag, then zip closed and freeze. Best to use frozen avocados within 4-5 months of freezing.
I thought some Major Grey’s mango chutney would be a perfect compliment to these avocado rolls. Major Grey’s chutney is a style of chutney not a brand. The ingredients in Major Grey’s chutney vary both across commercial brands and recipes, but a few elements seem to remain constant like mangoes, raisins, citrus, onions, a sugar of some sort, and warm spices. The chutney is sweet and tangy with a nice ‘kick’ of heat at the end that’s enough to compliment the different layers of flavor without consuming them. You will often see it served with curried dishes or as a compliment to meats and cheeses.
Major Grey’s chutney is considered by many the gold standard of all chutneys. Complete with its own legend of a 19th Century British Army officer who presumably lived in British India and created this unique condiment.
The great part about making your own chutney is that you can tailor the ‘sweet & heat’ balance to your own preferences. Of course, there is absolutely nothing wrong with just picking up a jar at the supermarket!!
Print Recipe
Avocado Dinner Buns w/ Major Grey's Mango Chutney
Votes: 1
Rating: 5
You:
Rate this recipe!
Ingredients
Major Grey's Mango Chutney
Ingredients
Major Grey's Mango Chutney
|
Votes: 1
Rating: 5
You:
Rate this recipe!
|
Instructions
Avocado Rolls
In a small bowl, place yeast, lukewarm milk & 1 tsp sugar. Stir; cover & set aside until frothy, about 10 minutes.
In a large bowl, whisk together remaining 1/4 cup sugar, mashed avocado, eggs. Add yeast mixture & stir to combine.
In another bowl, whisk flour & salt. Add flour mixture to yeast mixture gradually, combining after each addition. Once all flour has been added, knead on a lightly floured surface for about 2 minutes.
Lightly grease the large bowl, place dough in it & cover with plastic wrap & a tea towel. Allow to rest for at least an hour in a draft-free place until dough has doubled in volume.
Punch dough down. Divide into 18 equal pieces in shape into balls. Place into a greased baking dish & cover with plastic wrap/towel. Allow to rise until doubled in volume, about an hour.
Preheat oven to 350 F. Bake rolls about 20 minutes or until golden. Remove from oven; cool for just a few minutes then brush with the Tbsp of butter. Serve with Mango Chutney.
Mango Chutney
In a saucepan, combine all chutney ingredients; bring to a boil. Reduce heat to medium-low; cook, stirring, until reduced & thick. Refrigerate any not used on rolls.