
Since they were introduced in 1941, Cheerios have been a staple in households across North America. They remain one of the most popular breakfast cereals on the market and are now available worldwide.
Cheerios are primarily made from whole grain oats and come in an assortment of flavors. In fact, there are at least 15 varieties — with seasonal ones appearing on occasion.
A bowl of cereal is perfect for a quick breakfast. Or lunch. Or, let’s be honest, dinner. And while these are perfectly acceptable uses of cereal, there is so much more you can do with them from snacks and desserts to buttery casserole coatings that take the morning mainstay to new heights.
To enhance these cupcakes, the regular milk is switched out for ‘cereal milk’ (milk that’s been soaked in sweet cereal).
Cereal milk tastes like that dense, slightly sweet, starchy, oaty milk from the bottom of the cereal bowl, that everybody loves to enjoy at the end.
The nostalgic and comforting combination of milk and cereal combined in this cupcake recipe is really quite special. These seem like kind of a ‘kid’ thing but I’m sure it won’t take long for them to disappear.
Print Recipe
Breakfast Cereal Cupcakes
Votes: 1
Rating: 5
You:
Rate this recipe!
|
|
Votes: 1
Rating: 5
You:
Rate this recipe!
|
Instructions
Mini Cakes
Preheat oven to 350 F. Line a 24 cup mini muffin pan with cupcake liners. Set aside.
In a liquid measuring cup, stir together the milk & 1/4 cup Very Berry Cheerios. Microwave for 30 seconds, stir, & set aside while you prepare the batter.
In the bowl of a stand mixer, cream together the butter & sugar on medium speed until light & fluffy. Add in the eggs on at the time, scraping the bowl as necessary.
In a separate bowl, whisk together the flour, baking powder, & salt. Using a fork, remove the cereal from the milk. Discard the cereal. Make sure you still have 1/2 cup milk, add more if necessary. Add the honey & vanilla extract to the milk. Whisk together.
Gradually add 1/3 of the dry ingredients, mix to combine. Add 1/2 of the wet ingredients, mix. Repeat, ending with dry ingredients.
Divide the batter between 24 muffin cups. Bake for 8-10 minutes, or until a toothpick comes out clean. Let cool in the pan for 5 minutes, then remove to a wire rack to cool completely.
Frosting
In a bowl, whip cream cheese & butter. Beat on medium-low speed until smooth & combined, 1-2 minutes, scraping the sides of the bowl as needed.
Sift powdered sugar into the cream cheese mixture & add the vanilla, lemon juice & salt. Beat the frosting on a low speed to combine, then increase the speed to medium-high & beat until light & fluffy, 1-2 minutes, scraping down the sides of the bowl once or twice.
Add slightly crushed cheerios & FOLD into mixture gently. Top each COOLED mini cake with a dollop of frosting then sprinkle with extra cheerios.
Recipe Notes
- If you prefer, bake in 12 regular size muffin cups.

The Manchester tart is an English baked treat with its roots tracing back to none other than the vibrant city of Manchester, England. This retro tart has a shortcrust pastry base that’s layered with raspberry preserves, custard, desiccated coconut and sometimes glace cherries. The combination of sweet preserves, creamy custard, and coconut creates a wonderful balance of flavors and textures.
The Manchester tart was a staple on school dinner menus until the mid-1980s and is now a staple in bakeries and home kitchens, cherished for its simplicity and delicious taste.
Over the years, the Manchester Tart has undergone numerous adaptations and variations, with some recipes incorporating different fruits, toppings, or pastry bases. However, its essence remains rooted in the tradition of British baking, symbolizing comfort and nostalgia for many who have enjoyed it throughout generations.
For my adaptation of these tarts I made a pastry cream to give a lightness and added some fresh raspberries to give some tang to balance the sweetness of the preserves. Instead of using the traditional glace cherry on top, I went with a few more fresh raspberries.
Print Recipe
Manchester Tarts
Votes: 1
Rating: 5
You:
Rate this recipe!
Ingredients
Raspberry Preserves/Fruit
Ingredients
Raspberry Preserves/Fruit
|
Votes: 1
Rating: 5
You:
Rate this recipe!
|
Instructions
Tart Base
Combine the flour, powdered sugar, cornstarch, salt, & vanilla in a large bowl. Add the butter and mix with your hands until the butter is broken down into pieces the size of peas and the ingredients are well combined. Add the egg and mix with a spatula until the dough is smooth and the egg is fully incorporated. Don’t overmix.
Turn the dough out onto a large piece of plastic wrap and gently shape it into a ball. Wrap the dough in the plastic wrap and flatten it into a disc. Refrigerate for at least 30 minutes or overnight, until cold but still pliable. It should have the texture of clay.
When the dough has chilled, unwrap the dough and place it on a silicone baking mat on your work surface. Roll it out into a rectangle about 1⁄8 inch thick, using a second silicone sheet on top. The silicone mat makes it easier to lift the rolled-out dough onto the sheet pan later. Make sure to work quickly so the dough doesn’t get too warm.
Place the silicone mat with the dough on a baking sheet.
Using the tart rings, cut out 18 circles of dough. Remove the rest of the dough from around the rings.
Reroll remaining dough between 2 sheets of parchment. Using a sharp knife, slice strips about 10 inches long & 1- inch thick. These strips will make the sides of each tartlet.
Working with one at a time, transfer a strip of dough to one of the tart rings and press it to the sides. Use your fingers to slightly push the bottom of the sides to the dough circle (to seal it). Repeat with the remaining strips of dough. Use a small knife to cut the edge to the rim of the rings.
Transfer the baking sheet containing the tartlet shells to the freezer & freeze for at least 20 minutes.
-
Bake tart rings for about 15 minutes or until golden. Remove from oven & take off rings to allow them to cool.
Pastry Cream
Heat the milk over medium high heat & bring it to a simmer, almost to a boil.
While heating the milk, place the sugar, egg yolks, cornstarch, vanilla & salt in a bowl. Whisk until you have a thick, smooth mix then set aside until the milk comes almost to a boil.
As soon as the milk starts to steam or simmer, remove it from the heat. Slowly pour about a half of the hot milk in a thin stream into the egg mix, WHILE WHISKING CONSTANTLY to temper the egg mix. When the eggs have been tempered, add the egg mix back into the hot milk in the saucepan.
Heat the custard base, over medium heat, while whisking vigorously until it starts to thicken – this should take about 1 – 2 minutes. Make sure to reach the corners of the saucepan so that the custard does not stick to the bottom of the pan.
While whisking, let the custard come to a boil (the custard will release bubbles). You may need to stop whisking from time to time for a few seconds to see if the custard is ‘bubbling’. Look for big bubbles breaking the surface of the custard.
Lower the heat and cook for a further 1 – 2 minutes after you see the first bubbles break the surface, and make sure to whisk constantly.
Remove from the heat & add the butter. Whisk in the butter, until it’s completely mixed in.
Pour the custard into a bowl & immediately cover the surface with plastic wrap, making sure the plastic wrap is touching the whole surface. This is to prevent a custard ‘skin’ from forming on top. You can also choose to pass the custard through a sieve to remove any lumps.
Let the custard cool down to room temperature & then let it chill in the fridge for a few hours, until it’s completely chilled.
The custard will have ‘set’ after chilling. So, it is important to whisk the pastry cream to make it smooth before using.
Assembly
Once the base & custard have cooled, spread raspberry preserve over the bottom of pastry cases. Spoon in the custard, then sprinkle with the coconut & chill. Decorate with raspberries and a final sprinkle of powdered sugar on the berries. Serve.
Recipe Notes
- I used two sizes of tart rings - 2 1/4 + 2 1/2" for these.

Spring, for many, is a symbol of new beginnings. When the first green emerges from the ground and the first bud opens, people the world over celebrate. The earth comes to life once more. The symbolic meaning of the butterfly is similar across most cultures, regardless of time, and is most commonly associated with the soul. Cultural myth and lore honor the butterfly as a symbol of transformation because of its impressive metamorphosis–from caterpillar to chrysalis and ultimately, the butterfly. Butterflies also symbolize spring, a celebratory time of year, and embody the beauty of symmetry, pattern, color and shape.
These colorful and vibrant, yet delicate creatures can imply freedom, endurance, inspiration, openness, change, joy, rebirth, patience, transformation and happiness. As Spring approaches, we can see trees and flowers starting to bud, birds beginning to sing, and bumblebees and butterflies returning to the landscape.
I have always loved butterflies… their beautiful colors, their presence in the outdoor landscape. The magnificent yet short life of butterflies serves to remind us that life is short and to make the most of each day we have.
When it comes to spring baking, butterfly cookies always seem to work their way into my kitchen each year. This is my creation for this season!
Print Recipe
Vanilla Butterflies
Votes: 1
Rating: 5
You:
Rate this recipe!
|
|
Votes: 1
Rating: 5
You:
Rate this recipe!
|
Instructions
In a large bowl, cream together butter & icing sugar. Add egg & vanilla extract & mix well.
In a separate bowl, sift together flour & baking powder. Add to the wet mixture a little at a time until well incorporated. Wait approximately 30 minutes before working with the dough as it will firm up slightly.
Roll the dough between baking paper & put it into the fridge for a few hours to help it from spreading. When dough is a bit firmer, take it out of the fridge & cut into butterfly shapes.
Place the cookies on a parchment lined baking sheet & return to fridge again for another 1-2 hours, this will also help prevent spreading.
-
Bake cookies for approximately 10 - 12 minutes or until lightly browned on bottoms.
When cookies are completely cooled, personalize them with your favorite icing, colors & design.
Recipe Notes
- Allow cookies to cool overnight or at least four hours if you have to decorate right away.
- If you can, it is a good idea to wait until the cookies are a day old before decorating them to reduce the chance of oil from the cookie leaching into the icing & causing icing spots or butter bleeds.
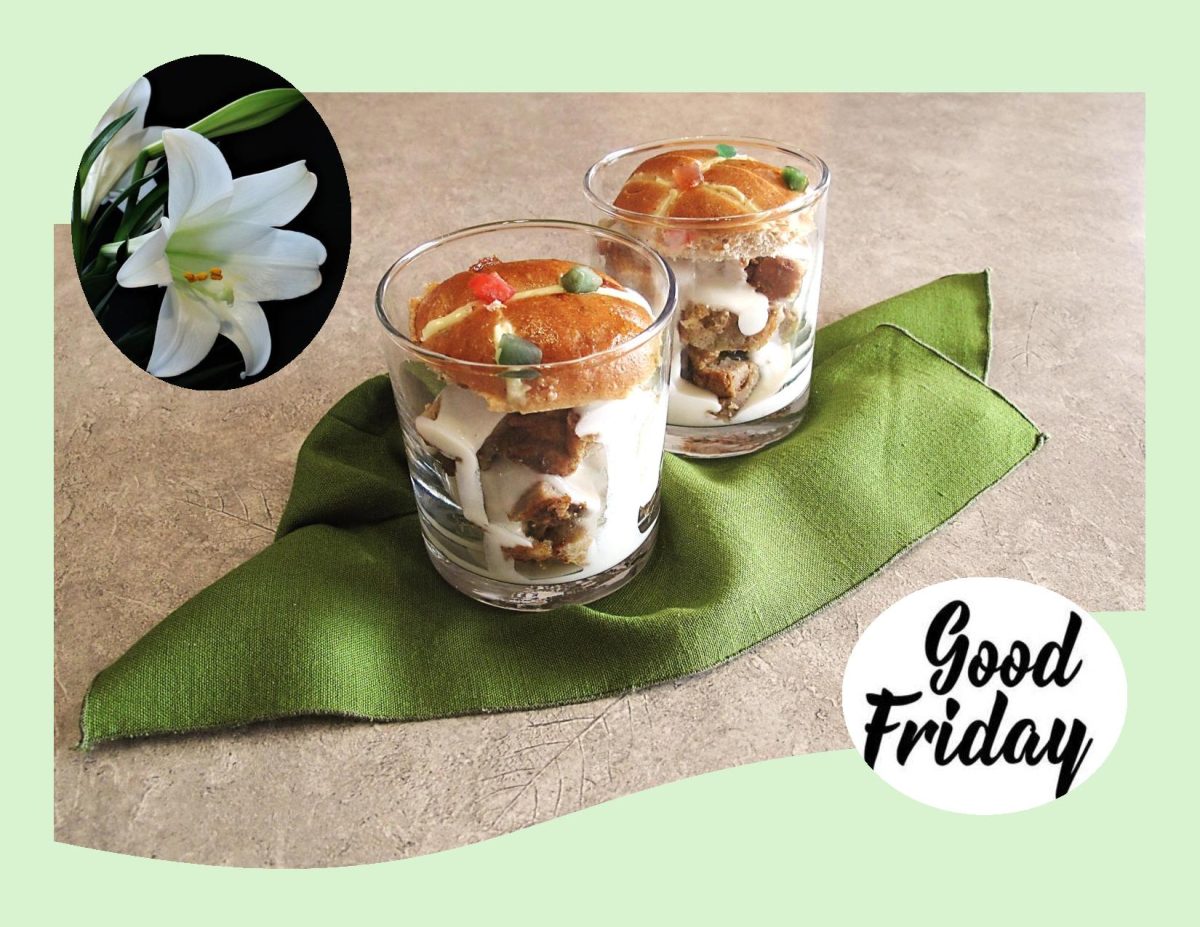
CELEBRATING GOOD FRIDAY!
Bread pudding always gives me reason to remember good things. Truly a comfort food for those of us that recall it from childhood days. It’s not that the dish was invented here — that honor likely goes to clever medieval or even ancient cooks in Europe and the Middle East who had a surplus of stale bread on their hands. The perfect embodiment of the virtues of frugality and indulgence: day old bread, too precious to waste, is bathed in a mixture of milk and eggs and made into either a sweet or savory bread pudding (with a few other additions) and baked into something sublime. What makes it special is the blend of spices mixed into it and the sauce.
The chai spice baking blend, which is sometimes overlooked, adds a distinct warm flavor and depth. It can include a number of different spices. Cardamom is the most common ingredient, followed by some mixture of cinnamon, ginger, star anise and cloves. Pepper, coriander, nutmeg and fennel are also used but they are slightly less common.
This bread pudding combines hot cross buns with spices inspired by the world’s love affair with Indian chai. The origins of hot cross buns may go back as far as the 12th century. According to the story, an Anglican monk baked the buns and marked them with a cross in honor of Good Friday. Over time they gained popularity, and eventually became a symbol of Easter weekend.
Bread pudding, when done right, should have the perfect balance of gooey goodness and chewy texture. That’s why stale bread/buns are important. The bread needs a degree of crunch otherwise you will have ‘mush pudding’. For additional flavor, the pudding is served with a vanilla sauce. Who says bread pudding has to be boring!
Print Recipe
Chai Spiced Hot Cross Bread Pudding w/ Vanilla Sauce
Votes: 1
Rating: 5
You:
Rate this recipe!
|
|
Votes: 1
Rating: 5
You:
Rate this recipe!
|
Instructions
Bread Pudding
Place cubed hot cross buns in a greased 9 x 9-inch baking dish.
In a large bowl, combine the milk, brown sugar, eggs, vanilla, spices & salt. Pour over buns, making sure that the bread is completely covered by the milk mixture.
Cover & refrigerate for at least an hour or overnight.
Set out the chilled bread pudding while you preheat the oven to 350 F.
Bake 40 - 45 minutes, or until a knife inserted into the center of the pudding comes out clean. Remove from oven & serve with vanilla sauce.
Vanilla Sauce
In a small saucepan, melt butter & add flour. Stir until mixture has a nutty aroma.
Add salt, cream & sugar; stir until mixture becomes thick. Remove from heat & stir in vanilla.
Spoon over servings of warm bread pudding.
Recipe Notes
- You will notice I have only used 2 Tbsp sugar in the vanilla sauce to offset the sweetness of the pudding.

I was intrigued by the concept of these cookies; in that they replicate the flavor profile of the ‘nostalgic’ Neapolitan ice cream. The name ‘Neapolitan’ comes from Naples, Italy. Many believe the history of Neapolitan ice cream can trace its roots back to ‘spumoni’ – a traditional form of ice cream originating in southern Italy and made of multiple blocks of ice cream put together. The most popular flavors of spumoni are cherry, chocolate and pistachio. Historically the colors of the Italian flag – green (pistachio), white (vanilla), and red (cherry pink).
As legend goes, in the 19th century, immigrants to North America from southern Italy (namely Naples) brought along the recipes popular in their homeland including spumoni. The dessert likely adapted to popular local flavors at the time being, chocolate, vanilla and strawberry.
Over time, this flavor trio has evolved into much more, such as cookies, drinks, cheesecakes, trifle, fudge, rice krispie treats, parfaits and the list goes on.
Print Recipe
Neapolitan Swirl Cookies
Votes: 1
Rating: 5
You:
Rate this recipe!
|
|
Votes: 1
Rating: 5
You:
Rate this recipe!
|
Instructions
Cream together butter & powdered sugar. Add egg & mix thoroughly. Sift in the flour, cornstarch & salt.
Combine into a dough consistency. Divide dough into 3 equal portions.
Add vanilla to the first one & combine well. To the second portion add strawberry flavor & red food gel; combine until evenly colored. To the third portion, add the melted chocolate & cocoa powder.
Place each flavored ball of dough between parchment paper & roll out in a circle to an 1/8-inch thickness. On the chocolate piece place the vanilla layer & then the strawberry layer. Roll up in a 'cinnamon roll' fashion & place in the freezer for about 10 minutes.
Preheat the oven to 350 F. Line a cookie sheet with parchment paper.
Using string, cut cookie roll in slices. This should create a nice 'feathery' look.
Bake the cookies for about 10-12 minutes or until just lightly browned on the bottom.
Recipe Notes
- I make use of the Lorann flavorings whenever I can. Lorann's professional strength flavorings and essential oils are 3x to 4x stronger than typical alcohol-based extracts. They smell & taste amazing!

Christmas bread has a lot of different interpretations. The most traditional iterations involve sugar and spice, and often—but not always—yeast, and ultimately have strong cultural associations and country ties. One thing we can all agree on is that Christmas bread is celebratory, whether or not we observe the holiday. From the unleavened matzo of Passover to the German stollen of Christmas, from the British hot cross buns baked on Good Friday to the Russian kolach baked for any special occasion, bread in its many forms brings people together, linking traditions and generations.
The scent of Christmas spices, bread baking, and fresh-cut pine define holiday memories. Generations ago, the rich dough itself – lush with butter, eggs, dried fruit, sugar – relayed a cook’s generosity, her willingness to share the most precious ingredients in her pantry. The time and effort it took to make and bake the Christmas loaves expressed the cook’s devotion and love.
Last year, I was introduced to the liqueur known as Dom Benedictine. After doing much research into this interesting liqueur, I incorporated it in some savory and sweet recipes. We really enjoyed them so this year I was interested in doing a bit of recipe development to create a Christmas bread with it.
The story of Benedictine dates back to 1510 when a Venetian monk of the Abbey of Fécamp, Dom Bernardo Vincelli, created an elixir intended to support good health. It includes a combination of 27 herbs and spices derived from plants from around the globe, including juniper, myrrh, saffron, vanilla, thyme, coriander and more. The liqueur tastes primarily of honey and baking spices, with citrus peel, herb, and stone fruit notes.
So here you have it, my newly created Christmas bread tradition. Hope you can try it and enjoy it as much as Brion & I have.
Print Recipe
Benedictine Liqueur Christmas Braid
Votes: 1
Rating: 5
You:
Rate this recipe!
|
|
Votes: 1
Rating: 5
You:
Rate this recipe!
|
Instructions
Marinate raisins, candied fruit & cranberries in Benedictine liqueur overnight, Stir occasionally.
Dissolve yeast in 1/4 cup lukewarm water with 1 tsp sugar. Set aside for 5 minutes.
In a large bowl, sift 2 cups of the flour. Stir in yeast mixture & lukewarm milk. Cover with plastic & let stand in a draft free place until doubled in volume, about 1 hour. Punch down firmly & work in beaten eggs, 1/2 cup sugar, lemon zest, vanilla & pieces of softened butter.
Sift remaining 3 cups of flour with salt, cinnamon & cardamom & work 2 cups in to form a soft dough. Turn dough onto a lightly floured work surface. Knead in remaining cup of flour & fruit mixture. This becomes a very soft & buttery dough but is not sticky.
Invert the dough onto a lightly floured work surface & dust with flour. Cut the dough into four equal pieces & then stretch & roll each piece into a rope about 20 inches long. Lay the ropes parallel to one another (vertically). Pinch them tightly at the top, then fan them out.
Begin by taking the strand farthest to the right & weave it toward the left through the other strands using this pattern: over, under, over. Take the strand furthest to the right & repeat the weaving pattern again: over, under, over. Repeat this pattern, always starting with the strand farthest to the right, until the whole loaf is braided, Tuck the ends under to give the loaf a finished look.
Carefully transfer the braided loaf to a parchment-lined 13x18-inch baking sheet, brush with egg wash. Cover the loaf loosely with plastic wrap & allow to rise in a warm, draft-free spot until about 1 1/2 times the size, about 1-2 hours. Toward the end of the rising time, preheat the oven to 350 F. & set an oven rack in the middle position.
Gently brush risen dough again with egg wash. Place in an air-bake pan to prevent the bottom crust from browning too much.
Bake 40-45 minutes or until a nice golden brown. Cool on a wire rack. Combine powdered sugar & lemon juice/zest to make glaze. When braid is completely cool, brush loaf with lemon glaze & decorate to your liking.
Recipe Notes
- To see a more in-depth article on Dom Benedictine Liqueur, check out my blog from December 21/2022 - Benedictine Liqueur Cupcakes.

So many of our berries can be used to make excellent dessert sauces as their naturally tart flavor pairs so well with rich sweet desserts. Cranberry-raspberry sauce is one such sauce. It is made with a combination of whole cranberry sauce and fresh or frozen raspberries, along with a bit of sugar and a little lemon or orange zest. Everything is cooked over medium low heat until the sauce thickens with the end result being a glistening red sauce with a sweet and tangy flavor that is especially nice atop these mini cheesecake tarts. It can also be used as a filling for cakes or trifles, or for a quick dessert, it can be poured over a bowl of vanilla ice cream.
Tarts are the epitome of elegance in the world of desserts. They showcase a perfect harmony of flavors, with their flaky or crispy crust and luscious fillings. But one key factor in achieving the ultimate tart is having a crisp, clean edge on the tart shell, which not only elevates the appearance but also enhances the texture. A well-defined edge results in a satisfying contrast between the tender, flaky layers, and the smooth filling.
Since the Christmas season is upon us, I thought of using some ‘tart rings’ to give these little tarts more of an upscale look. Using rings instead of tart pans makes for such a clean look. Being perforated allows for the ring to heat up quicker (along with it being very thin), which allows for better baking. This also allows steam to escape from the crust, which keeps your crust nice and crispy.
Baking is a passion for many because of the immersion between art and science. For me, I’m always in pursuit of another way to make an old idea new again or as they say, ‘the same only different’.
Print Recipe
Cranberry-Raspberry Tartlets
Votes: 1
Rating: 5
You:
Rate this recipe!
Ingredients
Cranberry-Raspberry Topping
Ingredients
Cranberry-Raspberry Topping
|
Votes: 1
Rating: 5
You:
Rate this recipe!
|
Instructions
Pastry
Combine the flour, powdered sugar, cornstarch, salt, & vanilla in a large bowl. Add the butter and mix with your hands until the butter is broken down into pieces the size of peas and the ingredients are well combined. Add the egg and mix with a spatula until the dough is smooth and the egg is fully incorporated. Don’t overmix.
Turn the dough out onto a large piece of plastic wrap and gently shape it into a ball. Wrap the dough in the plastic wrap and flatten it into a disc. Refrigerate for at least 30 minutes or overnight, until cold but still pliable. It should have the texture of clay.
When the dough has chilled, unwrap the dough and place it on a silicone baking mat on your work surface. Roll it out into a rectangle about 1⁄8 inch thick, using a second silicone sheet on top. The silicone mat makes it easier to lift the rolled-out dough onto the sheet pan later. Make sure to work quickly so the dough doesn’t get too warm.
Place the silicone mat with the dough on a baking sheet.
Using the tart rings, cut out 18 circles of dough. Remove the rest of the dough from around the rings.
Reroll remaining dough between 2 sheets of parchment. Using a sharp knife, slice strips about 10 inches long & 1- inch thick. These strips will make the sides of each tartlet.
Working with one at a time, transfer a strip of dough to one of the tart rings and press it to the sides. Use your fingers to slightly push the bottom of the sides to the dough circle (to seal it). Repeat with the remaining strips of dough. Use a small knife to cut the edge to the rim of the rings.
Transfer the baking sheet containing the tartlet shells to the freezer & freeze for at least 20 minutes.
-
Bake tart rings for 8 minutes or until barely set (crust will complete baking with the filling in). Remove from oven.
Filling
Using a mixer, beat cream cheese until smooth then add sugar & blend well. Add eggs & vanilla, beat until smooth. Pour cream cheese mixture over warm crust.
Bake for 20 minutes or until the crust is firm & BARELY browned. Set aside to cool.
Topping
In a saucepan, combine whole berry sauce & 1 ½ cups fresh or frozen unsweetened raspberries, orange zest & sugar.
Cook over medium heat, stirring often, until the sauce thickens & is bubbly. Remove from heat & let cool. The sauce will thicken as it cools.
Place a dollop of sauce over each tartlet. Decorate & serve chilled.
Recipe Notes
- I made these tartlets in 3 sizes from 2 3/4-inch to 2-inch.
- If you find the dough is to soft to work with just add a small amount of flour, just enough to make it easier to handle.
- This is a real nice crispy pastry dough. When its baked it would give the impression of being real hard but instead its crisp and so nice to bite into.
While certain holidays such as Christmas, lend themselves to giving food as gifts, gift-giving should be thoughtful and sincere.
We give gifts during the holiday season to express gratitude, love, or friendship to those near and dear throughout the year. But the custom of giving gifts goes all the way back to the first Christmas when the wise men brought Jesus three gifts — gold, frankincense and myrrh.
Many of the gifts we give and receive at Christmas time, especially ones related to food, have symbolic meaning and tales of folklore behind them. Others are just fun to make and share with family and friends. Sometimes those food gifts become an anticipated tradition that the gifter enjoys making and the receiver looks forward to every year.
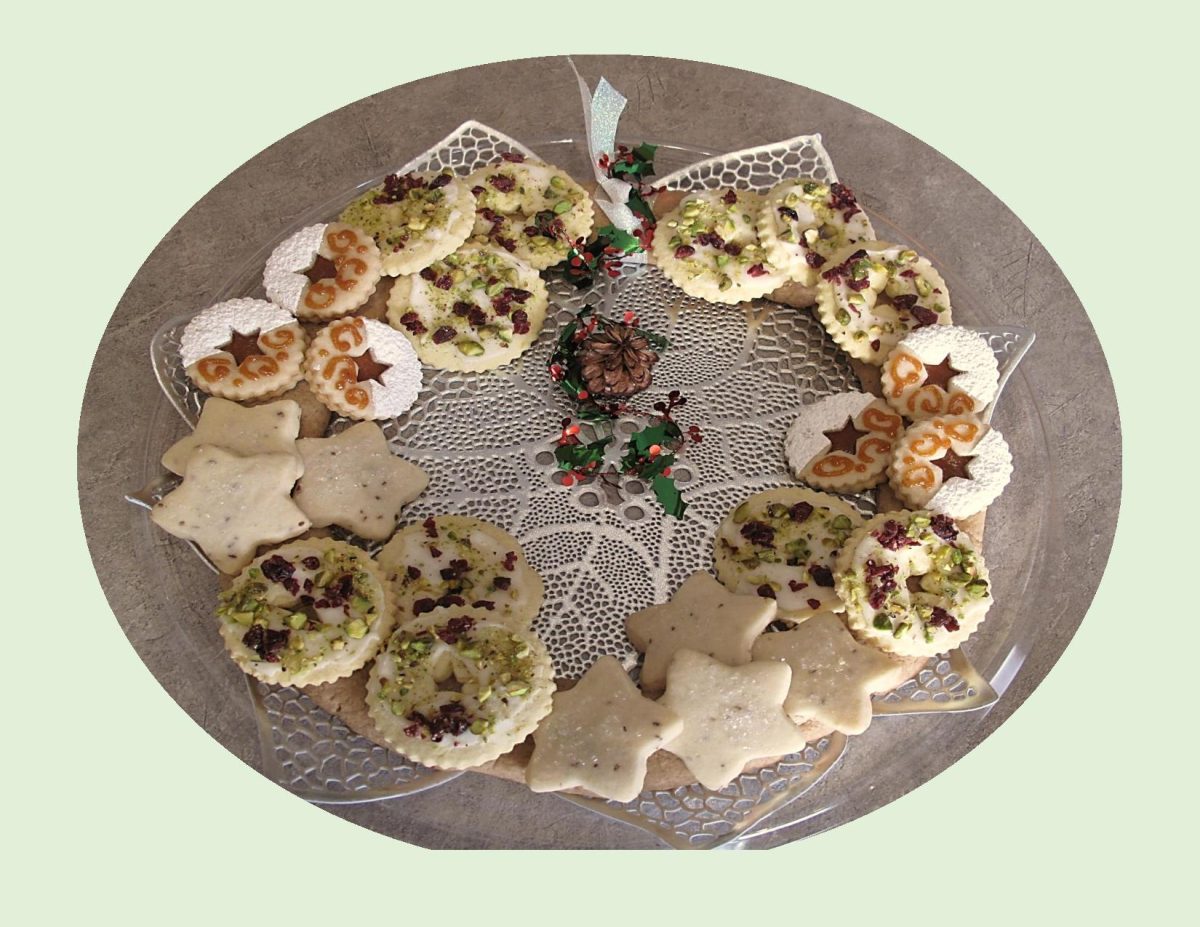
These Christmas cookie wreaths seem like the perfect gift for our neighbors. Hope they like them because they where a lot of fun to make.
Print Recipe
Christmas Cookie Wreaths for Gifts
Votes: 1
Rating: 5
You:
Rate this recipe!
Ingredients
Cranberry Lemon Pistachio Cookies
Ingredients
Cranberry Lemon Pistachio Cookies
|
Votes: 1
Rating: 5
You:
Rate this recipe!
|
Instructions
Spicy Wreath Base
In a large bowl, combine all ingredients. Mix until dough forms. Divide dough in half for 2 separate wreaths. Roll each half into a long strip about 43-inches long. On 2 sheets of parchment paper, draw 2 round circles each about a 13-inch circumference. Place on baking sheets. Following the circle outline, place a strip of dough on each circle. Press with the back of a spoon to flatten to about a 1/2-inch thickness.
Preheat oven to 310 F. Bake cookie bases for about 15 minutes. They should be baked but not overdone so that the centers are soft. Remove from oven & cool on a wire rack until ready to assemble with cookies.
Cranberry Lemon Pistachio Cookies
In a bowl, whisk together flour, cornstarch, baking powder & salt. Place butter & sugar in a bowl & beat with a mixer until pale & fluffy. Mix in egg yolks, lemon zest & vanilla. Reduce speed to low & gradually mix in flour mixture. Shape into a disk; wrap in plastic. Refrigerate until firm, about 1 hour.
Preheat oven to 350 F. Transfer dough to a lightly floured work surface. Roll out to 1/8-inch thick. Using a 2 1/2-inch round fluted cutter, cut out wreaths. Cut out centers using a 7/8-inch round or star cutter.
Space 2 inches apart on baking sheets lined with parchment paper. Refrigerate until firm, about 15 minutes. bake until just golden, about 12 minutes. Allow to cool for a couple of minutes before icing.
Stir together powdered sugar & lemon juice in a small bowl. Spread each cookie with icing & sprinkle with pistachios and/or pepita seeds & cranberries. Yield: 24
Anise Shortbread Stars
In a bowl, sift together cornstarch, powdered sugar, flour & anise powder. Blend in butter with a spoon, mixing until a soft, smooth dough forms. If the dough is too soft to handle, cover & chill about 1 hour.
Between 2 sheets of parchment paper, roll dough out about 1/2-inch thick. Using a star cookie cutter, cut out stars & sprinkle with coarse white sanding sugar. Transfer to ungreased baking sheets spacing 1 1/2-inches apart. Place baking sheets in refrigerator & chill 30 minutes. Halfway through, preheat oven to 300 F. Bake for about 20 minutes or until edges are just barely browned. Yield: 18
Persimmon Linzer Cookies
In a bowl, sift together flour & salt. Set aside. In a large bowl, cream butter, sugar & vanilla until light & fluffy. Beat in as much of the flour mixture as possible. Mix the rest & gently knead until dough comes together. Wrap in plastic wrap & chill for 30 minutes.
Prepare persimmon puree. In a saucepan over medium low heat, combine persimmons, sugar, cinnamon & salt. Simmer until thick, stirring occasionally, about 20 minutes. Remove from heat, cool slightly then transfer to a small food processor. Puree mixture until smooth. Set aside to cool.
Preheat oven to 350 F. Line a baking sheet with parchment paper.
Roll out dough on lightly floured surface to 1/4-inch thickness. Cut into rounds with a 2-inch fluted LINZER cookie cutter with a star attachment in the center. Place on lined cookie sheet. Bake for about 12-15 minutes or just until edges begin to brown. Allow cookies to cool to room temperature.
Spread persimmon puree on the flat side of each solid cookie. Dust & decorate cookies with cut outs using powdered sugar & some more puree. Place decorated cookie tops on bottoms spread with puree, making a sandwich.
Assembly
Arrange cookies on wreath base to your liking. You can either 'fasten' them with an bit of icing that will harden (see notes) or just place them on top base. That way they are easy to pick up by guests without to much trouble. The base can be cut into pieces after the top cookies are eaten for some more cookie goodness.
Recipe Notes
ICING FOR ATTACHING COOKIES TO WREATH:

Persimmon fruit is delicious in their natural state, but they also add wonderful moisture and flavor to baked goods. Fall and winter is the season for persimmons, and with persimmons you can make the most wonderful, sweet or savory things.
A good persimmon (at its peak) has a mild taste that has been described ‘honey-like’. Its texture is similar to that of an apricot and its skin is tougher than an apple.
For Fuyu persimmons, make sure they are very ripe. Peel them, chop them, and remove their seeds. Use a food processor to puree the fruit. If you have ripe persimmons but aren’t ready to make use of them yet, you can freeze the pulp for up to six months. Freeze the puree in 8-ounce containers or ice cube trays. You can add frozen persimmon pulp to smoothies right out of the freezer. If you want to bake with it, bring it to room temperature and use it when thawed.
These little minis are a wonderful mouthful of light and creamy cheesecake made with fresh persimmon puree and warm holiday spices. Take advantage of this wonderful fruit—in season October through February.
Print Recipe
Mini Persimmon Cheesecakes
Votes: 2
Rating: 5
You:
Rate this recipe!
|
|
Votes: 2
Rating: 5
You:
Rate this recipe!
|
Instructions
Base
Preheat oven to 350 F. Place inserts into bottom of each of the 12 cavities of a mini cheesecake pan.
In a small bowl combine gingersnap crumbs with melted butter. Divide between the 12 cavities & press down firmly with the back of a spoon.
Bake on middle rack of oven for about 8 minutes. Cool on a wire rack while filling is being prepared.
Cheesecake Filling
Beat the cream cheese in a medium bowl until smooth, about 1 minute. Add the brown sugar, persimmon puree, sour cream, egg, spices & vanilla. Beat until smooth & well combined.
Divide filling between the 12 cavities in the cheesecake pan.
Bake on the middle rack of the oven for 15-20 minutes or until set. Begin checking for doneness after 10 minutes, as oven temperatures vary considerably.
Cool 20 minutes on a wire rack, then using your finger, push up through the hole in the bottom of each cheesecake & remove each one. Remove metal insert & cool completely in the refrigerator for 3 hours or overnight.
Garnish with fresh persimmon slices & a bit of whip topping or your choice.


