Saskatoon Pie w/ Grated Pastry Topping

MEMORIES OF LORETTA!

Today, July 25, my sister Loretta, would have celebrated her 83rd birthday. Over the years I have shared many experiences on the blog that I had enjoyed with Loretta. She was an avid follower of the blog and always encouraged me to keep writing. In February of 2023, Loretta’s time on this earth ended. She was always a constant in my life during her lifetime. Loretta was so much more than just a sister to me. Her passing has left such an empty place in my heart. The thing nobody tells you about losing a loved one is that you do not just lose them on the day they leave. You lose them over and over again, in every moment they were supposed to still be a part of.

There is something very special about having an older sibling. For me, I just wanted to be with her and do everything and anything she could think of. For her, it was probably not quite as much fun having this ‘brat’ tagging along all the time asking questions.

There are endless memories that replay over and over in my mind. Life in the fifties had a such a gentle rhythm to it …. what a pleasure it was to be a kid at that time and be a part of it all.

Loretta was a very kind, gentle soul. She was a sister, mother, grandmother, great grandmother, friend and professional health care worker as well as many other things she did with such love and compassion.

Loretta lived in many places during her life, including California and Vancouver Island, but was particularly drawn to the Peace Country in Northern Alberta. She worked as an LPN for 25 years north of Grand Prairie for Central Peace Hospital in Spirit River and Fairview General Hospital.

Loretta had a love for music, gardening, crafting, and reading. She cared for all animals big and small which included one little precious Dachshund dog named Amigo.

Loretta & Amigo spent a lot of time after she retired with Brion & I. For many years they would come and look after our home while we were away on vacation. Of course, that always included some time after we came home so we could enjoy their company. The three of us loved Amigo so it was great being together.

Saskatoon berries are very high on my list of nostalgic memories from my childhood. How these little berries can evoke such a flood of treasured thoughts is amazing. Our family farm was located in Southern Alberta, (Canada). If you were to stand on our farmhouse, west veranda, the sight of the ‘foothills’ came into view (foothills are an upland area that flank the eastern side of the Rocky Mountains).

How wonderful it was to be able to pack a picnic lunch on a Sunday afternoon and be able to drive there. It was like a whole different world. A landscape of long ridges and rolling hills covered in native lodgepole pine, aspens and spruce trees. The small streams wound their way through meadows of dwarf birch, willow and prairie grasses. You could easily come across some of the beautiful wildlife such as elk, moose or deer that lived there.

This is where our family would go to pick saskatoon berries. Very often we were accompanied by family friends or relatives. It was such a great time, everyone picking berries together, eating Mom’s fabulous fried chicken and potato salad (etc. etc.) for our picnic lunch. I was looking at some pictures from those times. We must have had some hot dogs on one occasion, and I burnt my mouth it seems. What priceless memories!

With ‘saskatoon season’ in full swing I thought it would be a good time to make some saskatoon pie. Most often the pie is made with a top crust of pastry or designs cut out and laid over the fruit. Other ideas would be to use a nice streusel topping or as I have done on mine, grated pastry sprinkled with coarse sugar. This is such a great summer dessert served, of course, with ice cream! I know it would be something Loretta would have enjoyed.

As we remember Loretta today, we hold on to those precious memories she left with us that will never fade from our minds.

Print Recipe
Saskatoon Pie w/ Streusel Topping
Votes: 1
Rating: 5
You:
Rate this recipe!
Servings
Votes: 1
Rating: 5
You:
Rate this recipe!
Instructions
Pastry
  1. In a large bowl, whisk together flour, baking soda, baking powder & salt. With a pastry blender or finger tips, cut in white & yellow Crisco shortening. In a measuring cup, place the egg & vinegar then add enough COLD water to make 1 cup; whisk together.
  2. Make a well in center of flour & pour ALL liquid in. With hands combine quickly but do NOT over mix.
  3. This recipe will should give you enough for about 3 - double crust 10-inch pies. Whatever you don't use, freeze for later use. This is so handy when time is short & dessert is needed.
  4. At this time, roll out a DEEP DISH 9-inch bottom pie shell, place in pie pan & refrigerate until ready to fill.
  5. Take the same amount of pastry, form it into a ball, wrap in plastic wrap & place it in the freezer. When you are ready for the top pastry on your saskatoon pie, remove the ball from the freezer & GRATE it over the top of the fruit.
Filling
  1. In a saucepan over medium heat, cook the saskatoon berries & the lemon juice (and water, if using frozen berries), stirring often, until the berries release some of their juices & shrink a bit, about 5 minutes. In a small bowl, stir together the sugar & the cornstarch until they are well combined. Pour into the berries & bring them to a boil, stirring often.
  2. Once they boil, cook the pie filling until it is thickened, about 30 seconds. Stir in the almond extract. (If you used frozen berries, the filling may look quite thick at this point, but the berries will release more juice as the pie bakes.)
  3. Remove the saskatoon pie filling from the heat & allow it to cool completely. At this point, the filling can be refrigerated for up to 5 days before being used in a pie.
Assembly
  1. Preheat oven to 400 F.
  2. Place filling into chilled pie shell, using the large holes on a box grater, grate the ball of pastry (from freezer) directly over the fruit, as you would a block of cheese. Using a fork, gently move the gratings here & there for an even covering. Sprinkle with coarse sugar.
  3. Bake pie on center rack for 30 minutes. Reduce heat to 375 F. rotating pie for even baking. Bake about 25-30 minutes more or until to is golden brown & juices are bubbly & thick around the edge. Remove from oven. Serve warm with ice cream.

Pear Cheesecake w/ Oat Pecan Streusel

A cheesecake is always an appropriate dinner party finale, but this version is a true showstopper. This cheesecake really makes the most of pear season, with the fruit layered on top of the cheesecake batter then covered with oat streusel. The wow-factor comes into play with the stained glass candied pears.

Candied Pears are a beautiful and completely edible decoration for cakes, cupcakes, or any other creative baking project.  Modern twists in candying techniques have seen a resurgence in recent years, blending traditional methods with innovative approaches breathing new life into the timeless art of candying fruit.

Today, candied fruit is enjoyed in various forms, from baking ingredients to standalone snacks. It has become a versatile ingredient in both sweet and savory dishes, catering to a wide range of tastes and preferences. The perception of candied fruit has shifted from being a rare luxury to a widely available and beloved treat for people of all backgrounds.

At this time of year, I’m always trying to come up with something special to give as gifts to our neighbors on either side of us. We couldn’t ask for better neighbors so it’s always nice to show our appreciation in some way. We usually try to give something they use when hosting family & friends. The family this pear cheesecake is for have a pear tree in their back yard so I think its safe to say they like pears.

Print Recipe
Pear Cheesecake w/ Oat Pecan Streusel
Votes: 1
Rating: 5
You:
Rate this recipe!
Servings
Ingredients
Stained Glass Candied Pears
Oat Pecan Streusel Crust & Topping
Salted Caramel Sauce - Optional
Servings
Ingredients
Stained Glass Candied Pears
Oat Pecan Streusel Crust & Topping
Salted Caramel Sauce - Optional
Votes: 1
Rating: 5
You:
Rate this recipe!
Instructions
Candied Pears
  1. Preheat oven to 300 F.
  2. Combine water & sugar in a large saucepan. Very thinly slice pears all the way across so that you have a cross section of an entire pear. When sugar is dissolved in the water on the stove, stir & add the pear slices to the simple syrup. Simmer for about 6-8 minutes or until you can almost see through pears. Remove from simple syrup with a tongs & lay flat on parchment paper lined baking sheet.
  3. Mix about 2 tablespoons of simple syrup in a small cup with 2 drops of gel coloring of your choice. Prepare one bowl for each color you wish to use. Using a small clean paintbrush, lightly paint each pear slice as desired. Mottle colors a bit on each slice if using more than one color. Dap with a paper towel to remove excess moisture. Flip slices over and paint on the other side. Dap again with paper towel.
  4. Bake the pears for 20 minutes, paint on some clear simple syrup, turn the slices over & paint the other side. Bake another 10 minutes, then repeat.
  5. Remove from the oven & shape immediately if you do not want flat slices. Sprinkle with gold luster dust, if desired.
Streusel Crust & Topping
  1. Preheat oven to 350 F. Line the sides of a 9-inch springform pan with parchment paper.
  2. In a large mixing bowl, cream together the softened butter with sugar until light and fluffy. Gradually add in the flour, baking soda & ground cinnamon. Toss in the oats & chopped pecans & combine well. Press half of the mixture into springform pan and bake for 8-10 minutes until slightly golden brown.
Pear Mixture
  1. In a medium bowl, toss together the chopped pears with sugar, starch, cinnamon & nutmeg. Combine well & set aside.
Cheesecake Filling
  1. In a large mixing bowl, cream together the cream cheese & sugar until smooth & creamy. Mix in the vanilla & almond extract. Add the egg & combine until smooth and creamy.
  2. Pour cream cheese mixture onto the slightly warm crust. Spread pears over the cream cheese. Sprinkle the rest of the oatmeal streusel topping covering the pears, pressing down lightly.
  3. Bake until slightly brown & center is set around 50 minutes. Cool completely & refrigerate overnight preferably.
Salted Caramel Sauce
  1. Combine brown sugar, 1/2 & 1/2 cream, butter & salt in a saucepan over medium-low heat. Cook while whisking gently for a couple of minutes, until it slightly thickens. Add the vanilla & cook another minute. You are not cooking the sauce very long so it remains quite pourable. Turn off heat, cool slightly. Pour sauce into a blender & blend on high until sauce is 'creamy'. Refrigerate until cold.
Decorating/Serving
  1. To decorate, place cheesecake on serving dish & arrange candied pears on top. When ready to serve, slice & drizzle salted caramel sauce over cheesecake.

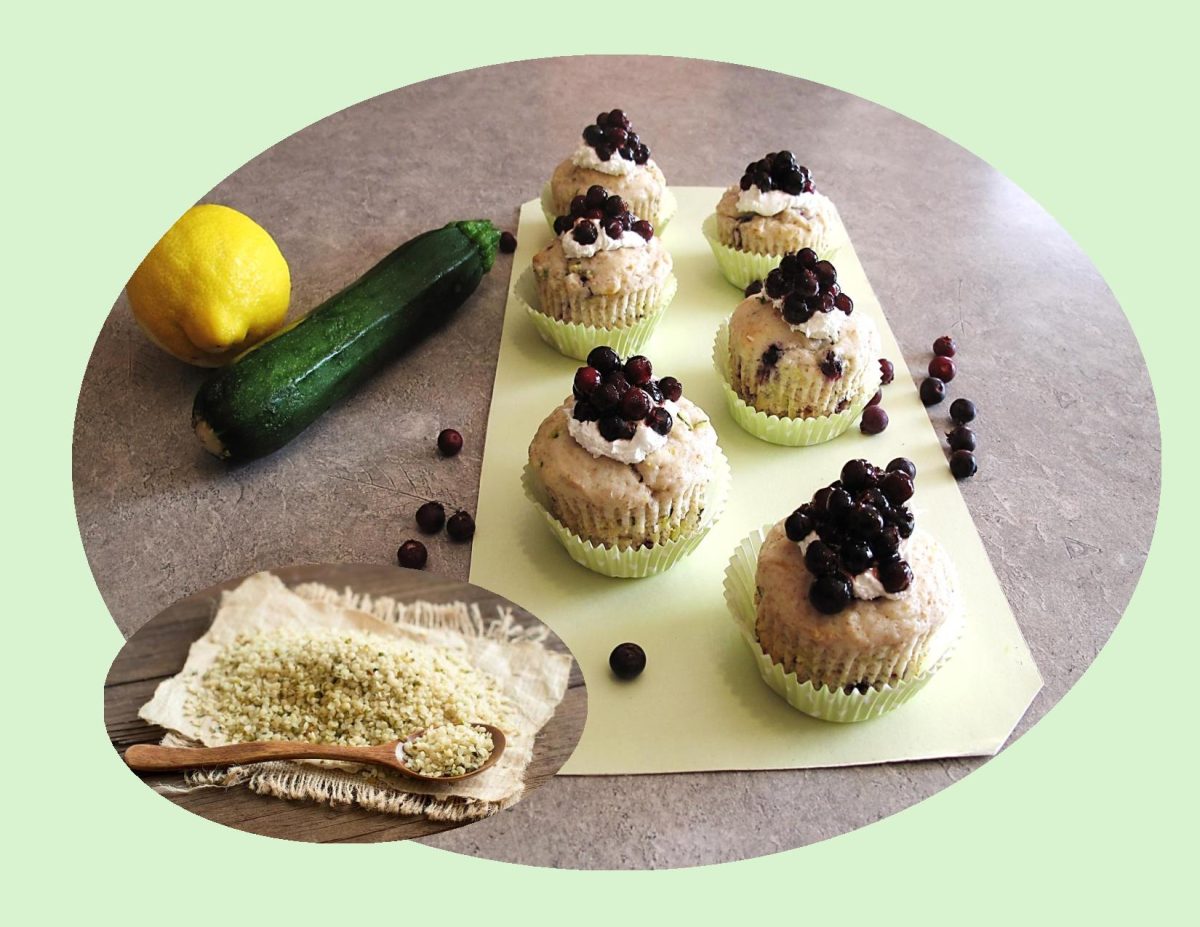
Lemon Saskatoon Zucchini Muffins w/ Hemp Hearts

You cannot go wrong when you pair lemon and saskatoons. I guess, it’s kind of a spin-off of the classic lemon blueberry combo. The zucchini just adds more texture and ensures these muffins are never dry and for a little protein and Omega 3, hemp hearts make a fabulous addition to the mix.

Though often mistaken for seeds or grains, hemp hearts are actually a nut and are derived from the hemp plant once its outer hull has been removed.

Like all the ancient grains, its history goes way back. It was found in a 10,000-year-old archeological site near Japan. Its popularity quickly grew as people discovered the variety of its uses. It is a very fibrous plant and was used anciently by the Chinese to make paper, clothes, ropes, and shoes. Hemp seeds were a by-product in the hemp fiber industry and often fed to animals. It was not until recently that the high nutritional value of hemp seeds for human consumption was discovered. 

Hemp hearts provide plenty of nutritional benefits when consumed on their own, but there are plenty of other ways to enjoy them such as:

  • In soup, salad, or vegetable dishes
  • Sprinkled on cereal, oatmeal, or yogurt
  • Added to baked goods or desserts
  • Added to smoothies or protein shakes
  • Spread on toast with nut butter
  • Sprinkled in sandwiches or wraps

Of course, this is just one more reason to enjoy that bountiful seasonal zucchini crop!

Print Recipe
Lemon Saskatoon Zucchini Muffins w/ Hemp Hearts
Votes: 1
Rating: 5
You:
Rate this recipe!
Servings
Votes: 1
Rating: 5
You:
Rate this recipe!
Instructions
Muffins
  1. Preheat oven to 375 F. Line 12 muffin cups with papers.
  2. In large bowl, mix together flours, baking powder, baking soda, hemp hearts, salt & lemon zest.
  3. In separate bowl, mix egg, sugar, oil, almond extract, yogurt (sour cream) & lemon juice.
  4. Add wet ingredients to dry ingredients. Stir just until combined.
  5. Add zucchini & saskatoons until just combined. Spoon into muffin pan.
  6. Bake for 15 to 17 minutes until tops are firm to the touch & centers test done using a toothpick.
  7. Remove from oven & cool for 5 minutes before removing from pan.
Topping
  1. In a small dish, combine jelly with water until smooth. Add saskatoon berries & mix to coat. Prepare small amount of whipped topping.
  2. When muffins are completely cool, top each with a tsp of whipped topping then a Tbsp of glazed saskatoons.
  3. The topping really isn't necessary but adds a nice touch making an ordinary muffin become 'special'.

Mango Cream Tarts

Mango purée takes very little effort to make and can be used in a variety of ways. Probably the most obvious use for it is in drinks but this bright purée is endlessly versatile. You can use it on pancakes, waffles, or oatmeal, in desserts like parfaits. Or simply use it as an alternative to applesauce, which is very often used in quick breads and muffins.

Mangoes have long been a favorite fruit of mine. The fact that we can readily buy them year-round, make them a nice winter dessert ingredient. This mango cream filling is made very few ingredients. The fresh mango purée adds such a great taste.

Print Recipe
Mango Cream Tarts
Votes: 2
Rating: 3.5
You:
Rate this recipe!
Course dessert
Cuisine American
Servings
Ingredients
Shortbread Tart Shells
Mango Cream Filling
Course dessert
Cuisine American
Servings
Ingredients
Shortbread Tart Shells
Mango Cream Filling
Votes: 2
Rating: 3.5
You:
Rate this recipe!
Instructions
Tart Shells
  1. Preheat oven to 350 F.
  2. In a bowl, combine butter & sugar, beat until light & fluffy. Mix in flour & baking powder; blend well. Press spoonful's into 12 individual tart pans. Prick shells with a fork. Bake until golden, about 10-12 minutes. Remove from oven & cool.
Mango Cream Filling
  1. In a small food processor, add mango chunks, ginger & water. Blend on high until smooth; set aside.
  2. In a mixing bowl, beat cream cheese, sugar & extract until well blended & smooth. Fold in mango puree. Chill about 30 minutes.
  3. Divide mango cream filling evenly among 10 baked pastry shells. Cover the tarts with plastic wrap & keep chilled until ready to serve. Decorate each with mango slices, a blueberry & mint leaves if desired.

‘Cinnamon Roll’ Cherry Pie

This cinnamon roll cherry pie is a unique take on the classic cherry pie. Mini cinnamon rolls line the pie pan to form the ‘crust’ makes it look so special.

After I saw a photo of a similar idea on Pinterest, some of our sour cherries came to mind and my recipe development came into play once again.

Taking that classic cinnamon roll flavor and making the base of a fruit pie seems perfect. You would probably not want to use it with a key lime pie, but anything that already uses cinnamon such as pumpkin or sweet potato should work great with this type of ‘crust’.

After I made a small amount of sour cherry filling it seemed only logical to make a bit of cream cheese filling to go with it.

While my little culinary creation was baking, I mixed up a bit of lemon glaze for drizzling on it when it had cooled slightly. This turned out to be a seriously good cherry cream pie!

Print Recipe
'Cinnamon Roll' Cherry Pie
Votes: 2
Rating: 5
You:
Rate this recipe!
Course dessert
Cuisine American, Ecuador, German
Servings
Votes: 2
Rating: 5
You:
Rate this recipe!
Instructions
Sour Cherry Filling
  1. In a saucepan, whisk together sugar, cornstarch & salt. Add juice/water mixture & stir to thoroughly combine. Bring to a boil over medium-high heat, stirring frequently. Simmer until thickened, about 2 minutes. Immediately remove from heat. Fold in cherries & cool to room temperature.
Cream Cheese Filling
  1. In a bowl, beat together cream cheese, egg, sugar & vanilla with an electric mixer until smooth. In a separate dish, combine cinnamon & cardamom spices.
Assembly
  1. On a sheet of parchment paper, roll puff pastry into a 12 X 16-inch (35 cm X 45 cm) rectangle. Brush on a thin layer of the cream cheese filling. Sprinkle with spice mixture. Roll it up tightly, starting from one of the long sides. Refrigerate for about 10 minutes or until firm enough to slice easily.
  2. When pastry has chilled, slice roll into 18 pieces. Line a greased 9-inch pie dish with half of the mini spiced rolls. Lay them in the center first & work your way outwards. Press them down in the dish so they stick together & form a base for the pie. Top the pastry first with remaining cream cheese filling, then the sour cherry filling.
  3. Preheat oven to 350 F. On a sheet of parchment paper, lay out the remaining 9 pastry rolls in a circular shape. Place a second sheet of parchment on top. Using a rolling pin, flatten the rolls slightly so they stick together to form the top crust. Pull off the top parchment & flip pastry over the filled pie; gently press it to conform to the pie edges.
  4. Bake for 40 minutes. If top crust is browning too fast, cover outside edges with foil.
  5. In a small dish, combine powdered sugar with lemon juice. After the pie has cooled, drizzle with lemon glaze.

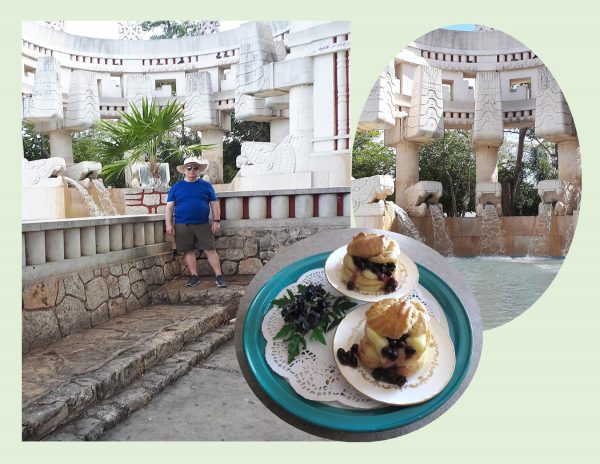
Saskatoon Berry Cream Puffs

This week we celebrate my husband Brion’s birthday. As we grow older, it comes clearer everyday, what a special privilege it is to simply have each other to share life with. I have always appreciated Brion’s strong support of my endeavors and for being the ‘wind beneath my wings’. Since it’s the time of the year when those wonderful saskatoon berries are available, I thought they would be nice in some ‘birthday’ cream puffs.

There have been many terms used to describe the humble cream puff. While the basic four ingredient recipe remains the same, how the ingredients are prepared and baked led to many names …. choux, puff, profiterole and buns. Often they were created in elaborate shapes such as swans or pyramids and filled with chocolate or vanilla custard. What was once the dessert of royalty is now a bakery aisle staple. At most supermarkets the frozen ones are available but nothing beats the taste of homemade cream puffs.

Many would describe the taste of a saskatoon as having a sweet, nutty almond flavor. Like their apple cousins, saskatoons continue to ripen after they are picked. In North America, these berries have a variety of names including: prairie berry, serviceberry, shadbush or juneberry.

I took this picture of Brion when we were in Merida, Mexico early this winter (January 2019). We managed to have a nice vacation there before the Covid-19 virus put the world in total disarray.

HAPPY BIRTHDAY, MY LOVE … YOU’RE THE BEST!

Print Recipe
Saskatoon Berry Cream Puffs
Votes: 1
Rating: 5
You:
Rate this recipe!
Servings
PUFFS
Ingredients
Cream Puffs
Almond Custard
Saskatoon Berry Compote
Servings
PUFFS
Ingredients
Cream Puffs
Almond Custard
Saskatoon Berry Compote
Votes: 1
Rating: 5
You:
Rate this recipe!
Instructions
Cream Puffs
  1. In a saucepan, heat water & butter to a light boil. Sift together flour, baking powder & salt. When butter is melted, add the flour mixture all at once. Stir vigorously & continuously until it forms a ball of dough that leaves the sides of the saucepan clean. Remove from heat & cool 5 minutes.
  2. Preheat oven to 400 F. Line a baking sheet with parchment paper. Add 1 egg & beat well, until fully incorporated. Repeat with the other two eggs. Drop or pipe mounds of batter onto baking sheet. Space them well apart as the puffs will double in size.
  3. Bake for 15 minutes, then lower the heat to 350 F. Continue baking until the puffs are lightly browned about 10-15 minutes for a small sized puff. PRICK EACH PUFF WITH A TOOTHPICK to allow steam to escape & prevent them from flattening. Turn off the oven & with the door slightly ajar, let the shells dry out for a further 10-15 minutes. Remove from oven & let cool on a wire rack.
Almond Custard
  1. In a bowl, whisk together sugar & egg yolks for 2-3 minutes until mixture is pale yellow. Beat in flour; continue beating & slowly add the boiling milk a dribble at a time in the beginning.
  2. Pour into a saucepan & over medium heat bring sauce to a boil, whisking continuously. Lower heat & cook for 2-3 minutes WHISKING to make sure the custard does not scorch. Remove from heat & whisk in the butter & almond extract. Cover with plastic wrap, making sure to have it touching the top of custard.
Saskatoon Berry Compote
  1. In a saucepan, combine water, cornstarch & sugar, then add the rest of the compote ingredients. Bring mixture to a simmer & reduce to a thickened sauce.
Assembly
  1. When the shells are cool, cut a slit in the side of each puff; spoon in a dollop of the custard & top with some berry compote. If you prefer, dust tops with powdered sugar.

Glazed Sour Cherry Yeast Cake

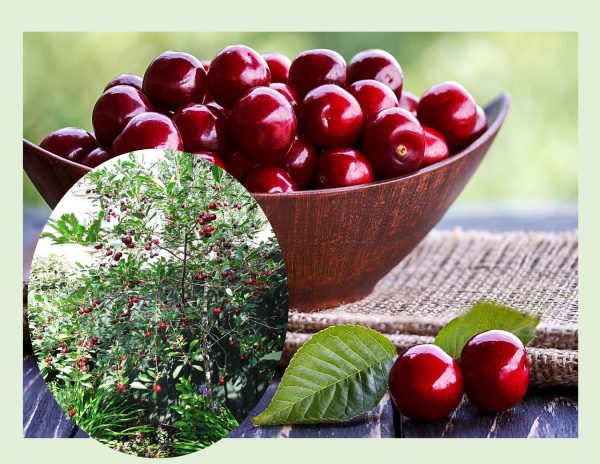
We seem to have had all the right weather conditions this year for our little cherry tree. It’s yield was close to 8 lbs (3.6 kg) of really beautiful fruit. I personally like using these cherries for cooking and baking as opposed to eating them fresh. The sweet/tart flavor lends itself so well to numerous recipes.

While the warmer summer months certainly slow down my baking activities, they never really stop completely. On the cooler or rainy days, I still heed the call to head to the kitchen for some baking therapy.

My recipe idea today was inspired by the 1970’s ‘Poke Cakes’. Originally created to increase sluggish sales for Jello-O gelatin, poke cakes are colorful and easy to make. A fork, chopstick or the handle of a wooden spoon is used to poke deep holes all over the top of the baked cake(mix). Next, it is topped with a colorful Jell-O syrup, which trickles into the cake looking like brightly colored streamers. Once it is refrigerated until set, the cake is then slathered with Cool Whip.

Although it seems like poke cakes are a phenomenon born in corporate American kitchens, drenching cake in flavorful liquids is not new, or entirely an American tradition. England’s sticky toffee pudding, a single layer date cake, is poked all over while still warm from the oven with a fork or skewer and drenched in sticky butterscotch sauce. Genoise, the classic French sponge cake, is almost always soaked in sugar syrups spiked with liqueur, not just for flavor, but to keep the cake fresh and prevent it from drying out. Pastel de tres leches, or ‘three-milks cake’, is a beloved Latin American classic. Made from sponge cake soaked in a milky syrup combining evaporated milk, sweetened condensed milk and heavy cream. All three called for this hole-poking action long before the 1970’s.

Of course, getting back to my German heritage, brings to mind a German butter cake or Butter Kuchen. This classic yeasted cake (actually more like a bread), seems to be very closely aligned with the poke cake idea. After the dough has risen and been rolled out, deep impressions are made for the filling to nestle in.

For our ‘cake’, I used an almond cream cheese filling to compliment the fresh cherries. We really enjoyed it!

Print Recipe
Glazed Sour Cherry Yeast Cake
Votes: 7
Rating: 4.57
You:
Rate this recipe!
Course Brunch, dessert
Servings
Ingredients
Cake Dough
Cream Cheese Filling
Glaze
Course Brunch, dessert
Servings
Ingredients
Cake Dough
Cream Cheese Filling
Glaze
Votes: 7
Rating: 4.57
You:
Rate this recipe!
Instructions
Cake Dough
  1. In a small dish, heat milk to lukewarm. Add yeast & 1 tsp sugar; let sit for 5 minutes to allow yeast to activate. In a large bowl, whisk together remaining 1/4 cup sugar, melted butter, sour cream & egg. Add yeast mixture & stir to combine.
  2. In another bowl, whisk flour & salt. Add flour mixture to yeast mixture 1 cup at a time, combining after each addition. Once all flour has been added, knead on a lightly floured surface for about 2 minutes.
  3. Lightly grease the large bowl, place dough in it & cover with plastic wrap & a tea towel. Allow to rest for at least one hour, in a draft free place until dough has doubled in volume.
Cream Cheese Filling
  1. Beat together filling ingredients & set aside in fridge until ready to use.
Assembly
  1. Line a 15" X 10"-inch jellyroll pan with parchment paper. Place dough on paper & press out evenly in pan. Make about 20 deep impressions in dough with your fingertips. Fill each one with a spoonful of filling & top with a couple of cherries. Allow cake to rise 10 minutes.
  2. Preheat oven to 350 F. Bake cake for about 20 minutes or until golden. Meanwhile, combine glaze ingredients. Remove from oven: cool for just a few minutes then drizzle with glaze. Sprinkle with sliced almonds. Cut into 24 serving pieces.