Dublin Pub Chicken

Dublin Pub Chicken, a hearty and flavorful dish, that has evolved over time, drawing inspiration from traditional Irish cuisine and the cozy ambiance of Dublin’s historic pubs.

Like many classic pub dishes, Dublin pub chicken likely started as a simple, rustic meal. Over time, cooks and chefs in Dublin’s pubs experimented with flavors, seasonings, and cooking techniques. The dish evolved to incorporate local ingredients and reflect the warm, convivial atmosphere of traditional Irish pubs.

Dublin pub chicken typically features roasted chicken atop a bed of healthy vegetables and is served in large bowls. 

Being someone who relates to the ‘taste of a memory’, I can only imagine anyone tasting this meal in a Dublin pub on a cool fall evening would come away with just that.

Print Recipe
Dublin Pub Chicken
Votes: 1
Rating: 5
You:
Rate this recipe!
Course Main Dish
Cuisine European
Servings
Ingredients
Course Main Dish
Cuisine European
Servings
Ingredients
Votes: 1
Rating: 5
You:
Rate this recipe!
Instructions
  1. Preheat oven to 375 F.
  2. Season chicken with salt, pepper, thyme & sage. Lightly sprinkle both sides with flour & set aside.
  3. Cut bacon into 1/2" pieces & add to frypan over medium high heat. Fry the bacon until crisp & rendered. Scoop bacon out of pan & allow to drain on paper towels.
  4. Add garlic to bacon drippings & cook 1 minute. Add seasoned/floured chicken to same frypan over medium high heat & allow to brown, about 3-4 minutes. Turn over & cook an additional 3-4 minutes. Remove from pan.
  5. Add shallots, potatoes & carrots to frypan & allow to caramelize over medium high heat, about 3-4 minutes. Add chicken broth & cook 1 minute to deglaze pan.
  6. Add raw cabbage to large baking dish. Pour vegetables & broth over top of the cabbage & sprinkle with bacon bits. Top with chicken thighs & place in oven. Cook 50-60 minutes, until chicken registers 165 F. & vegetables are tender.

Green Sunflower Seed Cookies

CELEBRATING ST. PATRICK’S DAY!

The term ‘green food’ can mean several things. More and more households are ‘going green’ with their menus, buying food from sustainable local sources. People who are ‘eating greener’ include those who grow their own food and compost all their waste to those who simply take a re-useable bag to the supermarket. Most of us are interested in making decisions that are better for the environment.

Others immediately think ‘green vegetables’. Then of course there are those who, especially at this time of year, may think of the color green and foods with which to celebrate St Patrick’s Day. There is so much you could do with this holiday in terms of food such as rainbows, leprechauns, shamrocks, pot of gold ………

In North America, St. Patrick’s Day is pretty much just a fun day here. Green food has been getting more and more ‘creative’ on this particular holiday. For the most part, it’s an excuse to party and drink some green beer.

In the spirit of St. Patrick’s Day, I wanted to incorporate some ‘green’ food into our day. I decided on some ‘magic’ sunflower seed cookies. These cookies are quite unique in that when you use sunflower butter combined with baking soda in the batter the bread turns green. The green color is a harmless result of natural chemical reactions and doesn’t affect the taste or safety of the cookies.

Sunflower seed butter, often called Sunbutter, naturally turns green when these two ingredients meet during baking. The alkaline baking soda interacts with the acidic chlorogenic acid, producing a green pigment called chlorophyllin. This reaction intensifies as the cookies cool down, leading to the characteristic green hue.

Nevertheless, I thought it was a fun way to put a different twist on today’s green celebrations.

Print Recipe
Green Sunflower Seed Cookies
Votes: 1
Rating: 5
You:
Rate this recipe!
Servings
Votes: 1
Rating: 5
You:
Rate this recipe!
Instructions
  1. Preheat oven to 350 F.
  2. Mix everything together in one bowl until well combined.
  3. Scoop the dough, roll in seeds & place onto a parchment paper lined cookie sheet. This amount will make 12 large balls or 15 small ones.
  4. Bake 10-15 minutes. Remove from oven & cool on wire rack.
Recipe Notes
  • It's definitely very important to use baking soda and make sure to mix the batter adequately to disperse the baking soda fully,  otherwise the chemical reaction that produces the green color won't happen. It also needs to sit for a few minutes after baking. Some brands (or even jars) of sunflower butter do work better than others, whether it has to do with freshness, added ingredients, or what. It's the secret ingredient to the green color - any other nut butter will just be brown! Look for a jar with as few additives as possible.


Blueberry & Brie Turkey Wellington

SEASON’S GREETINGS!

Christmas is undoubtedly one of the most special holidays, from the religious significance of the holiday to the cultural impact it has, the delicious food, the festive music, and the classic movies. Christmas provides a magical atmosphere that fills homes with warmth and joy. It’s a time to celebrate and appreciate the blessings in our lives and to spread love and kindness to those around us.

Today, December 25, is my sister Rita’s birthday and though it has been many years since we could all be together at this time as a family, her birth date brings many precious memories. Nostalgia is a very strange thing. It pops up when you least expect it. Taste, smell, music can take you right back to a moment. I have fond memories of her Christmas Eve family birthday ‘parties’. On the eve of Christmas, our family would go to church. After returning home, we were joined by some family friends to have birthday cake and homemade root beer. My parents wanted my sister to always have this special time to honor her birthday apart from the Christmas festivities.

At the heart of a memorable dinner is the main entree, so why not make it just a bit more special by serving it ‘En Croute’.  In the culinary arts, the term en croute (pronounced ‘on Kroot’) indicates a food that has been wrapped in a pastry dough and then baked in the oven. Traditionally the type of pastry used was a simple dough called pate pastry. Today, puff pastry is frequently used for most en croute recipes.

The key to preparing items en croute is that however long it takes to cook the pastry until it is golden brown is how long the item will spend in the oven. Some of the best choices are beef tenderloin, salmon or brie cheese, due to the fact they require less time to cook.

In the 1950’s and 60’s, Beef Wellington or as the French called it, ‘Boeuf en Croute’, became very popular. It was an elegant meal, using a beef tenderloin covered with liver pate and wrapped in pastry. My first introduction to this meal was a much more low-key version. It was simply achieved by making a nicely seasoned meatloaf, wrapping it in a basic pastry and baking it. My mother would serve it with tomato soup sauce. Definitely good but not quite the elegance of the true en croute entrees.

I’ve come to realize, there are two turkey ‘camps’ for most people. Those who love a roast turkey for the holiday dinner and those who like to part with tradition and have something different.

Now, I’m not actually in either turkey camp. Sometimes I love a juicy roasted turkey with all the complimentary side dishes. And other times, I crave something a little different but also mixed with a bit of tradition.

This savory blueberry & brie turkey wellington is a perfect showpiece for a holiday meal. Warm, melted cheese and crumbly bacon combined with fresh herbs, blueberries, topped with mushroom duxelle and covered in airy puff pastry. Served with blueberry chutney takes this meal to the next level!

HAPPY BIRTHDAY RITA!

LOVE TO YOU & RICK .. WISHING YOU HEALTH & HAPPINESS!

SEASONINGS GREETINGS TO EVERYONE WHO ENJOYS & FOLLOWS OUR BLOG

Print Recipe
Blueberry & Brie Turkey Wellington
Votes: 1
Rating: 5
You:
Rate this recipe!
Servings
Ingredients
Turkey & Prosciutto
Servings
Ingredients
Turkey & Prosciutto
Votes: 1
Rating: 5
You:
Rate this recipe!
Instructions
Stuffing
  1. Preheat the oven to 375 F.
  2. In a medium skillet over medium-high heat, heat olive oil. Add bacon, shallot & garlic; cook, stirring frequently, about 5 minutes. Stir in thyme, rosemary, ¼ tsp salt & ¼ tsp pepper. Remove from heat; set aside to cool.
  3. Place the turkey breast on a large cutting board. To butterfly the breast, with a sharp knife, slice into the thickest portion of the breast & cut down the length (the side) of the breast, but not all the way through, about ¾ of the way through. You should be able to unfold the turkey breast like a book.
  4. Place the turkey breast in a large zip lock bag. Using a meat mallet, pound out both sides until they are even in thickness, about ¾-1-inch. Sprinkle turkey with remaining salt & pepper.
  5. Place brie slices on one half of the inside of the turkey breast and the cover with the shallot, thyme mixture, blueberries & bacon. Fold the top over onto the bottom, closing it like a book. Gently transfer the turkey breast to a parchment lined baking sheet.
  6. Place prosciutto slices over the top of the turkey breast. If the prosciutto is thin and tears, that’s ok, just continue to layer the prosciutto over the breast, tucking the prosciutto under the breast as needed.
  7. With either 4 – 5 strands of kitchen twine or wooden toothpicks, tie or ‘pick’ the turkey breast. Don’t tie the breast too tight. Just enough to keep it secure.
  8. Place in the turkey breast in the oven & bake for about 35 minutes. The turkey will be par-cooked & needs to cool for about 10-15 minutes. Once cool enough, cut the twine off (or remove picks) the turkey.
Mushroom Duxelle
  1. While the turkey is cooling, make the mushroom duxelle. In a skillet, add olive oil & cook shallots just until they are soft. Then add the mushrooms & fresh herbs. Let the mushrooms cook until soft & wilted & have released some of their liquid. Stir in the garlic & cook a few minutes longer. Then stir in the breadcrumbs & season with salt & pepper.
Pre-Cooking Turkey
  1. When ready, set the oven temperature to 400 F.
  2. Place one sheet of puff pastry on a flat lightly floured surface. Roll it out a bit lengthwise, about 1-inch. Most puff pastry is about 10×15 inches. I roll the pastry out to about 11×16 or 17. Then do the same with the second piece of puff pastry.
  3. Place one sheet of prepared puff pastry onto a parchment-lined baking sheet. Then place the cooled par-cooked turkey breast in the center of the puff pastry. With a sharp knife, cut horizontal slits (about 1 inch apart) on the edge of each side of the pastry dough.
  4. Top the turkey breast with the mushroom duxelle, patting it securely into place. Some of the mushroom mixture will tumble off but just put it back on & continue patting it gently until it sticks. Fold each piece of pastry over the turkey breast in a crisscross manner continuing until the breast is completely covered. Tuck the edges of both sides in & pinch them well. Use any extra bits of pastry to make decorations for the top if you like. I used a small holly leaf cookie cutter to make leaves. Use the egg wash to attach your pastry decorations.
  5. Then brush the remaining egg wash over the puff pastry and sprinkle with a little sea salt if you wish. Place in the oven & cook for 70 minutes. The turkey is done when the pastry is a deep golden brown or meat thermometer reads 165 F. Remove the Wellington from the oven & let stand for 10 minutes before cutting.
Blueberry Chutney
  1. While the turkey is roasting, make the blueberry chutney. In a saucepan, combine all chutney ingredients: mix well. Bring to a boil over medium heat, stirring frequently. Boil for 1 minute.
Serving
  1. To serve, slice the turkey Wellington & place it on a platter. Drizzle with a little blueberry chutney & serve. Serve the extra chutney on the side.
Recipe Notes

NOTE: This recipe has several steps, but it’s worth the effort. The stuffing as well as the mushroom duxelle can be prepared a day in advance and held in the refrigerator. Prepare chutney, cool & refrigerate until ready to use.

Summer Quiche w/ Veggies & Sausage

Summer vegetable quiche is all about the transformation of humble ingredients into a tasty, satisfying meal. Quiche is at once fancy, yet deeply practical, using whatever vegetables you happen to have available. Okra can be an interesting addition to a quiche. Its unique texture and flavor can complement other ingredients.

Okra has a fascinating history that spans continents and centuries. Its journey from the Abyssinia region of Africa, the area we now know as Ethiopia to various corners of the world reflects its adaptability and importance in diverse culinary traditions. Because this mountainous region was so isolated for centuries, little is known about the cultivation and uses there. Eventually, however, okra made its way throughout North Africa and the eastern Mediterranean regions, before eventually moving on to the rest of the world.

Admittedly, okra isn’t everyone’s cup of tea. Its silky, slippery consistency doesn’t exactly appeal to everyone. Luckily enough, there are ways of reducing that ‘sliminess’ when cooking okra, in order to make it more appealing!

Okra is a plant that many cultures regard as a culinary treasure. This plant is particularly famous in the Southern regions of the United States, where it’s a thickening agent for their treasured gumbos. Whether in gumbo, curries, or stir-fries, okra continues to be a beloved ingredient in global cuisine.

Print Recipe
Summer Quiche w/ Veggies & Sausage
Votes: 1
Rating: 5
You:
Rate this recipe!
Servings
Votes: 1
Rating: 5
You:
Rate this recipe!
Instructions
Pastry
  1. In a large bowl, whisk together flour & salt. Work the butter with your finger tips or a pastry cutter until it is a shaggy mixture full of pea-sized lumps. Stir enough cold water with a fork until the pastry just comes together. Gather into a ball & press into a disk. Wrap tightly & refrigerate for at least an hour.
Filling/Assembly
  1. Preheat oven to 375 F. Roll out the dough on a lightly floured surface into a large round. Fit it into a 9-inch deep dish pie pan. Prick the bottom of the pastry with a fork several times. Lay a sheet of parchment over the pastry & fill with pie weights (or dried beans). Bake until crust is set & pale golden. Remove the pie weights & brush the crust all over with egg white.
  2. In a saucepan, melt the butter & sauté the onions until translucent. Add chopped okra & seasonings. Cover & cook until the okra is soft but not OVERCOOKED. Remove mixture from saucepan & set aside.
  3. Place corn kernels in saucepan with chopped sausage meat. Cook over moderate heat, stirring occasionally, until corn is crisp tender, 5-8 minutes. Gently combine with onion/okra mixture. Set aside.
  4. Whisk together cream & eggs. Sprinkle half of the cheese over the baked pastry shell, then spoon the filling mixture over top. Sprinkle with remaining cheese over all. Lay halved cherry tomatoes over the cheese & then carefully pour the egg mixture evenly over everything.
  5. Transfer to the oven & bake until custard is set, 55-60 minutes. Remove from the oven & allow to cool for at least 15 minutes before cutting & serving.

Pear Cheesecake w/ Oat Pecan Streusel

A cheesecake is always an appropriate dinner party finale, but this version is a true showstopper. This cheesecake really makes the most of pear season, with the fruit layered on top of the cheesecake batter then covered with oat streusel. The wow-factor comes into play with the stained glass candied pears.

Candied Pears are a beautiful and completely edible decoration for cakes, cupcakes, or any other creative baking project.  Modern twists in candying techniques have seen a resurgence in recent years, blending traditional methods with innovative approaches breathing new life into the timeless art of candying fruit.

Today, candied fruit is enjoyed in various forms, from baking ingredients to standalone snacks. It has become a versatile ingredient in both sweet and savory dishes, catering to a wide range of tastes and preferences. The perception of candied fruit has shifted from being a rare luxury to a widely available and beloved treat for people of all backgrounds.

At this time of year, I’m always trying to come up with something special to give as gifts to our neighbors on either side of us. We couldn’t ask for better neighbors so it’s always nice to show our appreciation in some way. We usually try to give something they use when hosting family & friends. The family this pear cheesecake is for have a pear tree in their back yard so I think its safe to say they like pears.

Print Recipe
Pear Cheesecake w/ Oat Pecan Streusel
Votes: 1
Rating: 5
You:
Rate this recipe!
Servings
Ingredients
Stained Glass Candied Pears
Oat Pecan Streusel Crust & Topping
Salted Caramel Sauce - Optional
Servings
Ingredients
Stained Glass Candied Pears
Oat Pecan Streusel Crust & Topping
Salted Caramel Sauce - Optional
Votes: 1
Rating: 5
You:
Rate this recipe!
Instructions
Candied Pears
  1. Preheat oven to 300 F.
  2. Combine water & sugar in a large saucepan. Very thinly slice pears all the way across so that you have a cross section of an entire pear. When sugar is dissolved in the water on the stove, stir & add the pear slices to the simple syrup. Simmer for about 6-8 minutes or until you can almost see through pears. Remove from simple syrup with a tongs & lay flat on parchment paper lined baking sheet.
  3. Mix about 2 tablespoons of simple syrup in a small cup with 2 drops of gel coloring of your choice. Prepare one bowl for each color you wish to use. Using a small clean paintbrush, lightly paint each pear slice as desired. Mottle colors a bit on each slice if using more than one color. Dap with a paper towel to remove excess moisture. Flip slices over and paint on the other side. Dap again with paper towel.
  4. Bake the pears for 20 minutes, paint on some clear simple syrup, turn the slices over & paint the other side. Bake another 10 minutes, then repeat.
  5. Remove from the oven & shape immediately if you do not want flat slices. Sprinkle with gold luster dust, if desired.
Streusel Crust & Topping
  1. Preheat oven to 350 F. Line the sides of a 9-inch springform pan with parchment paper.
  2. In a large mixing bowl, cream together the softened butter with sugar until light and fluffy. Gradually add in the flour, baking soda & ground cinnamon. Toss in the oats & chopped pecans & combine well. Press half of the mixture into springform pan and bake for 8-10 minutes until slightly golden brown.
Pear Mixture
  1. In a medium bowl, toss together the chopped pears with sugar, starch, cinnamon & nutmeg. Combine well & set aside.
Cheesecake Filling
  1. In a large mixing bowl, cream together the cream cheese & sugar until smooth & creamy. Mix in the vanilla & almond extract. Add the egg & combine until smooth and creamy.
  2. Pour cream cheese mixture onto the slightly warm crust. Spread pears over the cream cheese. Sprinkle the rest of the oatmeal streusel topping covering the pears, pressing down lightly.
  3. Bake until slightly brown & center is set around 50 minutes. Cool completely & refrigerate overnight preferably.
Salted Caramel Sauce
  1. Combine brown sugar, 1/2 & 1/2 cream, butter & salt in a saucepan over medium-low heat. Cook while whisking gently for a couple of minutes, until it slightly thickens. Add the vanilla & cook another minute. You are not cooking the sauce very long so it remains quite pourable. Turn off heat, cool slightly. Pour sauce into a blender & blend on high until sauce is 'creamy'. Refrigerate until cold.
Decorating/Serving
  1. To decorate, place cheesecake on serving dish & arrange candied pears on top. When ready to serve, slice & drizzle salted caramel sauce over cheesecake.

Salted Caramel Pear Crumble Bars

Pears are the unsung heroes of autumn and winter! They might not get as much fanfare as apples or pumpkins, but they definitely deserve a moment in the spotlight. Pears and caramel are such a wonderful duo! Pears are naturally sweet, and caramel—well, it’s the golden champion of sweetness. The pear’s subtle sweetness balances out the intense caramel, creating a harmonious blend. They say opposites attract, right? Pears bring a touch of freshness and mildness, while caramel brings depth and complexity.

Pears are like the introverts of fruit—they’re quiet, unassuming and know how to make the most of fall and winter spices. Cinnamon, ginger, cardamom—they all work well.

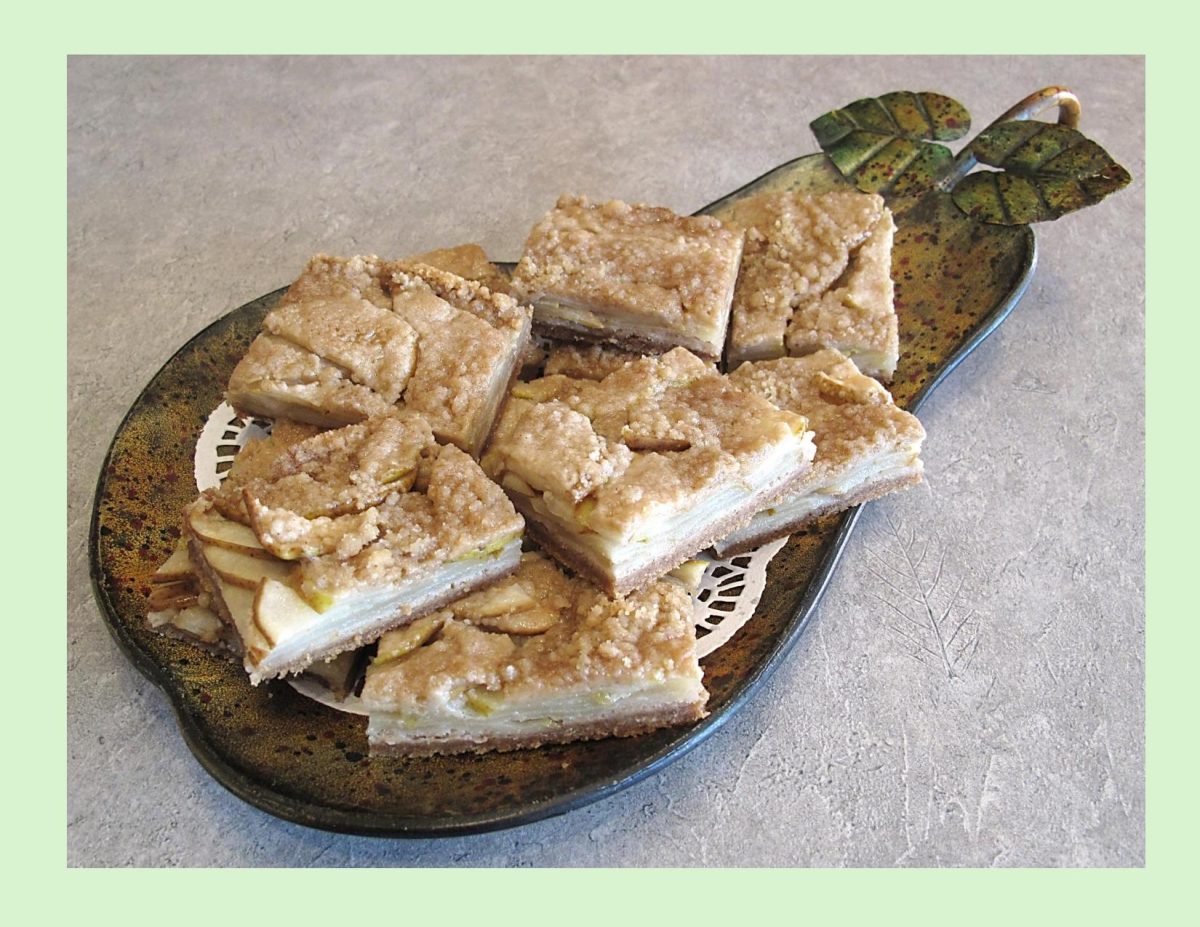
These bars are like a dessert bar and fruit crisp all in one. Thinly sliced pears nestled between layers of soft brown sugar crust drizzled with caramel sauce, then more crumbly goodness sprinkled on top. What’s not to love!

Print Recipe
Salted Caramel Pear Crumble Bars
Votes: 1
Rating: 5
You:
Rate this recipe!
Course dessert
Cuisine American
Servings
Ingredients
Crust & Topping
Filling
Course dessert
Cuisine American
Servings
Ingredients
Crust & Topping
Filling
Votes: 1
Rating: 5
You:
Rate this recipe!
Instructions
  1. Preheat oven to 350 F. Line a 9 X 13-inch baking pan with parchment paper. Set aside.
Crust/Topping
  1. Soften the butter in the microwave for about 20 seconds. Add brown sugar & mix until creamed. Add the flour, baking soda, cinnamon, cardamom, & salt. Mix until a crumbly dough forms. Set aside a cup full of the mixture for the topping. Press the rest of the mixture into prepared pan. Bake for 10-12 minutes.
Filling
  1. Thinly slice the pears. Combine brown sugar, butter & milk in a saucepan over medium heat; bring to a boil. Lower heat & cook until thickened, about 3-4 minutes. Remove from heat.
  2. When the crust is done baking, lay the pear slices over the crust in an even layer (overlapping if necessary). Pour the caramel over the pears, and sprinkle the reserved topping mixture over the top.
Baking
  1. Bake for 22-25 minutes, until lightly golden brown. Remove from oven & sprinkle with more sea salt to taste. Let cool slightly before slicing & serving.
Recipe Notes
  • These bars are best eaten the day they are baked as they do soften after they sit a while. Nevertheless, they are still good in a softer form.

Shrimp Taco Salad

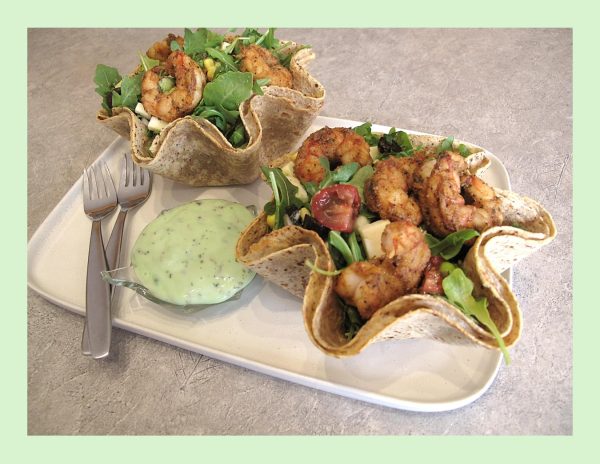
When you think of Mexican food you probably think of the standard burritos, nachos and quesadillas. While those dishes are definitely tasty why not do the summer ‘thing’ and incorporate these ingredients in a salad.

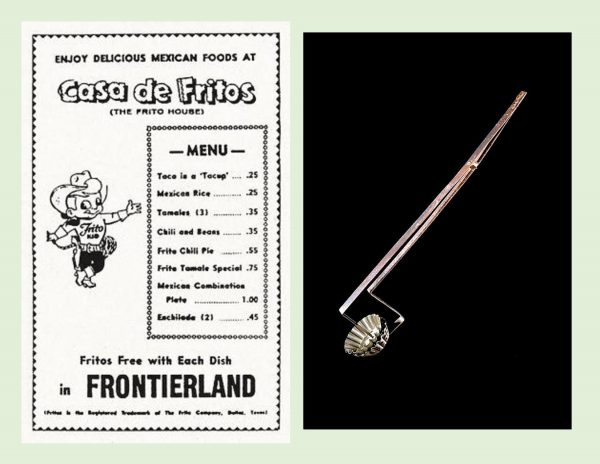
The idea of a full meal salad has always appealed to me. Of course, there are many of these using a variety of ingredients. Probably one of the most popular was the taco salad. The earliest record of it dates back to the 1960’s with its predecessor being the small teacup sized ‘Tacup’. It consisted of beef, beans, sour cream and cheese, served in a small ‘bowl’ made entirely of a Fritos tortilla.

The taco in a Tacup was invented by Charles Elmer Doolin, the founder of Fritos (tortilla chips). He created a device that looked like tongs but with two tart molds at the end of each tong. One mold would fit within the other mold with a tortilla sandwiched between them. The scalloped-edged shell was dipped into hot oil. Holes in the bottom mold exposed the tortilla to the hot oil, enabling it to cook evenly.

Tacups were first served in Dallas, Texas in the early 1950’s and by 1955, he was selling them in Fritos’ flagship restaurant, ‘Casa de Fritos’, at Disneyland in Anaheim, California. It became popular enough that the Tacup was made bigger and served as a full, main-dish sized salad bowl.

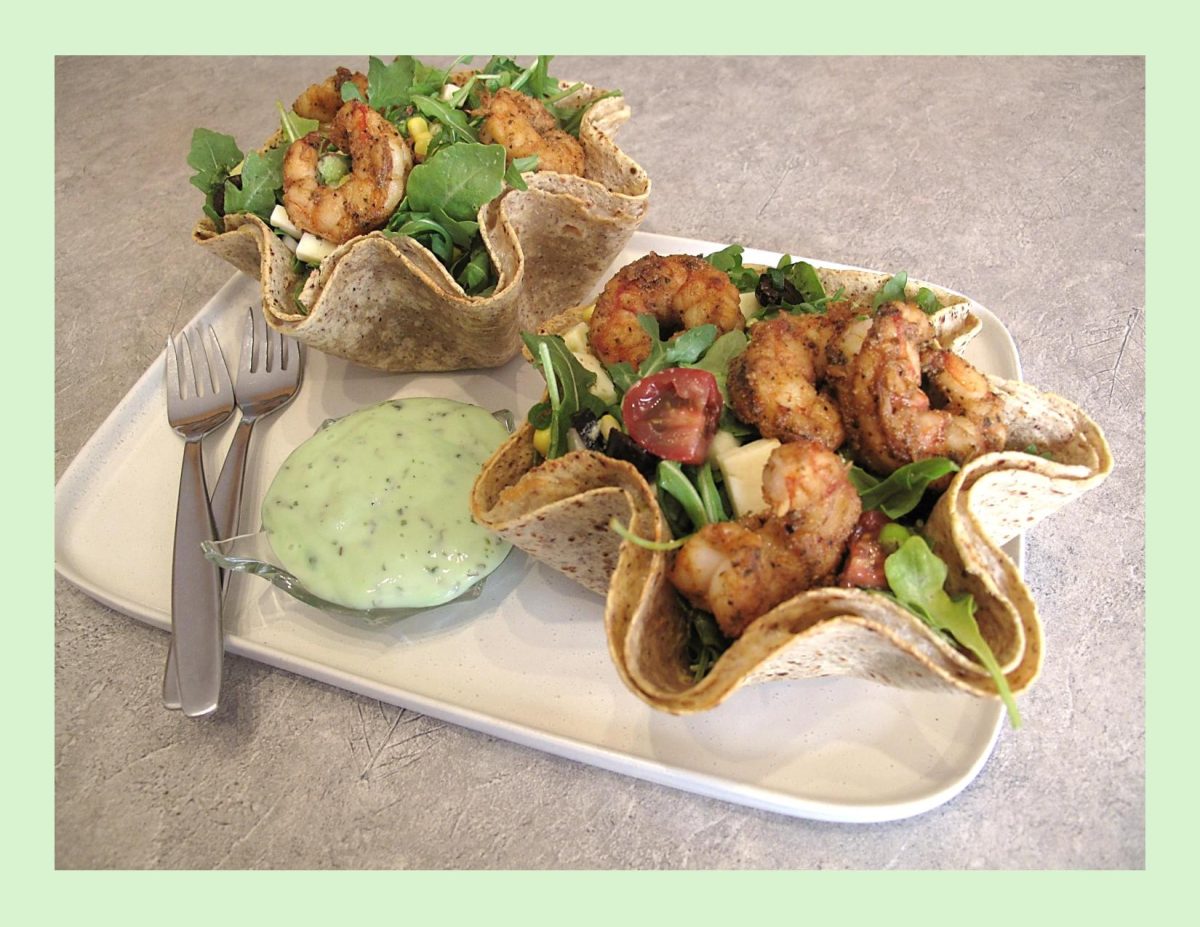
Today’s salad is a satisfying meal, a seriously feel-good dinner salad that’s crisp, spicy, and fresh all at once. Tacos de camarones (‘shrimp tacos’) originated in Baja California in Mexico. But these shrimp tacos in salad form gives you that full meal deal. All the very best elements —seasoned shrimp, healthy fresh veggies, in an edible tortilla bowl with a homemade cilantro lime dressing.

Print Recipe
Shrimp Taco Salad
Instructions
Cilantro Dressing
  1. In a food processor, place the cilantro, garlic, avocado, lime juice, honey, coriander & salt. Pulse to combine. With the machine is running, pour in the olive oil & process until smooth.
Shrimp
  1. In a medium bowl, add all marinade ingredients (except shrimp) & blend well. Add shrimp tossing well to coat. Set aside to marinate for 15 minutes. In a saucepan, melt a Tbsp butter then sauté shrimp over medium-high heat for 5 minutes or just until shrimp is cooked.
Salad Ingredients
  1. In a saucepan, fry bacon until cooked but not too crisp, drain on paper towel & chop. Drain canned or cook fresh corn on the cob & remove kernels from cob. Peel, pit & cube avocado. Sprinkle a bit of lime juice on it to keep it from going brown. Halve grape tomatoes. Slice green onions, chives & dill. Drain sliced black olives. Cube cheese.
Tortilla Bowls
  1. Preheat oven to 350 F.
  2. Brush inside of 2 heat resistant glass bowls with oil. Place one tortilla in each bowl so that the shape more or less adheres to the bowl. Line each tortilla with cheese slices then place a second tortilla on top.
  3. Place the bowls with the layered tortillas in the oven & bake for 7 minutes. Remove the bowls from the oven & allow to cool before removing the 'edible tortilla bowls'.
Assembly
  1. Place tortilla bowls on serving plates. In a large mixing bowl place shrimp & all salad ingredients. Toss gently, then divide between tortilla bowls. Drizzle with cilantro dressing (or dressing of choice) & serve.

Chocolate Rhubarb Brownies

While I’ll never grow tired of the classic pairing of strawberries and rhubarb, I love rhubarb too much to let it simply be a sidekick to those sweet berries. Not only can it hold its own, but it also begs to be matched up with many other flavors that give it new life.

Eating seasonally doesn’t have to be difficult when it tastes so delicious. Finding inventive ways to incorporate locally grown, seasonal fruits and vegetables into breakfast, lunch, and dinner dishes is actually a very easy task.

When making desserts, chocolate and rhubarb bring very different flavors to the table. The result makes a perfect balance. High-cacao chocolate is rich, subtly sweet, and creamy. Fresh rhubarb, meanwhile, is tart and comes into its own when offset by a dash of sweetness.

Celebrate rhubarb season with a stellar dessert like fudgy rhubarb brownies.

Print Recipe
Chocolate Rhubarb Brownies
Votes: 1
Rating: 5
You:
Rate this recipe!
Servings
Ingredients
Servings
Ingredients
Votes: 1
Rating: 5
You:
Rate this recipe!
Instructions
  1. Preheat oven to 375 F. Line an 8 x 8-inch baking pan with parchment paper.
  2. In a medium-sized bowl, whisk sugar, butter, eggs & vanilla.
  3. In a large bowl, whisk flour, cocoa powder, baking powder & sea salt.
  4. Stir the wet ingredients into the dry ingredients & mix until they are just incorporated. Add the rhubarb, chocolate chips & nuts. Mix only until they are combined. The batter will be quite thick. Pour batter into baking pan & spread it out so that it is even.
  5. Bake for 20-25 minutes or just until a toothpick inserted into the middle comes out clean. DO NOT OVERBAKE.
  6. Remove brownies from the oven & allow to cool for at least 10 minutes. Slice into squares.

Shrimp Orzotto in Creamy Wine Sauce

Cooking with wine is a bit of a misunderstood area. It’s not quite as simple as many people believe it to be with such a wide range of wines available to cook with and a variety of ways in which to use them.

Wine is used in a similar fashion to seasoning. You’re not pouring it in to change the taste of the entire dish, but more to enhance and complement the flavors already there. The alcohol present in wine actually triggers the release of flavor molecules in the sauce, making every ingredient the wine contacts taste even better.

White wines can be wonderful in a whole host of dishes, which is why you’ll often find them in chicken, fish and seafood recipes, as well as vegetarian.  Seafood such as lobster and shellfish are considered full-bodied, so are better partnered with creamier, full-bodied whites like Chardonnay. White wine sauce has been described as ‘a classic sauce for fish’.

A common misconception when cooking with wine is that all alcohol content is burned off during the cooking process. This isn’t completely true. Typically, the majority of the alcohol will evaporate, but in order to eliminate all traces you would need to cook something for a good three hours or more.

It’s not just alcohol content that is evaporated either. All wines contain a small amount of sulphites, a natural result of the winemaking process. These evaporate along with the alcohol, while the flavors are concentrated. The undesirable stuff comes out, the good stuff is enhanced!

This shrimp orzo is nicely complimented with the creamy wine sauce.

Print Recipe
Shrimp Orzotto in Creamy Wine Sauce
Votes: 1
Rating: 5
You:
Rate this recipe!
Servings
Votes: 1
Rating: 5
You:
Rate this recipe!
Instructions
  1. In a large bowl pat the shrimps dry with paper towel, & mix them with salt, 1 teaspoon Italian seasoning & crushed red pepper flakes.
  2. Melt 1 tbsp. of butter in a large, non-stick skillet on medium heat. Add shrimp & fry for 1-2 minutes on each side, just until it cooks through.
  3. Meanwhile bring 2 1/2 cups vegetable broth to a boil & cook orzo pasta until all the broth is absorbed & orzo is tender. Set aside.
  4. Remove the shrimps from the skillet & set aside. In the same skillet, add the remaining 1 tbsp. of butter & melt until it just starts to brown. Add onion & garlic and cook until translucent & fragrant.
  5. Once the garlic is cooked, add wine & cook for a couple of minutes. Next add heavy cream & once the liquid is simmering, add salt & 1 teaspoon of Italian seasoning. Add orzo & crumbled gorgonzola cheese.
  6. Add shrimp back into the skillet & reheat. Serve with chopped parsley.

Garlic Salmon w/ Roasted Veggies

HAPPY NEW YEAR TO EVERYONE!

Food has always been a powerful symbol especially at the start of a new year. Fish on New Year’s Day is like turkey at Christmas.

People all around the world eat a variety of traditional foods from grapes to lentils, to smoked fish at the stroke of midnight. Fish have also been linked to prosperity or wealth with their scales round and abundant like money. Because fish swim forward, they’re considered a lucky food and represent progress. Not only that, but salmon travel in schools, which is supposed to symbolize prosperity. 

There is also a German tradition of eating fish for the New Year’s Eve dinner, and keeping a fish scale from a carp in your wallet all year to ensure wealth for the whole family.

New Year’s celebrations bring thoughts of new beginnings, letting go of the past and a future of wealth and good fortune.

Whatever food you chose to have today, enjoy it to the fullest with family & friends as we enter this new year.

Print Recipe
Garlic Salmon w/ Roasted Veggies
Votes: 1
Rating: 5
You:
Rate this recipe!
Servings
Votes: 1
Rating: 5
You:
Rate this recipe!
Instructions
  1. In the microwave, bake potatoes with skin on until almost done. Remove & carefully cut into wedges. Set aside. Take beans out of freezer.
  2. Preheat oven to 325 F.
  3. Spread salmon with mustard; sprinkle with salt & pepper.
  4. In a skillet over medium-high, heat oil & add garlic. Cook, stirring often until garlic is fragrant & light golden brown, about 2 minutes. Pour hot oil over salmon on a large baking sheet. Place potato wedges at one end & spread out beans on the other. Sprinkle potatoes & beans with salt & pepper.
  5. Roast until salmon flakes easily with a fork & vegetables are tender & roasted. Remove from oven.
  6. Transfer salmon to a platter; sprinkle with tarragon & chives. Arrange vegetables on platter & serve.