July is such a wonderful month. The weather’s warm, there’s still plenty of summer left, and the produce is literally amazing.
Midsummer means the farmer’s markets are brimming with great fruit & veggies. With such a colorful bounty of goods, we can settle into our summer cooking routines with tasty meals hot or cold.
But, even in summer, we sometimes crave ‘comfort food’ such as a savory hand pie. The humble hand pie goes by many different names: call it a pasty, a turnover, an empanada, or whatever you like, who doesn’t love a little portable personal-sized savory pie?
These hand pies, with their tender, flaky, herbed crust perfectly envelop the creamy chicken and summer veggies. A flavorful meal that can be served as the main course for a warm-weather picnic or for a hand-held, backyard meal with the addition of a nice fresh salad at home.
Print Recipe
Summer Chicken/Veg Hand Pies w/ Herbed Crust
Votes: 1
Rating: 5
You:
Rate this recipe!
|
|
Votes: 1
Rating: 5
You:
Rate this recipe!
|
Instructions
Herbed Crust
Add the flour, sugar, basil, oregano & salt to a food processor; pulse just until combined. In a small bowl, whisk mix together the egg, vinegar & water. Add the cold butter pieces into the food processor; pulse until small coarse crumbs remain. Sprinkle the water/egg mixture over the flour & pulse again until the dough comes together.
Remove the dough with your hands & wrap it in plastic wrap. Refrigerate the dough for 30 minutes. Prepare filling during this time.
Filling
Heat a Dutch oven or pot over medium high heat; add the olive oil & butter. Season the chicken with the salt & pepper then add it to the pot. Cook until the chicken is golden & browned, then remove it with a spoon & place it in a bowl.
Add the 3 tablespoons of butter to the pot with the onion. Sprinkle in a bit more salt & pepper. Stir, then cook the onions until slightly soft, about 4 - 5 minutes. Add the potatoes & stir, cooking for another 5 minutes; stirring often. Sprinkle the flour over the onions & potatoes; stir gently to create somewhat of a roux with the vegetables. Cook for 2 - 3 minutes while stirring occasionally.
Slowly stream the chicken stock into the pot while stirring – it will thicken. Stir in the squash, green beans, corn and chicken. Stir in the cream. Taste the mixture and season with salt & pepper if needed.
Preheat the oven to 375 F.
Remove pastry from refrigerator & place on a baking sheet or board. Invert a 5-inch bowl over top to create your outline of each hand pie. Press down to cut out.
Line a baking sheet with parchment paper. Place rounds of pastry on the parchment & brush around the outer edge of each pastry circle.
Distribute the filling in the center of each pastry circle (don't fill to the edge; leave some space). You want enough filling in there, but not too much that you can't close/seal over.
Fold over each pastry circle (so each is a half-moon shape), pressing the outer edges with a fork to seal. You can gently press over top (with your hand) to spread out the filling inside.
Brush the hand pies with some of the remaining egg wash. Cut 3 slits in top of each pastry circle. Place them in the fridge for about 10 minutes so the pastry gets a little cold again.
Bake for 22 to 24 minutes or until they're golden brown and crispy on the outside & heated through. Allow to cool a few minutes before serving. Nothing says they can't be served with a little gravy (if desired)!
Recipe Notes
- You may get anywhere from 6-8 hand pies depending how thick your dough is rolled.

Call it brunch, call it breakfast, call it what you will but there’s nothing better than a fresh-baked quiche on Christmas morning. Many other brunch dishes get all the attention, such as eggs Benedict or bagels and lox, but I think quiche is the perfect brunch food. If you like breakfast casserole you’re sure to love quiche!
You hear a lot about the ‘joy of Christmas.’ This, to me, is the aroma and flavor of the holiday: rich and savory, warm and satisfying. Pure comfort.
The perfect brunch-at-home is quiche. Think about it: It’s filling, easy to portion out for a crowd, and make-ahead friendly.
This Christmas breakfast quiche is light but filling and gives you that warm and comforting feel while enjoying the holiday spirit. It has all the flavors of the holidays. The quiche filling is rich with flavor using eggs, ground pork, cranberries, and cheese and it makes the house smell amazing. That smell, my friends, is one of the Joys of Christmas.
Print Recipe
Sage Pork & Cranberry Quiche
Votes: 1
Rating: 5
You:
Rate this recipe!
|
|
Votes: 1
Rating: 5
You:
Rate this recipe!
|
Instructions
Pastry
Add flour, sugar, baking powder & salt to a food processor & pulse just until combined.
In a small bowl, whisk together the egg, vinegar & water. Add cold butter & pulse until small coarse crumbs remain.
Sprinkle water/egg mixture over flour & pulse again until the dough comes together.
Remove the dough from the processor & wrap in plastic wrap. Refrigerate dough for 30 minutes.
Filling
In a large skillet, over medium-high heat, brown pork with onion, sage, thyme salt & pepper. Remove from heat & add potatoes & cranberries.
Preheat oven to 375 F. Line a 9-inch pie pan with chilled pastry.
Sprinkle 3/4 of the shredded cheese over bottom of pastry & evenly add pork mixture. Sprinkle top with remaining cheese.
In a small bowl, combine eggs & half & half. Whisk until mixed, but not frothy. Pour over filling.
Bake for 40-45 minutes or until a knife tip inserted in the center comes out clean.
Allow to stand for 10 minutes before cutting into wedges.

Many cultures have embraced the apple pie and put their own spin on it, so why is it known as the quintessential American dessert. German immigrants brought over the modern hamburger and Italians were the first to combine cheese with macaroni. Apple pie—a dish that commonly follows the words ‘American as’ —has a reputation for being one of the rare dishes the country can fully claim. But as it turns out, the history of the iconic American dessert isn’t so simple.
The phrase ‘as American as apple pie’ emerged in the early 20th century. It gained widespread popularity during World War II, when soldiers were asked what they were fighting for. The response often included apple pie, alongside other symbols of American life like mom and baseball. This association cemented apple pie’s status as a quintessential American food.
For some cooks, grated apple pie was a practical alternative to the traditional sliced version. Grating or shredding the apples creates a pie with a tender, uniform, and almost custard-like filling, unlike the chunkier texture of a standard pie. Shredding the fruit reduces the cooking time required to soften the apples, which was an advantage for home bakers. As shown in some historic recipes, eggs and melted butter were often mixed into the grated apples, creating a richer filling.
This pie reminds me of an experience I had that seems quite comical when I think of it now. Before I had ever studied in the commercial food industry or made any number of pies, a friend gave me a recipe for a ‘Swiss’ apple pie. Her instructions were to place the shredded apple in a pastry lined pie pan. Next, pour vanilla pudding over the apples and bake. It sounded great! I purchased a box of Jell-O brand vanilla pudding & pie filling, made a crust and filled it with shredded apples. I assumed you were supposed to cook the pudding before covering the apples with it for some reason. Wrong!! What resulted was apples baked in a pastry shell with a ‘rubber top’. I guess we all have to start somewhere, right?!
Today, I wanted to revisit the grated apple pie idea being fall with all the wonderful apples that are in season right now.
Print Recipe
Grated Apple Pie w/ Salted Carmel Topping
Votes: 1
Rating: 5
You:
Rate this recipe!
|
|
Votes: 1
Rating: 5
You:
Rate this recipe!
|
Instructions
Pastry
Sift flour, sugar & baking powder into a bowl. Add salt & rub butter into flour with fingertips until it resembles breadcrumbs. In a small bowl, whisk together the egg, vinegar & water. Sprinkle the egg/water mixture over the flour mixture & combine ONLY until dough comes together. DO NOT OVERMIX. Wrap the dough in plastic wrap & refrigerate for 30 minutes.
Apple Pie
-
Grate apples & combine with lemon juice.
Line a 9-inch pie plate with chilled pastry. In a bowl, mix together the sugar, flour, cinnamon, nutmeg & salt. Sprinkle 3 Tbsp evenly in the bottom of the crust & set the rest aside.
In a mixing bowl, beat the butter until creamy. Add the remaining sugar mixture & beat until incorporated. Add the vanilla & eggs. Beat until mixed well & the mixture turns lighter. Stir in the apples.
Pour the filling mixture into the crust & spread out evenly. Place a pie ring or one made out of aluminum foil around the edges of the crust.
Bake at 450 F. for 15 minutes then reduce heat to 350 F. & bake for an additional 30-35 minutes. If the crust is not brown enough, remove the pie ring for the last 10 minutes of the cooking time.
Salted Caramel Sauce
Place the sugar & water into a large heavy bottomed saucepan. Cook, stirring, over a low heat until sugar has dissolved. Increase heat & bring to a boil for 5-7 minutes, stirring occasionally, until you get a deep amber color.
Remove from heat & immediately add the heavy cream & stir. Be careful as it will bubble up quite a lot. Once the caramel has dissolved into the cream, add the butter & salt. Place in a small blender & blend for a few seconds until mixture comes together nicely. Place into a small container & cool.
Finish
Once pie is at room temperature, brush or drizzle sauce over the apple filling. Chill further & serve.
Recipe Notes
The purpose of putting some of the sugar mixture into the bottom of the pie crust is to absorb some of the liquid that forms when sugar & fruit are mixed together.
If the apples produce a lot of juice, drain them BEFORE adding them to the batter. If you pour off the juice after adding the apples to the batter, you will lose a lot of the spice flavor.
Using a deep dish will help avoid it from running over in the oven.

Summer vegetable quiche is all about the transformation of humble ingredients into a tasty, satisfying meal. Quiche is at once fancy, yet deeply practical, using whatever vegetables you happen to have available. Okra can be an interesting addition to a quiche. Its unique texture and flavor can complement other ingredients.
Okra has a fascinating history that spans continents and centuries. Its journey from the Abyssinia region of Africa, the area we now know as Ethiopia to various corners of the world reflects its adaptability and importance in diverse culinary traditions. Because this mountainous region was so isolated for centuries, little is known about the cultivation and uses there. Eventually, however, okra made its way throughout North Africa and the eastern Mediterranean regions, before eventually moving on to the rest of the world.
Admittedly, okra isn’t everyone’s cup of tea. Its silky, slippery consistency doesn’t exactly appeal to everyone. Luckily enough, there are ways of reducing that ‘sliminess’ when cooking okra, in order to make it more appealing!
Okra is a plant that many cultures regard as a culinary treasure. This plant is particularly famous in the Southern regions of the United States, where it’s a thickening agent for their treasured gumbos. Whether in gumbo, curries, or stir-fries, okra continues to be a beloved ingredient in global cuisine.
Print Recipe
Summer Quiche w/ Veggies & Sausage
Votes: 1
Rating: 5
You:
Rate this recipe!
Ingredients
Filling
- 1 large egg, separated (use the white on the pie crust & the yolk mixed into the filling)
- 2 Tbsp butter or olive oil
- 1 small red onion, cut into wedges
- 8 (130 gm) okra
- 1/2 - 3/4 tsp sea salt
- 1/2 tsp EACH smoked paprika, garlic powder, black pepper, onion powder, oregano & thyme
- 3/4 cup corn kernels use fresh corn if possible.
- 500 gm Fire-Roasted Red Pepper chicken sausages, casings removed OR substitute with some Italian chicken sausages.
- 200 gm white, extra old cheddar cheese, grated
- 3 large eggs
- 3/4 cup half & half cream
- 8 cherry tomatoes, halved
Ingredients
Filling
- 1 large egg, separated (use the white on the pie crust & the yolk mixed into the filling)
- 2 Tbsp butter or olive oil
- 1 small red onion, cut into wedges
- 8 (130 gm) okra
- 1/2 - 3/4 tsp sea salt
- 1/2 tsp EACH smoked paprika, garlic powder, black pepper, onion powder, oregano & thyme
- 3/4 cup corn kernels use fresh corn if possible.
- 500 gm Fire-Roasted Red Pepper chicken sausages, casings removed OR substitute with some Italian chicken sausages.
- 200 gm white, extra old cheddar cheese, grated
- 3 large eggs
- 3/4 cup half & half cream
- 8 cherry tomatoes, halved
|
Votes: 1
Rating: 5
You:
Rate this recipe!
|
Instructions
Pastry
In a large bowl, whisk together flour & salt. Work the butter with your finger tips or a pastry cutter until it is a shaggy mixture full of pea-sized lumps. Stir enough cold water with a fork until the pastry just comes together. Gather into a ball & press into a disk. Wrap tightly & refrigerate for at least an hour.
Filling/Assembly
Preheat oven to 375 F. Roll out the dough on a lightly floured surface into a large round. Fit it into a 9-inch deep dish pie pan. Prick the bottom of the pastry with a fork several times. Lay a sheet of parchment over the pastry & fill with pie weights (or dried beans). Bake until crust is set & pale golden. Remove the pie weights & brush the crust all over with egg white.
In a saucepan, melt the butter & sauté the onions until translucent. Add chopped okra & seasonings. Cover & cook until the okra is soft but not OVERCOOKED. Remove mixture from saucepan & set aside.
Place corn kernels in saucepan with chopped sausage meat. Cook over moderate heat, stirring occasionally, until corn is crisp tender, 5-8 minutes. Gently combine with onion/okra mixture. Set aside.
Whisk together cream & eggs. Sprinkle half of the cheese over the baked pastry shell, then spoon the filling mixture over top. Sprinkle with remaining cheese over all. Lay halved cherry tomatoes over the cheese & then carefully pour the egg mixture evenly over everything.
Transfer to the oven & bake until custard is set, 55-60 minutes. Remove from the oven & allow to cool for at least 15 minutes before cutting & serving.
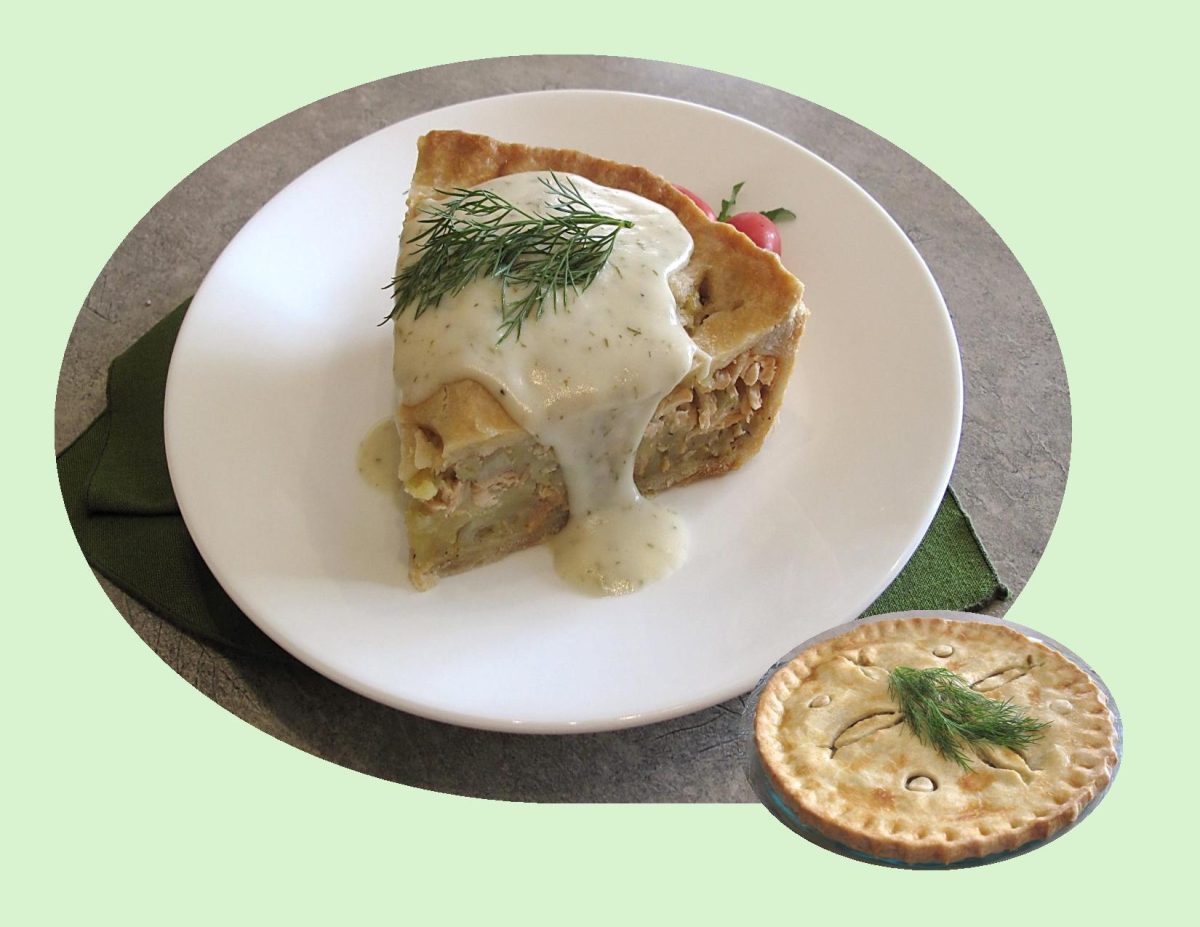
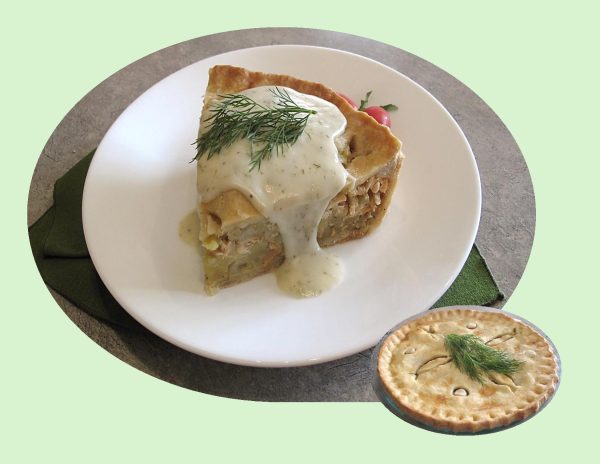
Salmon pie is a variation on a classic Canadian Christmas meat pie from Quebec called a ‘tourtiere’. Fundamentally, tourtiere is a pie that contains meat and spices baked in a flaky crust. The meat is generally diced or ground, including any or all of pork, veal, beef or wild game. No matter what the meats used, or the presence or absence of potato, bold seasoning is the rule for all varieties. The four original spices used in the classic tourtiere are cinnamon, cloves, allspice and nutmeg. Like so many of these recipes that have been ‘handed down’ over generations, each family alters it to suit their taste.
The salmon pie version takes the same meat pie concept, but uses flaked, cooked salmon that is seasoned and mixed with mashed potatoes.
I thought it would be nice to have some salmon pie before we get into all that Christmas turkey. The lemon dill sauce is such a nice condiment to go with it.
Print Recipe
Canadian Salmon Pie
Votes: 1
Rating: 5
You:
Rate this recipe!
Ingredients
Lemon Dill Béchamel Sauce
Ingredients
Lemon Dill Béchamel Sauce
|
Votes: 1
Rating: 5
You:
Rate this recipe!
|
Instructions
Pastry
In a large bowl, combine flour & salt. Cut in butter until mixture is an even crumbly texture. Add cold water a Tbsp at a time & mix until dough comes together. Shape the dough into a disc, wrap & chill in the refrigerator. While pastry is chilling prepare filling.
Salmon Filling
Wash & peel potatoes. Cut into chunks & boil in a medium size pot of water until tender, about 12 minutes. Drain, mash & set aside.
Melt butter in a large skillet over medium heat. Add the onions & sauté until they are softened, about 5 minutes. Add 1/2 cup water, thyme & Old Bay seasoning to skillet.
Season the salmon fillet with salt & pepper & place it into the skillet skin side down. Spoon liquid & onions over salmon, cover the skillet & cook until the salmon is opaque, about 5 minutes. Turn off the heat & let salmon cool slightly.
Remove the skin & break salmon into pieces. Add the salmon, onions & poaching liquid to the mashed potatoes & mix to combine. Taste & adjust salt & pepper if needed. While the salmon pie is baking, make the dill béchamel sauce.
Lemon Dill Béchamel Sauce
Melt the butter in a small saucepan over medium heat. Add flour & whisk until smooth. Gradually add milk, stirring constantly. When sauce begins to thicken, add the lemon juice, dill and salt & pepper to taste. Simmer for 2 minutes. Keep warm until ready to serve.
Serving
Remove pie from oven & let it cool for at least 10 minutes before serving. Cut pie into wedges & drizzle with lemon dill sauce. Serve warm.
To the younger generation, the word ‘blackberry’ probably only brings to mind a variety of gadgets, but to those who remember when there were no mobile phones in sight or in hand, the blackberry is first and foremost that small, ripe, juicy fruit that makes excellent pies, jams, jellies and wines.
Over 12 species of blackberries grow in woods and clearings in Canada, mainly in eastern provinces and southern British Columbia. Worldwide, Mexico is the leading producer of blackberries, with nearly the entire crop being produced for export into the off-season fresh markets in North America and Europe.
Although nowadays blackberries are primarily used in cooking, they are known to be very beneficial to health. Having one of the highest antioxidant contents of all fruits, blackberries are good for lowering cholesterol levels, support oral health, strengthen bones, regenerate the skin and aid the digestive system.
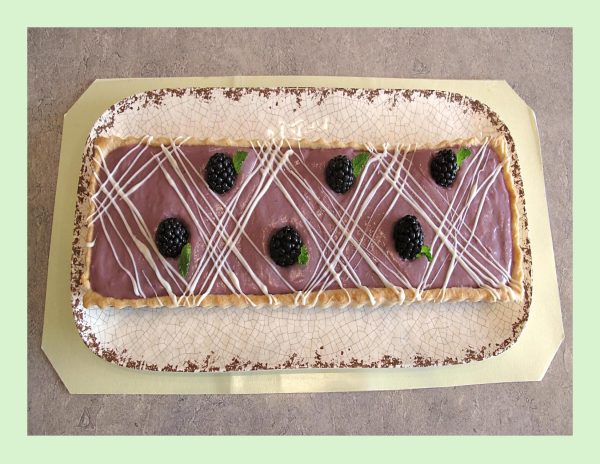
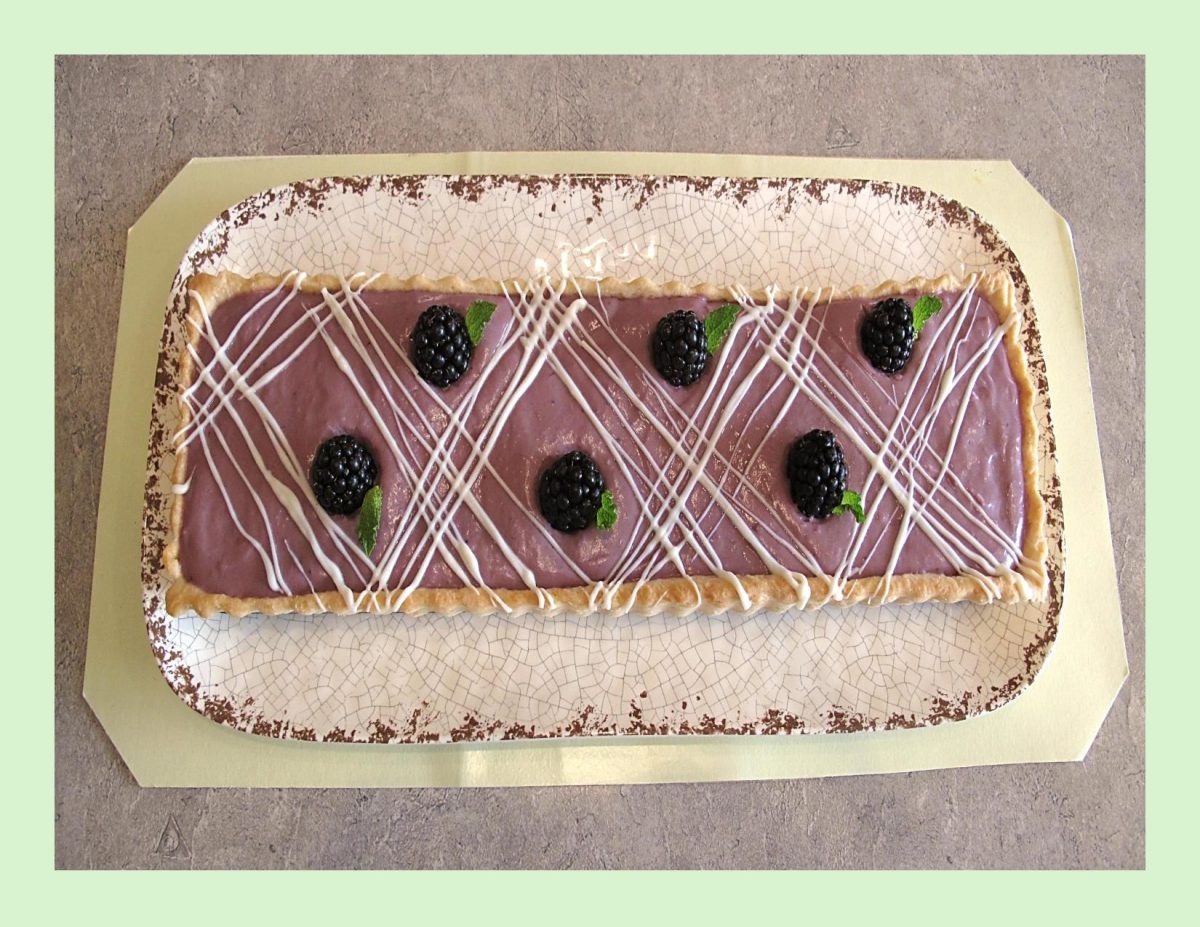
Today, I thought I’d incorporate them in a custard tart decorated with some white chocolate. The blackberries not only add color but with their deeper, darker, more complex tart/sweetness, add something very special.
Print Recipe
Blackberry White Chocolate Tart
Votes: 1
Rating: 5
You:
Rate this recipe!
|
|
Votes: 1
Rating: 5
You:
Rate this recipe!
|
Instructions
Pastry
In a food processor, pulse flour, sugar, salt & baking powder to blend. Add butter & pulse 3-4 times, until butter is in pea-size pieces. Sprinkle in the ice water; pulse another 4 times. Turn dough out on a lightly floured surface & knead gently a few times to form a disk. Wrap in plastic wrap & refrigerate for at least an hour.
Custard
In a saucepan, cook blackberries over low heat, stirring frequently, until berries break down & sauce begins to boil. Cook until sauce begins to thicken, 7-10 minutes. Remove from heat, strain through a fine mesh sieve, pressing on solids & discarding seeds & solids. Reserve blackberry juice.
In a small saucepan, whisk together 1/2 & 1/2 cream, sugar & salt. Bring to a boil over medium heat, stirring frequently.
In a medium bowl, whisk together egg yolks, cornstarch & cinnamon (or ginger). Slowly add half of the 1/2 & 1/2 mixture, whisking constantly. Add egg yolk mixture to remaining 1/2 & 1/2 mixture in saucepan & bring to a boil over medium heat. Cook, stirring constantly, until thickened, 2-3 minutes.
Remove from heat & whisk in butter & vanilla until butter is melted then whisk in reserved blackberry juice. Pour into a heatproof bowl, cover with plastic wrap, pressing wrap directly onto surface of custard to prevent a skin from forming. Allow to cool completely.
Baking
On a lightly floured surface, roll chilled pastry to 1/8-inch thickness. Transfer to a 14 x 4-inch rectangular tart pan. with a removeable bottom. Freeze for 15 minutes.
Top crust with a piece of parchment paper, letting ends extend over edge of pan. Add pie weights. Bake until lightly golden around edges. Carefully remove paper & pie weights. Bake until lightly golden & surface is set. Let cool completely.
Decorating
Whisk chilled blackberry custard then place into cooled prepared crust. Smooth with a spoon or an offset spatula. Melt white chocolate & place in a small plastic baggie. Snip off the tip of one corner of the bag. Drizzle the chocolate in parallel lines. Top with a few fresh blackberries & small mint leaves, then carefully place tart on a serving tray. Refrigerate until serving.

Saskatoon berries are very high on my list of nostalgic memories from my childhood. How these little berries can evoke such a flood of treasured thoughts is amazing. Our family farm was located in Southern Alberta, (Canada). If you were to stand on our farmhouse, west veranda, the sight of the ‘foothills’ came into view (foothills are an upland area that flank the eastern side of the Rocky Mountains).
How wonderful it was to be able to pack a picnic lunch on a Sunday afternoon and be able to drive there. It was like a whole different world. A landscape of long ridges and rolling hills covered in native lodgepole pine, aspens and spruce trees. The small streams wound their way through meadows of dwarf birch, willow and prairie grasses. You could easily come across some of the beautiful wildlife such as elk, moose or deer that lived there.
This is where our family would go to pick saskatoon berries. Very often we were accompanied by family friends or relatives. It was such a great time, everyone picking berries together, eating Mom’s fabulous fried chicken and potato salad (etc. etc.) for our picnic lunch. I was looking at some pictures from those times. We must have had some hot dogs on one occasion and I burnt my mouth it seems. What priceless memories!
With ‘saskatoon season’ in full swing, Brion and I thought it would be great to pick our own this year. It certainly can’t get any fresher than that. We chose the U-Pick farm called GROVE BERRY PATCH. This is a family owned and operated farm with 20 acres of saskatoon berries and 1 acre of raspberries, black currants, highbush cranberries and vegetables. They are located 1.5 km south off Highway 16A on Spruce Valley Road, Spruce Grove, Alberta, Canada.
It was such a nice little adventure. The morning was beautiful and the atmosphere of the berry farm and its family owners was very enjoyable. We picked a pail full of gorgeous saskatoons in a short space of time. I had originally started out with thinking I would post one recipe but of course, its turns out to be three. They consist of some Saskatoon Rhubarb Tarts, Saskatoon Butter Tarts and some Saskatoon Cream Cheese Tarts. Yum!
We are adding a few pics, not only of the tarts but some from the berry farm as well as a couple from my childhood days. Hope you enjoy the blog.
Print Recipe
Saskatoon Berry Tarts
Votes: 4
Rating: 5
You:
Rate this recipe!
Ingredients
Filling for SASKATOON RHUBARB TARTS
Filling for SASKATOON BUTTER TARTS
Filling for CREAM CHEESE SASKATOON TARTS
Ingredients
Filling for SASKATOON RHUBARB TARTS
Filling for SASKATOON BUTTER TARTS
Filling for CREAM CHEESE SASKATOON TARTS
|
Votes: 4
Rating: 5
You:
Rate this recipe!
|
Instructions
Pastry
In a medium bowl, whisk together flour, baking powder & salt until completely combined. Cut in butter with a pastry cutter or fork.
Measure the vinegar into a liquid measuring cup, then add enough ice cold water to make 1/2 cup. Pour over flour mixture, gently stir with a fork ONLY until combined. Wrap dough in plastic wrap & place in refrigerator for a minimum of an hour so it can chill well. When ready to use, Roll out dough on a lightly floured work surface. Using a 3 1/2" cookie cutter, cut out tart shells & place them in tart pans.
Saskatoon Rhubarb Filling & Streusel
In a small saucepan, combine saskatoons, diced rhubarb, sugar & cardamom. Set aside. In a small bowl, combine water, lemon juice & cornstarch. Whisk together to make a slurry. Add to to saucepan & cook on medium heat, stirring until mixture becomes thickened. Remove from heat; add vanilla & allow to cool before using.
FOR STREUSAL: Place all streusal ingredients in a small dish & combine with finger tips until crumbly. Spoon berry filling into tart shells & top with streusal. Bake at 375 F. until pastry is golden.
Saskatoon Butter Tart Filling
FOR BERRY TOPPING: In a small saucepan, mix together berries & water; simmer for 10 minutes over low-medium heat. In a separate bowl, mix together sugar & cornstarch then add to the berries & combine. Stir in lemon juice; simmer until mixture slightly thickens. Set aside to cool.
FOR BUTTER TART LAYER: First beat together eggs. In a saucepan, melt the butter then add sugar, vanilla, cream, raisins & beaten eggs. Bring to a boil over medium heat & boil for 3 minutes. Set aside to cool.
TO ASSEMBLE: Place a heaping Tbsp of butter tart mixture into each shell, then fill remainder of the tart shell with the berry topping mixture. DO NOT MIX. Bake at 375 F. for 15-18 minutes or until pastry is golden. Cool before removing from tart pans.
Cream Cheese Saskatoon Tart Filling
FOR BERRY TOPPING: Crush 1 cup of saskatoon berries & place in a small saucepan with 1 cup of water. Simmer about 2 minutes. Strain & return berry juice only to saucepan. Combine sugar & cornstarch; add to sauce. Cook over low heat, stirring constantly until mixture is thick & clear. Remove from heat & stir in remaining 2 cups of saskatoons to glaze & stir gently. Pre-bake tart shells.
FOR CREAM CHEESE LAYER: In a small bowl, blend together cream cheese, lemon zest, sugar & heavy cream. Divide cream cheese mixture between baked tart shells. Top with generous portions of berry topping & serve.
-
Recipe Notes
- The pastry recipe will yield about 48 mini tarts. I had doubled the pastry recipe because I wanted to make all 3 kinds. It's so nice to have some in the freezer for future use.
- If you make the pastry in 2 separate batches it seems to be nicer for some reason.
- If you happen to have any filling left over, it freezes well for another time.
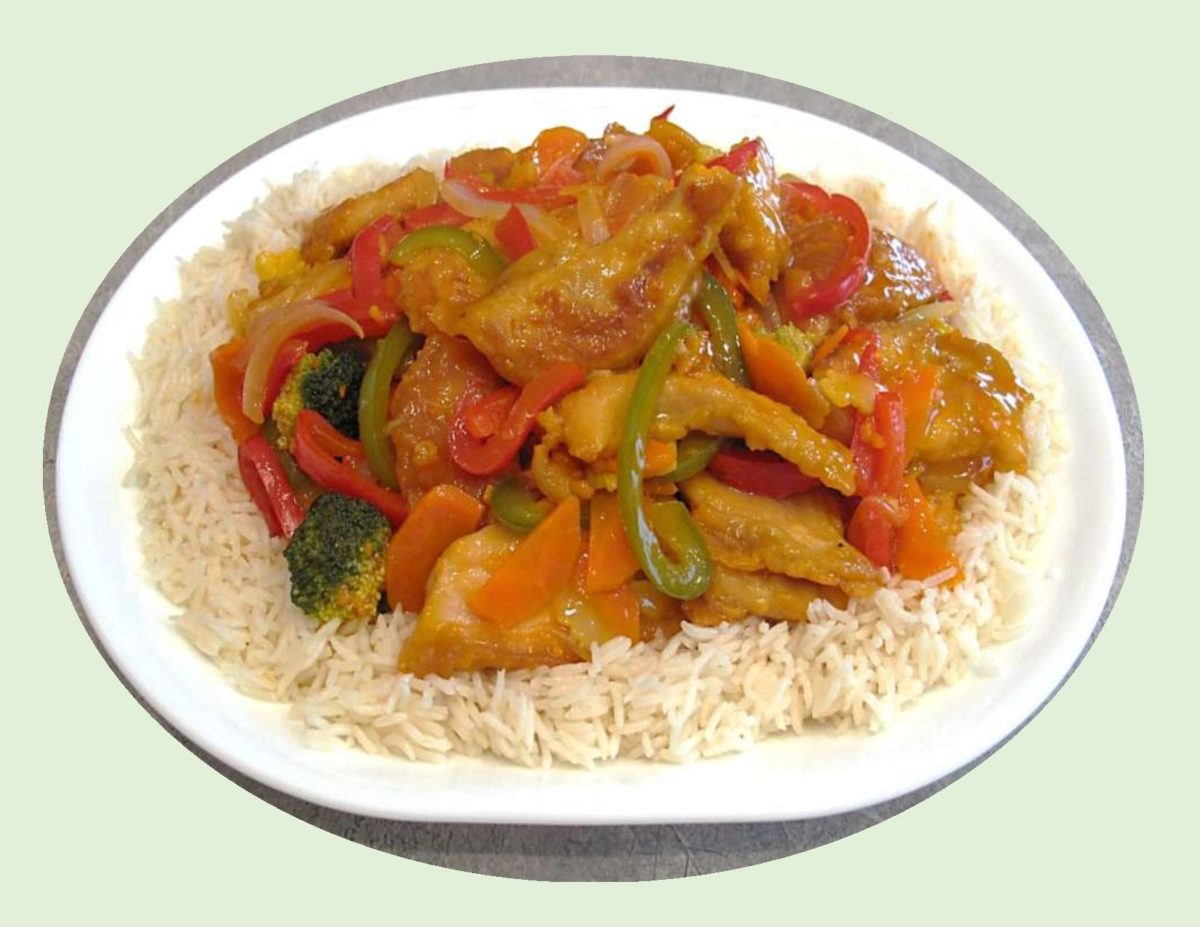
Though called Chinese food in North America, ‘orange chicken’ is rarely found in Chinese restaurants in China. It seems its more an Americanized mutation of the sweet & sour dishes found in China.
Chef, Andy Kao is credited with inventing orange chicken in 1987. Inspired by flavors from the Hunan Province of China, he developed the dish while he was employed as Panda Express’ executive chef in Hawaii.
I, personally, have never enjoyed eating anything that is coated in a heavy batter. Tempura is different from other fried fare due to its distinctive batter. It uses no bread crumbs and less grease than other frying methods. The light batter is made of cold water (sometimes sparkling water is used to keep the batter light) and soft wheat flour. Eggs, baking powder, baking soda, cornstarch, oil and/or spices may also be added.
Tempura batter is traditionally mixed in small batches for only a few seconds. Leaving lumps in the mixture along with the cold batter temperature, result in a unique fluffy and crisp structure when cooked. Over mixing tempura batter will result in activation of the wheat gluten, which causes the flour mixture to become soft and dough-like when fried.
The orange chicken I’m making today uses a nice light tempura batter, is grilled instead of deep fried, then coated with a unique and quick orange sauce (from kraftcanada.com). Add some Jasmine rice and veggies — perfect!
Print Recipe
Orange Tempura Chicken
Votes: 4
Rating: 4.5
You:
Rate this recipe!
|
|
Votes: 4
Rating: 4.5
You:
Rate this recipe!
|
Instructions
Vegetables
-
Prepare vegetables & saute in 1/2 cup chicken broth ONLY until tender-crisp. Drain broth & reserve for sauce when vegtables are sauteed.
Orange Sauce
-
In a small saucepan, combine dry jelly powder & cornstarch. Add broth, dressing, garlic & gingerroot; stir until jelly powder is dissolved. Add reserved broth from vegetables & cook until sauce is thickened, stirring frequently.
Tempura Batter & Chicken
-
Slice chicken into strips. In a small bowl, combine flour, cornstarch, baking soda & salt. In another small bowl, whisk egg with veg oil, soy sauce & ice water. Add to dry mixture, mixing only for a few seconds. Batter should be somewhat 'lumpy'.
-
Heat oil on an electric griddle to a medium heat. Dip slices of chicken in tempura batter with a fork, draining off excess. Place on griddle & fry about 7 minutes or until cooked through. Drain on paper towels.
-
Prepare Jasmine rice & place on a serving platter. Top with sauteed vegetables & chicken. Ladle orange sauce over vegetables & chicken. If you prefer, serve rice, veg, chicken & sauce all separately so everyone can make up there own combination.
Recipe Notes
- We always like quite a bit of sauce but if you don't, just make half a recipe of the orange sauce.