
HAPPY MOTHER’S DAY!
Today as we celebrate Mother’s Day, many special memories come to mind. My mother passed away in 1978 but even after 47 years, time has changed nothing. I still miss the sound of her voice, the wisdom in her advice, the stories of her life and just being in her presence. I miss her today as much as the day she left us, and I always will.
It is also with very loving thoughts, Brion & I celebrate my mother-in-law, Dolores, for her loving and kind ways and for raising that ‘special’ man I love sharing my life with. Love to my sisters, who gave so much of themselves to be the great mom’s they are.
In honor of these two precious women who prepared so many wonderful meals for us years ago, I like to post something special on this day. My choice this year are these unique looking raspberry curd tart cases.
I think tart rings give these little tarts more of an upscale look, fitting for the occasion. Using rings instead of tart pans gives such a clean look. Being perforated allows for the ring to heat up quicker (along with it being very thin), which allows for better baking. This also allows steam to escape from the crust, which keeps your crust nice and crispy.
I became interested in making curds a number of years ago. Curds differ from pie fillings or custards in that they contain a higher proportion of juice and zest, which gives them a bolder, fruitier taste. Also, curds containing butter have a smoother and creamier texture than both pie fillings and custards, which contain little or no butter and use cornstarch or flour for thickening. Additionally, unlike custards, curds are not usually eaten on their own. It seems fruit curds continue to gain popularity as evidenced by the wide array of recipes available today.
I think these should taste as good as they look.
LOVE TO ALL THE MOM’S OUT THERE READING MY BLOG TODAY!
Print Recipe
Raspberry Curd Tart Cases
Votes: 1
Rating: 5
You:
Rate this recipe!
|
|
Votes: 1
Rating: 5
You:
Rate this recipe!
|
Instructions
Pastry
Combine the flour, powdered sugar, cornstarch, salt, & vanilla in a large bowl. Add the butter & mix with your hands until the butter is broken down into pieces the size of peas & the ingredients are well combined. Add the beaten egg & mix with a spatula until the dough is smooth & the egg is fully incorporated. Don’t overmix.
Turn the dough out onto a large piece of plastic wrap & gently shape it into a ball. Wrap the dough in the plastic wrap & flatten it into a disc. Refrigerate for at least 30 minutes or overnight, until cold but still pliable. It should have the texture of clay. While the dough chills is a good time to make the filling.
When the dough has chilled, unwrap the dough and place it on a silicone baking mat (or parchment paper) on your work surface. Roll it out into a rectangle about 1⁄8 inch thick, using a second silicone sheet on top. The silicone mat makes it easier to lift the rolled-out dough onto the sheet pan later. Make sure to work quickly so the dough doesn’t get too warm.
Place the silicone mat with the dough on a baking sheet.
Using the tart rings, cut out 12 circles of dough. Remove the rest of the dough from around the rings.
Reroll remaining dough between 2 sheets of parchment. Using a sharp knife, slice strips about 10 inches long & 3/4- inch thick (or the thickness of your pastry rings). These strips will make the sides of each tartlet. At this point you may want to place the sheet of strips in the freezer for about 5-10 minutes so they will be easier to work with.
Working with one at a time, transfer a strip of dough to one of the tart rings and press it to the sides. Use your fingers to slightly push the bottom of the sides to the dough circle (to seal it). Repeat with the remaining strips of dough.
On another sheet of silicone or parchment, roll out any leftover dough & cut 12 tartlet case tops. Cut round holes in various sizes in them for decoration. Remove excess dough from around & in tops. Place on a separate baking sheet as they will bake faster than the tartlet cases.
Transfer the baking sheets containing the tartlet shells & tops to the freezer & freeze for at least 20 minutes.
-
Bake tart rings for about 20 minutes or until golden. Bake tops until they are just slightly golden (they bake fast so you need to keep a close eye on them). Remove from oven.
Raspberry Curd
Combine raspberries, sugar, lemon zest, lemon juice & water in a saucepan over medium-high heat. Bring mixture to a boil (about 5 minutes); reduce heat & simmer 5 minutes. Remove mixture from heat & let stand 5 minutes. Place in a food processor or blender; process until smooth. Strain mixture through a fine-mesh sieve into a bowl & discard solids.
Wipe pan clean & return strained mixture to pan. Whisk together egg yolks & cornstarch in a small bowl until smooth. Stir yolk mixture into raspberry mixture; bring to a boil over medium-low heat (about 5 minutes). Cook for 1 minute, stirring constantly, then remove from heat (the mixture should coat the back of a spoon). Add salt & butter, stirring until smooth. You may need to return the mixture to processor at this point if your curd doesn't seem smooth enough.
Place curd into a bowl; cover with plastic wrap, pressing it directly onto the surface of the curd to prevent a skin from forming. Chill curd in the refrigerator at least 2 hours, or up to 1 week if making in advance.
Assembly
Place tartlet tops on a wire rack & dust with powdered sugar. Spoon raspberry curd into cooled tart shell & spread into an even layer with an offset spatula. Arrange pastry lid on top of each filled tartlet. Decorate with fresh raspberries. Best eaten when they have chilled OVERNIGHT or a minimum of 2 hours.
Recipe Notes
If you find the dough is to soft to work with just add a small amount of flour, just enough to make it easier to handle.
This is a real nice crispy pastry dough. When its baked it would give the impression of being real hard but instead its crisp and so nice to bite into.

I find the aroma of the hot cross buns baking so intoxicating. Brion & I have always loved these soft, spicy little buns. Each year, at Easter time, I really enjoy making some version of Easter bread or buns (of course, trying to make it just a bit better than the year past). While I was giving this some thought, I read a comment where someone was complaining that they had too many hot cross buns leftover from Easter. Is there really such a thing as having too many hot cross buns … seriously!
While hot cross buns are now sold and enjoyed throughout the year, they were once reserved for Good Friday alone. There is no one clear explanation … some theories rest in Christian symbolism while there are also more than a few stories that indicate hot cross buns were baked on Good Friday for superstitious reasons.
Every year I like to try and make a different version of these traditional, seasonal treats. This year I’m going with some dried blueberry lemon hot cross buns. Should be good!
Print Recipe
Dried Blueberry Lemon Hot Cross Buns
Votes: 1
Rating: 5
You:
Rate this recipe!
|
|
Votes: 1
Rating: 5
You:
Rate this recipe!
|
Instructions
Buns
In a small dish, dissolve 1 Tbsp sugar in lukewarm water. Sprinkle yeast over the surface. Do not stir. Let stand for 15 minutes.
In a large bowl, mix together 1/2 cup sugar & lemon zest with fingers. Add flour, salt & cinnamon & mix well. Add prepared yeast along with melted butter, egg & egg white. Combine with a fork then add blueberries & citron.
On a lightly floured surface, knead dough for about 10 minutes. If dough is quite sticky add a LITTLE more flour.
Cover & allow to sit in a draft-free, warm place for 30-40 minutes.
Line pan with parchment paper or butter a 7x11-inch baking dish. Divide the dough into 12 equal parts & form into balls. Place them in the prepared pan & let rise for about an hour or until doubled in size.
Whisk together egg wash & lightly brush over buns before baking.
Before buns are finished rising, preheat oven to 350 F. Bake buns for about 30-35 minutes.
Remove from pan & let rest on a wire rack for about 15-20 minutes before piping on the glaze crosses.
Glaze
Mix together powdered sugar, milk & vanilla (if using) until smooth. You will want this to be quite a stiff glaze so only add enough milk to bring it to a thick consistency. Pipe crosses onto the tops of the slightly warm buns. A Ziploc bag with a corner snipped off works well for this small job.
-

Raspberry Crumble Cookies are no ordinary treat. Half tart, half cookie, they offer a perfect balance between a soft, melt-in-your-mouth texture and a crumbly, cookie-like crust. Made with a homemade tangy raspberry compote, these cookies are a delectable balance of sweet and tart flavors with a burst of fruity goodness in every bite.
I have wondered where this crumb (or crumble) cake/cookie idea came from. Its origins speak of its German heritage. The origin of crumb cake was called ‘streuselkuchen,’ and today’s modern crumb cake is fairly similar to its forebear. Streuselkuchen ‘crumb cake’ is often referring to a cake made of a sweet yeast dough covered with a crumb topping that is called ‘streusel.’ Today, we make crumble cakes with baking soda or baking powder for leavening. One thing that has not changed is the signature thick layer of crumb topping where the crumbs are made simply of sugar, butter, and flour and allowed to have a roughly unfinished look. The crumb topping is sprinkled with powdered sugar to add interest to the look of the uneven top.
What we know today as crumb or crumble cake/cookies is most likely the adaptation of coffee cake recipes by German bakers who came to North America. The cake does bear a passing resemblance to many of the streusel topped kuchen recipes, a popular coffee-friendly cake from Germany.
Raspberry Crumble Cookies are baked in a muffin tin and look like mini pies! The dough does double duty as the base of the butter cookies and the crumble topping.
Print Recipe
Raspberry Crumble Cookies
Votes: 1
Rating: 5
You:
Rate this recipe!
|
|
Votes: 1
Rating: 5
You:
Rate this recipe!
|
Instructions
Raspberry Compote
Place rasp[berries, sugar, lemon juice, zest & vanilla in a small saucepan over medium heat. Bring to a boil, stirring frequently. Reduce heat & simmer for 7-10 minutes. Remove from heat & pour through a sieve. Press through sieve with a spatula to take out as many of the seeds as possible. Set aside.
Cookies
Preheat oven to 350 F. Spray 24 mini tart or mini muffin tins with cooking spray. Set aside.
In food processor, place flour, sugar & butter. Pulse a few times until mixture is crumbly; set aside 1/2 cup of the mixture. To remainder add baking powder, baking soda & nuts. Place mixture in a large bowl.
In a small bowl, beat egg slightly then stir in sour cream & lemon zest. Add to dry ingredients; stir until just moistened.
Divide batter between the 24 mini tins. With the back of a small scoop that has been dipped in flour, press batter to go over the bottom & up the sides. Spoon about 1 tsp raspberry compote in the indented area of the cookie. Sprinkle each cookie with some of the reserved crumb mixture.
Bake 15-18 minutes or until done. Remove from oven & allow to cool in pans for at least 10 minutes. At this time the cookies should pop out easily.
Store in an airtight container at room temperature.

Eggs Benedict is a common North American breakfast or brunch dish, consisting of two halves of an English muffin, each topped with Canadian bacon, a poached egg, and hollandaise sauce. It was popularized in New York City.
Many variations of eggs Benedict exist, involving replacing any component except the egg such as:
- Avocado toast eggs Benedict – substitutes toast in place of the muffin and adds sliced avocado.
- California eggs Benedict – adds sliced avocado. Variations may include sliced tomato instead of Canadian bacon.
- Eggs Atlantic – substitutes salmon which may be smoked, in place of Canadian bacon.
- Eggs Blackstone – substitutes streaky bacon in place of Canadian bacon and adds a tomato slice.
- Eggs Florentine – adds spinach, sometimes substituted in place of the Canadian bacon.
- Eggs Mornay – substitutes Mornay sauce in place of the Hollandaise.
- Eggs Neptune – substitutes crab meat in place of Canadian bacon.
- Eggs Omar (steak Benedict) – substitutes a small steak in place of Canadian bacon and sometimes replaces the Hollandaise with bearnaise.
- Huevos Benedictos – adds sliced avocado or Mexican chorizo, topped with salsa and Hollandaise sauce.
- Irish Benedict – substitutes corned beef or Irish bacon in place of Canadian bacon.
Being seafood lovers, Brion & I are having a pre-Christmas treat of scallops benedict for brunch today. Yum!
Print Recipe
Scallops Benedict
Votes: 1
Rating: 5
You:
Rate this recipe!
Ingredients
Chive Buttermilk Biscuits
Brown Butter Hollandaise Sauce
Ingredients
Chive Buttermilk Biscuits
Brown Butter Hollandaise Sauce
|
Votes: 1
Rating: 5
You:
Rate this recipe!
|
Instructions
Biscuits
Preheat oven to 400 F. Line a baking sheet with parchment paper.
In large bowl, whisk together flour, baking powder & baking soda. Using pastry blender, cut in butter until coarse crumbs. Add chopped chives. Toss together & make a well in the center. Pour in the buttermilk, stirring with fork to form ragged dough.
Turn out onto lightly floured surface. With lightly floured hands, knead gently until dough comes together. Pat or roll into 1 1/2-inch thickness. Using floured cutter, cut out rounds. Place, well spaced, on lined baking sheet. Dough should make 6 large biscuits.
Bake in the 400 F. oven for about 10 minutes before lowering the temperature to 375 F. & baking for an additional 10 minutes or until tops of the biscuits are light golden. Remove from oven & keep warm in a basket with a tea towel over it.
Hollandaise Sauce
Melt butter in a saucepan over medium heat, watching it until the color turns light golden brown. Pour it off immediately into a heat proof measuring cup, leaving the sediment behind.
In a blender, combine egg yolks, mustard, lemon juice & zest for a few seconds. With the blender on medium speed, slowly pour in hot butter in a thin stream. The sauce should thicken quickly. Pour into a bowl & keep the bowl warm in a warm water bath while preparing the other components of the scallops benedict.
Scallops
Season the scallops with Old Bay seasoning, salt & pepper. Pan sear them in a hot pan with butter & olive oil for only a few minutes per side. Keep warm. Prepare scrambled eggs.
Assembly
Slice biscuits in half, using bottoms as the base. Divide scrambled eggs evenly between the 6 bottom biscuit halves & top each with a couple of seared scallops. Pour some hollandaise sauce over scallops & sprinkle with chopped bacon. Garnish with chopped chives. Top with the second half of the biscuit if you wish.
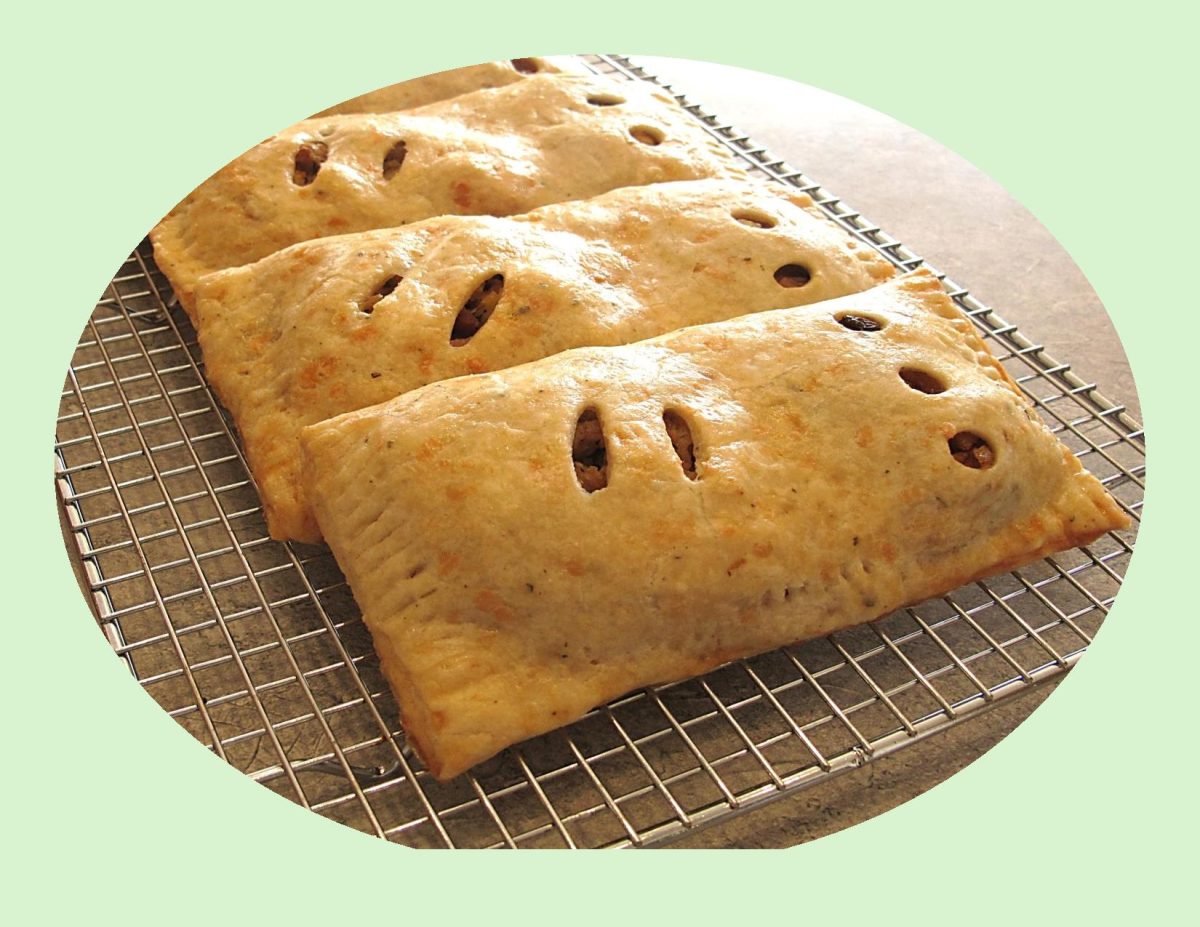
The Bedfordshire Clanger is a very unique and little-known meat pie recipe from England, specifically (not surprisingly) from the county of Bedfordshire, a small, low-lying and predominantly agricultural county nestled in the east of England.
In centuries past many of the working husbands of the area used to toil in the fields there. Their wives, knowing their husbands would need lots of protein and carbohydrate sustenance, came up with the brilliant idea of a doubled, loaf-shaped pie. One end contained a savory filling that used the famed pork of the area while the other end was filled with stewed apples (made from the famed local apples) as dessert. So, the two fillings didn’t combine, there was a ‘pastry wall’ in between blocking any flavors from mixing. A ‘secret code’ denoted which end was meat and which was dessert: two knife slits on one end of the pastry top means meat, three small holes on the other shows the sweet. This was brilliant, an entire meal for the hard-working man – handheld, portable and delicious
I guess you could say, the Bedfordshire clanger is not only a tasty treat but also a piece of culinary history that has stood the test of time!
Print Recipe
Pork & Apple Bedfordshire Clanger w/ Cheddar-Sage Pastry
Votes: 1
Rating: 5
You:
Rate this recipe!
|
|
Votes: 1
Rating: 5
You:
Rate this recipe!
|
Instructions
Pastry
In a medium bowl, whisk together the flour, sage & salt. Sprinkle the butter cubes over the flour mixture & use your fingers to work them in. Alternately you could use a pastry cutter to do this.
When the mixture resembles cornmeal with pea-sized bits of butter remaining, stir in cheese with a fork until evenly distributed. Sprinkle 6 Tbsp ice water over mixture & stir with a fork until dough begins to come together. If needed, add an additional Tbsp or two of ice water.
Turn the dough out onto a lightly floured surface & knead for about three times. Gather the dough into a disk & wrap in plastic wrap. refrigerate for at least 30 minutes or overnight.
Pork Filling
Bake potato in microwave, peel & cut into small cubes. Set aside.
Heat oil in a skillet & sauté celery, onion, garlic & bacon together on medium heat until veggies are soft & bacon is cooked. Add ground pork, breaking it up well. Stir in dried herbs & spices. Cover & simmer for about 10 minutes.
Remove from heat & stir in cooked potato & cheese. Set aside to cool.
Apple Filling
In a small saucepan, combine butter, water, cinnamon & brown sugar. Bring to a simmer then add diced apples, raisins, lemon zest & juice. Gently simmer for 5 minutes. Remove from heat & allow to cool.
Assembly/Baking
Divide pastry into 5 equal pieces. On a lightly floured surface (or dry wax paper) roll out each piece of pastry into 7 x 7 1/2-inches. The excess trimmed from the sides will be used for little pastry ‘walls’ dividing the sweet & savory fillings. Roll the excess into a 3-inch length.
From the top of each piece, LIGHTLY make a line across your pastry 4-inches from outside edge. This will help to place your fillings properly.
On the 3-inch wide section of the pastry, place savory filling to cover 2/3 of the area. Place one of the rolled strips after that then place sweet filling on the remaining 1/3 to complete the 'clanger'. The little rolled piece of pastry divides the savory & sweet filling.
On the sweet side make 3 holes for vents & on the savory side make 2 slashes. This is the 'code' to let the person eating the clanger which was savory or sweet.
-
Brush the edges of each pastry with egg wash. Lift the pastry from the opposite side over the fillings & seal the edges with a fork.
Brush clangers with remaining egg wash & bake for about 30-35 minutes or until golden.

Since stone fruit is so gorgeous when in season, why not make a fruit tart? Not just an ordinary fruit tart, but one bursting with an array of colorful fruit and roasted to bring out all the natural sweetness.
I like this tart in the fall made with apples, but since we can enjoy the seasons stone fruit bounty right now, let’s take advantage of it. When we were shopping for fruit, we came across some apricots called raspberry apricots. Their flavor is absolutely incredible. Of course the plum/apricot cross (pluots) is pretty special as well. I decided on a nice cinnamon-y pastry to highlight all these wonderful fruit flavors!
Roasting stone fruits concentrates their sweetness and flavor, creating a depth of taste unrivaled by a regular fruit salad. The cornstarch in the filling acts as a thickener to prevent the fruit juices from making the base soggy while it bakes. And the open-faced top exposes the fruit to the oven’s heat, allowing it to caramelize and concentrate its flavor. What’s not to love!
Print Recipe
Roasted Fruit Tart w/ Cinnamon Crust
Votes: 1
Rating: 5
You:
Rate this recipe!
|
|
Votes: 1
Rating: 5
You:
Rate this recipe!
|
Instructions
Crust
In a bowl, combine flour, sugar, cinnamon & salt. Cut in butter with a fork or finger tips to form a crumbly mixture. Drizzle in beaten egg & combine until mixture just begins to come together. Lightly press mixture into the bottom & up the sides of a 14 x 4 x 1-inch tart pan. Chill until firm while you prepare the filling.
Filling
Toss prepared fruit with sugar, cornstarch, lemon zest & juice, vanilla & salt.
Assembly
-
Arrange fruit mixture over pastry in pan. Press down slightly into pan.
Bake until the fruit is soft & cooked through, the fruit juices are bubbling & the crust is a golden brown about 40-50 minutes. Remove from oven & allow to cool for about 20-30 minutes.

Rissole is an interesting group of dishes with an intriguing history. The original French rissoles were prepared by enclosing the main ingredients in pastry dough and frying them, but over time the original recipe has evolved and changed.
Many nations have created their own version of the rissole. This food is commonly on offer in street stalls as a casual snack food, or in fast-food restaurants. Some fancy restaurants also serve rissole dishes, although they may use fancier ingredients and dress things up with complex sauces to make their rissoles more interesting. Today, rissoles can be found in numerous European countries, but also in Australia, New Zealand, and even Indonesia and Brazil.
Some cooks refrain from using any sort of coating for a rissole, preferring to make a blend of meat, potatoes, eggs, and breadcrumbs which can be molded into a firm patty. Ingredients such as onions may be added to rissoles as well, along with various spices, especially in nations with a culinary tradition of heavily spiced food. They can be made with ground or cut meat, seafood, or vegetables, and the sweet varieties are usually made with fruit. Most of them, including both sweet and savory rissoles, are usually served with a sauce on the side. Primarily, rissoles were deep-fried, but today the name also encompasses the varieties that are baked in an oven or fried in shallow oil.
Today, I’m making artichoke & garlic chicken rissoles. The sauce gives the rissoles a nice punch of flavor and pairs so well with creamy mashed potatoes & roasted green beans.
Print Recipe
Artichoke & Garlic Chicken Rissoles
Votes: 1
Rating: 5
You:
Rate this recipe!
|
|
Votes: 1
Rating: 5
You:
Rate this recipe!
|
Instructions
Sauce
Place all ingredients except oil in a food processor. With motor running, add olive oil in a slow stream to make an emulsion. Continue processing while adding the cream to make a fairly smooth consistency. Remove from food processor & set aside.
Chicken Rissoles
Place chicken, panko crumbs, salt, egg, garlic & soup mix in a bowl. Combine well. Divide into 6 portions. Form each portion into a patty shape.
Heat oil in a large saucepan, Cook rissoles for 2-3 minutes. Turn & cook for a further 1-2 minutes or until golden. Transfer to a plate a wipe out saucepan.
Return rissoles back in saucepan & add sauce. Simmer for 10 minutes until rissoles are cooked through. Nice to serve with creamy mashed potatoes & roasted green beans.
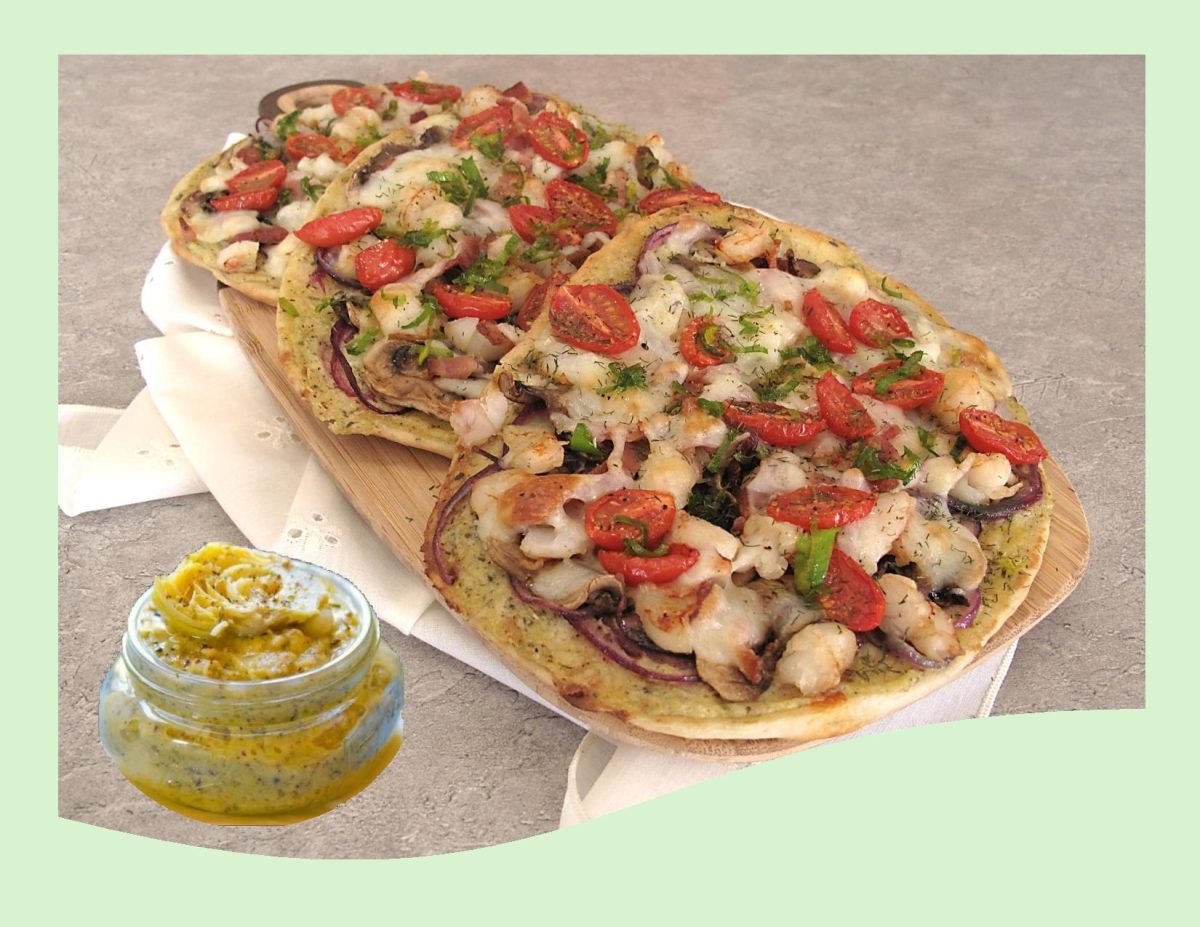
It’s hard to get bored of pizza, but sometimes you want to change things up a bit. In addition to trying new toppings and cheeses, consider using an alternative to tomato sauce on pizza.
Pizza night is a cherished tradition in many households, but sometimes, it’s good to break away from the routine and experiment with new flavors. One of the easiest ways to do this is by trying out different alternative pizza sauces.
The other day Brion & I were in a Winners/Homesense store. Of course, my favorite spot is always the area where they have all the cookware and specialty food items. I saw bottled sauce made with artichokes and garlic. Immediately my thoughts were as to how I could use it. It was quite pricey, so I opted to try and make a copycat version at home.
While tomato sauce has long been associated with traditional pizza, there is a whole new world of flavors waiting to be discovered by breaking from tradition. Tradition of course has its place—there’s a reason classic tomato-topped pizza has been a staple for generations. But there is more to pizza sauce than regular tomato. There are exciting flavors, interesting textures, sweet things, spicy things, cheesy things, even exotic things!
Here are some ideas for making pizza without tomato sauce:
- White pizza – Make a white sauce with olive oil, garlic, parsley, and a dash of salt and pepper. Spread it on the pizza dough instead of tomato sauce. Top with cheeses like mozzarella, ricotta, or feta, and veggies.
- Pesto pizza – Spread pesto sauce on the dough instead of tomato sauce. Top with veggies and cheeses.
- BBQ chicken pizza – Use BBQ sauce as the base instead of tomato sauce. Top with chicken, red onion, cheddar cheese, etc.
- Mediterranean pizza – Make a tahini sauce base. Top with artichoke hearts, kalamata olives, feta, red onion, etc.
- Breakfast pizza – Scramble eggs with veggies and meats. Spread it on the dough. Sprinkle with cheeses.
- Buffalo chicken pizza – Spread buffalo wing sauce on the dough. Top with chicken, blue cheese, mozzarella, celery, onion.
- Thai pizza – Make a spicy peanut sauce base. Top with chicken, carrot, onion, cilantro, mozzarella.
- Carbonara pizza – Spread an alfredo sauce base. Top with bacon, onion, Parmesan, egg, parsley.
The best thing about pizza is that there are endless ways to enjoy it. So here you have it … shrimp pizza with artichoke & garlic sauce. Yum!
Print Recipe
Shrimp Pizza w/ Artichoke & Garlic Sauce
Votes: 1
Rating: 5
You:
Rate this recipe!
|
|
Votes: 1
Rating: 5
You:
Rate this recipe!
|
Instructions
Sauce
Place all ingredients except oil in food processor. With motor running, Add olive oil in a slow stream to make an emulsion. Place in a dish & set aside.
Pizza Toppings
Fry bacon until done but not crisp. Drain on a paper towel then chop into bite-sized pieces. In the same skillet, sauté shrimp until just cooked & remove it from skillet.
Sauté sliced mushrooms & sliced onions until just cooked.
Slice cherry tomatoes in halves & prepare fresh herbs.
-
Assembly
-
Spread each naan bread with artichoke & garlic sauce.
Top pizzas with onions, mushrooms, shrimp & bacon. Sprinkle shredded cheese over all then dot with halved cherry tomatoes & herbs.
Bake 10-15 minutes or until cheese is bubbly & tomatoes are roasted. Serve.
Recipe Notes
- You will no doubt have extra artichoke & garlic sauce. Store it in an air-tight container for up to one week. Enjoy it on toasted bread or swirl into cooked pasta.


