Adzuki Bean Bolognese Lasagna

Ordering a lasagna Bolognese in Italy might leave some North Americans a bit surprised by the dish placed before them. The traditional recipe layers lasagna noodles with a meaty ragù and creamy, white béchamel sauce, a very different recipe than the lasagna Bolognese served in North America where the layers of noodles alternate with tomato sauce, meat, mozzarella, and ricotta cheese. 

A while back Brion and I were in an Asian Supermarket, and I became very interested in some of the desserts made with sweet red adzuki bean paste. In October (2023), I used it in some ‘Anpan Buns’ that I posted on the blog. We really enjoyed them so I wanted to explore the savory side of this bean.

Adzuki beans have a unique and distinct taste that can be described as mildly sweet and nutty with a slightly earthy undertone. The flavor is not overpowering and is often described as more delicate compared to other beans like black beans or kidney beans. The sweetness is subtle, making adzuki beans particularly suitable for both sweet and savory dishes.

In North America they often are put to savory use, mixed into salads, cooked with rice and dropped into soups. Like other beans, adzuki are a good source of protein. Unlike many other dried legumes, they don’t have to be soaked before cooking.

Getting back to today’s lasagna, I thought if I added some cooked adzuki beans to the Bolognese sauce might just make this classic dish even better.

Print Recipe
Beef & Adzuki Bean Lasagna
Votes: 1
Rating: 5
You:
Rate this recipe!
Course Main Dish
Cuisine Asia
Servings
Ingredients
Bolognese Sauce
Béchamel Sauce
Other Ingredients
Course Main Dish
Cuisine Asia
Servings
Ingredients
Bolognese Sauce
Béchamel Sauce
Other Ingredients
Votes: 1
Rating: 5
You:
Rate this recipe!
Instructions
Bolognese Sauce
  1. Heat a large pot over medium heat. Add oil, garlic & onions. Sauté until fragrant, for a minute or two, avoid browning. Then add ground meat.
  2. Sauté the ground meat until it is no longer pink. Add carrot & celery & sauté for about one minute.
  3. Add the liquids – seasoned, diced tomatoes & tomato paste & cooked adzuki beans. Stir to combine. Heat it on medium high heat & let it come to a boil.
  4. Add the rest of the seasonings – basil, oregano, beef bouillon, salt & pepper. Stir to combine. Lower heat to medium heat & let it cook for another ~10 minutes, or until sauce thickens.
  5. Remove from heat & set aside.
Béchamel Sauce
  1. Add butter to a medium pot & heat over medium heat. Once butter is melted (avoid browning butter), add flour to pot. Using a whisk, whisk to combine. Mixture will be slightly clumpy.
  2. Immediately add milk into the pot and bring to medium high heat so that it comes to a boil. Whisk continuously until mixture is smooth & thickens.
  3. Once mixture reaches desired thick consistency, add salt & pepper. Stir to combine, then remove from heat.
Assembly/Bake
  1. Preheat oven to 375 F.
  2. Place a thin layer of Bolognese sauce on the bottom of a deep 9 x 13-inch baking dish.
  3. Start layering with 2 of the rectangular lasagna sheets, then add 1/4 of the Bolognese sauce, and then 1/4 of the béchamel sauce & cheese.
  4. Repeat 3 more times. There should be a total of four sets of lasagna sheets/Bolognese sauce/béchamel sauce & cheese layers. Sprinkle it with remaining cheese to top it off.
  5. Place casserole dish in the oven & place a cookie sheet under the casserole dish to catch any potential drippings. Bake for 45 minutes, then (optional) broil for 2 minutes to brown the top.
  6. Remove dish from oven and let it sit for 20 minutes before cutting into lasagna. Garnish with parsley & serve!
Recipe Notes
  • This recipe will easily serve 8-10 people. With just 2 of us, I still like to make the full recipe so I can freeze the rest for future meals.
  • On the other hand, the recipe can be easily halved if you wish.
  • To cook the adzuki beans:
  • Use a strainer to rinse the dried beans under cold water. Remove any debris, stones or deformed beans from the mix and thoroughly drain the beans afterward.
  • Fill a pot with water, add the beans and bring it to a boil. After the water has started to boil, reduce the heat to a simmer, and continue cooking the beans for about 45-60 minutes. The adzuki beans will be ready once the beans are fork tender. Drain.

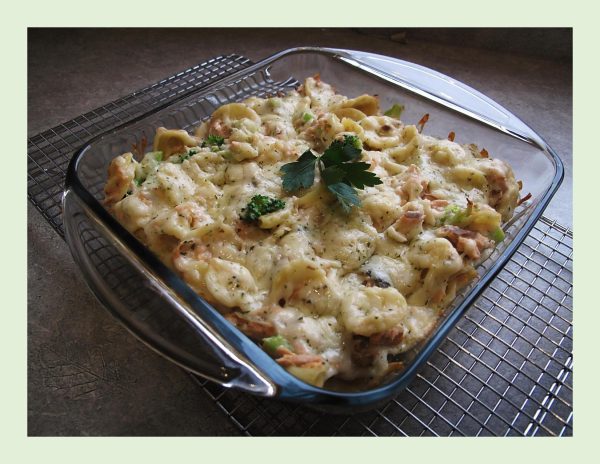
Orecchiette au Gratin w/ Salmon & Broccoli

Orecchiette au gratin is an immensely satisfying mac & cheese-like dish. Then take it a step further and add salmon, broccoli and alfredo sauce … pure comfort food! Personally, I’ve always loved the taste of alfredo sauce with its creamy parmesan flavor. You might be surprised to know that alfredo sauce does not exist in Italy! Well, mostly.

The origin of this popular American dish comes from the love story between Alfredo Di Lelio and his wife, Ines. Alfredo, a young cook from Rome, prepared this dish for the first time in 1908 to entice his wife Ines to eat while she recovered from pregnancy; she was very weak and had lost her appetite after giving birth.

Alfredo made egg-fettuccine and dressed it with a mix of fresh butter and parmesan cheese. Fortunately, his wife not only loved the dish, but also suggested that he put this creamy pasta on his restaurant’s menu.

He later did introduce the dish, modestly named after himself, into the menu of his restaurant on via della Scofa in 1914. Some years later, in 1920 he famously served it to American film stars Mary Pickford and Douglas Fairbanks, who were visiting Rome on their honeymoon. And the rest, as they say, is history.

Alfredo’s original recipe does not call for cream; that was added when the dish crossed the ocean to North America. In the original version, the cheese is mixed vigorously with the pasta and a bit of the water in which the pasta is cooked, forming a creamy consistency without the actual cream.

Print Recipe
Orecchiette au Gratin w/ Salmon & Broccoli
Instructions
  1. Preheat oven to 400 F.
  2. In a pot of boiling salted water, cook the pasta al dente. Add broccoli to the pot 5 minutes before the pasta is done cooking. Drain.
  3. In another saucepan, heat the sauce over medium heat for 2-3 minutes. Stir in pasta, broccoli, flaked roasted salmon & if desired basil.
  4. Transfer the mixture to an 8-inch baking dish, Cover with mozzarella & bake for 20-25 minutes.

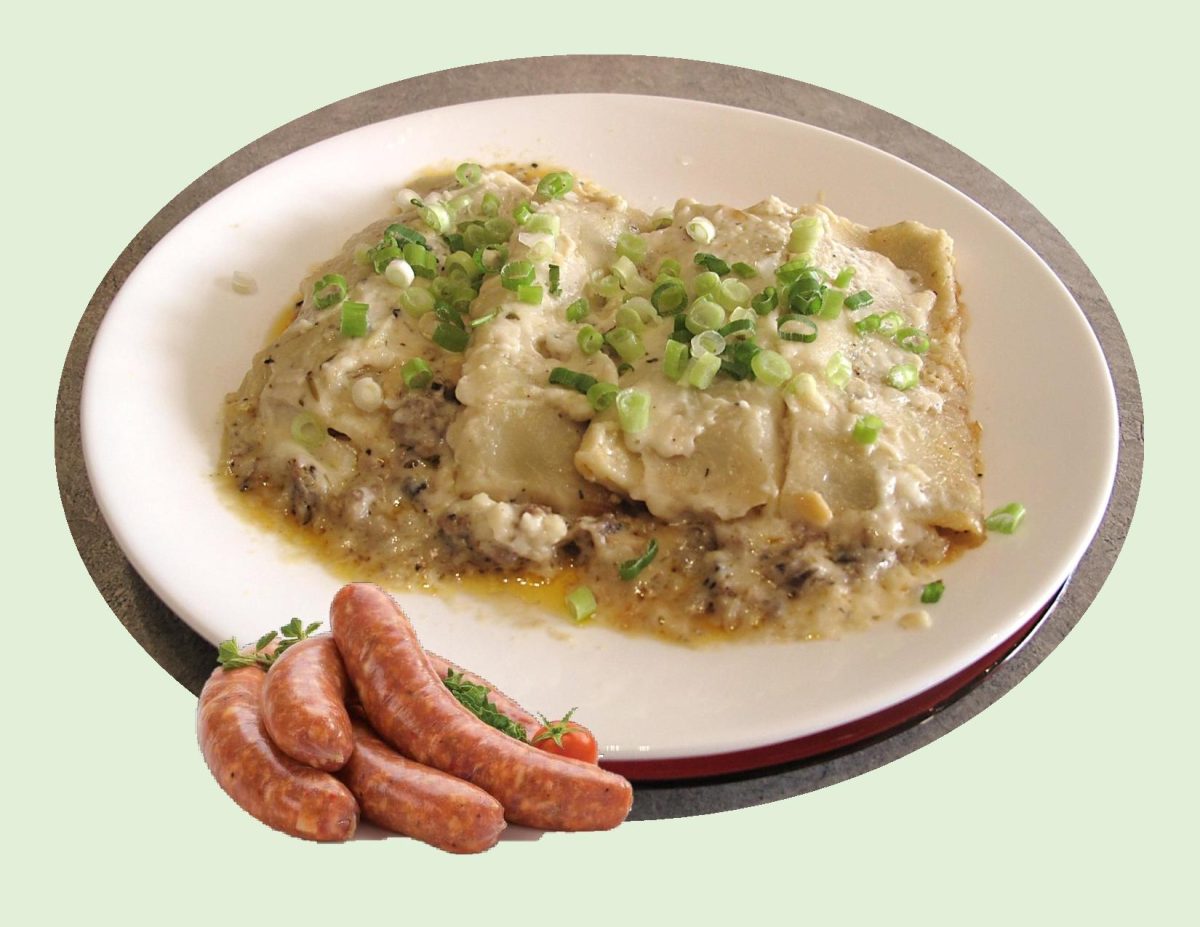
Italian Sausage Cannelloni

Although it might seem that cannelloni have been eaten since ancient times, this is a recent custom. You could not find it in any Catalan cookbook until the start of the 20th century. Cannelloni originally came from Italy, brought to Catalonia at the end of the 18th century by foreign chefs working in hotels.

There is a basic difference between Catalan and Italian cannelloni. With Catalan, the meat is cooked first, then ground, whereas the Italians put the ground meat straight into the cannelloni tubes.

Manicotti is the Italian American version of cannelloni. Both are pasta tubes, but the difference between the two is fairly minimal: Manicotti tubes are ridged, larger and slightly thicker. Cannelloni tubes are smooth, a touch smaller and slightly thinner.

Over the years, no-boil (also called oven-ready) cannelloni tubes have become a permanent fixture on supermarket shelves. Much like ‘instant rice’, no-boil pasta is precooked at the factory. The pasta tubes are run through a water bath and then dehydrated mechanically. During baking, the moisture from the sauce softens, or rehydrates, the pasta, especially when the pan is covered as the cannelloni bakes.

This baked pasta can be stuffed with a myriad of fillings that suit any taste, from chicken with asparagus to shrimp and lentils. Whether you make a meat sauce, a mixture of herbs and ricotta cheese, or fish accompanied by a tomato sauce, the filling can be made the day before. In fact, this will make it even tastier. 

Print Recipe
Italian Sausage Cannelloni
Instructions
Filling
  1. In a large skillet over medium heat, add oil, onion & mushrooms. Cook for 5-10 minutes allowing the onion to soften & mushrooms to release their liquid.
  2. Once most of the liquid has dissipated, add sausage crumbling it with a wooden spoon into small pieces as it cooks. Stir & cook all ingredients until the onion is softened & the sausage is no longer pink & is starting to brown. Set aside.
Béchamel Sauce
  1. Melt butter in a medium saucepan over medium heat. Add flour, paprika & Italian seasoning & stir until well incorporated. Slowly, add milk & whisk together until smooth. Continue whisking until sauce comes to a slow boil & starts to thicken. Stir 1/3 of the sauce into the sausage mixture. (Reserve the other two thirds to pour under & over the cannelloni.) Add 340 gm shredded mozzarella to the sausage & sauce mixture & mix to combine.
Assembly/Baking
  1. Preheat oven to 350 F.
  2. Spread a bit of sauce over the bottom of (2) 13 X 9-inch baking pans. Using a large pastry tube with a star tip, fill (oven ready) cannelloni shells. Nestle the cannelloni in the sauce & cover with remaining sauce.
  3. Top with a combo of 50 gm shredded mozzarella & 25 gm shredded Parmesan. Cover with foil.
  4. Bake for 45 minutes, remove foil & bake another 5 minutes or until cheese starts to turn golden. Remove from oven, let stand 5 minutes then serve.
Recipe Notes
  • As far as the cheese goes in this recipe, use whatever kind you prefer or have on hand. You know it will always be great because 'cheese makes it better' right!
  • This meal freezes well so if it is to big for your family in one setting just freeze the rest for another time.

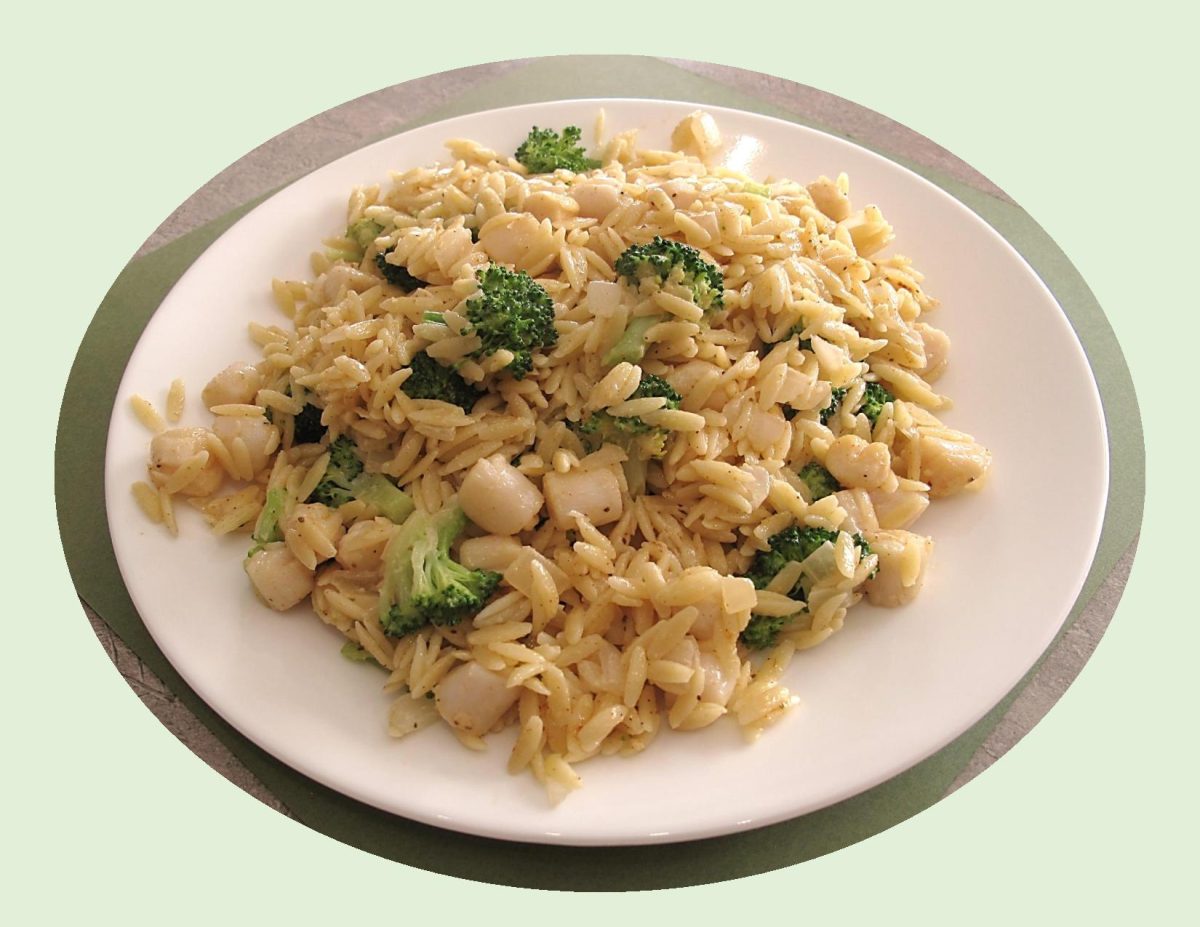
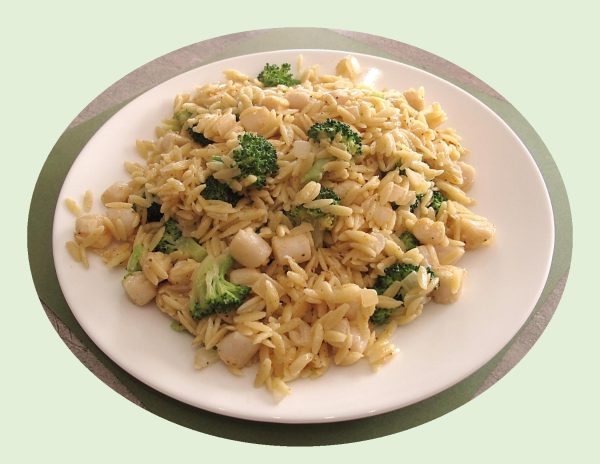
Creamy Orzo w/ Bay Scallops, Broccoli & Parmesan

Oblong and common in Mediterranean cooking, orzo has a look of rice and the texture of pasta. While orzo’s origins lie in Italy, it is now a staple in cooking across Europe, especially Greece, and the Middle East. Its use in North America can be traced to the mid-20th century or even earlier. It seems there are recipes that date back to the early 1950s like orzo pasta salad, orzo stuffed tomatoes and Betty Crocker’s Chicken Orzo Soup.

The pasta itself is made from durum semolina wheat… a particularly hard variety of wheat. It holds up perfectly during the cooking process and has a very pleasant clear flavor and chewy ‘mouthfeel’. The name is somewhat misleading though as orzo actually means barley in Italian, but there is no barley in it. Instead, the pasta derives its name from its shape, which closely resembles the grain.

Orzo has been around a long time… and stands on its own as a versatile and tasty pasta in a supporting role as a side dish, or as the star in a main dish. Because of its size, and ability to absorb flavors very well, orzo can be combined with other ingredients and become a perfect filler for things like stuffed peppers and squash.

Orzo pasta also comes colored, and flavored with vegetables. Spinach is common, but it can also be mixed with beets, carrots and other vegetables. Rainbow orzo pasta combines several different vegetables to create a highly colorful take on this wonderful, and versatile pasta.

Today, I’m pairing it with bay scallops and broccoli in a nice cheesy parmesan sauce. Yum!

Print Recipe
Creamy Orzo w/ Bay Scallops, Broccoli & Parmesan
Instructions
  1. Rinse scallops & pat dry. Set aside.
  2. Melt 1 Tbsp of the butter in a large skillet over medium heat. Add the onion & sauté until soft, about 4 - 5 minutes. Remove the onions to a plate. Set aside.
  3. Add 2 Tbsp of the butter to the skillet & melt over medium heat. Add the prepared scallops & sauté for 4 - 5 minutes. Place scallops on a heated platter & cover with foil.
  4. Fill a large sauce pan of water with 4-6 quarts of water & bring to a boil. Add the orzo & stir.
  5. After the orzo has been boiling for 5 minutes, add the broccoli florets to the same pot and continue to cook for 5 additional minutes. Once the orzo & broccoli are cooked and tender, drain well and pour into a large mixing bowl.
  6. Quickly add the parmesan cheese & the final 2 Tbsp of butter to the orzo & broccoli mixture. Stir thoroughly, allowing both the cheese & butter to melt. Slowly add the cream, while stirring. Next, add the sautéed onions, scallops. Mix well. Season with salt and pepper. Garnish with parsley if you wish. Serve immediately

Sour Cream Rice Pancakes

ENJOYING SHROVE TUESDAY!

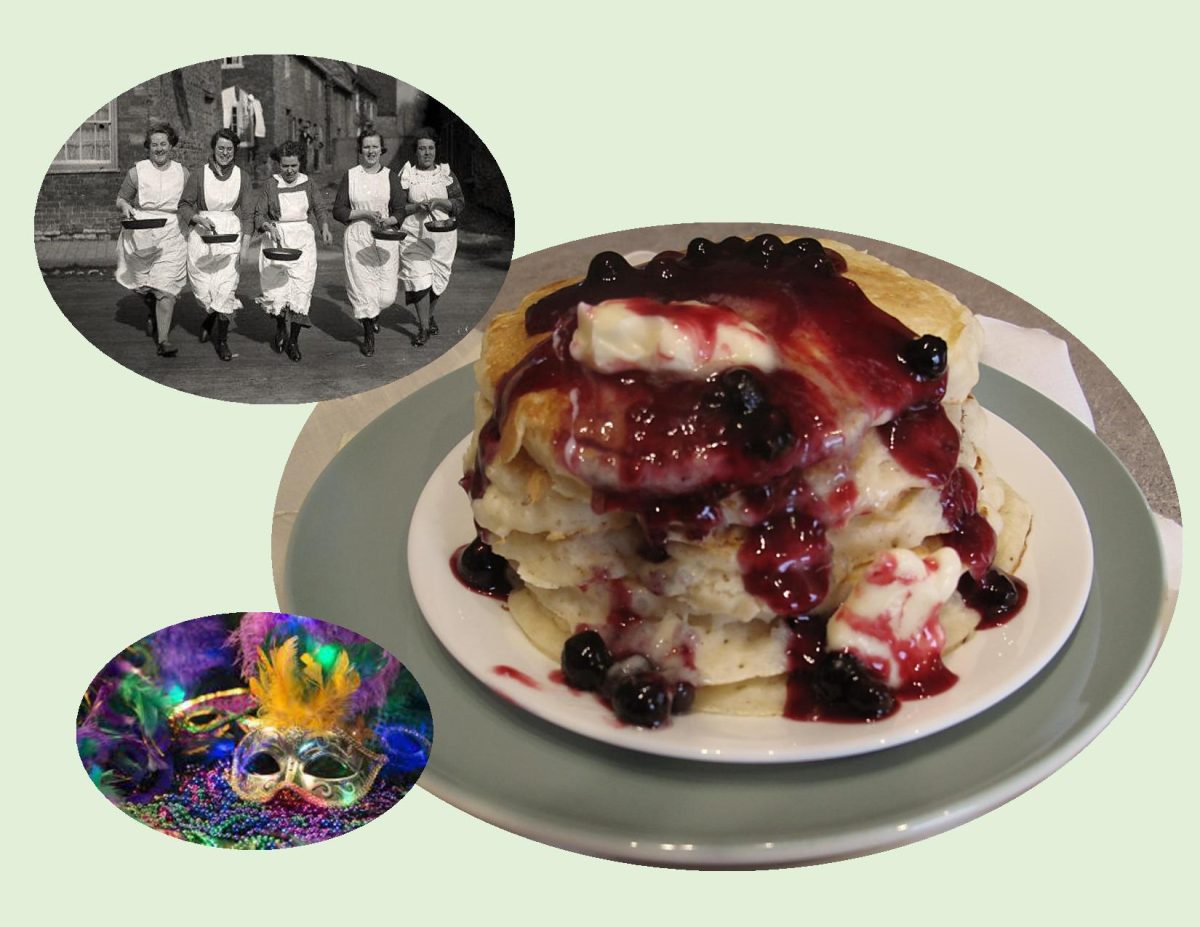
Whether you call it Shrove Tuesday, Mardi Gras, or Pancake Day, Tuesday is the day of feasting and celebration before 40 days of fasting known as Lent. Celebrated by Anglo-Saxon Christians, participants would attend confession in order to be ‘shriven’ (forgiven for their sins). A bell rang to call everyone to church. This bell came to be known as the Pancake Bell and is still rung today.

Shrove Tuesday was the last day to use up eggs, sugar and fats before the fast, and making pancakes was the perfect way to do it! The ingredients of pancakes also symbolize four pillars of the Christian Faith. Flour for sustenance, eggs for creation, salt for wholesomeness, and milk for purity.

While other countries celebrate Shrove Tuesday, or Mardi Gras, with extravagant and exotic parades, in England, people race around towns and villages wielding frying pans that hold pancakes. The tradition was created in 1445 when a woman of Olney, Buckinghamshire was making pancakes when she heard the bell summoning her to church. In a rush to get to church, she ran, still in her apron and holding her frying pan. The Olney Pancake Race is now the most popular pancake race in the world. Participants must be local housewives and they must wear an apron. The goal of the race is to run while carrying a frying pan with a cooked pancake inside flipping it as you run. In order to win, the woman must successfully toss the pancake three times throughout the race, reach the church and serve the pancake to the bell ringer. Hundreds of people gather every year to participate in this fun tradition!

Mardi Gras, which translates to Fat Tuesday in French, is largely celebrated in the city of New Orleans, Louisiana. Parades, parties, and feasts dazzled in colors of green, gold, and purple fill the city for two weeks leading up to Fat Tuesday.

Personally, I have always liked pancakes, so in keeping with the Shrove Tuesday tradition Brion & I will be enjoying some today. Although I can’t quite picture myself running in a pancake race, I’m making some sour cream rice pancakes … if you like rice pudding as well as pancakes, these are for you!

Print Recipe
Sour Cream Rice Pancakes
Votes: 1
Rating: 5
You:
Rate this recipe!
Course Main Dish
Cuisine American
Servings
Ingredients
Pancakes
Blueberry Sauce
Course Main Dish
Cuisine American
Servings
Ingredients
Pancakes
Blueberry Sauce
Votes: 1
Rating: 5
You:
Rate this recipe!
Instructions
Pancakes
  1. In a large bowl, whisk together eggs, sugar, milk, sour cream, butter & vanilla.
  2. In a separate bowl, combine flour, cooked rice, baking powder, baking soda & salt.
  3. Add the flour mixture to the liquid mixture & whisk together. Let batter sit for 15 minutes.
  4. Heat a nonstick griddle to medium-low heat. Spray with oil. Using a 1/4 cup measure, portion out batter on griddle. Cook for about 2 minutes per side.
  5. Serve immediately garnished with blueberry sauce or your choice of topping.
Blueberry Sauce
  1. In a small saucepan, combine cornstarch, sugar & salt. Add water & blueberries & cook until 'clear' & bubbling. Remove from heat & stir in butter & lemon juice. Serve warm over pancakes.

Sticky Chinese Five-Spice Chicken Traybake

The term traybake seems to have two very different meanings. For example:

  • A dessert baked in a square or rectangular pan and then cut into squares or slices after baking.

 OR

  • a savory dish consisting of several items of food being placed together on a baking tray along with some seasonings, then go into the oven together. With the right cut of meat and the right vegetables, they all are done at the same time. Dinner is served!

Life’s hustle and bustle can mean the last thing you want to worry about is fixing a busy dinner with multiple pots and pans…and having to clean it all up. The solution? Simple tray bakes. With minimal prep, basic ingredients, and little clean-up, this is surely one of the quickest ways to get dinner on the table (and takes less time than waiting for food to be delivered).

For the best success with this easy cooking technique, use your sturdiest pan (this will prevent your ingredients from browning too much) and have a bottle of your favorite oil cooking spray handy. Once you’ve assembled everything on the sheet pan, you can sit back, relax, and let the oven do the work for you.

When you’re roasting food, air circulation is everything. That’s why low-rimmed baking sheets are preferred over roasting pans. They accelerate cooking and boost browning in a traybake.

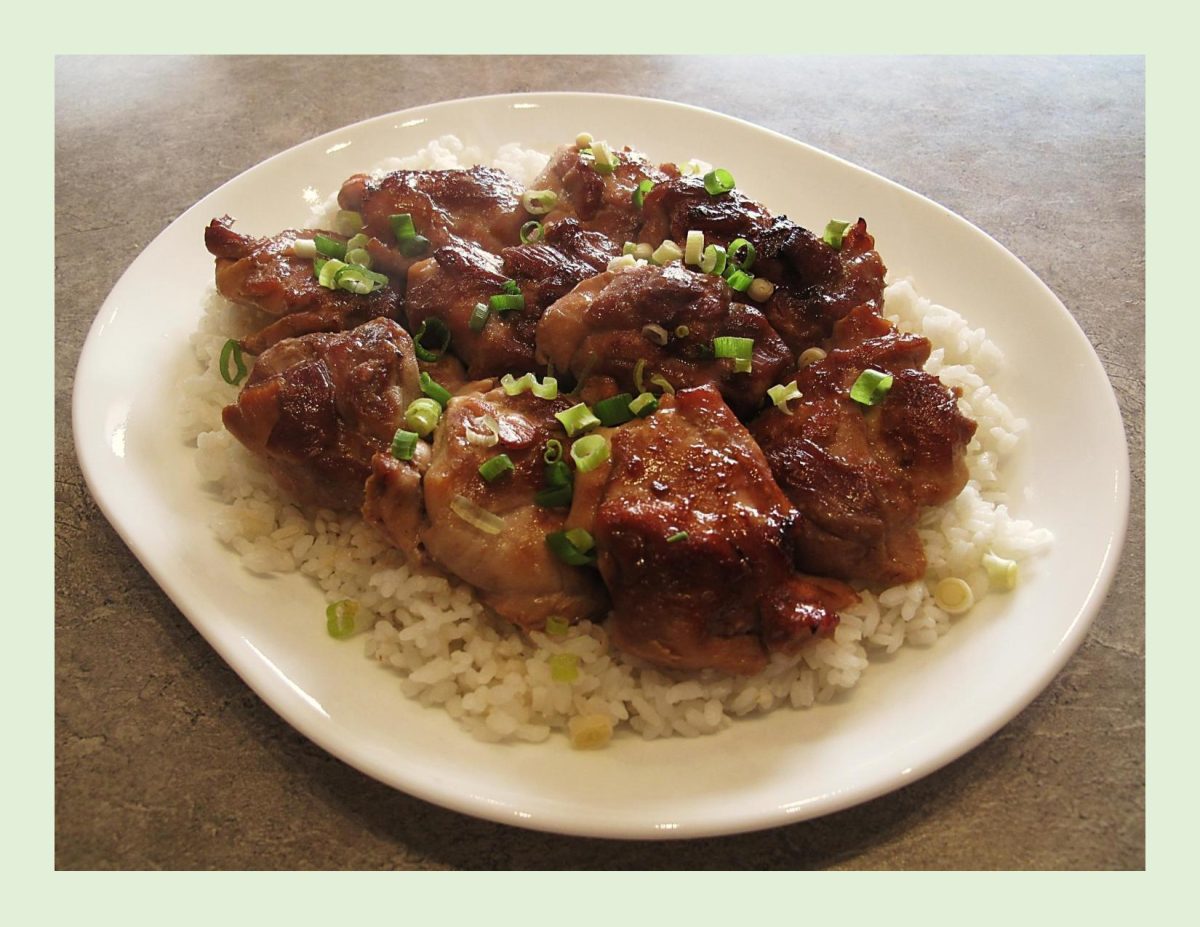
Traybake is the cooking technique of choice for these Chinese 5-spice chicken thighs. Simply load a sheet pan with chicken thighs that have been marinated in the spicy Chinese sauce, then you can just pop it in the oven and wait for the magic to happen. Serve over brown or white rice garnished with green onion.

Print Recipe
Sticky Chinese Five-Spice Chicken Traybake
Instructions
  1. In a container with a cover, combine hoisin sauce, sesame oil, honey, five-spice powder, ginger, garlic & some salt & pepper.
  2. Add chicken thighs to marinade & toss to coat. Cover & refrigerate for about 2 hours or overnight.
  3. Preheat oven to 400 F.
  4. Arrange chicken thighs on a foil-lined baking sheet. Roast for 30-40 minutes until cooked through, basting at least once. If using cashews, remove chicken from oven & stir through chicken. Bake 5 minutes more.
  5. Prepare rice while chicken is baking. Arrange on a platter & top with chicken thighs. Garnish with green onions.
Recipe Notes
  • If you wish, garnish with some cashew nuts for extra flavor.

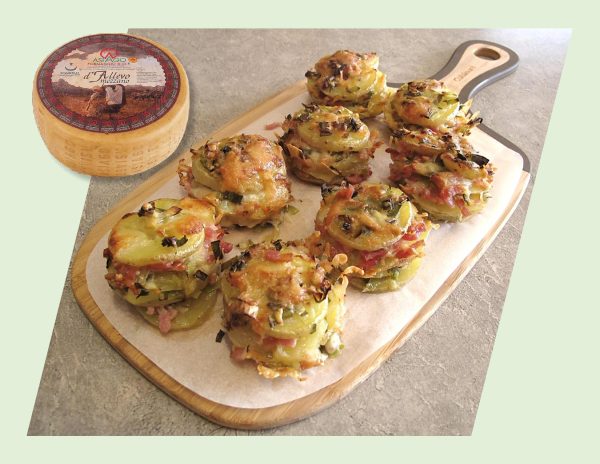
Asiago Potato Stacks

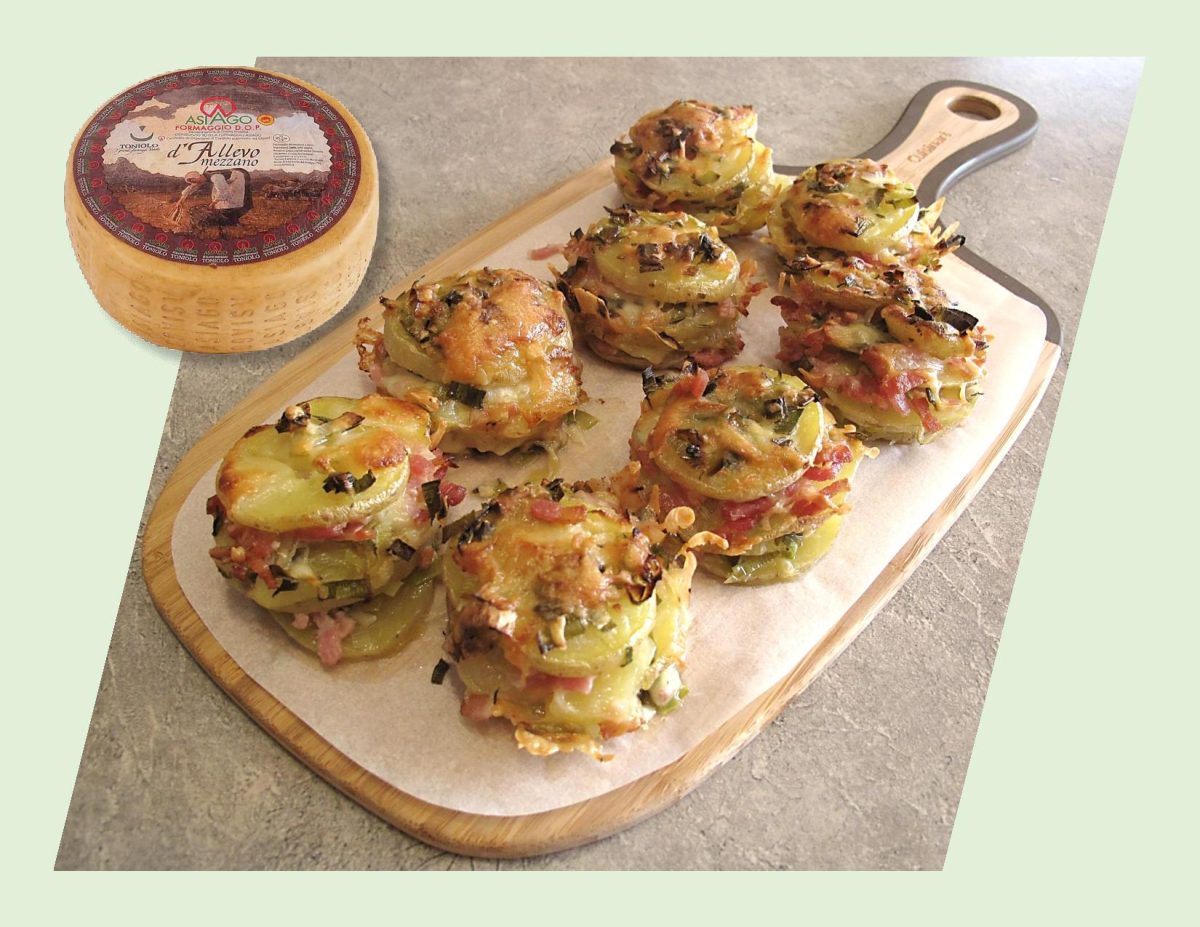
Asiago Cheese is one of my personal favorite kinds of cheese. Coupled with a rich history and unique flavor profile, asiago cheese is a deliciously versatile and ranges from smooth and silky to crumbly and brittle.

Asiago cheese has a characteristically sweet and mildly nutty taste. However, the flavors develop as it ages, getting sharper, more intense, and piquant.  As it matures, the cheese develops a slightly acidic and tangy undertone and a fruity appeal. The scent of the cheese is aromatic, with a floral smell that gets deeper with maturity.

A semi-hard cow’s milk cheese, asiago originated in Italy and takes its name from the famous plateau located in the north-eastern part of the peninsula.

Because this cheese features so much variety the everyday cheese lover might know they like asiago but not really be able to describe exactly what it tastes like. Asiago is actually considered one of the best cheeses to use for cooking due to its mild but noticeable flavor.

These ‘asiago potato stacks’ are a nice change from your typical roasted potatoes. Sure, you can dump any kind of cheese on top of potatoes, and they’ll turn out tasty. But elevate those cheesy ‘taters with freshly grated asiago and a fresh burst of rosemary and they’re amazing!

Print Recipe
Asiago Potato Stacks
Votes: 1
Rating: 5
You:
Rate this recipe!
Course Main Dish
Cuisine Italian
Servings
Course Main Dish
Cuisine Italian
Servings
Votes: 1
Rating: 5
You:
Rate this recipe!
Instructions
  1. Preheat oven to 375 F. Using a mandolin, thinly slice potatoes & place in a large bowl.
  2. Melt butter in a small skillet over medium heat. Add olive oil to skillet & mix to combine. Add shallots & garlic; sauté for 1 minute. Add thyme, salt & pepper & sauté for for 30 seconds. Remove from heat.
  3. Pour butter mixture over potatoes & toss until each side is coated. Add cheese to potatoes & continue tossing until well combined.
  4. Spray a 12-cup muffin tin with cooking spray. Stack potato slices in muffin cups & top with additional cheese.
  5. Bake for 30-35 minutes until stacks are golden brown & crispy. Serve immediately.

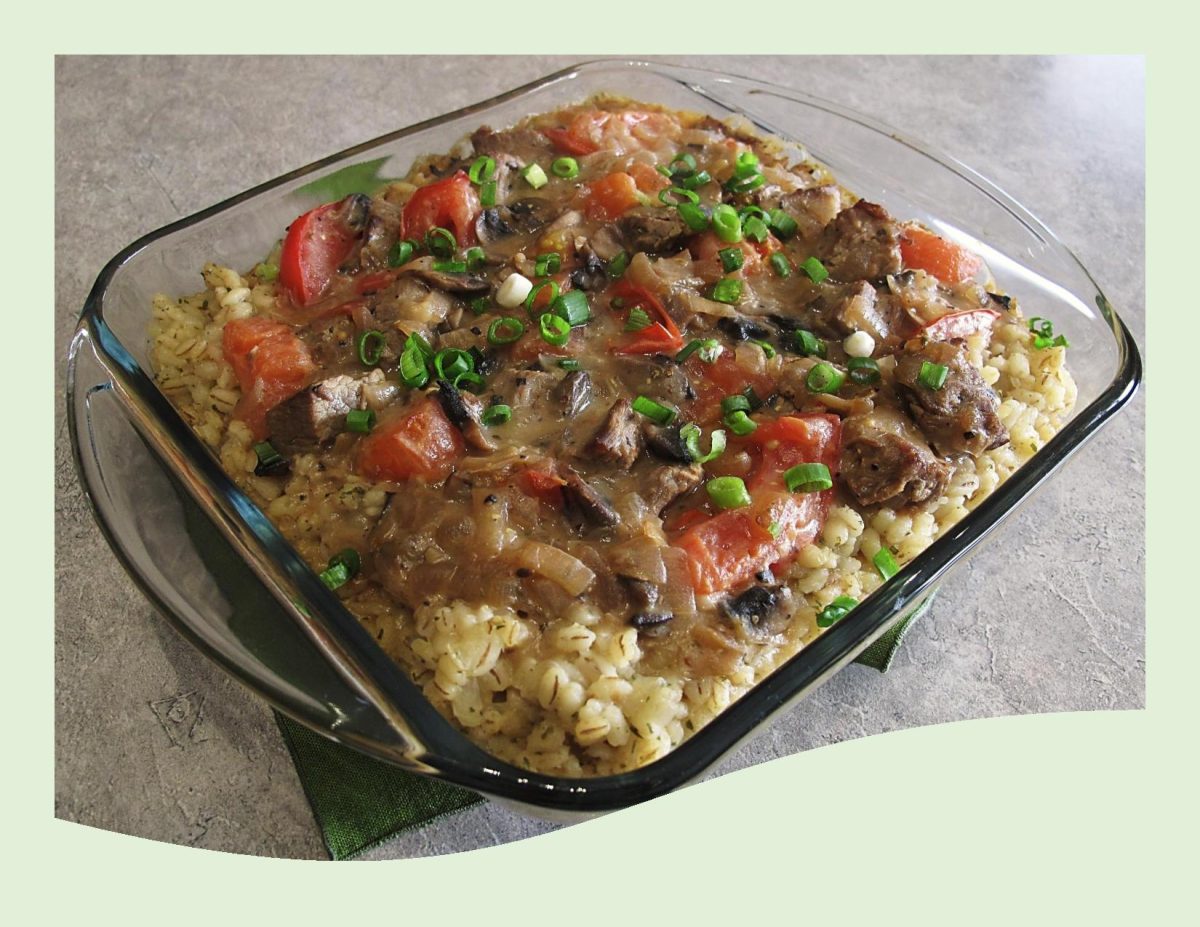
Beef Stroganoff w/ Barley Risotto

Beef Stroganoff is a perfect dinner party dish – inexpensive and easy to prepare yet rich and luxurious. History reveals a simple but elegant dish of steak meat sautéed with onion and cooked in a sauce of sour cream, seasonings and usually, mushrooms.

This dish was invented sometime in the early 1800s and had its North American heyday in the 1950s and 1960s.

The best cuts of beef for stroganoff are tender, juicy cuts such as:

  • boneless rib eye
  • boneless sirloin.
  • sirloin steak tips.
  • beef tenderloin.

In researching beef stroganoff, I’ve seen recommendations for all sorts of things to serve it with, including kasha, egg noodles, French fried potatoes, rice, mashed potatoes with chives, wild rice, and the leftovers on buttered toast points.

Since Brion & I always enjoy risotto, it seems like a good choice to pair with our stroganoff. I’ve made risotto from rice, couscous, orzo and they were all good so today I’m using barley.

Print Recipe
Beef Stroganoff w/ Barley Risotto
Votes: 1
Rating: 5
You:
Rate this recipe!
Servings
- 6 SERVINGS
Ingredients
Servings
- 6 SERVINGS
Ingredients
Votes: 1
Rating: 5
You:
Rate this recipe!
Instructions
Beef - Marinade
  1. In a large zip-lock bag or glass dish, whisk together oil, soy sauce & Montreal Steak Spice. Add cubed steak & marinate in refrigerator for 2 hours.
Mustard Sauce
  1. In a small saucepan, melt 1 tablespoon butter over medium heat. Stir in flour until smooth; gradually whisk in chicken stock and mustard. Bring to a boil, stirring constantly; cook and stir until thickened, 3-5 minutes. Reduce heat; simmer, uncovered, 5 minutes.
  2. Meanwhile, cut tomato into thick strips. In a large skillet over medium-low heat, cook tomato until softened, 3-5 minutes. Stir into mustard sauce; add salt, liquid smoke & sour cream.
  3. In same skillet, melt 1 tablespoon butter over medium-high heat. Drain beef using a strainer, discarding marinade. Add sliced onion & mushrooms to pan; cook and stir until onion is softened. Add beef & cook until meat is no longer pink, 6-8 minutes. Add mustard sauce; reduce heat to low and simmer, uncovered, until slightly thickened. Keep warm until serving.
Barley Risotto
  1. Bring water to a boil in a large saucepan. Reduce heat to maintain simmer. In another large saucepan, melt butter over medium heat. Add chopped onion & salt. Cook and stir until liquid evaporates. Add barley; toast in pan.
  2. Stir hot water into barley 1 cup at a time, waiting until liquid has almost absorbed before adding more. Cook until barley is softened but still slightly chewy, 15-20 minutes; stir in parsley. Serve immediately with beef.

Greek Spanakopita Pasta

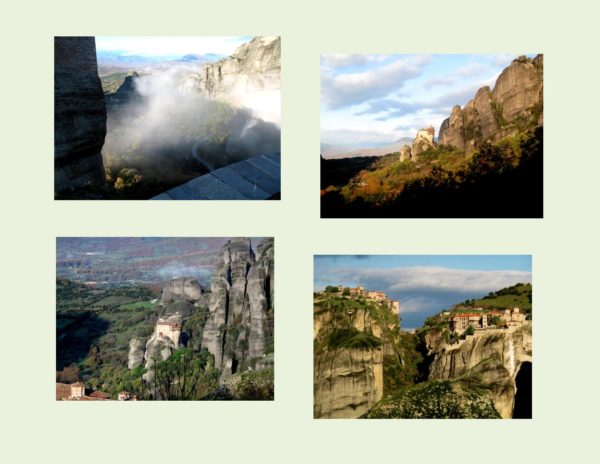
January is kind of a different month — all the holiday hoopla is done for another year, in our part of the country its fairly cold, bringing on the winter ‘blaas’. I have numerous friends that say they find themselves feeling a bit ‘down’ at this time. That being said, It seemed the perfect time to be a ‘mental traveler’. I’d like to share an experience Brion & I had which was totally amazing in 2010.

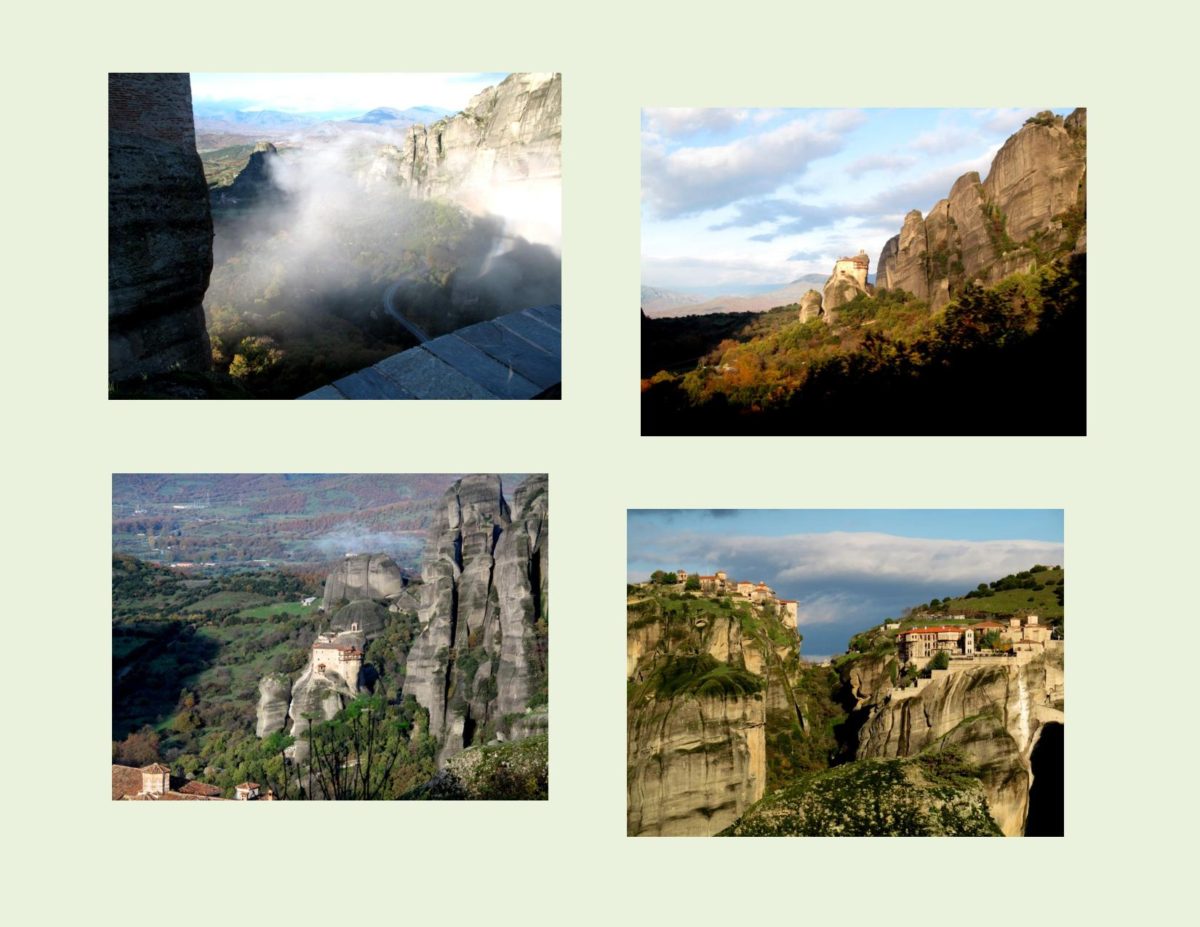
Your day begins in central Greece. A misty fog blankets the Kalambaka Valley as the tour takes you to your morning destination.

Here, in the shadow of the Pindus Mountains and just beyond the town of Kalambaka, massive gray colored pinnacles rise out of the valley towards the sky. Over thousands of years, this landscape has been sculpted by wind and water into a strange and breathtaking sight. Perched miraculously on the tops of these pinnacles are monasteries. The area is called METEORA   and literally means ‘columns in the sky’.

The sandstone peaks were first inhabited by Byzantine hermits in the 11th century, who clamored up the rocks to be alone with God. Though it is unknown how the first hermits reached the tops of these vertical rock faces, it is likely that pegs were hammered into tiny gaps in the rocks. Around 1382 the first monastery was built. By the 1500’s, 24 monasteries were built on these sheer cliffs, but by the 19th century most had fallen to ruin.

Because there were no steps, the main access to the monasteries was by means of a net that was hitched over a hook and hoisted up by rope and a hand cranked windlass to winch towers over hanging the chasm. Monks descended in nets or on a retractable rope ladders up to 40 meters long to the fertile valley below to grow grapes, corn and potatoes.

The natural rock buildings blend so evenly with the scenery, they are hard to spot at first. Only the red tile roofs give them away. Centuries of weather have caused natural streaking of the rock which acts as a camouflage. In the 1920’s, roads, pathways and stairs were built to make today’s remaining six monasteries more accessible as they are now largely dependent on tourist donations.

Inside the walls of these monasteries, life goes on as it has for more than 900 years. Wine is still made in giant oak vats where the monks climb in with bare feet to crush grapes. Most of the carpentry and masonry tools are hand made in the same style as their ancestors. Terracotta pots/bowls are fired by hand pumped bellows on a furnace. Traditional icons are painted using hand ground pigments bonded with egg yolk to make tempera paint that was common in the Middle Ages.

Among the existing monasteries is a convent called Saint Stephen’s that was built in 1798. The occupying nuns are courteous and friendly, but no visitor gets past them with bare shoulders or knees. Novices holding piles of blue aprons and capes meet the visitors at the gate. Anyone not meeting the exacting dress code must don the local sackcloth or be turned away.

To experience this rare geographical phenomenon is something you will not forget easily. If you have the opportunity, be sure to take it. In the meantime, I hope you have enjoyed this mental journey I have taken you on. Check out a few more pictures I’ve added in the recipe section of the blog.

Now, in keeping with the food part of the blog, I made a savory  GREEK SPANAKOPITA PASTA  meal. Easy, quick and tasty.

Print Recipe
Greek Spanakopita Pasta
Votes: 1
Rating: 5
You:
Rate this recipe!
Course Main Dish
Cuisine Greek
Servings
SERVINGS
Course Main Dish
Cuisine Greek
Servings
SERVINGS
Votes: 1
Rating: 5
You:
Rate this recipe!
Instructions
Pasta
  1. Cook pasta in salted boiling water 8-10 minutes, until al dente. Drain & set aside.
Cheese Sauce
  1. In a heavy saucepan over medium heat, heat the milk until hot but not boiling. Combine flour & butter in another saucepan. Whisk until the mixture has gently bubbled for 2 minutes, being careful not to brown the flour.
  2. Begin to add the hot milk to the flour mixture a little at a time while whisking vigorously. Continue to add the milk until it is fully incorporated. Bring the mixture to a boil, reduce heat to low; simmer, stirring constantly, until it thickens, 6-8 minutes ( it will resemble heavy cream). Crumble the feta cheese & add to hot sauce, whisking until smooth. Add dill & pepper; stir. Remove from heat & let cool.
  3. Preheat oven to 375 F. Squeeze water from frozen, thawed spinach. Toss the pasta, cheese sauce, spinach, ricotta & garlic in a large bowl until well combined. Taste to see if any more salt & pepper is needed.
  4. Place in a casserole dish & top with Parmesan Cheese. Bake for 20-30 minutes, until cheese browns a little.
Recipe Notes
  • If you prefer to make this a day ahead of baking, cover well & refrigerate.
  • If you do not care for feta cheese you can substitute 285 grams of either Gorgonzola or mozzarella in place of the 140 grams of feta.

Garlic Salmon w/ Roasted Veggies

HAPPY NEW YEAR TO EVERYONE!

Food has always been a powerful symbol especially at the start of a new year. Fish on New Year’s Day is like turkey at Christmas.

People all around the world eat a variety of traditional foods from grapes to lentils, to smoked fish at the stroke of midnight. Fish have also been linked to prosperity or wealth with their scales round and abundant like money. Because fish swim forward, they’re considered a lucky food and represent progress. Not only that, but salmon travel in schools, which is supposed to symbolize prosperity. 

There is also a German tradition of eating fish for the New Year’s Eve dinner, and keeping a fish scale from a carp in your wallet all year to ensure wealth for the whole family.

New Year’s celebrations bring thoughts of new beginnings, letting go of the past and a future of wealth and good fortune.

Whatever food you chose to have today, enjoy it to the fullest with family & friends as we enter this new year.

Print Recipe
Garlic Salmon w/ Roasted Veggies
Votes: 1
Rating: 5
You:
Rate this recipe!
Servings
Votes: 1
Rating: 5
You:
Rate this recipe!
Instructions
  1. In the microwave, bake potatoes with skin on until almost done. Remove & carefully cut into wedges. Set aside. Take beans out of freezer.
  2. Preheat oven to 325 F.
  3. Spread salmon with mustard; sprinkle with salt & pepper.
  4. In a skillet over medium-high, heat oil & add garlic. Cook, stirring often until garlic is fragrant & light golden brown, about 2 minutes. Pour hot oil over salmon on a large baking sheet. Place potato wedges at one end & spread out beans on the other. Sprinkle potatoes & beans with salt & pepper.
  5. Roast until salmon flakes easily with a fork & vegetables are tender & roasted. Remove from oven.
  6. Transfer salmon to a platter; sprinkle with tarragon & chives. Arrange vegetables on platter & serve.