Sour Cream Rice Pancakes

ENJOYING SHROVE TUESDAY!

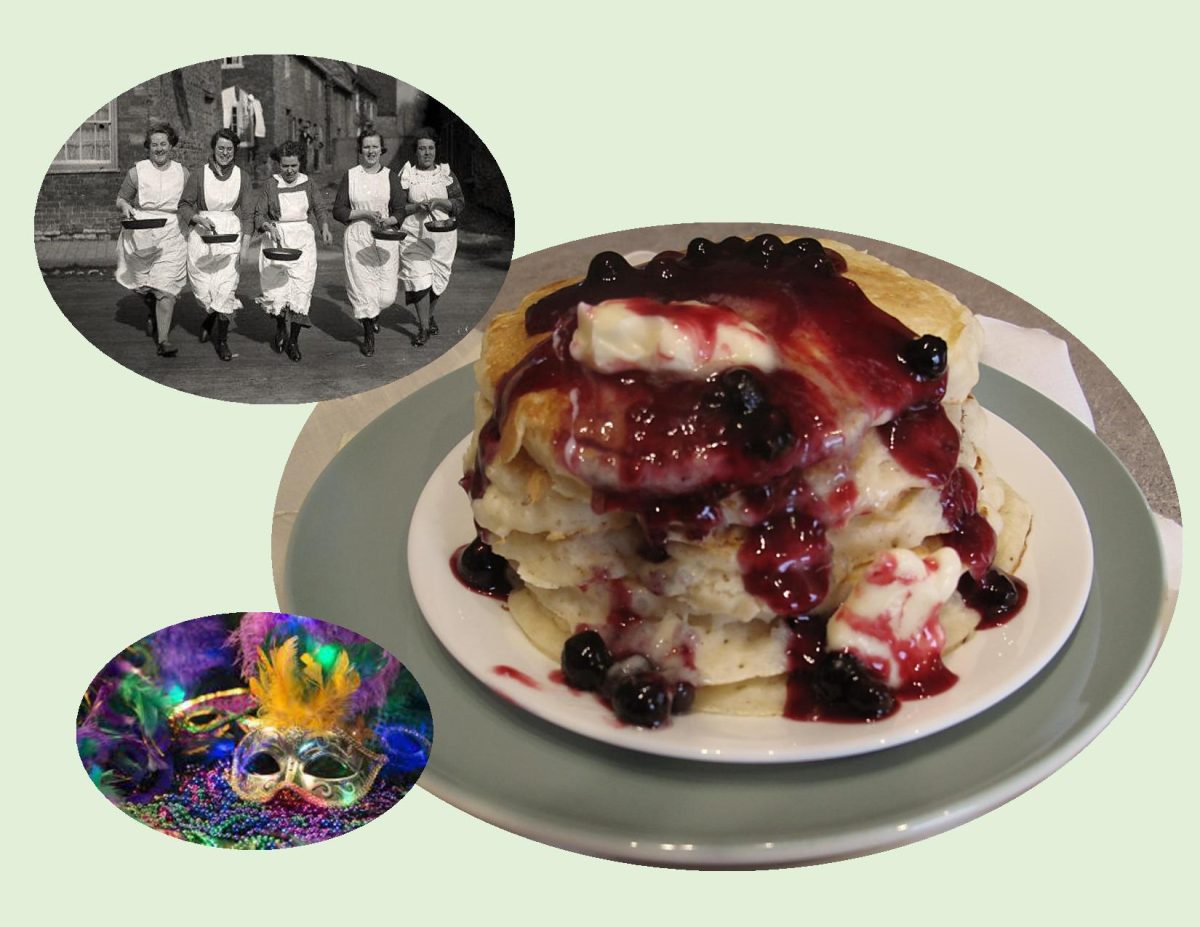
Whether you call it Shrove Tuesday, Mardi Gras, or Pancake Day, Tuesday is the day of feasting and celebration before 40 days of fasting known as Lent. Celebrated by Anglo-Saxon Christians, participants would attend confession in order to be ‘shriven’ (forgiven for their sins). A bell rang to call everyone to church. This bell came to be known as the Pancake Bell and is still rung today.

Shrove Tuesday was the last day to use up eggs, sugar and fats before the fast, and making pancakes was the perfect way to do it! The ingredients of pancakes also symbolize four pillars of the Christian Faith. Flour for sustenance, eggs for creation, salt for wholesomeness, and milk for purity.

While other countries celebrate Shrove Tuesday, or Mardi Gras, with extravagant and exotic parades, in England, people race around towns and villages wielding frying pans that hold pancakes. The tradition was created in 1445 when a woman of Olney, Buckinghamshire was making pancakes when she heard the bell summoning her to church. In a rush to get to church, she ran, still in her apron and holding her frying pan. The Olney Pancake Race is now the most popular pancake race in the world. Participants must be local housewives and they must wear an apron. The goal of the race is to run while carrying a frying pan with a cooked pancake inside flipping it as you run. In order to win, the woman must successfully toss the pancake three times throughout the race, reach the church and serve the pancake to the bell ringer. Hundreds of people gather every year to participate in this fun tradition!

Mardi Gras, which translates to Fat Tuesday in French, is largely celebrated in the city of New Orleans, Louisiana. Parades, parties, and feasts dazzled in colors of green, gold, and purple fill the city for two weeks leading up to Fat Tuesday.

Personally, I have always liked pancakes, so in keeping with the Shrove Tuesday tradition Brion & I will be enjoying some today. Although I can’t quite picture myself running in a pancake race, I’m making some sour cream rice pancakes … if you like rice pudding as well as pancakes, these are for you!

Print Recipe
Sour Cream Rice Pancakes
Votes: 1
Rating: 5
You:
Rate this recipe!
Course Main Dish
Cuisine American
Servings
Ingredients
Pancakes
Blueberry Sauce
Course Main Dish
Cuisine American
Servings
Ingredients
Pancakes
Blueberry Sauce
Votes: 1
Rating: 5
You:
Rate this recipe!
Instructions
Pancakes
  1. In a large bowl, whisk together eggs, sugar, milk, sour cream, butter & vanilla.
  2. In a separate bowl, combine flour, cooked rice, baking powder, baking soda & salt.
  3. Add the flour mixture to the liquid mixture & whisk together. Let batter sit for 15 minutes.
  4. Heat a nonstick griddle to medium-low heat. Spray with oil. Using a 1/4 cup measure, portion out batter on griddle. Cook for about 2 minutes per side.
  5. Serve immediately garnished with blueberry sauce or your choice of topping.
Blueberry Sauce
  1. In a small saucepan, combine cornstarch, sugar & salt. Add water & blueberries & cook until 'clear' & bubbling. Remove from heat & stir in butter & lemon juice. Serve warm over pancakes.

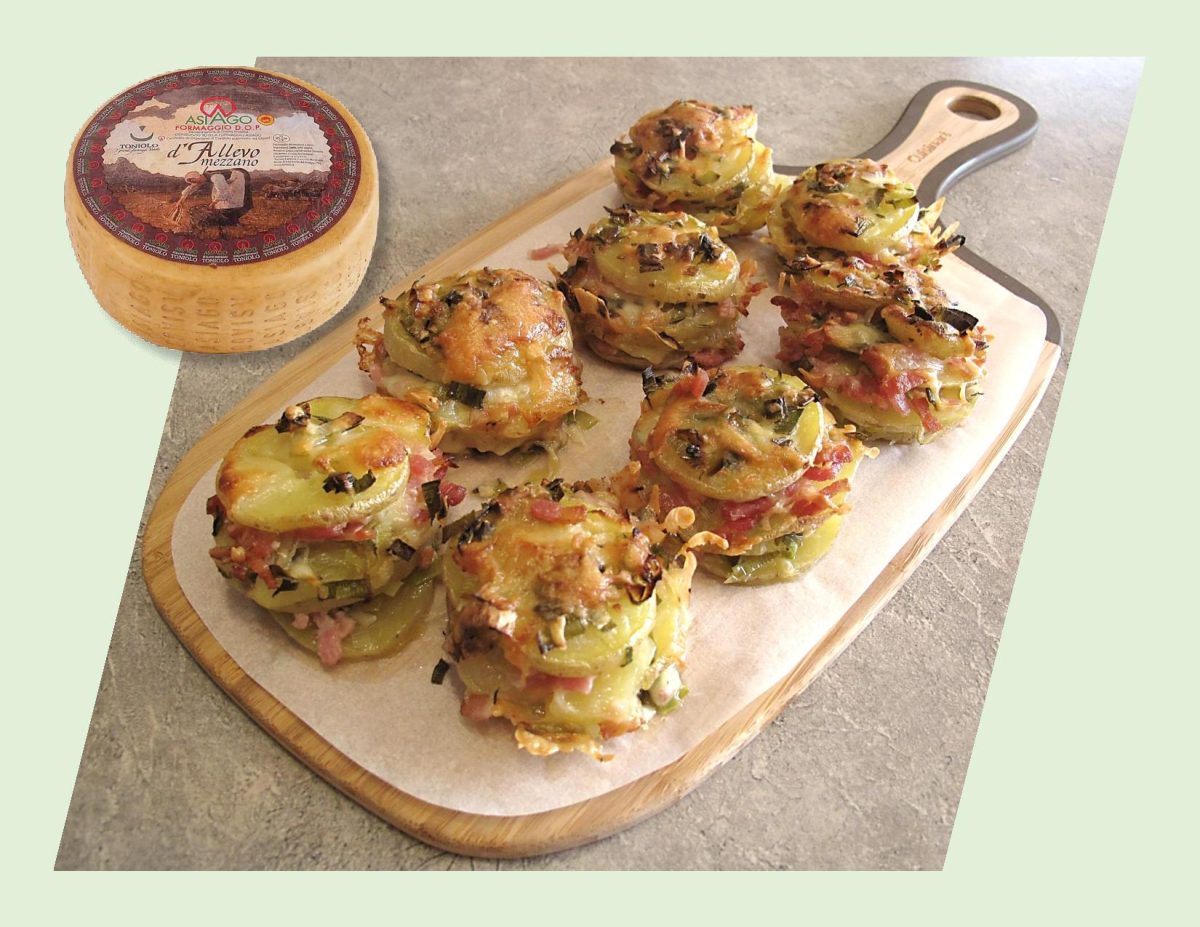
Asiago Potato Stacks

Asiago Cheese is one of my personal favorite kinds of cheese. Coupled with a rich history and unique flavor profile, asiago cheese is a deliciously versatile and ranges from smooth and silky to crumbly and brittle.

Asiago cheese has a characteristically sweet and mildly nutty taste. However, the flavors develop as it ages, getting sharper, more intense, and piquant.  As it matures, the cheese develops a slightly acidic and tangy undertone and a fruity appeal. The scent of the cheese is aromatic, with a floral smell that gets deeper with maturity.

A semi-hard cow’s milk cheese, asiago originated in Italy and takes its name from the famous plateau located in the north-eastern part of the peninsula.

Because this cheese features so much variety the everyday cheese lover might know they like asiago but not really be able to describe exactly what it tastes like. Asiago is actually considered one of the best cheeses to use for cooking due to its mild but noticeable flavor.

These ‘asiago potato stacks’ are a nice change from your typical roasted potatoes. Sure, you can dump any kind of cheese on top of potatoes, and they’ll turn out tasty. But elevate those cheesy ‘taters with freshly grated asiago and a fresh burst of rosemary and they’re amazing!

Print Recipe
Asiago Potato Stacks
Votes: 1
Rating: 5
You:
Rate this recipe!
Course Main Dish
Cuisine Italian
Servings
Course Main Dish
Cuisine Italian
Servings
Votes: 1
Rating: 5
You:
Rate this recipe!
Instructions
  1. Preheat oven to 375 F. Using a mandolin, thinly slice potatoes & place in a large bowl.
  2. Melt butter in a small skillet over medium heat. Add olive oil to skillet & mix to combine. Add shallots & garlic; sauté for 1 minute. Add thyme, salt & pepper & sauté for for 30 seconds. Remove from heat.
  3. Pour butter mixture over potatoes & toss until each side is coated. Add cheese to potatoes & continue tossing until well combined.
  4. Spray a 12-cup muffin tin with cooking spray. Stack potato slices in muffin cups & top with additional cheese.
  5. Bake for 30-35 minutes until stacks are golden brown & crispy. Serve immediately.

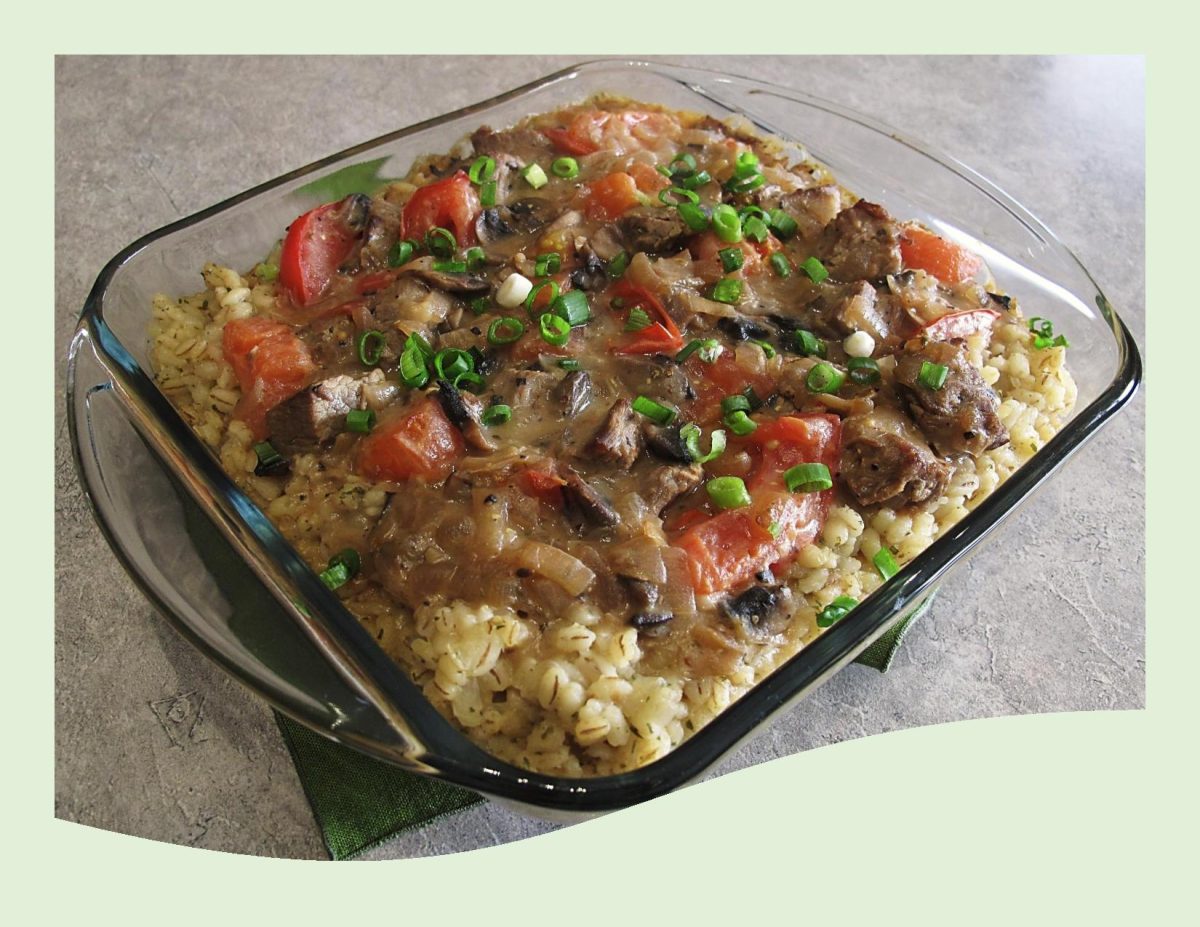
Beef Stroganoff w/ Barley Risotto

Beef Stroganoff is a perfect dinner party dish – inexpensive and easy to prepare yet rich and luxurious. History reveals a simple but elegant dish of steak meat sautéed with onion and cooked in a sauce of sour cream, seasonings and usually, mushrooms.

This dish was invented sometime in the early 1800s and had its North American heyday in the 1950s and 1960s.

The best cuts of beef for stroganoff are tender, juicy cuts such as:

  • boneless rib eye
  • boneless sirloin.
  • sirloin steak tips.
  • beef tenderloin.

In researching beef stroganoff, I’ve seen recommendations for all sorts of things to serve it with, including kasha, egg noodles, French fried potatoes, rice, mashed potatoes with chives, wild rice, and the leftovers on buttered toast points.

Since Brion & I always enjoy risotto, it seems like a good choice to pair with our stroganoff. I’ve made risotto from rice, couscous, orzo and they were all good so today I’m using barley.

Print Recipe
Beef Stroganoff w/ Barley Risotto
Votes: 1
Rating: 5
You:
Rate this recipe!
Servings
- 6 SERVINGS
Ingredients
Servings
- 6 SERVINGS
Ingredients
Votes: 1
Rating: 5
You:
Rate this recipe!
Instructions
Beef - Marinade
  1. In a large zip-lock bag or glass dish, whisk together oil, soy sauce & Montreal Steak Spice. Add cubed steak & marinate in refrigerator for 2 hours.
Mustard Sauce
  1. In a small saucepan, melt 1 tablespoon butter over medium heat. Stir in flour until smooth; gradually whisk in chicken stock and mustard. Bring to a boil, stirring constantly; cook and stir until thickened, 3-5 minutes. Reduce heat; simmer, uncovered, 5 minutes.
  2. Meanwhile, cut tomato into thick strips. In a large skillet over medium-low heat, cook tomato until softened, 3-5 minutes. Stir into mustard sauce; add salt, liquid smoke & sour cream.
  3. In same skillet, melt 1 tablespoon butter over medium-high heat. Drain beef using a strainer, discarding marinade. Add sliced onion & mushrooms to pan; cook and stir until onion is softened. Add beef & cook until meat is no longer pink, 6-8 minutes. Add mustard sauce; reduce heat to low and simmer, uncovered, until slightly thickened. Keep warm until serving.
Barley Risotto
  1. Bring water to a boil in a large saucepan. Reduce heat to maintain simmer. In another large saucepan, melt butter over medium heat. Add chopped onion & salt. Cook and stir until liquid evaporates. Add barley; toast in pan.
  2. Stir hot water into barley 1 cup at a time, waiting until liquid has almost absorbed before adding more. Cook until barley is softened but still slightly chewy, 15-20 minutes; stir in parsley. Serve immediately with beef.

Greek Spanakopita Pasta

January is kind of a different month — all the holiday hoopla is done for another year, in our part of the country its fairly cold, bringing on the winter ‘blaas’. I have numerous friends that say they find themselves feeling a bit ‘down’ at this time. That being said, It seemed the perfect time to be a ‘mental traveler’. I’d like to share an experience Brion & I had which was totally amazing in 2010.

Your day begins in central Greece. A misty fog blankets the Kalambaka Valley as the tour takes you to your morning destination.

Here, in the shadow of the Pindus Mountains and just beyond the town of Kalambaka, massive gray colored pinnacles rise out of the valley towards the sky. Over thousands of years, this landscape has been sculpted by wind and water into a strange and breathtaking sight. Perched miraculously on the tops of these pinnacles are monasteries. The area is called METEORA   and literally means ‘columns in the sky’.

The sandstone peaks were first inhabited by Byzantine hermits in the 11th century, who clamored up the rocks to be alone with God. Though it is unknown how the first hermits reached the tops of these vertical rock faces, it is likely that pegs were hammered into tiny gaps in the rocks. Around 1382 the first monastery was built. By the 1500’s, 24 monasteries were built on these sheer cliffs, but by the 19th century most had fallen to ruin.

Because there were no steps, the main access to the monasteries was by means of a net that was hitched over a hook and hoisted up by rope and a hand cranked windlass to winch towers over hanging the chasm. Monks descended in nets or on a retractable rope ladders up to 40 meters long to the fertile valley below to grow grapes, corn and potatoes.

The natural rock buildings blend so evenly with the scenery, they are hard to spot at first. Only the red tile roofs give them away. Centuries of weather have caused natural streaking of the rock which acts as a camouflage. In the 1920’s, roads, pathways and stairs were built to make today’s remaining six monasteries more accessible as they are now largely dependent on tourist donations.

Inside the walls of these monasteries, life goes on as it has for more than 900 years. Wine is still made in giant oak vats where the monks climb in with bare feet to crush grapes. Most of the carpentry and masonry tools are hand made in the same style as their ancestors. Terracotta pots/bowls are fired by hand pumped bellows on a furnace. Traditional icons are painted using hand ground pigments bonded with egg yolk to make tempera paint that was common in the Middle Ages.

Among the existing monasteries is a convent called Saint Stephen’s that was built in 1798. The occupying nuns are courteous and friendly, but no visitor gets past them with bare shoulders or knees. Novices holding piles of blue aprons and capes meet the visitors at the gate. Anyone not meeting the exacting dress code must don the local sackcloth or be turned away.

To experience this rare geographical phenomenon is something you will not forget easily. If you have the opportunity, be sure to take it. In the meantime, I hope you have enjoyed this mental journey I have taken you on. Check out a few more pictures I’ve added in the recipe section of the blog.

Now, in keeping with the food part of the blog, I made a savory  GREEK SPANAKOPITA PASTA  meal. Easy, quick and tasty.

Print Recipe
Greek Spanakopita Pasta
Votes: 1
Rating: 5
You:
Rate this recipe!
Course Main Dish
Cuisine Greek
Servings
SERVINGS
Course Main Dish
Cuisine Greek
Servings
SERVINGS
Votes: 1
Rating: 5
You:
Rate this recipe!
Instructions
Pasta
  1. Cook pasta in salted boiling water 8-10 minutes, until al dente. Drain & set aside.
Cheese Sauce
  1. In a heavy saucepan over medium heat, heat the milk until hot but not boiling. Combine flour & butter in another saucepan. Whisk until the mixture has gently bubbled for 2 minutes, being careful not to brown the flour.
  2. Begin to add the hot milk to the flour mixture a little at a time while whisking vigorously. Continue to add the milk until it is fully incorporated. Bring the mixture to a boil, reduce heat to low; simmer, stirring constantly, until it thickens, 6-8 minutes ( it will resemble heavy cream). Crumble the feta cheese & add to hot sauce, whisking until smooth. Add dill & pepper; stir. Remove from heat & let cool.
  3. Preheat oven to 375 F. Squeeze water from frozen, thawed spinach. Toss the pasta, cheese sauce, spinach, ricotta & garlic in a large bowl until well combined. Taste to see if any more salt & pepper is needed.
  4. Place in a casserole dish & top with Parmesan Cheese. Bake for 20-30 minutes, until cheese browns a little.
Recipe Notes
  • If you prefer to make this a day ahead of baking, cover well & refrigerate.
  • If you do not care for feta cheese you can substitute 285 grams of either Gorgonzola or mozzarella in place of the 140 grams of feta.

Scallop Crepes w/ Cauliflower Sauce

Can you believe the New Year is almost here and as the clock approaches midnight, it is a time to reflect and assess the year that has gone by…to hopefully, realize how precious time is. The word ‘new’ brings about thoughts of hope, and an opportunity to focus on a list of fresh goals, challenges, and opportunities.

Many cultures around the world believe the key to a happy, healthy, financially secure, and even productive year begins with eating certain lucky foods. The theory is ‘do good, eat good’, to begin the New Year right.

New Year’s Eve calls for a celebration. Whether you’re spending the night in, or you’re hosting an intimate party with friends, a scallop dinner is the perfect treat to finish off the year because scallops symbolize new opportunities or the opening of new horizons.

Brion & I enjoy seafood a lot so its not hard to fit some elegant scallop crepes into the menu.

Print Recipe
Scallop Crepes w/ Cauliflower Sauce
Votes: 1
Rating: 5
You:
Rate this recipe!
Course Main Dish
Cuisine American
Servings
Course Main Dish
Cuisine American
Servings
Votes: 1
Rating: 5
You:
Rate this recipe!
Instructions
Crepes
  1. Place all crepe ingredients in a small blender & whirl for 1 minute at high speed. Scrape down sides, whirl for another 15 seconds. Pour into a small bowl & cover. Refrigerate 1 hour or more.
  2. Brush an 8-inch non-stick skillet lightly with melted butter; heat. Stir crepe batter; pour 2 Tbsp into center of skillet. Lift & tilt pan to coat bottom evenly. Cook until top appears dry; turn & cook 15-20 seconds longer. Remove to a wire rack. Repeat with remaining batter, brushing skillet with melted butter as needed.
Sauce
  1. Pour chicken broth into a medium saucepan, add cauliflower florets & bring to a boil. Cook for about 10 minutes, stirring occasionally until the cauliflower is tender. Drain in a colander, reserving the liquid, then place the cauliflower in a food processor & allow it to cool for 5 minutes before blending. Process, slowly adding 1 cup of reserved chicken broth. Add seasonings & process until 'creamy'. Set aside.
Filling
  1. In a large skillet, bring scallops, wine & pepper to a boil. Reduce heat; simmer until scallops are firm & opaque, 3-4 minutes. Drain & set aside.
  2. In the same skillet, fry chopped bacon until slightly browned. Add 2 Tbsp butter, mushrooms & green onions & sauté until moisture has evaporated from mushrooms. Return scallops back to skillet & add cheese & enough of the cauliflower sauce to bring mixture together into a filling consistency.
Assembly & Cooking
  1. Preheat oven to 350 F.
  2. Divide filling among the 12 crepes, spreading filling down the center of each one. Place remaining cauliflower sauce in the bottom of a 13 x 9-inch baking dish. Roll up crepes & place in a single layer on top of sauce. Cover & bake until heated through about 30 minutes.
  3. Garnish with sliced green onions if you prefer.
Recipe Notes
  • These crepes look & taste indulgent, but I've made the sauce with pureed cauliflower rather than lots of cream. It sounds a bit odd, but it works beautifully & compliments the flavor of the sweet scallops & salty bacon.

Turkey Breast w/ Quinoa Mushroom Stuffing

SEASON’S GREETINGS!

The Christmas season makes us reflect on many different things; to live life a little more grateful, more hopeful and a little more peaceful. It is a time to connect with friends and loved ones to enjoy the traditions we grew up with. 

Today, December 25th, our family celebrates my sister Rita’s birthday as well as Christmas. I have fond memories of her Christmas Eve family birthday ‘parties’. On the eve of Christmas, our family would go to church. After returning home, we were joined by some family friends to have birthday cake and homemade root beer. My parents wanted my sister to always have this special time to honor her birthday apart from the Christmas festivities.

As I write about this memory, something else comes to mind. Our church at that time, was a small, old building. For the choir it had a small loft. As long as I can remember, the same lady played the organ as well as directing the choir members in song. She in turn, had a teenage daughter gifted with an unbelievable voice. One of the highlights of the Christmas service was to hear her sing a solo version of ‘Oh Holy Night’. You could hear a pin drop; it was breathtaking how angelic and beautiful her voice was. I get emotional even now remembering it.

The strange and fascinating story of ‘O Holy Night’ began in France, yet eventually made its way around the world. This seemingly simple song, inspired by a request from a clergyman, would not only become one of the most beloved anthems of all time, it would mark a technological revolution that would forever change the way people were introduced to music.

In 1847, Placide Cappeau de Roquemaure was the commissionaire of wines in a small French town. Known more for his poetry than his church attendance, it probably shocked Placide when his parish priest asked the commissionaire to pen a poem for Christmas mass. Nevertheless, the poet was honored to share his talents with the church.

In a dusty coach traveling down a bumpy road to France’s capital city, Placide Cappeau considered the priest’s request. Using the gospel of Luke as his guide, Cappeau imagined witnessing the birth of Jesus in Bethlehem. Thoughts of being present on the blessed night inspired him. By the time he arrived in Paris, ‘Cantique de Noel’ had been completed.

Moved by his own work, Cappeau decided that his ‘Cantique de Noel’ was not just a poem, but a song in need of a master musician’s hand. Not musically inclined himself, the poet turned to one of his friends, Adolphe Charles Adams, for help.


The son of a well-known classical musician, Adolphe had studied in the Paris conservatoire. His talent and fame brought requests to write works for orchestras and ballets all over the world. Yet the lyrics that his friend Cappeau gave him must have challenged the composer in a fashion unlike anything he received from London, Berlin, or St. Petersburg.

As a man of Jewish ancestry, for Adolphe the words of ‘Cantique de Noel’ represented a day he didn’t celebrate and a man he did not view as the son of God. Nevertheless, Adams quickly went to work, attempting to marry an original score to Cappeau’s beautiful words. Adams’ finished work pleased both poet and priest. The song was performed just three weeks later at a Midnight Mass on Christmas Eve.

Since that first rendition at a small Christmas mass in 1847, ‘O Holy Night’ has been sung millions of times in churches in every corner of the world. And since the moment a handful of people first heard it played over the radio, the carol has gone on to become one of the entertainment industry’s most recorded and played spiritual songs. This incredible work has become one of the most beautiful, inspired pieces of music ever created.

For our turkey stuffing today, I decided to go with something a bit different. The quinoa-mushroom stuffing can be made to stuff the bird or served as a standalone side-dish.

BIRTHDAY WISHES WITH LOVE TO YOU RITA. HOPE YOU, RICK & AMBER HAVE A WONDERFUL DAY!

Print Recipe
Turkey Breast w/ Quinoa Mushroom Stuffing
Votes: 1
Rating: 5
You:
Rate this recipe!
Servings
Ingredients
Quinoa Mushroom Stuffing
Turkey
Servings
Ingredients
Quinoa Mushroom Stuffing
Turkey
Votes: 1
Rating: 5
You:
Rate this recipe!
Instructions
Stuffing
  1. Cook & mash potatoes. Prepare gravy mix as directed on pkg. Set aside.
  2. Cook the quinoa in a small pot by bringing the quinoa & water to a boil. Cover & reduce heat to very low & cook for about 20 minutes. Remove lid & set aside.
  3. Heat a saucepan, add the onions & sauté for 2-3 minutes, adding just a Tbsp of water at a time if the onions stick, stirring frequently. Add celery, mushrooms, onion & garlic powder, poultry seasoning & dried basil. Sauté for 5 minutes.
  4. Add about 1/4 cup water, fresh herbs, chard & cranberries. Cook about 5 minutes more, stirring occasionally.
  5. In a large bowl, mix cooked quinoa with mashed potatoes, vegetable/spice mix & gravy to make a moist stuffing consistency. Set aside while you prepare turkey breast.
Turkey Breast
  1. Preheat oven to 350 F.
  2. Lay turkey breast on a clean work surface so that it lies open & flat. Cover with plastic wrap, then pound lightly with a meat mallet to flatten into an even thickness all over. Discard plastic wrap.
  3. On one half of the turkey breast spread a thick layer of stuffing. Fold the adjoining half of the turkey breast over all. Fasten with metal skewers if you wish to help keep the stuffing enclosed.
  4. Place a wire rack in a roasting pan & lay stuffed turkey roast on it. Combine herb butter ingredients & brush over turkey breast. Roast uncovered, until turkey reaches an internal temperature of 180 F. about 1 1/2 - 2 hours. Cover loosely with foil if top browns too quickly.
  5. Place any extra stuffing in a buttered casserole & bake for about 30 minutes.
  6. Remove turkey breast from oven, tent with foil & allow to rest for about 5-10 minutes. Remove skewers & slice. Serve with cranberry sauce.

Mini Tarts w/ Roast Beef & Gruyere

The holiday season always seems to creep up on us each year. You’ve probably got the mains and desserts figured out for your big Christmas dinner. Now, it’s time to nail down the appetizers or hors d’oeuvres, aka the real reason everyone loves the holidays. Hors d’ oeuvres are part of the holiday party tradition. I think that the best appetizers are ‘finger foods’ where you can eat them easily and with very little mess. Each culture has its own collection of favorite appetizer recipes which have evolved over the years.

If you’re looking for a sophisticated, bite-sized appetizer for Christmas or New Year’s Eve, look no further than mini appetizer tarts. Tartlets can be sweet or savory, hot or cold, and are a perfect choice if you’re looking for a vegetarian option. Think of your favorite flavor combination and you can find a way to serve it in these tiny pastry cups — try brie and raspberry, chicken cordon bleu, cranberry and goat cheese, pear and blue cheese, buffalo chicken and ranch or roast beef and gruyere.

Not only do mini tarts make for a chic presentation, but they also make it easy to time your guests’ arrival with taking the tarts out of the oven if you are serving them hot. Most recipes require a short cooking time, which allows you to pop the tartlets in the oven half an hour before your guests arrive and serve a warm appetizer as soon as they walk through the door.

These mini tarts are filled with roast beef, shallot-sautéed mushrooms, cream cheese, horseradish and Gruyère. You will love the nutty aroma when the tarts come out of the oven. I think  they are the perfect Christmas appetizer or party food idea.

Print Recipe
Mini Tarts w/ Roast Beef & Gruyere
Votes: 1
Rating: 5
You:
Rate this recipe!
Servings
Votes: 1
Rating: 5
You:
Rate this recipe!
Instructions
Pastry
  1. In a large bowl, whisk together flour, baking powder, baking soda & salt. With fingertips, cut in cold butter until mixture resembles small peas. In a measuring cup, whisk together water, egg & vinegar. Make a well in dry mixture & pour wet mixture into it all at once. With hands, mix until JUST combined. Roll out pastry & cut 24 squares with a pastry cutter. Fit squares into 24 mini tart pan cups. Set aside in refrigerator until ready to fill.
Filling
  1. In a skillet, over medium heat, melt butter, then add shallots & mushrooms. Add thyme, salt & pepper; sauté until browned. Remove from heat. Divide roast beef between the 24 pastry shells. Spoon mushrooms onto the mounds of roast beef followed by a tiny dollop of horseradish.
  2. Place cream cheese & eggs into a small bowl & whisk until smooth. Season with salt & pepper. Spoon into tart shells, allowing the mixture to settle down into them.
  3. Sprinkle each cup with some grated cheese before transferring to the oven & bake for 20 minutes. Cool 5 minutes before serving.
Recipe Notes
  • If you prefer, you can always use frozen prepared mini tart shells instead of homemade for a quick shortcut.

Christmas Cookie Wreaths for Gifts

While certain holidays such as Christmas, lend themselves to giving food as gifts, gift-giving should be thoughtful and sincere.

We give gifts during the holiday season to express gratitude, love, or friendship to those near and dear throughout the year. But the custom of giving gifts goes all the way back to the first Christmas when the wise men brought Jesus three gifts — gold, frankincense and myrrh.

Many of the gifts we give and receive at Christmas time, especially ones related to food, have symbolic meaning and tales of folklore behind them. Others are just fun to make and share with family and friends. Sometimes those food gifts become an anticipated tradition that the gifter enjoys making and the receiver looks forward to every year.

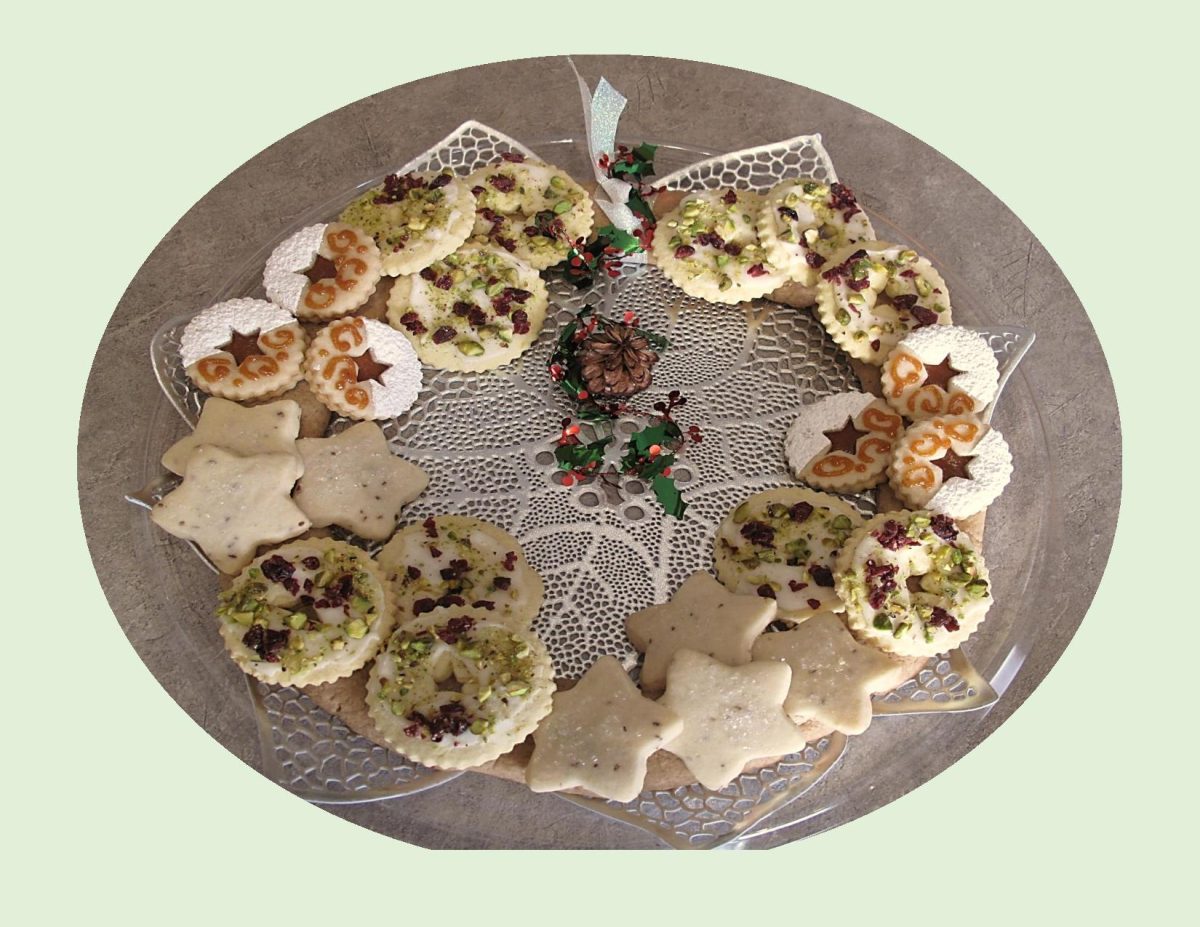
These Christmas cookie wreaths seem like the perfect gift for our neighbors. Hope they like them because they where a lot of fun to make.

Print Recipe
Christmas Cookie Wreaths for Gifts
Votes: 1
Rating: 5
You:
Rate this recipe!
Course dessert
Cuisine American
Servings
WREATHS
Ingredients
Spicy Wreath Base
Cranberry Lemon Pistachio Cookies
Persimmon Linzer Cookies
Course dessert
Cuisine American
Servings
WREATHS
Ingredients
Spicy Wreath Base
Cranberry Lemon Pistachio Cookies
Persimmon Linzer Cookies
Votes: 1
Rating: 5
You:
Rate this recipe!
Instructions
Spicy Wreath Base
  1. In a large bowl, combine all ingredients. Mix until dough forms. Divide dough in half for 2 separate wreaths. Roll each half into a long strip about 43-inches long. On 2 sheets of parchment paper, draw 2 round circles each about a 13-inch circumference. Place on baking sheets. Following the circle outline, place a strip of dough on each circle. Press with the back of a spoon to flatten to about a 1/2-inch thickness.
  2. Preheat oven to 310 F. Bake cookie bases for about 15 minutes. They should be baked but not overdone so that the centers are soft. Remove from oven & cool on a wire rack until ready to assemble with cookies.
Cranberry Lemon Pistachio Cookies
  1. In a bowl, whisk together flour, cornstarch, baking powder & salt. Place butter & sugar in a bowl & beat with a mixer until pale & fluffy. Mix in egg yolks, lemon zest & vanilla. Reduce speed to low & gradually mix in flour mixture. Shape into a disk; wrap in plastic. Refrigerate until firm, about 1 hour.
  2. Preheat oven to 350 F. Transfer dough to a lightly floured work surface. Roll out to 1/8-inch thick. Using a 2 1/2-inch round fluted cutter, cut out wreaths. Cut out centers using a 7/8-inch round or star cutter.
  3. Space 2 inches apart on baking sheets lined with parchment paper. Refrigerate until firm, about 15 minutes. bake until just golden, about 12 minutes. Allow to cool for a couple of minutes before icing.
  4. Stir together powdered sugar & lemon juice in a small bowl. Spread each cookie with icing & sprinkle with pistachios and/or pepita seeds & cranberries. Yield: 24
Anise Shortbread Stars
  1. In a bowl, sift together cornstarch, powdered sugar, flour & anise powder. Blend in butter with a spoon, mixing until a soft, smooth dough forms. If the dough is too soft to handle, cover & chill about 1 hour.
  2. Between 2 sheets of parchment paper, roll dough out about 1/2-inch thick. Using a star cookie cutter, cut out stars & sprinkle with coarse white sanding sugar. Transfer to ungreased baking sheets spacing 1 1/2-inches apart. Place baking sheets in refrigerator & chill 30 minutes. Halfway through, preheat oven to 300 F. Bake for about 20 minutes or until edges are just barely browned. Yield: 18
Persimmon Linzer Cookies
  1. In a bowl, sift together flour & salt. Set aside. In a large bowl, cream butter, sugar & vanilla until light & fluffy. Beat in as much of the flour mixture as possible. Mix the rest & gently knead until dough comes together. Wrap in plastic wrap & chill for 30 minutes.
  2. Prepare persimmon puree. In a saucepan over medium low heat, combine persimmons, sugar, cinnamon & salt. Simmer until thick, stirring occasionally, about 20 minutes. Remove from heat, cool slightly then transfer to a small food processor. Puree mixture until smooth. Set aside to cool.
  3. Preheat oven to 350 F. Line a baking sheet with parchment paper.
  4. Roll out dough on lightly floured surface to 1/4-inch thickness. Cut into rounds with a 2-inch fluted LINZER cookie cutter with a star attachment in the center. Place on lined cookie sheet. Bake for about 12-15 minutes or just until edges begin to brown. Allow cookies to cool to room temperature.
  5. Spread persimmon puree on the flat side of each solid cookie. Dust & decorate cookies with cut outs using powdered sugar & some more puree. Place decorated cookie tops on bottoms spread with puree, making a sandwich.
Assembly
  1. Arrange cookies on wreath base to your liking. You can either 'fasten' them with an bit of icing that will harden (see notes) or just place them on top base. That way they are easy to pick up by guests without to much trouble. The base can be cut into pieces after the top cookies are eaten for some more cookie goodness.
Recipe Notes

ICING FOR ATTACHING COOKIES TO WREATH:

  • 2 Tbsp warm water
  • 1 1/2 tsp corn syrup
  • 1 1/2 cups powdered sugar
  • Mix together the warm water, corn syrup and icing sugar for the icing. Make it on the thicker side, so add more icing sugar if needed.

Pork & Turkey Pie w/ Spiced Liqueur Cranberries

Today, November 23rd, our neighbors to the south in the USA, are celebrating their Thanksgiving Day. It encompasses both religious and secular aspects … being both a harvest festival and a festival of family.

Here in Canada, we have already enjoyed our Thanksgiving in October, but I thought it would be nice to acknowledge their holiday with posting a special meal.

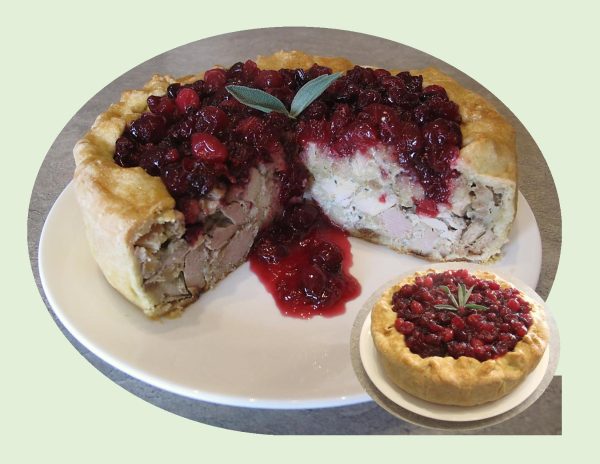
Savory Pork & Turkey Pie is an interesting combination of pork, turkey and stuffing. This recipe was born after a long-time love of homemade pot pies and some trial and error on various meat pies. It’s made with chicken, pork fillet, leftover stuffing, and a flavorful blend of spices and herbs all wrapped in a sour cream cornmeal pie crust. It’s incredibly tasty, even reheated as leftovers.

Of course, it wasn’t that the pie isn’t really good as it is, but the spiced cranberries are certainly the ‘icing on the cake’ you could say. Nobody goes to a Thanksgiving or Christmas meal and says, ‘I can’t wait to try the cranberry sauce this year’! But while it is not the center of the meal, it is certainly an important component of it.

Fresh cranberry sauce has become almost as important as the turkey itself. A Thanksgiving feast doesn’t feel complete without a bowl of cranberry sauce. Undeniably, the tangy condiment has become as much of a showpiece as the traditional turkey it’s served with!

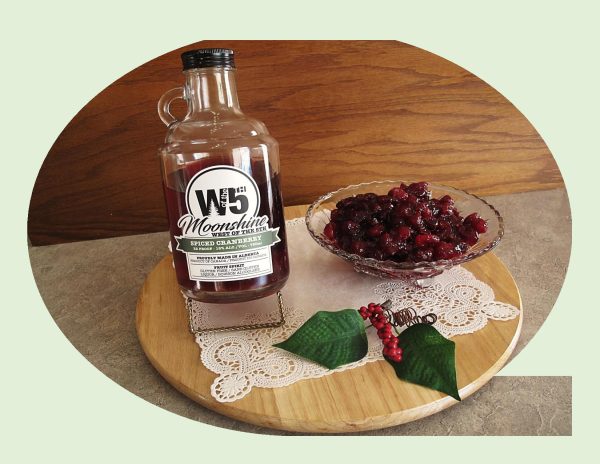
This version of the cherished sauce brings a modern twist to the holiday table. Simmered in spiced cranberry liqueur, the cranberries acquire an exquisite depth and a delicate sweetness. Meanwhile, the cinnamon and orange zest, simmered alongside the colorful berries, bring a bit of nuance and extra layers of flavor. Once done, the sauce ends up having a compote-like texture, which makes it even more luxurious.

Print Recipe
Pork & Turkey Pie w/ Spiced Liqueur Cranberries
Votes: 1
Rating: 5
You:
Rate this recipe!
Servings
Ingredients
Sour Cream Cornmeal Pastry
Cranberries w/ Spiced Liqueur
Servings
Ingredients
Sour Cream Cornmeal Pastry
Cranberries w/ Spiced Liqueur
Votes: 1
Rating: 5
You:
Rate this recipe!
Instructions
Pastry
  1. In a small bowl, combine sour cream & ice water; set aside. In a large bowl, whisk together flour, cornmeal, sugar & salt. Using a pastry blender or fingertips, cut in butter until mixture resembles both coarse crumbs & small peas. Sprinkle the cold sour cream mixture over dough, 1 Tbsp at a time, tossing with a fork to evenly distribute it.
  2. After you have added all the sour cream mixture, dough should be moist enough to stick together when pressed; if not add additional cold water, 1 tsp at a time. DO NOT overwork dough. Wrap in plastic wrap & refrigerate for at least 2 hours.
  3. Roll out the pastry on a lightly floured surface. Line the base & sides of an 8-inch spring form pan leaving about a 1-inch dough overhang. Refrigerate until filling is prepared.
Filling
  1. Preheat oven to 400 F.
  2. In a large saucepan, melt butter over medium heat. Stir in the flour, thyme, sage, savory, salt, & pepper. Add chicken broth and milk all at once.
  3. Cook and stir until thickened and bubbly. Stir in cooked chicken, pork & stuffing, being careful not to overmix. Taste to adjust seasoning if necessary. Pour mixture into pastry shell.
  4. Bake, uncovered, for 30 to 35 minutes or until pastry is golden.
Cranberries w/ Spiced Liqueur
  1. In a medium nonstick saucepan, combine all ingredients. Bring to a boil. Reduce heat and cook until reduced and slightly thickened, about 20 minutes. Remove from heat, take out cinnamon sticks.
  2. Top pie w/ cranberry compote.

Chicken, Veal & Shrimp Pastetli (Vol-Au-Vent)

Pastetli were invented in the early 1800s in Antonin Carême’s pastry store in Paris, France where they’re called vol-au-vent, French for ‘windblown’ to describe its lightness. While they’re served as an appetizer in France, they’re eaten as a main meal not only in Switzerland but also in Belgium and the Netherlands. It is also from the Netherlands where the Swiss name Pastetli origins from. The Dutch call them pasteitje (little pastry). From there it came to the German Pastete. Just to add a little complication though, a Pastete in Switzerland is rectangle cake shaped puff pastry pie filled with sausage meat, mushrooms in a creamy sauce.

A vol-au-vent is a light puff pastry shell that resembles a bowl with a lid. The shell is generally filled with a creamy sauce (most often a velouté sauce) containing vegetables, chicken, meat or fish. The lid is placed on the filled shell and the pastry is then served as an appetizer, also known as bouchée à la Reine, or as the main course of a meal. When prepared, the pastry dough is flattened and cut into two circles. A smaller circle is cut out of the center of one of the circles, which then will be used as the lid. The circle without the center cut and the circle with the center cut are then joined together around the edges so as the pastry bakes, it rises into a shell with a hole in the top. The lid, which is baked separately, is added later. The pastry shell may be made the size of an individual serving, or it can be made in several different sizes to become a main serving for one or a larger size to be served for more than one.

Vol-au-vents rose to prominence in Paris in the 19th century. In post-war Britain, they were a mainstay of any self-respecting buffet, served to suitably impressed guests alongside welcome drinks at dinner parties. By the 1990s, they had become unfashionable and remained so for decades. Updated vol-au-vents started reappearing in chic restaurants a year or two before the covid pandemic (2020) erupted and have become the retro appetizer or main course to have.

You can even adapt them to make some elegant desserts. Fill with cream and fresh fruit or melt a chocolate orange with a dash of Grand Marnier and orange zest then spoon this quick-fix mousse into the cases and top with sweetened Chantilly cream and chocolate shavings.

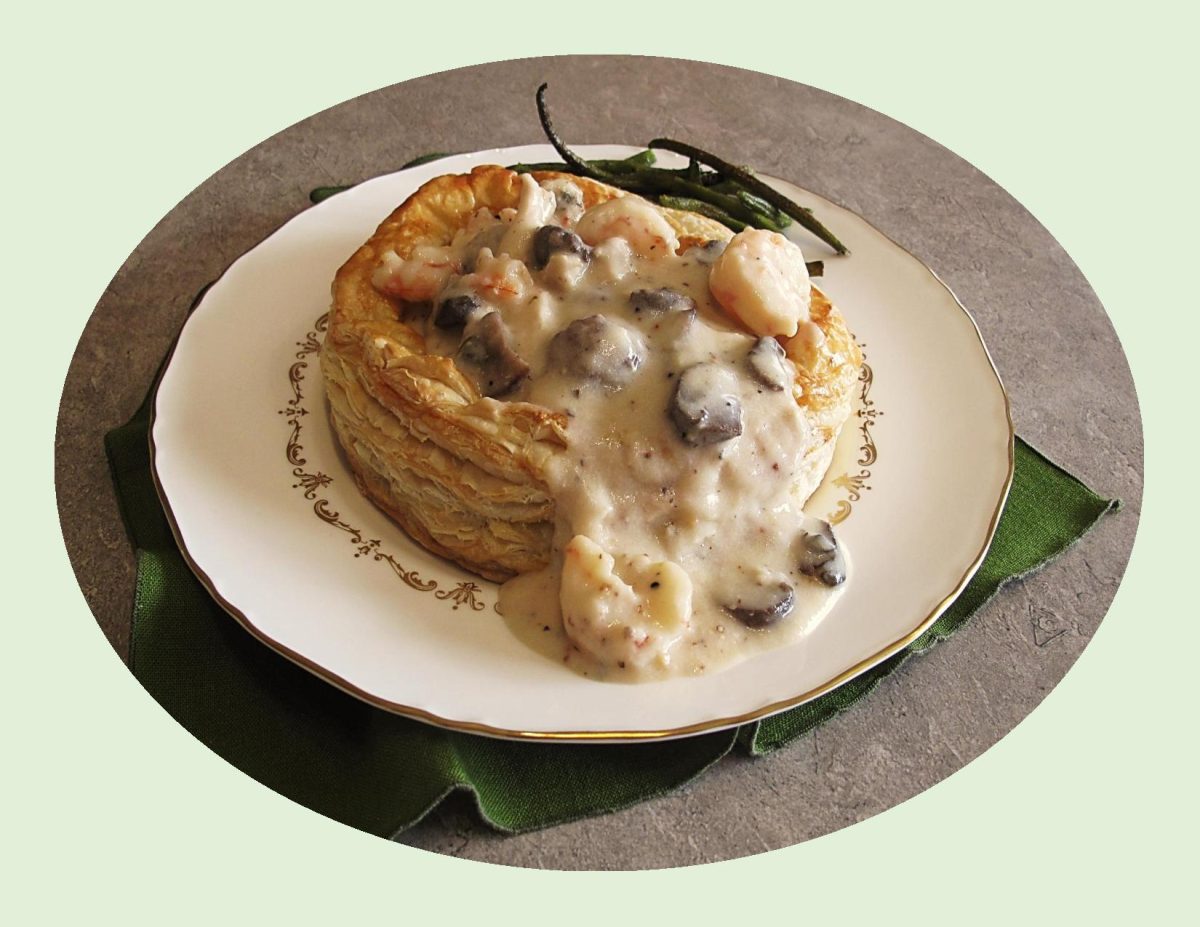
For our main course vol-au-vents, I am making an interesting filling which includes, chicken, shrimp, mushrooms and tiny meatballs. Sounds a little odd but is packed with flavor.

Print Recipe
Chicken, Veal & Shrimp Pastetli (Vol-Au-Vent)
Votes: 1
Rating: 5
You:
Rate this recipe!
Servings
Votes: 1
Rating: 5
You:
Rate this recipe!
Instructions
Chicken/Broth
  1. Add the rosemary, garlic, bay leaves, cloves, chopped celery, carrot and onion to a stock pot. Season generously with pepper and salt. Cut the chicken up: legs, wings and breasts. Also chop up the remaining carcass. Add it all to the pot. Then fill it with water (about 7 cups) until the chicken is fully submerged.
  2. Place the pot over high heat until boiling, then leave it there for 10 minutes. Turn the heat lower and gently cook the chicken for about 30 minutes. Remove the chicken from the heat and let it cool down for another 45 minutes.
Mushrooms/ Shrimp/ Cheese
  1. Chop the mushrooms into bite-size pieces. Peel & devein shrimp. Grate parmesan cheese.
Puff Pastry Shells
  1. Preheat oven to 375 F.
  2. Cut (4) 5-inch circles from puff pastry. Beat the egg & prick holes in the large circles with a fork & brush with egg. Cut 12 more RINGS from pastry about an inch wide. Lay a ring on each of the 4 circles & brush with egg wash. Repeat this until there are 3 rings on each large circle. Bake the puff pastry shells for 25 minutes.
Finish the Broth
  1. Remove the cooked chicken from the hot stock. Reserve stock for later. Remove any chicken skin, bones, veins, cartilage, or sinew (discard all this) & pick the cooked meat from the bones. Shred the larger bits up roughly. Then transfer the chicken meat to a large saucepan.
  2. Strain the chicken stock in a fine sieve or colander over a large pan. You should end up with about 6 cups (1,4 l) of chicken stock. Discard the cooked vegetables.
Meatballs
  1. In a bowl, combine ground veal (pork), salt & pepper, egg & breadcrumbs. Mix well and make tiny balls of ½ oz (15 g) each. You should end up with about 20 of them. Cover the meatballs with cling film and store them in the fridge until later.
  2. Bring the stock to a gentle boil again. Once warm, add the meatballs, shrimp & mushrooms. Poach them for about 5 minutes. Then remove the meatballs, shrimp & mushrooms using a slotted spoon. Add them to the shredded chicken in the large saucepan.
Béchamel Sauce
  1. Take the chicken stock off the heat now. In a large saucepan melt the butter over medium heat. Add the flour and whisk well until you get a wet crumble. Gently cook this over medium-low heat for about a minute. Then gradually add splashes of the warm chicken stock until you get a sticky flour paste. Keep stirring. Don't add too much at once or the sauce will become lumpy.
  2. Whisk well. Gradually add more chicken stock (about 3 to 4 cups) until you get a pretty runny sauce. Bring the sauce to a low simmer & cook for 3-4 minutes or until thickened. whisk in Montreal Steak Spice, onion salt, garlic powder, mustard & grated parmesan.
  3. Add the béchamel sauce to the chicken, meatballs, shrimp & mushrooms. Stir carefully. Cover the pan for another 5 minutes and let the vol au vent filling warm through or place it back over very low heat.
  4. Put the vol au vent puff pastry casings onto 4 serving plates. Top with the chicken, meatball, shrimp & mushroom filling. Garnish with chopped fresh parsley if desired. Serve the vol au vents hot.