Summer Chicken/Veg Hand Pies w/ Herbed Crust

July is such a wonderful month. The weather’s warm, there’s still plenty of summer left, and the produce is literally amazing.

Midsummer means the farmer’s markets are brimming with great fruit & veggies. With such a colorful bounty of goods, we can settle into our summer cooking routines with tasty meals hot or cold.

But, even in summer, we sometimes crave ‘comfort food’ such as a savory hand pie. The humble hand pie goes by many different names: call it a pasty, a turnover, an empanada, or whatever you like, who doesn’t love a little portable personal-sized savory pie?

These hand pies, with their tender, flaky, herbed crust perfectly envelop the creamy chicken and summer veggies. A flavorful meal that can be served as the main course for a warm-weather picnic or for a hand-held, backyard meal with the addition of a nice fresh salad at home.

Print Recipe
Summer Chicken/Veg Hand Pies w/ Herbed Crust
Instructions
Herbed Crust
  1. Add the flour, sugar, basil, oregano & salt to a food processor; pulse just until combined. In a small bowl, whisk mix together the egg, vinegar & water. Add the cold butter pieces into the food processor; pulse until small coarse crumbs remain. Sprinkle the water/egg mixture over the flour & pulse again until the dough comes together.
  2. Remove the dough with your hands & wrap it in plastic wrap. Refrigerate the dough for 30 minutes. Prepare filling during this time.
Filling
  1. Heat a Dutch oven or pot over medium high heat; add the olive oil & butter. Season the chicken with the salt & pepper then add it to the pot. Cook until the chicken is golden & browned, then remove it with a spoon & place it in a bowl.
  2. Add the 3 tablespoons of butter to the pot with the onion. Sprinkle in a bit more salt & pepper. Stir, then cook the onions until slightly soft, about 4 - 5 minutes. Add the potatoes & stir, cooking for another 5 minutes; stirring often. Sprinkle the flour over the onions & potatoes; stir gently to create somewhat of a roux with the vegetables. Cook for 2 - 3 minutes while stirring occasionally.
  3. Slowly stream the chicken stock into the pot while stirring – it will thicken. Stir in the squash, green beans, corn and chicken. Stir in the cream. Taste the mixture and season with salt & pepper if needed.
  4. Preheat the oven to 375 F.
  5. Remove pastry from refrigerator & place on a baking sheet or board. Invert a 5-inch bowl over top to create your outline of each hand pie. Press down to cut out.
  6. Line a baking sheet with parchment paper. Place rounds of pastry on the parchment & brush around the outer edge of each pastry circle.
  7. Distribute the filling in the center of each pastry circle (don't fill to the edge; leave some space). You want enough filling in there, but not too much that you can't close/seal over.
  8. Fold over each pastry circle (so each is a half-moon shape), pressing the outer edges with a fork to seal. You can gently press over top (with your hand) to spread out the filling inside.
  9. Brush the hand pies with some of the remaining egg wash. Cut 3 slits in top of each pastry circle. Place them in the fridge for about 10 minutes so the pastry gets a little cold again.
  10. Bake for 22 to 24 minutes or until they're golden brown and crispy on the outside & heated through. Allow to cool a few minutes before serving. Nothing says they can't be served with a little gravy (if desired)!
Recipe Notes
  • You may get anywhere from 6-8 hand pies depending how thick your dough is rolled.

Omelet w/ Veggies, Bacon & Cheddar

I had no idea when I completed my studies in the commercial food industry that there would be some food items, I would make so many times. One such item was an omelet. 

In the early years of my career, my first position was a short order chef. It all sounded pretty easy until it came to the weekends. On Sunday morning alone, you could use anywhere from 90-120 DOZEN eggs. A large percentage of them were made into omelets with various fillings. All this would be made and served in the course of 4-5 hours as individual breakfasts in the hotel restaurant. That job definitely taught you the perseverance you would need to survive in the industry. 

Omelets have a long history dating back to 16th century France. Most are made with just simple egg and dairy ingredients. The fluffiest omelets use whole eggs or all egg whites, which are beaten with a small measure of cream, milk or water. I even recall adding just a tiny bit of pancake batter to give them more body.

Legend has it that when Napoleon and his army were travelling through the south of France, they spent one night near Bessieres. Napoleon ate an omelet prepared by a local cook and enjoyed it so much that he ordered the townspeople to gather all the eggs in the village and prepare a gigantic omelet for his army the next day.  Since 1973, every year on the Monday following Easter, people in Bessieres, France make a giant omelet, using 15,000 fresh eggs.

I have added some pictures of this huge omelet as well as one of a cook dumping eggshells in a pile.

The recipe I am including has everything it takes to make a great flavored omelet.

Print Recipe
Omelet w/ Veggies, Bacon & Cheddar
Votes: 1
Rating: 5
You:
Rate this recipe!
Servings
Votes: 1
Rating: 5
You:
Rate this recipe!
Instructions
  1. On a large griddle, place frozen hashbrowns & spray with cooking spray. Cover with a lid & cook until golden then flip over & fry a little longer. Remove from griddle & set aside.
  2. Place bacon on griddle & cook until crispy. Set on paper towels to drain the grease then chop into crumbles. Set aside.
  3. Place the onions & mushrooms on the griddle in the bacon drippings & cook on medium-high for 10 minutes or until the mushrooms are golden brown & the onion is tender. Remove from pan & set aside.
  4. Using an 8-inch baking dish turned upside down, form 2 'foil pans' with aluminum paper. Spray the inside of each one with cooking spray.
  5. In a bowl, whisk eggs, cornstarch & milk until well blended; season with sea salt & pepper, to taste. Set 'foil pans' on the medium-high heated griddle. Divide the egg mixture into each of the 'foil pans', swirling so the pan is evenly coated with the egg.
  6. Once the egg is starting to set, sprinkle a small amount of cheese on top of each egg mixture then divide the hashbrowns & refried beans & spoon over each omelet. Next, top each omelet with half of the onion/mushroom mixture & a sprinkle of green onions & a bit more cheese.
  7. 'Cover' The griddle with a large baking sheet to help 'steam' the omelets. This will only take a few minutes. Remove each 'foil pan' & place the omelets on serving plates. Roll into customary omelet shape if preferred.
  8. Top each with remaining cheese & green onion if preferred. Serve immediately.
Recipe Notes
  • Omelet is the standard spelling in American English.  The British spelling, omelette, is actually the modern French spelling. 

Retro Porcupine Meatballs

Porcupine meatballs are an North American casserole dish of ground beef and rice meatballs cooked in tomato sauce. This recipe, that appealed to cooks in the 1930s, appears to have been developed during World War I when rice was affordable and readily available, but meat was pricey. The recipe appeared as ‘rice meat balls’ in the 1918 cookbook ‘Conservation Recipes’, a clear forerunner of the recipe from the Better Homes and Gardens Cookbook (1939). The name comes from the appearance of the meatballs, which appear prickly when the rice pokes out of them as they cook, resembling a porcupine.

Meat, even something as mundane as ground beef, was expensive and home cooks used innovation and imaginative ways to make a small amount of protein stretch to feed a large and hungry family. Porcupine meatballs were one of the answers to the problem.  It’s great that generations later we are still enjoying them!

Of course, this simple recipe is very customizable. Other ingredients could be added to the meatballs like green pepper, mustard, celery, horseradish, Worcestershire sauce, ketchup, or other seasonings. The simple tomato sauce made with canned soup could be enriched with molasses and seasoned with chili powder and cumin. A later recipe from 1969 for ‘porcupine meatballs paprika’ replaces tomato soup with cream of mushroom, and adds other ingredients like mustard, or sour cream and paprika. ‘Porcupine meatballs Chinois’ was a variation influenced by Chinese cooking techniques and ingredients. Served with peach sauce, the Chinois meatballs are made with ground pork, shrimp, rice and green onion, seasoned with soy sauce and sherry, and steamed instead of being cooked in sauce.

Ground turkey can also be substituted for the ground beef, just add 1/4 cup oatmeal to the mix to compensate for the extra moisture in the turkey.

I recall my mother making these meatballs numerous times when I was growing up. They tasted great then and still do today. I decided to make some with the tomato sauce and some with mushroom sauce since Brion was not familiar with this meal. I think he will enjoy them.

Print Recipe
Retro Porcupine Meatballs
Votes: 1
Rating: 5
You:
Rate this recipe!
Servings
SERVINGS
Ingredients
Meatballs
Alternative Brown Mushroom Sauce
Servings
SERVINGS
Ingredients
Meatballs
Alternative Brown Mushroom Sauce
Votes: 1
Rating: 5
You:
Rate this recipe!
Instructions
Meatballs/Sauce
  1. Preheat oven to 350 F.
  2. In a medium bowl, lightly mix together all meatball ingredients. Form mixture into 12 meatballs & place in an 11 x 7-inch baking dish.
  3. In a small bowl, whisk together sauce ingredients; pour over meatballs. Cover & bake 1 1/4 hours or until rice is tender.
  4. These meatballs are nice served over rice, egg noodles, mashed or baked potatoes. Simple but tasty!
Alternative Tomato Sauce
  1. In a saucepan, heat oil over medium heat. Sauté onion until tender crisp. Add crushed tomatoes & simmer for about 5 minutes. Add seasoning to taste & sour cream; combine then whisk in chicken broth. Pour over meatballs & bake.
Alternative Brown Mushroom Sauce
  1. In a skillet, heat oil & sauté onion & mushrooms. Add beef base, pepper, garlic powder & 2 cups of the water. Bring to a boil. Combine cornstarch with remaining 1/2 cup water. Gradually add cornstarch mixture to pan & stir as you are pouring. Cook, stirring often, until thoroughly mixed. Pour over meatballs & bake.
Recipe Notes
  • The advertisement picture on the blog was from life magazine in 1948.

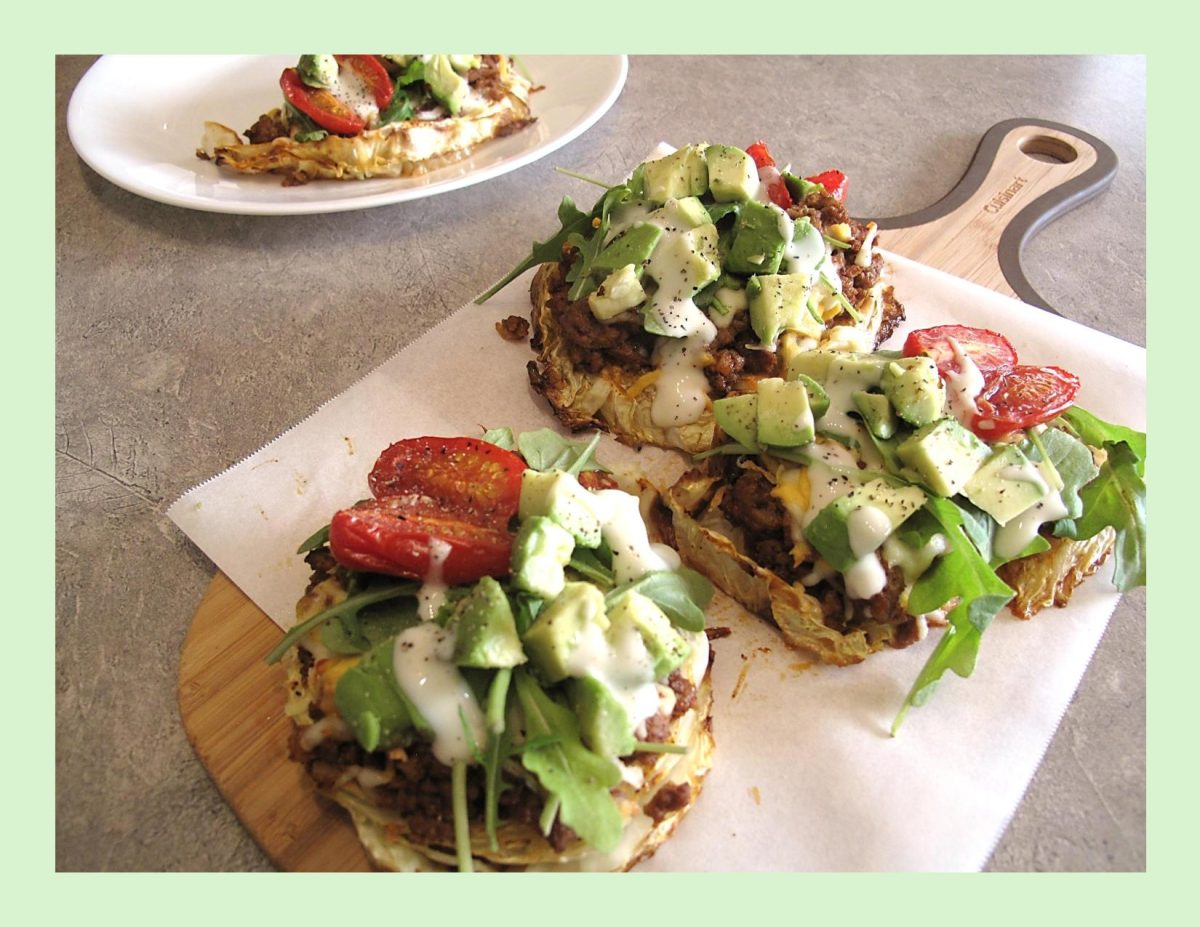
Loaded Taco Cabbage Steaks

The concept of ‘loaded cabbage steaks’ is an interesting twist on traditional cabbage dishes and are a tasty alternative to traditional tacos.

Sometimes it’s hard to get excited about cabbage but I think this recipe will change your mind a little bit. Roasting the cabbage provides a subtly sweet flavor. Cabbage is very affordable, mildly flavored and easy to prepare. This recipe involves roasting thick slices of green cabbage with olive oil, salt, and taco seasonings. You can top them with either ground meat or black beans, shredded cheese, diced avocado, sliced cherry tomatoes, and chopped cilantro. Lime crema adds a zesty finish. 

It’s time to elevate cabbage from a humble vegetable side dish to the main attraction with these loaded cabbage steaks!

Print Recipe
Loaded Taco Cabbage Steaks
Votes: 1
Rating: 5
You:
Rate this recipe!
Course Main Dish
Cuisine American
Servings
Ingredients
Cabbage Steaks
Ground Meat
Lime Crema
Course Main Dish
Cuisine American
Servings
Ingredients
Cabbage Steaks
Ground Meat
Lime Crema
Votes: 1
Rating: 5
You:
Rate this recipe!
Instructions
Taco Seasoning
  1. In a small dish, combine all ingredients & mix well.
Lime Crema
  1. Whisk together the ingredients using milk to thin out the sauce to your desired consistency. Set aside.
Cabbage Steaks
  1. Preheat oven to 425 F. Line a large rimmed baking sheet with parchment paper.
  2. Keep your cabbage core INTACT, slice your cabbage in half first then into thick slices – ending up with 6-7 slices. Place them on your baking tray & brush both sides of each slice with olive oil. Season with 1/2 of the prepared 'taco seasoning' Roast for 30-35 minutes or until golden.
Ground Meat or Beans
  1. In a large skillet, heat the oil & sauté onion for 2 minutes. Add in the ground meat, using a wooden spoon break everything up until no longer pink & cooked through. Season with remaining taco seasoning. Divide the meat between the roasted cabbage slices then top with the cheese & pop back into the oven until melted – about 5 minutes.
  2. If you're using the beans, simply top the cooked cabbage steaks equally with some beans, covering the cabbage & then top with the shredded cheese. Pop back into the oven until the cheese has melted – 5 minutes.
  3. Remove cabbage steaks from oven & top with tomatoes, avocado & arugula. Drizzle with lime crema & serve hot.

Classic Reuben Sandwich on Swirl Bread

HAPPY LABOUR DAY!

Once again, the last long week-end of summer has arrived. Here in Canada, families with school age children, take it as the last chance to travel before the end of summer. Others enjoy the company of family and friends at barbecues, picnics, fairs, festivals and fireworks displays. Canadian football fans may spend a large portion of their week-end watching the Labour Day Classic matches live on television. Whatever your choice of relaxation is, you know good food will be a part of the holiday.

For some reason, the classic Reuben sandwich came into my thoughts for a tasty choice. If you’re barbecuing, it can be wrapped in foil and heated on the grill. If a picnic is your preference, add a nice potato salad and of course, a beer. Perfect, easy and delicious!

I can’t quite remember when my love for sandwiches began. I have memories of my brother and I having cold, leftover mashed potato sandwiches with my mother’s homemade bread after school.

The Reuben sandwich turns 104 this year. Its origin has definitely be contested, but it is universally acknowledged as an American invention. It brings together Irish corned beef, Jewish rye bread, German sauerkraut, Swiss cheese and Russian dressing to create the perfect balance of interesting flavors and textures.


Print Recipe


Classic Reuben Sandwich on Swirl Bread

Votes: 6
Rating: 3.5
You:
Rate this recipe!

Servings


Ingredients
Ingredients for 4 Reuben sandwiches

Sauerkraut

Servings


Ingredients
Ingredients for 4 Reuben sandwiches

Sauerkraut

Votes: 6
Rating: 3.5
You:
Rate this recipe!


Instructions
Sauerkraut
  1. In a colander, rinse & drain sauerkraut. In a large skillet, melt butter; stir in caraway seeds, salt & pepper. Add diced onion & saute for 3 minutes; add sauerkraut & combine well. Continue to saute, stirring frequently for 6 minutes; remove from heat & set aside.

Assembly
  1. Butter one side each of 8 slices of bread. Divide shredded cheese, corned beef & sauerkraut between 4 of the slices (on the unbuttered side) Top with remaining 4 slices. Heat an electric griddle to 350 F. Transfer sandwiches to griddle & grill until cheese is melted. Remove from griddle on to serving plates; lift top slice of bread from each sandwich & drizzle with Russian dressing. Close Reuben & slice. Serve with pickles & potato fries or chips.


Recipe Notes
  • Thousand Island & Russian dressings are similar. If you want to make your own Russian dressing just add 1/2 cup chili sauce to 3/4 cup Thousand Island dressing for a simple fix.

Mango Chutney Country Style Ribs

If you are not accustomed to using chutneys it is well worth revisiting the idea. Chutney is similar to salsa or a sweet ‘relish’. The perfect balance of sweet, sour and spicy are critical elements for most chutneys. The sweetness coming from fresh or dried fruits, the sour element from vinegar, lemon or lime and the spiciness from a variety of whole spices. 

There is no right or wrong recipe, just a preferred flavor or two. They can be cooked or fresh and are made from a wide variety of ingredient combinations of fruits and/ or vegetables and spices. Ground spices tend to make chutney cloudy so it is best to use whole ones.

In the majority of chutney recipes one ingredient tends to dominate the flavor. The sweet and sour ones work well with beef, pork and chicken, whereas sweeter versions are great on cheese and crackers, bagels and toast.

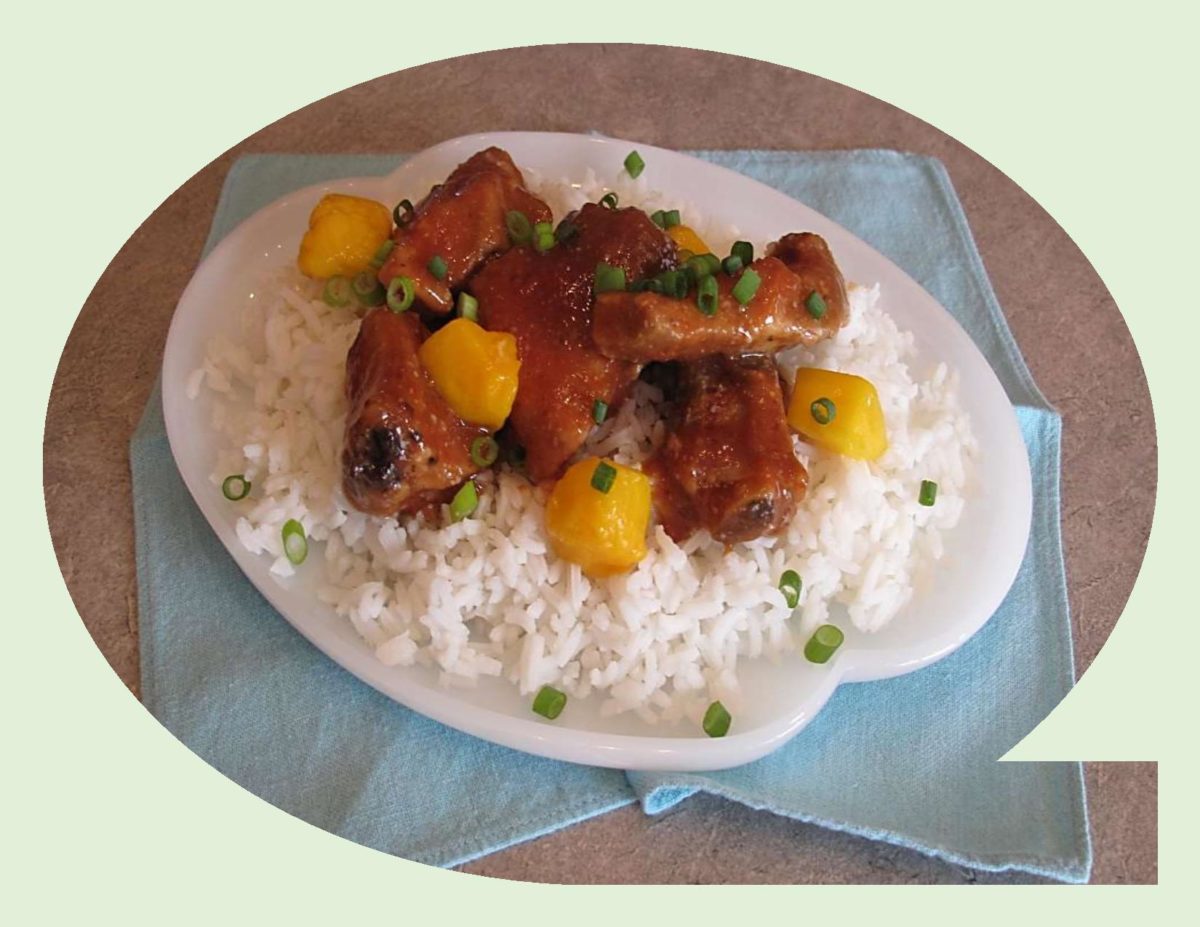
I have made numerous chutneys over the years. Some were served with warm Brie cheese but very often I’ve used mango chutney when cooking pork. This particular recipe can be made with either purchased chutney or just make a recipe of your own. It creates a unique flavor along with nice tender ribs.

Print Recipe
Mango Chutney Country Style Ribs
Votes: 1
Rating: 5
You:
Rate this recipe!
Servings
Votes: 1
Rating: 5
You:
Rate this recipe!
Instructions
Mango Chutney
  1. In a saucepan, combine honey & vinegar, Bring to a boil & simmer until honey dissolves. Add remaining ingredients & simmer, uncovered until mixture becomes slightly thickened. Pour into a glass dish & set aside until needed. Refrigerate any remaining chutney that you don't use in making ribs.
Ribs / Sauce
  1. In a saucepan, Brown ribs & set aside on a paper towel-lined plate. Add all 'sauce' ingredients to saucepan except for the 1 fresh mango. Bring to a boil, cooking for about 15 minutes, gently mashing tomatoes with a fork, until sauce is reduced to about 1 1/4 cups.
  2. Preheat oven to 300 F. Place ribs in a baking dish; pour sauce over ribs, cover & bake for about 1-1 1/2 hours until ribs are very tender. Serve with sauce & top with remaining diced fresh mango.