Bedfordshire Clangers w/ Variations

July is such a wonderful month. The weather’s warm, there’s still plenty of summer left, and the produce is literally amazing.

Midsummer means the farmer’s markets are brimming with great fruit & veggies. With such a colorful bounty of goods, we can settle into our summer cooking routines with tasty meals hot or cold.

But, even in summer, we sometimes crave ‘comfort food’ such as a ‘hand pie’. The humble hand pie goes by many different names: call it a pasty, a turnover, an empanada, or a ‘Bedfordshire clanger’….

A Bedfordshire Clanger dates back to at least the 19th century. It was typically made for agricultural workers to take with them to work as their lunch. The original pastry was made from suet and cooked by a boiling method. There is a theory that the pastry crust was not originally intended for consumption but as a vessel in which to protect the filling from the soiled hands of the workers.

The clanger originated from the county of Bedfordshire, a small, low-lying and predominantly agricultural county nestled in the east of England and adjacent counties, including Buckinghamshire and Hertfordshire. 

The name is as intriguing as the food itself. The word clanger, it had been suggested, referred to the mistake of mixing sweet and savory fillings. But a more likely explanation was that in nearby Northamptonshire dialect, ‘clang’ means to eat voraciously.

Knowing their husbands would need lots of protein and carbohydrate sustenance, homemakers came up with the brilliant idea of a doubled, loaf-shaped pie. One end contained a savory filling that used the famed pork of the area while the other end was filled with stewed apples (made from local apples) as dessert. So, the two fillings didn’t combine, there was a ‘pastry wall’ in between blocking any flavors from mixing. A ‘secret code’ denoted which end was meat, and which was dessert: two knife slits on one end of the pastry top means meat, three small holes on the other shows the sweet. This was brilliant, an entire meal for the field workers – handheld, portable and delicious.

The version we have today is not its beginnings but its evolution. Once you’ve nailed this basic Bedfordshire clanger recipe you can experiment with all sorts of flavor combos, there’s really no limit to what you can combine in this savory/sweet pastry.

Since Brion takes lunch to work, I became intrigued with the idea and decided to get creative with the fillings. That way I could make a variety and freeze them and use as needed. These tasty little ‘clangers’ can be served as the main course for a warm-weather picnic or for a hand-held, backyard meal with the addition of a nice fresh salad at home.

Print Recipe
Bedfordshire Clangers w/ Variations
Votes: 1
Rating: 5
You:
Rate this recipe!
Servings
Ingredients
Chicken w/ Caramelized Onions
Raspberry / Nectarine Filling
Blueberry Filling
Apple / Apricot Filling
Plum / Rhubarb Filling
Rhubarb / Apple Filling
Servings
Ingredients
Chicken w/ Caramelized Onions
Raspberry / Nectarine Filling
Blueberry Filling
Apple / Apricot Filling
Plum / Rhubarb Filling
Rhubarb / Apple Filling
Votes: 1
Rating: 5
You:
Rate this recipe!
Instructions
Pastry
  1. In a medium bowl, whisk together the flour, sage & salt. Sprinkle the butter cubes over the flour mixture & use your fingers to work them in. Alternately you could use a pastry cutter to do this.
  2. When the mixture resembles cornmeal with pea-sized bits of butter remaining, stir in cheese with a fork until evenly distributed. Sprinkle 6 Tbsp ice water over mixture & stir with a fork until dough begins to come together. If needed, add an additional Tbsp or two of ice water.
  3. Turn the dough out onto a lightly floured surface & knead for about three times. Gather the dough into a disk & wrap in plastic wrap. refrigerate for at least 30 minutes or overnight.
Pork Filling
  1. Bake potato in microwave, peel & cut into small cubes. Set aside.
  2. Heat oil in a skillet & sauté celery, onion, garlic & bacon together on medium heat until veggies are soft & bacon is cooked. Add ground pork, breaking it up well. Stir in dried herbs & spices. Cover & simmer for about 10 minutes. Remove from heat & stir in cooked potato & cheese. Set aside to cool.
Spiced Meat Combo
  1. In a saucepan, sauté onion & garlic. Add ground meat, basil, thyme, cardamom & salt & pepper. Scramble fry until cooked, remove from heat & add parmesan & potato. Place in a dish.
  2. In the saucepan, melt butter; add flour to make a roux. Cook, stirring constantly for 2-3 minutes. Slowly add beef broth, stirring until sauce thickens. Season to taste. Add to ground meat mixture & combine to form filling. Set aside until ready to use.
Turkey Filling
  1. In a skillet, cook bacon until just crisp, then remove to a paper towel lined plate to drain; chop when cooled. Remove all but 1 Tbsp of the bacon drippings from skillet.
  2. Add butter to the skillet, sauté onions, garlic & mushrooms with herbs & spices, scraping up any brown bits, until the onions have softened & mushrooms have lost most of their size & moisture. Stir in the bacon & shredded cooked turkey, taste for seasoning. Cook for another minute or two, then remove from heat & set aside.
  3. In a saucepan, combine Boursin, milk & spices (if using). Stir until Boursin has melted. Remove from heat. Add to turkey/veg mixture.
Chicken w/ Caramelized Onions
  1. Heat butter over medium low heat in a heavy ovenproof skillet. Add the onions cook for 20 minutes or so, stirring occasionally. When the onions are a deep golden color, remove them from the pan and set aside.
  2. Preheat oven to 350 F.
  3. Combine the flour, salt, chili powder, thyme, allspice, & black pepper. Dredge each piece of chicken in the flour mixture, shaking off the excess. In the same pan as the onions, heat the oil over medium high heat. Add each piece of chicken & fry for a few minutes until golden brown; flip & cook for a few more minutes. Transfer to a plate (it will not be fully cooked at this point, just browned – it will finish cooking in the oven).
  4. Turn the heat down & let the oil cool off a little bit. Make a roux with excess oil in skillet & dredging flour. Add chicken broth & cook until a sauce forms. Add the onions & chicken to the pan. Bake for about 20 minutes longer. When chicken/onion mixture is cooked, remove from oven. Allow to cool until ready to use.
Raspberry/Rhubarb Filling
  1. In a small saucepan, whisk together sugar, cornstarch, cardamom & salt. Add water & stir then add chopped nectarines. Simmer until nectarine is slightly soft & liquid is thickened. Remove from heat & carefully fold in raspberries. Set aside to cool.
Blueberry Filling
  1. In a small saucepan, combine all ingredients except blueberries. Cook until sauce starts to thicken then gently fold in blueberries & cook a couple of minutes more. Remove from heat & set aside to cool.
Apple/Apricot Filling
  1. Peel & dice apples. Drain canned apricot juice into a small saucepan. Add sugar, cornstarch, cinnamon & salt & combine. Add apples & cook until apples are tender. Cut canned apricot halves into quarters. When apples are cooked & sauce has thickened, remove from heat & add apricots. Gently combine & set aside to cool.
Plum/Rhubarb Filling
  1. In a small saucepan, combine sugar, cornstarch, salt & lemon zest. Add rhubarb & plums. Gently stir over a low heat. When enough juice has formed, allow to simmer until rhubarb is soft & juice has thickened. Remove from heat. Set aside to cool.
Sour Cherry Filling
  1. In a small saucepan, place sugar, cornstarch & salt. Add juice/water mixture & stir to thoroughly combine. Bring to a boil over medium-high heat, stirring frequently. Simmer until thickened, about 2 minutes. Immediately remove from heat. Gradually fold in cherries. Set aside to cool.
Rhubarb/Apple Filling
  1. In a small saucepan, add the rhubarb, apples, salt & sugar. Add a drizzle of water if necessary & heat on medium. The rhubarb will begin to release liquid & break down as the apples soften. Heat the mixture until the moisture has evaporated & begins to thicken. Once the mixture is thickened, add the lemon juice, lemon zest and cinnamon. Place it in a bowl & allow to cool.
Apple/Pear Filling
  1. Heat butter in a small skillet until melted, add apples & pears & cook until fruit begins to soften, about 5 minutes. Sprinkle sugar over mixture & continue to cook stirring often until fruit begins to lose its juices. Mix together cornstarch & lemon juice & add to pan. Simmer until mixture has thickened, about 4 minutes. Remove from heat & allow to cool.
Assembly/Baking
  1. Divide pastry into 5 equal pieces. On a lightly floured surface (or dry wax paper) roll out each piece of pastry into 14 x 7 1/2-inches. The excess trimmed from the sides will be used for little pastry ‘walls’ dividing the sweet & savory fillings. Roll excess pastry into a 3-inch length.
  2. Cut each piece of pastry in half horizontally so you have (2) 7-inch long pieces from each piece of pastry. From the top of each piece, LIGHTLY make a line across your pastry 4-inches from the outside edge. This will help to place your fillings properly.
  3. On the 3-inch wide section, place savory filling to cover 2/3 of the area. Place one of the rolled strips after that then place sweet filling on the remaining 1/3 to complete the 'clanger'. The little rolled piece of pastry divides the savory & sweet filling.
  4. On the sweet side make 3 holes for vents & on the savory side make 2 slashes. This is the 'code' to let the person eating the clanger which was savory or sweet.
  5. Preheat oven to 350 F.
  6. Brush the edges of each pastry with egg wash. Lift the pastry from the opposite side over the fillings & seal the edges with a fork.
  7. Brush clangers with remaining egg wash & bake for about 30-35 minutes or until golden.
Recipe Notes
  • Due to the length of this recipe, I found making the savory & fruit fillings on one day & the pastry, assembling & baking the next, worked out well for me. Although these pastries are VERY time consuming, believe me, the are well worth it in the end, especially if your freezing some to use later. I baked them all & then wrapped them well before freezing.
  • You will probably find there will be enough savory & sweet fillings left over to make about 10 more clangers.
  • All of them will freeze well which will be a time saver for your next batch. Just make a recipe of pastry & your ready to assemble & bake.
  • If your not interested in freezing the 'leftovers', the fruit combined will make a wonderful crisp & the savory fillings can be used in quiche or casseroles.

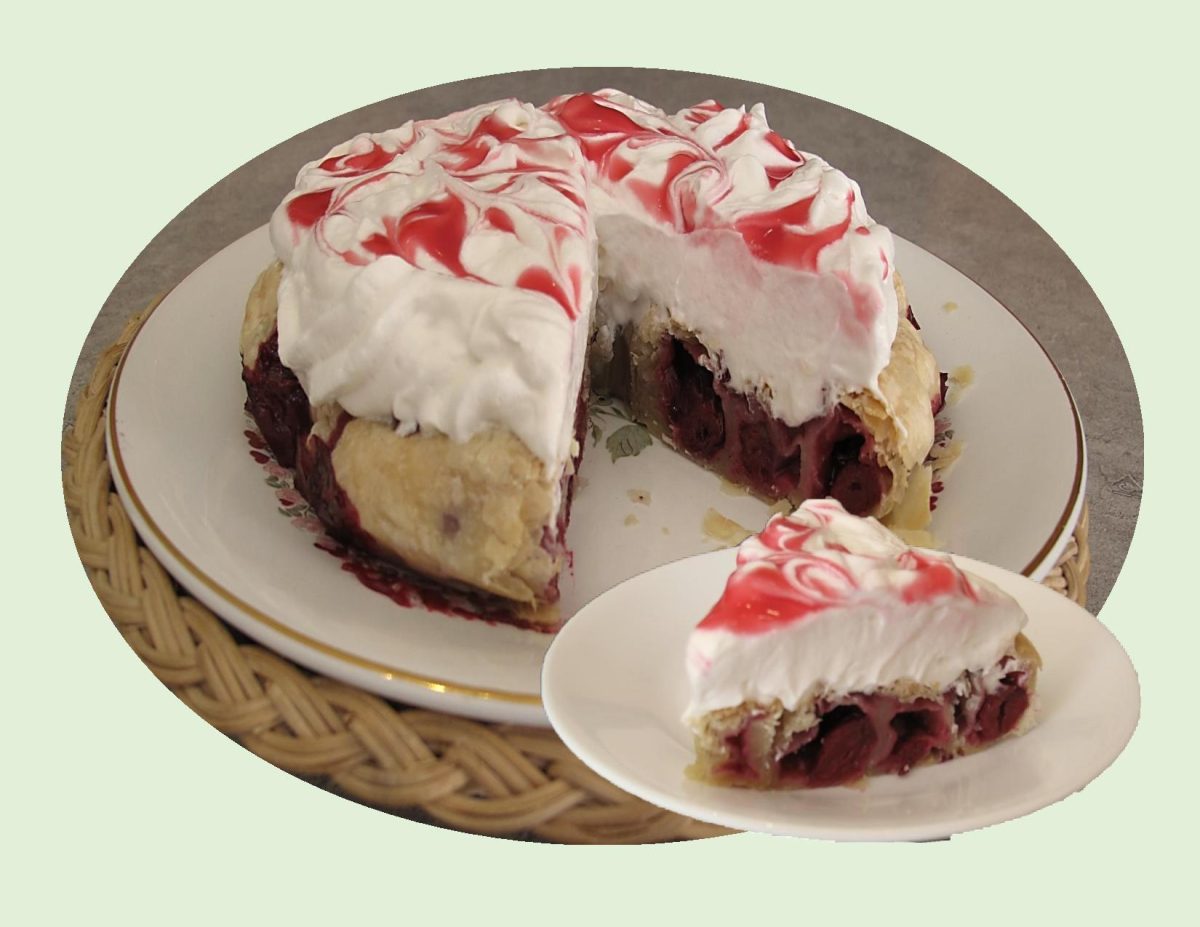
Cherry Puff Cake

Because sometimes, less really is more. Dessert recipes can range from multi-component, complex creations to something as low-key as fresh berries with a mound of whipped cream.

It’s been said, ‘stressed spelled backwards is just desserts’. Let’s just say that you’re having a party and need to whip up some desserts by tonight. You could either become stressed over it, or you could make an easy, minimal ingredient dessert so that you don’t show up to the party empty handed.

This recipe is proof that you don’t need a pantry full of exotic ingredients to satisfy your sweet tooth because sometimes the simplest things are the most delicious. 

Print Recipe
Cherry Puff Cake
Votes: 1
Rating: 5
You:
Rate this recipe!
Course dessert
Cuisine American
Servings
Course dessert
Cuisine American
Servings
Votes: 1
Rating: 5
You:
Rate this recipe!
Instructions
Filling
  1. In a small saucepan, combine sugar, cornstarch & salt. Add juice/water mixture & stir to combine.
  2. Bring to a boil over medium-high heat, stirring frequently. Simmer until thickened, about 2 minutes them immediately remove from heat.
  3. Gradually fold in the cherries. cool to room temperature, stirring occasionally.
Assembly /Baking
  1. Roll out puff pastry & slice into (4) 3-inch wide strips.
  2. Using a slotted spoon, remove cherries from sauce. Place cherries tightly next to each other in a line down the center of each pastry strip. Pinch the edges together to seal the cherries inside.
  3. Preheat oven to 375 F.
  4. Line an 8-inch pie pan with parchment paper. Wind the pieces of dough around one another, spiraling until you have a circular cake.
  5. Bake 'cake' for about 25 minutes or until cake is golden brown. Remove cake from baking pan to cool on a wire rack.
Serving
  1. Whip package of whip topping as directed on package. When cake has cooled, swirl topping over it then drizzle with cherry sauce. Slice & serve.

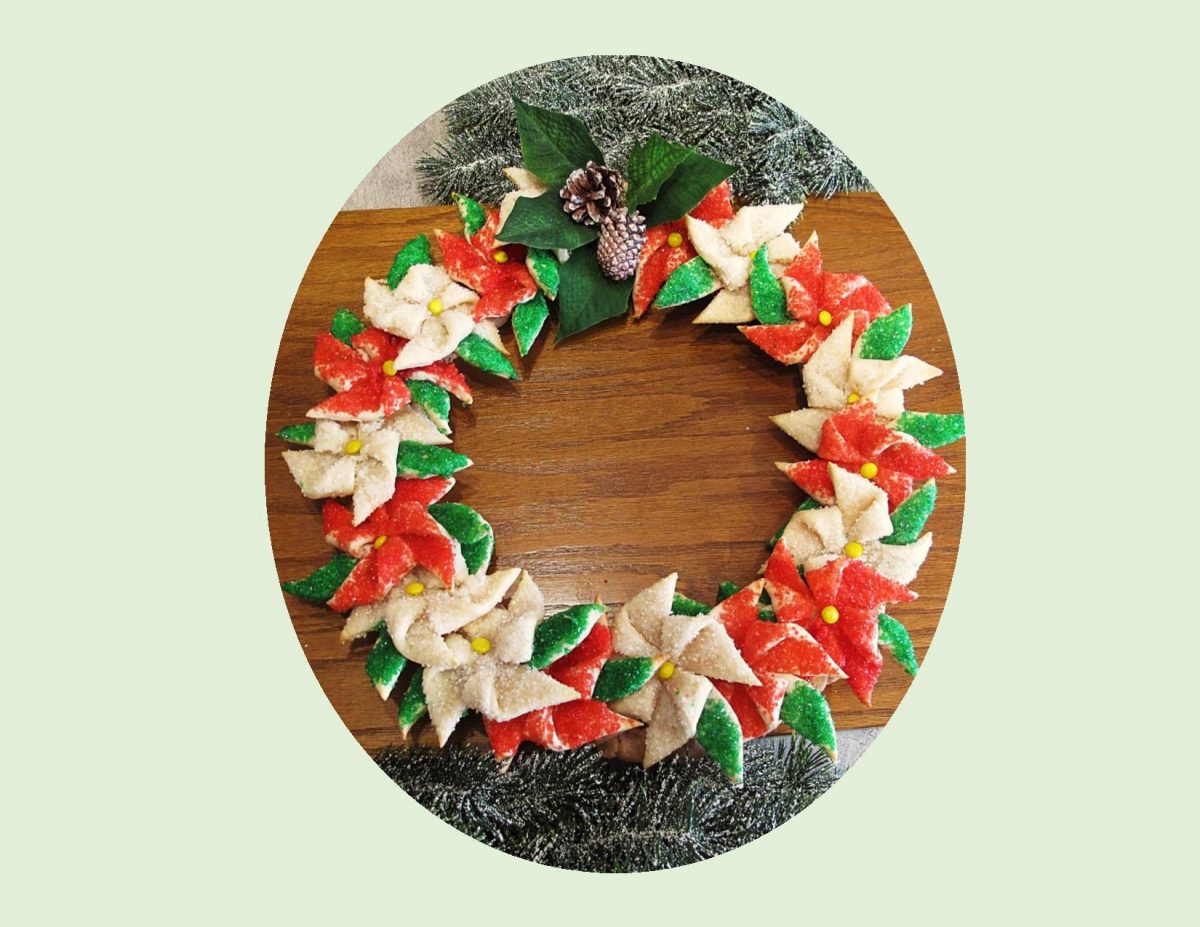
Poinsettia Cookie Wreath

There are certain plants that play important and often mysterious roles in holiday traditions and celebrations all over the world. From the Egyptians who decorated trees during the winter solstice, to the Pagans and Druids who used mistletoe in their winter customs, stories of ritualized plant use span continents and history and have become infused into the mythologies that span generations. I’ve always wondered how poinsettias and Christmas became intertwined. After a bit of research this is what I found.

It seems the story behind poinsettias is rich in history and lore. The vibrant plants are native to the rocky canyons of Guatemala and Mexico. Poinsettias were cultivated by the Mayans and Aztecs, who valued the red bracts as a colorful, reddish-purple fabric dye, and the sap for its many medicinal qualities.  The poinsettia was first associated with Christmas in southern Mexico in the 1600s, when Franciscan priests used the colorful leaves and bracts to adorn extravagant nativity scenes.

There is an old Mexican legend about how Poinsettias and Christmas come together, it goes like this:

There was once a poor Mexican girl called Pepita who had no present to give the baby Jesus at the Christmas Eve services. As Pepita walked to the chapel, sadly, her cousin Pedro tried to cheer her up.
‘Pepita’, he said, ‘I’m sure that even the smallest gift, given by someone who loves him will make Jesus happy.’

Pepita didn’t know what she could give, so she picked a small handful of weeds from the roadside and made them into a small bouquet. She felt embarrassed because she could only give this small present to Jesus. As she walked through the chapel to the altar, she remembered what Pedro had said. She began to feel better, knelt down and put the bouquet at the bottom of the nativity scene. Suddenly, the bouquet of weeds burst into bright red flowers, and everyone who saw them were sure they had seen a miracle. From that day on, the bright red flowers were known as the ‘Flores de Noche Buena’, or ‘Flowers of the Holy Night’.

The shape of the poinsettia flower and leaves are sometimes thought as a symbol of the Star of Bethlehem which led the Wise Men to Jesus. The red colored leaves symbolize the blood of Christ. The white leaves represent his purity.

Although it doesn’t pre-date Christianity like its Christmas counterparts, the holiday season wouldn’t be the same without the reds and greens of the poinsettia.

Print Recipe
Poinsettia Cookie Wreath
Instructions
Poinsettia Cookies
  1. In a large bowl, beat the cream cheese, butter, sugar & flavorings with an electric mixer on medium-high speed until light and fluffy, about 2 minutes, scraping down the bowl with a rubber spatula as needed.
  2. Reduce the mixer speed to low and beat in the flour & salt until combined. Divide the dough between 2 large pieces of plastic wrap. Flatten each into a 1/2-inch-thick disk and wrap. Refrigerate until firm, at least 1 hour or overnight.
  3. Line two baking sheets with parchment.
  4. Roll out 1 disk of dough between 2 heavy sheets of plastic wrap into a square about 1/8 inch thick. You should be able to cut (9) 3-inch squares from it as well as have some edges left for making about 18 leaves. Re-wrap & refrigerate dough scraps while you shape the poinsettias.
  5. Cut a 1 1/2-inch slit in all four corners of each dough square to form 8 points. Fold over every other point, moisten tip with egg white & press into the center of the square. Arrange cookies on prepared cookie sheet. Refrigerate while you repeat the same procedure with the other disk of dough. 
  6. Cut enough leaves out of the scraps using a sharp knife or a leaf-shaped cutter, making 2 leaves for each poinsettia. Arrange the leaves on plate & lightly brush with egg white, then sprinkle with green sanding sugar. Set aside in the refrigerator.
  7. Preheat the oven to 350 F.
  8. Lightly brush the poinsettias with egg white & sprinkle half with red sanding sugar & half with white sanding sugar. Brush the ends of 2 leaves & tuck underneath each poinsettia on opposite sides. (No need to press the dough; it will meld together as it bakes.) 
  9. Bake, rotating the baking sheet halfway through, until the cookies are puffed and the edges are golden, 20 to 25 minutes. Immediately press a yellow (chocolate) candy in the center of each warm cookie. Let cool 5 minutes, then transfer the cookies to a wire rack to cool completely.
Assembly
  1. Using a bit of gel paste from a purchased tube, anchor each cookie in place on top of wreath base to form 'poinsettia wreath'. Finish with adding a ribbon or some holly leaves & pinecones or personalize to your own taste.
Recipe Notes
  • I like to save the heavy plastic wrap from frozen puff pastry for recipes like this. When you roll the dough between two sheets of plastic wrap as opposed to using flour on your board, it really keeps the dough from becoming so dry.
  • I found if I took the poinsettia cookies out of the oven about 5 minutes before they were finished baking & pressed the candy center in then returned them to the oven, the candies stuck to the cookies better.

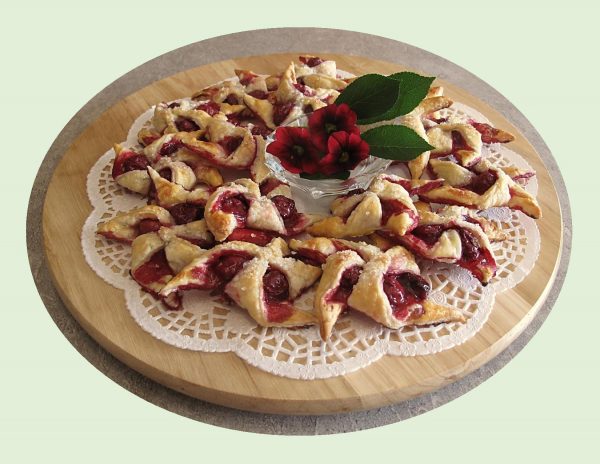
Sweet & Sour Cherry Pastries

There are two basic types of cherries grown in North America: sweet and sour. Sour cherries are also known as tart, pie cherries, or red cherries.

Cherries are not native to North America, in fact both the sweet and sour varieties were brought to Canada and the U.S. in the 1600s by French and English settlers. The plants, especially the sour varieties, adapted well to our climate.
Sour cherries are a hardier plant than the sweet variety and are well-suited to growing in slightly cooler climates. Commercial production didn’t begin here until the 1800s

This recipe is made with sour cherries, so it has that sweet and sour ‘thing’ going on that makes it so good! Homemade sour cherry pie filling is perfect for all kinds of baked goods, such as crisp, puff pastries, pies, galettes, as a cake filling or by itself with a scoop of ice cream.

You can use fresh or frozen sour cherries. I love using frozen cherries personally, because I’ve already pitted them, but this recipe is great with fresh cherries too.

Print Recipe
Sweet & Sour Cherry Pastries
Votes: 1
Rating: 5
You:
Rate this recipe!
Course dessert
Cuisine American
Servings
Votes: 1
Rating: 5
You:
Rate this recipe!
Instructions
Sour Cherry Filling
  1. In a saucepan, whisk together sugar, cornstarch & salt. Add juice (water) & stir to thoroughly combine. Bring to a boil over medium-high heat, stirring frequently. Simmer until thickened, about 2 minutes; immediately remove from heat. Gradually fold in cherries; cool to room temperature, stirring occasionally.
Assembly & Baking
  1. Preheat oven to 400 F. Line two large baking sheets with baking paper. Roll the thawed puff pastry out on a surface lightly dusted with icing sugar or flour into a large square.
  2. Cut into 2 1/2-inch squares, using a sharp knife or a pizza cutter; cut about 1-inch into each corner. Drop a tablespoon of the sour cherry filling in the center of each puff pastry square.
  3. Brush the pastry with beaten egg then fold one corner into the center, allowing for a slight overlap. Repeat with the other corners to make a windmill shape. Slightly pinch corners together if needed.
  4. Sprinkle with coarse sanding sugar and bake until they are golden and firm (about 12-15 minutes) where they have puffed up on the sides. Allow to cool on the baking sheet for a few minutes before transferring to a wire rack to cool completely.
Recipe Notes
  • Cut pastry squares as big or small as you wish.

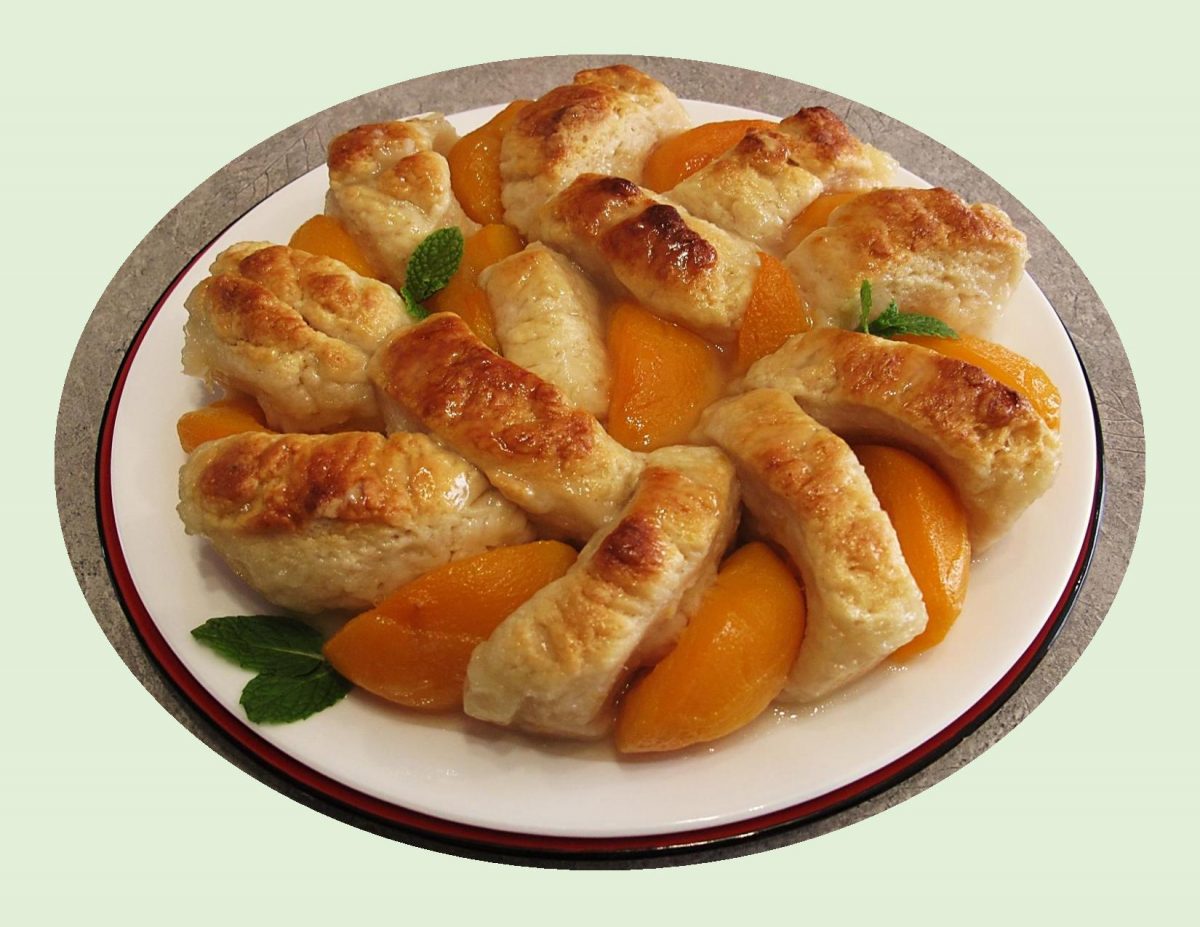
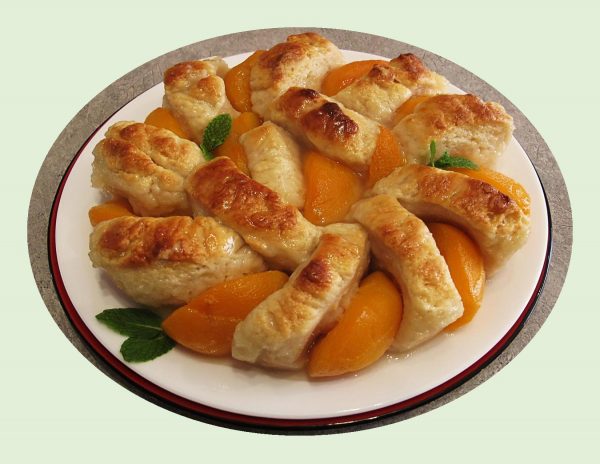
Glazed Peach Coffeecake

Coffeecake as we know it today wasn’t so much a creation as it was an evolution, with many countries given as the potential origin point. It is generally accepted that coffeecake originated from northern or central Europe during the 17th century. At that time, coffee was still fairly new to Europe, having only made it to the continent in the previous century.

While the earliest coffeecakes included coffee as an ingredient, updated popular recipes recommend eating the cake with coffee and instead deriving flavor from nuts, dried fruit, oats, cinnamon and other spices. Another addition to coffeecakes has been to incorporate yogurt, cheese or sour cream in the batter to produce the cake-like texture which further deviates from its bread origins.

The countries laying some sort of claim to the coffeecake such as Germany, Austria and Denmark were already well versed in sweetened breads and cakes and found that their local sweet paired incredibly well with this new beverage. It became very commonplace in these countries to have a small sweet served alongside coffee.

When the coffeecake made its way to North America via German immigrants in the late 19th and early 20th centuries, bolstered by the creation of refrigerated sections in grocery stores, the addition of sour cream became more common place, both as a means of adding more moisture into the cake as well as activating the baking soda. Another modification to the coffeecake came with the popularity of the Bundt pan in the 1950s. With its ring-shaped design, the Bundt pan allowed bakers to drastically increase the moisture content in their cakes without having to worry about the center being uncooked.

Sometimes cake, sometimes bread, the only real defining trait of a ‘coffeecake‘ is that it is meant to be enjoyed with a cup of coffee.

Print Recipe
Glazed Peach Coffeecake
Since the recipe calls for canned peaches you can enjoy the taste of summer early.
Votes: 1
Rating: 5
You:
Rate this recipe!
Course dessert
Cuisine American
Servings
Course dessert
Cuisine American
Servings
Votes: 1
Rating: 5
You:
Rate this recipe!
Instructions
Peach Glaze
  1. Drain peach halves; set peaches aside. In a saucepan, combine sugar, cornstarch, salt, lemon juice & peach syrup. Bring to a boil then stir in butter & almond extract. Set aside.
Coffeecake
  1. Preheat oven to 350 F. Butter a 8-inch pie pan.
  2. In a medium bowl, combine flour, sugar, baking powder & salt. With a pastry blender, cut in cream cheese & shortening until mixture resembles coarse peas. Stir in milk & lemon zest. On a lightly floured work surface, knead dough gently & form into a log shape. Do not overwork dough. Divide into 12 slices.
  3. You will need 12 peach halves (or pieces). Alternating with dough rounds & peach halves or pieces, form a ring around the sides of the pie pan. Fit the last 3 pieces of dough & peach in the center.
  4. Bake cake for about 10-15 minutes then pour WARM peach glaze over the PARTIALLY BAKED cake & continue baking for another 45-50 minutes or until cake tests done. Serve warm as is or with ice cream or whipped cream.

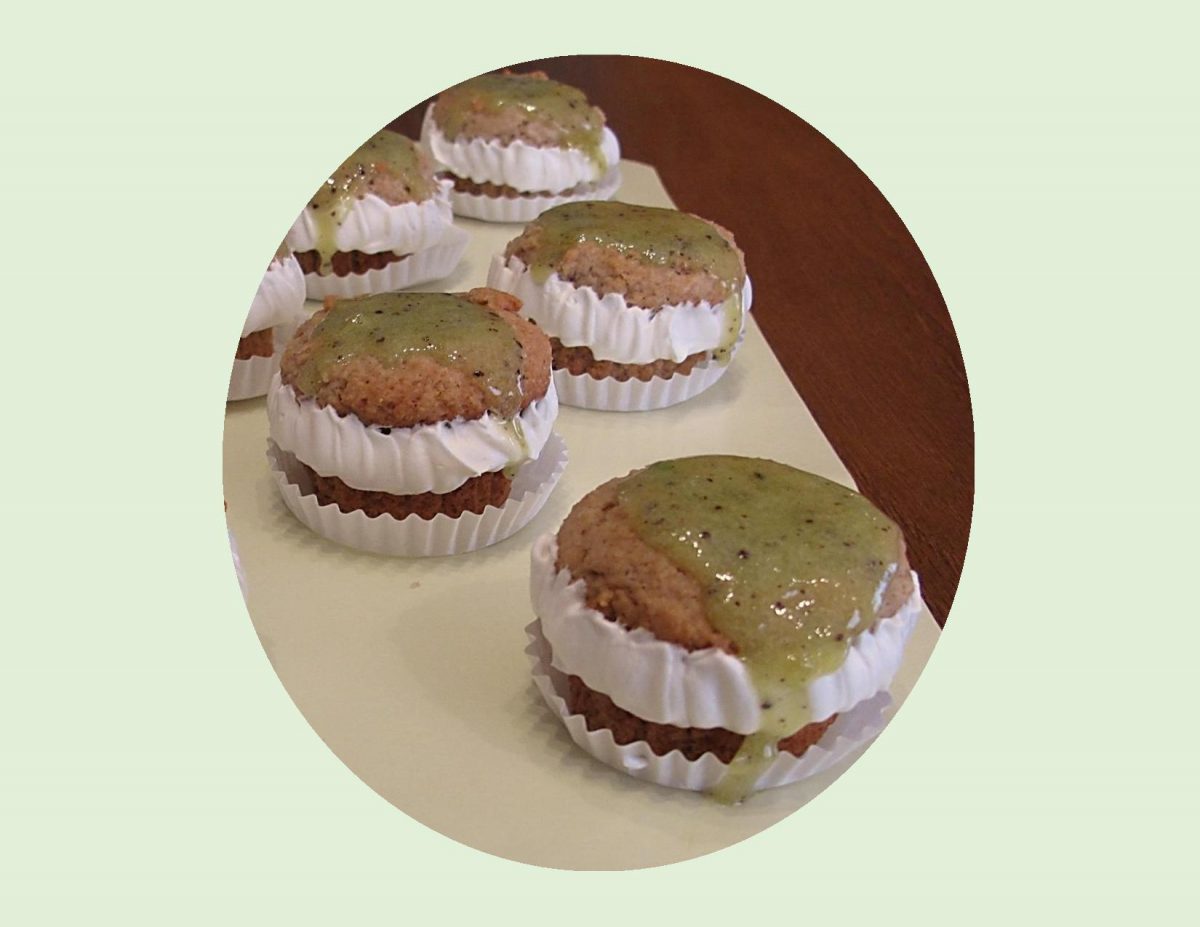
Kiwi Curd Cupcakes

After the winter months with its cold weather, covid restrictions & lots of comfort food, hopefully spring is on the horizon. With it comes lighter baking options like lime and kiwi pastries, lemon slice and strawberry cake.

Although kiwi fruit is available year round, doesn’t make it less appealing. I realize the lack of interest in kiwi curd is probably due to the enzymes in this fruit not willing to play nice with gelatin.

As a recent curd-convert, I started to wonder what other fruits I could incorporate. I’ve made mango curd, passion fruit etc. but have never tried a kiwi curd. Today, I’m going to pursue it with a different idea and see what happens ?!

Print Recipe
Kiwi Curd Cupcakes
Votes: 1
Rating: 5
You:
Rate this recipe!
Course dessert
Cuisine American
Servings
Ingredients
Kiwi Curd Filling
Cupcake Batter
Course dessert
Cuisine American
Servings
Ingredients
Kiwi Curd Filling
Cupcake Batter
Votes: 1
Rating: 5
You:
Rate this recipe!
Instructions
Kiwi Curd Filling
  1. Peel & chop kiwis. In a saucepan, combine kiwis, sugar & lemon juice. Bring mixture to a boil, stirring occasionally. Beat the egg yolks in a separate bowl. When kiwi mixture reaches a boil, very slowly add it to the egg yolks, whisking vigorously. Pour it back into the saucepan & allow to gently simmer about 8 minutes. The mixture should be thick enough to cover the spoon (it will thicken a little as it cools also). Remove mixture from heat & allow to cool until needed. If you wish, pulse curd in food processor for a couple of seconds.
Cupcakes
  1. Preheat oven to 375 F.
  2. In a large bowl, whisk flour, oatmeal, sugars, baking soda, spices & salt.
  3. In another bowl, whisk together yogurt, oil, eggs & extracts until smooth. Stir wet ingredients into dry mixture until combined.
  4. Bake 20-25 minutes. Remove to a wire rack & allow to cool for 10 minutes.
  5. Top with about 1 Tbsp of the kiwi curd & serve.
Recipe Notes
  • This recipe will make about 18 mini cupcakes if you like smaller ones.

Fruity Swedish Tea Rings w/ Orange Butter

Believe it or not, we are at the eve of Christmas 2019. I’m sure I’m not the only one who is wondering how we got here so fast. This year I thought it would be nice to make some Swedish Tea Rings for gifting.

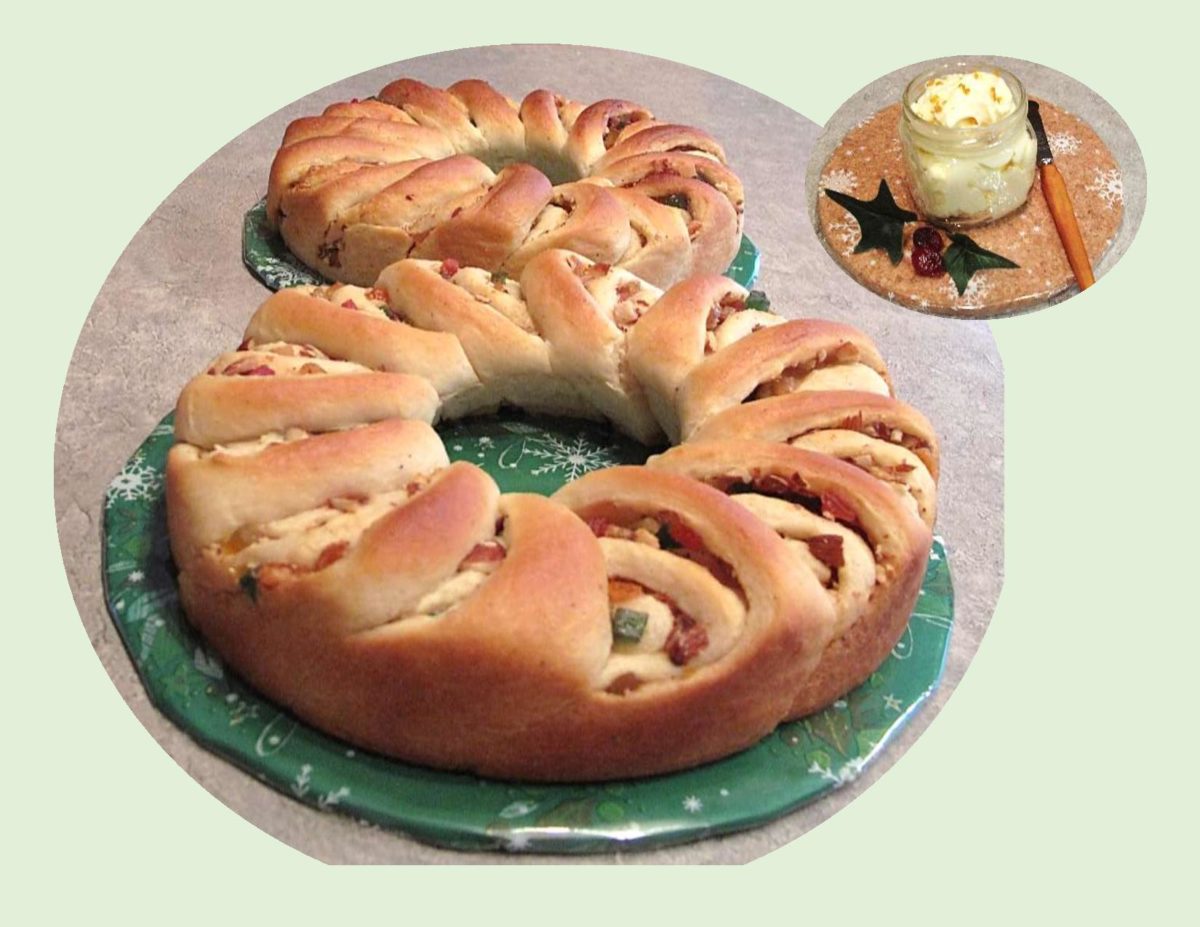
These sweet bread rings are slashed at the sides to expose the colorful fruit and nut filling. There are different variations of this bread, some do not have any fruit in them at all, just cinnamon sugar.

Swedish tea rings have been around for a very long time and while not much is known about their origin, their roots are definitely Swedish. It is believed that the bread essentially started as Christmas preparation and was a part of the grand Swedish Christmas feast.

It seems, the authentic Swedish tea rings are similar to a cinnamon roll in the shape of a ring or wreath. I have also concluded that cardamom ( one of my favorite spices) is to Scandinavians like vanilla is to us in America …. the backdrop to anything sweet. With that, I decided to go with a fruit bread that brought both cardamom and cinnamon together. Sweet!

Print Recipe
Fruity Swedish Tea Rings w/ Orange Butter
Votes: 2
Rating: 5
You:
Rate this recipe!
Course Brunch, dessert
Servings
Ingredients
Sweet Bread Dough
Filling
Orange Butter
Course Brunch, dessert
Servings
Ingredients
Sweet Bread Dough
Filling
Orange Butter
Votes: 2
Rating: 5
You:
Rate this recipe!
Instructions
Sweet Roll Dough
  1. In a small dish, heat milk to lukewarm. Add yeast & 1 1/2 tsp sugar; let stand for 5 minutes to allow yeast to activate. In a large bowl, whisk together remaining 6 Tbsp sugar, melted butter, sour cream & eggs. Add yeast mixture & stir to combine.
  2. In another bowl, whisk together flour, cardamom, cinnamon & salt. Add flour mixture to yeast mixture, 1 cup at a time, combining well after each addition. Once all flour has been added, knead on a lightly floured surface for about 2 minutes.
  3. Lightly grease the large bowl, place dough in it & cover with plastic wrap & a tea towel. Allow to rest for at least one hour, in a draft free place until dough has doubled in volume.
Filling
  1. In a small bowl, combine butter, sugar, extract & orange zest; set aside. Toss the fruit & almonds with flour; set aside.
Assembly
  1. Punch dough down. Turn onto a lightly floured surface, divide in half. Roll each into an 18 x 12-inch rectangle. Spread half of the (butter) filling over each rectangle to within 1/2-inch of edges; sprinkle each with half of the fruit mixture. Roll up jelly-roll style, starting with a long side, pinch seams to seal.
  2. Place seam side down on a parchment lined baking sheets. Pinch ends together to form wreaths. With sharp scissors, cut from outside edge to 2/3 of the way toward center of ring at 1-inch intervals.
  3. Separate the cut pieces slightly, twisting each individually to allow filling to show,overlapping with the previous piece. Cover & let rise in a warm place until doubled in size, about an hour.
  4. Preheat oven to 325 F. Bake for 25-30 minutes or until golden brown. Remove from pan to a wire rack to cool. In a small bowl, combine orange butter ingredients. Serve with fruit bread. Refrigerate any leftover orange butter.

Rhubarb Almond Lattice Cake

There are few food combinations as heavenly as strawberries and rhubarb. This is food for the soul! The juicy sweetness of one balances out the almost inedible tartness of the other. Then there is that gorgeous color that strawberries bring to make rhubarb look so good. It’s a classic pairing that’s hard to get enough of if you enjoy this seasonal treat.

Since rhubarb appears quite frequently on my summer blogs, I wanted to give it a different look today. As usual I’m trying to meld a few ideas together into one dessert. The lattice top, made from tender summer rhubarb is weaved over a layer of almond cake. Then strawberry/vanilla filling comes next with the bottom consisting of a second layer of the almond cake. It may require a little more time than some desserts but well worth the effort.

Print Recipe
Rhubarb Almond Lattice Cake
Votes: 1
Rating: 5
You:
Rate this recipe!
Course Brunch, dessert
Servings
Ingredients
Almond Cake
Rhubarb Lattice Topping
Course Brunch, dessert
Servings
Ingredients
Almond Cake
Rhubarb Lattice Topping
Votes: 1
Rating: 5
You:
Rate this recipe!
Instructions
Almond cake
  1. Preheat oven to 350 F. Line TWO 9-inch round baking pans with parchment paper.
  2. In a small bowl, whisk together flour, ground almonds, baking powder, baking soda & salt. In a large bowl, beat butter & sugar with a mixer until light & fluffy, about 2-3 minutes. Beat in eggs, 1 at a time, scraping sides of bowl after each addition. Beat in almond extract.
  3. Beat in flour mixture on low in 3 additions, alternating with buttermilk, until just combined.
  4. Divide batter evenly between cake pans & bake for 25-30 minutes, or until a toothpick inserted in the center comes out clean. Transfer to a cooling rack.
Rhubarb Lattice Topping
  1. Peel thin slices off the rhubarb with a knife or vegetable peeler. Use the outer skins as they are the pinkest & save the leftover stalks to make the filling.
  2. In a large saucepan, heat the water & sugar until sugar is dissolved & the mixture is just simmering. Over low heat, add a few rhubarb strips at a time & poach until soft, about a minute. Remove to a plate to cool. Repeat with remaining rhubarb strips. Place a piece of plastic wrap on a plate & form the lattice top for your cake. Set aside the poaching syrup & allow to cool.
Strawberry/Rhubarb Filling
  1. Combine diced rhubarb & strawberry gelatin in a large microwave-safe glass bowl. Cover bowl & cook for a couple of minutes until rhubarb is soft. Let mixture cool. Stir milk & vanilla pudding mix in a bowl until moistened. Beat with an electric mixer on low speed until thickened, about 2 minutes; stir cooled strawberry/rhubarb mixture into pudding mixture.
Assembly
  1. Once cakes have cooled, place one on top of rhubarb lattice. Spread the strawberry/rhubarb filling on top of this before placing second cake on top of that. Carefully place a light serving dish over cake & turn over so that the rhubarb lattice is on the top. Neaten up the edges of the lattice work by cutting with a pair of scissors if necessary. Drizzle over any remaining syrup (if you wish). Slice & serve.
Recipe Notes
  • If you wish, place a layer of fresh sliced strawberries on the cake after you have topped the first layer with filling.

Raspberry Almond Summer Rice Pudding

From what I have read, today August 9th, is  national rice pudding day  in the USA. I’m not sure how these holidays are figured out but who needs a special date to have rice pudding?!  In Canada & the USA, most rice pudding recipes were brought by European immigrants. The basic version contained long grain rice, milk, sugar, raisins, cinnamon and nutmeg.

This food traces its roots to the grain pottage’s made by Middle Eastern cooks. Almost every region of the world has its own take on rice pudding. Some versions are sweet, while others are savory and some are thick while others are thin.

Summer rice puddings put a fresh twist on an this old classic comfort food. There is so much fresh summer fruit to choose from and combinations of flavors just waiting to be explored.

I remember my mother’s rice pudding with fondness. I wasn’t big on raisins at the time and always thought it would be perfect if they would be omitted, but it was still wonderful.

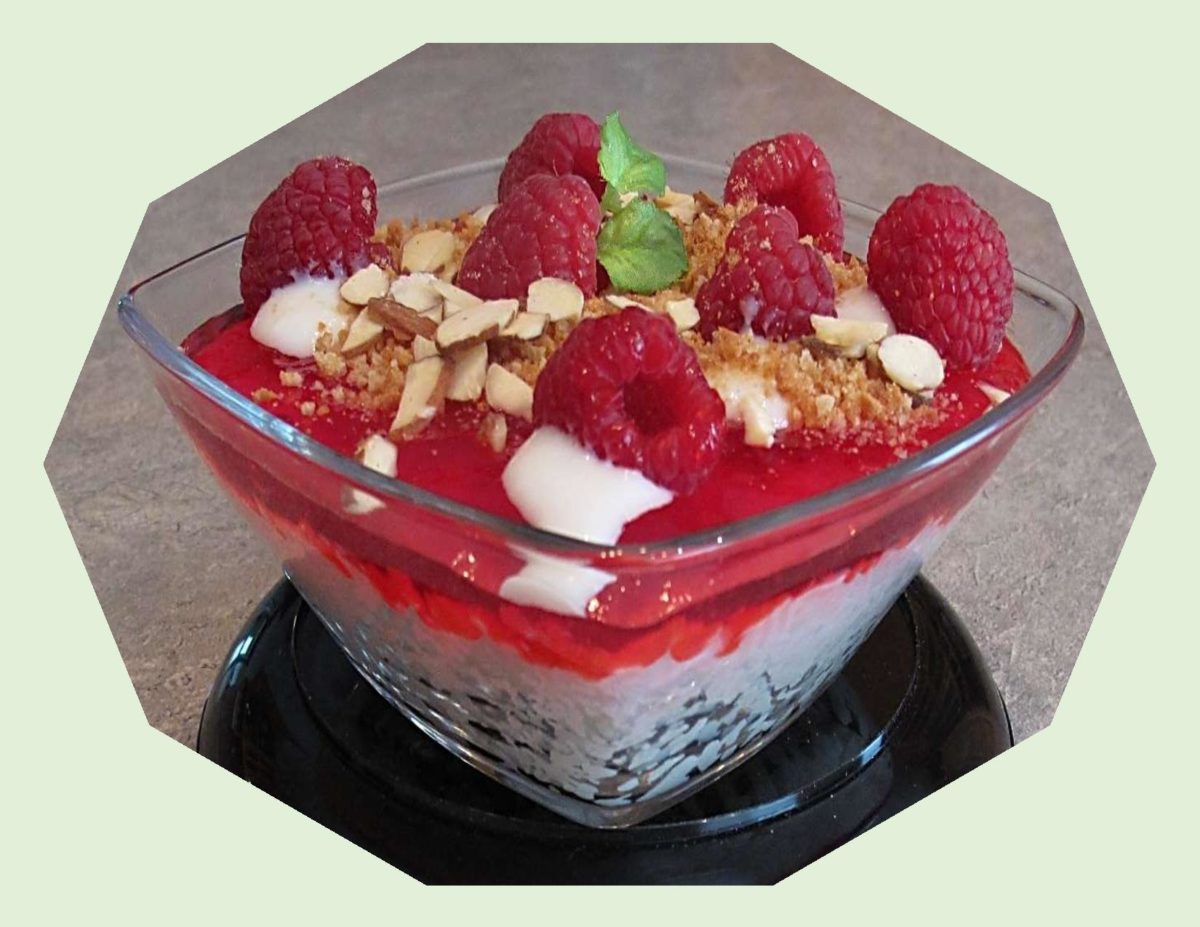
Today’s showy little dessert makes use of the season’s nice fresh raspberries. 


Print Recipe


Raspberry Almond Summer Rice Pudding

Votes: 1
Rating: 5
You:
Rate this recipe!

Servings

Votes: 1
Rating: 5
You:
Rate this recipe!


Instructions
  1. In a large saucepan, combine rice, sugar, milk & butter; bring to a boil. Reduce heat & simmer for 30-35 minutes until rice is cooked. While rice is cooking toast almonds in a skillet.

  2. When rice is cooked, allow to cool THEN add almonds & extract, lifting as you stir. Divide rice between dessert cups & refrigerate 30 minutes.

  3. Make raspberry jell-o according to package instructions. Once the jell-o is made allow to cool until slightly set. Top each dessert cup with 1/6 of the jello & refrigerate for at least 4 hours or until jell-o has set.

  4. Decorate desserts with fresh raspberries, crushed amaretti biscuits, sliced almonds & a sprig of mint if desired.

Almond Poppy Seed ‘Sheet’ Cake

Sheet cakes are sometimes thought of by some as a lazy man’s cake. Yes, they are easy to bake and contain no fancy layers or have intricate decorations but ….

Traditionally a sheet cake refers to a cake baked in a large, shallow rectangular pan such as a jelly-roll pan. They are single layer and almost always frosted on both top and sides.

The famous ‘Texas Sheet Cake’ that is very popular in the US seems to be referenced as far back as 1936. I understand it started out as three layers and ultimately became a one layer, large sheet cake. By the 1970’s these recipes were using sour cream instead of buttermilk and alternative ingredients had evolved.

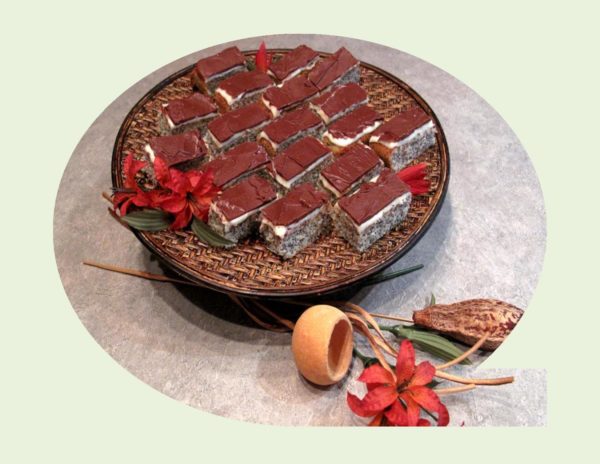
Today, if you are wanting to make a sheet cake you can find over 300 recipe choices on allrecipes.com alone. At this time of year with so many people hosting block parties, barbecues, family gatherings etc. I thought it would be nice to post a favorite recipe of mine. If you like poppy seed, you will absolutely love this cake. 

Print Recipe
Almond Poppy 'Sheet' Cake
Votes: 1
Rating: 5
You:
Rate this recipe!
Servings
Ingredients
Cake
Topping
Servings
Ingredients
Cake
Topping
Votes: 1
Rating: 5
You:
Rate this recipe!
Instructions
Cake
  1. Preheat oven to 325 F. Beat egg whites until stiff, set aside in fridge. In a small bowl, combine flour, poppy seed, baking powder & salt. In a large bowl, beat egg yolks, gradually adding sugar, followed by oil, milk, flavorings & dry ingredients.
  2. Gently fold in egg whites. Pour into 2 unbuttered 9 x 13" pans or onto an unbuttered cookie sheet 18 x 15 x 1". Bake on middle rack for about 20 minutes. Remove from oven & allow to cool completely.
Icing & Topping
  1. In a small bowl, combine icing ingredients & beat until smooth; spread on cake & cool completely. Melt chocolate & margarine in microwave. QUICKLY spread topping over cooled cake.
Recipe Notes
  • I was only needing a small amount today so I made a quarter of the recipe & baked it in an 8 x 8-inch pan. It cuts nicely into 9 or 18 pieces.