Chicken Broccoli Orecchiette

As far as vegetables are concerned, broccoli is a bit divisive, people either love it or hate it.  Broccoli is native to the Mediterranean and has been considered a very valuable food by the Italians since the Roman Empire, but when first introduced in England in the mid-18th century, broccoli was referred to as ‘Italian asparagus’. There’s a misconception that Italians only eat pasta. While they do eat a lot of pasta, they also eat a ton of vegetables.

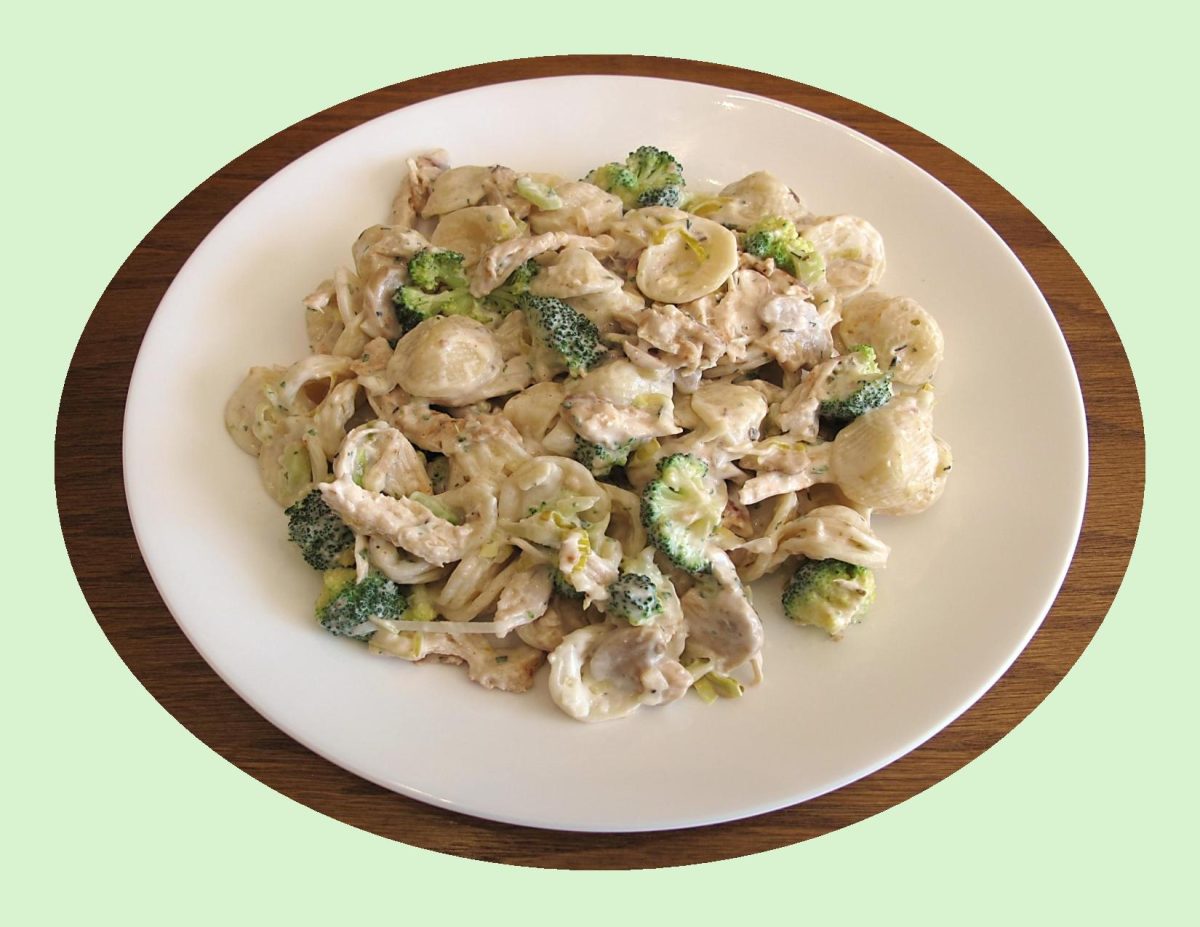
Orecchiette with broccoli is a wonderfully simple Italian comfort food. Stretched between the Adriatic and Ionian seas, Puglia’s sun-soaked landscape in southern Italy is where orecchiette pasta hails from. Meaning ‘little ears’ in Italian, the dish is made by flattening out dough and simply rolling your thumb like a fingerprint onto the dough. This creates an ear-shaped disc that resemble small bowls that have grooves from the fingerprint that are perfect at holding all types of sauces.

A classic combination for orecchiette is broccoli with sausage. Creamy sauces also go well with orecchiette, as do fresh tomato and pesto sauces. Orecchiette is also often served with tomato-based sauces such as marinara.

To make this a bit more of a hearty meal, I’m adding some chicken breast today. I think it should be really good!

Print Recipe
Chicken Broccoli Orecchiette
Votes: 1
Rating: 5
You:
Rate this recipe!
Servings
Votes: 1
Rating: 5
You:
Rate this recipe!
Instructions
  1. Bring a medium pot of salted water to boil. Pour the dry orecchiette pasta into the water, stir with a wooden spoon & bring the water back to a boil. Boil the pasta until it is just barely tender, between 10 -15 minutes. Pull one piece of orecchiette out of the water with the wooden spoon after 10 minutes to check for doneness. Orecchiette should be cooked al dente, tender but firm.
  2. When the pasta is done, carefully scoop 2 cups cooking water out of the pot with a measuring cup & set aside. Set a strainer over the sink & pour the orecchiette into the strainer to drain the remaining water. Do not rinse. Return to pasta pot.
  3. Place fresh broccoli in a microwave steamer dish & cook for a couple of minutes until tender crisp. Drain & add to pasta pot with orecchiette.
  4. Heat the oil in a large skillet over medium-high until sizzling. Pat the chicken breasts very dry with paper towels & season the tops generously with salt & pepper. Add the chicken to the pan, seasoned side down (season the sides facing up once you place them in the pan); do not disturb the chicken once it is in the skillet. Once you can see a bit of golden color forming around the sides, after about 2 minutes or so, take a peek — the goal is to achieve a deep golden brown shade.
  5. Once you flip the chicken, take its temperature with an instant-read thermometer. Pull it from the pan when the temperature is between 155°F & 160°F. If the chicken is very thin, it may be almost done. If it's on the thicker side, it may need a few more minutes. Checking early allows you to gauge the remaining cooking time. Once the chicken is done, slice into thin strips & add to pasta pot.
  6. Add the butter to the skillet. Once melted, add the mushrooms. Sprinkle with salt & cook, stirring occasionally, until tender & golden, 7 to 10 minutes. Add the garlic & cook for 20 to 30 seconds. Add the cream cheese & stir until melted & smooth. Whisk in 1 cup of the reserved pasta water, a little at time, until smooth, followed by the parmesan. Pour the sauce over the noodles, broccoli & chicken, toss to coat. If it's not quite creamy enough, add a little of the remaining pasta water. Taste & adjust seasoning.
  7. Garnish with additional Parmesan.

Roasted Boursin Salmon

When it comes to creating delicious and sophisticated flavor combinations, Boursin cheese and salmon are a match made in culinary heaven. The creamy and tangy taste of Boursin perfectly complements the rich flavor of the salmon.

Boursin Garlic & Herbs was launched in 1963 and quickly became a household name across France. Its unique texture and taste revolutionized the fresh cheese market, especially after being the first cheese brand to be the subject of a television campaign in 1968.

For those unfamiliar with it, Boursin cheese is known for its smooth, creamy texture and fresh herbs. That’s what makes it so versatile and perfect for sauces! With a variety of flavors to choose from, Boursin recipes open a world of possibilities.

Print Recipe
Roasted Boursin Salmon
Instructions
Salmon
  1. Preheat oven to 425 F. Lightly grease a baking dish.
  2. Pat the salmon dry with a paper towel. Mix together the lemon juice, olive oil, garlic, & Dijon mustard in a small bowl. Place the fillets in the baking dish & rub with this mixture. Season with a generous pinch of salt & pepper.
  3. Bake for 10-12 minutes, or until the salmon is cooked through.
Boursin Sauce
  1. As the salmon bakes, melt butter in a small pot over medium heat. Pour the chicken stock into the mixture & blend in the Boursin until it's thoroughly incorporated with the stock. Allow it to simmer for a few minutes until the sauce begins to thicken. Take off the heat & stir in the lemon juice & any natural pan juices from the salmon.
Serving
  1. Place cooked salmon on a serving plate & pour sauce over top.
  2. Garnish with parsley & lemon slices if desired.

Rhubarb Cardamom Thumbprint Cookies

The thumbprint cookie’s roots trace back to Sweden, where it is traditionally called Hallongrotta, which translates to ‘raspberry cave’ in Swedish. Made since the 1800s and probably earlier, they are a versatile cookie that can be made with any kind of dough you can shape into balls and press down in the center.

Thumbprint cookies, also known by various names in different cultures, are a timeless favorite.

  • In Germany, thumbprint cookies, are called Engelsaugen (angel’s eyes)
  • In Romania, they are called ochi de pisica (cat’s eyes)  
  • In France, they are known as niçois suns.
  • Polish thumbprint cookies, or teacakes, are typically filled with jam or fruit preserves.
  • Swiss thumbprint cookies are named vogelnestli (bird’s nests). The jam-filled centers resemble little nests.
  • Eastern European Jewish bakeries offer thumbprint cookies known as butter balls.
  • In the United States and Canada, thumbprint cookies are simply called thumbprint cookies.

It’s one of my favorite times of the season when rhubarb becomes available so bring on the rhubarb recipes! These cookies combine the classic thumbprint cookie concept with the seasonal goodness of rhubarb. The cookie dough is flavored with cardamom, a spice commonly used in Swedish baking and desserts. The jam filling is a rhubarb compote, which adds a tangy and fruity flavor. What’s not to love!

Print Recipe
Rhubarb Cardamom Thumbprint Cookies
Votes: 1
Rating: 5
You:
Rate this recipe!
Servings
Ingredients
Rhubarb Compote
Cookies
Servings
Ingredients
Rhubarb Compote
Cookies
Votes: 1
Rating: 5
You:
Rate this recipe!
Instructions
Rhubarb Compote
  1. Place all compote ingredients in a saucepan & simmer covered 3-5 minutes. Remove cover & stir, continue stirring for another 5 minutes making sure to avoid scorching the pan. Set aside to cool.
Cookies
  1. Preheat oven to 350 F. Line a large baking sheet with parchment paper.
  2. In a medium bowl, place softened butter, brown sugar, 1 tsp ground cardamom, salt & vanilla. Using a hand mixer, beat until light color & fluffy, scraping down the bowl as needed with a spatula, about 2 minutes.
  3. Add egg & beat until combined. Fold in flour until just combined.
  4. In a shallow bowl, place the sugar, cinnamon & remaining 1/2 tsp cardamom. Mix well to combine.
  5. Scoop the dough out by level Tbsp & roll each into a ball. Roll each ball in the cardamom sugar & place on the baking sheets, spacing them evenly apart. Make an indentation about 1/2-inch deep with your thumb into each ball.
  6. Bake 7 minutes. Rotate the baking sheet from front to back. Bake until the cookies take on a tiny bit of color (they don't really brown) & are dry to the touch, 5-7 minutes more. If indentations have lost their shape, remake them with the handle end of a wooden spoon. Let cookies cool completely on the baking sheet.
  7. Fill each cookie indentation with the cooled rhubarb compote. Let sit until the filling sets slightly, about 20 minutes, before serving.

Baked Chicken Gnocchi w/ Garlic Asiago Cream Sauce

There are many regions that lay claim to the origins of gnocchi. While they are generally associated with northern Italy, the truth is that these dumplings are found all over the peninsula and in many diverse forms, made with a variety of base ingredients depending on where they come from: flour, corn meal, semolina, bread, chestnut flour, ricotta, or vegetables—from pumpkin to spinach to the classic potato.

The word gnocchi is thought to come from nocca, which means knuckles, or from the Lombard word knohha, which means knot (such as wood knot) or walnut—all words that imply the small, tight, rounded shape of gnocchi that we know today.

The most famous potato gnocchi that are known and loved world-wide date back to the sixteenth or, more likely, seventeenth century—well after Spanish explorers brought potatoes from South America and introduced them to Italian kitchens.

Some iterations of gnocchi such as gnocchi à la parisienne or gnocchi alla romana are always baked, even the classic potato iteration can be improved by a bit of oven time. This isn’t necessarily the most traditional way to make and serve gnocchi, but it’s certainly a twist on the classic and, above all, a nice way to dress up a package of prepared gnocchi, which might otherwise be a bit tough.

Another idea would be to use gnocchi as the base for a vegetarian sheet-pan dinner with roasted vegetables, baking them until they get crispy and golden brown; in another, similar recipe, the roasted gnocchi could be served on a bed of arugula for even more nutrients and flavor. 

Of course, you can bake gnocchi in a casserole with lasagna-like influences, simmering in a bubbling mass of sausage, ricotta, marinara, and mozzarella; this gnocchi bake, meanwhile, marries the dumplings with chicken, broccoli, and a rich, creamy Asiago cheese sauce.

Print Recipe
Baked Chicken Gnocchi w/ Garlic Asiago Cream Sauce
Votes: 1
Rating: 5
You:
Rate this recipe!
Servings
Servings
Votes: 1
Rating: 5
You:
Rate this recipe!
Instructions
Gnocchi
  1. Cook gnocchi according to package directions. Drain in a colander & set aside.
Broccoli
  1. Cut broccoli into florets & place in a 'steamer' microwave dish. Cook in the microwave about 1 minute; drain dish & set aside.
Chicken
  1. Season chicken quarters with Italian seasoning, salt & pepper. Melt butter in a skillet over medium heat. Sear chicken on both sides, starting skin side down, until golden brown, about 2-3 minutes per side; drain & set aside.
Asiago Sauce
  1. Preheat oven to 400 F. Butter a rimmed baking dish & set aside.
  2. Melt butter in a skillet over medium heat. Add minced garlic & cook until fragrant, about 1-2 minutes. Gradually whisk in chicken broth & Italian seasoning. Cook, whisking constantly, about 1-2 minutes. Stir in half & half cream & grated asiago cheese until slightly thickened. Adjust seasoning with salt & pepper to taste.
Baking
  1. Arrange chicken quarters in prepared baking pan. Top with cooked gnocchi, broccoli florets & asiago cheese sauce. Roast until completely cooked through, about 25-30 minutes. Serve hot.

Nanaimo Truffles

The Nanaimo bar, a decadent Canadian treat, has a fascinating history. It is named after Nanaimo, a delightful city in British Columbia. When Prince Harry and Meghan Markle visited British Columbia in 2020, their interest in these treats caused a media frenzy in the U.K. and the U.S., prompting questions about what the square was and where it came from. It is a dessert bar that requires no baking and generally consists of three layers: a graham wafer crumb and shredded coconut base, custard-flavored butter icing in the middle, and a layer of chocolate ganache on top.

The dessert was popularized in the years following WWII and subsequently rose to wider prominence after Expo ’86. Susan Mendelson is perhaps most responsible for commercializing the Nanaimo bar. She sold the bar during the 1970s to help pay her tuition, and in 1979 founded The Lazy Gourmet, a café and catering company in Vancouver, which claims to be the first business to sell the dessert. Mendelson wrote the official cookbook for Expo ’86, held in Vancouver, and included the Nanaimo bar.

After that, the Nanaimo bar began to be sold on BC Ferries and spread in popularity across Canada. It can now be found in Costco, Starbucks and countless cafes in Canada and the United States. There can be some variations with each of these layers — e.g., adding mint, mocha or other flavoring, as well as food coloring, to the icing center, or various nuts to the base — but a classic Nanaimo follows the traditional trio.

In a bid to take advantage of the bar’s popularity, the city of Nanaimo launched a tasting trail much like Ontario has done for the butter tart. The Nanaimo Bar Trail features an array of establishments that proudly showcase their unique interpretations of the classic Nanaimo Bar. As of now, there are more than 39 businesses participating in this sweet adventure. These establishments offer a variety of Nanaimo Bar-inspired treats, from traditional bars to ice creams, macarons, cheesecakes, lattes, and even spring rolls.

All that being said, instead of the traditional rum balls at Christmas, here’s my version of Nanaimo truffles!

Print Recipe
Nanaimo Truffles
Votes: 1
Rating: 5
You:
Rate this recipe!
Course dessert
Cuisine Canadian
Servings
TRUFFLES
Course dessert
Cuisine Canadian
Servings
TRUFFLES
Votes: 1
Rating: 5
You:
Rate this recipe!
Instructions
Filling/Centers
  1. Cream butter, custard powder & powdered sugar together well. Divide mixture into 22 pieces & roll each into a ball. Freeze for at least 30 minutes.
Base
  1. Melt the first 3 ingredients in the top of a double boiler. Add beaten egg & stir to cook & thicken. Remove from heat. Stir in graham crumbs, cheerios, cocoanut & corn syrup. Set aside to cool.
  2. When base mixture has cooled, divide mixture into 22 portions. Place 1 portion in the palm of your hand & press to flatten into a large circle. Put one custard ball into the center & wrap the circle around the custard so it totally covers it. Squeeze gently to form a ball. Repeat until you have made all the truffles. Freeze for 30-60 minutes.
Coating
  1. Melt chocolate slowly in a double boiler until smooth. Without allowing the chocolate to cool down, take a frozen ball & carefully stick a toothpick or skewer into it & dip into the melted chocolate to cover. Remove the stick & allow the truffles to set on parchment paper.
  2. Store in refrigerator. Allow the truffles to come back up to room temperature to serve if you wish.
Recipe Notes
  • I have a nut allergy, so I replaced the nuts that are usually used in the base with crushed cheerios. I found it did not alter the flavor at all. Their still just as irresistible as ever!
  • The size & amount depends on your preference. Just divide the filling & base components into whatever you wish.

Canadian Salmon Pie

Salmon pie is a variation on a classic Canadian Christmas meat pie from Quebec called a ‘tourtiere’. Fundamentally, tourtiere is a pie that contains meat and spices baked in a flaky crust. The meat is generally diced or ground, including any or all of pork, veal, beef or wild game. No matter what the meats used, or the presence or absence of potato, bold seasoning is the rule for all varieties. The four original spices used in the classic tourtiere are cinnamon, cloves, allspice and nutmeg. Like so many of these recipes that have been ‘handed down’ over generations, each family alters it to suit their taste. 

The salmon pie version takes the same meat pie concept, but uses flaked, cooked salmon that is seasoned and mixed with mashed potatoes.

I thought it would be nice to have some salmon pie before we get into all that Christmas turkey. The lemon dill sauce is such a nice condiment to go with it.

Print Recipe
Canadian Salmon Pie
Votes: 1
Rating: 5
You:
Rate this recipe!
Cuisine American
Servings
Ingredients
Pastry
Salmon Filling
Lemon Dill Béchamel Sauce
Cuisine American
Servings
Ingredients
Pastry
Salmon Filling
Lemon Dill Béchamel Sauce
Votes: 1
Rating: 5
You:
Rate this recipe!
Instructions
Pastry
  1. In a large bowl, combine flour & salt. Cut in butter until mixture is an even crumbly texture. Add cold water a Tbsp at a time & mix until dough comes together. Shape the dough into a disc, wrap & chill in the refrigerator. While pastry is chilling prepare filling.
Salmon Filling
  1. Wash & peel potatoes. Cut into chunks & boil in a medium size pot of water until tender, about 12 minutes. Drain, mash & set aside.
  2. Melt butter in a large skillet over medium heat. Add the onions & sauté until they are softened, about 5 minutes. Add 1/2 cup water, thyme & Old Bay seasoning to skillet.
  3. Season the salmon fillet with salt & pepper & place it into the skillet skin side down. Spoon liquid & onions over salmon, cover the skillet & cook until the salmon is opaque, about 5 minutes. Turn off the heat & let salmon cool slightly.
  4. Remove the skin & break salmon into pieces. Add the salmon, onions & poaching liquid to the mashed potatoes & mix to combine. Taste & adjust salt & pepper if needed. While the salmon pie is baking, make the dill béchamel sauce.
Lemon Dill Béchamel Sauce
  1. Melt the butter in a small saucepan over medium heat. Add flour & whisk until smooth. Gradually add milk, stirring constantly. When sauce begins to thicken, add the lemon juice, dill and salt & pepper to taste. Simmer for 2 minutes. Keep warm until ready to serve.
Serving
  1. Remove pie from oven & let it cool for at least 10 minutes before serving. Cut pie into wedges & drizzle with lemon dill sauce. Serve warm.

Roasted Turkey Breast ‘Porchetta’ Style

HAPPY THANKSGIVING DAY!

The second Monday of October has been the day Canada has celebrated Thanksgiving since 1957. You might say it is synonymous with autumn & the harvest season. For us, it’s a time to be thankful for having the privilege of being Canadian and able to live in such a wonderful country.

I, for one, have always loved the changing seasons. That’s not to say that I like freezing cold and slippery roads but that I have come to understand the important role each one plays in the ‘big picture’. When Brion and I initially landscaped our property, careful consideration was given to what plants were planted. Over the years it has developed into a beautiful tapestry of color through our growing season.

Growing up on the farm, Fall was an especially busy time with the grain crops being harvested, garden vegetables being canned, frozen or just stored for use over the coming months. So much needed to be done before winter would set in. As a teenager it all just seemed like a lot of work. Even as hard as my parents worked at making a living from farming, I think they felt a real sense of satisfaction in what they were able to achieve. Now I realize that even without being aware of it the visual beauty of the farmland at harvest was imprinted on me forever.

Our Thanksgiving meal today was inspired by the traditional Italian pork classic ‘porchetta’, a savory and moist boneless pork roast.

Porchetta is one of Italy’s most famous pork dishes. The term ‘porchetta’ traditionally refers to a whole boned and roasted young pig, specifically one which has been flavored with herbs, garlic and seasoning and cooked until the skin turns to golden crackling. The name of the dish stems from the word ‘porco’, meaning pork. It is a staple of numerous village festivals, fairs, markets, and concerts, when the streets of Rome are packed with food trucks selling this flavorful dish that is usually served on its own or as a filling for sandwiches. Italian immigrants brought the dish to North America in the early 20th century, where it is often referred to as Italian pulled pork.

The key elements of the finished dish are juicy meat, soft fat and crispy crust. In modern Umbrian kitchens, porchetta has expanded beyond pork, so that ‘porchetta-style’ has simply come to mean boneless meat, rolled round garlic and herbs, and roasted.

This ‘turchetta’ or roast turkey breast stuffed and rolled in the style of Tuscan porchetta makes a delicious alternative to ‘the same old Thanksgiving bird‘. 

Print Recipe
Roasted Turkey Breast 'Porchetta Style
Instructions
  1. Preheat oven to 325 F.
  2. In a large skillet, cook chopped bacon until golden & starting to crisp. Add butter, onion, celery & garlic. Sauté in bacon drippings until tender & golden.
  3. Toss sautéed veggies with crispy bacon, bread cubes, sage, thyme, rosemary, salt, pepper & chicken broth. Set aside while you prepare chicken breast.
  4. On a cutting board, place butterflied turkey breast & pound with a mallet so that the turkey is of even thickness throughout. Season with salt & pepper. Fill with stuffing, leaving a 1-inch border along the sides.
  5. Starting at the end closest to you, roll the turkey into a tight log shape & tie with twine. Season with salt & pepper & drizzle with a touch of olive oil.
  6. Roast for about 40-45 minutes until skin begins to crisp. On a piece of saran weave together a bacon 'mat'. Remove turkey from oven, cut twine & place turkey breast on the bacon mat. Using saran, turn roast over & tuck ends underneath the turkey breast. If necessary, use toothpicks to keep ends in place. Place in a roasting pan with a wire rack on the bottom to help drain away some of the drippings.
  7. Raise oven temperature to 350 F.
  8. Return turkey breast to oven & roast until turkey reaches an internal temperature of 160 F. & the bacon is crispy.
  9. Allow turkey to rest for 10-15 minutes before slicing & serving.

Everything Bagel Pull-Apart Bread

Pull-Apart Bread …. an interesting concept that has been called many names such as bubble bread or loaf, jumble bread, monkey bread etc. Initially it was formed pieces of yeast dough dipped in butter and baked in a loaf to be served with jam or preserves. In 1942, General Mills (Betty Crocker) promoted ‘Hungarian Coffee Cake’, which consisted of balls of yeast dough dipped in melted butter, then in sugar frequently mixed with cinnamon and/or chopped nuts. It was baked in a ring pan because the central tube helped prevent the center from being under baked and sinking due to all the butter. ‘Betty Crocker’ had a real way of turning unknown recipes into mainstream ideas.

By the 1990’s, General Mills promotions began entitling this sugar-coated treat as ‘Monkey Bread’. However, it may have been silent-screen movie star, ‘Zasu Pitts’, who provided this whimsical name. The term and recipe initially appeared in the Thursday, February 8th, 1945 edition of the Winnipeg Free Press (Canada) in the column ‘Culinary Clinic’. Zasu was most often remembered for her extraordinary name, huge eyes and fluttering fingers. Besides acting, she had a passion for cooking and published a 93-page cookbook in 1963.

Most of the early recipes called for rolling out the dough and cutting it into diamond shapes instead of forming balls. The widespread popularization of money bread corresponded to the advent of the commercial refrigerated biscuit dough in the 1950’s. One of the later innovations is to insert a little cinnamon-sugar coated cube of cream cheese in the center of each dough ball or drizzle with a cream cheese glaze.

Today, I’m taking the idea in a savory direction, combining buttery homemade dough, garlic herb cream cheese filling and my ‘go-to’ favorite – everything bagel seasoning!

Print Recipe
Everything Bagel Pull-Apart Bread
Votes: 1
Rating: 5
You:
Rate this recipe!
Servings
LOAF
Servings
LOAF
Votes: 1
Rating: 5
You:
Rate this recipe!
Instructions
Dough
  1. In a large bowl, combine lukewarm milk with sugar & yeast. Allow to sit for 5-10 minutes until frothy.
  2. Add butter, egg, flour & salt. With an electric mixer, beat on low for about 3 minutes. Dough will be soft. Transfer to a lightly floured work surface. Using lightly floured hands, knead for 1 minute then shape into a ball.
  3. Place the dough in a greased bowl & cover with plastic wrap. Place in a draft-free area to rise until doubled in size about 1 1/2 hours. As dough rises, prepare filling. Butter a 11 3/4 x 4-inch ribbed semi-circle bread pan. Sprinkle with everything bagel seasoning making sure to get the seasoning up the sides & on the ends of the pan. Set aside.
Filling
  1. In a small bowl, using a hand mixer, beat all of the filling ingredients together until combined. Set aside but don't refrigerate unless making well in advance.
Assembly
  1. Flip dough on a lightly floured work surface & with a rolling pin, roll out the dough until it is 1/4-inch thick. Spread cream cheese filling on top & sprinkle with sliced green onions. Using a 3 1/2-inch circle cookie cutter, cut into circles. Fold circles in half & line prepared pan, round side down fitting into the 'ribs' of the pan. Tuck the remaining pieces that are leftover into the crevice's between the folded circles.
  2. Cover with oiled plastic wrap & allow to rise once again in a draft-free area until puffy, about 30 minutes.
  3. Preheat oven to 350 F. when bread is nearly finished rising.
  4. Bake until golden brown, about 30-35 minutes. Remove from oven & place on wire cooling rack. Cool for 10 minutes in the pan then remove from pan, slice or pull apart & serve.
Recipe Notes
  • If you prefer, you can make your own everything bagel seasoning with 1 Tbsp each poppy & sesame seeds, 1 1/2 tsp each dried minced onion & garlic flakes & 1 tsp coarse salt.
  • For this pull-apart loaf I used a European ribbed semi-circle bread/cake pan. The size is bigger than a 9 x5-inch loaf pan so it is quite easy to fit all the dough into it.
  • Brion & I really enjoyed this bread made into a savory French toast for brunch.

Plum Yeast Cakes (Kuchens)

I know it sounds quite ordinary, but we are not just talking about just any plum cake. Variations of the German specialty, ‘zwetschgenkuchen’, exist where some versions are made with a shortbread pastry verses a yeast dough, some have streusel – some do not – some are round, others are rectangular. One thing for sure is that they all use the plump, sweet, juicy European plums also known as Italian Prune Plums or Empress Plums. This variety is ideal for cooking not only because of their texture but also because their flavor becomes more complex through cooking.

Fruit and yeast-based cakes are a German hallmark with this cake being a perfect example. It’s not overly sweet, has a touch of tartness to it, a small hint of cinnamon and that tender yeast dough.

Italian prune plums are available in Canada in late summer to early fall. When I was growing up and my mother used these ‘little gems’ in her canning and baking, I thought it was because they were available at the time. I had no idea that they played such a special part in German baking until I was an adult.

Prune plums are native to the Mediterranean coastal regions of Italy, and though they are named after their country of origin, they are not a favorite there. Instead, because of the German affinity for plums, they feature in many German desserts.

When ripe, prune plums are wonderfully sweet with a rich complex flavor. The flesh has a greenish-amber color that turns a deep shade of fuchsia when cooked. The single pit at the center separates easily and almost fall out on their own.

I wanted to highlight the prune plum in another blog before this deliciously sweet fruit closes the summer season. This recipe makes individual kuchens (kuchen translates to ‘cake’ in German) as opposed to one large cake.

Print Recipe
Plum Yeast Cakes (Kuchens)
Votes: 1
Rating: 5
You:
Rate this recipe!
Course dessert
Cuisine German
Servings
Course dessert
Cuisine German
Servings
Votes: 1
Rating: 5
You:
Rate this recipe!
Instructions
Dough
  1. In a small container, warm milk to lukewarm, stir in yeast & a pinch of sugar. Allow to sit until frothy, about 5 minutes.
  2. Combine the flour, remaining sugar and the salt in a stand mixer fitted with the paddle attachment. Mix on low speed to combine.
  3. Separate 1 of the eggs & set aside the white for the egg wash. Whisk the egg yolk & remaining whole egg into the yeast mixture. Add the yeast mixture to the flour, then mix on low speed to make a smooth, thick dough.
  4. Increase the speed to medium & add the butter. Once the butter has been added, beat on high until smooth, about 1 minute. Switch to the dough hook & knead the dough until it forms a smooth, springy ball on the hook, 4 to 5 minutes (add a little more flour, if needed, if the dough doesn't form a ball).
  5. Grease a large bowl & turn the dough in the bowl to coat. Cover & allow rise at room temperature until doubled, 1 - 2 hours.
Custard
  1. In a large saucepan, combine the cream, sugar, cornstarch, salt, egg & yolk. Whisk it together & heat over medium heat until thick, 4 to 5 minutes.
  2. Remove from the heat, add the butter & extract; stir until combined. Transfer to a clean bowl. Cover the surface of the custard with plastic wrap. Let cool at room temperature.
Assembly/Baking
  1. Line a 9 x 13-inch baking pan with parchment paper. Cut the dough in half, then cut each half into 6 equal pieces. Working with one piece at a time, form the dough into balls by folding the dough under itself and pinching to seal underneath.
  2. Set the ball, smooth-side up, on a floured surface, and turn in your hand to form a tight round shape. Cover loosely with plastic wrap & allow to rise until doubled, about 30 minutes.
  3. Preheat the oven to 350 F.
  4. Once the buns have risen, gently press down on each to make indentations that will make space for the custard. Fill the indentations with the custard. Top with the plums wedges.
  5. Brush the buns with the reserved egg white mixed with a splash of water & sprinkle with a pinch of cinnamon & a bit of sea salt.
  6. Bake until the buns are risen & golden & the custard is set, 25 - 30 minutes. Transfer to a wire rack to cool.
Recipe Notes
  • If you wish, instead of making 'pan buns' use 2 baking sheets so they bake individually. Same taste - different look!

Filet Mignon w/ Shrimp & Lobster Cream Sauce

Today, I have a couple of things I’d like to share with you. First of all, it’s my husband Brion’s birthday. With summer in full swing, our back yard is bursting with all its glorious flowers and foliage and even though he would rather I didn’t add his picture to my blog today, I wanted to share this garden view with you. I think it’s a great backdrop for a birthday picture, right!

Going ‘out’ to a restaurant for a special occasion has never been something that really appealed to us, especially me since my life’s work was in the food service industry. I find it is so nice to just have a specially prepared meal at home on these occasions. This year I decided to surprise Brion with an old favorite – surf & turf!

Sometimes affectionately known as ‘reef and beef,’ surf and turf is a main course that brings together the best of both worlds: seafood and red meat. While the classic combo features lobster and filet mignon, modern variations found on steakhouse menus might include prawns, shrimp, squid, or scallops.

Back in late 19th-century America, there existed glamorous establishments known as ‘lobster palaces.’ These were the go-to spots for the nouveau riche—those newly wealthy individuals eager to flaunt their prosperity. At these lobster palaces, patrons reveled in large portions of both lobster and steak, creating a decadent dining experience. However, like all trends, this one eventually waned, and by the 1920s, the lobster-steak combo had fallen out of favor. Fast-forward to the early 1960s, and surf ‘n’ turf made a triumphant comeback. Suddenly, the middle-class ‘continental cuisine’ of the ’60s and ’70s embraced this luxurious pairing, with frozen lobster and steak taking center stage. 

As we grow older, it becomes clearer every day what a special privilege it is to simply have each other to share life with. The little everyday things seem to take on a much greater importance. Maybe it’s the state of our world at this time that has made it very clear not to take anything for granted. Throughout our married life Brion has always gone above and beyond to look after us. I am grateful to have the privilege of such a loving and caring husband.

HAPPY BIRTHDAY, MY LOVE … YOU’RE THE BEST!

Print Recipe
Filet Mignon w/ Shrimp & Lobster Cream Sauce
Votes: 3
Rating: 3.33
You:
Rate this recipe!
Servings
Ingredients
Servings
Ingredients
Votes: 3
Rating: 3.33
You:
Rate this recipe!
Instructions
Steak
  1. In a zip-lock plastic bag, place oil, steaks & Montreal steak spice. Close bag & shake to combine contents well. Set aside to marinate while preparing the sauce.
Lobster & Shrimp
  1. In a skillet, heat butter & olive oil over medium heat. Sear prepared shrimp for 2 minutes on one side, then flip & sear for 1 minute more. Remove & set aside. Add 1 more Tbsp butter to the skillet, then add prepared lobster tails. Sauté lobster until it turns pink in color. This shouldn't take any longer than 3 minutes. Remove & set aside.
Cream Sauce
  1. Add 6 Tbsp of butter to skillet. When butter starts to melt, add white wine & clam juice. Stir in salt, pepper, garlic & onion powder & smoked paprika. Reduce heat to medium-low. Simmer for 10 minutes, stirring occasionally to prevent boiling over. Sauce will reduce & thicken. Taste & add more salt if you feel it needs it.
  2. Stir in shrimp & lobster & let simmer for an additional 1-2 minutes. Keep hot while you cook the steaks.
Cooking/Serving
  1. Turn on the broiler. Heat a cast iron pan to a very hot temperature. Once the pan is hot add marinated steaks & sear for approximately 3-5 minutes on each side depending on the thickness of steaks.
  2. Once steaks have seared, place under the broiler for approximately 4-5 minutes per side or to your desired level of doneness. Transfer steaks to serving plates & generously spoon the shrimp/lobster cream sauce over each filet mignon steak, allowing the flavors to meld together.
  3. Garnish with a sprig of fresh herbs & serve immediately. We enjoyed our steaks with mashed potatoes & roasted asparagus.