Sweet Red Bean Buns/ Anpan

Many people are often surprised to hear that beans can be enjoyed as dessert. But ‘anko’, a paste made from red beans called ‘azuki’, is a staple in traditional Japanese confectionery, and has been enjoyed by Japanese people for centuries. Anko, or sweet red bean paste, is the equivalent of chocolate in the western world. 

The origin of red bean paste dates back to the Heian period when Chinese travelers visited Japan with recipes for steamed buns. Japan adopted the recipe and incorporated meat and vegetables; however, Buddhist priests were unable to eat the meat-filled buns, so they opted for a substitute of boiled azuki beans. The beans only began to be sweetened during the Muromachi period when Dutch traders started importing sugar to Japan.

Anpan is a sweet roll that was first made in 1874 by a samurai named Mr. Kimura. He lost his job due to the dissolution of the samurai as a social class back in Meiji period. During that time, Japan was becoming more westernized, and bakeries started to appear. His new job was as a baker.

Soon after Mr. Kimura founded the well-known bakery called ‘Kimuraya’, which still exists today. Kimura created a bread that was more suited to Japanese tastes. He replaced the traditional Japanese red bean mochi (a Japanese rice cake made from short-grain glutinous rice) with western bread instead of mochi and it is here where anpan, the traditional soft Japanese bread roll filled with red bean paste, was first invented.  

Anpan, derived from anko red bean paste, and pan, taken from the French word for bread (pain), is undoubtedly one of Kimuraya’s most famous products, and one of the most popular types of bread in Japan. Like true artisans, their original recipe has not changed since their first conception. Kimuraya have also not patented their recipe, allowing other bakers to make the same product as they please.

You can find anpan in bakeries and convenience stores all throughout Japan. Anpan is almost always filled with azuki bean paste in varying textures. Some are smooth, and others are chunky. Zunda beans (green beans) and white soybeans are common fillings. Other non-azuki bean paste flavors are pumpkin, chocolate, and cream, to name a few.

Red Bean paste comes in many shapes and forms, but one thing is constant: the ingredient is a special and meaningful component of different East Asian cultures. With its creamy texture, red bean paste is suitable for a multitude of desserts. Its flavor is sweet and savory at the same time, with notes of chocolate and walnuts.

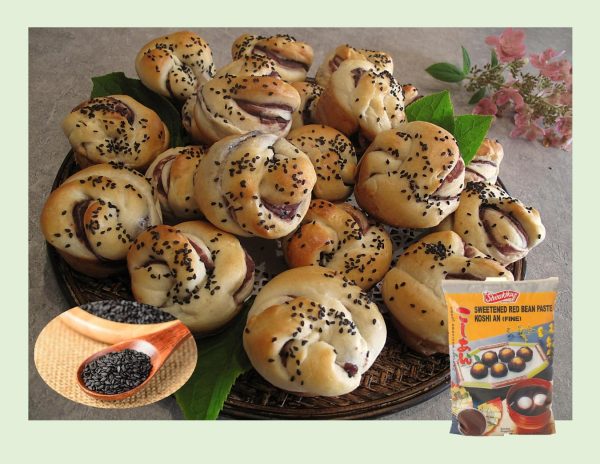
Just for fun, I thought I would try making some anpan buns to see if we would like them. Of course, what’s not to like …. there sweet and soft!!

Print Recipe
Sweet Red Bean Buns
Votes: 1
Rating: 5
You:
Rate this recipe!
Servings
Ingredients
Sweet Red Bean Filling
Servings
Ingredients
Sweet Red Bean Filling
Votes: 1
Rating: 5
You:
Rate this recipe!
Instructions
  1. In a small bowl, dissolve yeast & 1 tsp sugar in lukewarm milk. Let stand for 5 minutes to allow yeast to activate. In a large bowl, whisk together 1/4 cup sugar, melted butter, sour cream & egg. Add yeast mixture, stirring to combine.
  2. In another bowl, combine flour & salt. Add flour mixture, 1 cup at a time, combining with wet mixture. Once all flour has been added, knead dough for about 2 minutes until smooth & elastic consistency, Place dough in a greased bowl & cover with a towel or plastic wrap. Allow to rise in a warm place until doubled in bulk, about an hour.
  3. Lightly butter 2 muffin pans using only 20 cups total.
  4. Punch the risen dough down & transfer to a lightly buttered work surface. Divide the dough into 20 equal portions with about 50 grams each. Take one portion of the dough, shape it round, flatten it with a rolling pin, put a ball of red bean paste and seal it properly. Shape the ball, use a rolling pin to flatten (not too forceful or it will break the dough) it into a rectangular shape, use a sharp knife to cut 4 lines in the middle of the dough about ½-inches apart.
  5. Roll up, starting at the longest side of dough, twist & attach ends together. Place each bun in a muffin cup.
  6. Brush egg wash over tops of buns & sprinkle with sesame seeds. Cover buns with a tea towel & allow to rise for about 30 minutes or until doubled in size.
  7. Preheat oven to 350 F.
  8. Bake for 20 minutes or until golden in color. Remove from oven. Take buns out of pans & cool on wire racks.
Recipe Notes
  • If you prefer your bun dough a bit sweeter use 1/4 cup as opposed to 2 Tbsp as I did.

Pear & Gorgonzola Pastries

The fall season seems to orchestrate a return to the kitchen, to lure us who enjoy to cook, back to the stove. With the cooler days and nights, heating up the oven and cooking or baking becomes conceivable once more.

Autumn fruits are everywhere and pears are definitely in season. Pears & Gorgonzola are such a great pairing. The crisp, sweet, sometimes-earthy, sometimes-citrusy flavor of pears is naturally enhanced by the unique rich flavor of this Italian blue cheese.

Gorgonzola is named after a town outside of Milan, Italy where it was originally made. This soft, creamy cheese with blue-green marbling has a slightly pungent, savory flavor. The main difference between the different types of blue cheeses, is the region or country that they are made in or what type of milk is used in them.

Neither Brion or I like the strong flavored blue cheeses, but we sure wouldn’t pass up Gorgonzola used in either a sweet or savory recipe. These little pastries are a great fall/winter dessert. A bit more fidgety than making a larger tart or pie but as always, I love individual desserts …. there just so special!

Print Recipe
Pear & Gorgonzola Pastries
Votes: 1
Rating: 5
You:
Rate this recipe!
Servings
PASTRIES
Ingredients
Servings
PASTRIES
Ingredients
Votes: 1
Rating: 5
You:
Rate this recipe!
Instructions
  1. Preheat oven to 350 F.
  2. Unfold puff pastry sheet & cut into 3 long rectangles. Cut each rectangle into 3 equal size squares.
  3. Transfer to a parchment lined baking sheet. Placing tarts about an inch apart. Score a crust about 1/2-inch from edge of each tart. Using a pastry brush, paint the egg wash just across the outer crust of each tart.
  4. Divide fig jam between pastries. Spread jam across the center of each pastry, keeping it within the scored lines.
  5. Place 3-4 slices of pear in the center of the pastry, overlapping them. Sprinkle with walnuts.
  6. Divide the Gorgonzola between the pastries, gently pressing it into pears/walnuts.
  7. Bake for 20-25 minutes or until edges are golden brown & pastry is baked through.

Cardamom Lime Easter ‘Bunnies’

Although we may change the way we celebrate Easter this year, we can still enjoy some great food. One of the special things about any holiday is the brunch that seems to come with it and Easter is no different. The word itself sounds like coziness.

The practice of creating special breads to celebrate holidays, harvests, religious rites and other occasions worldwide, dates back thousands of years. In some cases, breads aren’t symbolic as much as traditional, baked as a reminder of family, togetherness and celebration. They often contain warm spices like cinnamon or cardamom. Some have a touch of liqueur added to them while others are created in special shapes or have little surprises baked in them.

Cardamom may not get the acclaim of cinnamon, nor does it pop up in recipes as often as ginger, but its flavor pairing capabilities are extensive. This is a flavor that you may love or hate, but for me it is very addictive. Warm, subtly spicy, exotically aromatic, a flavor that transforms both sweet and savory recipes into heavenly dishes.

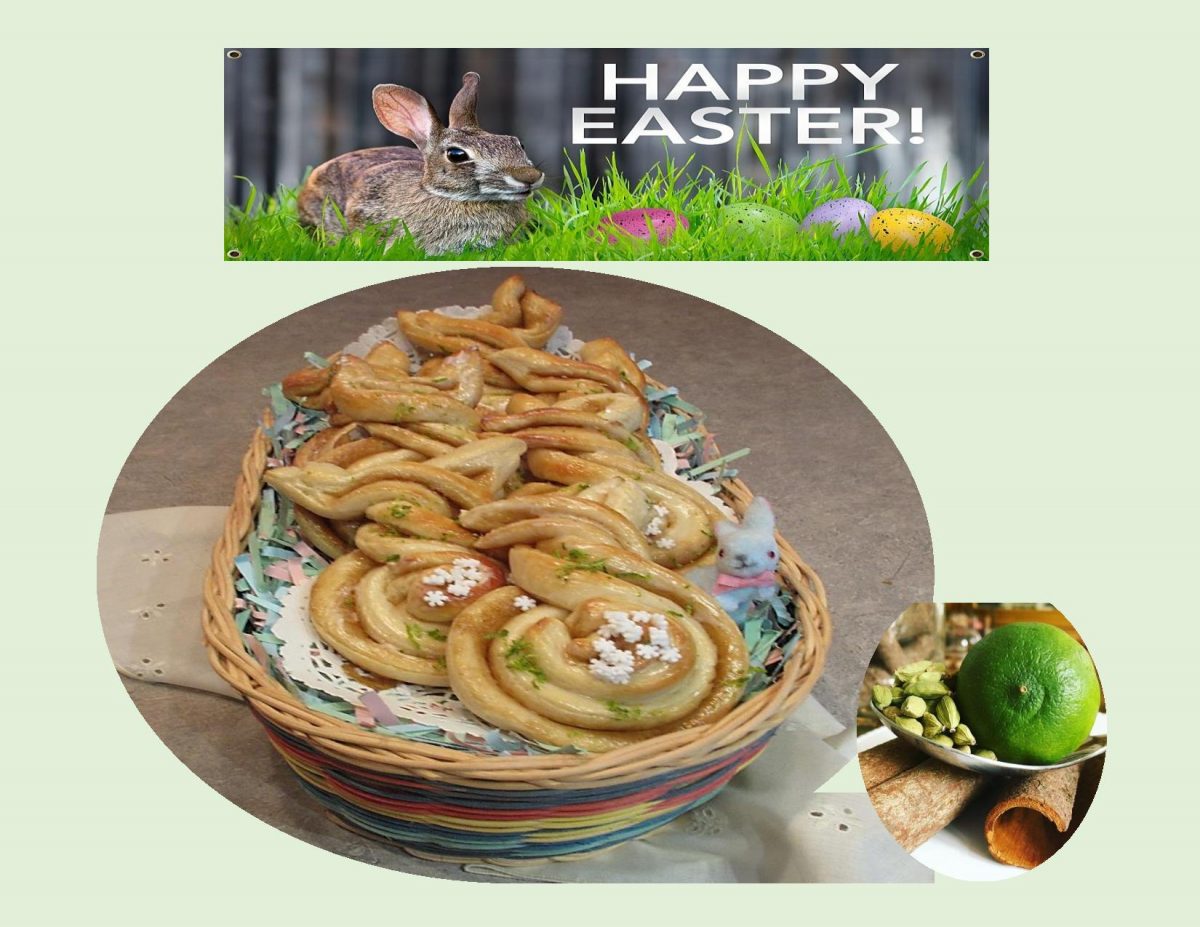
With some simple snipping and shaping, this cardamom sweet dough turns into adorable bunnies for Easter brunch. Edible table décor!

Print Recipe
Cardamom Lime Easter 'Bunnies'
Votes: 1
Rating: 5
You:
Rate this recipe!
Servings
Servings
Votes: 1
Rating: 5
You:
Rate this recipe!
Instructions
Sweet Dough
  1. In a small bowl, whisk together yeast , 1 tsp sugar & lukewarm milk. Set aside until yeast mixture begins to form a frothy foam, about 5 minutes.
  2. In a large bowl, whisk together flour, remaining sugar & salt. Add yeast mixture, melted butter & egg. Knead until dough comes together in a ball & no longer sticks to the sides of the bowl. Transfer dough to a greased bowl & cover with a tea towel. Set aside in a draft free place until dough doubles in size, about an 1 hour.
Filling
  1. In a small bowl, combine brown sugar, lime zest, cardamom & butter. Mix well. Set aside.
Glaze
  1. In a small bowl, beat together cream cheese, butter & lime juice. Add powdered sugar & mix until glaze consistency. Set aside until buns are baked.
Assemble & Bake
  1. Turn dough onto a lightly floured work surface. Divide in half; roll each half into a rectangle about 12x10-inches. Sprinkle filling evenly over one of the rectangles. Place the second sheet of pastry on top. Lay a piece of plastic wrap over the pastry & lightly roll with a rolling pin.
  2. With a pizza cutter cut 14 strips. You will use 12 of the strips for 'bunnies' & 2 strips for their tails. To form bunnies, overlap one end of strip over the other to form a loop; bring the end that's underneath up over the top end, letting one end extend on each side to make ears.
  3. Place the shaped 'bunnies' on a parchment lined baking sheet, leaving about 2-3-inches between them as they will expand a bit. Cut each of the remaining strips into 6 equal pieces. Roll each into a ball & place it in the loop to form the tail. Loosely cover the 'bunnies' & let them rise for about 15 minutes.
  4. Preheat oven to 350 F. Brush bunnies with egg wash & bake for about 15 minutes until golden brown. Remove from oven & allow to cool slightly on a cooling rack.
  5. While still slightly warm, brush bunnies with glaze. Sprinkle with lime zest & top tails with whites candies.
Recipe Notes
  • If you prefer your bunnies to be a bit more plump, instead of making 12, just make 8 or 10.

Turkish Borek w/ Beef, Leeks & Potato

Borek (buhr-ECK’) is an essential part of life in Turkey. They are made for any occasion and can be eaten at any time of the day.

There are many variations with different kinds of fillings (cheese, potato, meat), different ways to cook them (fried, baked), different kinds of dough (filo, puff), but in the end they are all called ‘borek’.

You might not have have heard of ‘yufka’, but you have probably already eaten it in the dessert called ‘baklava’. Yufka is used in a lot of traditional Turkish recipes. Some say that it may have been the earlier form of phyllo/filo dough.

The dough itself is made from wheat flour, water and a bit of salt. Yufka finds its way onto the table in the form of casseroles, strudel or a filled pastry roll as well as just flat bread. Traditional Turkish specialties such as borek are made from thin sheets of this wheat dough that are filled and rolled.

Brion & I have many wonderful memories of the holiday time we spent in Turkey some years ago.

Print Recipe
Turkish Borek w/ Beef, Leeks & Potato
Votes: 2
Rating: 5
You:
Rate this recipe!
Servings
Votes: 2
Rating: 5
You:
Rate this recipe!
Instructions
Dough
  1. in a medium bowl, whisk together flour & salt. Make a well in the center & pour in the water & oil. Using your fingers, draw the flour in from the sides, working mixture into a sticky dough.
  2. Turn the dough out onto a floured surface & knead, adding more flour as necessary to prevent sticking, until the dough is smooth & elastic, about 3 minutes.
  3. Transfer to the mixing bowl, drizzle with a little bit of oil & turn to coat. Cover the dough with plastic wrap & allow to rest in a draft-free place for 4 hours.
Borek Filling
  1. In a saucepan, stir-fry ground meat with spices. Remove from saucepan, place in a bowl & set aside. Add 2 tablespoons oil to saucepan & sauté leeks & garlic until tender. Microwave potato, peel & mash with Parmesan cheese. Add leeks, garlic, potato & cheese to meat & spices. Season with salt & pepper to taste; combine well.
Assembly & Baking
  1. Preheat oven to 350 F. Grease a round 11-inch diameter baking pan & set aside.
  2. Divide dough into 2 equal pieces. Form each piece into a ball. On a lightly floured surface, roll the balls into very thin rounds, using more flour as needed to prevent sticking.
  3. On one side of the dough, put a line of filling. Try to build a continuous line. Divide the filling between the 2 rounds. Roll the dough making sure filling is in the whole length of the roll.
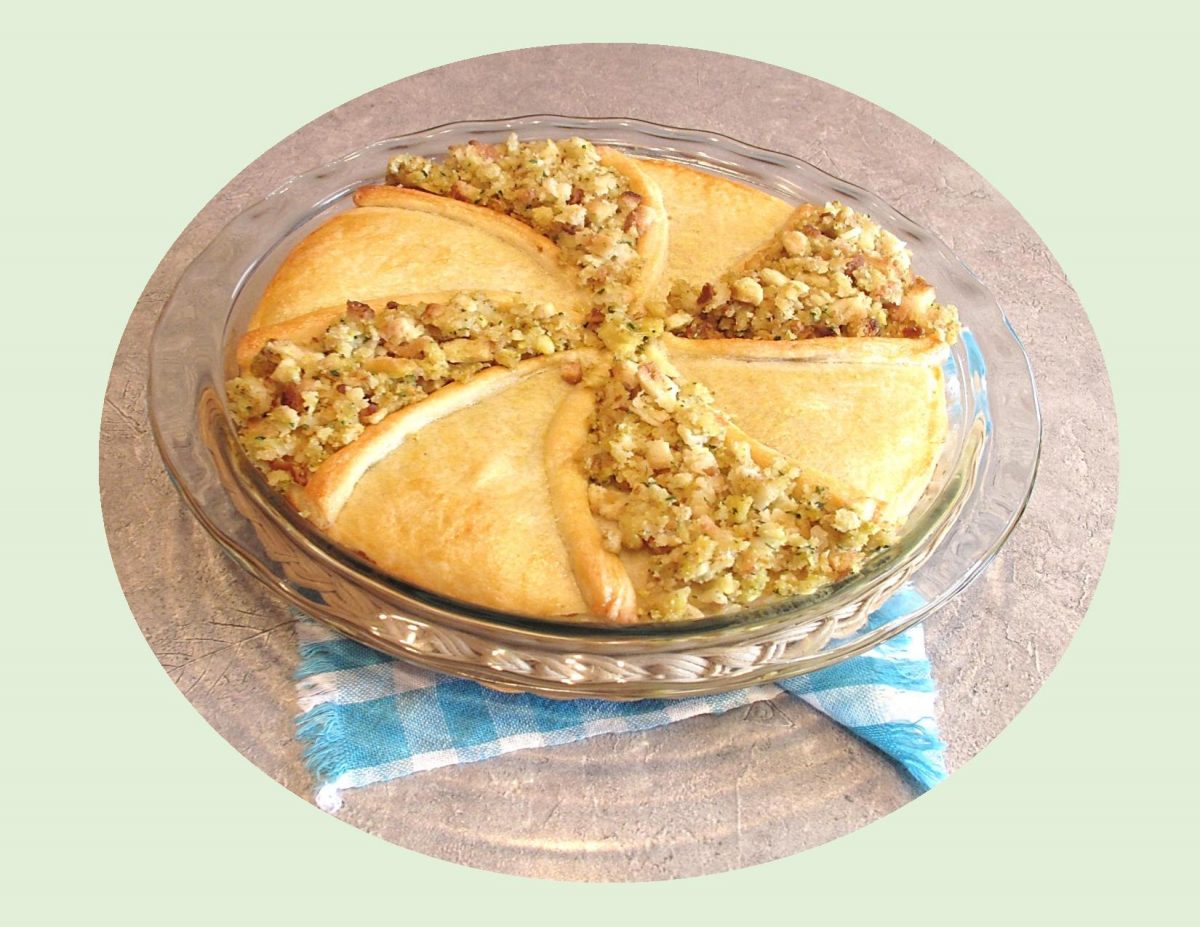
  4. Form a spiral with the meat roll in the baking pan, starting in the center. Add the second roll to complete the spiral, filling the pan. Brush borek with egg wash, making sure to brush all visible surfaces.
  5. Bake on middle rack for 45 minutes or until pastry is golden. Let it cool for a bit before serving. Borek is best when freshly baked, however it still tastes great if stored in an airtight container for 2-3 days.

Roast Chicken & Stuffing Pie

Meals like pot pies are classics for a good reason which makes them the foundation for endless inspiration. When you chose to ‘reinvent’ classic dishes, you must keep some of the elements that make the dish familiar and at the same time, you want to make the dish better, not just new. Taking a new approach to an ‘old school’ dish gives a chance to appreciate what was great about the original but making it new again.

Pot pie is a comfort food favorite which I have posted on this blog in many renditions over the years. Along with chicken I have featured seafood, beef as well as some pork & oyster pot pies.

Chicken is arguably one of the most favored proteins to put on the dinner table. Its valued for its nutrition, accessibility, low cost and most importantly its extreme versatility. Poultry serves as a blank slate and flavor absorbing foundation for every type of cuisine imaginable.

Print Recipe
Roast Chicken & Stuffing Pie
Votes: 1
Rating: 5
You:
Rate this recipe!
Servings
Ingredients
Sour Cream Cornmeal Pastry
Servings
Ingredients
Sour Cream Cornmeal Pastry
Votes: 1
Rating: 5
You:
Rate this recipe!
Instructions
Cornmeal Pastry
  1. In a small bowl, combine sour cream & ice water; set aside. In a large bowl, whisk together flour, cornmeal, sugar & salt. Using a pastry blender or finger tips, cut in butter until mixture resembles both coarse crumbs & small peas. Sprinkle the cold sour cream mixture over dough, 1 Tbsp at a time, tossing with a fork to evenly distribute it.
  2. After you have added all the sour cream mixture, dough should be moist enough to stick together when pressed; if not add additional cold water, 1 tsp at a time. DO NOT overwork dough. Press dough into 2 disks & wrap in plastic wrap. Refrigerate for at least 2 hours.
Chicken Filling
  1. Dice previously roast or pan fried chicken; set aside. In a saucepan, melt oil & butter & add leek, mushrooms & garlic. Cook until fragrant & the leek has softened. Toss in the bacon & continue to cook for about 2-3 minutes; stirring to combine. Add diced roast chicken.
  2. Sprinkle with the flour & seasonings; stir to combine. Add the stock & milk. Cook to reduce the sauce as well as it thickening it. Remove from heat & transfer to a bowl to cool then refrigerate for 20 minutes. Prepare Stove Top stuffing as directed on package.
Assembly
  1. Preheat oven to 400 F. Prepare the egg wash in a small dish.
  2. Remove pastry disks & filling from refrigerator. Allow pastry to sit for a few minutes to become workable. Roll out first disk to about 10 1/2-inches in diameter. Line a 9 1/2-inch pie dish with it. Fill case with chicken filling. Fold top inch of pastry over filling in a cupping fashion. Using about 2/3 of remaining pastry, roll it into a 9-inch diameter & place on top of filled pie.
  3. Divide remaining dough into 8 strips. Place over covered pie resembling spokes of a wheel. On alternate wedges place chicken stuffing. Use egg wash on remaining four sections & on top of the narrow pastry strips.
  4. Bake for 40 minutes or until golden & cooked through. If the top is browning too quickly, loosely cover with a layer of foil until done. Remove from oven & allow to cool somewhat before serving.

Mushroom, Caramelized Onion & Gruyere Finger Food

New Year’s Eve ……. normally this eve would bring about lots of parties and celebrations but the start of 2021 looks much more subdued. As expected, cities have cancelled or modified their plans due to the pandemic. Although tradition has been silenced this year, one thing that will never change is the ticking of time and the arrival of a New Year at midnight on December 31st.

When I was growing up, I recall one of the Christmas tree ornaments my mother had was a mushroom with a white spotted red cap. At that time, I remember thinking it seemed unusual as a Christmas tree ornament but never really questioned it. Many years later, through my interest in food history, I understand the connection.

In Germany and other parts of Central and Eastern Europe this iconic mushroom (Amanita muscaria) has long been considered a symbol of good luck and is intertwined with the Yuletide Season.

‘The Mushroom’ of Christmas and the New Year is frequently found growing underneath pine trees because the roots of this specific mushroom can only grow in the root zones of certain trees. There is some speculation that the red & white of Christmas and the use of pine trees may be linked to these humble mushrooms.

Even though the Amanita muscaria mushroom is toxic and should never be eaten it is still symbolizes the hope for good fortune in the coming year. The tradition of gifting mushroom imagery has stuck around, especially for those of German or Austrian descent who still exchange the pretty red & white mushrooms at Christmas time (often in the form of cards or other trinkets). Its not hard to understand why ‘meringue’ mushrooms are a popular decoration for the ‘Yule Log’ cakes.

After all these years, I understand the meaning of my mothers little mushroom ornament. New Year’s of 2020 seems like a good time to make a mushroom finger food in hopes of having the good fortune of Covid 19 coming to an end so we can all resume ‘normal’ life in 2021.

Print Recipe
Mushroom, Caramelized Onion & Gruyere Finger Food
Instructions
  1. Preheat oven to 400 F. Line 2 baking sheets with parchment paper.
  2. In a large, heavy bottomed skillet, heat olive oil over medium-low heat; add onions. Cook, stirring occasionally, until they begin to caramelize, about 20 minutes.
  3. Add the butter to the pan. Once melted, add the mushrooms & sauté, stirring occasionally, until they are completely soft & all the liquid evaporates, about 20 minutes.
  4. Add the garlic, sage & thyme; sauté until fragrant, about 1 minute. Season with salt & pepper to taste.
  5. Add the broth, scraping the bottom of the pan to pull up all of the browned bits, & cook until all of the liquid has evaporated. Remove from heat.
  6. Unfold the thawed sheet of puff pastry & cut out 36 circles from dough, placing them evenly spaced on the baking sheets. Using a very sharp knife, make four small scores around the perimeter of the dough, about 1/4 to 1/2-inch from the edge.
  7. Top the rounds of puff pastry with a small spoonful of the mushroom mixture, trying to keep the filling within the score marks. Top with grated Gruyere cheese. Brush the edges of the dough rounds with the egg wash.
  8. Bake until the pastry is golden brown, about 15-25 minutes. Garnish with fresh chopped parsley.

Mini Harvest Galettes

Its like a mix between carrot cake and apple pie. Vegetables and fruit in a pie …. this recipe never fails to be fantastic even if you don’t like zucchini.

The oral history of pie predates its written record. Many cooks stand by family secrets scrawled on stained index cards. It seems, pie is eaten for breakfast, with lunch and for dessert after dinner. In many ways, pie is more prized because it takes time and effort, a slice carries more importance than a cookie, but is less fussy than cake.

The perfect pie (or galette), is built on two things …. a well made crust with a flaky texture and golden color and a fresh, well set, flavorful filling.

The combination of carrots, apple and zucchini is something special. The carrots and zucchini are really interchangeable, so if you’d like to use more of one than the other, no problem.

When baked, zucchini has a similar texture to an apple; it gets soft but retains some texture. Add the same warm, fragrant spices as in an apple pie, lemon juice, a bit of extra sugar to compensate and you got it!

This recipe has been one of my fall favorites for many years and we still enjoy its wonderful flavor.

Print Recipe
Spicy Harvest Galette
Votes: 1
Rating: 5
You:
Rate this recipe!
Servings
Votes: 1
Rating: 5
You:
Rate this recipe!
Instructions
  1. Prepare pastry & either use 6 mini flan pans or one 9"deep pie pan. Preheat oven to 425 F.
  2. In a large bowl, combine apples, zucchini, carrots, nuts & flour; toss to coat.
  3. In a medium bowl, cream together brown sugar & butter; add cinnamon, cardamom, salt, lemon juice, vanilla, orange zest & 2 eggs. Blend well. Add apple mixture & combine well.
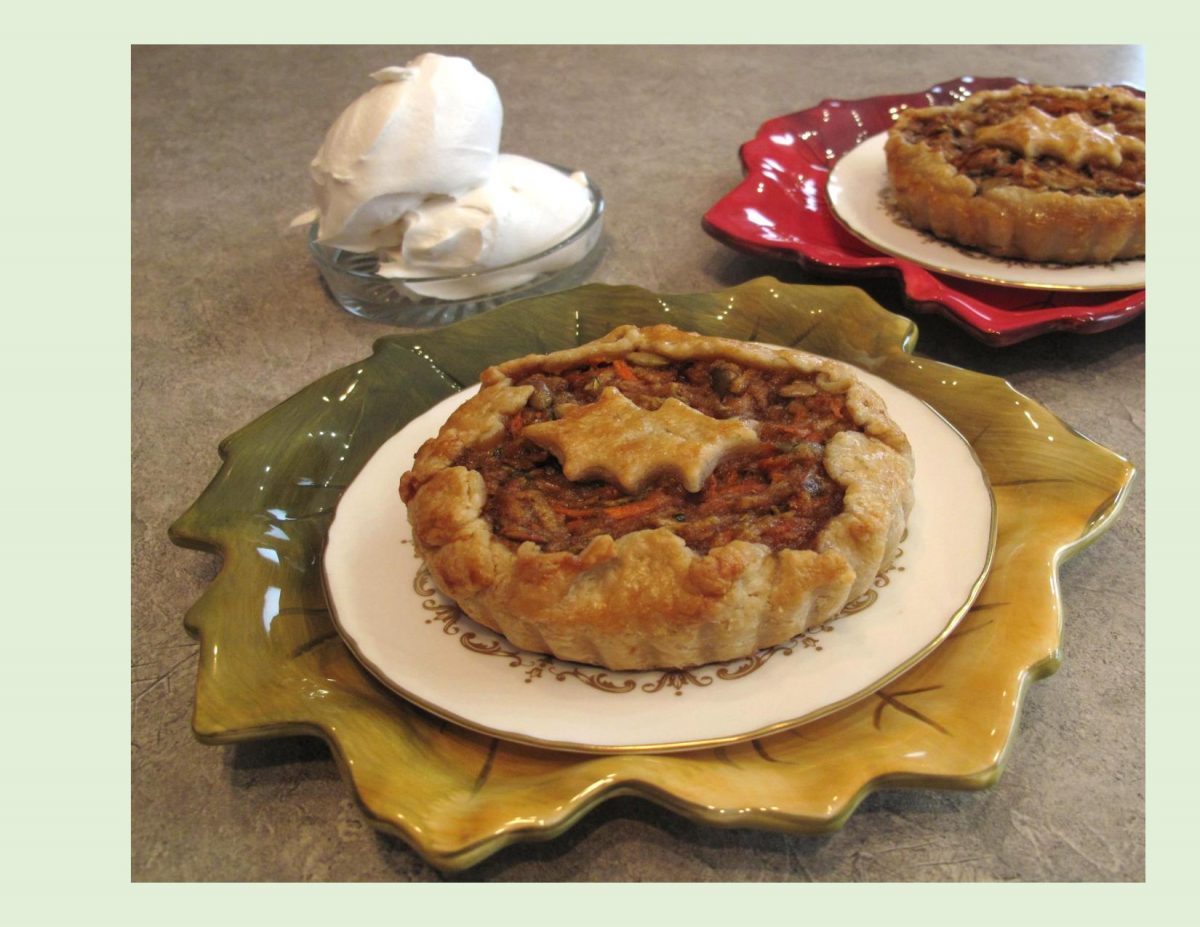
  4. Roll out pastry larger than your pans. Line pans leaving the jagged edge to fold over filling. Make a few pastry designs for the tops if you wish. Spoon filling into a pastry lined, mini pans. Flip rough edges over filling. Top with pastry in a fall leaf pattern. In a small dish, blend egg wash & brush over crust.
  5. Bake for 40-50 minutes or until deep golden brown. If necessary, cover pies loosely with foil during last 15 minutes of baking to prevent excessive browning.
  6. Serve warm with whipped cream. Store any 'leftovers' in refrigerator.
Recipe Notes
  • I laid the grated zucchini on paper towel  & placed the grated apple in a strainer while I prepared the rest of the ingredients. In both cases, I did NOT hand squeeze them as you still need some of that moisture to prevent having a dry filling when baked.

Nectarine Custard Tart

A nectarine is a variant of a peach …. one genetic step away and fuzz-less. White nectarines were the only kind available up until 1942, when a white one was crossed with a peach resulting in a yellow/red nectarine.

Just like peaches, both have similar sugar levels. However, white nectarines taste sweeter because they have less acid than the yellow varieties. Probably the most reliable way to pick a good-tasting nectarine is by its strong, sweet aroma. Traditional peach pies and cobblers can easily be interchanged with nectarines. Their firmer flesh softens when cooked but still holds its shape and leaving the skin on not only saves time but improves the flavor.

When nectarines are in season, I hate to miss out on the chance to incorporate them into whatever I can. To avoid getting into any long detailed procedures today, I’m going with this custard tart. It meets all requirements …. pre-fab pastry, egg-less custard and some of those wonderful nectarines, not to mention the bonus of how pretty it looks.

Print Recipe
Nectarine Custard Pie
Votes: 2
Rating: 5
You:
Rate this recipe!
Servings
Servings
Votes: 2
Rating: 5
You:
Rate this recipe!
Instructions
  1. Preheat oven to 350 F. Cut six 1-inch wide strips of dough from the sheet of puff pastry (best to cut one from the top, one from the bottom & four from the side). Place a large (9 x 2-inch) pie plate on the uncut area of dough, trace a circle around it with a knife. Place the round piece of dough in the pie plate. Place in refrigerator until ready to assemble & bake.
  2. In a saucepan, whisk together milk, sugar, cornstarch, salt & vanilla. Cook on medium heat, stirring constantly. Once the mixture is hot, lower the heat to medium-low to prevent the bottom from burning. Continue cooking until mixture thickens. Remove from heat & cool. When cooled, spread the pudding over puff pastry using a spoon to smooth it out.
  3. Halve nectarines, remove the pits & cut in even slices. Place the nectarine slices in the pudding cream, starting at outer edge, slightly overlapping, & working your way in.
  4. Take the 6 strips of dough from beginning & lay them in between the nectarine ring layers until the design is complete. Take the last dough strip, roll it up & place it directly in the center of the pie dish.
  5. Brush the puff pastry with egg wash. Bake for 35 minutes or until golden. If you wish, brush apricot preserve over tart while it is still warm.

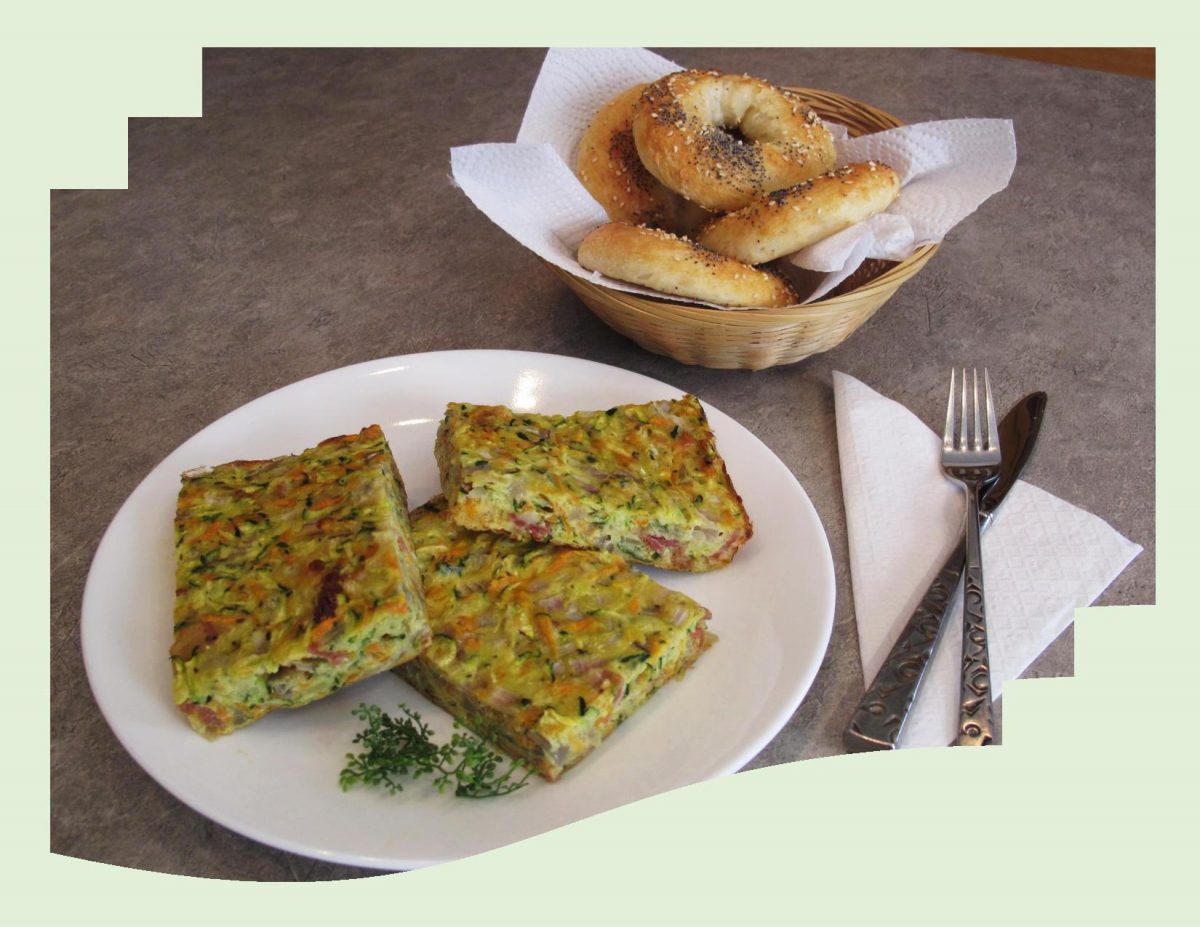
Vegetable-Bacon Squares w/ Baked Bagels

I guess if I were trying to classify this meal, I would put it somewhere between a crustless quiche and a frittata. Sometimes you just put together ingredients you like and it tastes amazing. There’s no incredible back story or cooking revelation, its just turns out to be a great meal.

Quiche and frittata are both egg dishes but they’re not just for breakfast anymore. The difference is the quiche, crustless or not, is made by adding ingredients to a custard base of eggs and heavy cream, milk or half & half that is poured into a baking dish and baked. With frittatas, eggs dominate and little or no cream or milk is used.

Usually they are first cooked in a pan on the top of the stove and then finished in the oven. These vegetable-bacon squares need only to be baked in the oven. For a nice compliment to this meal, I made some quick 5-ingredient bagels … no yeast or boiling required.

Print Recipe
Vegetable-Bacon Squares w/ Baked Bagels
Instructions
Veg-Bacon Squares
  1. Preheat oven to 325 F. Butter a 9 X 9-inch baking dish; set aside.
  2. In a large bowl, beat eggs until a little bit frothy. Sift in the flour & beat until well combined then whisk in oil. Add zucchini, carrot, onion, bacon & cheese; gently mix to combine.
  3. Pour into prepared baking dish, smooth the top & bake for about 30-35 minutes or until 'set'. Allow to cool slightly before cutting into serving pieces.
Baked Bagels
  1. Preheat oven to 375 F. Place parchment over a wire rack on a baking sheet.
  2. In a bowl, whisk flour, baking powder & salt. Add yogurt & mix with a fork until combined. It should resemble small crumbles. Lightly flour work surface & knead dough a few times until tacky but not sticky. Dough should not stick to your hands at this point.
  3. Divide into 4 equal balls. Roll each ball into 3/4-inch thick ropes & join the ends to form bagels. Top with egg wash & sprinkle with a topping of your choice or just leave plain. Bake on the top rack of the oven for 25 minutes. Let cool at least 15 minutes before cutting.

Savory Layered Puff Pie

That expression, ‘what’s old is new again’, definitely can be applied to so many things in today’s world. Very often, when you think you have come up with a new idea its really just a modernized version of an old one.

As I’ve probably mentioned before, Brion & I really enjoy casseroles. I happened to recall a casserole that was published in Good Housekeeping in 1958. My mother made a version of it at that time. Being mostly vegetables, it had such a nice flavor. It was called Seven Layer Casserole consisting of vegetables, rice, tomato soup and sausage or ground meat.

With that ‘taste of a memory’ in mind, my recipe development turned into a savory layered casserole. I used vegetables, rice, cheese and ground pork with a layer of puff pastry. When you prepare it, the sheet of puff pastry is on top so it gets crispy, but when it is baked, you flip it over and it becomes a bottom crust.

Of course, we are talking about frozen puff pastry here. It seems it has become a supermarket staple, delivering all the glories of puff pastry without all the hard hours of work. This is a convenience food that’s perfectly useful for cooks of all skill and commitment levels.

All this talk of frozen puff pastry probably seems odd coming from someone who has made a living in the food industry. But lets face, to make it from scratch is either a labor of love or a sign of madness depending on who you are. So here’s my remake of that vintage 7-layer casserole.

Print Recipe
Savory Layered Puff Pie
Instructions
  1. Cook rice. In a skillet, saute onion in 1 Tbsp butter for a few minutes. Add ground pork, water & seasonings; scramble-fry until cooked. Drain well & remove from skillet. Add another Tbsp of butter to skillet & saute drained mushrooms then blot on paper towel.
  2. Grate cheese combo of choice. Preheat oven to 375 F. Line casserole baking dish with foil & butter.
  3. Start layering with mushrooms, cheeses, rice, meat/onion combo & frozen green beans. Top with puff pastry. Cut a few slits in the pastry for vents. Brush with egg wash.
  4. Bake for about 30-40 minutes or until pastry is golden. Remove from oven & allow to stand for about 15-20 minutes then invert on a serving plate. Remove foil paper & cut into serving pieces. If you wish, serve the casserole with a brown gravy.