Coconut Rice Crepes with Seafood Filling

CELEBRATING MOTHER’S DAY!

Here in Canada, we set aside the second Sunday in May to honor our Mother’s with expressions of love and gratitude.

As I grow older, I realize how many ways I unconsciously emulate my mother. I loved everything about her and as a kid I could never imagine life without her. But in the natural sequence of events, that’s not how it works. I guess along with many other things, I’m grateful for the fact that she was there through my childhood. She passed away at the age of sixty and although she is no longer on this earth, her wonderful memory will live on in our hearts forever.

It is also with love, Brion and I celebrate his mother Dolores, for all of her kind and loving ways.

In honor of these two precious women who prepared so many wonderful meals for us years ago, I like to post something special on this day. My choice this year are these unique looking crepes.

The crepe has its roots in Malaysia and is called ‘Roti Jala’ which literally translates to ‘Net Bread or Crepe’. The intricate lacy pattern is created with a special mold or ladle that has five nozzles.

Roti Jala is eaten with a chicken curry, generally a spicy one, which is the perfect accompaniment to these coconuty pancakes. Usually homemade, this crepe is served at events such as weddings or festivals in Malaysia, Sinapore and Indonesia. It has also become a popular tea time snack and street food.

There are a few methods for preparing the batter, some use coconut milk, others with regular milk. The use of rice flour in the batter produces a very light and tender crepe.

Since neither Brion or I enjoy the taste of curry, I gave these crepes a seafood/veggie filling and served them over a Gouda sauce. I think they make such a special, lacy little crepe for brunch.

Print Recipe
Coconut Rice Crepes with Seafood Filling
Votes: 1
Rating: 5
You:
Rate this recipe!
Cuisine American, Asia, Korean
Servings
Ingredients
Coconut-Rice Crepes
Gouda Sauce
Seafood Filling
Cuisine American, Asia, Korean
Servings
Ingredients
Coconut-Rice Crepes
Gouda Sauce
Seafood Filling
Votes: 1
Rating: 5
You:
Rate this recipe!
Instructions
Coconut-Rice Crepes
  1. In a bowl, whisk together flour, cornstarch & salt. In another bowl or pitcher, lightly beat eggs, add coconut milk & oil; stir to combine. Pour this over flour mixture & stir until a smooth batter is achieved. Allow to stand for at least 20 minutes or as long as two hours. ( If leaving more than 30 minutes, cover & refrigerate until 10 before using.)
  2. Place an 8-inch non-stick skillet over high heat. When it is hot, lower heat to medium & rub a paper towel oiled with coconut oil over the cooking surface. Transfer the batter to a large squeeze bottle or a traditional Roti Jala maker. Squeeze the batter onto the hot pan, starting from the side of the pan, in sort of an up & down motion, then move to the top of the pan making a left to right motion to create that net look.
  3. Cook for about 45 seconds or until lightly browned on the first side, then turn the crepe over & cook for another 30 seconds. Turn out onto a rack & repeat with the remaining batter, wiping the skillet with an oiled paper towel between each one.
Gouda Sauce
  1. In a small dish, combine spices. Grate cheese & set aside. In a skillet, melt butter, stir in flour & cook until bubbly but not browned. Whisk in milk, chicken broth & spices, stirring until smooth & bubbly. Stir in grated Gouda. Cover with a piece of plastic wrap & set aside.
Seafood Filling
  1. In a skillet, heat oil & saute shrimp & scallops for a few minutes. Add zucchini, green onions, garlic, mushrooms & peppers & saute for another minute or two. Add ginger, soy sauce & water; cover & cook over low heat for several minutes until cooked. Do not overcook. Divide mixture between warm crepes, carefully roll. Ladle some Gouda sauce onto each serving plate & top with filled, rolled crepes.

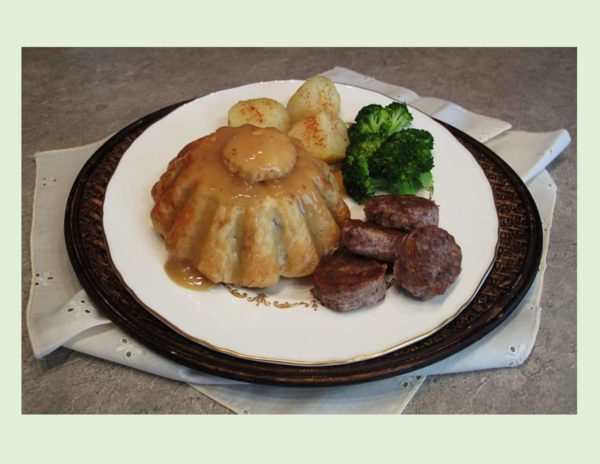
Mushroom Wellington

Mushroom Wellington is a vegetarian spin on the French classic ‘beef wellington’. The original is an elegant meal, using a beef tenderloin covered with liver pate’, wrapped in pastry and baked. The key to preparing items in this fashion, is that however long it takes to bake the pastry to a golden brown is how long it will be in the oven. In other words, the filling needs to require less time to cook.

A plant based filling makes that even easier to achieve than its meat filled cousin. The use of different types of mushrooms cut into varying sizes gives the dish texture and heartiness along with an earthy flavor. The secret to a deliciously juicy yet flaky mushroom wellington is to drain everything dry and make sure it is completely cold before wrapping it in the puff pastry. Skip this step and your pastry is not only going to be soggy, it will tear when you try to wrap up your wellington. Believe me — ‘bin there, done that’!

Although this would probably be the center piece of a vegan meal, it works beautifully as an accompaniment to meat and roast veggies as well.


Print Recipe


Mushroom Wellington

Votes: 1
Rating: 5
You:
Rate this recipe!

Course Lunch, Main Dish

Servings

Votes: 1
Rating: 5
You:
Rate this recipe!


Instructions
Mushroom Wellington
  1. In a skillet, fry diced bacon until crispy. Remove bacon to paper towels & blot dry, leaving drippings in skillet. Chop mushrooms, onion & garlic. Saute veggies with spices in bacon drippings until moisture has evaporated. Remove from heat, add bacon & drain or blot off any excess moisture. Cool mixture completely then add cold, cooked Basmati rice, stirring to blend. While the mixture cools prepare vegetable gravy if you are using it.

  2. Preheat oven to 400 F. Line your choice of preferred baking pan mold with thawed puff pastry. You should have excess enough to fold over the 'top' of filling. This will form the bottom of your wellington when baked. In each wellington, place 1/4 of the filling, topping each with 50 gms of the cheese. Divide remaining filling between the two wellingtons & fold the excess pastry over it.

  3. If you choose to make a decoration for your baked wellingtons, cut it from some of the excess before closing them. Bake the decorations on a separate pan. Place molds on a baking sheet & bake for about 35 minutes or until pastry is cooked. Remove from oven. I like to flip them onto paper towel at this point just to blot off any excess butter from pastry. Do what you prefer in this case.

Vegetable Gravy
  1. In a saucepan, bring water to a boil. Add bouillon powder, garlic, carrot, celery & onion. Cover & simmer until veggies are very soft. Remove from heat & cool slightly. Puree in food processor or blender. Combine cornstarch & water in a small dish. Stir into puree; return to heat & stir until boiling & slightly thickened. Stir in sour cream IF USING. Serve over mushroom wellingtons.


Recipe Notes
  • If you prefer, omit bacon & use butter to saute your veggies in making it a more vegetarian friendly entree.

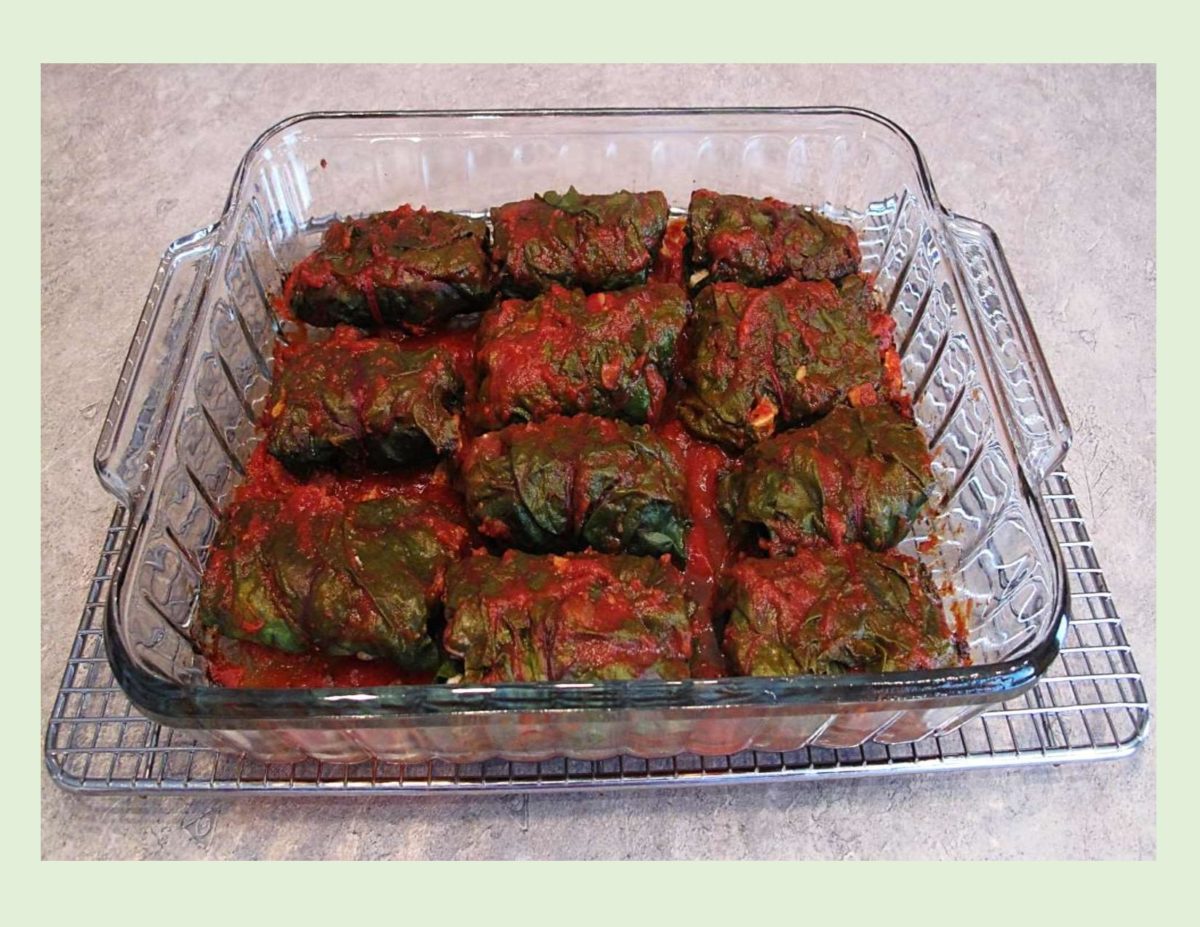
Swiss Chard Rolls with Turkey & Wild Rice

Having a German heritage, cabbage rolls are no stranger to me. I have to admit, I quite enjoy them. If I’m remembering correctly, my mother made them with a  ground beef/rice filling and a typically German, sweet/sour tomato sauce. Myself, I’ve made them with beef, pork, turkey or the sour cabbage and seasoned rice version.

This year, we were gifted with some tender, fresh Swiss chard from a neighbor’s garden. I made some of it into these Swiss chard rolls with a turkey and wild rice filling. Of course, we had this meal much earlier on in the season even though I’m just now getting around to blogging about it. Swiss chard is a biennial plant you can still buy in the grocery stores even if gardening is finished for this year in our part of the country. It was really a great tasting new spin on an old classic.

Swiss chard, also known as silverbeet, is actually a beet that was developed specifically for its edible stems and leaves. It originated in Sicily before being grown in America. ‘Swiss’ was added to the crop’s name to distinguish it from French spinach. Chard has a mild, sweet, earthy taste with some bitterness. When cooked, it takes on a more refined taste and will lose that bitterness. A very unique plant in that both the leaf and the colorful stalks can be eaten either cooked or raw.

This meal is nice served with a medley of sauteed red pepper, mushrooms, zucchini and snow peas with some sweet potato crisps.

Print Recipe
Swiss Chard Rolls with Turkey & Wild Rice
Votes: 1
Rating: 5
You:
Rate this recipe!
Course Main Dish
Servings
Votes: 1
Rating: 5
You:
Rate this recipe!
Instructions
  1. Butter a 13 X 9-inch baking pan; set aside. In a bowl, whisk eggs & add garlic, salt & pepper, Italian herbs, rice pilaf, & cooked turkey. Set aside. Preheat oven to 350 F.
  2. Bring a large pot of salted water to a boil. Trim leaves to relatively the same size, Trim any stalks to allow for even blanching & easier rolling. Immerse 4-6 leaves at a time into boiling water & blanch for 1 minute. Transfer to a paper towel-lined baking sheet as done & allow leaves to drain & cool slightly. Arrange leaves on a work surface, smooth side down. Divide filling between them. Roll up, starting with the large end of the leaf & folding it over the filling to roll up like a 'burrito'.
  3. Place rolls, seam side down in prepared baking dish. Pour tomato basil sauce over rolls; cover with foil & bake until filling is cooked & bubbly, about 15-20 minutes. Remove from oven & serve.

Amigos Birthday

Today, December 21st, a very special member of our family is having his 15th  birthday. He is ‘our’ little mini German Dachshund with the cute name of ‘Amigo’. My sister Loretta, adopted Amigo when he was only two months old so needless to say, their hearts have been well secured together.

Brion & I have had the incredible pleasure of being able to share in his life as well. On different occasions he stayed with us while Loretta had to attend to other things. It would usually take a bit of time at first for him to accept the idea she was gone temporarily. Then we would become part of his ‘pack’.

When I was growing up on the farm we had a Collie. I loved that dog but being a farm dog living outdoors, your interactions were only when you were out of the house. Until we cared for Amigo, I just had no idea what a privilege it is to be loved by a dog. Dachshunds are such a special breed. Amigo has left an imprint on my heart that will remain forever with me. Whenever Amigo is present, he brings such happiness and the perspective to enjoy the moment along with a dogs’ uncanny ability to understand humans and give so much unconditional love. We humans really need to learn some of these virtues.

As we watch him growing older, I find it so unfair that animals give so much and yet they still have to suffer the aches and pains of old age the same as humans. It seems they should be spared this ordeal.

Amigo is definitely a great source of pleasure to Loretta and I am truly grateful their lives were connected so long ago.

Two of Amigos favorite foods have always been cheese and chicken. Although he isn’t going to be having any, I’m putting a chicken meal on my blog today in honor of his birthday.

                                             HAPPY BIRTHDAY, AMIGO!

Print Recipe
Cranberry-Gruyere Stuffed Chicken Breasts
Chicken breasts go from ordinary to extraordinary when filled with tart cranberries and Gruyere cheese.
Votes: 1
Rating: 5
You:
Rate this recipe!
Course Main Dish
Cuisine American
Servings
Course Main Dish
Cuisine American
Servings
Votes: 1
Rating: 5
You:
Rate this recipe!
Instructions
Chicken & Stuffing
  1. Flatten chicken breast to a 1/4-inch thickness. In a small bowl, combine cheese & cranberries. Divide cheese mixture between breasts; roll up & secure with toothpicks.
Breading
  1. In a food processor, place walnuts & parsley; cover & process until ground but not over processed. Transfer to a shallow bowl; stir in bread crumbs, salt & pepper. In another shallow bowl, combine eggs & mustard. Place flour in a third shallow bowl. Coat chicken with flour, then dip in egg mixture & coat with walnut mixture.
  2. Preheat oven to 350 F. Line a baking sheet with greased foil paper. Place breasts seam side down & bake for 35-40 minutes or until thermometer reads 170 F. Remove from oven; discard toothpicks & serve. This is real nice served with couscous & a veggie.

Potato Pancakes w/ Pork Filling

Potato pancake variations are present in National cuisines all over the world and considered by many to be pure comfort food. The nice thing is, you can create this great meal by using leftover mashed potatoes. It can be kept simple or you can amp up the flavor with cheese, onion, bacon or a variety of spices. I recall my mother making them. I think she just added some eggs, onion, a bit of flour and some salt & pepper to the leftover, mashed potatoes. They were made into patties and pan fried as you would a pancake.

Depending on which part of Eastern Europe you come from, the name varies — Kolduny, Zrazy, Kartoffelpuffer are just a few. Regardless of the name you call them, they are just simply delicious. The Russian version takes it a bit further. The potato pancake is stuffed with a filling and then fried to a golden brown.

After reading through numerous recipes, I decided to ‘meld’ some of them into my own creation. These are what developed — nothing pretty but really good flavor. Yes, truly comfort food.

Print Recipe
Potato Pancakes w/ Pork Filling
Votes: 1
Rating: 5
You:
Rate this recipe!
Course Main Dish
Servings
Ingredients
Potato Pancakes
Course Main Dish
Servings
Ingredients
Potato Pancakes
Votes: 1
Rating: 5
You:
Rate this recipe!
Instructions
Pork Filling
  1. In a bowl, combine pork filling ingredients; divide into 8 portions & form each into a patty shape. Refrigerate until potato pancake 'batter' is prepared .
Potato Pancakes
  1. In a skillet, fry bacon until crispy; drain on a paper towel until cool. In skillet with remaining bacon grease, saute onion & garlic until translucent.
  2. In a large bowl, crumble bacon into small bits. Add cold mashed potatoes, onion, garlic, beaten egg, cheddar (if using), flour, salt & pepper. Combine well. Using a large piece of waxed paper, form 16 patties. On top of each one, place one of the pork patties & then top each with the remaining potato patties. With a pair of scissors, cut waxed paper to separate filled potato pancakes so it will be easy for you to place them on a griddle for frying.
  3. Lightly oil a frying pan or griddle. Using the waxed paper remaining under each pancake, carefully flip each filled pancake onto the griddle. Flatten a bit & press edges to enclose filling better. Fry first side to a nice golden brown then carefully flip with a spatula & brown second side a few minutes. Cover with a lid (or foil) for remaining cooking time to ensure pork is cooked through.
  4. Once cooked, remove from griddle & serve with sour cream or Ranch dressing.
Recipe Notes
  • Don't hesitate to make the pancakes the size that works best for you.

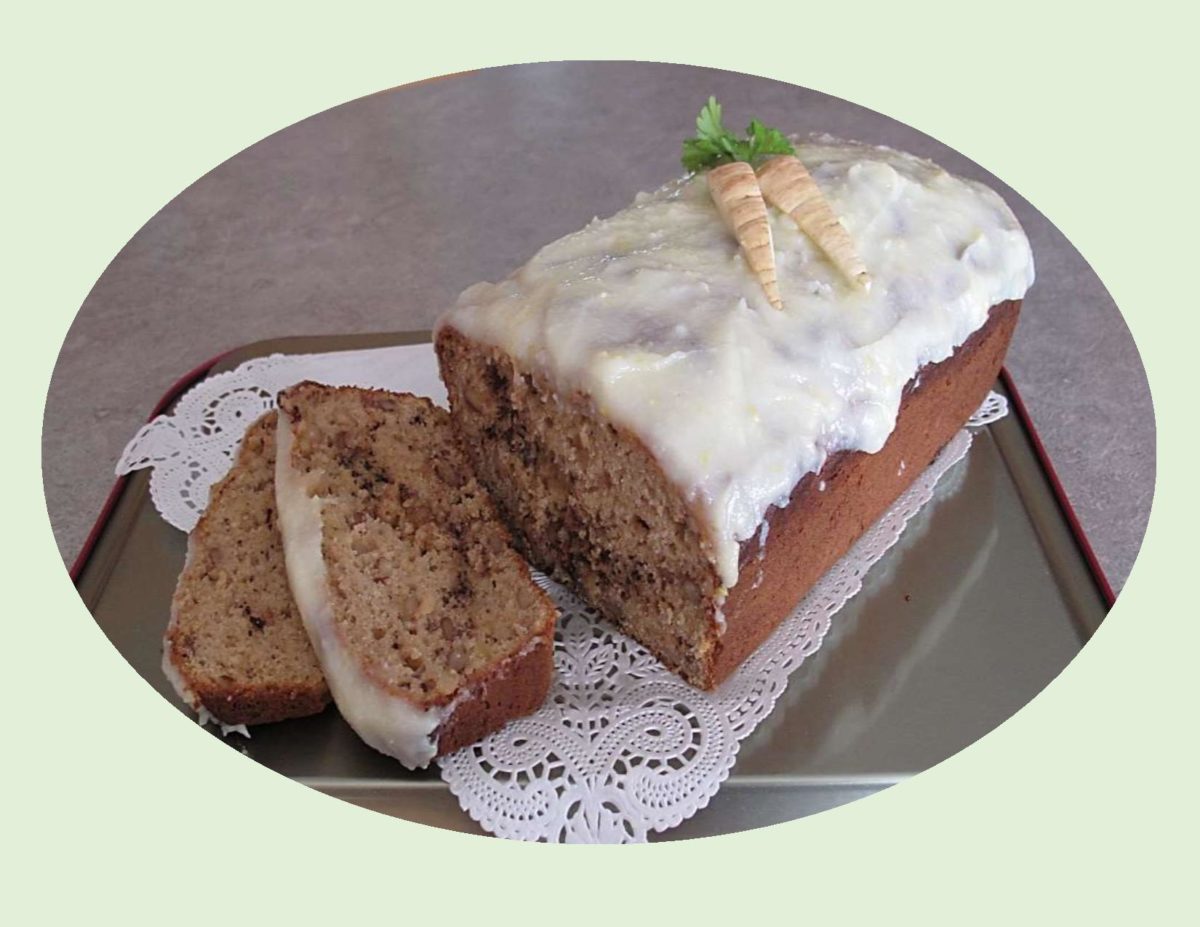
Roasted Parsnip Loaf / Sticky Lemon Frosting

Root vegetable desserts aren’t exactly a new concept. Incorporating vegetables such as beets, asparagus, mushrooms and sweet potatoes can lend themselves to new creative dessert ideas if you start thinking ‘out of the box’. 

Parsnips, traditionally used in savory dishes, can bring a subtle sweet tenderness to your baked goods. When roasted or sauteed, their sugars caramelize richly and are well complemented by a variety of seasonings such as orange or lemon zest, ginger and cardamom. 

As the autumn weather turns cooler, root vegetables like carrots and parsnips convert their starch to sugar. After a few fall frosts, parsnips develop a higher sugar content than those harvested before the freeze.

My original idea was to make a loaf cake with shredded raw parsnips as you do with carrots when making  a carrot cake. Knowing how sweet they become when roasted, I decided to do that first. If you have any roasted parsnips leftover from a previous meal they would work just great.

I realize parsnips are not for everyone. It probably seems a bit odd to make them the ‘star’ in dessert but I have to say we both loved this cake. The tart sticky lemon frosting was truly the ‘icing on the cake’.

Print Recipe
Roasted Parsnip Loaf / Sticky Lemon Frosting
Votes: 2
Rating: 5
You:
Rate this recipe!
Course dessert
Cuisine American
Servings
Ingredients
Roasted Parsnips
Frosting
Course dessert
Cuisine American
Servings
Ingredients
Roasted Parsnips
Frosting
Votes: 2
Rating: 5
You:
Rate this recipe!
Instructions
Roasted Parsnips
  1. Preheat oven to 350 F. Peel parsnips & quarter lengthwise; remove core. Chop into medium size pieces & place in a plastic bag. Add a little veg oil & shake to distribute evenly. Line a baking sheet with foil; place parsnips on it & sprinkle with salt & pepper. Bake until soft, about 20 minutes. Remove from oven & allow to cool, then puree in food processor.
Cake
  1. Line a 9 x 5-inch loaf pan with parchment paper.
  2. In a bowl, combine flour, baking powder & salt. Using a mixer, beat eggs & sugar together. Add parsnip puree, oil, sour cream, vanilla & spices. Fold in flour mixture, combining gently until well incorporated. Fold in walnuts & chocolate, creating a marble appearance ONLY.
  3. Pour batter into loaf pan & bake for about 40 - 45 minutes or until it tests done. Remove from oven & cool slightly before topping with frosting.
Frosting
  1. While cake is baking, combine cream cheese, powdered sugar, lemon zest & extract in a small bowl. With hand mixer, beat until smooth. Frosting will be thick & sticky. Top loaf cake while it is still slightly warm. Slice when cool & serve.
Recipe Notes
  • I had personalized the spices in this cake but if my combination doesn't appeal to you, simply use 1/2 tsp each nutmeg & cloves with a teaspoon of cinnamon instead.
  • When purchasing parsnips, look for the small to medium size. Large parsnips are often bitter & have an undesirable woody quality.

Cauliflower Crust Pizza with Ground Beef & Olives

Ricing vegetables has been around for as long as I remember. Maybe not to the degree that is happening today. I recall a utensil my mother had that resembled a large garlic press. It was called a potato ricer and to my knowledge was only used for potatoes to change the texture.

As time has passed, this idea has evolved into so much more. Cauliflower ‘rice’ came on the scene as a popular grain-free alternative to rice. As with many food trends, the ‘riced’ craze has continued using other veggies like sweet potatoes, broccoli, carrots, onions and peas.

The grocery stores have jumped on the bandwagon with fresh and frozen products and in a variety of plain and flavored versions.

Making your own riced vegetables is even easier than in days gone by. Just trim, chop and pulse your veggies in a food processor. Cook with a quick steam or saute and flavor with some fresh herbs and spices. Of course, you can always change it up with other chopped veggies, nuts or a sprinkle of cheese.

Riced cauliflower can be used on its own, fried, in baked casseroles or as I’m using it today, in a pizza crust. A different texture than traditional pizza crust but loaded with flavor. Its sort of firm, chewy and soft all at the same time. I wasn’t sure how well we would like this pizza but it tasted just great with the addition of some homemade bread sticks.

Print Recipe
Cauliflower Crust Pizza with Ground Beef & Olives
Instructions
Cauliflower Crust
  1. Preheat oven to 375 F. Line a 14-inch pizza with parchment paper. Process cauliflower. In a bowl, combine all crust ingredients. Pat mixture onto pizza pan & press to form pizza crust. Bake 15-20 minutes; remove from oven.
Pizza Toppings
  1. In a skillet, crumble fry beef & mushrooms with spices until cooked. Drain & cool slightly. Carefully 'spread' cauliflower crust with tomato sauce. Top with mozzarella cheese, meat mixture, red peppers & sliced olives. Sprinkle with grated parmigano-reggiano & bake an additional 7-10 minutes, until cheese melted. Remove from oven & allow to cool for a few minutes before serving.

Pineapple Chicken over Wild Rice

This week we are celebrating Brion’s birthday. We have never felt the need to give gifts on ‘occasions’ but rather just enjoy another holiday travelling together or ‘gift’ each other at random. As we grow older, it comes clearer everyday, the special privilege it is to simply have each other to share life with. I appreciate the fact that Brion has always believed in me and supported my endeavors and I’ll be forever grateful for the love we share. This picture of Brion was taken in Havana, Cuba this year along the beautiful seawall. 

               THANK YOU FOR BEING THE SPECIAL PERSON YOU ARE!

                                   BIRTHDAY WISHES, WITH LOVE


Print Recipe
Pineapple Chicken over Wild Rice
Votes: 1
Rating: 5
You:
Rate this recipe!
Course Main Dish
Cuisine American, European
Servings
Votes: 1
Rating: 5
You:
Rate this recipe!
Instructions
  1. Preheat oven to 450 F. Lightly spray a 9 x 13-inch baking pan.
  2. Trim chicken, rinse & pat dry; season with salt & pepper. Place the chicken in pan, not overlapping.
  3. Drain pineapple chunks, reserving 1/2 cup of the juice. In a saucepan, whisk together juice, honey, ginger, vinegar & soy sauce. Place over medium heat & simmer, whisking often until slightly thickened, about 8 minutes. In a small bowl, dissolve cornstarch in the water; whisk into the pineapple/honey sauce.
  4. Place the pineapple chunks on top of chicken; pour pineapple/honey sauce over all & sprinkle with the almonds. Bake for 15-20 minutes or until chicken registers 165 F.
Recipe Notes

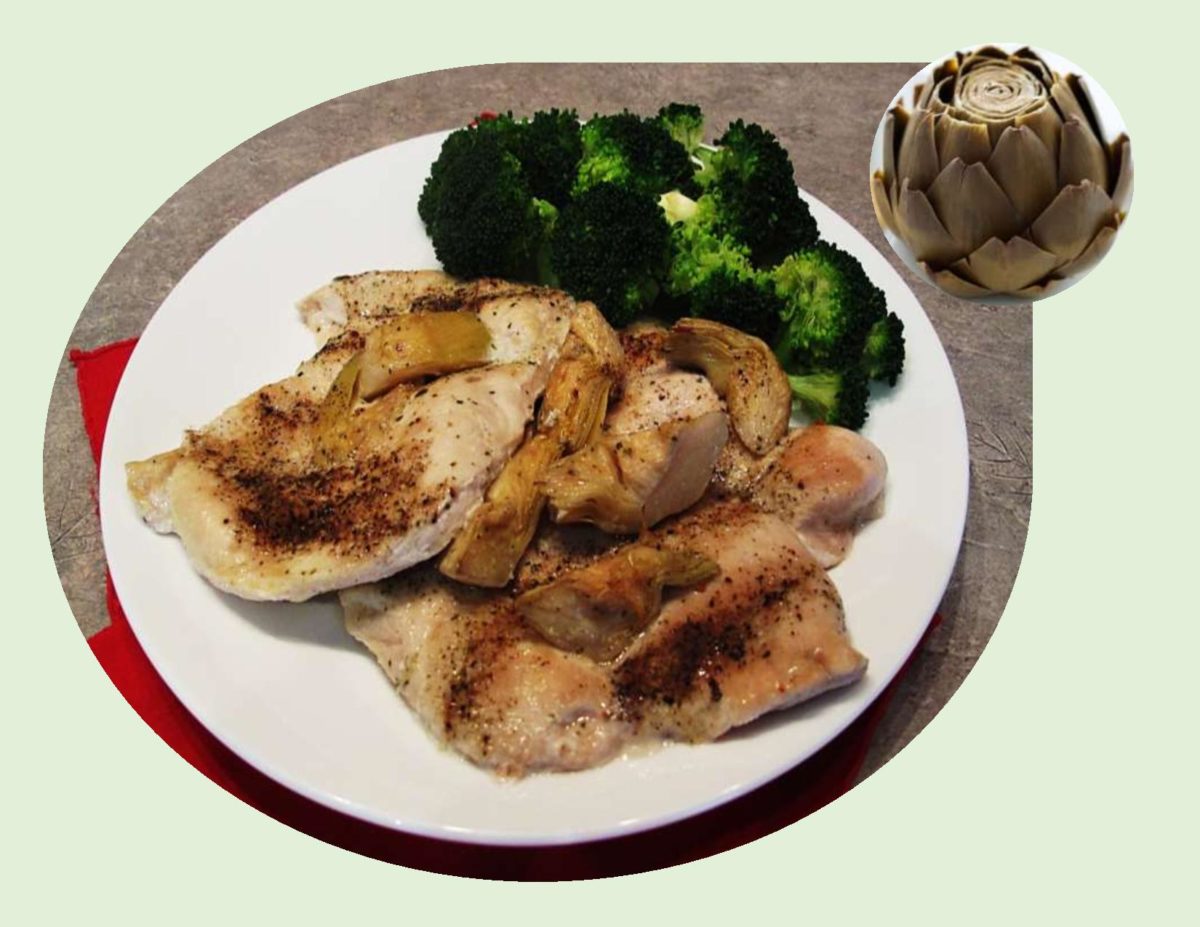
Baked Chicken Breast with Marinated Artichokes

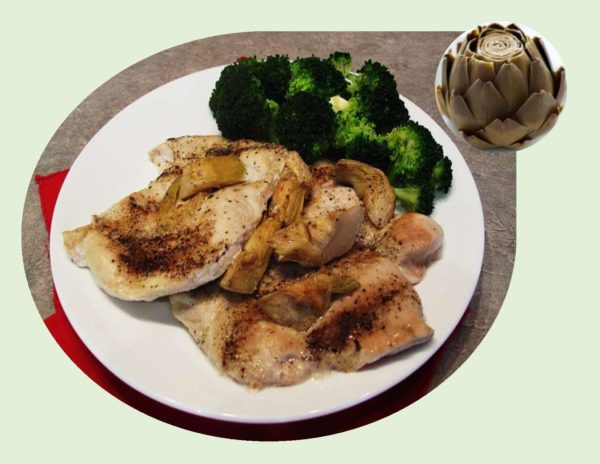
Strangely enough, it has taken Brion and I quite a while to become interested in eating artichokes. When we spent some time in Cuba this year we had a nice meal at an Italian restaurant one evening. The main course was served with some artichokes on it. After tasting them, we realized we should have tried them a long time ago — we have been missing out!

The globe artichoke is a variety of a species of thistle. The edible matter are buds that form within the flower heads before the flowers come into bloom about six months after planting. The buds that are not harvested,  change to a coarse, barely edible form when the flower blooms. They can be harvested as many as 30 times in a season. The peak seasons are spring and early autumn.

Since the bottled marinated version has all the same things you would use in marinating chicken, why not keep it real simple. Combine the chicken with the marinated artichokes, a little salt and pepper and you end up with some nice tender chicken covered in artichokes. Yum!

Print Recipe
Baked Chicken Breast & Marinated Artichokes
Votes: 2
Rating: 5
You:
Rate this recipe!
Course Main Dish
Cuisine American
Servings
Course Main Dish
Cuisine American
Servings
Votes: 2
Rating: 5
You:
Rate this recipe!
Instructions
  1. In a bowl, combine chicken breasts & artichoke hearts with liquid. Cover & refrigerate for 1 hour.
  2. Preheat oven to 325 F. Place chicken, artichokes & 1/4 cup of the liquid into a baking dish. Sprinkle with salt & pepper. Bake for 45-55 minutes or until chicken is cooked through. If you prefer, place under broiler for 2-4 minutes to brown chicken before serving.

Amigos Birthday

Today, December 21st, ‘our’ precious little Amigo is having his 14th birthday. Technically he belongs to my sister Loretta, who adopted him when he was only two months old. If you are a dog lover and have ever been in the presence of a Dachshund, you will understand how easily they can ‘velcro’ themselves onto your heart. Brion and I are accepted by him as if we were his aunt and uncle, so I guess you could call us part of his ‘pack’.

The antics of a Dachshund are priceless. During visits to our house he could come up with all kinds of games. One such game was to put his ball in a chosen spot then sit, out of sight, patiently waiting and watching to see how long it would take you to find it.

To be loved by a Dachshund is truly a privilege of a lifetime never to be taken lightly.

For today’s blog recipe, I thought it would be nice to have roasted chicken breast with a savory-sweet stuffing of apricot and brie, accompanied with small roasted potatoes.

                                       HAPPY BIRTHDAY TO AMIGO!

Print Recipe
Apricot & Brie Stuffed Chicken Breasts
Votes: 1
Rating: 5
You:
Rate this recipe!
Course Main Dish
Cuisine American
Servings
Ingredients
Course Main Dish
Cuisine American
Servings
Ingredients
Votes: 1
Rating: 5
You:
Rate this recipe!
Instructions
Potatoes
  1. Preheat oven to 400 F. In a plastic bag, combine potatoes, olive oil, seasoned salt, pepper, garlic & lemon zest; toss well. Place on a foil lined large baking sheet & roast for 10 minutes.
Chicken Breast/Stuffing
  1. Place walnuts, 1 cup fresh basil & garlic in food processor; slowly add 1 Tbsp olive oil until mixture becomes paste-like. Next add brie, cream cheese & egg to the food processor & pulse until mixed well. Season with salt, pepper & pepper flakes.
  2. Place chicken breasts between 2 sheets of plastic wrap & carefully flatten with a meat mallet. Divide stuffing between the 4 breasts. Roll up or fold over, enclosing filling well. In a small bowl, combine apricot preserves, balsamic vinegar & remaining Tbsp olive oil.
  3. Remove potatoes from oven & slide them around a bit to make room for the chicken. Place the chicken on the pan; brush apricot mixture all over breasts. Place the pan back in the oven & roast for 30-40 minutes or until the chicken is cooked through & potatoes are golden. Garnish with fresh basil if preferred.