No matter how you slice it, cheesecake is truly a dessert that has stood the test of time. From its earliest recorded beginnings to its current iconic status around the world, this creamy cake remains a favorite for dessert lovers of all ages.
The no-bake cheesecake, turned the process of making cheesecake into one that consisted mostly of stirring and chilling. Simply combine cream cheese, milk and Jell-O instant pudding mix, pour into a crust, and chill for an hour or two. The pudding mix sweetens and stabilizes the filling. Essentially foolproof, its a recipe that works every time and tastes custardy and rich with a lighter texture than the traditional cheesecake.
The original recipe for no-bake cheesecake has spawned numerous iterations, many of which were popularized by ‘Jell-O’ itself. The best part about the original formula was that it created harmony between industrialized shortcuts and the real thing. Jell-O eventually launched an entire ‘N0-Bake’ dessert line in 1966.
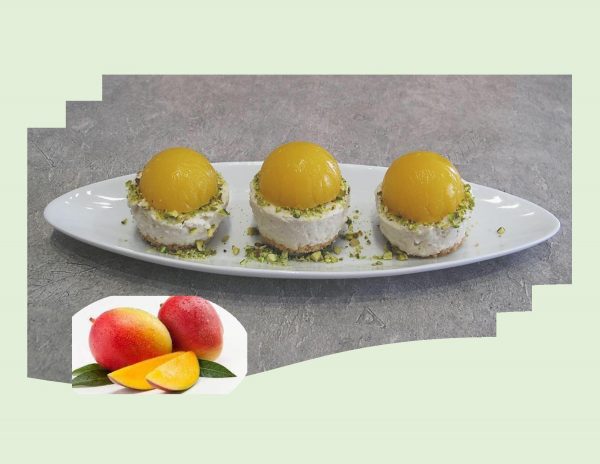
The simplicity of the recipe makes it endlessly adaptable. Of course, you can use different flavored pudding mixes or add spices or extracts to the filling for extra flavor and variation such as cinnamon, cardamom, lemon zest or almond extract. In addition you can serve the cheesecake with fruit or glaze as I’ve done here .
Print Recipe
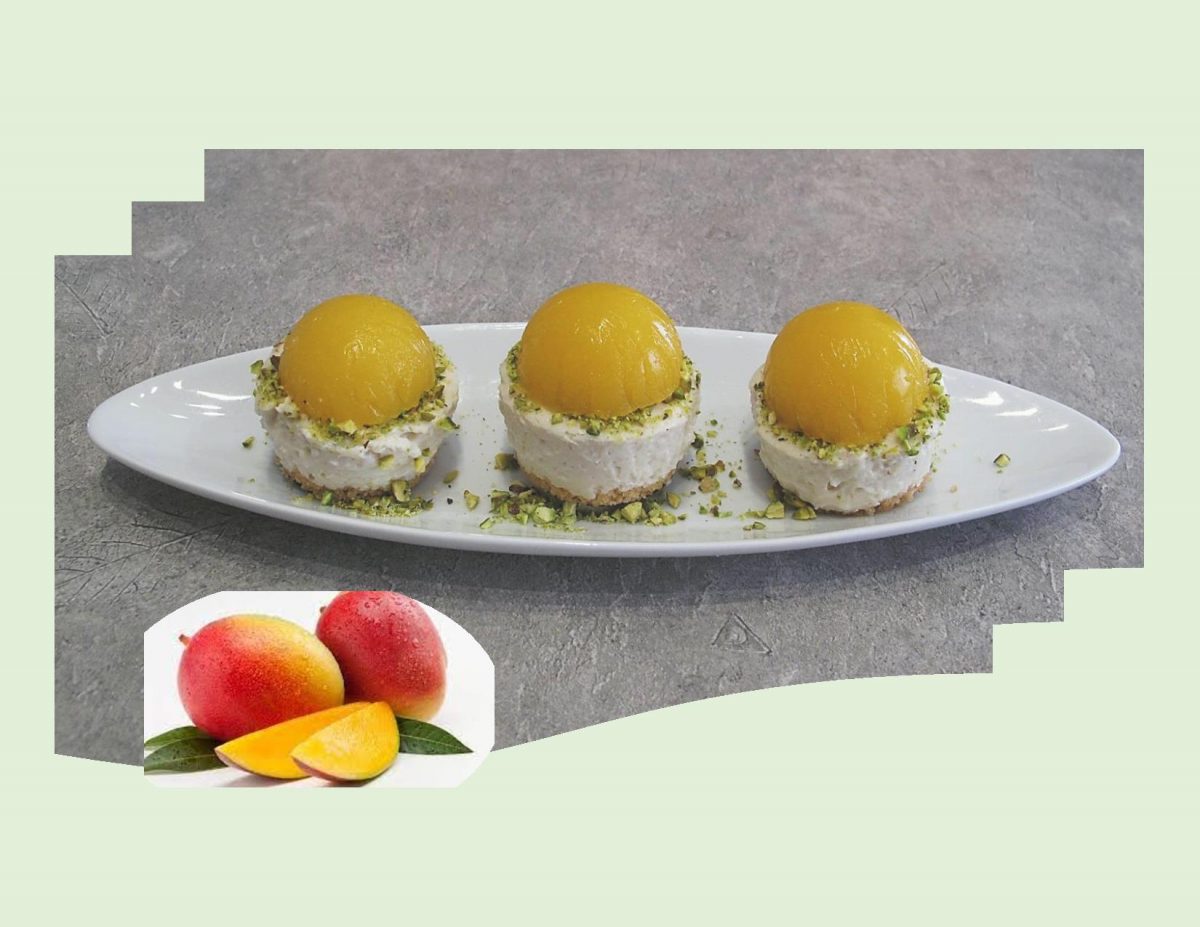
No Bake Mango Cheesecake
Votes: 2
Rating: 5
You:
Rate this recipe!
|
|
Votes: 2
Rating: 5
You:
Rate this recipe!
|
Instructions
Crust
-
In a small bowl, combine crust ingredients, mixing well. Divide between mini cheesecake pan cups & press down firmly. Bake 5-7 minutes; allow to cool completely.
Cheesecake
In a bowl, beat cream cheese 1/2 cup milk until smooth. Add the remaining 1 1/2 cups milk, cardamom & instant pudding mix; beat until smooth. Divide between mini cheesecake pan cups, filling almost to the tops. Allow to chill for at least 2-3 hours.
Glaze
Place all glaze ingredients in saucepan & heat. As it comes to a boil, lower the heat & simmer 3-4 minutes. Turn off the heat & allow the glaze to cool slightly. Divide glaze between mini cheesecakes & allow it to set for 3-4 hours. Ensure that the cheesecake is properly set before topping with the glaze.
Recipe Notes
- For a bit of a different look, I filled my cheesecake cups right to the top. Then I poured my mango glaze into a cake pop pan to set a bit. When the glaze was firm enough I topped each cheesecake with one forming a dome instead of a flat layer.

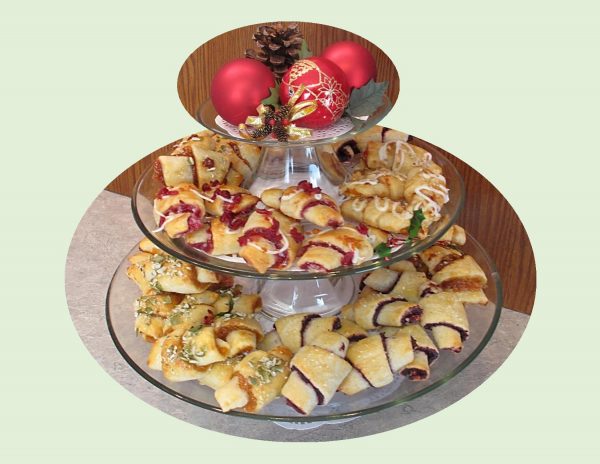
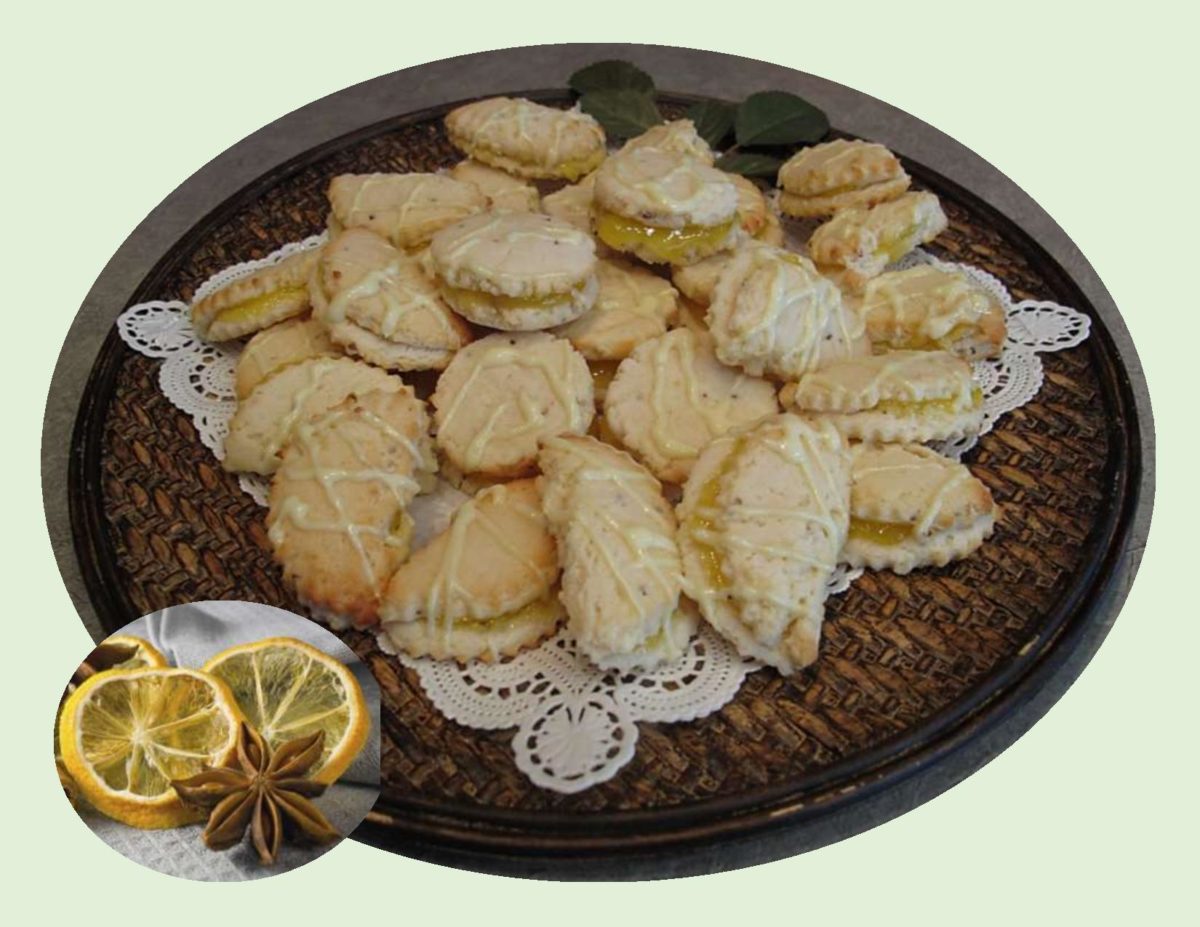
Rugelach is an irresistible baked treat which is both delicious and versatile. So is it a pastry or a cookie? Rugelach’s unique buttery, tender dough wrapped around any variety of tasty fillings seems to straddle the line.
Traditionally, rugelach was made with yeast dough but the pastry has evolved and is now made with cream cheese which is both quicker and easier to make. The cream cheese dough was first used by North American bakers in the 1940’s, and now forms the staple of the modern rugelach we know today.
At this time of year it is a good idea to have rugelach in your entertaining ‘tool box’. Make some up when you have the time and tuck away in the freezer. At a moments notice, flick on the oven, put them on a baking sheet and bake. Fresh pastries …. just like that!
I recall my mother making endless kinds of cookies for the Christmas season. It seems, especially in the European countries, the baking of cookies for Christmas was the barometer of domestic excellence. Baking six kinds normally would generate applause, 12 kinds was regarded with such awe that it was like announcing you had just climbed Mount Everest in high heels.
I thought I’d go for six kinds …. of course when you can use the same cookie dough for 5 or 6 different fillings I suppose that is cheating a bit!
Print Recipe
Rugelach in Six Flavors
Votes: 1
Rating: 5
You:
Rate this recipe!
|
|
Votes: 1
Rating: 5
You:
Rate this recipe!
|
Instructions
Using a food processor, add flour & salt to bowl & pulse briefly to combine. Cut in butter & cream cheese & add along with sour cream. Pulse just until dough forms chunks. You can also make the dough by hand quite easily if a processor is not available.
Divide the dough into six equal portions, about 250 gm each. Press each gently into a disk. Make the disks as round as possible, smoothing their edges. Wrap the disks in plastic wrap & chill the dough about 1 hour or until firm but not hard. While the dough is chilling, assemble your choices of fillings so they are ready to use.
Working with one piece of dough at a time, place it on a floured work surface. Roll it into a 10-inch circle. Spread with one of your filling choices all the way to the edges.
Using a ruler or pizza cutter, divide the circle into 12 wedges. I found using the straight edge of a ruler & pressing it straight down gave me a nice clean cut.
Roll each wedge up from the wide end to the narrow end. Place the rolls point-side down on parchment lined baking sheets. Repeat with the remaining 5 disks & fillings, placing prepared rugelach in the refrigerator until all 72 are made.
At this point, if you wish to freeze the rugelach for later use, place them in the freezer. When the rugelach is firm, transfer to air-tight containers & label.
If you wish to bake them (or some of them) at this time, preheat the oven to 350 F. Remove rugelach from refrigerator, brush carefully with egg wash.
Bake for 25-30 minutes or until golden brown. Remove from oven & cool right on pan. Serve warm or at room temperature.
Recipe Notes
- Personalize your rugelach with the filling you prepare or purchase.
- I found that it worked the best if the filling is of a smooth consistency for cutting purposes. You can add a bit of texture with the toppings.
- Nothing says it can't just be cream cheese sprinkled with cinnamon/sugar.
The fillings I chose to use were:
- Saskatoon Berry w/ Lemon
- Quince & Walnuts
- Spiced Apricot & Mango w/ Pumpkin Seeds
- Cranberry Orange w/ Cream Cheese
- Apple Butter w/ Gouda & Walnuts
- Fig & Gorgonzola w/ Nuts
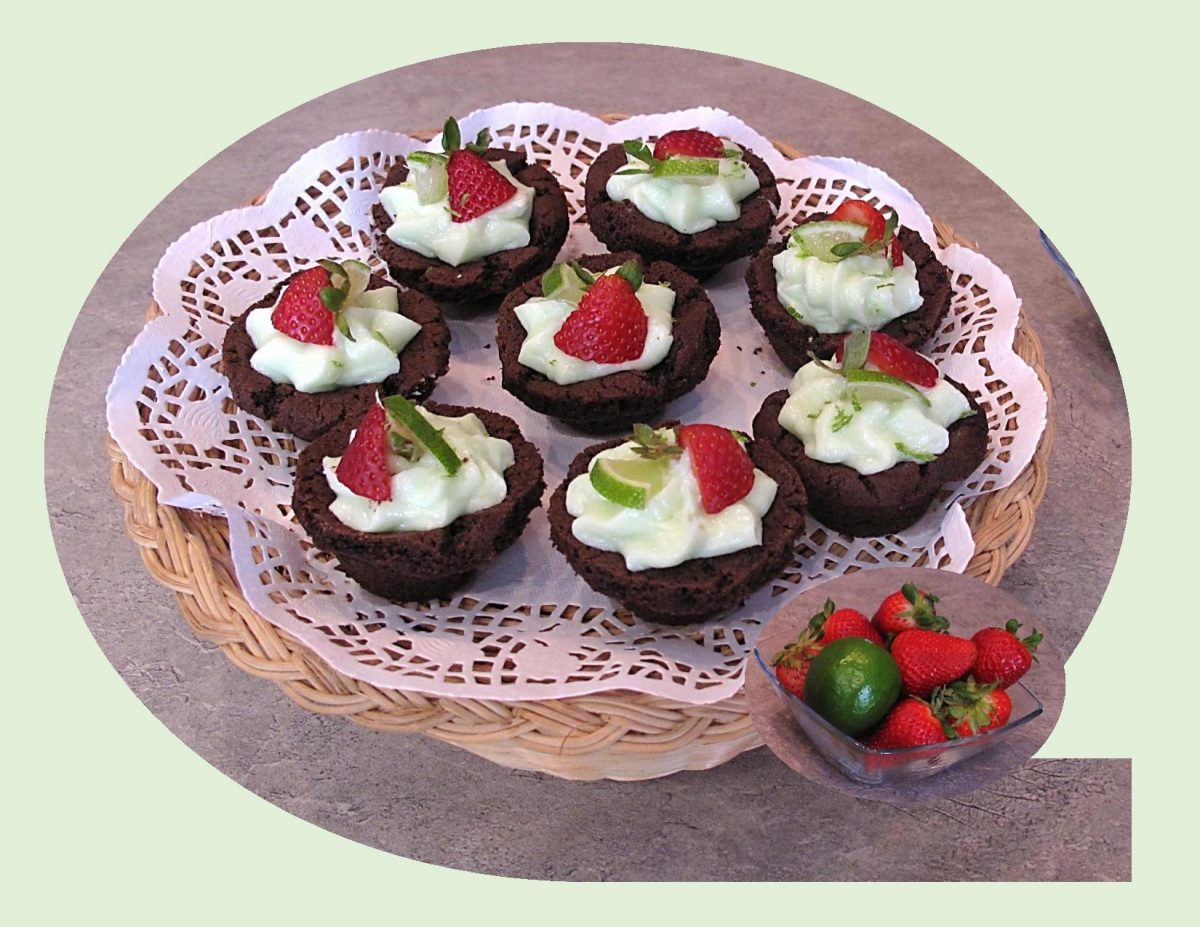
The flavor of lime has not always been one that I have enjoyed. It always seemed to have an overall harsh characteristic about it. After we spent a few holidays in the Yucatan, Brion started using lime juice in his chicken soup and really enjoyed it. From there I swapped out the lemon juice for lime in our guacamole. Now here I am putting it in cheesecake. Who knew it could be that good!
A squeeze of lime juice is vital to many classic dishes. It’s the kick in a margarita, the spark that ignites many curries and the tart foil to sweetness in a host of desserts. Conveniently, for such an indispensable ingredient, limes are available year round.
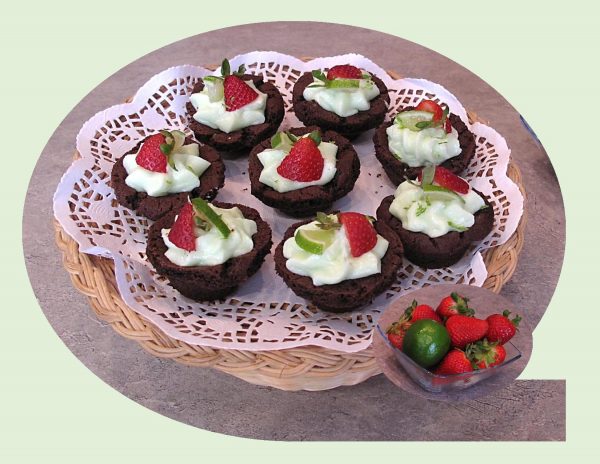
Lime pairs well with apple, berries, cherry, ginger, papaya, plum and strawberry to name a few. Today, I’m using it in a cheesecake filling. It seems like a nice little dessert to start off the month of June.
Print Recipe
Strawberry Lime Cheesecake Cups
Votes: 1
Rating: 5
You:
Rate this recipe!
|
|
Votes: 1
Rating: 5
You:
Rate this recipe!
|
Instructions
Cookie Cups
Preheat oven to 350 F. Butter or coat with cooking spray a miniature or small muffin pan.
In a bowl, cream butter & sugar together for 5-7 minutes until light & fluffy. Add egg & vanilla; beat until combined. Add dry ingredients to wet ingredients; mix until smooth. Dough will be thick.
Shape into 1-inch balls; press onto the bottom & up the sides of muffin cups. Bake for 10-12 minutes. Remove from oven & allow to cool for about 5 minutes, then remove to a cooling rack to finish cooling. If centers aren't cupped enough use the underside of a measuring tablespoon to press the centers down a bit.
Cheesecake Filling
In a bowl, combine cream cheese, sugar & lime juice & beat well. When cookie cups have completely cooled, pipe the filling in them & top with a fresh strawberry. Refrigerate until served.

With Victoria Day week-end upon us, many people will be thinking of outdoor events. For some reason, food just tastes better when it is cooked over a campfire (or barbecue).
To date, no one seems to know who actually started toasting marshmallows on a stick, over a campfire. S’mores have been a camp tradition ever since the recipe first appeared in the 1927 edition of the Girl Scout Handbook. No doubt it was given its name ….. short for ‘some more’.
It seems there are endless campfire dessert concoctions such as: dessert pizza, apple pie foil packets, monkey bread, pineapple upside-down cake foil packets, walnut chocolate burritos, cinnamon buns in orange peel cups, etc., etc.
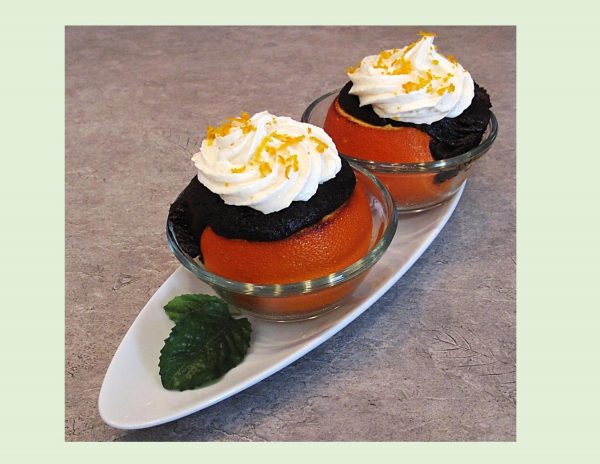
Since Brion & I are not inclined to go camping, I baked these in the oven. The orange peels infuse the chocolate with a fragrant, citrus flavor. Nice!
Print Recipe
Chocolate Cupcakes in Orange Peel Cups
Votes: 1
Rating: 5
You:
Rate this recipe!
|
|
Votes: 1
Rating: 5
You:
Rate this recipe!
|
Instructions
Oranges & Cake
Cut oranges in half. Using a grapefruit knife, remove pulp from each half. Juice the pulp & reserve 1 cup for the cake mix.
Preheat oven to 350 F. In a medium bowl, combine cake mix, eggs, oil & 1 cup freshly squeezed orange juice. Mix until batter has no lumps.
Place the orange cups into a muffin tin & fill with about 1/4 cup each of the chocolate batter. Bake 25 minutes. Remove from oven & allow to cool.
Topping
In a bowl, blend cream cheese, vanilla & orange zest with a hand mixer until smooth. Add butter & mix on medium-high for a couple of minutes. Add powdered sugar & blend until topping is uniformly smooth. Place a dollop of topping on each dessert.
Recipe Notes
If you wish to bake these desserts over a campfire:
- Wrap each orange loosely in aluminium foil, taking care to keep the oranges upright.
- Place the wrapped oranges on the edge of the camp-fire, out of the direct flame but close enough to the embers so the cakes will bake.
- After 25 - 30 minutes remove the cakes from the heat and carefully unwrap. You should see cooked cake peeking out of the orange cup. Leave to cool for 15 minutes before adding a dollop of topping or just eat as is.
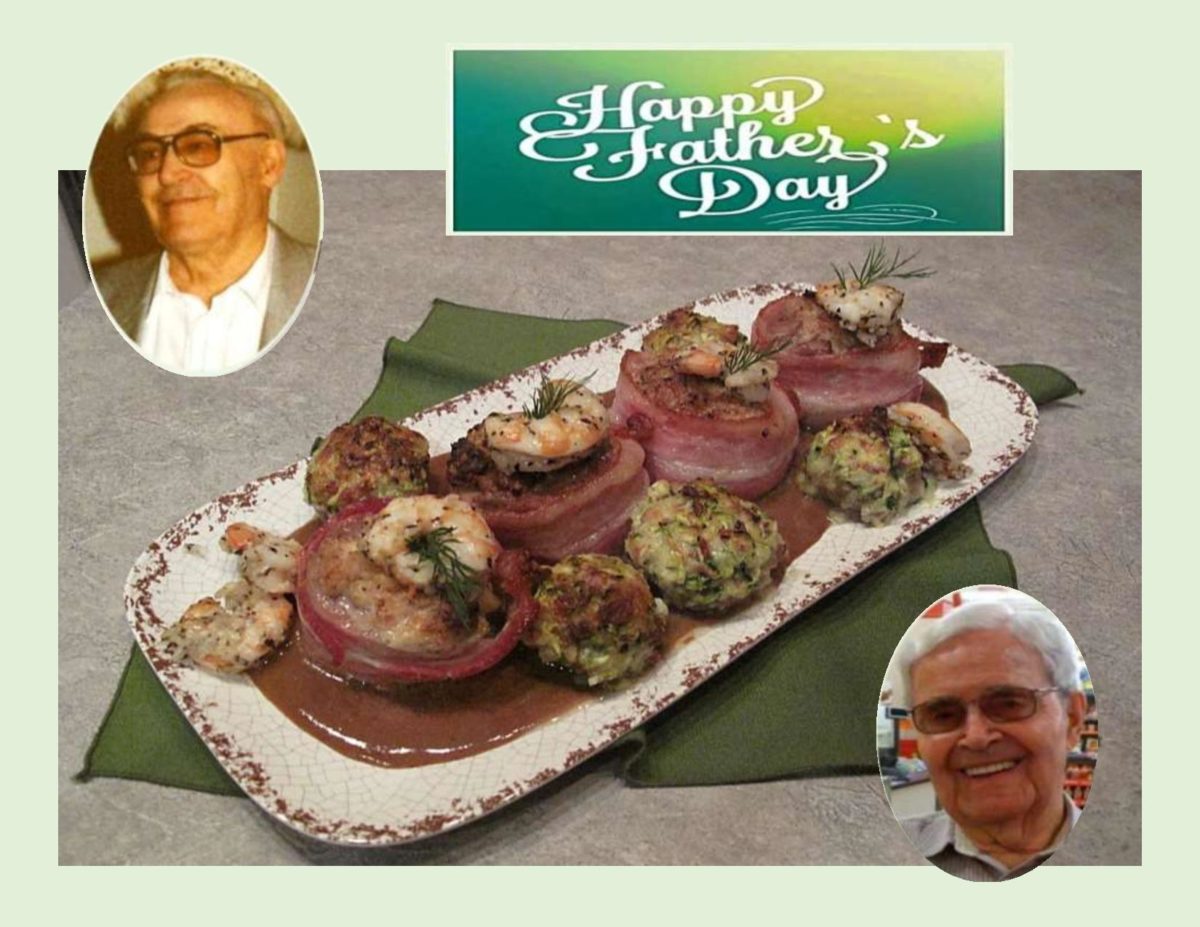
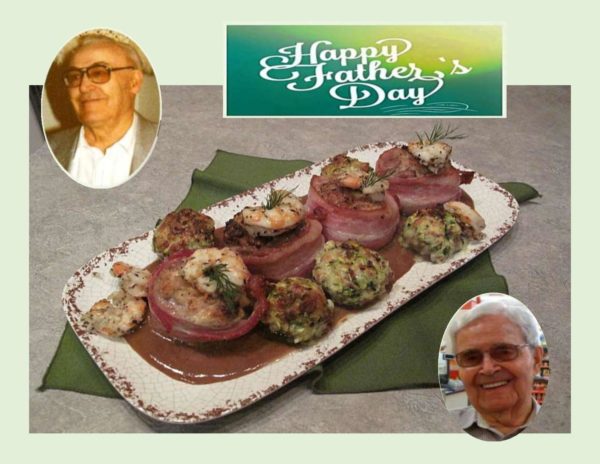
CELEBRATING FATHER’S DAY!
Honoring your father on Father’s Day doesn’t require his physical presence. I feel what is more important, is just the act of doing it. I am very grateful to have had a father who was such a strong role model in my life. Everything he did was driven by his commitment to provide and care for the family he loved.
My father passed away in 2005 and Brion’s in 2011. Both our Dad’s loved to talk and tell stories from their lives. We often wish we could retrace that time and hear their voices again. It seems you never fully appreciate your parents until they are no longer on this earth. It is so important to appreciate every hour they are in your life.
My special meal to honor them on this Father’s Day, is a nice medley of pork, shrimp and mushrooms.
Print Recipe
Seafood Stuffed Pork Medallions with Peppercorn Sauce
Votes: 1
Rating: 5
You:
Rate this recipe!
|
|
Votes: 1
Rating: 5
You:
Rate this recipe!
|
Instructions
Stuffed Mushrooms
Shred zucchini, sprinkle with a little salt & set aside. In a bowl, combine the cheeses, crumbled bacon, egg & seasonings. Squeeze as much liquid from zucchini as possible. Add it to the filling & mix well. Divide the filling between mushrooms. Place a small amount of Zesty Italian dressing in a cup. Dip bottom of each mushroom in dressing & allow to dip off for a few seconds. Place stuffed mushroom caps on a small baking dish making sure they will stay upright. Place in fridge until ready to bake.
Parmesan Shrimp
In a bowl, combine oil, garlic, oregano, basil, Parmesan, salt & pepper. Add shrimp & toss gently; thread onto skewers. Place on a plate & refrigerate until ready to cook.
Stuffing / Tenderloin
In a saucepan, saute garlic & shallots in 1 Tbsp olive oil for a few minutes. Add a few pinches of salt & pepper; stir in breadcrumbs. Add water; stir till all is combined & transfer to a bowl.
In a bowl, cream together butter & cream cheese. Add 1/2 of the capers, the parsley & stir thoroughly. Add the Gruyere & scallops, stirring gently. Set aside.
'Butterfly' tenderloin & pound making it all the same thickness. Spread stuffing evenly on flattened cut side. Starting with the long side, carefully ROLL the tenderloin as opposed to just FOLDING it over. On work surface, lay out bacon strips side by side. Lay stuffed tenderloin at one end & roll up in bacon strips, placing a toothpick at end of each strip.
Preheat the oven to 400 F. In a skillet, heat remaining 2 Tbsp olive oil, add the roast carefully & saute for about 3-4 minutes on each side to cook the bacon a bit. Place a rack in a shallow roasting pan & lay stuffed tenderloin on it; bake at 400 F. for 10 minutes, then reduce heat to 350 F. & bake for another 20 minutes. Remove from oven, set the roast on a cutting board, cover loosely with foil, & let rest while the shrimp & stuffed mushrooms are cooking. When ready to serve, slice into 1 - 1 1/2" thick 'medallions'.
Increase oven temperature to 400 F. Remove stuffed mushrooms from refrigerator, bake for 20-30 minutes or until filling is golden & mushrooms have softened. Meanwhile, line a baking sheet with foil, place skewered shrimp in oven for the last 6-8 minutes of cooking the mushrooms.
Peppercorn Sauce
This can be made earlier or while the last items are cooking in the oven. In a hot skillet, add butter, shallots & peppercorns; stir until shallots are golden, about 1 minute. Add broth & thyme sprigs; reduce heat & allow sauce to simmer for a few minutes. Remove thyme sprigs. Add cream & salt & pepper to taste. If you wish to thicken sauce, combine cornstarch & water in a small dish, stirring until smooth. Add a bit at a time to your hot mixture, stirring until desired thickness is achieved.

Buche de Noel is not just another cake roll. It is THE cake. As in, the iconic French Christmas Cake. It was a tradition, dating from pre-Christian times, to honor the God Thor and celebrate the winter solstice with the building of a bonfire. As Christmas came to replace the winter solstice celebrations, France carried on the tradition for a ‘Yule’ log by cutting down a tree each year and placing it in the fireplace so heat from the log could be used to prepare the Christmas Eve midnight supper. The ashes from this yule log were believed to hold magical and medicinal powers that would ward off the evil spirits in the coming year. Another tradition was started when new homes were built without fireplaces so they could not burn a real yule log. The story goes than an innovative French pastry chef came up with the idea of replacing the real yule log with a cake that was log shaped.
Marzipan and meringue decorations, two of the most popular choices for yule logs, appeared on many a medieval table. Sponge cake, which often constitutes the base of the log, is one of the oldest cakes still made today, dating back to at least 1615.
The beauty of this cake is that you can use any flavor combination that you choose in both the cake and filling. It can range all the way from very basic to very sophisticated. During the many years I worked in the commercial food industry, it was probably one of the most requested desserts with trifle coming in right behind it.
Print Recipe
Walnut Orange Buche de Noel
Votes: 1
Rating: 5
You:
Rate this recipe!
Ingredients
Orange Mascarpone Filling
Ingredients
Orange Mascarpone Filling
|
Votes: 1
Rating: 5
You:
Rate this recipe!
|
Instructions
Cake Roll
Preheat oven to 300 F. Line a 12 X 17-inch rimmed baking sheet with parchment paper. Spray & flour parchment, tapping off excess; set aside. In a food processor, pulse walnuts with flour until coarsely ground; set aside.
In the bowl of an electric mixer, whisk egg yolks with 5 Tbsp sugar until thick & pale. Beat in vanilla. In a clean mixing bowl fitted with a clean whisk, beat egg whites with salt until soft peaks. form. Gradually add remaining 5 Tbsp sugar, beating until stiff, glossy peaks form. Fold egg whites into yolk mixture in 3 equal batches; add walnut/flour mixture with last batch.
Spread batter evenly in prepared baking pan. Bake until top is golden & springs back when touched, about 30 minutes. Run a small sharp knife around edges of cake; invert cake onto a clean, dry towel dusted with powdered sugar. Peel off parchment paper. Starting at short side, gently roll the cake into a log, incorporating towel. Transfer to a wire rack, cool completely for about 1 hour.
Orange Mascarpone Filling
In a bowl of an electric mixer fitted with a paddle attachment, beat all ingredients except heavy cream, until smooth. Gently fold in whipped cream.
Chocolate Bark
Line a baking sheet with parchment paper; set aside. Place chocolate in a small heat-proof bowl; set over a pan of simmering water, stir until melted. Remove bowl from heat; let chocolate cool, stirring occasionally, until it registers 88 degrees on a candy thermometer.
Pour onto prepared baking sheet; spread evenly with an offset spatula. Refrigerate until firm but still pliable, 8-10 minutes. Tear into jagged pieces, no larger than 1 1/2-inches each. Refrigerate until firm, about 15 minutes.
Meringue Mushrooms
Preheat oven to 200 F. Line 2 baking sheets with parchment paper. In a bowl, beat egg whites until frothy; add cream of tartar. Continue beating until soft peaks form then increase speed to high & gradually add sugar, 1 tsp at a time. Beat egg whites until shiny & hold stiff peaks, being careful not to dry. Spoon meringue into a large pastry bag fitted with a 1/2-inch round tip.
For Mushroom Caps: hold the pastry bag at a 90 degree angle about 1/2-inch from the parchment. Using firm & even pressure, squeeze out a round meringue disk about 2-inches in diameter & 1-inch high. Stop squeezing, then twist the bag & lift it from the meringue to get a clean 'break' from the cap. Repeat in regular intervals on the baking sheet until you have approximately 2 dozen mushroom caps. You can smooth out the tops by wetting you index finger & lightly running it along the caps.
For Stems: Position the bag perpendicular, about 1/2-inch from the baking sheet. Begin squeezing the bag to form a 1-inch round base. Continue to squeeze as you slowly & evenly draw the bag up, forming a tapering stem about 1 1/2-inches tall. Use the remaining meringue to pipe as many stems as possible.
Bake the meringues for about 90 minutes, turning them halfway through the cooking time to ensure even baking. The meringues should be hard to the touch & easy to lift off the parchment. Once they are done, turn off the oven & let them sit in the oven for several hours.
To Assemble the Mushrooms: melt white chocolate in a small bowl in the microwave, stirring after every 30 seconds to prevent overheating. Use a toothpick to carve a small hole in the bottom of a mushroom cap. Dip the top of a stem into white chocolate, then place the stem in the hole on the bottom of mushroom cap. Repeat until all caps & stems are used; placing them on a baking sheet. Place cocoa powder in a wire sieve & lightly dust tops of the mushrooms.
Due to the amount of time required to make mushrooms, it is nice if you can do this well in advance. Mushrooms can be stored for up to a month in an airtight container in a cool, dark room. Humidity can make them collapse, so do not place them on a cake (or in the refrigerator) until immediately before serving.
Assembly of Buche de Noel
Reserve 1 1/2 cups mascarpone filling. Unroll cake & spread with remaining filling, leaving a 1/2-inch border on all sides. Carefully re-roll cake. Arrange, seam side down, on serving platter. Spread top & sides ONLY with remaining 1 1/2 cups mascarpone filling. Using a serrated knife, trim off ends of log to even it ( if you wish ). Arrange chocolate bark, overlapping pieces slightly, to look like wood bark. Refrigerate until firm, at least 1 hour. Garnish with meringue mushrooms, fresh, whole cranberries, marzipan holly leaves, a dusting of powdered sugar or whatever is your choice.
-
