CELEBRATING HERITAGE DAYS!
Heritage Festival in our city of Edmonton, Alberta Canada is one of the world’s largest multicultural events, taking place every August. It features over 70 pavilions representing almost 100 countries set up in William Hawrelak Park. All ethnic minorities of Canada come together to exchange experiences, entertainment, cultures and to celebrate Canada’s diversity. Thousands of visitors come to enjoy the tastes, smells and sounds of different nations around the world.
Due to the Covid-19 world pandemic this year, the annual August long weekend tradition of the Edmonton Heritage Festival will not be celebrated in Hawrelak Park, and is instead being reformatted from an on-site event into a virtual festival. You will be able to enjoy performances from past events, entertainment from countries around the world, explore new cultures and authentic recipes, as well as order food from local Edmonton restaurants. More than 40 pavilions are ready to celebrate our heritage online.
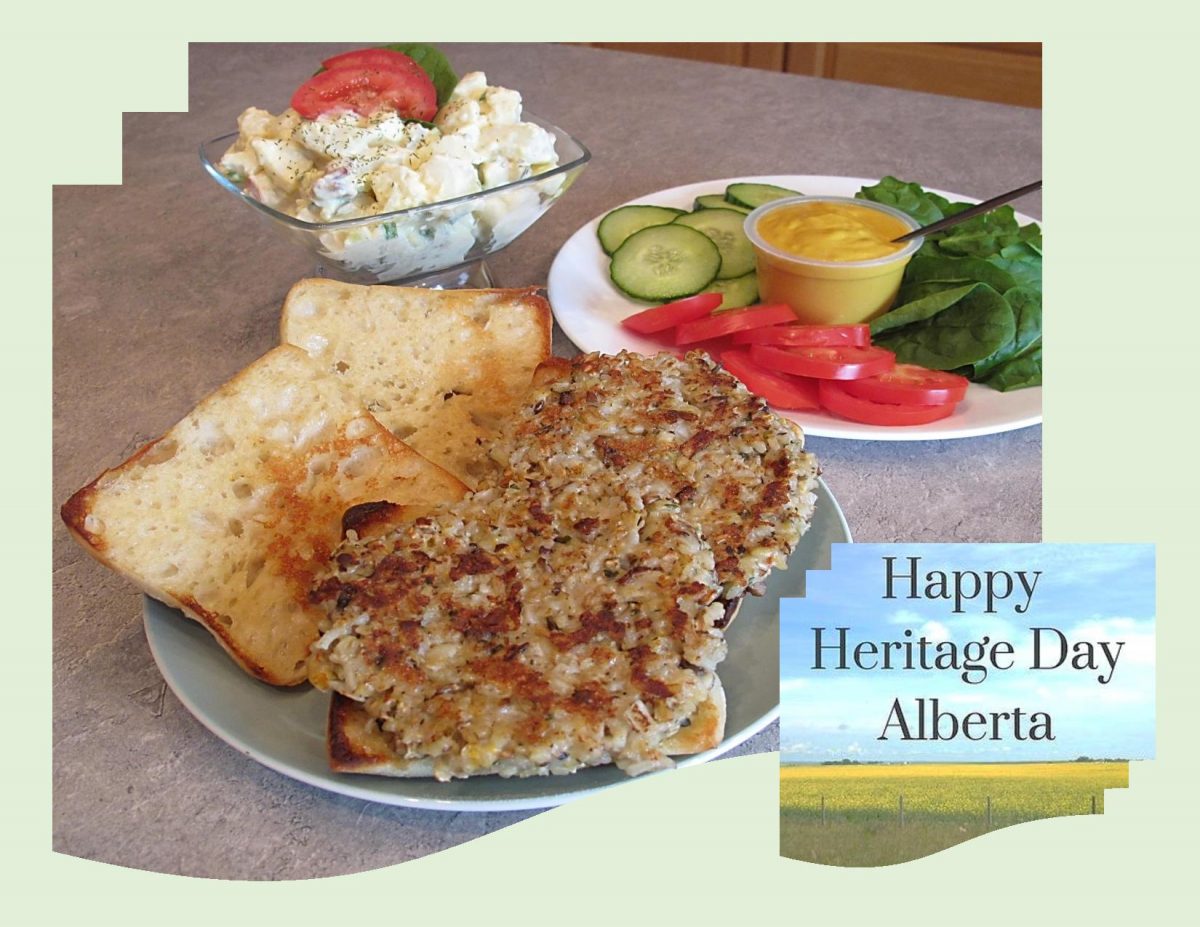
These grain burgers are one of my favorite ‘burgers’. Heritage Day seems like a good reason to enjoy some!
Print Recipe
Garden Grain Burgers
Votes: 1
Rating: 5
You:
Rate this recipe!
Ingredients
- 1/2 cup brown rice, uncooked
- 1/2 cup bulgur wheat, uncooked
- 1 Tbsp salt-free seasoning blend
- 1/4 tsp poultry seasoning
- 2 cups water
- 2 cups fresh mushrooms, finely chopped
- 3/4 cup old-fashioned oats
- 112 grams (1 cup) mozzarella cheese, part-skim, shredded
- 30 grams (1/4) cheddar cheese, low-fat, shredded
- 1/3 cup onion, finely chopped
- 1 cup cottage cheese, fat-free
- 1/2 cup egg substitute OR 2 whole eggs
- 2 Tbsp fresh parsley, minced
- 1 tsp salt
- 1/2 tsp dried basil
- 1/4 tsp celery seed
- 1 Tbsp veg oil
- 12 Ciabatta buns or your choice
- lettuce, tomato slices, mustard for toppings
|
Votes: 1
Rating: 5
You:
Rate this recipe!
|
Instructions
In a large saucepan, combine rice, bulgur wheat, seasoning blend, poultry seasoning & water; bring to a boil. Reduce heat; cover & simmer for 30 minutes or until rice is tender. Remove from heat; cool completely. Cover & refrigerate overnight if possible.
In a large bowl, combine mushrooms, oats, mozzarella cheese, cheddar & onion. In a food processor, process cottage cheese & egg substitute until smooth; add to the mushroom mixture. Stir in parsley, salt, basil, celery seed & chilled rice mixture. Divide mixture into 12 balls & shape into patties.
On a large non-stick griddle, cook patties in oil for 5 minutes on each side or until lightly browned & crisp. Serve on lightly grilled Ciabatta buns with your choice of garnishes.
Recipe Notes
- If using a BBQ, place patties on a oiled sheet of foil paper to grill.

Vegetables may seem like unusual ingredients to use in baked goods, but this style of cooking is actually the perfect combination of savory comfort and earthy, wholesome flavor.
I know this isn’t a new concept. We have all eaten our fair share of zucchini bread and carrot cake but if you haven’t tried using sweet potato in baking, you should.
The naturally sweet, super-creamy ingredient can go way beyond the classic Thanksgiving casserole dish. Sweet or savory, sweet potatoes are versatile magic-makers. Not only will they add a pop of color but they can reduce the need for some of the expected flour, eggs and/or sugar as well as help in retaining moisture to keep baking from drying out.
In this loaf cake, I paired the sweet potato with some clementine orange, resulting in a real nice flavor!
Print Recipe
Sweet Potato & Clementine Loaf Cake
Votes: 1
Rating: 5
You:
Rate this recipe!
|
|
Votes: 1
Rating: 5
You:
Rate this recipe!
|
Instructions
Candied Clementine
Thinly slice clementine orange into 1/4-inch rounds. Remove any seeds. Boil sugar & water in a saucepan. Reduce heat to medium-low, then carefully add slices. Simmer until slices look slightly translucent, about 20 minutes. Remove from heat; lay candied slices on a wire rack & reserve syrup for cake batter.
Cake
Prick unpeeled small sweet potato several times with a fork. Microwave on high until tender, turning halfway through, 5-8 minutes. Allow to cool about 20 minutes. Cut in half & scoop into a small bowl. Mash until smooth. Reserve 1/3 cup for cake. The rest can be used for something else or eaten as is.
Preheat oven to 350 F. Line or spray a 9 X 5-inch loaf pan.
Rub 1/2 cup sugar & orange zest in a medium bowl with your hands to release natural oils. Whisk in flour, baking powder & salt.
In large bowl, whisk eggs, oil, 1/3 cup mashed sweet potato, orange juice & reserved candied clementine syrup. Stir in flour mixture until just combined. Scrape into prepared loaf pan & smooth top.
Bake 35-40 minutes or until tests done. Cover loosely with foil if browning too quickly. Allow loaf to cool for 10 minutes in pan; remove to a rack to cool completely.
Glaze
In a small bowl, whisk together powdered sugar, marmalade & lemon juice. Brush loaf with glaze, then decorate with candied clementine slices.
Recipe Notes
- Clementine rind is a little to bitter for our liking so I just removed it after it was candied & used the flesh.
CELEBRATING VICTORIA DAY!
Victoria Day is the distinctly Canadian holiday that serves as the official marker to end winter. For Canadians, this is the first long week-end since Easter and a good excuse to celebrate the beginning of the summer season. Camping and barbecuing are the name of the game but this year in view of the pandemic crisis, things are quite a bit more subdued.
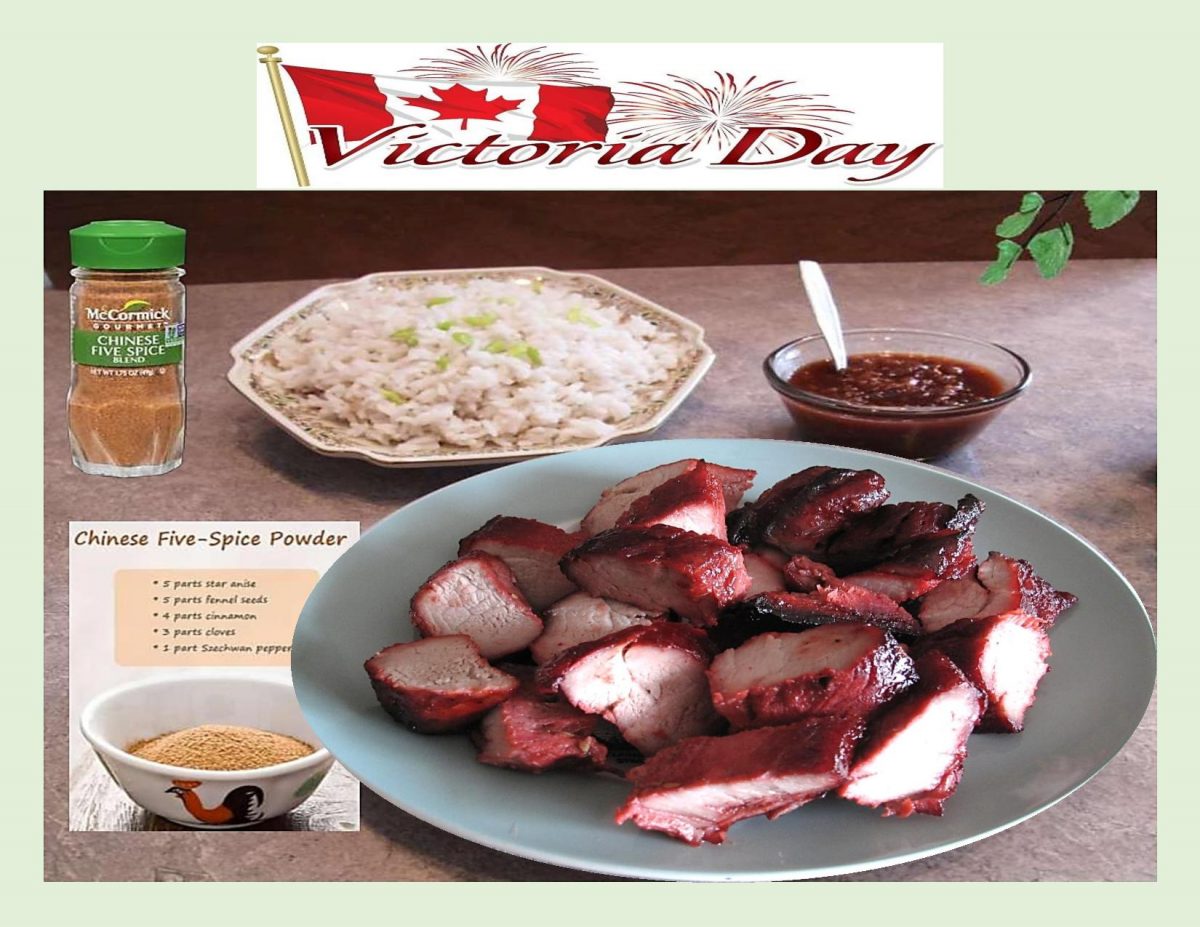
In keeping with the spirit of a ‘seasonal barbecue’ on this holiday, Brion & I are having some char siu pork tenderloin.
Char siu is a dish made from seasoned boneless pork. The pork is covered in a sweet, savory glaze and placed on wooden skewers or forks over low heat. Its cooked until tender but not falling apart. The use of the skewers changes how the meat cooks. It should heat slowly and evenly from all sides. The char siu marinade is very distinctive in its flavor.
Many cuts of pork can be used in char siu such as neck meat, pork belly and pork butt. Just about any lean boneless cut will work but I like pork tenderloin the best.
Char siu has been around for many years and was generally roasted over a fire. Nowadays, its either cooked in an oven or on an outdoor grill. No matter which way you choose to cook char siu, the shiny red glaze gives it a very unique look and flavor. Char siu doesn’t have a lot of fancy ingredients or a complicated procedure. Instead, it pairs a tasty marinade with a lean cut of quality meat for a super good meal.
Print Recipe
Char Siu - Chinese Roast/Barbecued Pork
Votes: 1
Rating: 5
You:
Rate this recipe!
|
|
Votes: 1
Rating: 5
You:
Rate this recipe!
|
Instructions
Marinade
Whisk marinade ingredients together in a bowl. Cut pork in half horizontally to make two long, flat, thin pieces about 2 X 1-inches in thickness. Place the pork & marinade in a zip-lock bag. Marinate 24 - 48 hours in refrigerator (3 hours is the bare minimum). Soak wooden skewers in water while meat marinades.
To Roast
Preheat oven to 350 F. Line a deep baking tray with foil.
Remove pork from marinade, save marinade. Thread meat onto soaked skewers. The skewers will naturally suspend the meat above the baking tray with plenty of room to ensure that the meat is cooked evenly from all sides. A small amount of water in the bottom of the baking tray will help to keep the meat moist while its roasting.
Pour reserved marinade in a saucepan & combine with the 2 Tbsp of extra honey. Bring to a simmer over medium-high heat & cook for 2 minutes until syrupy. Remove from heat.
Around halfway through roasting, baste generously with the reserved marinade. Try to get as much marinade on the meat as possible as it is the key for getting the thick glossy glaze. When finished roasting, the meat should be tender but not falling apart. Allow to rest for 10 minutes before slicing.
Recipe Notes
- One of the key ingredients that gives char siu its wonderful taste is hoisin sauce.
- Chinese five spice refers to a mixture of spices used commonly in Chinese cooking. Each brand varies in terms of content.

If you like corn, chances are you are also a big fan of cornbread in its many interesting forms. I used to think that cornbread was so good it didn’t need anything extra thrown in the ‘mix’.
Cornbread appeals to all of our senses, a pop and sizzle as batter pours onto a hot griddle, the earthy fragrance that fills the kitchen when its baking. Then there’s the taste …. !! We love what makes us feel good, especially comfort foods that are warm, simple and delicious.
The beauty of cornbread is that it can take on so many different flavors. It can be sweet, savory or as spicy as you would like. Thanks to its simplicity, there are very few food items it wouldn’t pair with, so the limits to cornbread-based culinary creations are endless.
While this isn’t necessarily your classic cornbread it makes a very interesting meal served with a baked potato and some Parmesan zucchini fries.
Print Recipe
Ham & Cheese Cornbread Roll
Votes: 1
Rating: 5
You:
Rate this recipe!
|
|
Votes: 1
Rating: 5
You:
Rate this recipe!
|
Instructions
Cornbread Roll
Preheat oven to 400 F. Line a 15 X 10 X 1-inch jelly-roll pan with parchment paper. Set aside.
In a small bowl, whisk together cornmeal, flour, sugar & baking powder; set aside. With a hand mixer, beat egg whites with cream of tartar until stiff but not dry. Alternately fold in cornmeal mixture & oil; fold in cheddar cheese saving some to sprinkle on top of roll before placing in the oven.
Spread batter evenly in prepared pan & bake for 5-6 minutes (top should spring back when lightly touched with finger; do NOT over bake). Remove from oven & turn bread onto a towel that has been lightly sprinkled with cornmeal. Remove & discard parchment paper. Starting at narrow end, roll bread with towel; set on a wire rack & allow to cool for 5 minutes.
Filling
In a small bowl, mash together butter, mustard, onion & Worcestershire sauce until combined & thick. Unroll bread, remove towel & top with ham slices; spread filling mixture over ham & sprinkle with shredded Swiss cheese. Reroll bread & place, seam side down on lined jelly roll pan. Sprinkle with remaining cheddar cheese & bake until cheese is melted, about 5-6 minutes.
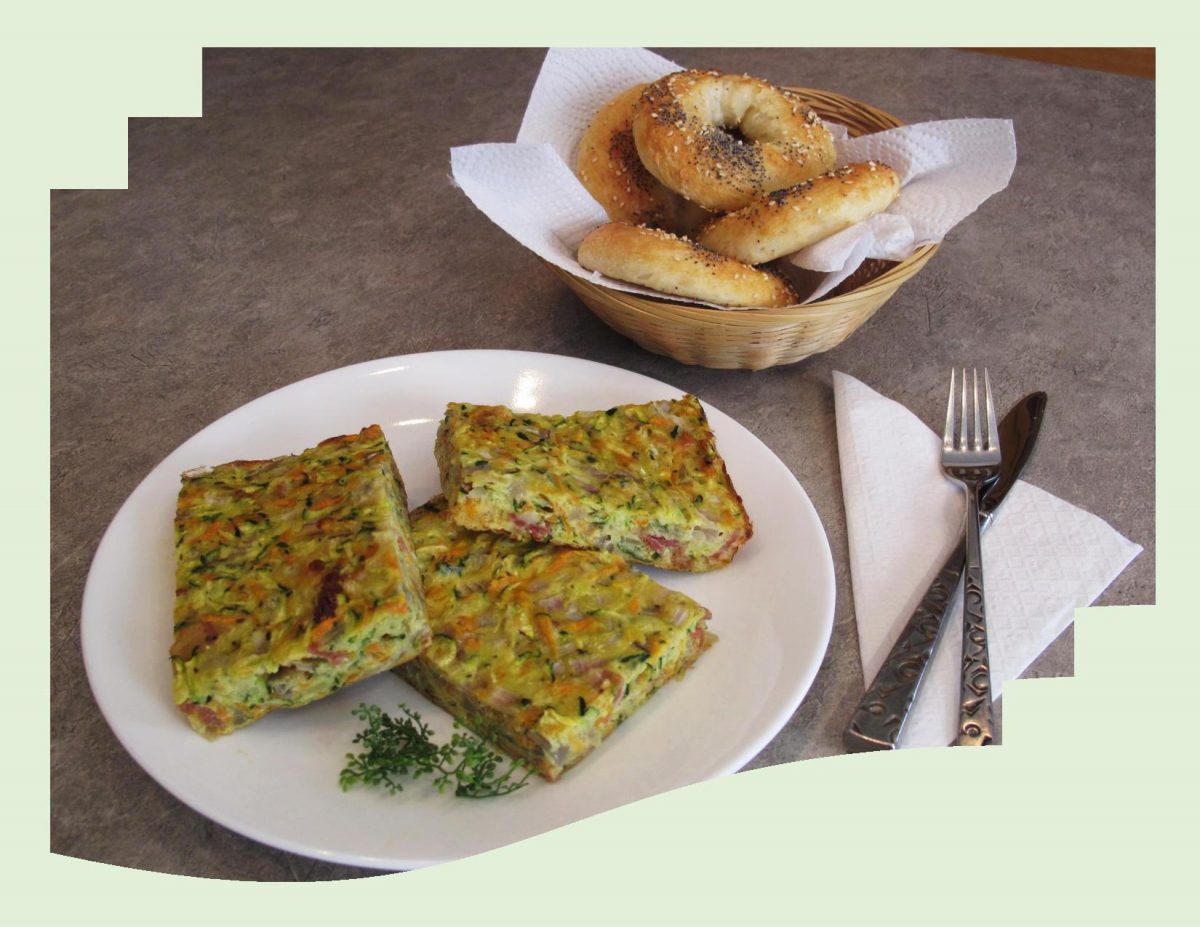
I guess if I were trying to classify this meal, I would put it somewhere between a crustless quiche and a frittata. Sometimes you just put together ingredients you like and it tastes amazing. There’s no incredible back story or cooking revelation, its just turns out to be a great meal.
Quiche and frittata are both egg dishes but they’re not just for breakfast anymore. The difference is the quiche, crustless or not, is made by adding ingredients to a custard base of eggs and heavy cream, milk or half & half that is poured into a baking dish and baked. With frittatas, eggs dominate and little or no cream or milk is used.
Usually they are first cooked in a pan on the top of the stove and then finished in the oven. These vegetable-bacon squares need only to be baked in the oven. For a nice compliment to this meal, I made some quick 5-ingredient bagels … no yeast or boiling required.
Print Recipe
Vegetable-Bacon Squares w/ Baked Bagels
Votes: 1
Rating: 5
You:
Rate this recipe!
|
|
Votes: 1
Rating: 5
You:
Rate this recipe!
|
Instructions
Veg-Bacon Squares
Preheat oven to 325 F. Butter a 9 X 9-inch baking dish; set aside.
In a large bowl, beat eggs until a little bit frothy. Sift in the flour & beat until well combined then whisk in oil. Add zucchini, carrot, onion, bacon & cheese; gently mix to combine.
Pour into prepared baking dish, smooth the top & bake for about 30-35 minutes or until 'set'. Allow to cool slightly before cutting into serving pieces.
Baked Bagels
Preheat oven to 375 F. Place parchment over a wire rack on a baking sheet.
In a bowl, whisk flour, baking powder & salt. Add yogurt & mix with a fork until combined. It should resemble small crumbles. Lightly flour work surface & knead dough a few times until tacky but not sticky. Dough should not stick to your hands at this point.
Divide into 4 equal balls. Roll each ball into 3/4-inch thick ropes & join the ends to form bagels. Top with egg wash & sprinkle with a topping of your choice or just leave plain. Bake on the top rack of the oven for 25 minutes. Let cool at least 15 minutes before cutting.

A little touch of exotic seems like a good idea in late February. When you think of bananas and papaya, doesn’t tropical come to mind? I never seem to have much luck when I bake with bananas. I would rather eat them raw, in fact you might say they are a staple at our house. But, I have hung on to this muffin recipe for a long time and never tried it. Papayas are not something I usually buy, but that soft buttery texture and slight musky undertone paired with banana should work magic in this recipe.
You will notice the name of the recipe says ‘spiced’ and when you read it there is only one teaspoon of cardamom spice in it. A little bit of this pungent spice packs a big punch so it is good to use it sparingly. The flavor of cardamom is wonderfully complex … herbal, spicy, floral and slightly sweet.
Cardamom is a spice that’s used in both sweet and savory cooking in many cuisines all over the world. No other spice more completely captures the essence of the exotic and that exactly what I was aiming for.
Print Recipe
Spiced Papaya-Banana Muffins
Votes: 1
Rating: 5
You:
Rate this recipe!
|
|
Votes: 1
Rating: 5
You:
Rate this recipe!
|
Instructions
-
In a bowl, whisk together flour, sugar, cardamom & baking powder. In another bowl, combine mashed banana, papaya, oil & beaten egg.
Add wet ingredients to flour mixture, stirring gently, then fold in pistachios. Stir ONLY until batter is combined.
Put batter in muffin tray cups lined with paper cups, filling each to about 3/4 full. Top with remaining chopped pistachios.
Bake for about 18-20 minutes or until baked through. Remove from oven & let them cool in the tray for 10 minutes, then put the muffins on a wire rack to finish cooling.
Recipe Notes
- This recipe makes either 7 large muffins or 14 medium size.

Yucatan food is markedly different from Mexican food as most of us know it. One reason is, of course, the pronounced Mayan influence, but numerous other cultures have left their mark on the cuisine as well. From the British and Spanish to the Lebanese and even the Dutch with their Edam cheese. No one knows for sure how the Dutch cheese got to this part of Mexico … some attribute it to Caribbean trade routes, others claim wealthy Yucatan hacienda owners who grew ‘henequen’, (a fiber used to make rope), brought it back from their European travels.
Like many desserts and culinary traditions around the world, the invention of ‘marquesitas’ has its own unique story. Legend has it that the marquesita was invented in the city of Merida, Mexico. During one cold (??) winter when ice cream sales were down, an ice cream vendor started experimenting with ideas to use the waffle cone in a different way. It was then that the marquesita began to take shape.
Marquesitas are like crunchy crepes: a batter is poured into what looks like a waffle maker, sweet or savory add-ins are tossed in, then the whole thing is rolled up once its crispy. The crepe itself tastes like a waffle cone with hints of vanilla and almond … but its all about what sweet and savory fillings you choose. Traditionally, Dutch Edam cheese was shaved right into the crepe.
Votes: 1
Rating: 5
You:
Rate this recipe!
|
|
Votes: 1
Rating: 5
You:
Rate this recipe!
|
Instructions
In a blender, place all ingredients EXCEPT cheese & puree until smooth. Set aside for 10 minutes or cover & refrigerate up to 12 hours. Stir before using.
If a marquesita iron is not available a 10-inch crepe pan or even just a flat bottomed non-stick skillet will do just fine. Heat skillet over medium-high heat. Once hot, pour about 1/4 cup batter out in a 10-inch circular shape. You want to create a very thin layer. Once the bottom begins to become toasted & golden , loosen the edges with a spatula & flip to toast the other side.
Sprinkle the marquesita with some grated cheese while it is still pliable. Roll up into a big, wide roll. Finish with some gated cheese on top. You can add whatever filling you choose ... sweet or savory!

Ever since I made pizza with yeasted potato crust it has become a staple in our meal rotation list. It seems like all it takes to come up with an amazing filling combo is just a little inspiration so the influence of flavors Brion and I tasted in Mexico became a natural choice for me.
Although avocado on pizza may sound weird, if you are a guacamole lover, its glorious. When you think about it, tomato or tomato sauce is a big part of pizza most of the time. Often guacamole is made with tomato, so it compliments pizza well. I used all the ingredients you would normally fit into a tortilla for toppings. Spicy chicken, bacon, avocado, onion, tomato, cheese and GUACAMOLE!
When I make guacamole for pizza, I like to keep it simple: mashed avocados, onion, garlic, lime juice, salt and cilantro. Another thing I found, was that any left over pieces can be wrapped tightly in plastic wrap and placed in a freezer bag and frozen. When you want to use them, thaw at room temperature then heat slightly in the microwave. Most often pizza is frozen unbaked and needs assembly and baking. This pizza tasted just as good as when it was freshly baked!
Print Recipe
Spicy Chicken, Bacon & Avocado Pizza
Votes: 1
Rating: 5
You:
Rate this recipe!
Ingredients
Pizza Toppings
- Marinated chicken strips
- 3-4 slices bacon, crisply cooked, coarsley chopped
- 1/4 cup onion, chopped & cooked a few minutes in the microwave
- 1 EACH red & green pepper, small, julienned
- 1 large Roma tomato, seeded & chopped
- 1 avocado, peeled, seeded & sliced thin
- 100 grams Gouda or your choice of cheese, shredded
- 100 grams 100% mozzarella cheese, shredded
- 1/2 cup Guacamole
|
Votes: 1
Rating: 5
You:
Rate this recipe!
|
Instructions
Pizza Dough
Cook potato, peel, mash & cool. Combine yeast with lukewarm water; whisk until yeast is dissolved. Let stand about 3 minutes until foamy. Add butter, salt, sour cream & potato; mix well.
Stir in flour, one cup at a time. When dough is completely blended, turn onto a lightly floured surface. Knead dough about 10 minutes, until smooth & elastic. Place dough in a lightly greased bowl, cover with a tea towel & allow to rise in a warm place until doubled in bulk, about 1 hour.
Chicken Marinade
In a large resealable plastic bag, combine all ingredients. Seal & turn to coat; refrigerate for 1-4 hours.
Guacamole
In a large bowl, coarsely mash avocados with lime juice & salt. Stir in garlic, onion & cilantro. Blend well. Cover & set aside until ready to use. You will have extra for something else.
Pizza Topping Prep
In a skillet, cook bacon until fairly crisp, drain on paper towels & chop coarsely. Wipe skillet with paper towel. Add marinated chicken, stir-fry until cooked then remove to a dish. Add peppers & onion to skillet; sauteing until tender crisp.
Assembly
Preheat oven to 375 F. On a large sheet of parchment paper, roll or press dough into a 16-inch circle. Transfer with paper to a baking sheet.
Using some grated cheese, make a ring around the outer edge of the dough. Roll dough once over cheese ring. Carefully spread the 1/2 cup of guacamole over the bottom of pizza, then sprinkle with a bit more cheese. Layer with avocado slices, onion, bacon, chicken, tomato & remaining cheese. If you prefer, brush to top of the outside ring with egg wash.
Bake for 15-20 minutes or until golden brown, Remove from oven & slice.
Recipe Notes
- You may choose to prepare your marinated chicken & guacamole before you start making the dough.
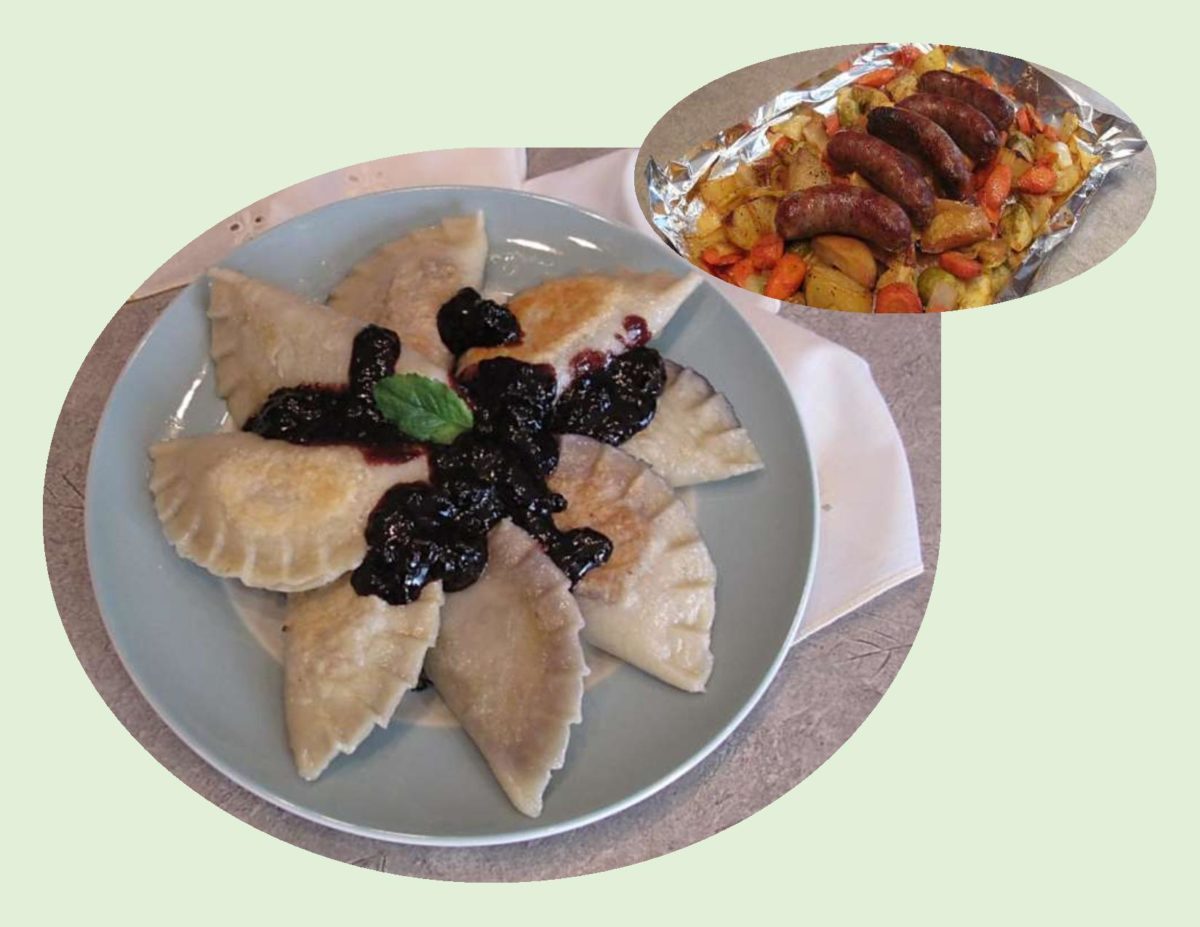
Perogies are of virtually untraceable Central or Eastern European origin although speculation has it the recipe could have been brought from the Far East.
Thinking beyond potatoes and cheddar — who knew that perogies could be filled with fruit?! Although the most traditional fruit filling is plum, many fruits will work. Summer perogies are often filled with apricots, sweet or sour cherries and apples. At Christmas, sweet poppy seed filling is a popular choice. This simple food turns into a wonderful dessert when served with orange sauce, lemon curd, a basic chocolate ganache or even a raspberry or strawberry coulis.
I realize we are not quite into summer yet but blueberries are great anytime. What makes berries so attractive as a filling is their size and texture. Perogies need only a short time to cook – a few minutes each in water than in the frying pan so the berries will break down sufficiently in this amount of time.
While savory perogies are often fried, baked or even deep fried after being boiled, most fruit perogies are served without frying, lending a delicate texture to the more delicate flavor of the fruit.
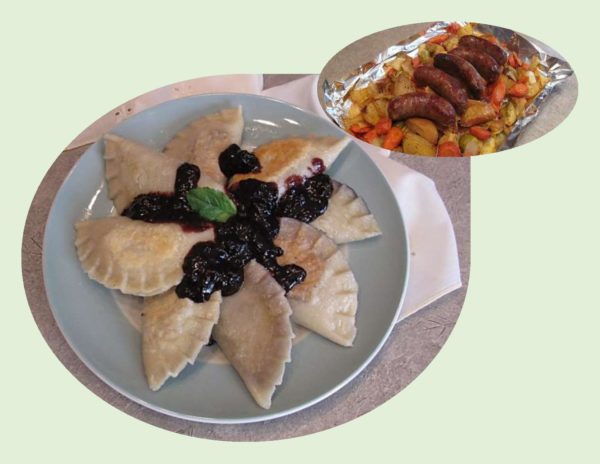
Since I wanted to serve these blueberry perogies as a compliment to our roasted bratwurst and veggies, we preferred them slightly fried and topped with a sweet/savory balsamic blueberry sauce. It made a great combo!
Print Recipe
Blueberry Perogies
Votes: 1
Rating: 5
You:
Rate this recipe!
Ingredients
Balsamic Wild Blueberry Sauce
Blueberry Filling for Perogies
Ingredients
Balsamic Wild Blueberry Sauce
Blueberry Filling for Perogies
|
Votes: 1
Rating: 5
You:
Rate this recipe!
|
Instructions
Balsamic Sauce
In a small saucepan over low heat, place blueberries, garlic & honey; stir until mixture begins to boil & thicken. Stir in balsamic vinegar. Bring sauce to a boil & allow to reduce slightly to become the consistency of honey. Set aside, keeping warm until ready to serve.
Blueberry Filling
Wash & dry blueberries; set aside. In a small dish, combine cornstarch & sugar; set aside.
Perogy Dough
In a large bowl, whisk together flour & salt. In a separate bowl, whisk together egg, sour cream & oil until well mixed. Add liquid ingredients to dry mixture & gently combine. Before the dough is completely mixed, transfer to a lightly floured work surface. Knead dough 7 or 8 times to form a soft ball. Do NOT over-work dough.
Roll out dough to 1/8-inch thickness. Using a 3 1/2-inch cutter, cut circles out of the dough or if you prefer to just cut same size pieces from dough ball. Stretch each to a 'perogy' size. Place about 1 tablespoon of berries on each round of dough. Sprinkle 1/4 teaspoon of the sugar/cornstarch mixture over berries. Moisten the edge of each dough circle with a little water & fold the dough over filling. Pinch the edges firmly to create a tight seal.
Place perogies on a baking sheet lined with parchment paper while preparing them. Keep covered with a slightly moist towel until ready to cook.
Fill a large pot with about 8 cups of water. Add 1 teaspoon of salt (+ 1 tsp oil if you wish), cover & bring to a boil. Cook perogies in batches. Stir gently until perogies float, cook about 2-3 minutes. Do not over cook or dough will be tough.
Serve perogies with warm balsamic wild blueberry sauce.

Brunch has been sometimes been thought to be distinctly North American but probably started in 16th century Vienna. At that time, the custom was to have five official meals a day. Early breakfast was mostly liquid like hot chocolate or other beverages. The mid morning meal was called ‘gabelfruhstuck’, meaning fork breakfast. The custom of having fork food in the middle of the morning supposedly spread throughout Europe among the wealthy classes before coming to North America.
Whatever its specific origin, ‘brunch’, as it has become known as, is always the combination of breakfast and lunch foods. It seems to increase and wane in popularity but never really goes out of style. It is always open to new interpretations as well as just staying with the classics.
One such iconic brunch meal is Shrimp Newburg Strata. Evolving from the original, Lobster Newburg that was served at New York’s famed Delmonico restaurant in the United States. It became a standby of the after-theater suppers that were in vogue at the time.
The limitless choices that can be made for brunch have always made it one of my favorite meals to prepare. Overnight strata is the perfect choice to serve for an Easter brunch. This Shrimp Newburg pairs well with a Waldorf salad and hot cross buns.
Print Recipe
Overnight Shrimp Newburg Strata
Votes: 2
Rating: 5
You:
Rate this recipe!
|
|
Votes: 2
Rating: 5
You:
Rate this recipe!
|
Instructions
-
In a large skillet, heat oil & saute mushrooms & onion for 3 minutes or until tender. Set aside.
-
In a buttered, shallow baking dish, arrange half of bread slices. Peel & devein raw shrimp & coarsely chop. Top bread with half of the mushroom mixture & half of the shrimp. Arrange remaining bread slices over shrimp; top with remaining mushroom mixture & shrimp. Sprinkle strata with grated Gruyere cheese.
-
In a bowl, whisk together milk, eggs & spices; carefully pour over casserole. Cover & chill at least 8 hours or up to 24 hours.
-
Preheat oven to 350 F. Bake, strata, uncovered for 55 minutes or until a knife inserted near the center comes out clean.


