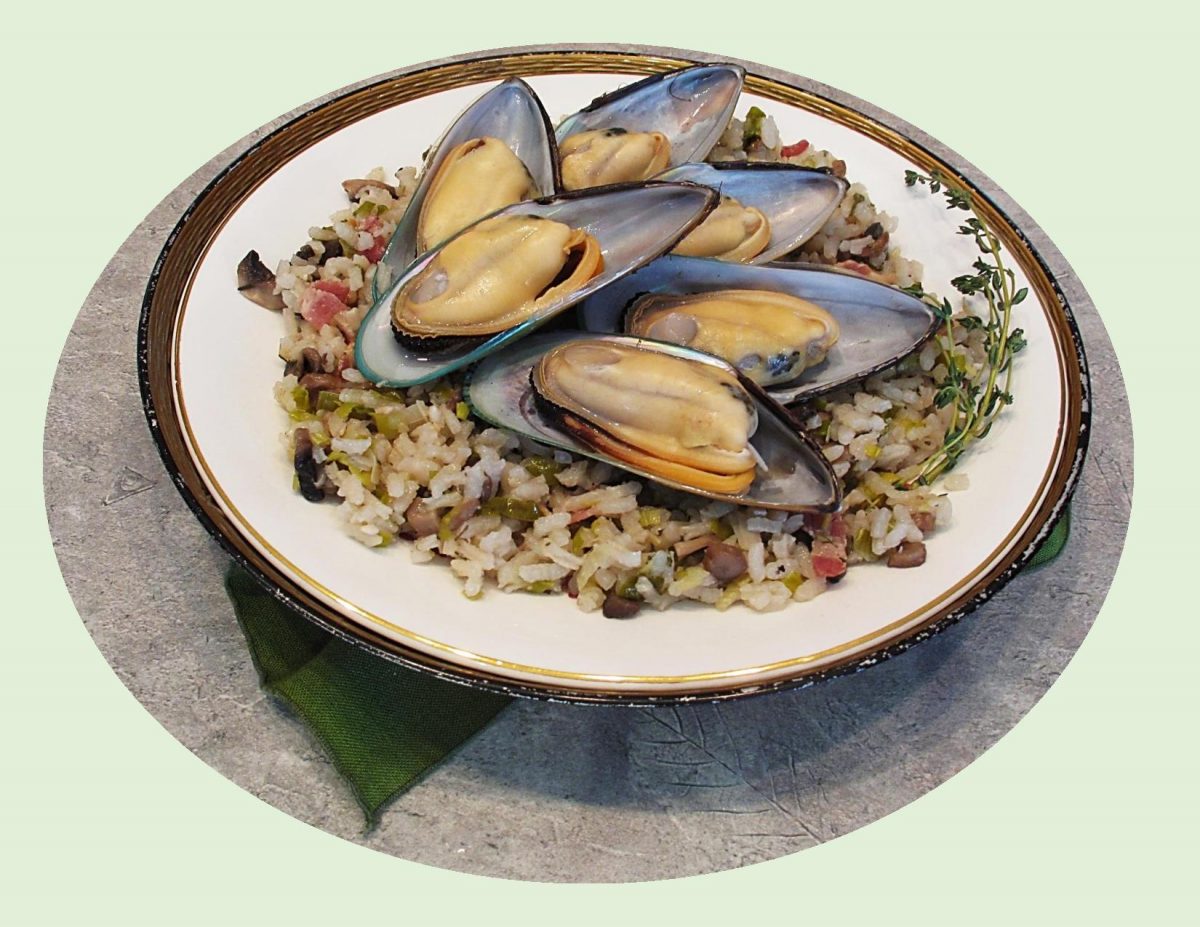
French Mussels w/ Bacon & Leek Risotto

Thanks for the memories! This phrase says it all when I think back to the wonderful time we spent in France. Although this holiday is now 20 years past, the memories remain very vivid and special.

My sister, Loretta had joined Brion & I on this French vacation which had made it even more special. Our journey began in Paris where we had rented a car, then travelled south (about 613 km/380 miles) to the sleepy little village of St Thibery. For this segment of our trip we had rented an apartment to use as ‘home base’ during our time in this part of France. Many of these houses are from the 14th,15th & 17th century. The apartment was quaint but adequate even having a roof top patio.

St Thibery is situated between the larger towns of Agde & Pezenas and is just a short distance from the Mediterranean Sea. On one of our day trips we visited the town of Agde. It is one of the oldest towns in France and is captivating by its maze of narrow streets. Agde was built of black basalt from a volcanic eruption thus the black color of its buildings.

It was here we discovered a nice restaurant where we enjoyed some classic French steamed mussels. It would be an understatement to say how much the three of us enjoyed this feast of fresh seafood.

During the time we spent in the area, we made the 20 minute drive from St Thibery to Agde just to have some more mussels on numerous evenings.

Brion & I decided to revisit the taste of those ‘French’ mussels today with our supper meal. Of course, nothing compares to the ‘taste of a memory’!

Print Recipe
French Mussels w/ Bacon & Leek Risotto
Instructions
Risotto
  1. Bring vegetable broth to a boil in a saucepan, then turn heat to low & keep at a simmer.
  2. Heat a large skillet over medium heat; add bacon & sauté until crisp. Remove to a paper towel lined plate to drain & set aside.
  3. Remove all but 2 Tbsp bacon drippings from skillet (add extra olive oil if necessary to equal 2 Tbsp) then add leeks, mushrooms & shallot. Turn heat up to medium-high; season with salt & pepper. Sauté until vegetables are tender & starting to turn golden brown, about 7-8 minutes. Add garlic & sauté for 1 minute. Add rice; stir to coat & cook for 1 more minute.
  4. Turn heat back to medium; add wine & stir until absorbed by rice. Add hot vegetable broth; stir near constantly until rice is tender & all the broth is absorbed, about 25 minutes. If broth gets to a hard boil, turn heat down. Remove skillet from heat; stir in thyme, parmesan cheese & cooked bacon. Keep warm until mussels are ready.
Mussels
  1. Heat olive oil & butter in a large pot over medium high heat. Sauté the onion & garlic until softened, about 5 minutes.
  2. Add the mussels, wine, cream, butter & parsley. Season well with salt & pepper to taste.
  3. Mix well, cover pot with a lid & cook until mussels are cooked through & opened, about 12-15 minutes.
  4. Serve mussels along with the juices in the pan with risotto & crusty or garlic bread.

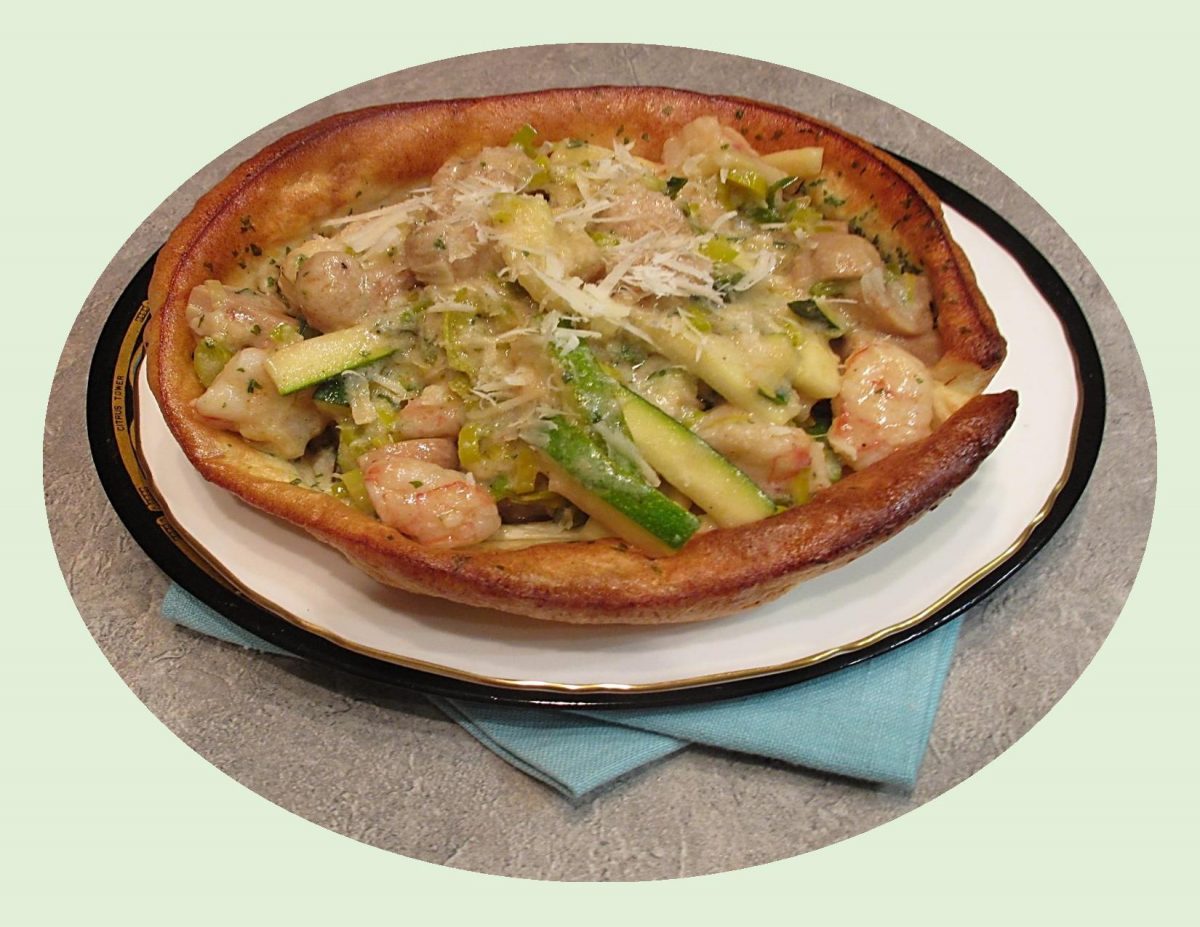
Shrimp Dutch Baby Pancake

A Dutch baby pancake is a cross between a fluffy style pancake and a soufflé. Its less work than standard pancakes and less complicated than a soufflé.

If you follow our blog, you probably have seen other versions, both sweet & savory featured on it. Dutch baby’s are such an easy meal to make, they are a regular in our meal rotation, not to mention how delicious they are.

Dutch baby recipes work best in cast iron pans because they retain heat and cook evenly. If you don’t have cast iron cook-ware, I find pyrex bowls will work as a substitute.

Because of the delicate nature of the batter, you can only add your toppings once the batter has baked. For some toppings, this will require cooking these ingredients on the stove top while the eggy batter bakes.

Be careful with recipes that instruct you to mix chopped veggies and meat directly into the batter. The combination of weight and moisture will prevent the batter from cooking and puffing up as it should. One exception to this would be finely grated Parmesan cheese. To help create height, bring the eggs to room temperature before mixing into the batter.

Being seafood lovers, this meal really works for us.

Print Recipe
Shrimp Dutch Baby Pancake
Votes: 3
Rating: 5
You:
Rate this recipe!
Servings
SERVINGS
Votes: 3
Rating: 5
You:
Rate this recipe!
Instructions
Dutch Baby Pancakes
  1. In a bowl, whisk together eggs & milk. Add flour & whisk until incorporated then whisk in parmesan cheese, scallions, parsley, thyme, salt & pepper. Set aside in refrigerator until sauce & filling are made.
Gouda Sauce
  1. In a small saucepan, melt butter; sprinkle with flour & seasonings. Mix well; add milk & broth, stirring until sauce becomes thickened. Blend in cheese; set aside
Shrimp Filling / Baking
  1. Peel & devein shrimp (you can chop into pieces if you prefer). Prepare filling veggies for cooking.
  2. Preheat oven to 425 F.
  3. Place 2 Tbsp butter in each of TWO 7-inch pyrex baking bowls (alternately you can use one 10-inch cast iron skillet). Place bowls in hot oven to melt butter (and heat the bowls for baking pancakes in). Once the butter is melted & the bowls are hot, divide the batter between them. Bake for 25 minutes.
  4. The Dutch Baby will puff up during cooking, but once its removed from the oven & starts to cool it will deflate slightly. At this point its nice to do the final sautéing of your filling so that when the pancakes come out of the oven you are ready to fill & serve.
  5. In a large skillet, sauté zucchini, onion, mushrooms & garlic in oil until tender-crisp. Combine soy sauce with water in a cup; add to vegetable mixture along with shrimp. Gently stir fry ONLY until shrimp is cooked, then fold in Gouda sauce.
  6. When Dutch Baby pancakes are finished baking, remove from oven & transfer to 2 serving dishes. Divide filling between the 2 pancakes & serve hot.

Swiss Roll w/ Ube Halaya

Ube (pronounced ooo-bae) originated in the Philippines and refers to a bright purple yam. Ube is a very versatile ingredient. It is not a purple sweet potato or taro, it is a purple yam. Its unique taste reminds one of vanilla, pistachios or chestnuts. The vibrant purple color inside and out is uniquely photogenic.

Fresh ube seems to be fairly difficult to find in North America but with a little persistence it is possible. There are a few different forms it is sold in. Dehydrated powder, extract, ube halaya (or paste) or as a grated frozen product. Ube is not an exotic ingredient in the Philippines but a common everyday staple.

This brings us to today’s recipe. Rolled cakes have been around for years but still have such a unique and modern look to them. In North America the terminology evolved from Jelly Cake (1852), Roll Jelly Cake (1860), Swiss Roll (1872), Jelly Roll (1873) and Rolled Jelly Cake (1876).The name ‘Jelly Roll’ was eventually adopted. I recall my mother’s version as a yellow sponge cake with a red jam rolled inside.

In the Philippines a rolled variant has a very simple filling of sugar and butter. Modern versions, however, are commonly frosted and can include a variety of fillings flavored with ube.

My love for ube continues as this is now my fourth blog centered around it. It seems that unique flavor and gorgeous lavender color is finding its way into an endless variety of desserts these days.

Print Recipe
Swiss Roll w/ Ube Halaya
Votes: 1
Rating: 5
You:
Rate this recipe!
Course dessert
Cuisine Filipino
Servings
Ingredients
Ube Halaya (Jam) Filling
Course dessert
Cuisine Filipino
Servings
Ingredients
Ube Halaya (Jam) Filling
Votes: 1
Rating: 5
You:
Rate this recipe!
Instructions
Ube Halaya (Jam)
  1. In a medium saucepan, melt butter. Add coconut & condensed milks; stir until heated. Add thawed, grated ube & stir everything together. This process takes about 40-50 minutes until the ube is cooked. The mixture will be thick & sticky. It is important to stir the mixture often during cooking process to prevent it from forming a crust. When cooked, transfer the ube halaya to a container. Cover it with plastic wrap, making sure it is touching the ube paste to prevent a skin from forming & set aside. I find, making this filling a day ahead makes everything come together a lot easier.
Roll Cake
  1. Preheat oven to 350 F. Line a 10x15x1-inch jelly roll pan with parchment paper (bottom & sides). Lightly grease the parchment paper.
  2. In a large bowl, whisk the yolks with a hand whisk until lighter in color. Add 1/4 cup sugar & continue to whisk the mixture until it has slightly thickened. Add the milk, oil & vanilla to the bowl. Whisk until incorporated.
  3. In a separate bowl, whisk together flour & baking powder. Gradually add this mixture to the yolk mixture & beat with the hand whisk until smooth & lump free.
  4. In the bowl of a stand mixer, beat egg whites until frothy. Add the cream of tartar & beat until soft peaks form. Add the remaining 1/4 cup sugar gradually while the mixer is running & continue to beat until stiff peaks form. Fold the beaten egg whites (meringue) into the yolk batter in three additions using a rubber spatula until the color of the batter is uniform.
  5. Pour half of the batter into another mixing bowl. Gently fold in some violet food color. Spread the plain batter on the pan, using a rubber spatula to help spread it evenly. Gently pour the colored batter on top of the plain batter. Spread this batter out very gently so the two batters don't get mixed together.
  6. Use a chopstick & start drawing a pattern horizontally first in a continuous motion & then vertically in a continuous motion as well. Gently tap the baking sheet on your work surface once or twice to release air bubbles. Bake for 10-12 minutes, or until a toothpick inserted in the middle of the cake comes out clean. While the cake bakes, grate the cheese; set aside.
  7. Remove the cake from the oven & lift it out of the pan immediately to a cooling rack & peel off parchment paper from the 4 SIDES. Let it cool for about 5-6 minutes then place a new piece of parchment paper, larger than the cake, on top of the cake & flip over to the other side. Peel off the parchment paper from bottom.
  8. Use a serrated knife to trim about 1/4-inch of the 4 edges. This makes rolling the cake easier. You should roll parallel to the direction of the last hurricane line you drew earlier or the pattern won't show when you cut it. If you trim the side that will be on the bottom at an angle, you cake will sit better when its rolled up. On the side you are going to start rolling, make 4 shallow slices about an inch apart. This helps the cake to roll easier without cracking.
  9. Spread the ube halaya on the surface of the cake. You want to spread most of it near the side you are going to roll up from. There should be less filling towards the other end because as you roll up, the filling will get pushed forward & by the time you roll to the other end, it should be just the right amount of filling.
  10. Very gently use one hand to lift the parchment paper up to help you roll the cake up until you reach the other side. Remove the parchment paper & place the cake on a serving plate. Sprinkle with grated cheese. Loosely tent cake with parchment paper being careful to not have it touching the surface of the cake. Refrigerate for at least 1 hour.
Decorate & Serve
  1. When cake is cool & 'set', decorate with additional ube paste & slice. Serve.
Recipe Notes
  • I used about 2 cups of the ube filling for inside the roll. Don't worry if you have extra when your finished decorating, it is so good you will probably enjoy eating any leftovers by the spoonful!

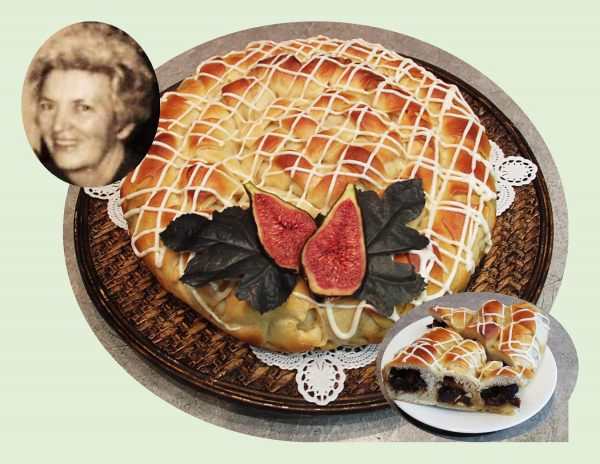
Fig Bread

Today, March 28th, marks the date of my mothers birth. Although she left this earth 43 years ago, her memory remains crystal clear. She was a wonderful mother who made our lives so much better in ways we never realized. She set a good example just by the way she lived the ‘best version of herself’.

When this date rolls around each year, I like to post something on the blog that I think she would have enjoyed to make. Baking was a ‘job’ she really seemed to enjoy and our family certainly reaped the benefits of that.

Since Easter is only a week away, I thought a fig bread would be nice. Fruit appears in myths from around the world with figs being regarded as a sacred symbol by many.

Velvety soft on the outside with sweet crimson flesh within, the fig is a captivating food. Widespread and abundant throughout the Mediterranean region, figs have been eaten fresh and dried for storage for thousands of years. The fig found its way to America with Spanish missionaries who brought the fruit to Southern California (USA), in the 1700’s. The variety became known as ‘Mission’ figs.

Easter and Good Friday inspire a particularly rich array of decorative breads and buns that make some of the nicest edible centerpieces.

Print Recipe
Fig Bread Wreath
Votes: 1
Rating: 5
You:
Rate this recipe!
Course Brunch, dessert
Cuisine American, European
Keyword Fig bread
Servings
Ingredients
Course Brunch, dessert
Cuisine American, European
Keyword Fig bread
Servings
Ingredients
Votes: 1
Rating: 5
You:
Rate this recipe!
Instructions
Bread Dough
  1. In a small bowl, whisk together yeast, 1 tsp sugar & warm milk. Set aside for about 5 minutes until frothy
  2. In a large bowl, whisk together flour, remaining sugar & salt. Add yeast mixture, melted butter & egg. Knead until dough comes together in a ball & no longer sticks to the sides of the bowl. Transfer dough to a greased bowl & cover with a tea towel. Allow to rise until doubled in size, about 1 1/2 hours.
Fig Filling
  1. Coarsely chop figs. In a bowl, cream together butter, sugar, cinnamon & cardamom; add figs. Stir to combine & set aside.
Assemble & Bake
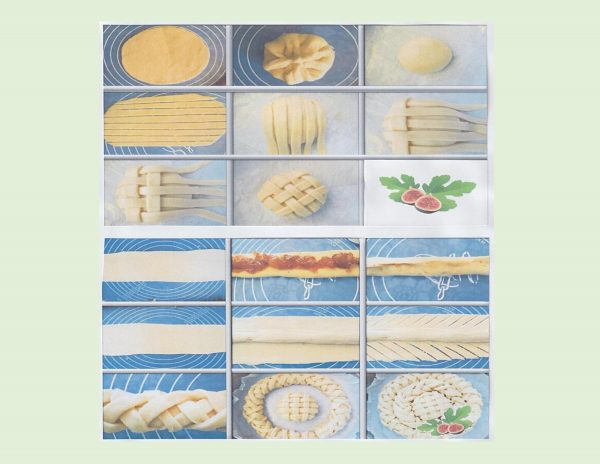
  1. Fit a piece of parchment paper to cover bottom & sides of a 10-inch round springform baking pan. Deflate dough & divide into 6 parts. One small part of the dough will be used to for the middle. Roll out in a round circle & place a scoop of filling in the center. Pull sides up around filling & pinch together. Place the 'bun' in the middle of the pan, seam down. Roll out another small piece of the dough into a circle. Cut it into parallel strips then place strips over bun in a weave pattern.
  2. Next roll each of the remaining 4 strips into long rectangles (about 6" x 16" each). Divide filling between 2 of the strips, placing a row down the center of each one. Bring sides together over filling & pinch to seal.
  3. Lay one filled strip over each of the 2 remaining rectangles of pastry (seam side down). Cut angled strips on either side of filled pastry. Using these strips, form a braid over top.
  4. Preheat oven to 350 F. Transfer braids to baking pan forming 2 circles around the center ball. Beat egg wash together & brush over surface of bread wreath. Allow to rise for about 15 minutes in a draft-free place.
  5. Bake until golden brown about 30 minutes. Remove from oven & place on a wire rack to cool.
Cream Cheese Glaze
  1. In a small bowl, whisk together cream cheese, butter, vanilla & powdered sugar until smooth. Drizzle or pipe over fig bread. Decorate with fresh figs if desired.

Bacon Crusted Quiche w/ Savory Madeleines

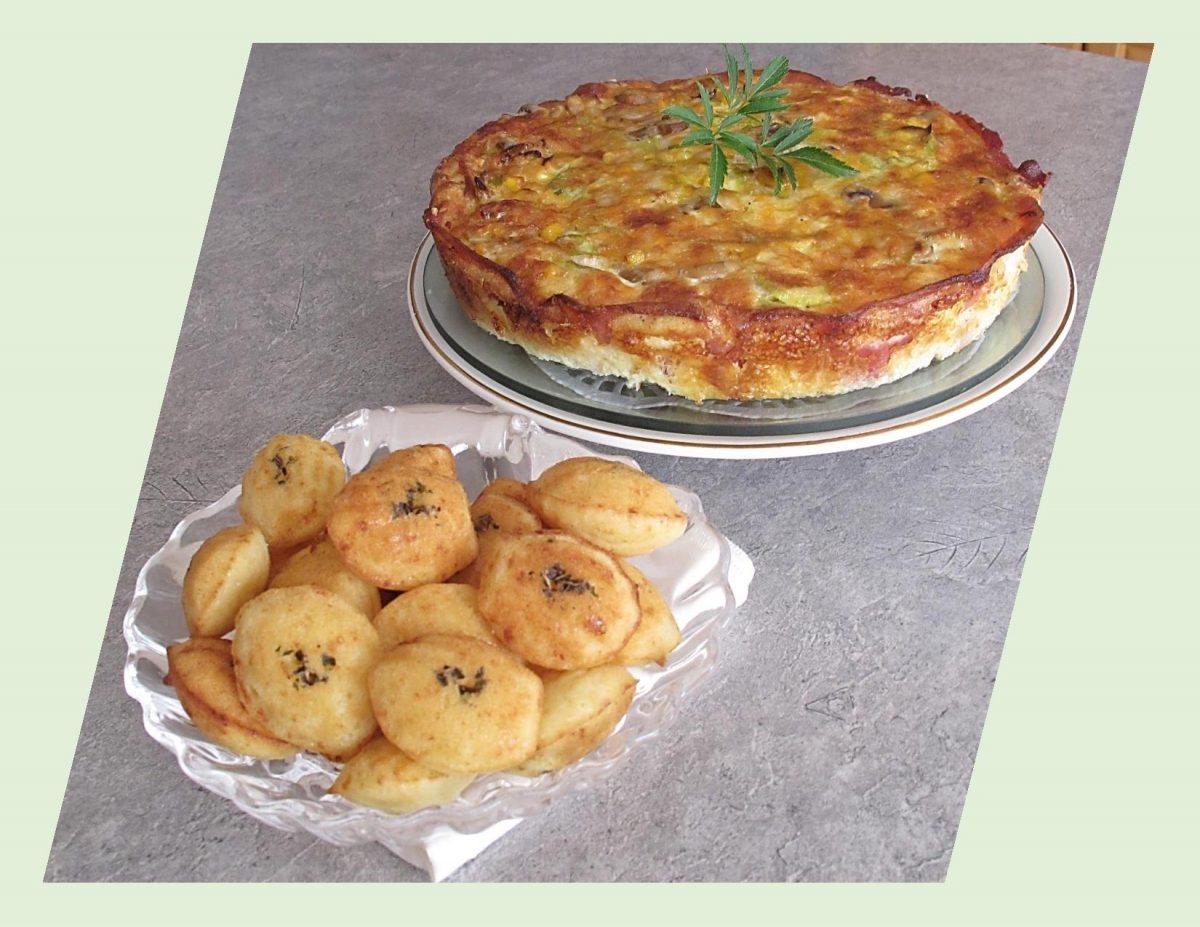
Quiche is one of those meals that appeals to me at any time of the year. The choice of ingredients is truly only limited to one’s imagination and what’s in your fridge or pantry. In this particular quiche, I opted to use bacon as my ‘crust’ since it was filled with vegetables.

I have been wanting to make some savory ‘madeleines’ for a while and think they will compliment this quiche well.

The madeleine or petite madeleine was first created in northeastern France in the Lorraine area. Technically — they are tea cakes, not cookies and are nothing like scones, very light, puffy and soft — not heavy at all.

Madeleines have a distinctive shell-like shape acquired from being baked in pans with shell-shaped depressions.

The appeal of them is how easy they are to make, how cute they are and how light and airy they are. And while they’re delicate and generally a sweet cake, madeleines hold up to having cheese and onion added to them as well. Many savory versions exist so I decided to go with a cheese madeleine today.

Print Recipe
Bacon Crusted Quiche w/ Savory Madeleines
Votes: 1
Rating: 5
You:
Rate this recipe!
Servings
Servings
Votes: 1
Rating: 5
You:
Rate this recipe!
Instructions
Parmesan Cheddar Madeleines
  1. Preheat oven to 350 F. Grease depressions in madeleine pan. (If you are using a regular size it will have 12 or the mini size you will have enough batter for 36). It is a good idea to dust the pans with flour as well, tapping out any excess. Sprinkle dried thyme leaves in depressions of pans.
  2. In a small saucepan, melt butter & honey; remove from heat & cool for 10 minutes. In a bowl using a hand held mixer, beat eggs until pale, thick & doubled in volume.
  3. Using a large metal spoon, gently fold butter mixture into eggs. Next fold in flour, cheeses, yogurt & 1/4 tsp salt until combined. Divide between madeleine cups but don't smooth out.
  4. Bake until risen & golden. The time will depend on whether you are using a regular or petite size madeleine pan. Cool in tin for 5 minutes. Firmly tap tin on surface to loosen the madeleines, then carefully invert onto a wire rack to allow them to fall out onto the rack.
Bacon Crusted Vegetable Quiche
  1. Preheat oven to 350 F. Line a 8-inch round baking pan with foil paper.
  2. In a skillet, fry bacon until lightly cooked but still pliable, 3-4 minutes. Remove the bacon from skillet & blot on paper towel. Drain all but one Tbsp of bacon drippings from pan.
  3. Add the leeks, mushrooms & thyme; cook over moderate heat until veg are tender crisp but not browned, about 5 minutes. Microwave potatoes & slice; drain corn (or cook corn on cob & remove kernels). Grate cheese. In a bowl, whisk together eggs, milk & remaining spices.
  4. Line the sides if baking pan with slices of bacon. Layer bottom with sliced, cooked potato & half of the cheese. Top with corn kernels & leek/mushroom mixture. Pour egg/milk mixture carefully over vegetable mixture. Sprinkle with remaining cheese.
  5. Bake for 40 minutes, until the quiche has puffed up slightly & browned. Test middle to make sure eggs have set. Remove from oven & allow to cool for 2-3 minutes. Remove from pan & serve with savory madeleines.

Mushroom, Caramelized Onion & Gruyere Finger Food

New Year’s Eve ……. normally this eve would bring about lots of parties and celebrations but the start of 2021 looks much more subdued. As expected, cities have cancelled or modified their plans due to the pandemic. Although tradition has been silenced this year, one thing that will never change is the ticking of time and the arrival of a New Year at midnight on December 31st.

When I was growing up, I recall one of the Christmas tree ornaments my mother had was a mushroom with a white spotted red cap. At that time, I remember thinking it seemed unusual as a Christmas tree ornament but never really questioned it. Many years later, through my interest in food history, I understand the connection.

In Germany and other parts of Central and Eastern Europe this iconic mushroom (Amanita muscaria) has long been considered a symbol of good luck and is intertwined with the Yuletide Season.

‘The Mushroom’ of Christmas and the New Year is frequently found growing underneath pine trees because the roots of this specific mushroom can only grow in the root zones of certain trees. There is some speculation that the red & white of Christmas and the use of pine trees may be linked to these humble mushrooms.

Even though the Amanita muscaria mushroom is toxic and should never be eaten it is still symbolizes the hope for good fortune in the coming year. The tradition of gifting mushroom imagery has stuck around, especially for those of German or Austrian descent who still exchange the pretty red & white mushrooms at Christmas time (often in the form of cards or other trinkets). Its not hard to understand why ‘meringue’ mushrooms are a popular decoration for the ‘Yule Log’ cakes.

After all these years, I understand the meaning of my mothers little mushroom ornament. New Year’s of 2020 seems like a good time to make a mushroom finger food in hopes of having the good fortune of Covid 19 coming to an end so we can all resume ‘normal’ life in 2021.

Print Recipe
Mushroom, Caramelized Onion & Gruyere Finger Food
Instructions
  1. Preheat oven to 400 F. Line 2 baking sheets with parchment paper.
  2. In a large, heavy bottomed skillet, heat olive oil over medium-low heat; add onions. Cook, stirring occasionally, until they begin to caramelize, about 20 minutes.
  3. Add the butter to the pan. Once melted, add the mushrooms & sauté, stirring occasionally, until they are completely soft & all the liquid evaporates, about 20 minutes.
  4. Add the garlic, sage & thyme; sauté until fragrant, about 1 minute. Season with salt & pepper to taste.
  5. Add the broth, scraping the bottom of the pan to pull up all of the browned bits, & cook until all of the liquid has evaporated. Remove from heat.
  6. Unfold the thawed sheet of puff pastry & cut out 36 circles from dough, placing them evenly spaced on the baking sheets. Using a very sharp knife, make four small scores around the perimeter of the dough, about 1/4 to 1/2-inch from the edge.
  7. Top the rounds of puff pastry with a small spoonful of the mushroom mixture, trying to keep the filling within the score marks. Top with grated Gruyere cheese. Brush the edges of the dough rounds with the egg wash.
  8. Bake until the pastry is golden brown, about 15-25 minutes. Garnish with fresh chopped parsley.

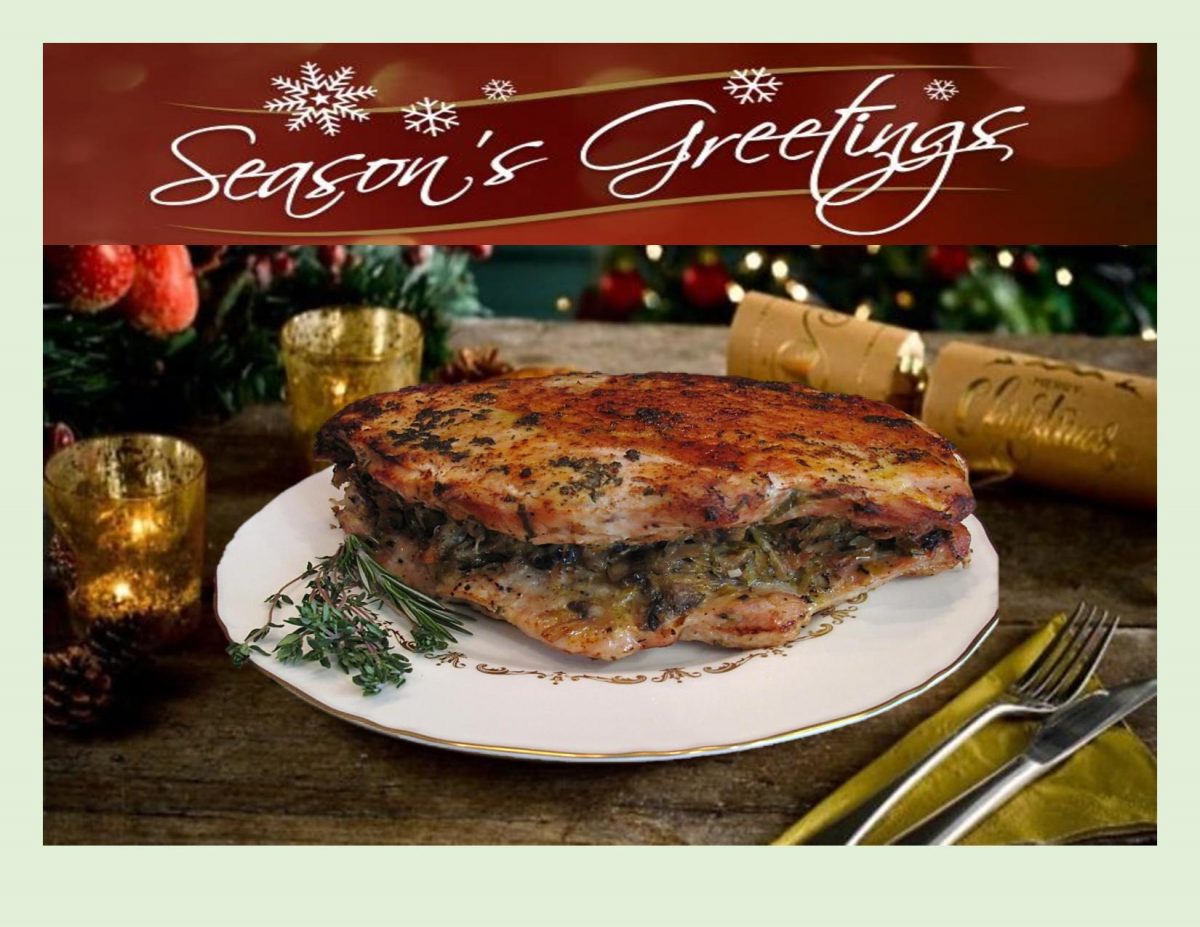
Herb-Crusted Turkey Breast w/ Mushroom Leek Stuffing

SEASON’S GREETINGS TO EVERYONE!

If this year has taught us anything, its that you can’t plan ahead at this moment. The coronavirus pandemic that has shuttered much of the world economy has also stole festivals, celebrations, reunions and all the related joys of a normal course of life.

Like everything else this year, Christmas 2020 looks very different to what we are used to. But, all this doesn’t mean that Christmas is cancelled. It just means you have to be a bit more creative about making it another joyful and meaningful memory for you and your loved ones.

This brings me to the special event in our family on Christmas day. December 25th just happens to be my sister Rita’s birth date. She will forever be the ‘special gift’ our family was so priviledged to receive at Christmas.

Rita, you are loved and treasured very much. Brion & I are very grateful for the fact you are able to share some of your time with our sister Loretta, especially in light of the covid crises.

With regard to our Christmas dinner being featured in this blog, the herbs added heaps of savory flavor to the stuffing and turkey rub. Rosemary, thyme and sage are quintessential winter herbs that really give that special holiday flavor …. no pears, apples, nuts are necessary. Having been cultivated for thousands of years around the world, herbs have helped shape culinary traditions that have lasted into modern times.

HAPPY BIRTHDAY RITA … WE CELEBRATE YOU WITH LOVE

ENJOY YOUR DAY!!

Print Recipe
Herb-Crusted Turkey Breast w/ Mushroom Leek Stuffing
Instructions
Stuffing
  1. In a large skillet over medium heat, melt 2 Tbsp butter. Add garlic & sauté, stirring constantly, for 10 minutes. Add leeks & cook until softened, about 5 minutes. Add mushrooms & cook until softened & liquid has evaporated, about 10 minutes.
  2. Remove from heat & stir in breadcrumbs, cheese, herbs & 1/4 tsp each salt & pepper; set aside.
Herb Butter
  1. In a small dish, combine all herb butter ingredients & set aside.
  2. Preheat oven to 350 F.
Assembly
  1. Arrange turkey breast skin side down on a work surface so that it lies open & flat. Cover with plastic wrap, then pound lightly with a meat mallet to flatten & make an even thickness all over.
  2. Discard plastic wrap & season turkey all over with remaining salt & pepper.
  3. Spread stuffing over turkey, leaving a 3/4-inch border around the edge. Close up snugly, tucking in the stuffing as you go, then tie with kitchen twine at 1-inch intervals around the entire turkey breast.
  4. Rub turkey all over with herb butter & arrange it on a rack in a roasting pan.
  5. Roast uncovered, basting occasionally, until turkey reaches an internal temperature of 180 F. about 2 hours. (Cover with foil if top browns too quickly).
  6. Remove & discard twine, slice turkey & serve.

Ube Cruffins

Ube (pronounced OO-bay), is a purple yam native to the Philippines and other areas of Southeast Asia. Ube is a very versatile ingredient. It is not a purple sweet potato or taro, it is a purple yam. Its special taste reminds one of vanilla, pistachios or chestnuts. The vibrant purple color inside and out is uniquely photogenic.

Ube has been used for decades in Filipino cuisine and has now caught on in North America, especially in the form of desserts.

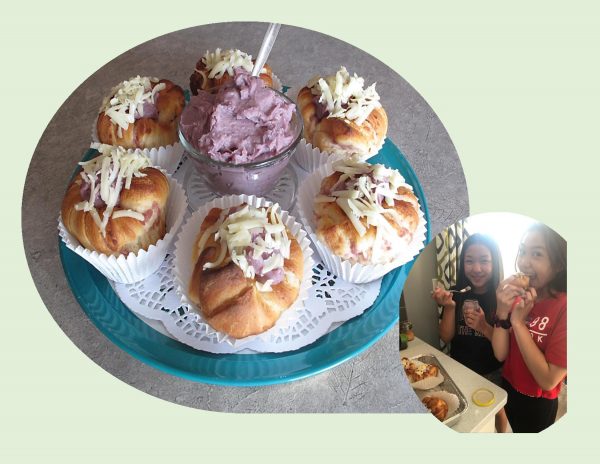
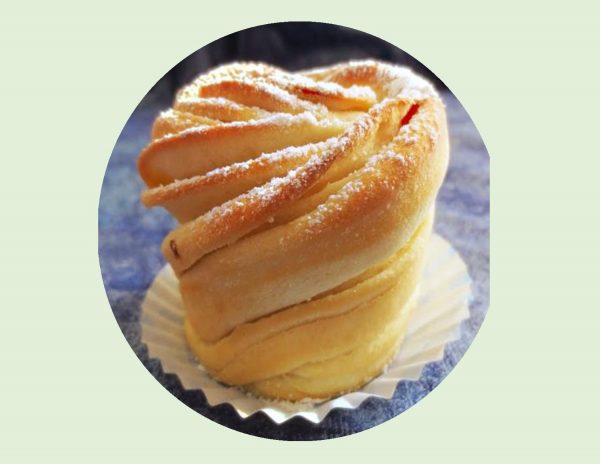
If you’re not familiar with ‘cruffins’, they are a hybrid of a croissant and a muffin. The dough that would be used to make a croissant is rolled up on itself and placed in a popover or muffin pan to be baked. This is how they achieve their characteristic and striking appearance. Next, they are filled with jam, creams, curds, ganaches, etc… You might say it’s about reinventing the croissant.

The first known cruffin was created by Kate Reid in Melbourne, Australia in 2013. A former designer of Formula One racing cars, Kate is no ordinary patisserie. As far back as she remembers, she had a close connection to cars. Her father, being an avid classic car collector, young Kate and her brother would hover around when he was restoring classic Porsche 911’s, sitting in the driver’s seat pretending to go on road trips.

Kate Reid wanted to work at the pinnacle of motor sport. She had the vision that working in the upper echelon of innovation and technology for the automotive industry would give her the opportunity to be incredibly innovative, thinking outside the box and really pushing the boundaries of what was possible.

She tilted her entire education towards earning a degree in aerospace engineering, which eventually led her to a job in Formula One as an aerodynamicist. However, she discovered that it was not what she had imagined it would be like.

From a young age, Kate Reid always loved baking. One day it occurred to her that baking could be more than just a hobby. Fast forward to today, Kate is a pastry chef and the founder and business owner of Lune Croissanterie in the city of Fitzroy, Melbourne, Australia. Seven years in operation, Lune has become known as the prime location for the perfect croissant. It’s a combination of the passion, inspiration and complexity of the croissant.

She harbors no regrets about her big career change, living by the credo that ‘we get one chance at life, so why not love what you’re going to devote your time and mental capacity to’.

One thing for sure, culinary history never gets boring! So now I’m inspired to make some ‘ube cruffins’ and we just happen to have some special little Filipino friends that can be the official taste testers!!

Print Recipe
Ube Cruffins
Votes: 1
Rating: 5
You:
Rate this recipe!
Servings
CRUFFINS
Ingredients
Ube Halaya (Jam) BEST TO MAKE A DAY AHEAD OF USING
Servings
CRUFFINS
Ingredients
Ube Halaya (Jam) BEST TO MAKE A DAY AHEAD OF USING
Votes: 1
Rating: 5
You:
Rate this recipe!
Instructions
Ube Halaya (Jam)
  1. In a medium, heavy saucepan, melt butter. Add coconut & condensed milks; stir until heated. Add thawed, grated ube & combine well.Cook over a low heat. It is important to stir the mixture often during cooking to prevent it from forming a 'crust'. This process takes about 40-50 minutes until the ube is cooked. The mixture should be thick & sticky. Transfer the ube jam to a container & set aside.
Cuffins
  1. In a small dish, heat milk to lukewarm. Add yeast & 1 tsp sugar; let sit for 5 minutes to allow yeast to activate. In a large bowl, whisk together remaining 1/4 cup sugar, melted butter, sour cream & egg. Add yeast mixture & stir to combine.
  2. In another bowl, whisk flour & salt. Add flour mixture to yeast mixture one cup at a time, combining after each addition. Once all the flour has been added, knead on a lightly floured surface for about 2 minutes.
  3. Lightly grease the large bowl, place dough in it & cover with plastic wrap & a tea towel. Allow to rest for at least one hour, in a draft-free place until dough has doubled in volume.
  4. Lightly grease cups of either a popover or muffin tin. Sprinkle work surface with flour. Roll dough out into a rectangle 21 X 16-inches (about 54 X 40 cm). WITHOUT CUTTING through, mark dough into six equal strips starting on the longest side.
  5. Thinly spread ube jam on strip # 2 & #5 (numbering from the left side). Fold strip #1 & #6 over the jam. Lightly spread the top of each folded side with more jam then fold each one toward center.
  6. Now spread the top of one folded piece, then bring the other side over it. With a rolling pin, slightly press entire layered roll flatter.
  7. With a buttered, sharp knife, cut the strip along its entire length into 3 strips. Next cut each strip horizontally into 4 (or 5) pieces. Carefully lift each piece, stretch it out a bit & then twist it.
  8. Form it into a ring & place in muffin (or popover) cup. When all cruffins are in the pan, use a pastry tube & pipe some ube jam in center of the spiral.
  9. Allow cruffins to sit in a draft-free place for about 30 minutes. Preheat oven to 350 F. Bake cruffins for 20-25 minutes. Grate cheese & set aside.
  10. When cruffins are baked, remove from the oven. While still warm, sprinkle with grated cheese.
Recipe Notes
  • Instead of piping ube jam in center of unbaked cruffins, you can reserve any extra for serving on the side instead.
  • Instead of making a 'true' croissant dough, I used my favorite (sweet) yeast dough. Of course, you don't get the flakiness of a croissant, but the taste & tenderness of the cruffin was still real good.
  • Another alternative would be to use frozen puff pastry.

Limoncello Mini Cakes

Nothing says spring more than the zesty, fresh flavor of lemons. Just to kick it up a notch, I decided to make some limoncello desserts.

Limoncello, (pronounced lee-mon-CHAY-low) the Italian lemon liqueur, is known for its refreshing sweet and tangy flavor. It is made from lemon rinds, alcohol and sugar. Although, traditionally served as an after dinner drink, it is a wonderful ingredient to use in cooking and baking.

Limoncello origins are disputed. Some say it was created by monks or nuns while others credit the wealthy Amalfi Coast families or even local townsfolk. In any case, its roots are in Southern Italy, primarily along Italy’s Amalfi Coast and the Sorrentine Peninsula known for their meticulous lemon cultivation. These lemons are considered the finest lemons for making limoncello. Prized for their yellow rinds, intense fragrance, juicy flesh and balanced acid.

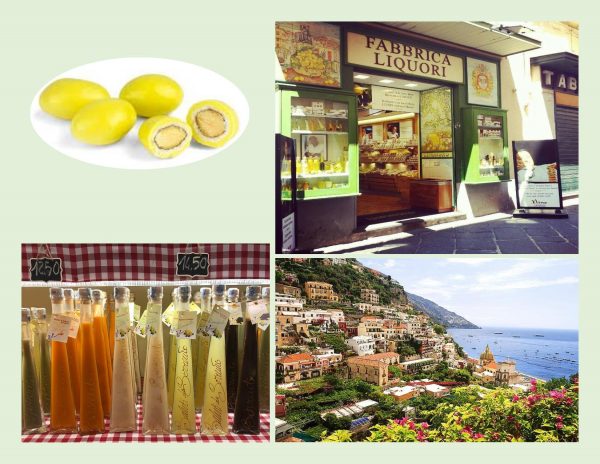
Some years ago, while travelling in Italy, Brion & I tasted athentic limoncello in the town of Sorrento. As we walked through the quaint artisan shops packed together onto a maze of medieval alleys, we came accross one that sold liqueurs & confectionery. One of the treats that they made were limoncello sugar coated almonds … to die for!

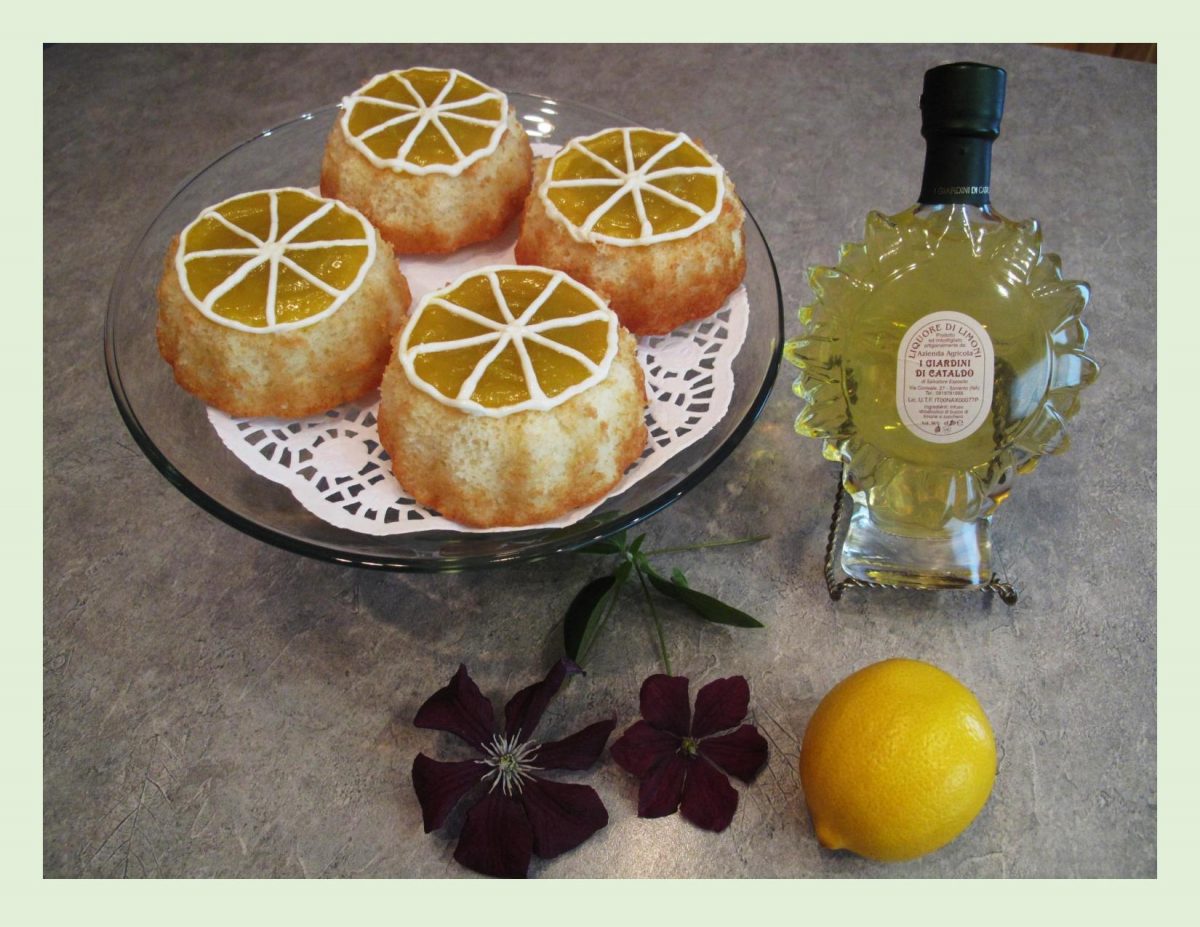
Today’s little cakes use limoncello not only in the cake but the frosting and glaze as well. Definitely gives them some spring zing!

Print Recipe
Limoncello Mini Cakes
Votes: 1
Rating: 5
You:
Rate this recipe!
Course dessert
Servings
mini cakes
Ingredients
Limoncello Cakes
Limoncello Glaze
Course dessert
Servings
mini cakes
Ingredients
Limoncello Cakes
Limoncello Glaze
Votes: 1
Rating: 5
You:
Rate this recipe!
Instructions
Cakes
  1. Preheat oven to 350 F. Lightly butter & flour 4 mini bundt pans.
  2. In a small bowl, cream butter & sugar; add egg & mix well. Fold in the flour then add milk & limoncello; beat well. Spoon mixture into the bundt pans & bake for 18 minutes or until they test done. Allow to cool.
Cream Cheese Frosting
  1. In a small bowl, beat together butter, cream cheese & limoncello (if using). Add powdered sugar & mix until smooth.
Limoncello Glaze
  1. In a small saucepan, whisk together sugar, lemon zest & egg. Cook until sugar dissolves & the mixture turns light in color, about 2 minutes. Stir in limoncello & cook for about 5 minutes or until mixture thinly coats the back of a spoon, stirring constantly with a whisk. Remove from heat & whisk in butter. Cover with plastic wrap & cool before using.
Assembly
  1. Place cakes on a serving plate. Fill the center indentation from the bundt pan with glaze as well as glazing the tops. Place frosting in a piping bag with a tip that has a small hole. Pipe frosting to look like lemon slices.

Sweet Corn Risotto w/ Sauteed Shrimp

Comforting, creamy risotto is one of those dishes that isn’t difficult to prepare but it can be quite time consuming. I find it works best for me when I’m doing other things in the kitchen at the same time.

Risotto is typically made with arborio rice, but pearl barley is a good substitute; it produces a similar texture but with a nuttier taste.

Over the years, I have made various kinds of risotto. Brion is the eternal rice lover. He could eat rice everyday of the week. Even though his favorite is just plain white rice, I can’t resist adding risotto to the mix now and again.

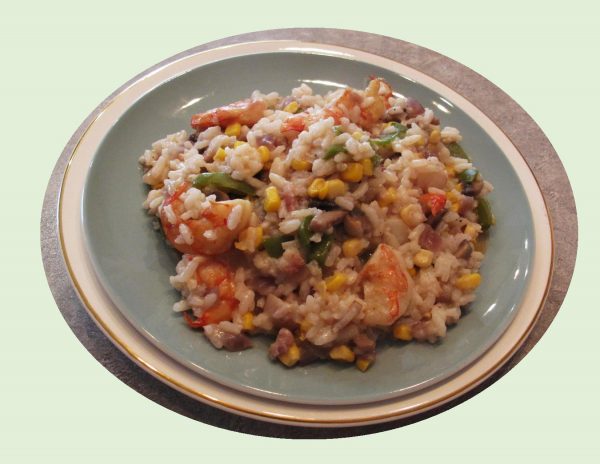
As a rule, if you are using corn in risotto, it would probably be fresh. In February, ‘fresh’ is not happening in our part of the country yet. One of the most favorite canned vegetables in North America is corn. Personally, I love corn no matter if its canned, frozen or fresh. Without trying to sound like an advertisement, I found that Green Giant Steam Crisp was real nice for this recipe. It’s supposedly picked at its peak and then quickly steamed in the can to preserve as many vitamins and nutrients as possible. I added some bacon and mushrooms to give it some extra pizzazz!

Print Recipe
Sweet Corn Risotto w/ Sauteed Shrimp
Instructions
  1. In a medium saucepan, bring chicken broth to a simmer.
  2. In another large saucepan, saute bacon until lightly browned but not crispy. Using a slotted spoon, transfer bacon to a plate lined with paper towels. Drain off fat & wipe out pan with paper towels.
  3. Add butter to pan & melt over medium heat. Saute mushrooms until moisture evaporates; add onion & green pepper. Saute for 5 minutes or until tender crisp then add barley (or rice) & hot chicken broth; simmer, stirring occasionally until all broth is absorbed, 15-20 minutes. If you need to make more broth, do so but be sure it is hot before adding it.
  4. When barley (or rice) is cooked & broth is absorbed, remove from heat & stir in corn, butter, Parmesan & parsley. Season with salt & pepper & transfer to a large bowl.
  5. Add remaining 2 Tbsp olive oil to skillet & heat over medium-high heat. Add garlic, shallot & red pepper flakes & cook until fragrant, 1-2 minutes. Add shrimp & cook until pink & beginning to brown, 3-4 minutes. Add 1/4 cup chicken broth & let simmer until evaporated, about 2 minutes. Remove from heat, season with salt & pepper & stir in basil. Add risotto & bacon back to skillet, stirring to combine with shrimp. Serve.