Today, November 24, our neighbors to the south are celebrating Thanksgiving. Over the years, Brion and I have been in the USA numerous times on this occasion and enjoyed the food and holiday atmosphere very much. Today’s blog post acknowledges the American holiday with some special meal choices.
At the heart of a memorable dinner is the main entree, so why not make it just a bit more special by serving it ‘En Croute’. In the culinary arts, the term en croute (pronounced ‘on Kroot’) indicates a food that has been wrapped in a pastry dough and then baked in the oven. Traditionally the type of pastry used was a simple dough called pate pastry. Today, puff pastry is frequently used for most en croute recipes.
The key to preparing items en croute is that however long it takes to cook the pastry until it is golden brown is how long the item will spend in the oven. Some of the best choices are beef tenderloin, salmon or a brie cheese, due to the fact they require less time to cook.
In the 1950’s and 60’s, Beef Wellington or as the French called it, ‘Boeuf en Croute’, became very popular. It was an elegant meal, using a beef tenderloin covered with liver pate and wrapped in pastry. My first introduction to this meal was a much more low key version. It was simply achieved by making a nicely seasoned meatloaf, wrapping it a basic pastry and baking it. My mother would serve it with a tomato soup sauce. Definitely good but not quite the elegance of the true en croute entrees.
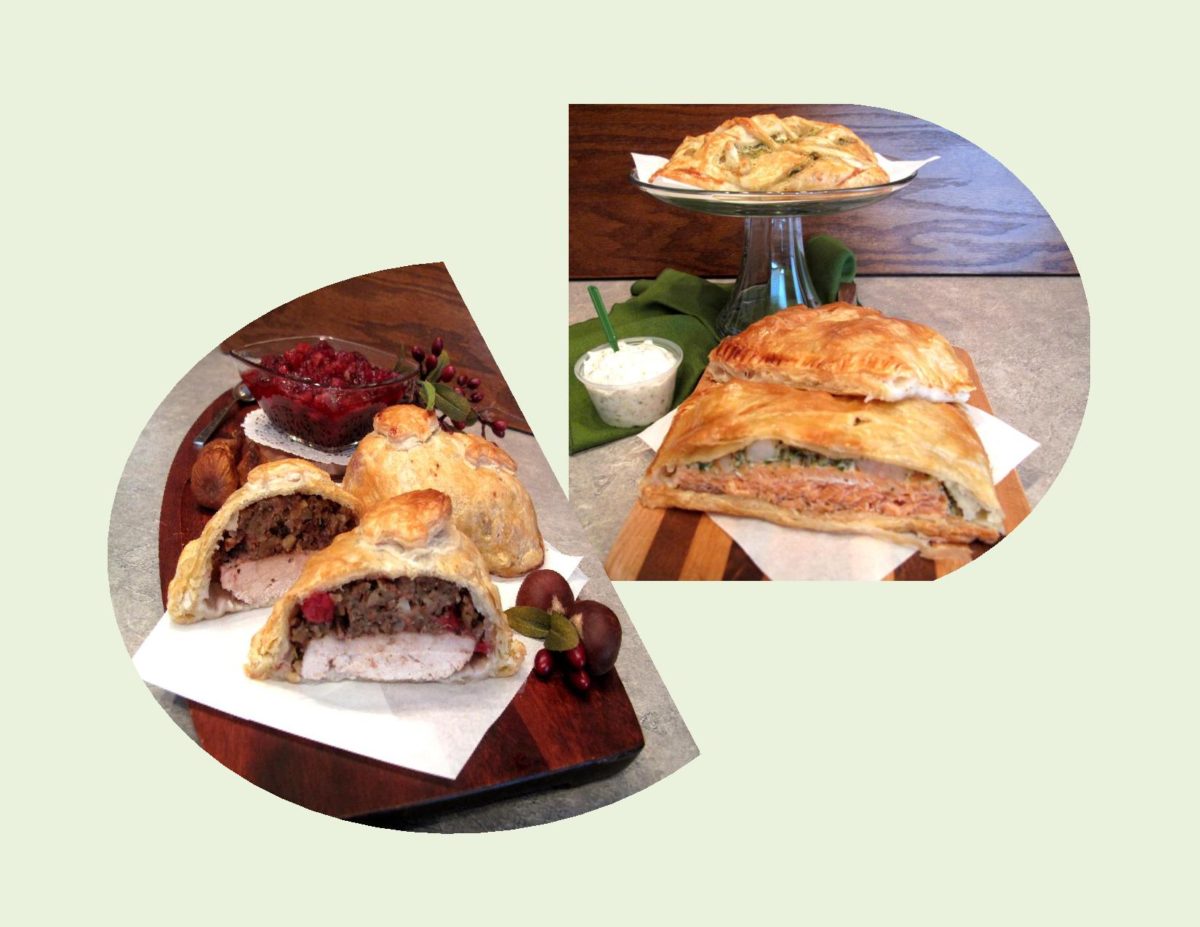
Two favorites of mine are variations of the classic ‘boeuf en croute’. One uses boneless turkey breast topped with a cranberry, hazelnut stuffing and baked in a tender puff pastry then served with a citrus-fig cranberry sauce. The other one is a seafood en croute using fresh salmon. The salmon is topped with shrimp or scallops in a seasoned egg/cream mixture and baked in puff pastry. A dill cream sauce is served to compliment this entree. Having a few alternatives to change out your traditional holiday meals always keeps it interesting.
Print Recipe
Turkey / Seafood 'en Croute'
Alternative ideas for those special occasions.
Votes: 1
Rating: 5
You:
Rate this recipe!
Ingredients
Citrus - Fig Cranberry Sauce
Ingredients
Citrus - Fig Cranberry Sauce
|
Votes: 1
Rating: 5
You:
Rate this recipe!
|
Instructions
Turkey en Croute
Saute garlic & onions in olive oil & butter 1-2 minutes. Add bread crumbs; toss until they begin to brown slightly. Add hazelnuts, thyme, cranberries, salt & pepper. Add only enough turkey stock to make stuffing hold together.
Place the first pastry sheet on a parchment lined baking sheet. Place turkey breast along the center line of the pastry sheet. Brush the edges of the pastry with egg wash. Place stuffing on top of the turkey. Place the second pastry sheet over the turkey & stuffing. Trim the edges to form an oval shape. Save the trimmings in the fridge.
Bring the edges of the dough together & seal by pinching them. Roll the dough from the bottom layer over the top layer & press down all the way around the perimeter of the pastry. This creates a tighter seal. Brush egg wash over the entire surface of the pastry. Decorate, cutting leaf shapes from trimmed pastry & score leaf veining into them with the tip of a sharp knife. Cut four 1/2" slots in the top of the pastry to let steam escape. Chill for 20 minutes or longer in the fridge before baking. This helps the pastry to puff.
Bake at 400 F. for about 15-20 minutes then reduce the heat to 350 F. Use a meat thermometer to make sure that the center has reached at least 170 F. to be sure the turkey is completely cooked, about 35-45 minutes longer. Let rest for 10 minutes before cutting into servings.
Citrus - Fig Cranberry Sauce
Simmer all ingredients together slowly for 30-40 minutes or until the cranberries are fully cooked & the mixture reduces & thickens to a jam-like consistency. Stir the sauce often as it simmers. Remove the star anise (if using). Store in a plastic container in refrigerator until serving time.
Seafood en Croute
On a lightly floured surface, roll each pastry sheet into a 12 x 10-inch rectangle. Cut each sheet into four 6 x 5-inch rectangles. Place a salmon fillet in center of four rectangles.
In a small bowl, combine the shrimp (or scallops), cream, onions, parsley, dill, garlic, pesto, salt & pepper. In another small bowl, beat egg white on medium speed until soft peaks form; fold into shrimp mixture. Spoon about 1/4 cup over each fillet.
Top each with a pastry rectangle & crimp to seal. With a sharp knife, cut several slits in the top to let steam escape. Place on a 15 x 10 x 1-inch parchment lined baking sheet; brush with egg wash. Bake at 400 F. for 20-25 minutes or until a thermometer reads 160 F.
Dill Cream Sauce
Mix all ingredients & refrigerate until serving time.
Recipe Notes
- The original recipe source for the Cranberry Hazelnut Turkey & Citrus Fig Cranberry Sauce can be found at rockrecipes.com
- The cranberry sauce uses star anise or extract but feel free to omit it if you do not care for that flavor.
- The Seafood en Croute recipe is one that is featured on tasteofhome.com which has always been my favorite 'go-to' recipe company forever.
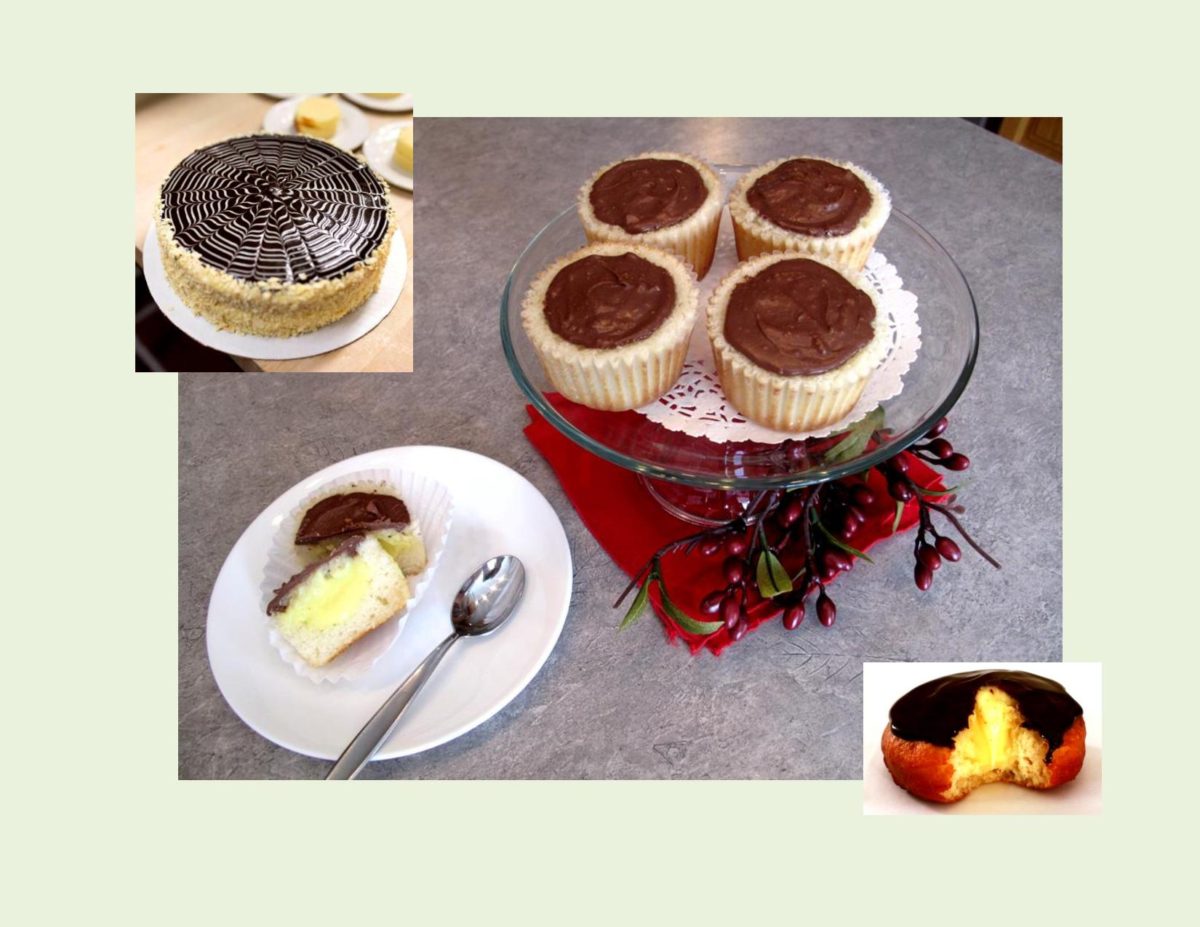
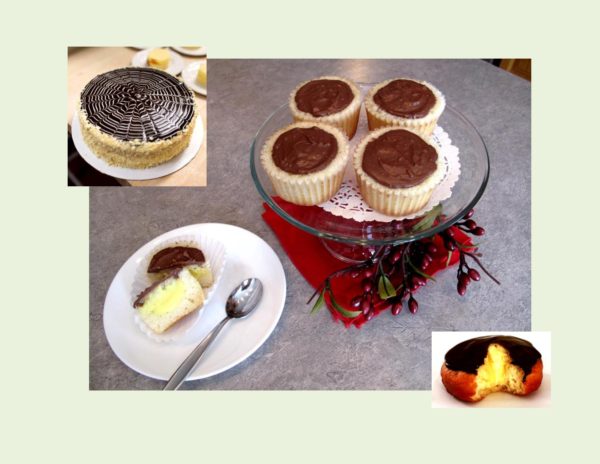
Boston Cream Pie, a French inspired cake that dates back to the late 1800’s. Considered an American classic, Boston cream pie is typically credited to Chef Sanzian of the Parker House Hotel right in downtown Boston, USA. One of the theories as to why it was called ‘pie’ instead of cake is that at that time, pie and cake tins were often considered interchangeable, as were the words themselves.
The original Boston cream pie consists of rich butter sponge cake filled with a rum-infused pastry cream. The sides are coated with toasted sliced almonds and topping it all is a layer of chocolate fondant. A delicate ‘spider web’ of white fondant adds a touch of elegance.
Most women of my mother’s time would do there own version of this pie/cake even if it was just a simple jam-filled layer cake topped with powdered sugar. Definitely the ‘classic’ version was reserved for special occasions. Men generally loved this ‘pie in cakes clothing’. Over time, homemakers as well as the food industry have come up with numerous ideas to recreate this dessert in donuts, cake pops, cupcakes etc.
I’m forever in pursuit of saving time and calories but ending up with a memorable ‘creation’. These Boston Cream Cupcakes are a good example. Tender little cakes filled with vanilla pudding and topped with a chocolate glaze.
Print Recipe
Boston Cream Cupcakes
Tasty little mini cakes with a few shortcuts.
Votes: 1
Rating: 5
You:
Rate this recipe!
Ingredients
Chocolate Glaze ( 2 versions,you chose)
Ingredients
Chocolate Glaze ( 2 versions,you chose)
|
Votes: 1
Rating: 5
You:
Rate this recipe!
|
Instructions
Cupcakes
Preheat oven to 350 F. Line a standard muffin pan with paper baking cups.
In a large bowl, combine flour, baking powder, salt & sugar with a wire whisk. Add butter & with a pastry blender combine until mixture resembles coarse meal. Add eggs, using a hand mixer on low, combine. Add milk & vanilla, increase to a medium speed & mix until batter is light & fluffy & free of lumps.
Fill lined muffin cups 3/4 full. Do not overfill. Bake about 18 minutes or until a toothpick inserted comes out clean. Cool in pan 5 minutes then transfer to a wire rack & cool completely.
Custard
Beat dry pudding mix & 1 cup milk with a whisk for 2 minutes. Stir in Cool Whip. Let stand 5 minutes before using.
Chocolate Glaze
For glaze #1... Microwave chocolate & butter in a microwave bowl on HIGH 1 minute; stir until chocolate is melted. Add sugar & 2 Tbsp milk; mix well.
For glaze # 2 ... Microwave chocolate & 1 cup Cool Whip topping in a microwave bowl on HIGH for 1 minute; stir until chocolate is melted & mixture is well blended
To Assemble: Insert a small knife at a 45 degree angle about 1/8-inch from the edge of each cupcake & cut all the way around, remove a cone of cake. Cut away all but the top 1/4-inch of the cone; leaving only a small disk of cake which will be used to top the cupcake.
Fill each cupcake with about 2 Tbsp of custard & top with the disk of cake. Carefully top each filled cupcake with 1-2 Tbsp of chocolate glaze. Refrigerate until ready to serve.
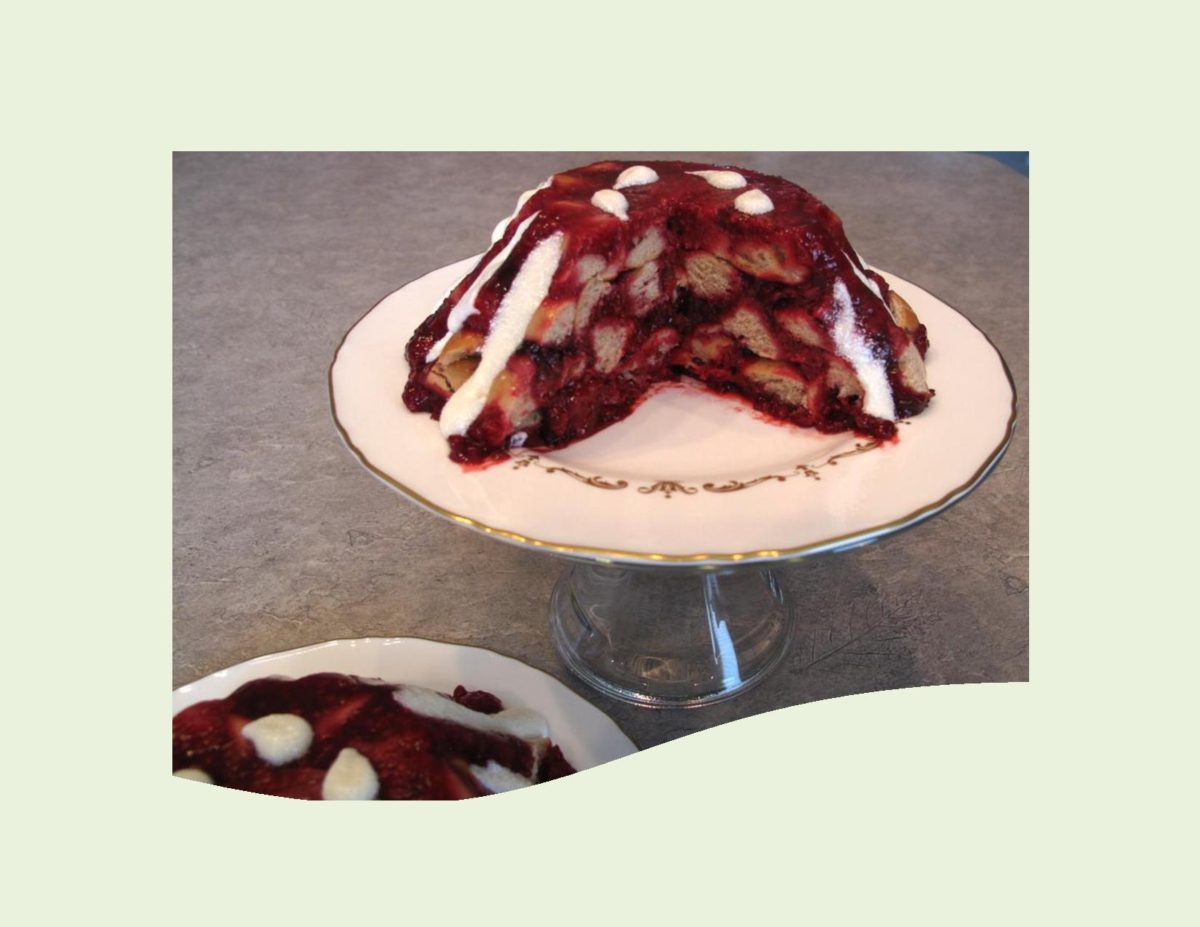
Bread pudding always gives me reason to remember good things. Why is it so beloved, aside from the extreme comfort food factor? It’s not that the dish was invented here — that honor likely goes to clever medieval or even ancient cooks in Europe and the Middle East who had a surplus of stale bread on their hands.
For those of you who haven’t tried it, sweet bread pudding is perhaps the ultimate comfort food. It’s simple to make, requires no special equipment and uses very basic ingredients. Just about every culture that makes bread has its own version of bread pudding.
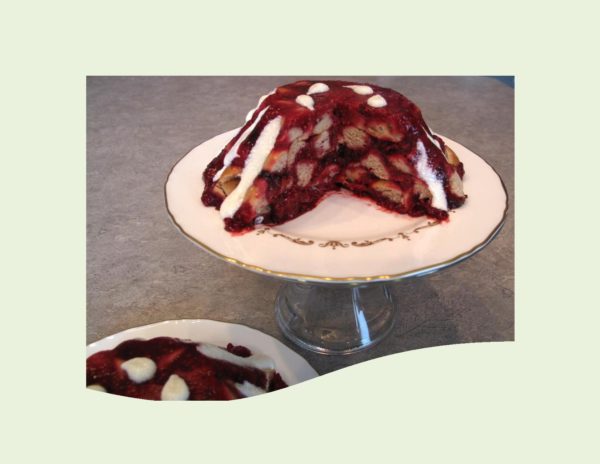
The bread you choose will have a huge effect on the texture of your pudding. Since raspberries seem to be appearing in bigger containers in the grocery store now and a teeny bit better priced, I wanted to share a recipe for an ‘unbaked’ or overnight version of Fresh Raspberry Bread Pudding with a Cream Cheese Drizzle. This is probably the easiest bread pudding recipe there is but it tastes soooo– good.
Print Recipe
Fresh Raspberry Bread Pudding
Easy, decadent, no-bake dessert.
Votes: 1
Rating: 5
You:
Rate this recipe!
|
|
Votes: 1
Rating: 5
You:
Rate this recipe!
|
Instructions
Bread Pudding
In a medium saucepan, combine sugar & cornstarch; blend well. Add raspberries; stir. Cook over medium heat until mixture boils & thickens, stirring constantly. Remove from heat; cool to room temperature.
Line a 8-cup mold with plastic wrap. Place some raspberry sauce in the bottom & top with a layer of bagel cubes; press down gently. Repeat, alternating layers with sauce & bagel cubes. Place plastic wrap over pudding. Cover with a plate that fits tightly inside mold, then place a heavy object on top of plate to help firm up pudding. Refrigerate overnight.
Cream Cheese Glaze
Whisk together cream cheese, powdered sugar, butter & vanilla. Add a little milk to achieve a drizzling consistency.
To serve, remove plate & plastic wrap; unmold onto a serving plate removing plastic wrap liner. Drizzle cream cheese glaze over pudding.

The quintessential summer BBQ dessert! Fruit pizza is like a giant cookie, covered with luscious cream, layered with colorful fresh fruit, topped with glaze and a drizzle of chocolate, if you please.
If you have been following my blogs, you have probably already noticed, choice is something I’m big on. Fruit pizza is a classic dessert with so many possibilities. I have always enjoyed to start with the original idea of a recipe and see how many ways I can vary it without getting too involved or requiring a lot of extra ingredients and time.
Since CANADA DAY celebrations are right around the corner I thought it was a good time to enjoy Fruit Pizza ‘personalized’. Here are some ideas to mix and match to your liking.
Print Recipe
Fresh Fruit Pizza
Personalize not only with ingredient choices but the design as well
Votes: 1
Rating: 5
You:
Rate this recipe!
Ingredients
Classic Shortbread or Pecan Shortbread Crust
Frozen Puff Pastry OR Crescent Roll Dough
Cool Whip / Custard Topping
Fresh Fruit (use whatever fruit you prefer)
Chocolate Drizzle (optional)
Ingredients
Classic Shortbread or Pecan Shortbread Crust
Frozen Puff Pastry OR Crescent Roll Dough
Cool Whip / Custard Topping
Fresh Fruit (use whatever fruit you prefer)
Chocolate Drizzle (optional)
|
Votes: 1
Rating: 5
You:
Rate this recipe!
|
Instructions
For Shortbread & Oatmeal Crusts
Preheat oven to 350 F. Lightly grease a 12-inch pizza pan or cookie sheet. In a large bowl, cream butter & sugar until light. Add any flavorings. In another bowl, combine dry ingredients; gradually add to creamed mixture. Mix with a wooden spoon or hand mixer until well blended. Press dough into pan & prick with a fork. Bake 10-15 minutes until golden. Allow to cool completely.
Frozen Puff Pastry
Follow package directions. Cool completely & place on serving tray.
Crescent Roll Dough
Preheat oven to 350 F. Pinch together crescent roll dough as you press into a 12-inch pizza pan. Sprinkle with 1 Tbsp sugar. Bake 10-12 minutes or until golden. Cool completely.
Cream Cheese Topping
In a small bowl, beat cream cheese, lime juice concentrate & sugar until smooth.
Cool Whip/Custard Topping
In a large bowl, whisk together dry pudding mix & milk for 2 minutes. Fold in Cool Whip.
Honey - Yogurt Topping
In a small bowl, whisk together yogurt & honey.
Citrus & Pineapple Glaze
In a small saucepan, combine ingredients. Cook over medium heat until thickens. Remove from heat & cool slightly. Using a pastry brush, gently brush the fruit with glaze. FOR PRESERVE GLAZE: mix preserves with water & brush onto fruit.
TO ASSEMBLE FRUIT PIZZA
Spread topping of choice onto cooled crust & arrange fruit onto. Brush with glaze of choice. Melt chocolate in a bowl over boiling water. Dip a large spoon into chocolate; drizzle, quickly letting the chocolate fall in thin ribbons from the end of the spoon. If chocolate seems to stiff, add a drop of vegetable oil. Let pizza stand until chocolate is firm.
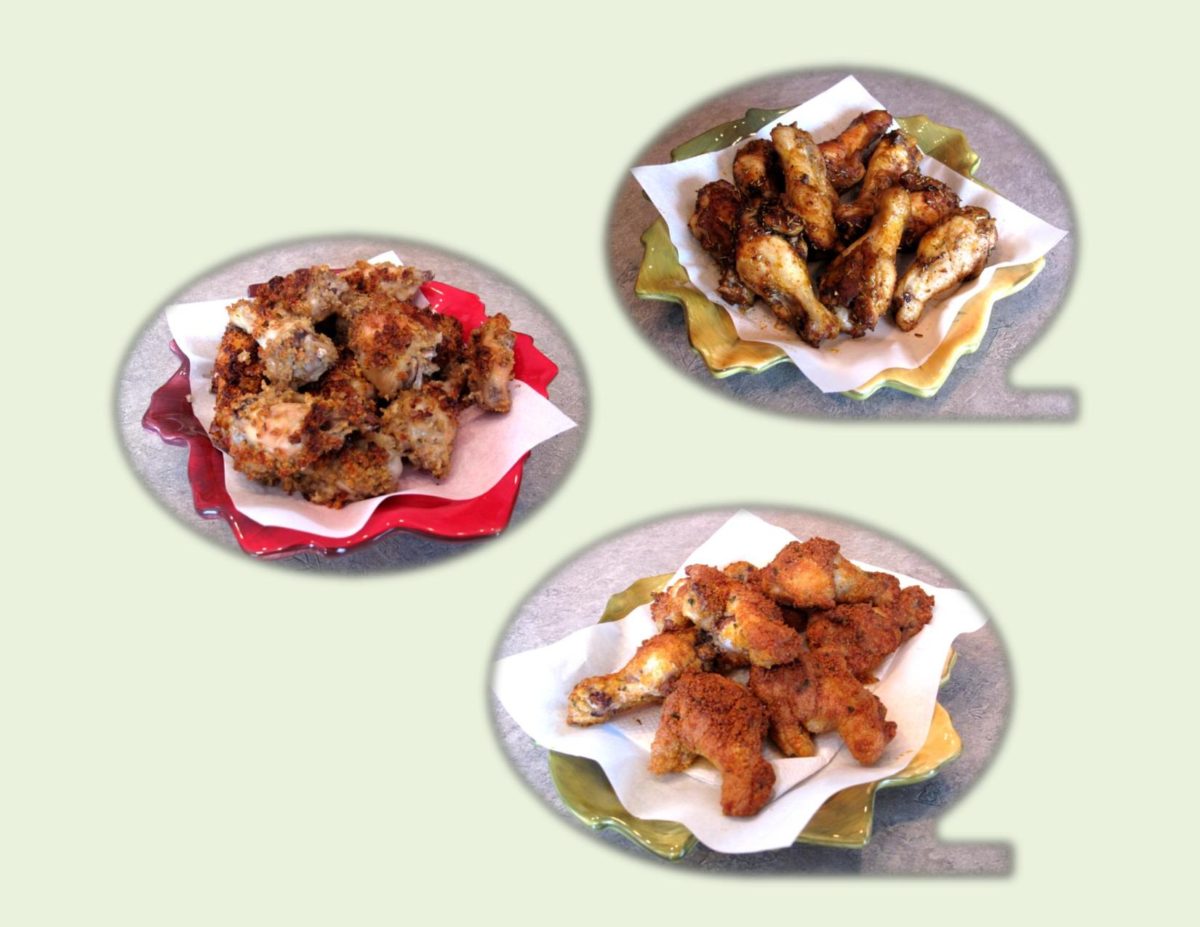
Chicken wings — versatile, affordable and one of North America’s most undisputed favorite ‘finger foods’. Even if they are classed as an appetizer, there is no problem fitting them in as the main course of a meal. The thing I like about them is how many different flavors you can give them. Gone are the days when everything had to be deep fried to taste good. Whether you prefer to barbecue them outdoors or bake in the oven, ‘wings’ taste great!
It seems like the grocery store meat counters have endless amounts of chicken wings in stock at this time. Of course, like most things nowadays, you have your choice — full wings, wing drumettes, wing tips and split wings. Good grief, we are so spoiled for choice! Then we go to cook them and there is more choice.
When I needed to make some of these tasty little morsels for company ‘finger food’ gatherings three of my favorites were ‘Parmesan’, ‘Rosemary’ and ‘Savory’ wings. I hope you enjoy them as well.
Print Recipe
Chicken Wing Drummettes
Make everyone happy -- make some of all three kinds!
Votes: 1
Rating: 5
You:
Rate this recipe!
|
|
Votes: 1
Rating: 5
You:
Rate this recipe!
|
Instructions
Parmesan wings
Preheat oven to 350 F. Line a 11 x 17 x 1-inch baking pan with foil. Place a 10 x 18-inch wire (cooling) rack on top. Combine parmesan cheese, parsley & spices in a large resealable plastic bag. Dip each chicken drumette in melted butter. Place a few in the bag at a time. Toss to coat evenly. Arrange drumettes in a single layer on wire rack. Bake uncovered for 45-55 minutes or until cooked.
Rosemary wings
Preheat oven to 375 F. Line a 11 x 17 x 1-inch pan with foil; spray foil with baking spray. In a resealable plastic bag, combine oil & spices. Add chicken; toss to coat evenly. Place drumettes on prepared pan. Bake for about 45 minutes or until cooked.
Savory wings
Preheat oven to 350 F. Line a 11 x 17 x 1-inch baking pan with foil. Place a 10 x 18-inch wire (cooling) rack on top. Combine bread crumbs & seasoning mix in a large resealable plastic bag. Dip each chicken drumette in melted butter. Place a few in the bag at a time. Toss to coat evenly. Arrange drumettes in a single layer on wire rack. Bake uncovered for about 45 minutes or until cooked.
Recipe Notes
- Whenever I have made wings, I prepared them to baking point early on in the day and popped them in the oven just prior to serving time.
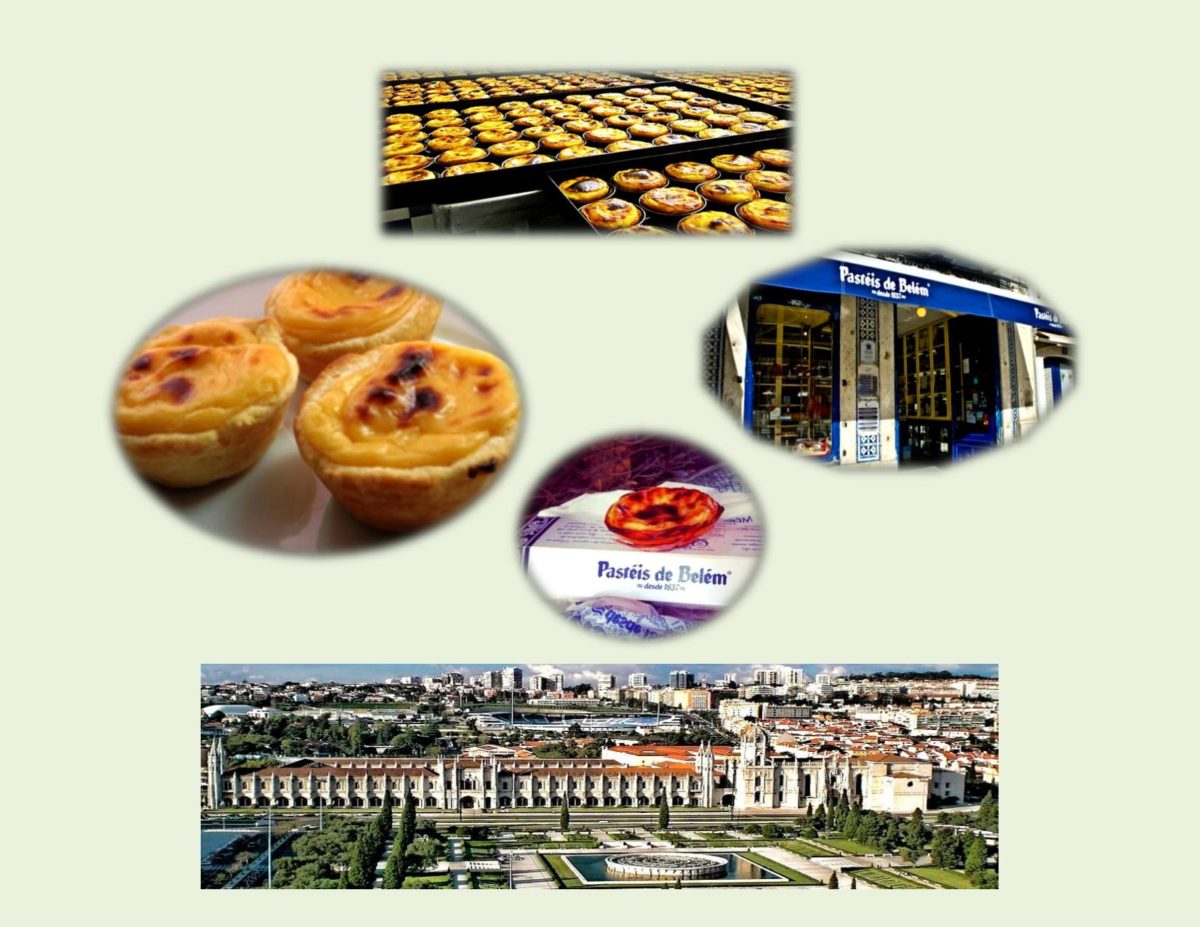
A while back I was in a grocery store and happened to notice a familiar looking little tart being sold. Sure enough, it was some Portuguese custard tarts with their typical characteristic of a ‘browned’ custard. There is no doubt this little sweet treat has universal appeal.
Until Brion and I had the pleasure of visiting Portugal in 2014, I really had never even tasted them or realized what an interesting history these unassuming custard tarts had.
‘Pasteis de nata’ were created by Catholic monks at the Jeronimos Monastery in the district of Belem, in Lisbon. These monks were originally based in France and loved these pastries. At the time, convents and monasteries used large quantities of egg whites for starching clothes, such as nuns’ habits. It was quite common for them to use the leftover egg yolks to make cakes and pastries, as a result these legendary tarts were born!
At the beginning of the nineteenth century, next to the Jeronimos Monastery there was a sugar cane refinery attached to a small general store. Following the extinction of the religious orders and in the face of the impending closing of many of the convents and monasteries in the aftermath of the Liberal Revolution of 1820, the monks started selling pasteis de nata at the sugar refinery to secure some revenue. In 1834 the monastery was closed and the recipe was sold to the sugar refinery. Three years later, the baking of the ‘Pasteis de Belem’ began in the buildings attached to the refinery, following the ancient ‘secret recipe’ from the monastery. Passed on and known exclusively to the master confectioners who hand-crafted the pastries in the’secret room’, this recipe remains unchanged to the present day. The bakery produces something like 10,000+ of these tarts a day, everything being done by hand except the filling of the tart shells.
When you read the recipe it makes you wonder how does a simple little custard tart reach such status. It seems it might be a few things such as ‘secret recipes’, teams of folks who do nothing but make the pastry dough or whip up the filling. Then there are those commercial ovens that blast at 800 F. to get that characteristic ‘browned’ look and taste. Definitely, when you make that many daily you can’t help but get it right!
All that being said, here is an easy way to make some ‘pasteis de nata’ in your own kitchen to enjoy but we all know so much of it is in ‘the taste of a memory’.
Print Recipe
Portuguese Custard Tarts (Pasteis de Nata)
Light, flaky, crispy crust with a lightly sweetened creamy custard
Votes: 1
Rating: 5
You:
Rate this recipe!
|
|
Votes: 1
Rating: 5
You:
Rate this recipe!
|
Instructions
Whisk yolks, eggs, cream, sugar & cornstarch in the top of a double boiler set over simmering water. Cook, stirring with a wooden spoon, until custard is thick enough to coat the back of spoon; remove from heat. Whisk in butter, vanilla & lemon zest. Strain the custard into a bowl. Place a piece of waxed paper directly over the custard; refrigerate until chilled or up to a day.
Starting from the short end, roll each sheet of thawed puff pastry into a log; cut each into 12 equal pieces. Lightly grease 2-12 cup muffin pans. Place a piece of dough in each cup, Pressing dough evenly with your fingers to form a tart shell. Line each tart case with a small round of parchment paper. Fill with baking weights or rice. 'Blind' bake at 400 F. for ABOUT 10 minutes.
Adjust oven temperature to 450 F. Fill tart shells about 2/3 full with cooled custard. Bake for about 10-12 minutes. Adjust to BROIL temperature & brown for 3-5 minutes, watching closely so they don't burn.
Leave to cool in muffin pans for about 5 minutes then turn out carefully on to a wire rack. Serve at room temperature. If preferred, sprinkle with a little ground cinnamon.
Recipe Notes
- Using frozen puff pastry makes it less time consuming but it still seems to take a few times of making them to get your timing just right with each part of the baking process. In the end it's well worth it!

For as long as I can remember, I personally have had a love affair with the ‘Big Sur’ coastline in California, USA. The spectacular beauty of this rugged 145 km (90 mile) coastline, with the natural drama playing out between land and sea is breathtaking.
Over the years many of our vacations have either been in this area or it has made a fabulous ending to a long flight coming back from Europe, before returning home to Canada.
One of the special memories I have from this vicinity was the quaint little European-style village of Carmel-by-the-Sea, located about 190 km (120 miles) from San Francisco.
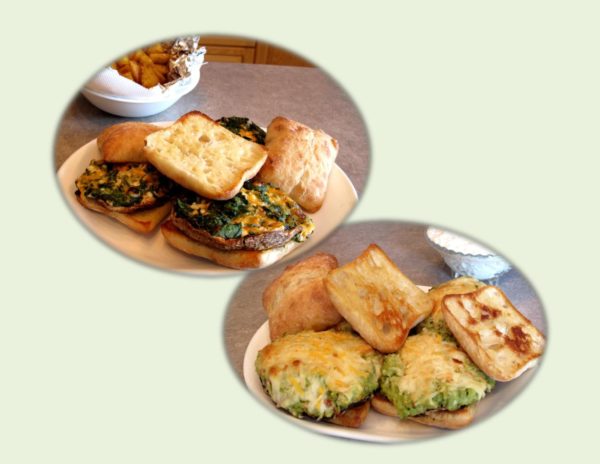
Some 30 years ago, actor Clint Eastwood, was elected mayor of Carmel for a two-year term. During that time he opened a restaurant/bar there called the ‘Hogs Breath Inn’. You had to enter it through a long , cobblestone alley corridor. The outdoor patio was nestled between the restaurant and the bar. A massive wall mural and numerous stone fireplaces all added tremendously to the wonderful ambiance. It was here that I first tasted a Portobello Mushroom Burger.
Every time Brion and I have returned to Carmel, we have made a point of eating lunch at the Hogs Breath Inn, just so I could taste that burger again. The Portobello mushroom seemed to have been marinated and then grilled on a barbecue. On top of it were some battered onion rings, lettuce and tomato. All of this came in a grilled Ciabatta bun with pickles and a side dish of your choice.
Of course, never having been someone who could just leave it at that, I had to see if I could push this idea just a bit further. Along came some more recipes for the ‘Stuffed Burger Series’. If you like these ingredients, I think you will really enjoy them.
Print Recipe
Portobello Mushroom Burgers
Votes: 1
Rating: 5
You:
Rate this recipe!
Ingredients
Seafood-Avocado Portobello Mushroom Burgers
- 2 Tbsp butter,
- 2 leeks, finely chopped all of white & part of green
- 1 garlic clove, minced
- 2 avocados, large, peeled & mashed
- 1/4 tsp garlic powder
- 1/4 tsp salt
- 1/2 tsp lemon juice
- 1/4 cup onion, minced
- 2 pieces sun-dried tomato, chopped fine
- 120 grams crabmeat
- 120 grams shrimpmeat
- 1/4 cup Zesty Italian dressing
- 30 grams Parmesan cheese
- 55 grams Asiago cheese, shredded
- 30 grams mozzarella cheese, shredded
- 6 Portobello mushrooms, large
- 6 Ciabatta buns or your choice
Spinach-Cheese Portobello Mushroom Burgers
|
Votes: 1
Rating: 5
You:
Rate this recipe!
|
Instructions
Seafood-Avocado Filling
Remove brown gills from the undersides of mushrooms using a spoon; discard gills. Remove stems, reserve for another use if desired. Melt butter in a large skillet over medium heat; add leek & garlic, & saute until tender. Remove from heat; cool.
Gently combine mashed avocado with next 7 ingredients in a medium bowl; stir into cooled leek mixture.
Dip round side of mushroom caps into Italian dressing; drain slightly. Arrange rounded sides down in a foil baking dish. Sprinkle parmesan cheese evenly into mushroom caps; then top evenly with seafood/avocado mixture, pressing filling to compact slightly. (Can be made 6 hours ahead. Cover & refrigerate if making in advance.)
Preheat oven or barbecue to 350 F. Combine Asiago & mozzarella cheese; sprinkle mushrooms with cheese mixture. Place foil baking dish with mushrooms in oven or on barbecue. Bake until tender & filling begins to brown, about 35 minutes. If necessary, cover loosely with aluminum foil so tops don't burn. Serve on slightly grilled Ciabatta buns. Serves 6
Spinach-Cheese Filling
Remove brown gills & stems from mushrooms. Dip round side of mushroom caps in Italian dressing; arrange, rounded side down, in a foil baking pan. Preheat oven or barbecue grill to 400 F.
Place spinach in a microwave safe bowl, sprinkle with a few drops of water & microwave on high for one minute. Chop cooked spinach; mix with cheddar & cottage cheese, garlic powder, onion powder, red pepper flakes, salt & pepper. Spread spinach mixture onto prepared mushroom caps.
Bake in oven or on barbecue until mushrooms are tender, about 12 minutes. Nice served on slightly grilled wholewheat buns. Serves 4
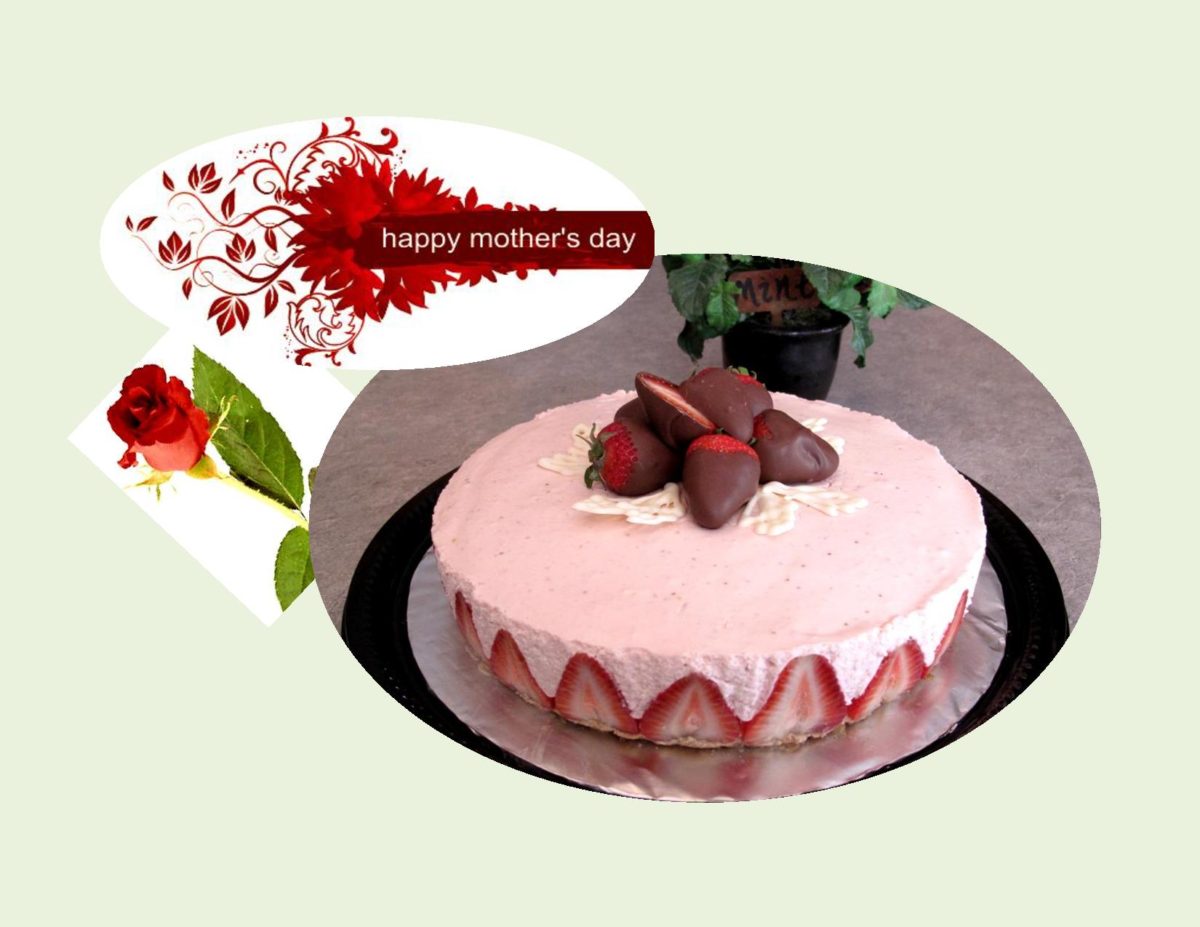
CELEBRATING MOTHER’S DAY!
Mother’s Day is our time to reflect and show gratitude to the women and mother’s who have been mentors and caregivers; ultimately those who have helped to shape us into who we are.
When my mother passed away in 1978, a friend said to me, ‘she will always be with you’. At that time I hadn’t really understood that comment fully. As the years go by I realized that is so true but of course it is never the same. Never a day goes by without something triggering a special memory of her.
Beauty lives deep in the heart of a mother and all she does for her family. This blog is especially to celebrate: the special memories of my mother for her endless giving of selfless love — my mother-in-law, Dolores, for her loving and kind ways and raising that ‘special’ man I love sharing my life with — to my sisters, who have given so much of themselves to be such great moms.
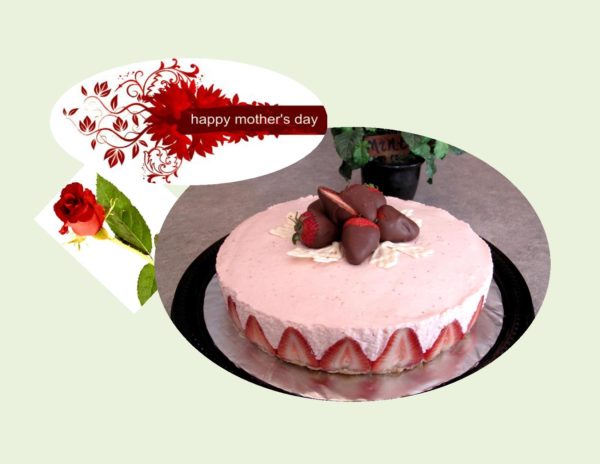
My choice of recipe for today’s blog is one that I have always enjoyed to make for special occasions — No-Bake Strawberry Cheesecake.
Print Recipe
Strawberry Cheesecake
A showy, light cheesecake tasting almost like you were eating a strawberry mousse dessert.
Votes: 1
Rating: 5
You:
Rate this recipe!
|
|
Votes: 1
Rating: 5
You:
Rate this recipe!
|
Instructions
Preheat oven to 325 F. Combine crumbs, coconut & butter; press into bottom of a 9-inch spring form pan. Bake for 8-10 minutes. Remove from oven & cool. Line sides of pan with a strip of parchment paper wide enough to reach the top of pan.
Reserve several strawberries for garnish. Cut two 1/4" slices from center part of enough strawberries to press in a single row of slices around base edge of pan. Cut up remaining strawberries to make 2 cups.
Process strawberries in food processor slightly; add softened cream cheese, sugar, orange & lemon juice. Continue to process until very smooth.
Soften gelatin in cold water; stir over low heat until dissolved. Beat into cheese mixture. Refrigerate until mixture just begins to mound. Fold in 1 cup whipped cream; pour into prepared crust &
refrigerate for several hours or overnight. Remove cheesecake from pan; carefully remove parchment paper.
Garnish with whipped cream, strawberry slices & fresh mint leaves.
Recipe Notes
- In the picture for the blog I chose to dip some strawberries to use in the garnish. Other times, I have made a floret of whipped cream on top of each serving piece topped it with a slice of strawberry & a piece of fresh mint.
- On occasion, I haven't baked the crust if time was of the essence & the cheesecake would be used right away.
- If you prefer a stronger strawberry flavor the 1 cup of whipping cream can be omitted. The cheesecake seems to have no problem 'setting up' without it.

In 2015, my husband Brion and I spent three months in Ecuador. Other than a holiday, we were wanting to check out this country as a possible ‘winter haven’, away from the cold ‘Alberta’ winters. It didn’t quite make the list but it was another adventure in our travels that is valuable in the big picture.
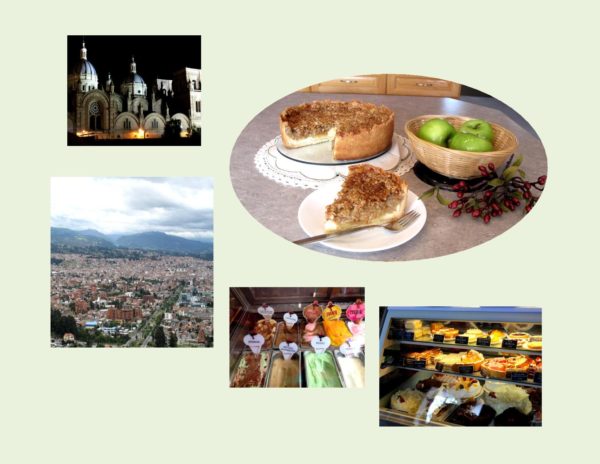
Cuenca is Ecuador’s third-largest city and the economic center of the southern sierra. The city sits on a plateau surrounded by mountains which explains the name Cuenca which means ‘basin’ in Spanish. Four rivers are found in the Cuenca basin and one, the Tomebamba, runs right through the center of the city.
An artistic mecca of southern Ecuador, artisans produce fine leather goods, custom made guitars, filigree jewelry, ceramics as well as the famous Panama hats, which originated in Ecuador not Panama.
Although near the equator, Cuenca sits high in the southern Andes at an altitude of 8300 feet and its residents enjoy year round spring-like weather. Temperatures rarely go beyond highs in the 70’s F.(21 Celsius) and lows in the 50’s F.(10 Celsius), so a sweater or light jacket is sufficient all year long. Rainfall averages around three inches per month.
Cuenca’s two ‘seasons’ are rainy and dry. The rainy season, roughly from January through May, features warm sunny mornings and frequent afternoon showers. During the middle of the dry season (June through December), you can expect long periods of chilly weather and overcast skies.
The apartment we had rented was in central Cuenca where we discovered a nice little place called ‘Tutto Freddos’. It was a unique spot where you could enjoy having a variety of things to eat such as pizza, sandwiches, ice cream treats, cakes and pastries with your coffee. It was like a bistro in appearance with its small tables as well as a mezzanine floor. While you enjoyed your coffee and treats you could watch the activity in the streets. Of course being the nature of the country, it never failed to be interesting! One of the treats we had numerous times was what seemed to me like a version of ‘Dutch Apple Pie’. I tried to find out anything I could about it in hopes of duplicating the ‘Taste of a Memory’. Here is my interpretation of this special ‘pie’.
Print Recipe
Dutch Apple Pie
Apple-cream cheese filling with a wonderful blend of 'Dutch' spices, baked in a shortbread cookie crust.
Votes: 1
Rating: 5
You:
Rate this recipe!
|
|
Votes: 1
Rating: 5
You:
Rate this recipe!
|
Instructions
Preheat oven to 375 F. In a food processor, combine flour, powdered sugar & cornstarch. Cover & process until combined; add butter. Pulse with on/off turns until mixture forms fine crumbs. Press mixture onto the bottom & 1 1/2" up the sides of a 9" spring form pan.
Beat cream cheese & 1/4 cup sugar with mixer until well blended. Add egg & vanilla; mix well. Spread onto bottom of crust. Mix remaining sugar, 2 Tbsp flour, & spice blend. Add to apples in a large bowl; toss to coat. Spoon over cream cheese layer.
Mix remaining flour, brown sugar & rolled oats in a medium bowl. Cut in butter until mixture resembles coarse crumbs; sprinkle over apple mixture. Lay a piece of foil loosely over pie to prevent over browning. Bake in bottom third of oven for 20 minutes, uncover & continue to bake for another 30 minutes or until apples are tender.
Recipe Notes
Spice Blend Mix: 4 tsp cinnamon, 1 tsp cloves, 1 tsp nutmeg, 1/4 tsp white pepper, 1 tsp anise seed, 1/2 tsp ginger, 1/4 tsp cardamom, 1/4 tsp mace
- Grind the spices together in a coffee grinder or blender; place in a screw-top jar in the refrigerator.
- Any extra spice mix can be used in recipes calling for 'apple or pumpkin pie spice'.


