
This is not just an ordinary oatmeal cookie; this oatmeal cookie has a surprise ingredient. Rice cereal, which adds a crispy crunch that gives a unique texture and flavor to this soft and chewy cookie with wonderfully crisp edges.
I have given these cookies the name of ‘blueberry, oatmeal, rice chewies’ but the original idea dates back to the 1930s. It seems they went by different names at that time, such as ranger cookies, Texas ranger cookies or cowboy cookies. There are a lot of opinions, not facts, about why this delicious oatmeal cookie recipe is called a ‘ranger cookie’.
There’s no real reason for either of the names, except for possibly because the cookies kept well in saddlebags and, thanks to the eggs, oats, and cereal, provided a bit of energy for long days in the field.
Regardless of their title, these cookies were frequently shared in community cookbooks because the recipe is easy to make and always pleases a crowd. Distinguishing itself from other types of cookies, this ranger cookies recipe has a blend of oats and crispy rice cereal, giving each cookie an intriguing mix of textures: light and tender with a crisp edge and a chewy middle. With the addition of some dried blueberries and pepita seeds, it gives them a whole new dimension.
The result is a cookie with a delightful harmony of flavor in every bite. With both oatmeal and rice krispies cereal in the cookies, I think you would be justified in having these for breakfast.
Print Recipe
Blueberry, Oatmeal, Rice Chewies
Votes: 1
Rating: 5
You:
Rate this recipe!
|
|
Votes: 1
Rating: 5
You:
Rate this recipe!
|
Instructions
Whisk together flour, baking powder, baking soda & salt.
In a large bowl, beat butter & both sugars on medium speed of an electric mixer until well combined. Add eggs, applesauce & vanilla; mix well. Add flour mixture, mixing until just combined. Stir in rice krispies, oatmeal, pepitas & dried blueberries. Chill dough for 30 minutes.
Preheat oven to 350 F. Line 2 baking sheets with parchment paper.
Scoop dough onto parchment lined cookie sheets.
Bake for about 10 minutes or until lightly browned. Remove from baking sheets & cool on wire racks. Store in airtight container.
Recipe Notes
Due to the fact that I have a nut allergy, I always tend to use seeds to add some crunch. Feel free to change it up with your choice of nuts or dried fruit if you wish.

Faster to make than cookies, easier to transport than a cake and equally as delicious as both, what’s not to love about dessert squares (or in this case ‘diamonds’).
The classic rice krispie treats recipe found on the back of the cereal box call for very few ingredients. While we will forever appreciate the simplicity of the sweet treat in its unaltered form, its hard not to experiment with a few new ideas.
There’s a good reason why oatmeal cookies are the poster child for rolled oats. Oatmeal can enhance a whole range of dough and/or batters from pancakes to bread & muffins, etc.
The idea of putting oatmeal, rice krispies, pumpkin seeds & candied fruit peel all in one dessert bar is the ultimate rice krispie treat in my opinion.
You can choose to cut them in whatever shape you wish depending on the the baking pan you use. I wanted to bake these in a 9 x 13 pan and cut them into diamonds for this blog recipe. I had previously made the same recipe in a drop cookie form. Same great taste, just a different shape.
Print Recipe
Crispy Seed & Fruit Oat Diamonds
Votes: 1
Rating: 5
You:
Rate this recipe!
|
|
Votes: 1
Rating: 5
You:
Rate this recipe!
|
Instructions
Preheat oven to 375 F. Grease or line (w/parchment paper) baking pan of choice & set aside.
In a medium bowl, combine flour, salt, baking soda & oatmeal.
In a large bowl, cream together butter & sugars until light & fluffy. Mix in vanilla & eggs until well incorporated. Add flour mixture & mix until completely combined.
Stir in seeds, fruit & rice krispies with a spatula.
Press batter into prepared baking pan. Bake 20 minutes, until LIGHTLY golden on the edges. These bars are best if slightly under-baked. They may look shiny & under-baked, but will darken & set up as they cool.
Cool completely then cut into desired size & shape (squares, diamonds or bars). Drizzle with lemon glaze & remove diamonds from pan.
Recipe Notes
- If you are not a fan of pumpkin seeds or candied fruit peel, just substitute them with your own favorites.
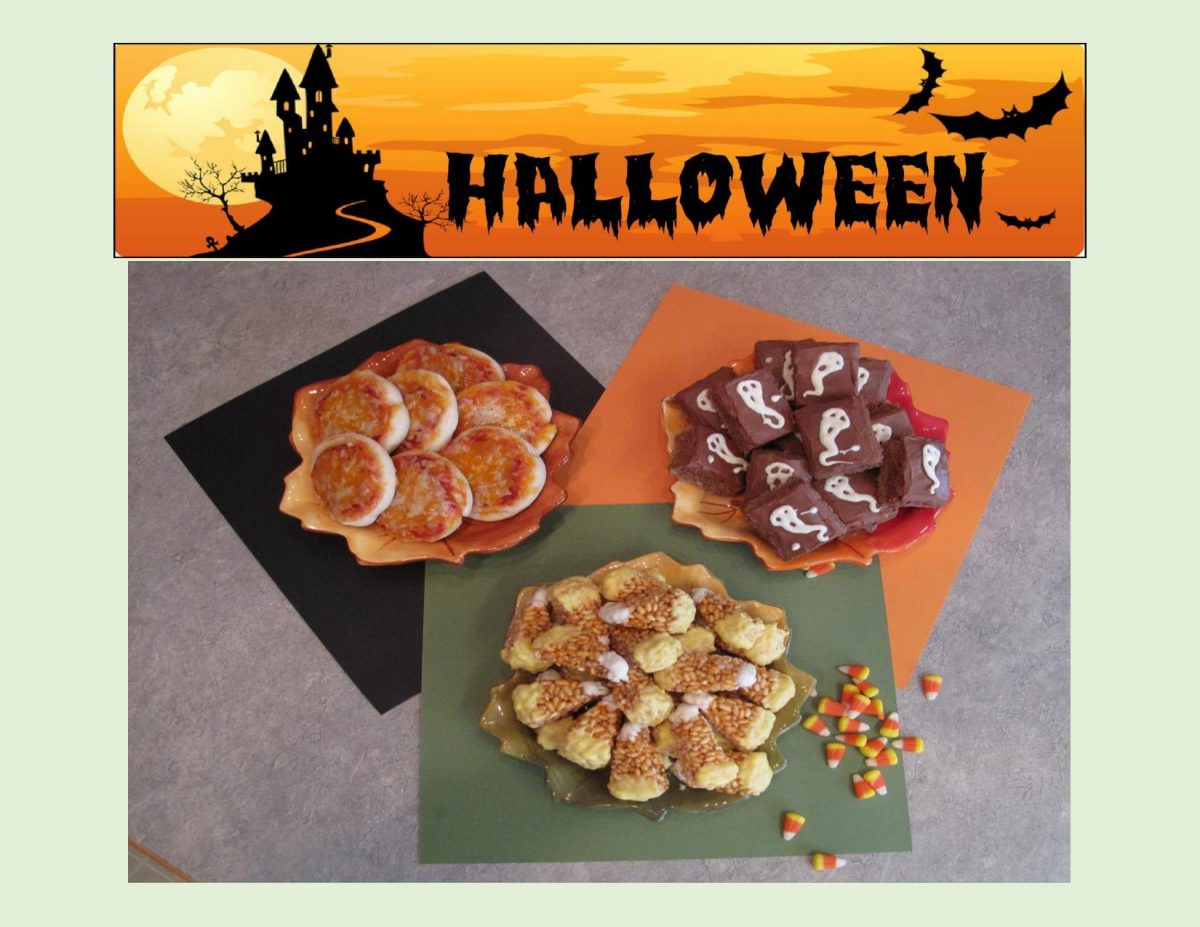
Well here we are, the end of October already, and Halloween has arrived. A number of years ago, Brion and I decided to take a different approach to this occasion. Rather than spending the evening running to the door to hand out treats, I would make some special goodies for our immediate neighbor’s ‘kids’. We have been lucky to have had the same neighbors for many years. Since food is my passion, its always fun to ‘create’ something that I think our four ‘young’ people will enjoy.
My choice of treats this year are brownie ghosts, krispie candy corn and some bite size pizzas. Most kids love chocolate so I think brownies will cover that and I swapped out the ‘waxy’ candy for rice krispies in the candy corn treats. Pizza bites aren’t exactly following the Halloween theme but the kids are getting older and I’m sure they will love them anyway.
Just an interesting little side note on the actual candy corn ‘candy’ since they seem to be synonymous with Halloween. Originally they were never tied to any time of year. Many candies of the day were molded into what was recognizable to regular folks. At the time, that was vegetables, fruits and other simple, earthy things.
When the Goelitz Confectionery Company first produced candy corn, it was called ‘chicken feed’. The boxes were illustrated with a colorful rooster logo and a tag line that read: ‘Something Worth Crowing For’. The multi-colored design was ground-breaking in the candy industry at the time it was invented. One of candy corn’s least favored qualities is that waxy texture. Strangely enough, even after more than 120 years, it still has a huge following as well as many other candy corn related and/or flavored recipes on the market.
ENJOY YOUR HALLOWEEN IN WHATEVER WAY WORKS FOR YOU!
Print Recipe
Brownie Ghosts - 'Krispie' Candy Corn - Pizza Pinwheels
Votes: 1
Rating: 5
You:
Rate this recipe!
Ingredients
Chocolate Dipped Candy Corn Treats
Ingredients
Chocolate Dipped Candy Corn Treats
|
Votes: 1
Rating: 5
You:
Rate this recipe!
|
Instructions
Bottom Layer of Brownies
Preheat oven to 350 F. Line a 9 X 9-inch baking pan with parchment paper. Combine all bottom layer ingredients until crumbly. Pat into pan & bake for 10 minutes.
Middle Layer of Brownies
In the microwave, very carefully melt chocolate (do NOT overheat) & add butter. Stir until combined & slightly cool; add beaten egg & sugar. In a small bowl, combine flour, baking powder & salt. Add to chocolate mixture alternately with combined milk & vanilla. Fold in walnuts. Carefully spread batter over bottom layer. Bake for 20-25 minutes; do not OVER BAKE. Remove from oven & cool. Slice into 20 squares.
Fudge Frosting
If you prefer to make your chocolate ghosts BEFORE the frosting, it will give them ample time to set before needed. TO MAKE FROSTING: Carefully melt chocolate & butter in microwave. Cool slightly; stir in powdered sugar & vanilla. Blend in hot water & beat until a smooth consistency. Spread icing evenly over brownies & decorate with a white chocolate ghosts.
White Chocolate Ghosts
Carefully melt white chocolate wafers in microwave. Pour melted chocolate into a piping bag fitted with a small hole tip. Place a large piece of waxed paper on a flat surface with a printout of ghost shapes underneath. Trace outline, then fill in the center. Allow to set completely, then peel ghosts from waxed paper & press lightly on top of brownies.
Chocolate Dipped Candy Corn Treats
Butter 2 round 5-inch baking pans. In a large pot over medium heat, melt butter. Add marshmallows & stir constantly until they are melted. Stir in a few drops of orange coloring & remove the pot from heat. Add rice krispies, being sure to stir until well coated. Press into prepared pans to set. Once treats have set, cut them into triangles & use your hand to gently round the corners for a more realistic look.
Melt candy coatings in separate dishes. Lay out a sheet of parchment paper. Dip the base of each triangle into the yellow chocolate, shaking off excess, then dip the tips into the white chocolate. Place them onto the parchment paper. Once the chocolate has set, you can store the treats at room temperature in an airtight container for up to three days. Yield 30 treats.
Mini Pizza Pinwheels
Preheat oven to 350 F. Line a large baking sheet with parchment paper. set aside.
Grate cheeses & combine in a small dish. Remove dough from packaging but DO NOT unroll. Slice each roll into 12 disks & space out on parchment paper. Using a 1/4 cup dry measure, (make sure you lightly butter & flour the bottom of your measure or it will stick to the dough). Press down the little disks to form a cavity. Divide the pizza sauce & grated cheese between the 24 disks.
Bake 10-12 minutes; remove from oven & cool on a wire rack.

I haven’t thought of puffed wheat cake in years. It’s probably been 15 or 20 years since I’ve even made any. So what happened to puffed wheat? I remember this cereal from my childhood, being sold in HUGE plastic bags. It seems that puffed wheat cake (or squares) was a distinctly rural Canadian phenomenon. Nearly anyone from the prairie provinces recalls the recipe from memory. When I looked through my mothers recipe file, she had a recipe for ‘puffed wheat brittle’. This was the forerunner to puffed wheat ‘squares’. It was made using sugar, water, vinegar, molasses, butter & salt.
The Rice Krispie cereal came on the market in North America in 1928. Food history states that similar recipes existed for Puffed Rice & Puffed Wheat but neither used marshmallows, only molasses. Most inventions are built on what has come before and the ‘Rice Krispie Marshmallow Treats’ were no different.
Home economists, Mildred Day and her co-worker, Malitta Jensen, who worked for the Kellogg’s company in 1939 are credited with inventing ‘Rice Krispie Treats’. Originally they had been developed as a snack for an organization called Campfire Girls. They were having a fundraiser and needed something unique that the girls could sell door to door.
In 1940, the original recipe for Kellogg’s Rice Krispie Treats first appeared on the cereal box and continues to do so to this day. In 1995, the company began selling the pre-packaged ones. The fact that they are so quick and easy to make attributes to their continued popularity and of course there are no end to variations you can make from the original recipe.
Here are a couple of ideas you might enjoy to try.
Print Recipe
Chai Puffed Wheat Squares / Rice Krispie Treats
Votes: 4
Rating: 5
You:
Rate this recipe!
Ingredients
Chai Puffed Wheat Squares
Ingredients
Chai Puffed Wheat Squares
|
Votes: 4
Rating: 5
You:
Rate this recipe!
|
Instructions
Chai Puffed Wheat Squares
-
In a large buttered bowl, measure out puffed wheat; set aside. In a saucepan, combine margarine, brown sugar, corn syrup & spices; bring to a boil. Remove from heat & add vanilla. Pour mixture over puffed wheat & stir quickly until completely coated. Pour immediately into prepared buttered pan (size will depend on how thick you like your squares to be) & press down firmly to flatten. When cool, cut into preferred size pieces.
Rice Krispie Treats
-
Lightly butter a 9 x 13" pan. In a large bowl, measure rice krispies, flax flakes, cranberries, pumpkin seeds & flax seed. In a large saucepan, slowly melt margarine with marshmallows. Remove from heat, add vanilla. Add mixture from bowl & stir quickly to combine well. Pour into buttered pan & press down firmly. When cool, cut into preferred size pieces.


