There is no one way to create ‘meatloaf’ and it is precisely this capacity for re-invention that has allowed meatloaf to maintain a continued place on our dinner tables. The limitations for the iconic dish are none. The criteria is ground meat primarily and whether it is beef, pork, chicken, turkey or a blend of, doesn’t matter. The meat must be cut with a filler or the loaf becomes to dense. Bread crumbs, oatmeal, crackers, Japanese panko crumbs, rice, minced vegetables are all good choices. Egg and/or dairy of some kind is essential to bind and moisten. Seasoning is definitely a personal choice. The loaf shape is classic but the top can be glazed, sauced, as is, or baked with strips of bacon over it.
At one time, trying to find a casual restaurant that didn’t serve meatloaf would have been like an Italian one that didn’t serve pasta. Some believe meatloaf was born during the Depression of the 1930’s. To stretch the small amounts of meat people had, it was ground and mixed with stale bread crumbs. At times, these loaves actually contained more ‘loaf’ than meat.
Whether you love meatloaf or hate it, the fact that it is still around after all these years is incredible. Today’s entree puts another spin on this old classic. This a recipe that was published in a Better Homes & Gardens magazine in the 70’s. Interesting!
Print Recipe
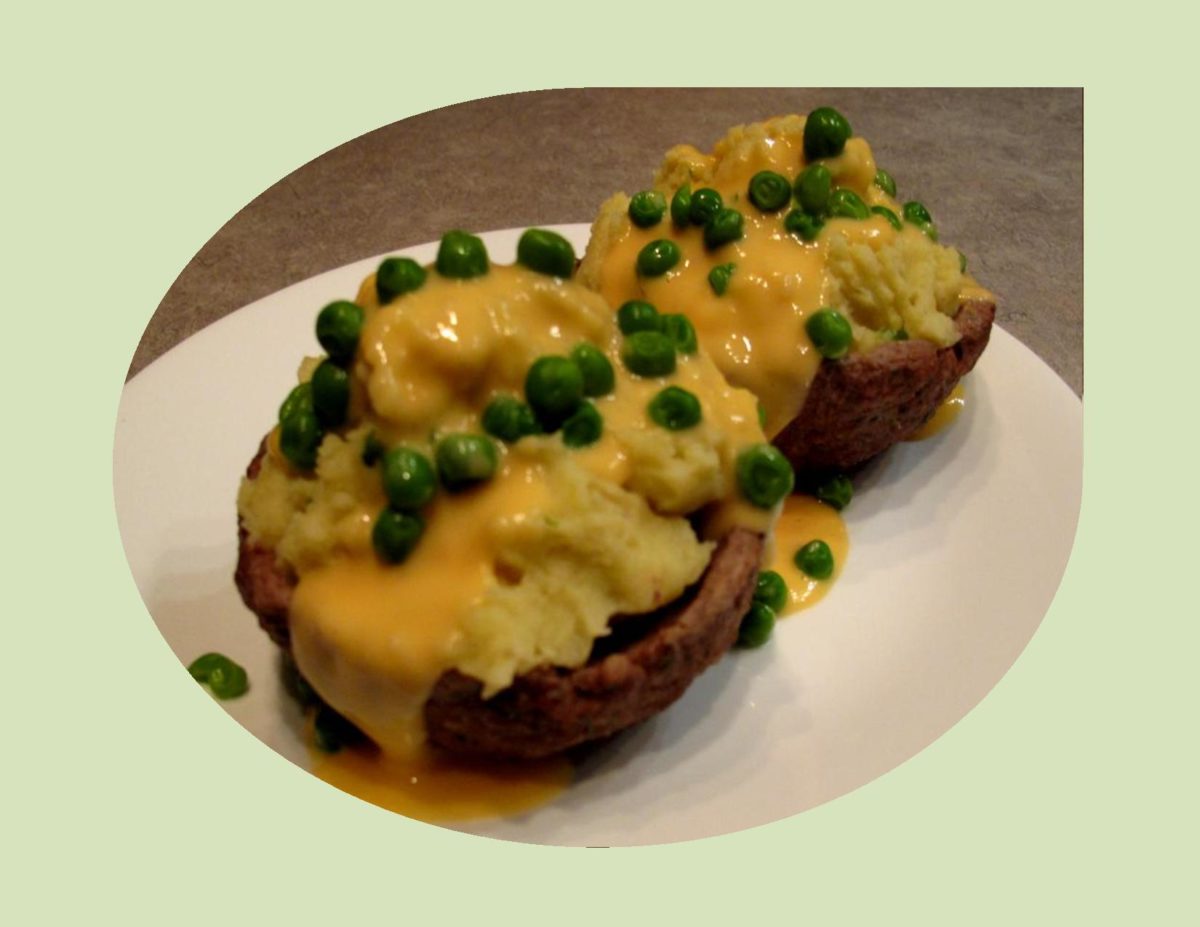
Mashed Potato-Meat Cups with Cheese 'Gravy'
Votes: 2
Rating: 5
You:
Rate this recipe!
|
|
Votes: 2
Rating: 5
You:
Rate this recipe!
|
Instructions
Meat Cups
In a skillet, heat oil & saute onions & garlic until translucent. Set aside to cool. In a large bowl, combine ground beef, salt, pepper, Worcestershire sauce, Parmesan, parsley, cooled onions & garlic, egg, breadcrumbs & milk. Combine well.
On 4 squares of waxed paper, shape into 4 patties with a 5-inch diameter. Shape each over an inverted custard cup; discard paper. Chill about an hour.
Mashed Potatoes
Peel & cook potatoes. In a large bowl, combine cooked potatoes, butter, seasonings, Parmesan & a splash of milk. Mash & add more milk gradually until potatoes are desired texture.
Cheese Sauce
In a saucepan, melt butter; whisk in flour, salt & pepper until smooth. Gradually whisk in milk. Bring to a boil; cook & stir while adding cheddar cheese. Cook, stirring constantly until thickened. Cook frozen peas.
Baking & Serving
Preheat oven to 375 F. Place inverted meat cups on a shallow baking dish. Bake for 20 minutes or until meat is cooked. Lift baked meat cups from custard cups & turn upright; fill with mashed potatoes. Place on serving plates, spoon cheese sauce over filled meat cups & top with green peas.

Having always had a passion for collecting recipes, I recall one of my mothers cupboard drawers being full of recipe pamphlets. I loved sifting through them to find a recipe I could make. Anyone who’s ever checked out the kitchen section of an antique store can attest, recipe pamphlets were once big business. Long before we had access to the internet, home brands like General Mills & Cuisinart regularly released pocket-sized magazines full of tips, recipes and instructions on their products. Glossy covers depicted the recipes inside, the price was right and they were easy to use. There was no reason to buy an expensive big cookbook when it was all here in a pamphlet form.
The Campbell Soup Company had its own kitchen dedicated to pumping out such pamphlets. In 1955, Dorcas Reilly, the recipe supervisor at the time, devised and tested the infamous ‘green bean casserole’ recipe. Her inspiration for the dish was to create a quick and easy recipe around two things most folks always had on hand in the 1950’s. They were green beans and Campbell’s cream of mushroom soup. Reilly’s recipe became immediately popular. This simple combination consisted of green beans, cream of mushroom soup, soy sauce, milk and french fried onions. The idea that it could be made ahead and reheated, made it perfect for holiday dinners. Even in the face of North America’s obsession with fresh, locally grown and artisan foods, its popularity continues.
Like with most iconic dishes, time brings changes and healthier upgrades or just different personal tastes. I’ve never been a fan of those french fried onions, so I opted for a crispy panko topping. Along with fresh green beans and mushrooms I’m using a bechamel sauce. It worked out quite nice.
Print Recipe
Panko-Crusted Green Bean & Mushroom Casserole
Votes: 1
Rating: 5
You:
Rate this recipe!
Ingredients
- 3 slices thick-cut bacon, diced
- 1/2 cup onion, finely chopped
- 2 cloves garlic, minced
- 350 grams wild mushroom blend, chopped
- 3 Tbsp butter,
- 3 Tbsp flour
- 1 cup half & half cream
- 1 tsp Worcestershire sauce
- 1 cup chicken broth
- 60 grams white cheddar cheese OR Parmigiana-Reggiano
- 3/4 tsp dried thyme
- 1/2 tsp salt
- 1/4 tsp pepper
- 454 grams fresh green beans, trimmed, halved & blanced (boil 5 minutes, place beans in ice water for a couple of minutes, drain)
- 1 cup Panko crumbs
- 3 Tbsp butter, melted
|
Votes: 1
Rating: 5
You:
Rate this recipe!
|
Instructions
Preheat oven to 350 F. In a large skillet, fry bacon until almost crisp. Add onions, cook until soft & translucent, about 4-5 minutes. Add mushrooms & garlic; cook another 4-5 minutes until mushrooms are soft. Transfer the mixture to a bowl.
Using the same skillet, melt butter & whisk in flour. Once combined, continue whisking for another 2 minutes until mixture has slightly deepened in color. Add half & half, Worcestershire sauce & chicken broth while constantly whisking to prevent lumps. Once slightly thickened, add grated cheese & whisk until melted & smooth.
Add the mushroom/bacon mixture along with thyme, salt & pepper. Let the sauce simmer for a couple of minutes, then add the blanched green beans. Stir to combine.
Pour the bean mixture into a 13 X 9-inch casserole dish. Combine panko crumbs with melted butter & sprinkle over casserole. Bake uncovered for 30 minutes.
Recipe Notes
- Everything can be done in advance except for adding the panko crumbs. Add those just before baking. Let casserole sit for at least 30 minutes after removing it from the fridge before baking.

From what archaeologists can determine, pita bread originated with peoples west of the Mediterranean. Pitas have been both a bread and a utensil throughout the Middle East and Eastern Mediterranean.It is a rather simple bread that could be made with limited technology. Pitas are cooked quickly at a relatively high temperature. The flat dough expands dramatically to form an interior pocket from steam.
Pitas’ popularity is partially attributed to using the pocket like a sandwich bread. Many traditional cultures use the pita more like a soft taco or the pita is pulled apart into pieces and dipped in a variety of sauces.
The possibilities of being able to pack, dip or wrap whatever you choose in the pita bread is limitless. Their taste can only be appreciated when eating your pita with different foods that will compliment them.
Although pitas are enjoyed all through the year, they seem like an easy summer meal to enjoy.
Print Recipe
Pita Pockets
Votes: 1
Rating: 5
You:
Rate this recipe!
|
|
Votes: 1
Rating: 5
You:
Rate this recipe!
|
Instructions
Filling
In a large skillet, cook beef, onion & green pepper over medium heat until meat is no longer pink; drain. Add the Worcestershire sauce, soy sauce, garlic powder, cumin & Italian seasoning; mix well. Simmer, uncovered, for 5-10 minutes.
Sauce
In a small saucepan, bring all the sauce ingredients to a boil. Reduce heat; simmer uncovered for 5-10 minutes. Spoon meat mixture into pita halves; top with sauce, tomatoes & lettuce.

With the passage of time, Kebabs have managed to find a very significant place in modern day cuisines. Although kebabs have their roots in the Mediterranean and Middle East, they have been able to make their way around the world.
There is something special about warm weather and the smell of grill aromas saturating the air; it just seems to take food to a whole new level.
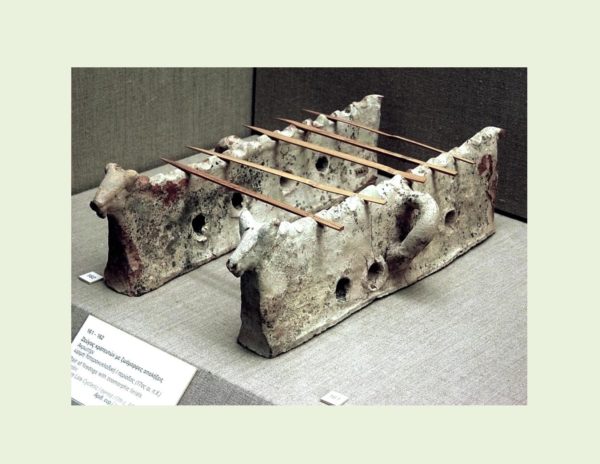
Tradition has it that kebabs were invented by medieval soldiers who used their swords to grill chunks of freshly hunted animals over open field fires. The word kebab means ‘fry’ but is also synonymous to ‘burning’. The first kebab dates back to 17th century BC, Greece. Akrotiri, a settlement on the Island of Santorini was buried in volcanic ash which preserved the remains of many objects, etc. In 1967, the site was excavated and unearthed stone sets for barbecuing. The stones were carved to resemble long dog-like animals that would have slots for skewers to lay in. These were called ‘firedogs’.
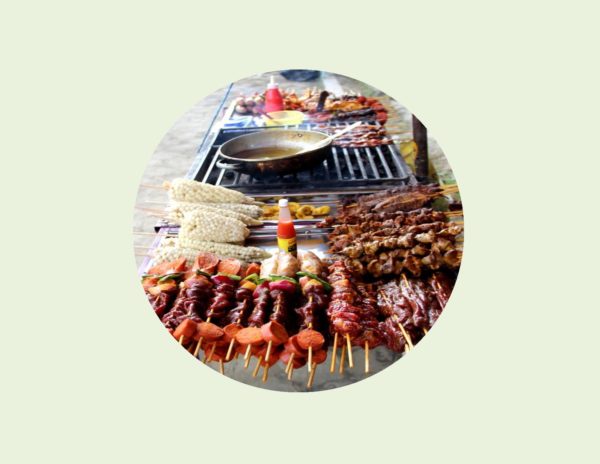
The nice thing about this meal is that its simple and easy. I guess you could say ‘the pizza of the grill’. The picture at the end of the blog is a very common sight we saw in the streets of Ecuador. Brion and I were never brave enough to try them but it sure smelled good in the open air.
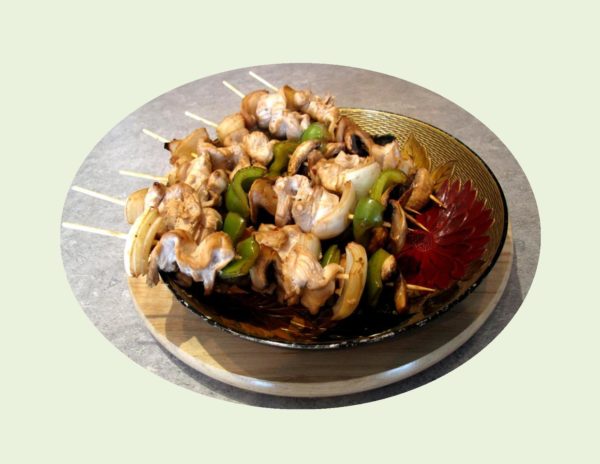
I am using chicken breast for my kebabs today. Nothing fancy, just good eating. Enjoy!
Print Recipe
Chicken Kebabs
Votes: 1
Rating: 5
You:
Rate this recipe!
|
|
Votes: 1
Rating: 5
You:
Rate this recipe!
|
Instructions
Cut chicken breasts into 18 lengthwise strips; place in a large resealable plastic bag. In another resealable plastic bag place green peppers, onions & mushrooms.
In a large bowl, combine salad dressing, soy sauce, Worcestershire sauce & lemon juice. Remove 1/3 cup; cover & refrigerate. Divide the remaining salad dressing mixture between chicken & the vegetables; seal both bags & turn to coat. Refrigerate 4 hours or overnight, turning occasionally.
Drain & discard marinade from chicken & vegetables. Alternately thread chicken & vegetables on 18 metal or soaked wooden skewers. Grill over medium heat for 12-15 minutes or until chicken juices run clear, turning & basting with reserved marinade occasionally.
-

Its only March, so BBQ season is till a few months away. Some would claim that good ‘barbecued’ food can only come from the grill, not the oven. But what about during our winter months or times when you just don’t feel like firing up the grill or you’re out of propane? Let’s face it, nothing can replace a good outdoor barbecue, but..
The key to oven BBQ chicken is to start with bone-in pieces. Chicken leg quarters are fairly fatty in comparison to chicken breast so it takes a lot to dry a chicken leg out. Which brings me to a recipe I clipped from a newspaper back in 1970 for OVEN BARBECUED CHICKEN. The ingredient list is rather lengthy but all pretty common place items. Brion likes this meal served with roasted potatoes.
In the month of March our family celebrates three birthdays. Today, March 21st would have been my Dad’s. He passed away at the age of 92, 12 years ago. Our Dad was a man of discipline; love was closely associated with duty and commitment for him. He was confident in who he was and didn’t demonstrate any need to conform to what we might have wanted him to do. Everything he undertook was driven by his commitment to honor and provide for the family that he loved.
IT IS WITH MUCH LOVE OUR FAMILY IS HONORING THIS DAY IN THE MEMORY OF OUR WONDERFUL DAD
Print Recipe
Oven Barbecued Chicken
Just right for one of those 'meat & potatoes' kind of meals.
Votes: 1
Rating: 5
You:
Rate this recipe!
|
|
Votes: 1
Rating: 5
You:
Rate this recipe!
|
Instructions
Preheat oven to 375 F. Have available a large baking dish that will hold chicken in a single layer. Combine flour, 1 tsp salt, paprika & 1/4 tsp pepper in a heavy plastic bag. Place chicken in bag & shake to coat evenly. In a heavy, large skillet, heat margarine & oil.
Add chicken & brown slowly on all sides; place in baking dish. Add onion & garlic to pan; cook gently for 3 minutes. Add all remaining ingredients, cover & simmer 10 minutes.
Pour this mixture over chicken, cover the pan & bake 15 minutes. Turn chicken legs, cover again & bake about 15 minutes more. Remove cover & continue baking until legs are tender, basting often with sauce, about 20 minutes.


