CELEBRATING HERITAGE DAY!
In 1974, the first Monday of August was made an official provincial holiday to recognize and celebrate the varied cultural heritage of Albertans. Businesses can chose whether or not to recognize the day as a general holiday, which most do.
The Heritage Festival held in our city of Edmonton, Alberta Canada is a three-day event to sample delicious food, see creative performances and celebrate Canada’s multiculturalism. Thousands of visitors come to enjoy the tastes, smells and sounds of different nations around the world.
Even though many people will take in the day’s events and cultural food at the festival, some chose to pack a picnic lunch and take a drive somewhere just to relax.
I am posting a summer veggie & shrimp pizza that should work real well with that idea.
Print Recipe
Summer Vegetable & Shrimp Pizza
Votes: 1
Rating: 5
You:
Rate this recipe!
Ingredients
Toppings
- 3 slices bacon, cut in 1/2-inch pieces
- 4 tsp olive oil, divided
- 1 small zucchini, cut into 1/2 circles
- 1/2 cup red onion, thinly sliced
- 2 cloves garlic, minced
- 300 gm WILD jumbo shrimp, peeled, deveined & cut in half lengthwise
- 2 ears corn, cooked
- 1/2 tsp EACH salt & pepper
- 25 gm Parmesan cheese, grated
- 50 gm mozzarella cheese, grated
- 5 leaves fresh basil, thinly sliced
- 2 Tbsp flat-leaf parsley, minced
|
Votes: 1
Rating: 5
You:
Rate this recipe!
|
Instructions
In a skillet, fry bacon until almost done. Remove to paper towel.
Add zucchini, onion & garlic to skillet with bacon drippings & sauté for 2 minutes. Transfer to a plate. Increase heat slightly & add 1/2 tsp. of oil. Add shrimp & cook for 1 minute, turning halfway through. Transfer to a plate. Cut cooked corn kernels off of the cobs.
-
Brush Naan breads with olive oil & sprinkle with salt, pepper & Parmesan cheese. Top with zucchini, onions, garlic, shrimp, corn, bacon bits & mozzarella cheese.
Bake until cheese is bubbling & naan bread is 'toasted', about 7-8 minutes. Allow pizza to rest for 5 minutes, then cut into 8 slices. Sprinkle with basil & parsley. Serve
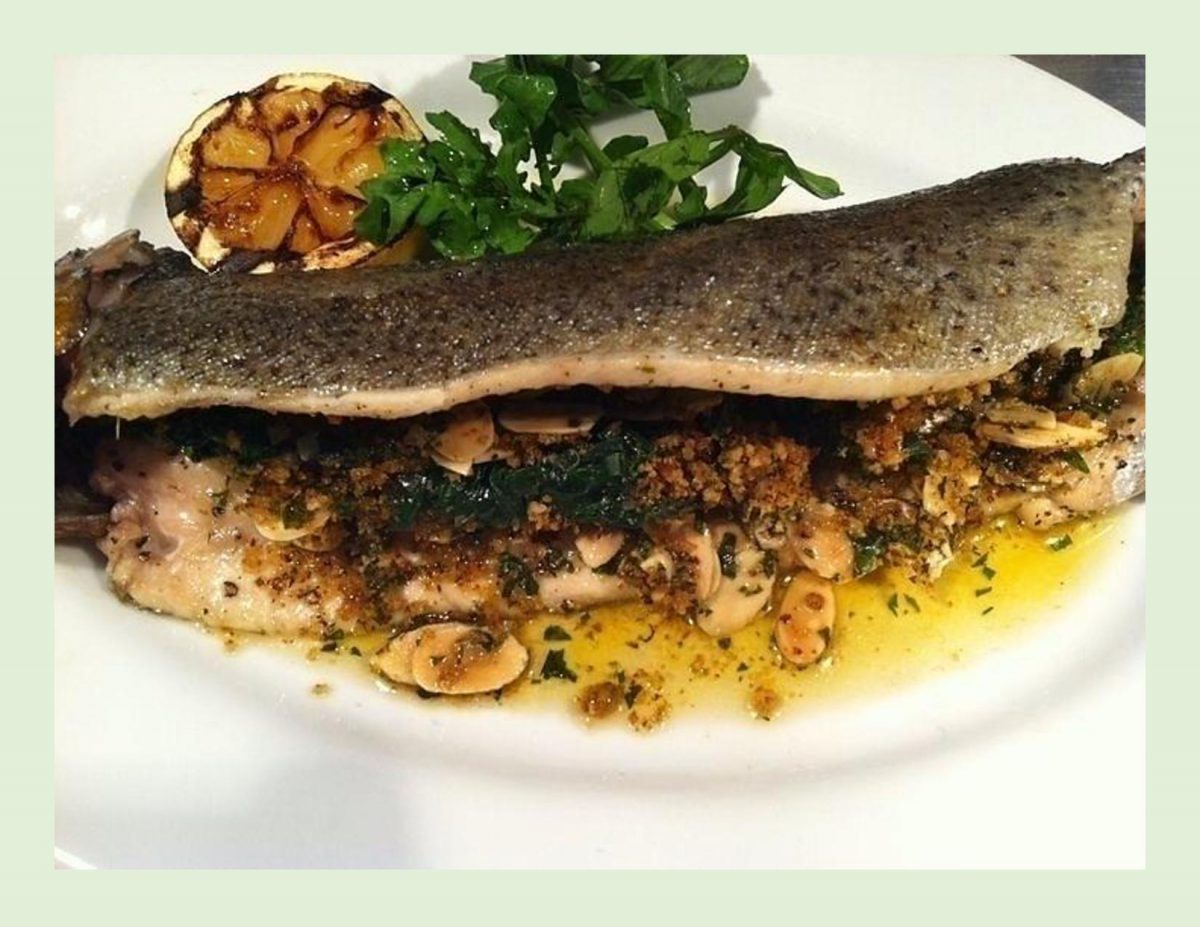
There is something about fresh roasted fish that always appeals to me. This simple preparation really allows the fish to be the star of the meal.
Trout are fresh water fish, with firm textured flesh and a medium to high (good) fat content. Rainbow trout is probably the best known and one of the most popular varieties in the world. Being a mild, white fish with a light, clean flavor and just a touch of ‘sweetness’, makes it perfect for even a non-fish lover.
Rainbow trout fillets vary from ivory to pink as they belong to the same family as salmon. They’re most often fried but can be poached, baked, steamed, grilled or broiled. Whole trout is often stuffed before being cooked. Mushrooms and fish are an underrated combination but a good one nonetheless. Fish cook very quickly so its important to make sure the stuffing is cooked first.
Print Recipe
Rainbow Trout w/ Mushroom Stuffing
Votes: 1
Rating: 5
You:
Rate this recipe!
|
|
Votes: 1
Rating: 5
You:
Rate this recipe!
|
Instructions
-
Clean & scale trout; set aside.
In a saucepan, heat butter. Add onions & celery; sauté for 3 minutes. Stir in mushrooms & season well; continuing to cook 3 more minutes. Add breadcrumbs & mix well. Add cream, fennel & chives; cook 3 minutes.
Remove pan from heat & stuff trout. Tie with string. Dredge with flour & bake 12-15 minutes.
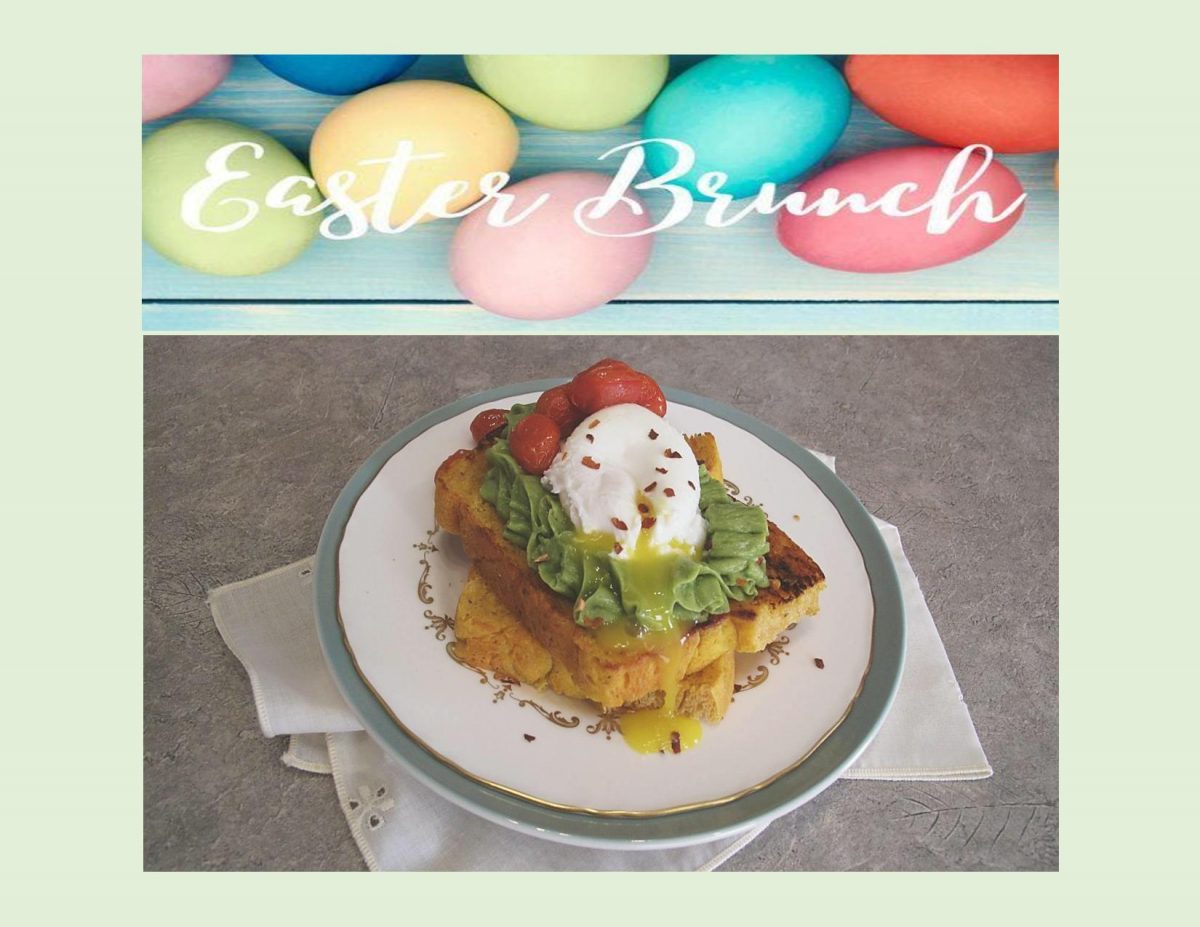
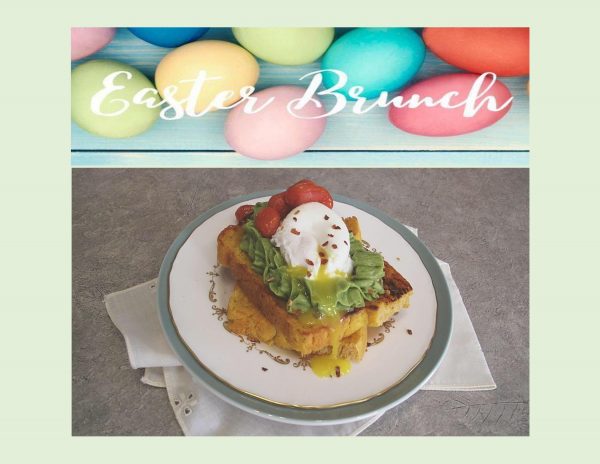
Its hard to believe its already Easter Sunday. In North America, many of us like to enjoy or host an Easter brunch. Traditional favorites very often include glazed baked ham, quiche, frittata & French toast casseroles. Of course, there are the classic hard boiled eggs that have been dyed & decorated for the occasion. Many countries make their own signature Easter breads ands buns. The one thing that I always loved about Easter was it signified the coming of ‘Spring’ in our part of the world. Plants were coming to life in the garden, the birds were singing their cheery, little tunes & the stores were filled with beautiful pastel colored Easter ‘things’.
I wanted to come up with something unique for our Easter brunch this year. French toast is always good but I was thinking more along the savory line. Sweet potatoes seem to be one of those polarizing food items, people either love or hate. For most part, I think its the memory of the overly sweet casserole most of us remember from our childhoods. But have you ever thought about using them in a savory context?
I had seen an idea using grated sweet potato patties with avocado and poached eggs. The temptation to kick it up a notch and make a savory sweet potato ‘toast’ for a base become a wonderful Easter brunch for Brion & I.
Print Recipe
Savory Sweet Potato Toast w/ Avocado & Poached Egg
Votes: 1
Rating: 5
You:
Rate this recipe!
Ingredients
Savory Sweet Potato Bread
Ingredients
Savory Sweet Potato Bread
|
Votes: 1
Rating: 5
You:
Rate this recipe!
|
Instructions
Bread
Pierce sweet potato several times, and wrap in a paper towel. Microwave the wrapped potato 4 - 6 minutes, or until it is soft to the touch & cooked through. Remove from oven, cool slightly, peel & mash. Measure correct amount needed for bread & reserve the rest for another use.
In a small bowl, combine water, milk, sugar & yeast . Allow to sit until yeast is frothy.
In another bowl, whisk together flour & salt.
In a large bowl, combine sweet potato, butter, black pepper, cumin, coriander, thyme & sage. Taste & adjust seasonings if desired. Add yeast & flour mixtures. Combine well but don't overmix.
Turn dough out onto a lightly floured surface & knead until dough is smooth & elastic. Place dough in a lightly oiled bowl, cover with plastic wrap, & set in a draft free place until doubled in bulk.
Turn the dough out onto a flat work surface lightly dusted with flour. Leave to rest about 10 minutes. Grease a 9 x 5-inch loaf pan. Flatten, shape into a loaf & set inside of pan. Cover loosely with plastic wrap & set aside to rise.
Preheat oven to 375 F. When dough is about an inch over the top of pan, place in oven & bake about 45 minutes, rotating pan about half way through baking time. Remove from oven & allow to cool completely before slicing. It is a good idea to make bread the day before you want to serve it.
Additional Preparation
Preheat oven to 350 F. Place cherry tomatoes in an oven proof dish. Drizzle with 1 Tbsp olive oil & roast for about 15 minutes.
Cut avocados in half & peel off skin. Lay one half of the avocado, cut side down, & slice the avocado thinly. Fan out avocado slices so that they form a long line with the slices overlapping each other. Starting from one end, curl avocado slices toward center. Continue curling the avocado slices until you have a 'rose'. Repeat with remaining 3 halves.
Heat a griddle to 350 F. Slice sweet potato bread to your desired thickness. Lightly butter bread slices on both sides. When grill is heated, grill bread on both sides. Place on serving plates, cover & keep warm.
Bring some water to a boil then poach the eggs for about 2 minutes. Drain.
Top grilled savory bread with avocado roses, poached eggs & roasted cherry tomatoes. Sprinkle with red pepper flakes, salt & pepper.
Recipe Notes
- This dough is very soft so it is a bit tricky to work with. I would imagine if you prefer it to be firmer you could you less yeast.
- When working with it , I used a buttered spatula.

Meatballs are one of those incredible inventions that travel the world uniting cuisines from across the globe.
Polpette is a word denoting Italian meatballs, traditionally consisting of ground beef or veal that is shaped into small balls. These meatballs are usually enriched with a wide variety of ingredients such as parsley, eggs, garlic, mashed potatoes & Parmigiana Reggiano.
Although some might think that polpette are served with pasta, that is mostly a North American thing. Italian polpetti are typically consumed on their own as a snack, appetizer or finger food.
These little meatballs are incredibly soft due to the good amount of mashed potatoes in them. Instead of being appetizers, I added some extra veggies to make it a main course. We really enjoyed the whole combination.
Print Recipe
Fried Meatballs w/ Potato
Votes: 2
Rating: 5
You:
Rate this recipe!
|
|
Votes: 2
Rating: 5
You:
Rate this recipe!
|
Instructions
In a saucepan, cover the potatoes with cold water & boil gently until tender.
In a large skillet, combine oil with 1/2 tsp minced garlic & the rosemary. Cook over moderately high heat, stirring frequently, until the garlic is fragrant but not colored. Add the ground meat, breaking it up with a wooden spoon. Season with salt & pepper, cook stirring occasionally until browned. Drain any fat from meat & transfer to a large bowl.
In a small bowl, soak the bread in the milk for a few minutes; it should absorb as much as possible.
Drain the potatoes as soon as they are tender. Peel them while still hot & mash or rice them. Place in the bowl with the meat; add soaked bread & remaining 1/2 tsp garlic, parsley, 1 egg & the Parmesan cheese. Mix thoroughly.
Break the remaining egg into a small bowl & beat it lightly with 2 Tbsp water. Spread the bread crumbs on a plate. Lightly roll the meat mixture into 1-inch balls. Dip the meatballs first in the beaten egg, lifting them out one at a time & letting any excess egg drip back into the bowl. Roll them in the bread crumbs & set aside on a platter.
Pour about 1/2-inch veg oil into a large skillet & heat. Add as many meatballs as will fit loosely in the pan & fry, turning as necessary, until evenly browned all over, about 4 minutes. Transfer the browned meatballs to a wire rack or paper towels. Continue to fry remaining meatballs. For our supper I added some mushrooms & peppers.
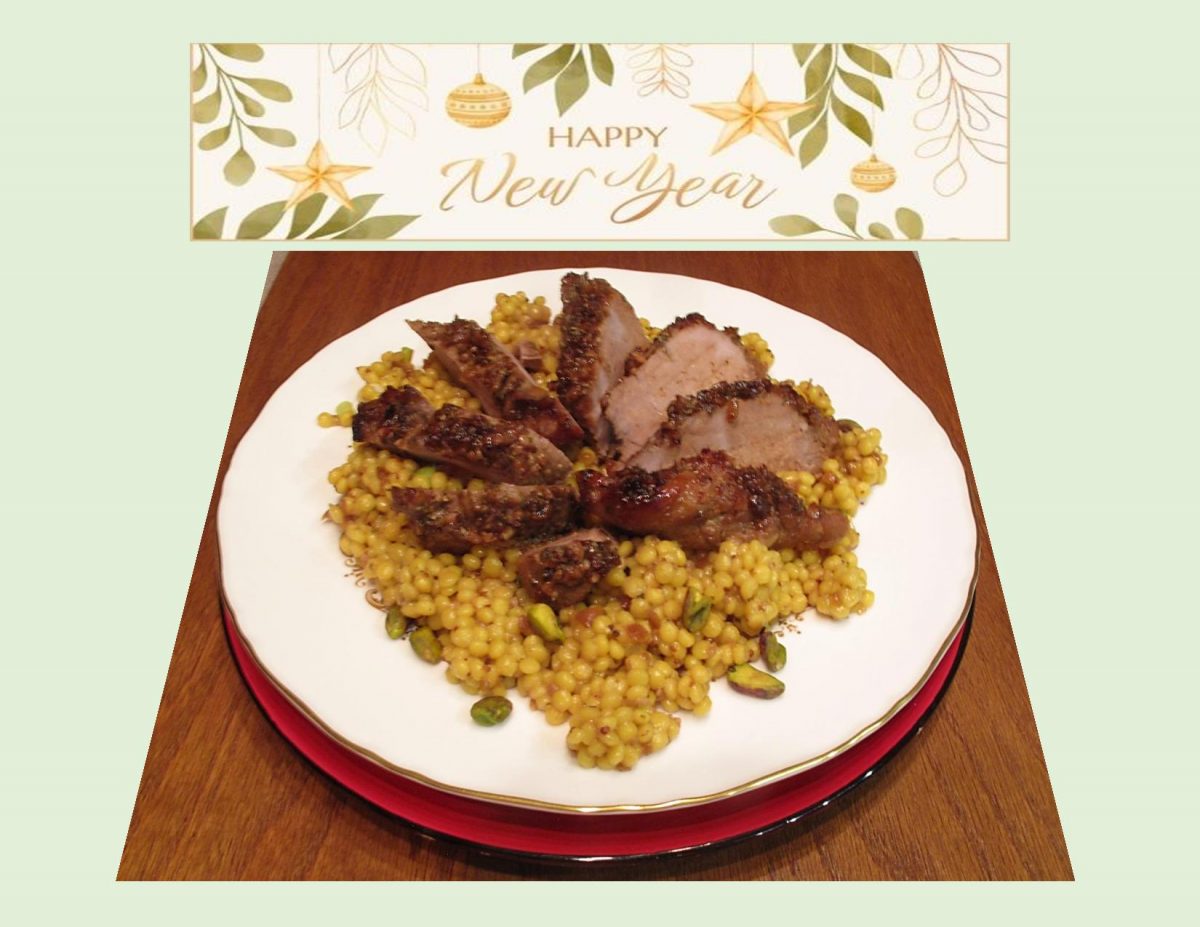
HAPPY NEW YEAR!
Many cultures around the world believe the key to a happy, healthy, prosperous & productive year begins with eating certain lucky foods on New Year’s Eve and New Year’s Day. The theory is ‘do good, eat good’ on the 1st day of the year, to begin the New Year right.
It hard to believe we have arrived at the end of another ‘complicated’ year and its time to reflect and assess the year it was. The word ‘new’ brings thoughts of hope and makes us realize how precious time is.
The tradition of eating pork on New Year’s dates back to …. well, no one really knows when. If your a meat eater, chose pork over chicken or beef on New Year’s Day because pigs dig with their snout, representing forward movement or progress, while chickens or turkeys scratch backward, the cows stand still. That’s it, that’s the folklore behind the tradition!
Many European countries such as Germany, Austria, Switzerland & Ireland, eat pork not only because of the belief of moving forward but because fatty meat is also symbolic of ‘fattening’ their wallets. Germans feel that pigs are so lucky that they give marzipan pigs known as ‘Glucksschwien’ or lucky pigs, as gifts to bring good luck in the coming year. They can also be given in other forms, such as little wooden or glass figurines.
With the pandemic situation that seems to be never ending, I think anything that will help in the good luck department is a good thing.
Print Recipe
Sage, Dijon Pork Tenderloin w/ Pistachio Couscous
Votes: 2
Rating: 4.5
You:
Rate this recipe!
|
|
Votes: 2
Rating: 4.5
You:
Rate this recipe!
|
Instructions
Cook the couscous according to package directions. Add parsley, olive oil, salt and pepper, and pistachios. Stir to incorporate. Taste and adjust for seasonings. Cover and set aside.
Preheat oven to 350º. Spray an 9” x 13” baking dish with cooking spray.
Using a knife poke several holes in the tenderloin about a half-inch deep so marinade can penetrate.
In a small bowl whisk together the shallots, garlic, soy sauce, mustard, honey, juice, sage, salt and pepper, and olive oil.
Pour the marinade over the tenderloin.
Bake uncovered for 45 minutes basting every 10-15 minutes.
Transfer the tenderloin to a large cutting board and allow them to rest for 10 minutes before slicing.
Slice the tenderloin and transfer to a serving dish placing atop warmed couscous.
Drizzle the marinade from the pan over the sliced pork medallions & couscous.
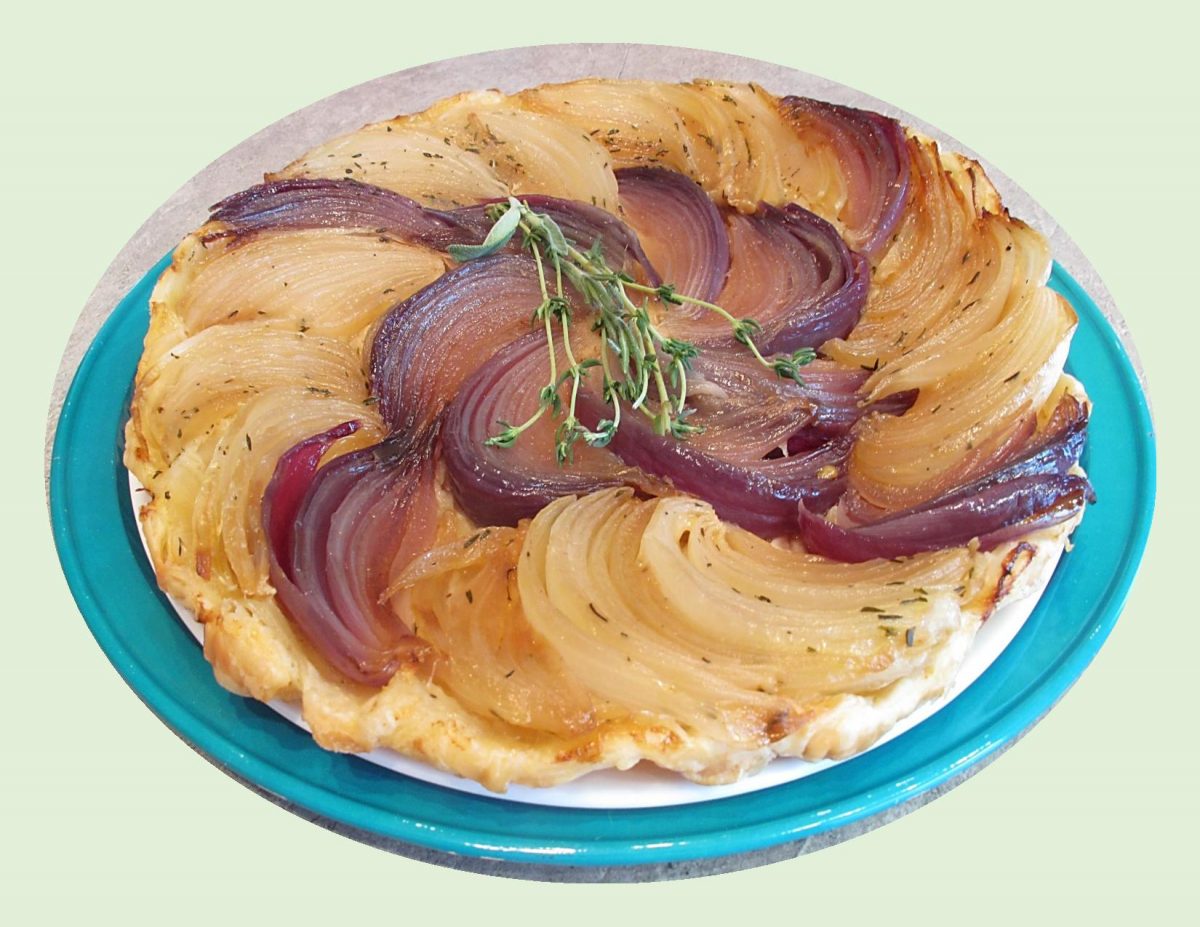
If you’re familiar with the French dessert called ‘Tarte Tatin’, you know that it is an upside-down caramelized apple tart. Basically, the apples are underneath the pastry. As with many things of brilliance, the creation was actually an accident. Named after the woman who invented it, Caroline Tatin, who had become a little distracted while baking an apple dessert at her hotel restaurant. She mixed butter, sugar and peeled apples, poured the mixture into a baking dish, completely forgetting the pastry. The mixture cooked & caramelized before she realized there was no pastry under it. In attempt to save the dessert, she placed some pastry on top and returned it to the oven. The result was Tarte Tatin with deliciously inversed flavors.
Onions are really a perfect bridge to take a normally sweet dish into the savory world. They already caramelize beautifully and when you add honey, spices, cheese and puff pastry, there’s really not a lot that could go wrong. The same traditional Tarte Tatin concept in a savory version.
Print Recipe
Tarte Tatin w/ Onions, Cheese & Thyme
Votes: 1
Rating: 5
You:
Rate this recipe!
|
|
Votes: 1
Rating: 5
You:
Rate this recipe!
|
Instructions
-
Cut each onion lengthwise into 12 wedges, leaving roots intact.
In a 12-inch cast-iron skillet, melt butter over medium heat. Add onions; cook, turning occasionally, until just beginning to brown, about 5 minutes. Add vinegar & honey (or apple cider vinegar & brown sugar); cook for 5 minutes. Add thyme, salt & pepper; sprinkle with Parmesan. Remove from heat.
On a lightly floured surface, gently roll pastry sheet to remove any crease lines. Using a knife, cut pastry into a 13-inch circle. Place pastry onto onions, carefully tucking edges down into skillet. Cut 2 small slits in top of pastry to release steam.
Bake until pastry is puffed & golden brown, 20-25 minutes. Let stand for 5 minutes. Carefully invert tarte onto a serving platter. Serve immediately. Garnish with thyme if desired.
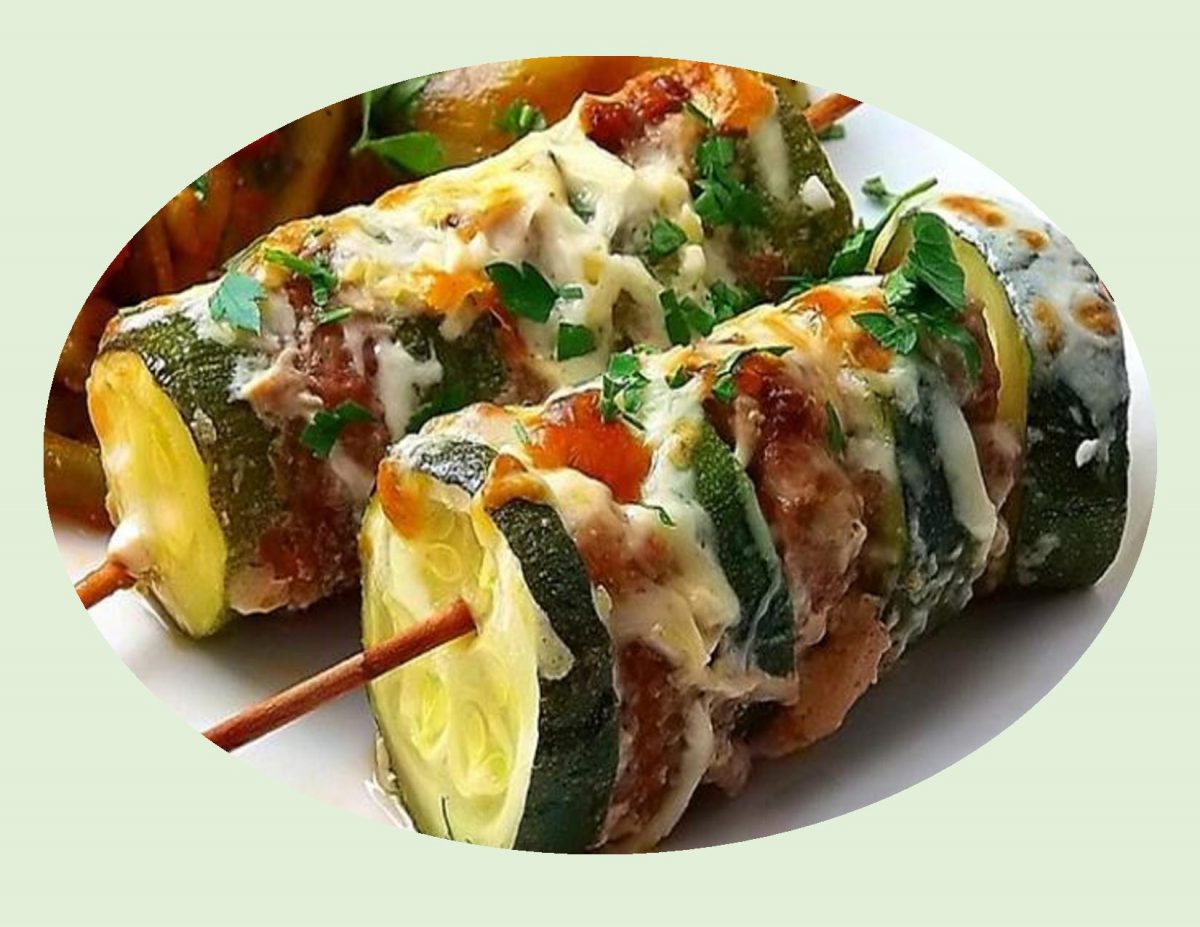
The kebab idea is often said to have had huge impact in global cuisine, starting in the Middle East where initially they were simply grilled meat heavily seasoned. There are two particular varieties which those of us in the West are particularly familiar, being shish kebab and doner kebab.
Shish kebab is by far, the more commonly known term and while we usually see these dishes prepared with the vegetables and meat on the same skewer, they were initially done separately.
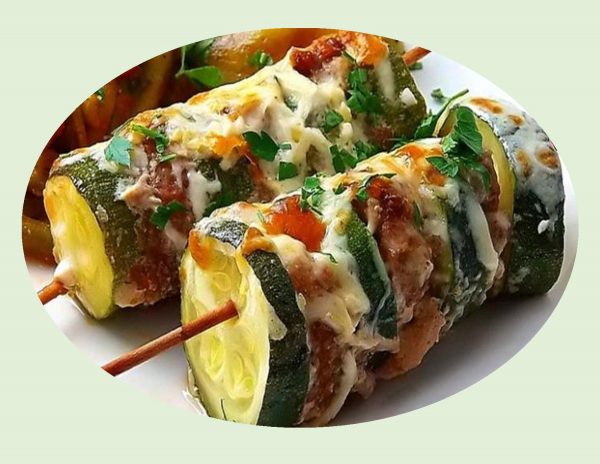
Almost every culture has its own take on skewered meat, but one theme connects them all …. whether simple or intricate, kebabs are uncomplicated and easy to cook and offer near instant gratification. I love any excuse to eat zucchini but these turkey slider-inspired skewers take my love to a whole new level.
Print Recipe
Turkey Zucchini Kebabs
Votes: 1
Rating: 5
You:
Rate this recipe!
|
|
Votes: 1
Rating: 5
You:
Rate this recipe!
|
Instructions
Zucchini
Preheat oven to 375 F. Line a baking sheet with foil paper. Slice zucchini into (18) 1/4-inch slices & place in a bowl. Add Italian dressing & gently toss. Remove from dressing allowing excess to drip off & transfer to the baking sheet, laying the slices in a single layer. Roast for 5 minutes to brown a bit. Remove from oven; drain off any excess moisture.
Turkey Sliders
Wipe off dressing from foil paper on baking sheet. Place a wire rack over a foil lined baking sheet. Spray lightly with cooking spray.
In a bowl, combine all of slider ingredients; mix ONLY until just combined. Form into (18) 2-inch patties; place on prepared baking sheet & bake approximately 15 minutes. Remove from oven & set aside until cool enough to handle.
Assembly
On 6 soaked wooden skewers, alternately thread turkey sliders & zucchini slices (about 3 each per skewer). Dot with some salsa & sprinkle with grated cheese.
Lay on wire rack over the foil lined baking sheet & return to oven to bake until cheese is melted & bubbly. sprinkle with a bit of extra parsley before serving if you wish.
Recipe Notes
- If you prefer to make these on your barbecue, that works just as well.
Thanks for the memories! This phrase says it all when I think back to the wonderful time we spent in France. Although this holiday is now 20 years past, the memories remain very vivid and special.
My sister, Loretta had joined Brion & I on this French vacation which had made it even more special. Our journey began in Paris where we had rented a car, then travelled south (about 613 km/380 miles) to the sleepy little village of St Thibery. For this segment of our trip we had rented an apartment to use as ‘home base’ during our time in this part of France. Many of these houses are from the 14th,15th & 17th century. The apartment was quaint but adequate even having a roof top patio.
St Thibery is situated between the larger towns of Agde & Pezenas and is just a short distance from the Mediterranean Sea. On one of our day trips we visited the town of Agde. It is one of the oldest towns in France and is captivating by its maze of narrow streets. Agde was built of black basalt from a volcanic eruption thus the black color of its buildings.
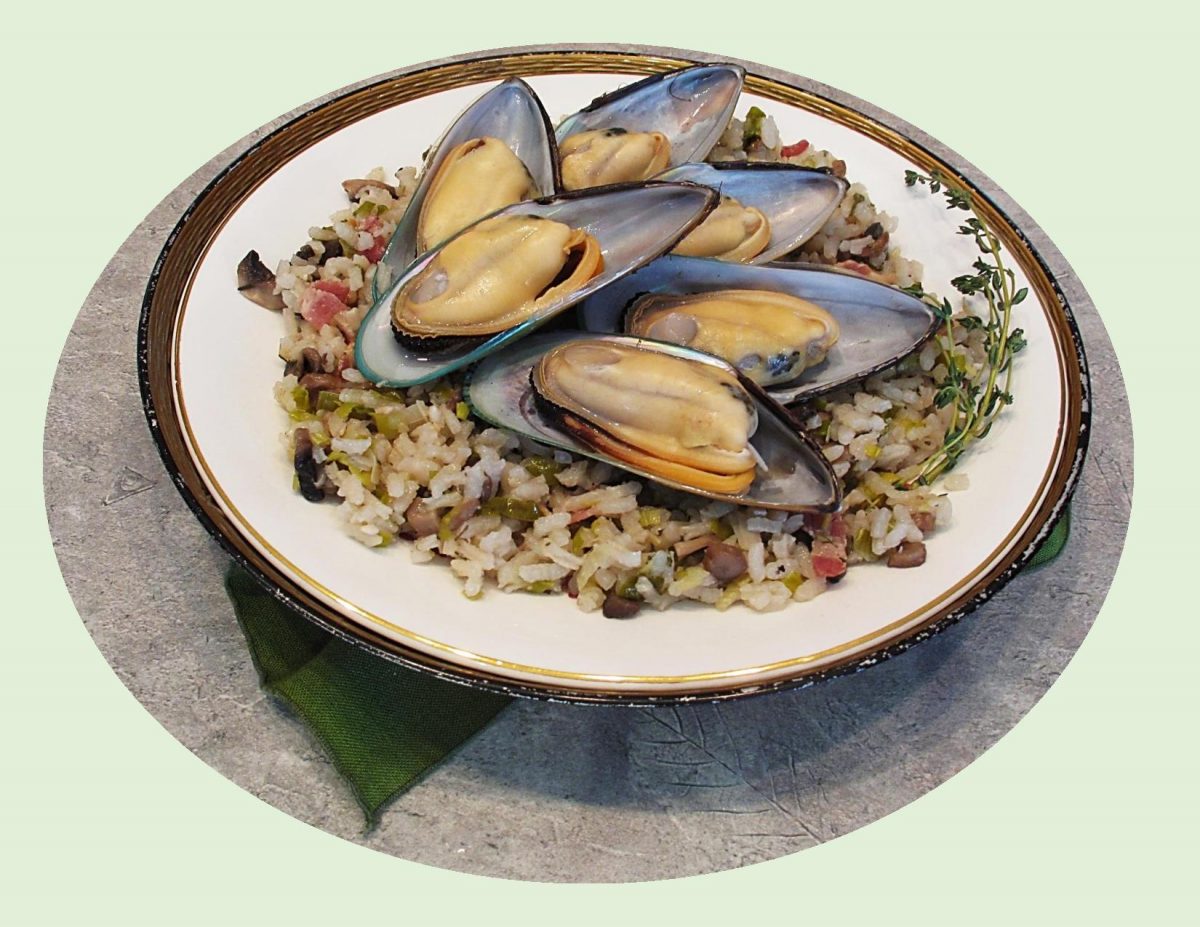
It was here we discovered a nice restaurant where we enjoyed some classic French steamed mussels. It would be an understatement to say how much the three of us enjoyed this feast of fresh seafood.
During the time we spent in the area, we made the 20 minute drive from St Thibery to Agde just to have some more mussels on numerous evenings.
Brion & I decided to revisit the taste of those ‘French’ mussels today with our supper meal. Of course, nothing compares to the ‘taste of a memory’!
Print Recipe
French Mussels w/ Bacon & Leek Risotto
Votes: 1
Rating: 5
You:
Rate this recipe!
|
|
Votes: 1
Rating: 5
You:
Rate this recipe!
|
Instructions
Risotto
Bring vegetable broth to a boil in a saucepan, then turn heat to low & keep at a simmer.
Heat a large skillet over medium heat; add bacon & sauté until crisp. Remove to a paper towel lined plate to drain & set aside.
Remove all but 2 Tbsp bacon drippings from skillet (add extra olive oil if necessary to equal 2 Tbsp) then add leeks, mushrooms & shallot. Turn heat up to medium-high; season with salt & pepper. Sauté until vegetables are tender & starting to turn golden brown, about 7-8 minutes. Add garlic & sauté for 1 minute. Add rice; stir to coat & cook for 1 more minute.
Turn heat back to medium; add wine & stir until absorbed by rice. Add hot vegetable broth; stir near constantly until rice is tender & all the broth is absorbed, about 25 minutes. If broth gets to a hard boil, turn heat down. Remove skillet from heat; stir in thyme, parmesan cheese & cooked bacon. Keep warm until mussels are ready.
Mussels
Heat olive oil & butter in a large pot over medium high heat. Sauté the onion & garlic until softened, about 5 minutes.
Add the mussels, wine, cream, butter & parsley. Season well with salt & pepper to taste.
Mix well, cover pot with a lid & cook until mussels are cooked through & opened, about 12-15 minutes.
Serve mussels along with the juices in the pan with risotto & crusty or garlic bread.
-
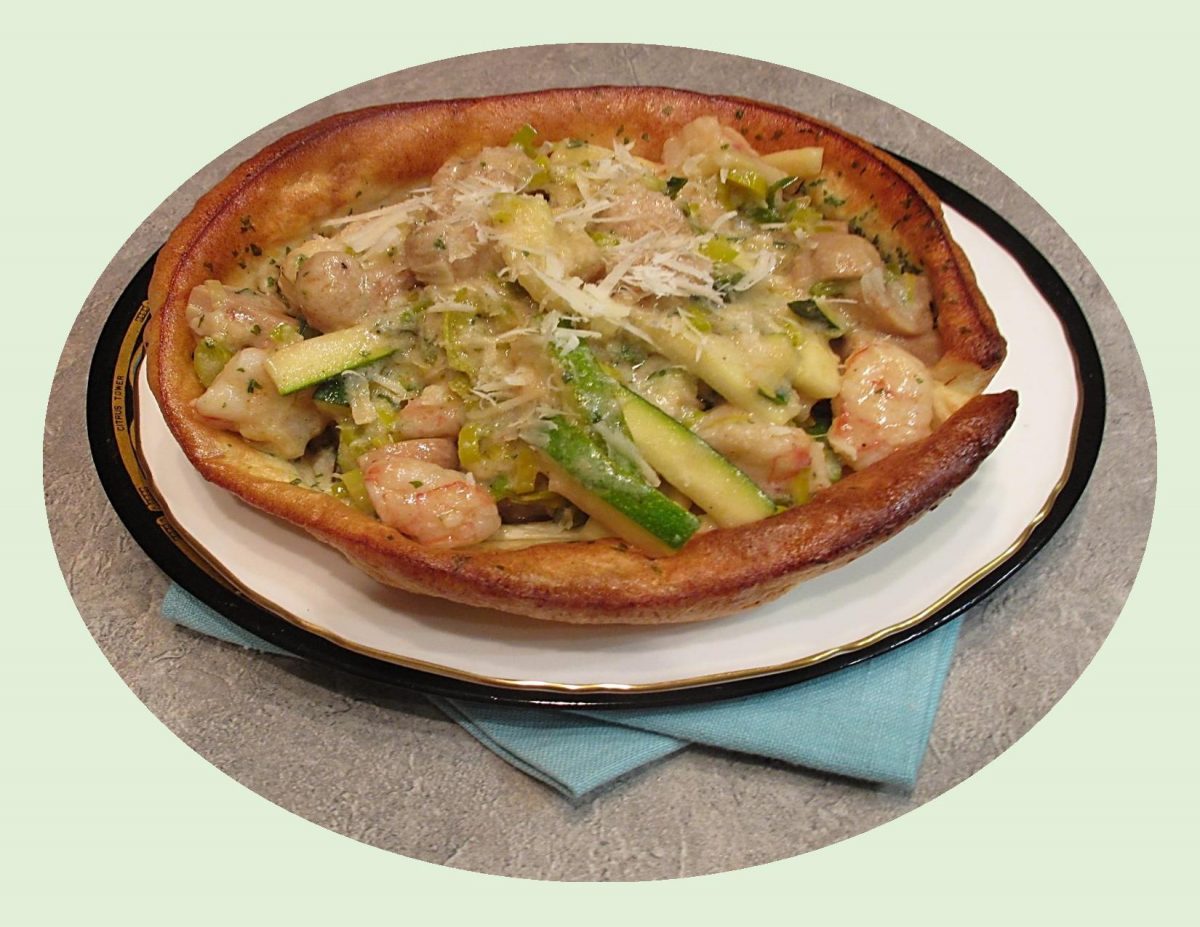
A Dutch baby pancake is a cross between a fluffy style pancake and a soufflé. Its less work than standard pancakes and less complicated than a soufflé.
If you follow our blog, you probably have seen other versions, both sweet & savory featured on it. Dutch baby’s are such an easy meal to make, they are a regular in our meal rotation, not to mention how delicious they are.
Dutch baby recipes work best in cast iron pans because they retain heat and cook evenly. If you don’t have cast iron cook-ware, I find pyrex bowls will work as a substitute.
Because of the delicate nature of the batter, you can only add your toppings once the batter has baked. For some toppings, this will require cooking these ingredients on the stove top while the eggy batter bakes.
Be careful with recipes that instruct you to mix chopped veggies and meat directly into the batter. The combination of weight and moisture will prevent the batter from cooking and puffing up as it should. One exception to this would be finely grated Parmesan cheese. To help create height, bring the eggs to room temperature before mixing into the batter.
Being seafood lovers, this meal really works for us.
Print Recipe
Shrimp Dutch Baby Pancake
Votes: 3
Rating: 5
You:
Rate this recipe!
|
|
Votes: 3
Rating: 5
You:
Rate this recipe!
|
Instructions
Dutch Baby Pancakes
In a bowl, whisk together eggs & milk. Add flour & whisk until incorporated then whisk in parmesan cheese, scallions, parsley, thyme, salt & pepper. Set aside in refrigerator until sauce & filling are made.
Gouda Sauce
In a small saucepan, melt butter; sprinkle with flour & seasonings. Mix well; add milk & broth, stirring until sauce becomes thickened. Blend in cheese; set aside
Shrimp Filling / Baking
Peel & devein shrimp (you can chop into pieces if you prefer). Prepare filling veggies for cooking.
-
Place 2 Tbsp butter in each of TWO 7-inch pyrex baking bowls (alternately you can use one 10-inch cast iron skillet). Place bowls in hot oven to melt butter (and heat the bowls for baking pancakes in). Once the butter is melted & the bowls are hot, divide the batter between them. Bake for 25 minutes.
The Dutch Baby will puff up during cooking, but once its removed from the oven & starts to cool it will deflate slightly. At this point its nice to do the final sautéing of your filling so that when the pancakes come out of the oven you are ready to fill & serve.
In a large skillet, sauté zucchini, onion, mushrooms & garlic in oil until tender-crisp. Combine soy sauce with water in a cup; add to vegetable mixture along with shrimp. Gently stir fry ONLY until shrimp is cooked, then fold in Gouda sauce.
When Dutch Baby pancakes are finished baking, remove from oven & transfer to 2 serving dishes. Divide filling between the 2 pancakes & serve hot.
CELEBRATING VICTORIA DAY!
For many Canadians, Victoria Day marks the unofficial beginning of summer. It is Canada’s oldest non-religious holiday and although we still hang on to the British Queen’s name (for old times sake), this truly Canadian holiday has everything to do with the end of the cold weather and short days and a lot to do with some great food.
This holiday is called ‘May Two-Four’ in some parts of Canada, a name that refers both to the date around which the holiday falls (May 24th) and Canadian slang for a case of twenty-four beers (a ‘two-four’), a drink popular during the long weekend.
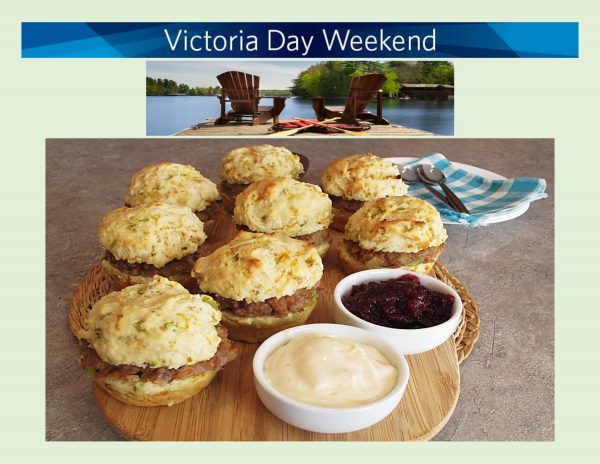
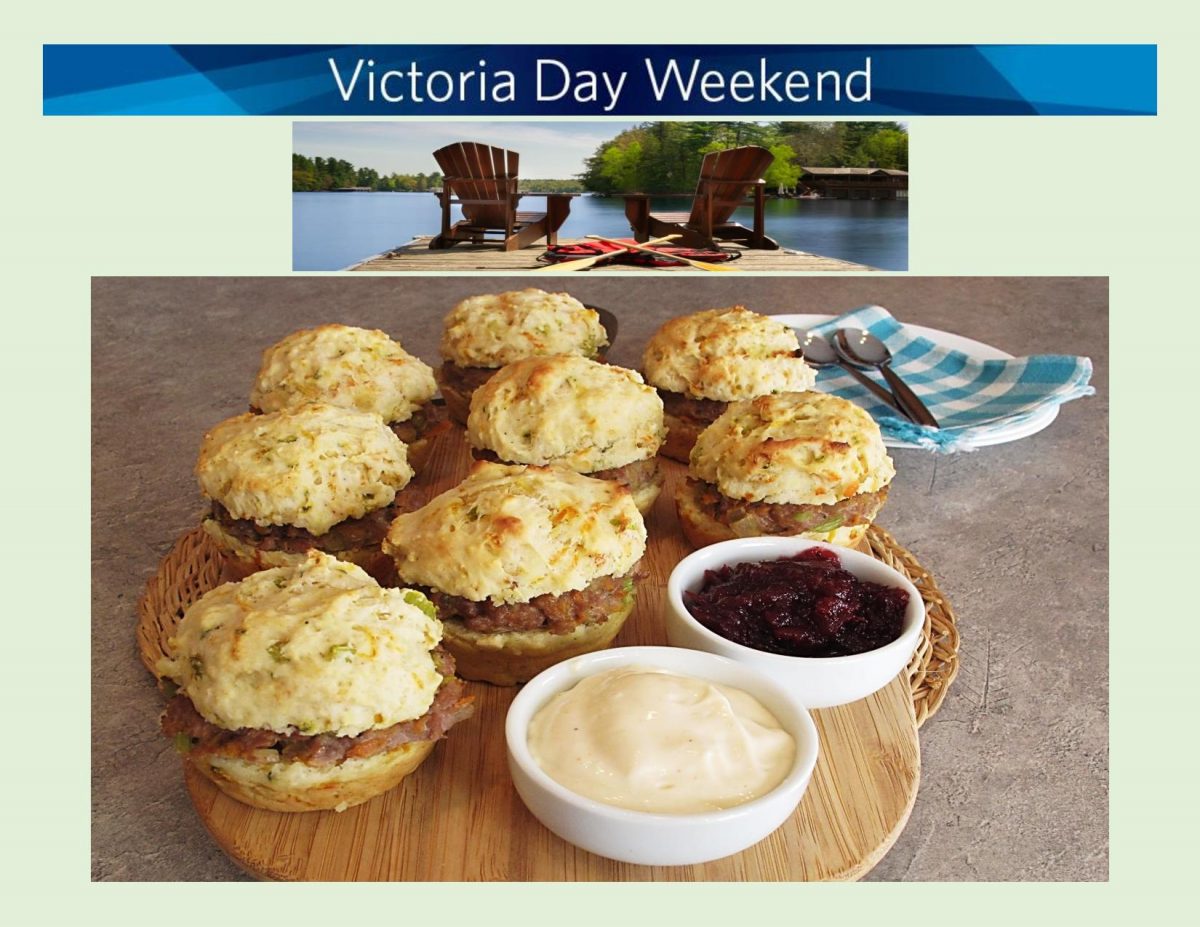
I’m sure, for many this weekend, barbecuing will be up front and center with burgers, steaks and ribs taking top billing. Brion & I decided to wait a bit longer to start barbecuing and have some turkey sliders today instead.
In keeping with some food history ….
The name ‘slider’ originated in the 1940’s when sailors in the US Navy would refer to mini-burgers as sliders because of their extreme greasiness. In just one or two bites, the burger would just slide right down. Fortunately around 2007, sliders evolved from miniature ‘grease bombs’ to elegant culinary creations that now appeal to people of all backgrounds and tastes.
There’s something inherently appealing about a small burger. For the diet-conscious, the idea of a small gourmet burger is more feasible. When dining out, ordering sliders instead of an average sized hamburger also allows you to try several different varieties as they are often served in pairs.
The modern day slider has been reinvented from the traditional beef patty to being made from chicken, pork and veal as well as various seafood options. Having our turkey sliders in stuffing biscuits definitely added that gourmet touch.
Print Recipe
Turkey Sliders in Stuffing Biscuits
Votes: 2
Rating: 5
You:
Rate this recipe!
|
|
Votes: 2
Rating: 5
You:
Rate this recipe!
|
Instructions
Stuffing
In a large skillet, heat oil on medium. Add all stuffing ingredients & cook about 15 minutes or until tender, stirring occasionally. Transfer to a bowl & cool completely.
Biscuits
Preheat oven to 450 F. Spray two 12-cup muffin pans with baking spray.
In a bowl, whisk together flour, sugar, baking powder, baking soda & salt until blended. Add butter; with finger tips, combine until mixture resembles coarse crumbs. Stir in buttermilk & one third of cooked, cooled, 'stuffing mixture' until JUST blended.
Divide among the 24 muffin cups (about 3 Tbsp each). Bake 15 minutes or until golden brown; transfer biscuits from pans to wire cooling rack.
Turkey Sliders
Line a baking sheet with foil paper. In a bowl, combine turkey, salt & remaining cooked 'stuffing mixture'. Form into 24 patties (2-inch width); place on foil-lined baking sheet & bake for 15 minutes or until cooked through.
Assembly
Slice warm biscuits in half. Add turkey patties & dollops of mayo & cranberry preserves.


