Meals like pot pies are classics for a good reason which makes them the foundation for endless inspiration. When you chose to ‘reinvent’ classic dishes, you must keep some of the elements that make the dish familiar and at the same time, you want to make the dish better, not just new. Taking a new approach to an ‘old school’ dish gives a chance to appreciate what was great about the original but making it new again.
Pot pie is a comfort food favorite which I have posted on this blog in many renditions over the years. Along with chicken I have featured seafood, beef as well as some pork & oyster pot pies.
Chicken is arguably one of the most favored proteins to put on the dinner table. Its valued for its nutrition, accessibility, low cost and most importantly its extreme versatility. Poultry serves as a blank slate and flavor absorbing foundation for every type of cuisine imaginable.
Print Recipe
Roast Chicken & Stuffing Pie
Votes: 1
Rating: 5
You:
Rate this recipe!
Ingredients
Sour Cream Cornmeal Pastry
Ingredients
Sour Cream Cornmeal Pastry
|
Votes: 1
Rating: 5
You:
Rate this recipe!
|
Instructions
Cornmeal Pastry
In a small bowl, combine sour cream & ice water; set aside. In a large bowl, whisk together flour, cornmeal, sugar & salt. Using a pastry blender or finger tips, cut in butter until mixture resembles both coarse crumbs & small peas. Sprinkle the cold sour cream mixture over dough, 1 Tbsp at a time, tossing with a fork to evenly distribute it.
After you have added all the sour cream mixture, dough should be moist enough to stick together when pressed; if not add additional cold water, 1 tsp at a time. DO NOT overwork dough. Press dough into 2 disks & wrap in plastic wrap. Refrigerate for at least 2 hours.
Chicken Filling
Dice previously roast or pan fried chicken; set aside. In a saucepan, melt oil & butter & add leek, mushrooms & garlic. Cook until fragrant & the leek has softened. Toss in the bacon & continue to cook for about 2-3 minutes; stirring to combine. Add diced roast chicken.
Sprinkle with the flour & seasonings; stir to combine. Add the stock & milk. Cook to reduce the sauce as well as it thickening it. Remove from heat & transfer to a bowl to cool then refrigerate for 20 minutes. Prepare Stove Top stuffing as directed on package.
Assembly
Preheat oven to 400 F. Prepare the egg wash in a small dish.
Remove pastry disks & filling from refrigerator. Allow pastry to sit for a few minutes to become workable. Roll out first disk to about 10 1/2-inches in diameter. Line a 9 1/2-inch pie dish with it. Fill case with chicken filling. Fold top inch of pastry over filling in a cupping fashion. Using about 2/3 of remaining pastry, roll it into a 9-inch diameter & place on top of filled pie.
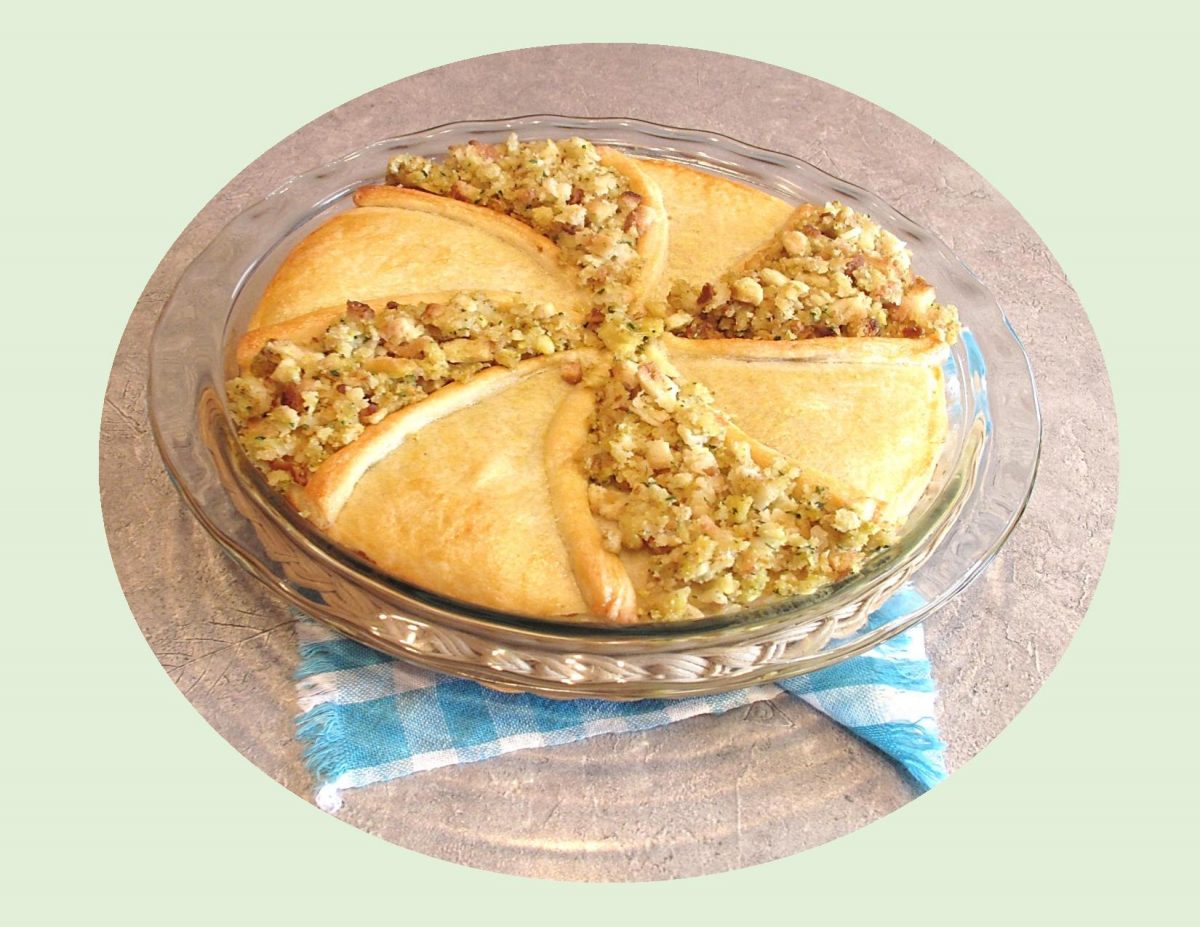
Divide remaining dough into 8 strips. Place over covered pie resembling spokes of a wheel. On alternate wedges place chicken stuffing. Use egg wash on remaining four sections & on top of the narrow pastry strips.
Bake for 40 minutes or until golden & cooked through. If the top is browning too quickly, loosely cover with a layer of foil until done. Remove from oven & allow to cool somewhat before serving.
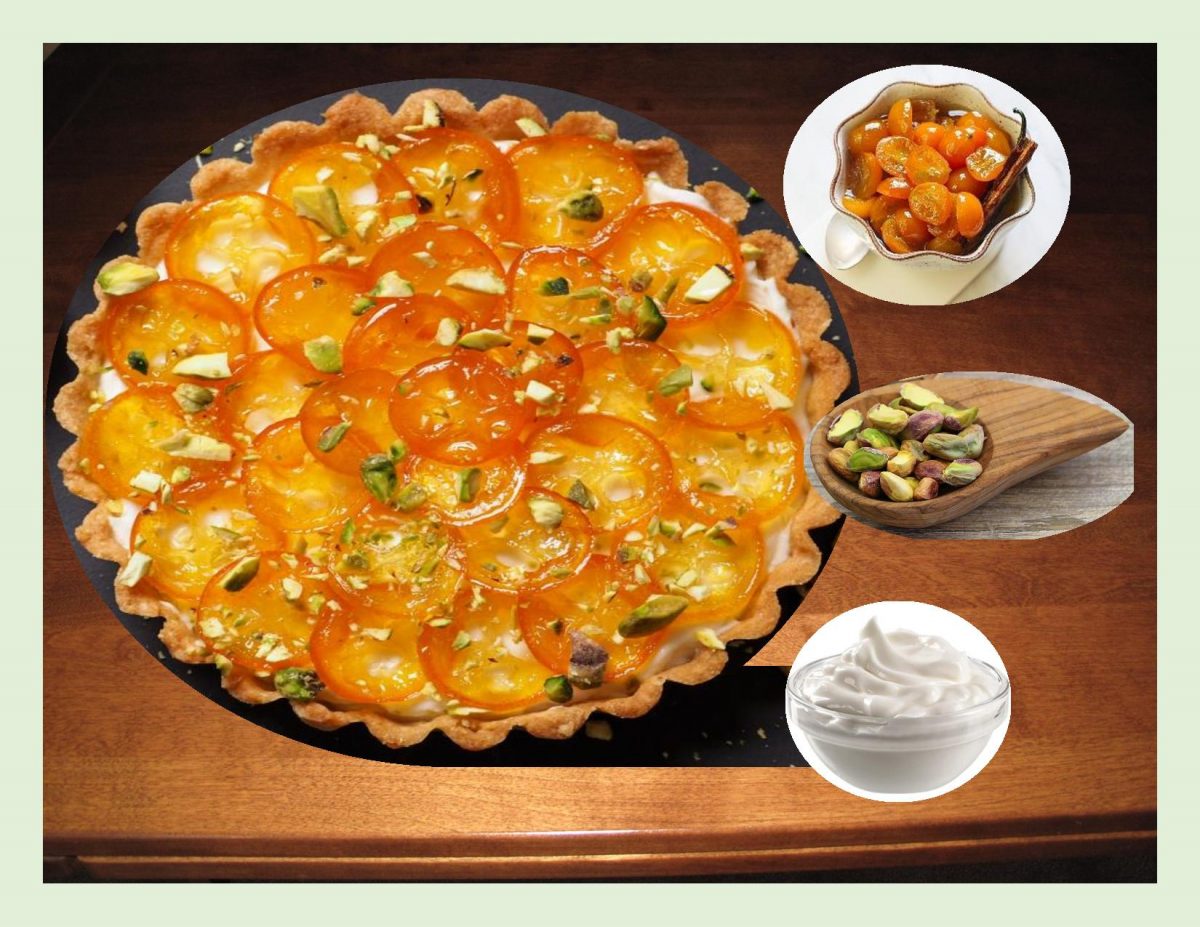
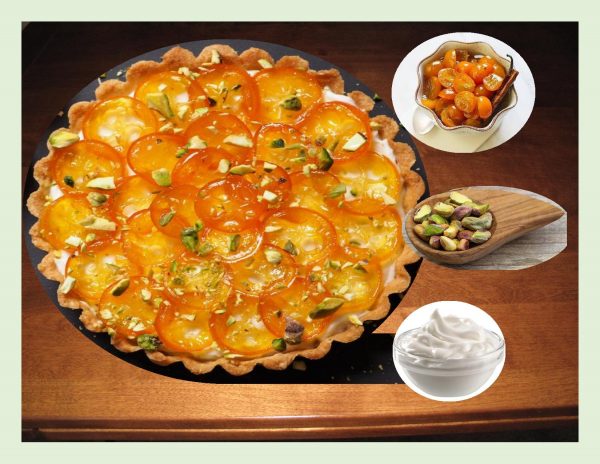
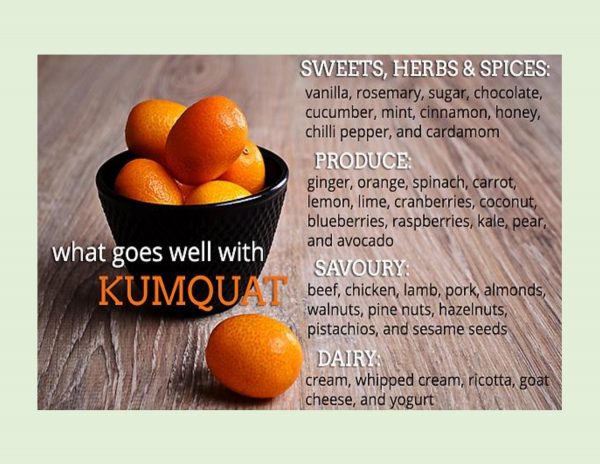
It’s that time of year when in our part of the country we start seeing kumquats in the grocery stores. If you have never tasted them, they are a little deceptive. Like many things in life, its all about expectations. Their diminutive size makes them seem harmless, but they have an intensely tart flavor. Kumquats have a sweet skin with a very tart flesh and are filled with a lot of seeds. The skin is often times more appetizing than the flesh itself making them perfect for candying.
This kumquat tart is such a beautiful presentation at Christmas gatherings. Thick Greek yogurt is an ideal filling to mellow the intensity of the candied citrus.
Yogurt often surpasses whipped cream as a topping for all kinds of sweet and spicy desserts. Greek yogurt has a smooth, rich and thick consistency. Part of what makes it different from regular yogurt is that it is strained to remove the whey. When whey is removed, so is water, which creates a thicker, more substantial yogurt product.
I blame it on inheritance, but I’ve always been one of those people who need something sweet after dinner. Doesn’t need to be fancy, just something to satisfy the craving. Of course, anything that seriously satisfies that craving isn’t going to be the epitome of a ‘healthy meal’. That being said, enjoy the tart.
Print Recipe
Spiced Kumquat & Greek Yogurt Tart
Votes: 2
Rating: 4
You:
Rate this recipe!
|
|
Votes: 2
Rating: 4
You:
Rate this recipe!
|
Instructions
Tart Pastry
In a large bowl, whisk together flour, baking powder, baking soda & salt. With fingertips, cut in cold butter until mixture resembles small peas. In a measuring cup, whisk together water, egg & vinegar. Make a well in dry mixture & pour wet mixture into it all at once. With hands, mix until JUST combined. Roll out pastry to about 1/8-1/4" thickness Cut out 8 - 6-inch circles with a pastry cutter. Press into tart forms. Refrigerate for at least 30 minutes.
Preheat oven to 375 F. Pierce the tarts with a fork across the bottom, line with parchment paper (paper should overflow the edges) & fill with pie weights to prevent dough from rising. Bake for 10 minutes, remove weights & paper & bake another 5 minutes more. Cool completely.
Tart Filling
Make sure the yogurt has any extra liquid strained from it by using a cheesecloth if necessary Do this before making the candied fruit.
In a small, heavy bottomed pot, place sliced kumquats, Grand Marnier, sugar, honey, water, star anise, cinnamon stick & vanilla extract. Bring to a boil.
Reduce heat slightly & cook for 15-20 minutes, stirring often, until the syrup thickens & the kumquats are very soft. Remove from heat & discard the anise stars & cinnamon stick.
Arrange a sheet of parchment paper over a cooling rack. Using tongs, remove fruit from sugar solution & lay flat on the parchment paper to cool.
When ready to assemble dessert, add a tsp of sugar solution per 1/2 cup of strained yogurt. Divide yogurt between the tart shells, spreading evenly. Arrange the candied kumquats on top & sprinkle with chopped pistachios.
-
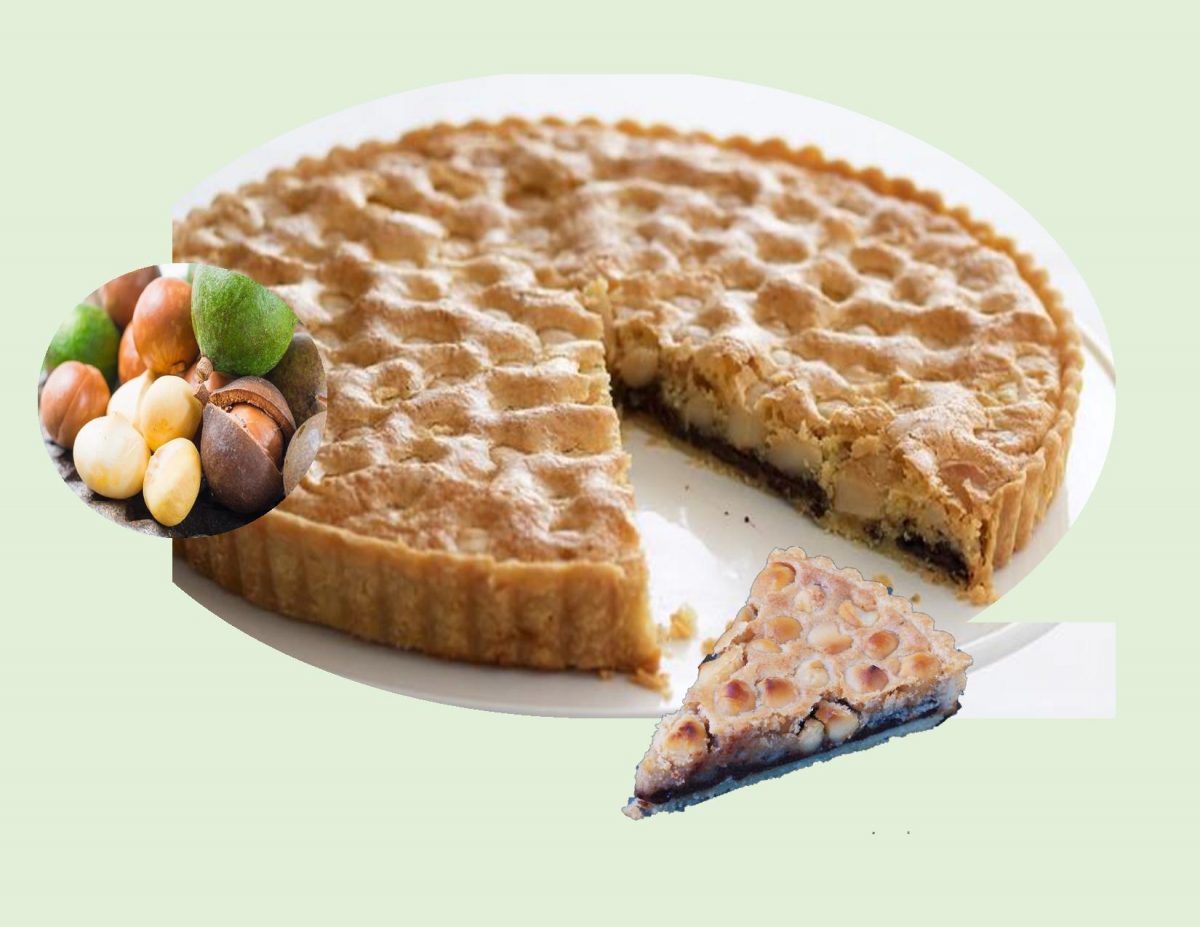
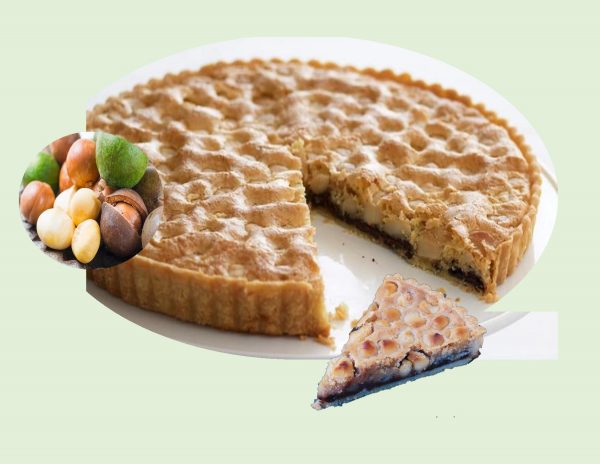
Despite originating in the rain forests of Queensland and New South Wales in eastern Australia, macadamia trees were first commercially grown in Hawaii. These slow growing, tropical evergreen trees flower differently from most other fruit and nut trees. The macadamia tree grows racemes; a flower cluster with separate flowers along the stalk at equal distances on a central stem. A 10 cm stalk can carry hundreds of tiny flowers. Each raceme spray of 40-50 flowers produces from 4-15 nutlets which ripen into macadamia nuts. These nuts are coveted for their sweet buttery flavor and creamy texture. It takes machinery to crack the shell, which may explain why they rank as the world’s most expensive nut.
We are fast approaching the Christmas season when all things ‘decadent‘ are up front and center in our dessert plans. Some years ago, I made a chocolate macadamia nut flan for a Christmas company gathering. I baked it in a large tart pan, cut it into eight slices, then cut each slice into four ‘wedges‘. It was a good way to serve such an elegant (& expensive) dessert at a stand-up event.
I was thinking of desserts that could be made and frozen ahead of all the hustle and bustle. So nice to pull such decadence out of the freezer and serve on short notice.
Macadamia nuts pair particularly well with coconut, chocolate and fish. They can be substituted for other nuts measure for measure in most recipes and visa versa without compromising the integrity of the original recipe. Some acceptable choices would be Brazil nuts, hazelnuts and cashews.
While this recipe is a bit time consuming, it is well worth the effort.
Print Recipe
Chocolate Macadamia Nut Wedges
Votes: 1
Rating: 5
You:
Rate this recipe!
|
|
Votes: 1
Rating: 5
You:
Rate this recipe!
|
Instructions
Crust
In a food processor, combine flour, salt & butter. Using short pulses, process until the mixture resembles oatmeal. Add ice water & pulse quickly until the mixture begins to come together but don't let it actually form a ball. Transfer the mixture to a lightly floured surface & gather it into a ball with your hands. Gently flatten into a smooth disk about 1 1/2-inches thick & wrap it in plastic wrap. Refrigerate until firm enough to roll out, at least an hour.
Roll the dough on a lightly floured surface into a 14-inch circle, about 1/8-inch thick. Fit into an 11-inch round tart/flan pan with a re-movable bottom; trim dough flush with rim. Chill 30 minutes or overnight.
Filling
Preheat oven to 400 F. In a large bowl, whisk together egg, sugar & liqueur until combined. Whisk in flour & salt then butter. Stir in chocolate until combined. Pour into chilled pastry shell. Arrange whole nuts on top.
Bake 10 minutes. Reduce oven temperature to 350 F. & continue baking until crust & filling are golden, about 35 minutes more. If tart is browning to quickly, tent with foil. Transfer pan to a wire rack to cool completely.
To serve, cut tart into 8 slices then cut each slice into 4 'wedges'.
-
Recipe Notes
- You'll notice the chocolate forms a layer on the bottom. If you want it to have a more decadent look, just drizzle a bit more chocolate on top after it's baked.

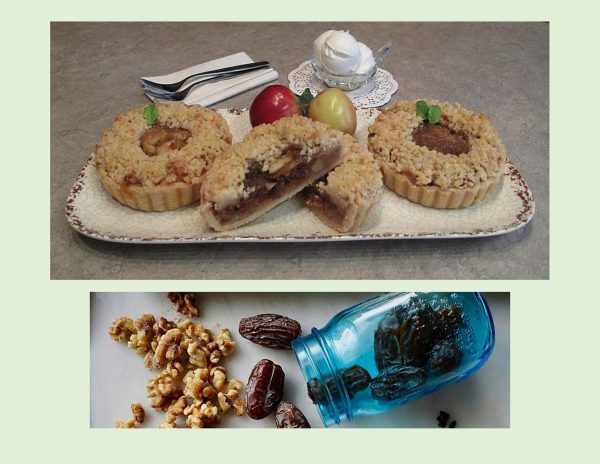
There are so many culinary uses for Medjool dates, in both sweet and savory dishes, whether served hot or cold. Often called the king of dates, not only because they are quite expensive but are highly treasured for their size and rich, intensely sweet flesh.
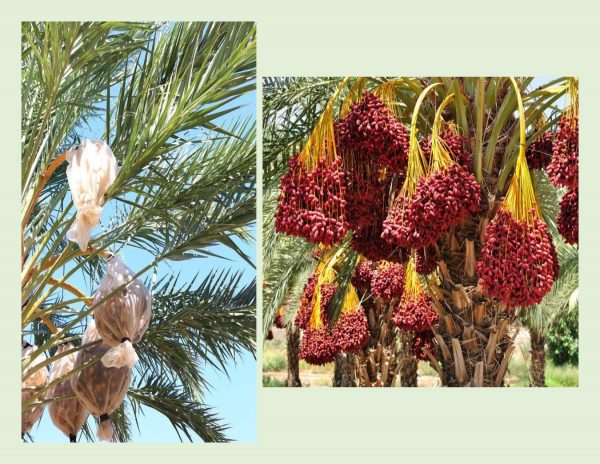
These special fruits are pricey because their cultivation is incredibly labor-intensive. In order to ensure quality and yield, Medjool date palms need to be hand pollinated, pruned, protected and hand picked. While growing, the date bunches are wrapped in bags to prevent the birds from snacking on them and to keep them from falling on the ground.
Dates are usually left to dry on the tree before being harvested, which accounts for their wrinkly appearance. This places them in a peculiar category of being both dried and fresh. Different types of dates have different textures that fall into three categories: soft (like Medjool); semi-soft, which are chewy and are pitted before packaging to dry a little more; and dry, which are often sun-dried after harvest and sold chopped.
Dates can be paired with lamb or chicken and spiced with Middle Eastern flavors or added to dried apricots, cranberries and toasted walnuts in rice or couscous accompaniments. Their caramel-like flavor adds a hint of the exotic to whatever you choose to use them in.
We had some extra apples I needed to do something with. The thought of pairing them with some Medjool dates and walnuts …. Yum!
Print Recipe
Medjool Date & Apple Flans
Votes: 1
Rating: 5
You:
Rate this recipe!
|
|
Votes: 1
Rating: 5
You:
Rate this recipe!
|
Instructions
Pastry
In a large bowl, whisk together flour, baking powder, baking soda, & salt. Cut in white & yellow Crisco shortening. In a dish, whisk together water, egg & apple cider vinegar. Make a well in flour mixture & pour all wet ingredients in it. Combine just until pastry pulls away from the bowl.
On a lightly floured surface, roll out pastry; cut out eight 6-inch pastry circles. They should fit nicely into the mini flan pans that measure about 4 1/2-inches in diameter & are 3/4-inch in height. Once you have the pastry you need for the shells, form the remaining pastry in a 'tube' shape. Set the pastry shells in the fridge while you prepare the filling. FREEZE THE TUBE OF PASTRY. This you will use to GRATE on top of the flans for the top crust.
Filling
In a large saucepan, melt the butter. Add prepared apples & saute until they start to soften, about 10 minutes. Add spices & honey, combine & cook 1 minute. Take off heat & allow to cool to lukewarm.
Assembly & Baking
Preheat oven to 350 F. Remove mini flan shells from refrigerator & place on a baking sheet. Spoon some apple mixture in the bottom of each shell. Top each with a portion of the dates & walnuts, then evenly divide the remaining apple mixture between them. Remove the frozen 'tube' of pastry from freezer & grate (on a cheese grater). Sprinkle over mini flans.
Bake until nice & golden, about 35 minutes. Cool slightly. Whip cream with sugar, cinnamon & vanilla until stiff & serve on warm flans.
-
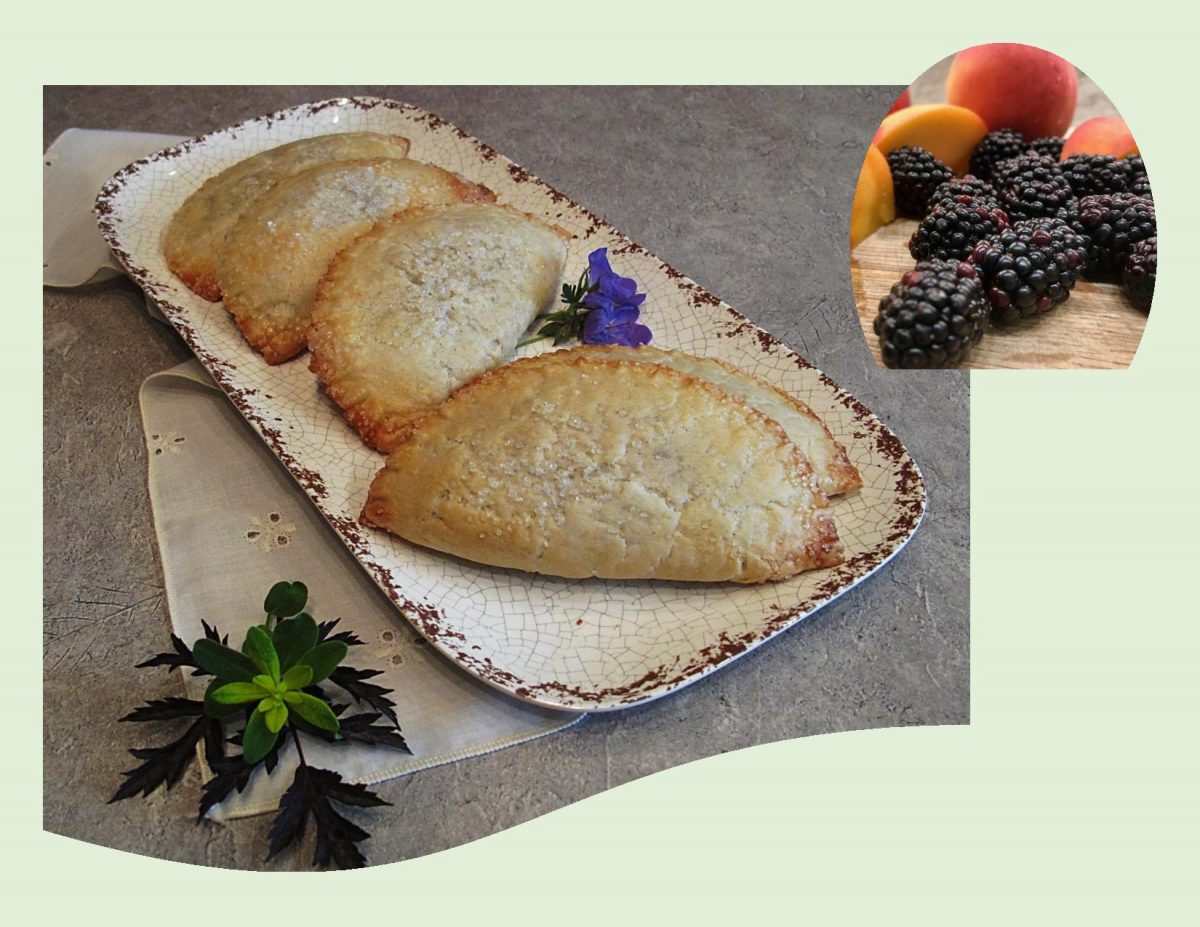
Hand pies are just perfect for this time of year. No fork or plate required —a variety of fresh seasonal fruit available — picnics and barbecues happening. Another great thing is that you can make up a big bunch on a cooler day and freeze them. Personally, I would bake them before freezing so they are ready on short notice but nothing says you have to.
Years ago, hand pies were primarily made with reconstituted dried fruit since fresh fruit is often to juicy to encase it with delicate pastry. Now, a blend of dried and fresh fruit with the help of thickeners can yield a balanced mixture of flavors and textures.
There seems to be various successful ways to go with your pastry from the traditional pie crust to a more biscuit-type pastry. One thing I found that helps to avoid having a ‘gummy’ inside is rolling your dough fairly thin.
When it comes to the filling, I always have the urge to overfill pies, be it full or hand size. Getting it right sure helps to keep them from splitting and leaking.
Hand pies have primarily been deep fried in past but my preference is to bake them. I guess I’ll just never be a deep fried lover of anything. These makes such a nice seasonal combo!
Print Recipe
Blackberry-Peach Hand Pies
Votes: 1
Rating: 5
You:
Rate this recipe!
|
|
Votes: 1
Rating: 5
You:
Rate this recipe!
|
Instructions
Pastry
In a large bowl, whisk together flour, baking powder, baking soda & salt. With fingertips, cut in cold butter until mixture resembles small peas. In a measuring cup, whisk together water, egg & vinegar. Make a well in dry mixture & pour wet mixture into it all at once. With hands, mix until JUST combined. Roll out pastry & cut 8 - 6-inch circles with a pastry cutter. Lay pastry circles on parchment paper lined baking sheet. Refrigerate until ready to fill.
Filling
In a small saucepan, whisk together sugar, cornstarch, cinnamon & salt. Stir in blackberries & peaches. Cook over medium heat until mixture has thicken, about 6-8 minutes. Add vanilla & allow to cool COMPLETELY. In a cup, beat egg with water for the egg wash topping. Set aside
Assembly
Preheat oven to 375 F. When fruit has cooled, remove pastry from fridge & divide filling between pastry circles. Try to keep the filling in the center, away from the outer edges. Brush a line of egg wash over pastry edge then fold hand pie in half. Use a fork to press the pastry layers together forming a seal to keep fruit from leaking. With a sharp knife, cut 3 vents in each pie.
Brush the tops with egg wash & sprinkle with sanding sugar. Bake for 15 minutes or until golden.
Recipe Notes
- Frozen puff pastry can easily be substituted for regular pastry if you wish.
- If you wish, use a hand pie cutter for easy assembly.

I remember the first time I heard of sour cream being used in making a rhubarb pie. I could hardly imagine it but once I tried it there was no going back! If you look through some of the older recipe books, there are at least eight or nine different pies made using sour cream. These nostalgic desserts certainly take you back to a simpler time.
Basically this is your classic rhubarb pie except with a sweet/sour cream, custard filling. The sour cream is not assertive; its presence simply provides a rich, creamy background for the rhubarb.
I’m not sure why, but I never get tired of cooking (or eating) rhubarb. Every season, I can’t wait until its ready to use. Last year, Brion and I found another spot for three new plants to grow in our yard, so hopefully they do well. I realize its not for everyone but it is certainly versatile in its uses.
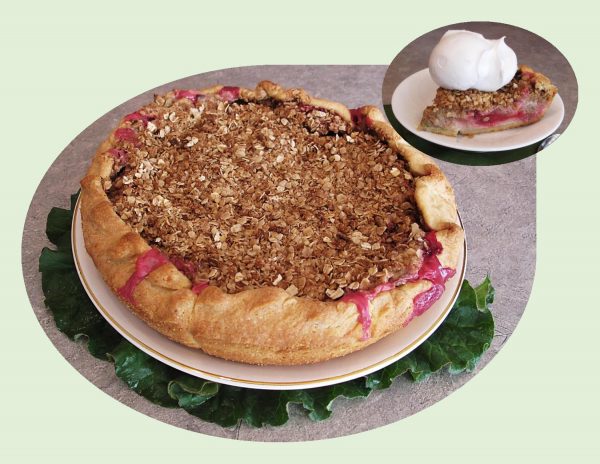
For this rhubarb crostada, I’m using an spiced-oat streusal topping which almost mimics a baked fruit crumble taste. Serving this dessert chilled brings it to its full potential. Of course, when you add a scoop of ice cream!
Print Recipe
Sour Cream Rhubarb Crostada
Votes: 1
Rating: 5
You:
Rate this recipe!
Ingredients
Cornmeal Pastry (OR use purchased refrigerated pastry if you wish)
Ingredients
Cornmeal Pastry (OR use purchased refrigerated pastry if you wish)
|
Votes: 1
Rating: 5
You:
Rate this recipe!
|
Instructions
Cornmeal Pastry
In a small bowl, combine sour cream & ice water; set aside. In a large bowl, whisk together flour, cornmeal, sugar & salt. Using your fingertips, cut in the butter until mixture resembles BOTH coarse crumbs & small peas. Sprinkle the cold sour cream mixture over dough, 1 Tbsp at a time, tossing with a fork to evenly distribute it. After you have added all the liquid mixture, dough should be moist enough to stick together when pressed. Do NOT over work pastry. Press dough into a disk shape; wrap in plastic wrap & refrigerate until ready to use.
Spiced-Oat Topping
In a bowl, combine all topping ingredients with fingertips until crumbly; set aside.
Filling
Preheat oven to 375 F. In a bowl, Mix 1 cup sugar, 3 Tbsp flour, 1 tsp cardamom & orange zest. Stir in slightly beaten eggs & sour cream, add rhubarb; toss gently.
Remove pastry from fridge. Preheat oven to 375 F. On a large sheet of parchment paper, roll out pastry into a 12-inch circle. Place pastry in a 9-inch pie pan, leaving parchment paper underneath it. Pour filling into crostada; gently fold the 1/2-inch of pastry remaining above pie pan rim over edge of crostada. Sprinkle spiced-oat topping over filling. Brush pastry edge with egg wash.
Bake 50-60 minutes until edge is puffed, filling is slightly jiggly & topping is golden. Cover loosely with foil if topping begins to brown too much. Cool at least 3 hours before serving. Slice & serve with a dollop of whipped cream or a scoop of ice cream.
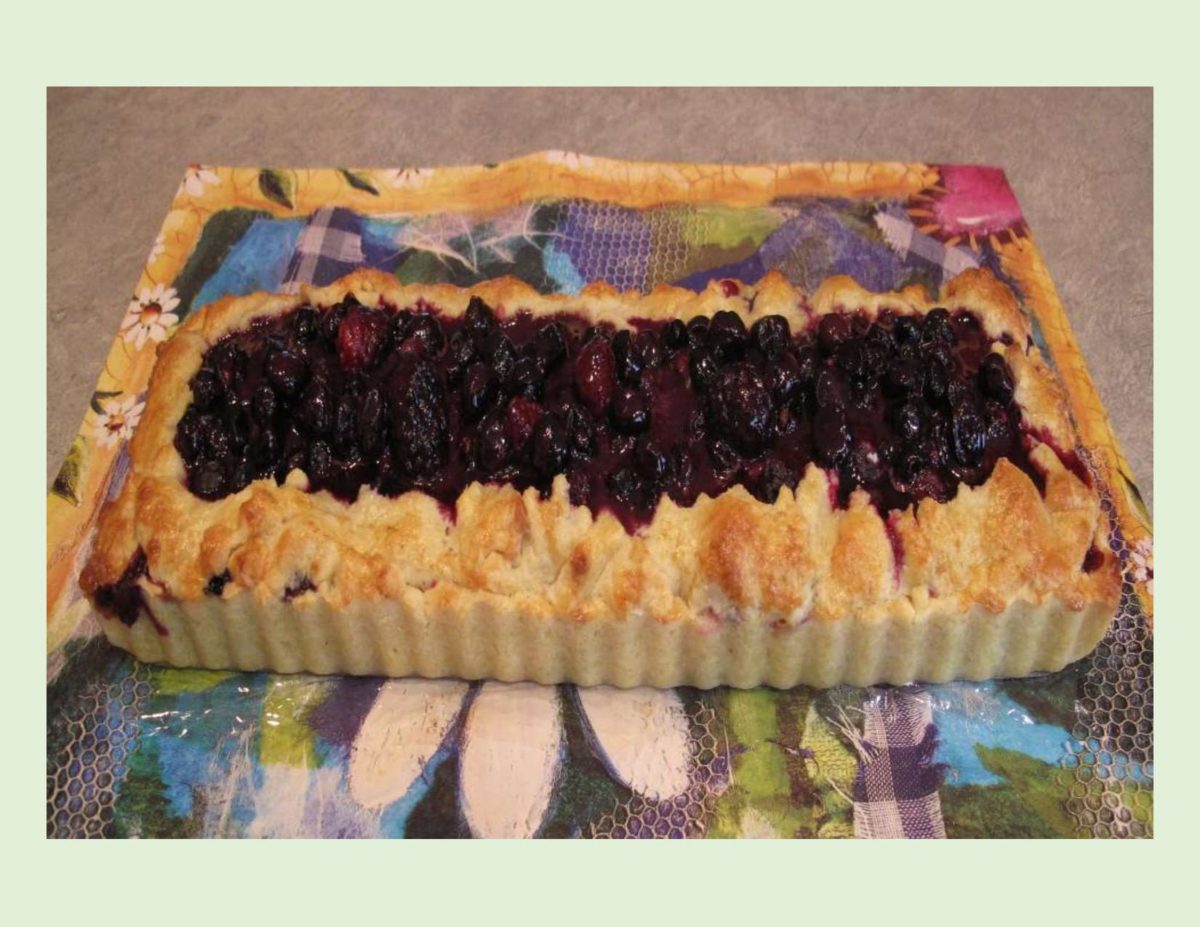
Nothing says summer like fresh fruit and if blackberries aren’t in the mix, you’re missing out. Blackberries have a sweet, tart flavor making them perfect for salads, smoothies, blended into savory sauces, eaten fresh or in desserts.
Blackberries are closely related to raspberries but should not be confused with the black raspberry. Although native to Europe, we can grow them here in Canada. They will thrive in a wide range of soils but good drainage and direct sunlight are a must. Blackberries are the largest of the wild berries, growing on thorny bushes called brambles.
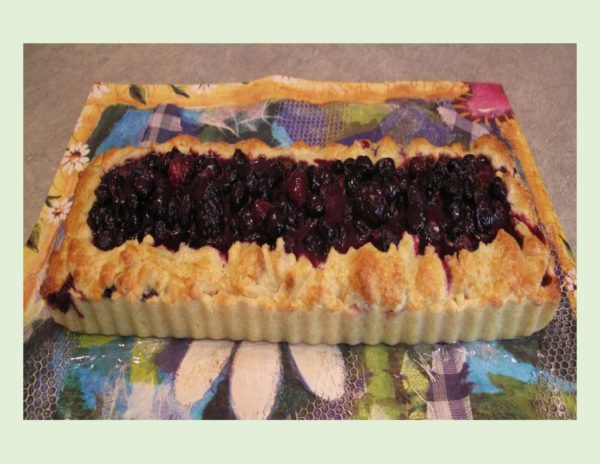
Because blackberries and blueberries make such an amazing combo, using them in this tart seems very fitting. My favorite alternative cornmeal pastry makes a buttery yet slightly crunchy crust. Since it stays so soft, I found it easier to press this pastry into the tart pan as opposed to rolling it out. I added a border after I filled the shell to give it a more rustic look. What more could you want — eye appeal and a fabulous flavor!
I should mention, I’m going to post some balsamic glazed fig & pork kebabs next time. Save a couple of pieces of this tart as they are a perfect ending to that meal.
Print Recipe
Blackberry & Blueberry Rustic Tart
Votes: 1
Rating: 5
You:
Rate this recipe!
|
|
Votes: 1
Rating: 5
You:
Rate this recipe!
|
Instructions
Cornmeal Pastry
In a bowl, whisk together flour, cornmeal, sugar & salt. With fingertips, cut in butter until mixture resembles small peas. In a measuring up, combine ICE water & sour cream. Add to dry mixture. Mix only until combined, do not over mix. Press into your favorite choice of pan ( tart, quiche or pie pans are all good). Place in fridge or freezer until ready to fill.
Filling
Preheat oven to 375 F. In a large bowl, combine berries, sugar, flour & lemon juice; spoon into pastry shell. Brush edges with beaten egg & sprinkle with coarse sugar.
Bake 45-50 minutes or until crust is golden & filling is bubbly. If your pan has a removable bottom, it makes it a lot easier for serving. Cool slightly & serve with whip cream (or ice cream) if you choose.
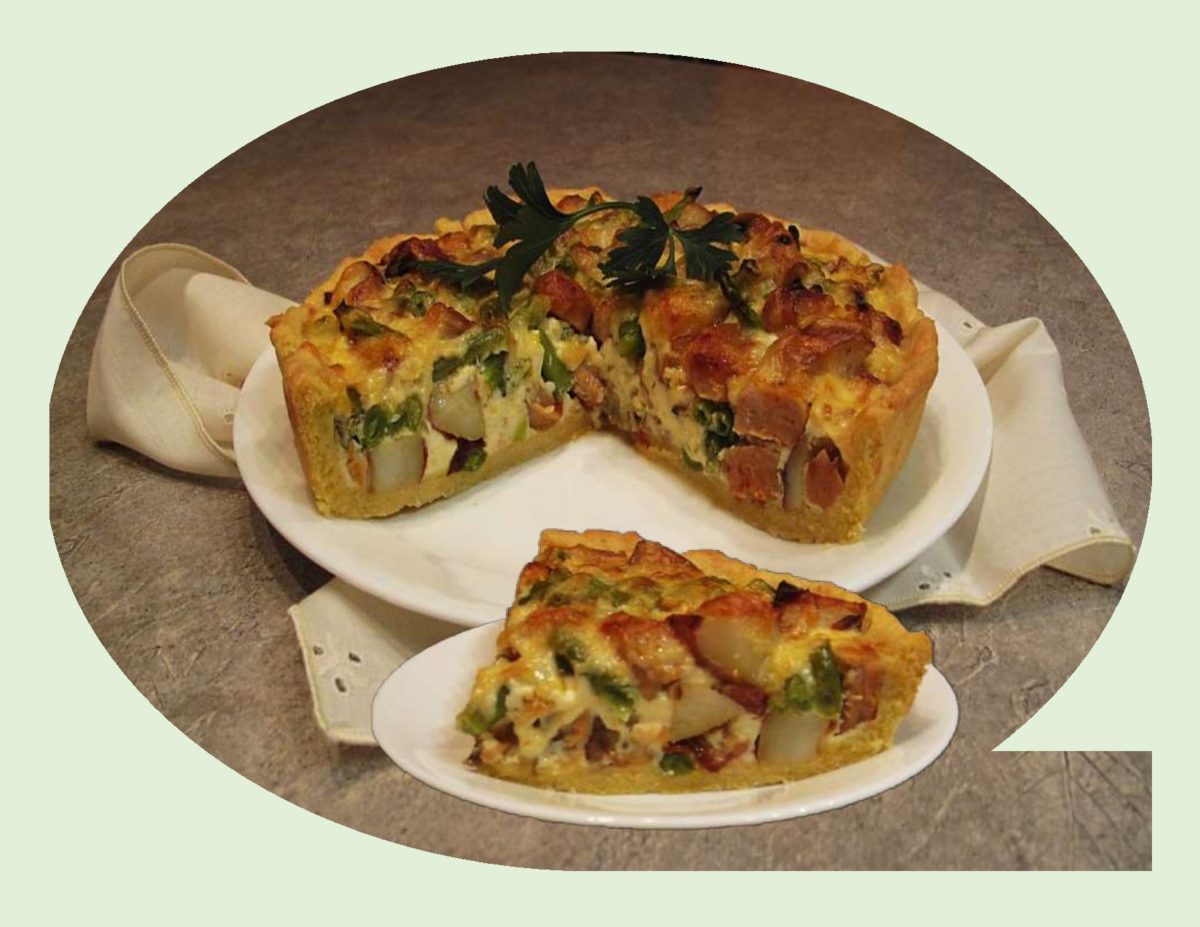
Quiche always sounds fancy or ‘gourmet-ish’ but the truth is, its one of the easiest meals to prepare. The same filling can be used in any size quiche recipe. Once you have a good basic format the possibilities are endless.
Start with the pan size — for a large quiche, use a 9-10-inch pie pan. For individuals, use muffin tins and for mini appetizers, use mini muffin tins.
EGGS: – A ratio of one large egg per half cup of dairy is a good rule to create a fluffy filling. DAIRY: – Heavy cream or a blend of half & half plus cream produces a rich but calorie laden filling. One or two percent milk works just as well but needs a bit longer to set. Using a mixer or a whisk to whip egg mixture until frothy results in a stable filling with a lighter texture. ADD-INS: – Vegetables, greens and meat need to be pre-cooked before adding to egg mixture to prevent the filling from becoming runny. Tomatoes and herbs are the exception. BLIND BAKING CRUST: – This is entirely personal preference. Pre-baking your crust a bit helps to prevent filling from leaking through. I have found that putting the cheese in the crust first, add-ins second and filling last will do the same thing. A blind baked crust will always be crispier if that’s what you want to achieve. OVEN POSITION: – For a large quiche use the bottom rack. For individual or mini quiche use middle rack.
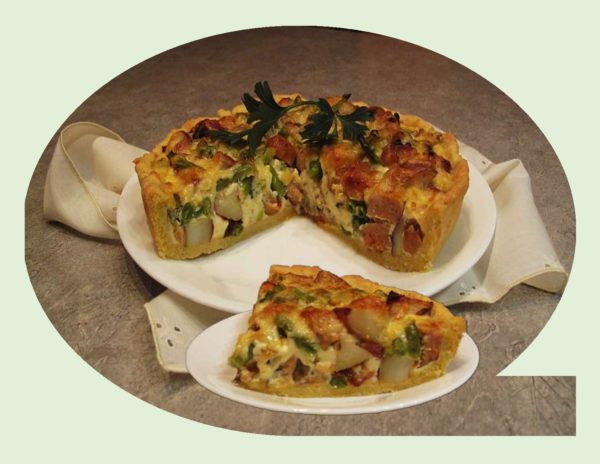
In my quiche today, I started with my favorite, simple cornmeal crust. You can either roast your own potatoes and green beans or purchase a package of the Green Giant steamers version. Use your own sausage choice. As you have probably noticed, I love the red pepper/ Asiago sausage made in-store at Save-On foods. Quiche of whatever kind, is always in my regular meal rotation.
Print Recipe
Roasted Potato with Red Pepper/Asiago Sausage Quiche
Votes: 1
Rating: 5
You:
Rate this recipe!
|
|
Votes: 1
Rating: 5
You:
Rate this recipe!
|
Instructions
Pastry
In a small bowl, combine sour cream & ice water; set aside. In a large bowl, whisk together flour, cornmeal, sugar & salt. Using a pastry blender or finger tips, cut in the butter until mixture resembles BOTH coarse crumbs & small peas. Sprinkle the cold sour cream mixture over dough, 1 Tbsp at a time, tossing with a fork to evenly distribute it. After you have added all the sour cream mixture, dough should be moist enough to stick together when pressed. If not add additional ice water, 1 tsp at a time. Do NOT over work the pastry.
I am using an 8-inch deep dish pan for my quiche. Cut out a circle of parchment about 12-inches in diameter. Roll or pat pastry evenly over paper leaving 1/2-inch border. Lift paper with pastry into pan carefully helping it to conform to the pan shape. Place in refrigerator until filling is prepared.
Filling
Preheat oven to 400 F. Rinse & pare baby potatoes & green beans (cut in to bite size pieces). Place in a plastic bag with some oil & shake well. On a foil lined baking pan, spread veggies out, season with dried rosemary, garlic powder, salt & pepper. Roast until tender. Remove from oven & cool slightly. If using frozen, cook as directed on bag for minimum time. Pour into a dish & cut up large pieces of potatoes. Adjust oven to 350 F. for quiche.
In a skillet, crumble sausage; add mushrooms. Cook over medium-high heat, stirring occasionally, until sausage is cooked; drain. Add sausage/mushroom mixture to roast veggies; stir to combine.
In a pitcher, whisk together eggs, cream & pepper until blended. Remove pastry from refrigerator; sprinkle cheese over bottom. Spoon filling mixture over cheese then carefully pour egg/cream combo over all.
Bake 35 minutes or until eggs are set in center. If necessary, cover edge of crust with strips of foil during the last 15 minutes of baking to prevent excessive browning. If you like, sprinkle with some fresh parsley.
Recipe Notes
- The extra border you left on the parchment when patting out the pastry will make it easy to lift the quiche out of the pan when cooled. I find you can make nice clean cuts that way.

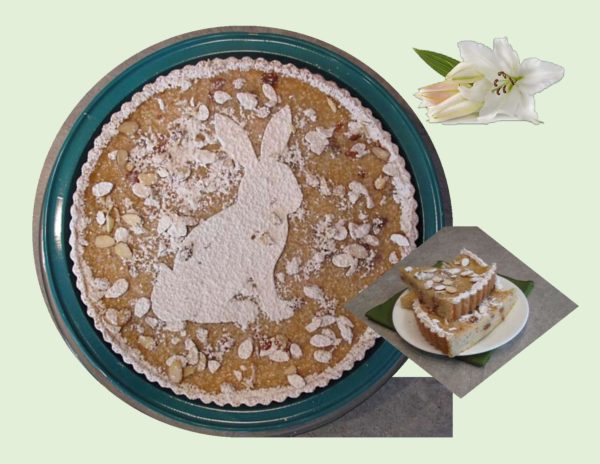
With Easter coming up real soon, why not bake something different this year or should I say, different for me. Swiss Rice Tart has a custard type filling made with rice, eggs, milk, citrusy lemon zest, ground almonds all baked in a sweet, crunchy pastry. Traditionally only served during Easter time in Switzerland, it is a wonderful non-fussy and unusual brunch dish/dessert item.
It took a bit of time to try and learn some history of this Easter specialty. It seems that the first available recipes for a similar tart are from the end of the 16th century. In a cookbook by Anna Wecker, (the first German cookbook to be published by a woman) there was mention of a similar tart. In some of the early recipes, Parmesan cheese was included in the dough but this was abandoned for a sweeter crust. Another version used bread as a starchy filling instead of rice or semolina and the flavoring was rosewater and wine. By the 19th century, the tart, as it is known today, made its way into the rotation of most Swiss bakeries.
The key to getting the right consistency for the filling is to slightly overcook the rice from the beginning as it needs to to become smooth and creamy. The ground almonds, amaretto liqueur and raisins all add richness to the flavor of this ‘rice pudding baked in a crust’.
Print Recipe
Swiss Easter Rice Tart
Votes: 1
Rating: 5
You:
Rate this recipe!
|
|
Votes: 1
Rating: 5
You:
Rate this recipe!
|
Instructions
Pastry
-
In a food processor, pulse flour, sugar, salt & baking powder to blend. Add butter & pulse about 3-4 times, until butter is in pea- size pieces. Sprinkle in the ice water; pulse another 4 times. Turn dough out on a lightly floured work surface & knead gently a few times to form a disk. Wrap in plastic wrap & refrigerate at least an hour.
Custard Filling
-
In a small bowl, combine amaretto liqueur & raisins & allow to marinate until ready to add to filling.
-
In a large saucepan, bring water to a boil. Stir in rice, lower heat to medium & cook until rice is soft & water is absorbed. Add evaporated milk, skim milk, butter, sugar & salt. Bring to a quick boil. Reduce heat to low & add amaretto liqueur ONLY, setting raisins aside.
-
Simmer until mixture has thickened almost to a 'risotto' consistency, about 20 minutes. Remove from heat & place the saucepan in a bowl of ice water for 10 minutes to cool mixture.
-
Preheat oven to 350 F. & place oven rack in the lowest position. When cooled, pour rice mixture into a bowl; add lemon zest & raisins. Mix ground almonds with the 1 Tbsp flour & fold into mixture along with eggs.
-
Press chilled pastry evenly into tart pan. Trim edges flush with pan. Pour filling into pastry dough & bake about 35 minutes, until filling is set & golden. Cool on a wire rack. Dust with powdered sugar & almond slices (create a design if you wish) before serving.
Recipe Notes
- This recipe was adapted from a site called cuisine Switzerland.
- I had used a 10-inch tart pan for mine but there was a small amount of filling left over which had to be baked in a casserole dish.
- I would suggest using a 10-inch spring form pan instead so the pastry sides could be higher to accommodate the extra filling.
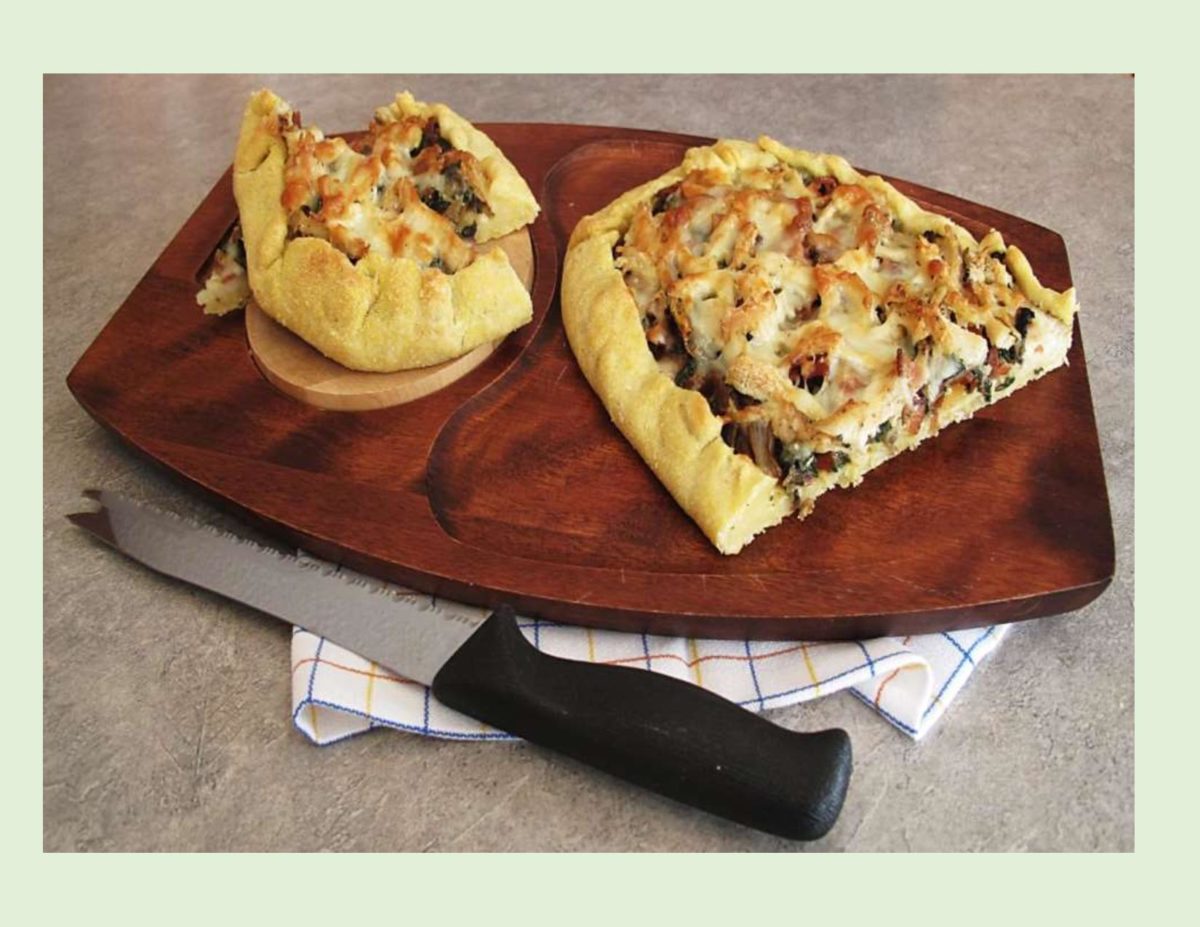
Whether you call it quiche, tart, galette, pizza or pie, these uncomplicated dishes remain some of the most universally appealing. Depending on the setting and time of day, such open face preparations can serve as a first course or an ideal main luncheon dish. Versatility makes them picnic fare as well as late evening snacks.
Spinach is a green that Brion longer enjoys to eat so I have sometimes used Swiss chard in its place. This particular galette uses a nice flour/cornmeal pastry. The chard and Gruyere make an excellent pairing. I love the vast complexity of Gruyere with its fruity tones slowly going towards earthy and nutty flavors. Covered by a natural rind, the texture is dense then matures to flaky and somewhat granular as it ages. No silage ever enters the diet of the cows providing the milk for it. Instead, these Swiss alpine cows, are allowed to roam freely on pastures cushioned between freshwater streams and hillsides. This natural forage is key to imparting the signature flavors of Gruyere.
Today’s galette can be just a meatless version or you can add chicken, bacon, pine-nuts, corn, mushrooms or whatever you prefer. It all works!
Print Recipe
Chard, Chicken & Gruyere Galette
Votes: 1
Rating: 5
You:
Rate this recipe!
|
|
Votes: 1
Rating: 5
You:
Rate this recipe!
|
Instructions
Cornmeal Galette Dough
In a small bowl, combine sour cream & ice water; set aside. In a large bowl, whisk together flour, cornmeal, sugar & salt. Using a pastry blender or finger tips, cut in butter until mixture resembles Both coarse crumbs & small peas. Sprinkle the cold sour cream mixture over dough, 1 Tbsp at a time, tossing with a fork to evenly distribute it. After you have added all the sour cream mixture, dough should be moist enough to stick together when pressed; if not, add additional cold water, 1 tsp at a time. DO NOT overwork dough. Press dough into a disk shape & wrap in plastic wrap. Refrigerate for at least 2 hours.
Mustard Sauce
In a small saucepan, melt butter. Whisk in flour & continue to cook, whisking constantly for about 2 minutes until golden brown. Add chicken broth & mustard. Continue to simmer, whisking until thick & bubbly. Remove from heat; set aside to cool slightly.
Filling
In a skillet, saute bacon until cooked; remove from pan; set aside. Remove stems from chard leaves; chop to equal 1 cup. Chop leaves to equal 4 cups. Heat bacon drippings in skillet over med-high heat. Reduce heat & add chard stems, mushrooms, garlic & onion to pan; saute 5 minutes. Add chard leaves to pan; saute until chard is wilted & no moisture remains, about 10 minutes. Stir in thyme, parsley, pepper, bacon & shredded chicken. Remove from heat & cool slightly.
Assembly
Preheat oven to 375 F. Remove pastry from refrigerator. On a 12 X 16-inch sheet of parchment paper, press out pastry into two rectangles about 9 X 14-inches ( you can make one big one if you prefer). Carefully spread mustard sauce over surface of dough, leaving an inch border all the way around pastry. Sprinkle with Parmesan cheese; make a layer of cooked, thinly sliced potato then evenly top with filling mixture. Sprinkle divided Gruyere between both galettes & fold edges of dough inward over filling. Brush egg wash over exposed crust.
Bake until crust has browned & cheese has melted, about 25-30 minutes. Slide the galettes off the parchment onto a cooling rack or cutting board. Slice & serve.


