Copycat Chachi’s Cran & Brie Sandwich

Several years ago, Brion and I came across a deli we had never noticed before. It was called Chachi’s which proved to be a great find. After checking out the menu we decided on what they called a Cran & Brie Sandwich. OMG .. it was so good! Since then, we have had them numerous times so of course I had to see if I could come up with a copycat version.

Chachi’s Deli is a popular chain started in Calgary, Alberta and now has over 20 locations across BC, Alberta & Manitoba. The concept serves sandwiches with local ingredients, in a contemporary style butcher shop environment. They also serve mac ‘n’ cheese as well as other comfort food offerings. Known for sourcing high-quality ingredients from local partners, Chachi’s has built a reputation for delicious fast food and is raising the bar for ‘mall food’ although some find it a bit pricey.

In December 2006, the first Chachi’s opened in TD Square in downtown Calgary. Derek Brock and Jason Cunningham started the company because they felt there was a need in the marketplace for a premium sandwich offering, above what was being offered by the sub giants. The question that they were asking themselves was … what would happen if you made a sandwich with the best local ingredients possible? That’s how the first Chachi’s sandwich was made and that’s how the company started.

Derek Brock and Jason Cunningham first met over 20 years ago while working as managers at Starbucks Coffee. After forming a strong friendship, they partnered to open the first ever Jugo Juice in 1998. The Jugo Juice brand was a pioneer in the smoothie and juice industry and has since grown to a national chain with stores across the country.

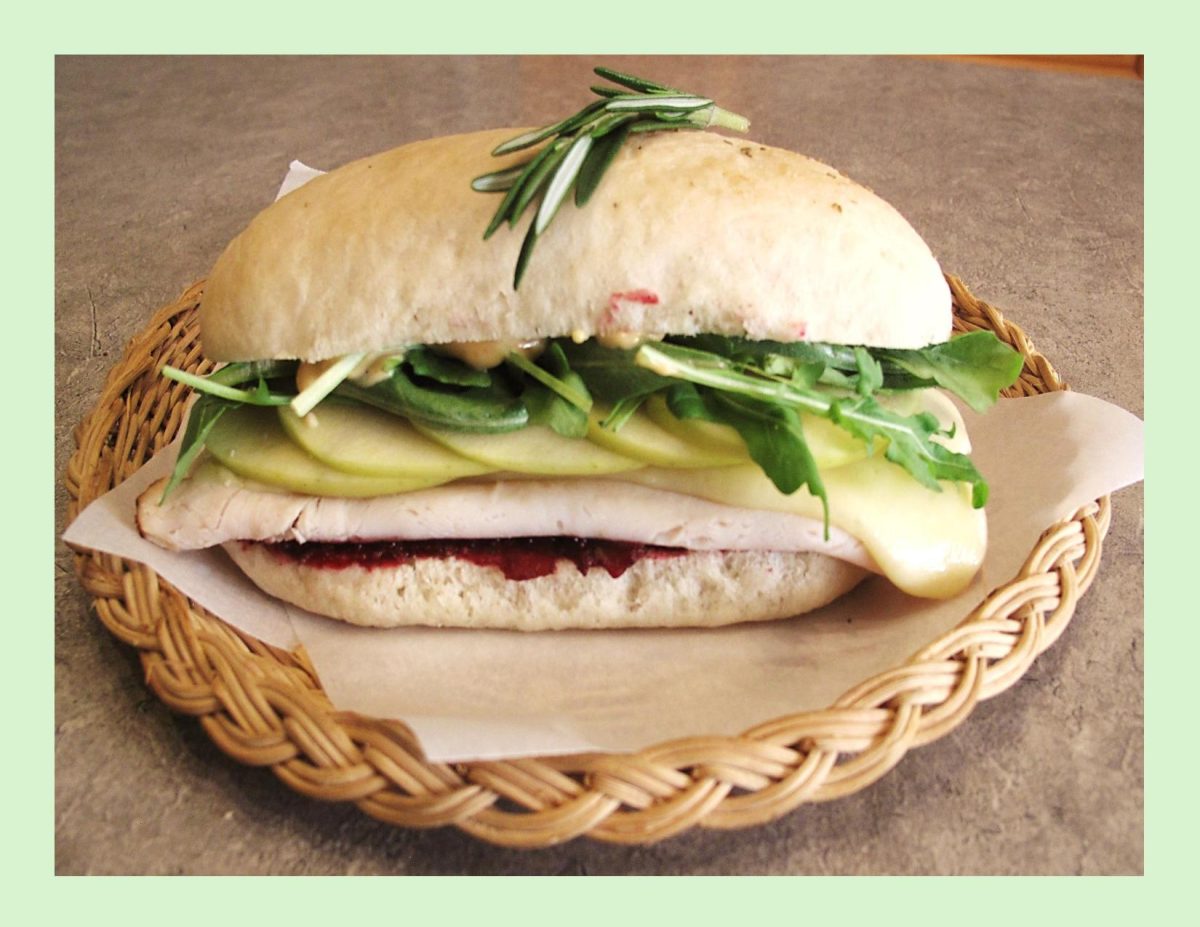
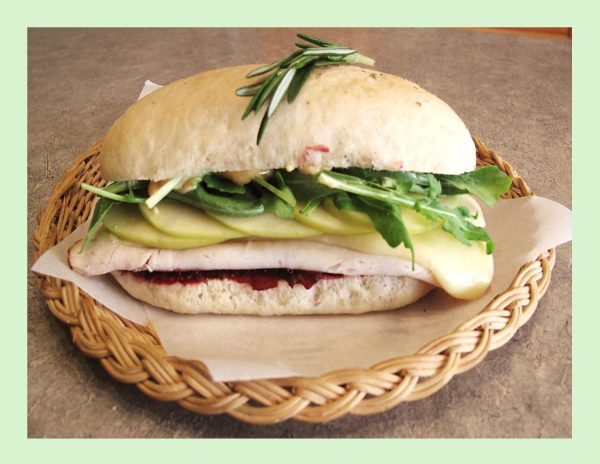
Chachi’s Cran & Brie sandwich consists of roast turkey breast, brie, cranberry chutney, mayo, arugula, granny smith apple & rosemary. Here is my copycat version which I’m sure will never quite match the original but …..
Print Recipe
Copycat Chachi's Cran & Brie Sandwich
Instructions
Ciabatta Rolls
  1. In a small bowl, combine yeast & 1/4 tsp sugar. Add lukewarm water set aside until frothy.
  2. In the bowl of your food processor or mixer (with dough hook), add flour, salt, remaining tablespoon of sugar and rosemary. Pulse once or twice to mix.
  3. When yeast is foamy, with mixer running, pour the liquid into dry ingredients. Add 3 tablespoons olive oil, continuing to mix until dough comes together in a ball. Add a little more flour if necessary, but your dough should by very sticky.
  4. Turn dough out onto floured surface & knead until smooth & elastic, about 20 times. Shape into ball & place into oiled bowl. Cover loosely & place in a draft-free, warm area.
  5. When dough has doubled in size, turn onto lightly floured surface & knead just a few times to deflate. Do not over knead. Divide dough into 6 equal pieces & shape into 6-inch long rolls. Place rolls on parchment paper. Press down & outward to flatten them to about 1-inch thickness. Cover loosely with plastic wrap which has been sprayed with cooking oil spray & set in a warm place until doubled in size.
  6. Preheat oven to 375 F.
  7. When rolls have risen & oven is hot, Remove plastic wrap, poke top of rolls with fingers to create slight indentations. Drizzle olive oil lightly & evenly over rolls. Sprinkle with coarse salt & dried rosemary if you wish.
  8. Slide parchment onto baking sheet bake for 20-25 minutes, until light golden brown.
Cranberry Chutney
  1. Place all chutney ingredients into a large saucepan. Bring to a simmer & cook on low heat until cranberries pop & fruit is soft, about 15-20 minutes. Adjust seasonings or sweetness to your taste. Remove from heat & cool slightly.
  2. Place chutney in a food processor & pulse a few times to puree ever so slightly. I like it to still have a nice texture but your not seeing specific chunks of apple.
Assembly
  1. Slice the ciabatta rolls in half lengthwise. On the bottom half of each, spread cranberry chutney & top with deli roast turkey slices. Layer brie cheese over the turkey. Next lay slices of Granny Smith apple. On the top halves of the ciabatta rolls squeeze some mayo.
  2. Place all prepared bottom & top halves of the rolls in a toaster oven to toast slightly & melt the brie cheese. When slightly toasted & brie is nice & melted, remove from toaster oven & top with arugula & bits of fresh rosemary (if you wish).
Recipe Notes
  • Brion & I used a 'smoky bacon mayo' on our sandwiches & it was real good!

Summer Corn Salad

One of the highlights of summer is the fresh sweet corn from local roadside farm stands. Fresh corn is soooo tasty!! Corn salads are a summer classic.

How do you cook corn on the cob? There seems to be as many methods as cooks. Do you steam, boil, microwave? Do you grill and if so, in the husks or out? Or do you get fancy and pull back the husks, put butter or an ice cube inside, rewrap and proceed?

This Summer Corn Salad is the ultimate summer salad to make for a BBQ during the warmer months. The lime-y dressing and sweet grilled corn are a winning combo alongside the fresh cherry tomatoes and avocado. It would pair perfectly alongside ribs, grilled chicken, or even seafood. 

Corn on the cob is one of those foods that just gives off summer vibes and when it arrives each year, Brion & I enjoy it to the fullest.

Print Recipe
Summer Corn Salad
Instructions
Dressing
  1. Whisk all dressing ingredients together & set aside.
Salad
  1. In a microwave steam dish, cook shucked corn ears for 6 minutes. Heat grill to medium-high. Brush corn lightly with olive oil & grill for a few minutes, rotating it as it cooks, until golden on all sides.
  2. Allow corn to cool & then cut corn off of the cobs; place in a bowl. Add remaining salad ingredients & drizzle with desired amount of dressing. Gently toss to combine. Sprinkle with shredded cheese. Refrigerate until ready to serve.

Baked Chicken w/ Tomato Bacon Relish

CELEBRATING FATHER’S DAY!

Honoring your father on Father’s Day doesn’t require his physical presence. I feel what is more important is just the act of doing it. I am very grateful to have had a father who was such a strong role model in my life. Everything he did was driven by his commitment to provide and care for the family he loved.

My father passed away in 2005 and Brion’s in 2011. Both our dads loved to talk and tell stories from their lives. We often wish we could retrace that time and hear their voices again. It seems you never fully appreciate your parents until they are no longer on this earth. It is so important to appreciate every hour they are in your life.

Brion & I eat a lot of chicken, so I’m always interested in another way of serving it. This recipe gives you not only crispy chicken but a flavorful tomato bacon relish to compliment it.

If you’re a bacon lover, it probably goes without saying, but bacon goes well with everything. Tomato bacon relish sounds like it would be savory, but it’s actually pretty sweet, just like other fruit jams! However, it does have a lot more complexity thanks to the bacon and spices.

The concept may sound strange, but it tastes like caramelized tomatoes–richer, sweeter, and more mellow than their fresh counterparts, balanced by the savory and smoky flavors of the bacon and smoked paprika. A little vinegar and mustard add a subtle tang, and you’ll get a hint of heat at the end from red pepper flakes.

It’s perfect spread on toast, in an omelet or a grilled cheese sandwich, on roasted veggies, next to cheese and crackers on a charcuterie board, or spread over cream cheese or brie for a party appetizer, etc. etc.

My special meal in honor of our dad’s on this Father’s Day is baked chicken tenders with bacon tomato relish.

Print Recipe
Baked Chicken w/ Tomato Bacon Relish
Votes: 1
Rating: 5
You:
Rate this recipe!
Servings
Servings
Votes: 1
Rating: 5
You:
Rate this recipe!
Instructions
Chicken
  1. Preheat oven to 425 F.
  2. In a shallow bowl, mix bread crumbs, 2 Tbsp thyme & 1/4 tsp each salt & pepper. Place flour & egg in separate shallow bowls. Dip chicken in flour; shake off excess. Dip in egg, then in crumb mixture, patting to help coating adhere. Place chicken on a greased rack in a 15x10x1-inch baking pan. Bake about 15 minutes or until no pink remains.
Bacon Tomato Relish
  1. In a skillet, over medium high heat, fry bacon until crispy. Remove bacon to plate. Drain all but 1 Tbsp bacon drippings.
  2. In the same skillet, sauté onions in reserved bacon drippings until onion starts to soften, about 4 minutes. Add garlic during last minute of sautéing.
  3. Add bacon & all remaining ingredients; stir to combine. Increase heat & bring mixture to a boil.
  4. Decrease heat & simmer, stirring occasionally, until tomatoes are tender.
  5. Serve over baked chicken tenders.

Pulled Pork Naan Pizza w/ Peach Onion Chutney

CELEBRATING HERITAGE DAY!

In 1974, the first Monday of August was made an official provincial holiday to recognize and celebrate the varied cultural heritage of Albertans.

The Heritage Festival in our city of Edmonton, Alberta Canada is one of the world’s largest three-day multicultural events, taking place every August. The festival showcases a diversity of cuisine, entertainment, interpretive materials, and crafts worldwide. There is no admission to enter or to watch the many cultural dances and folk music shows throughout the day. Attendees will be able to purchase various food made by the pavilions. Due to the renovations currently happening at William Hawrelak Park, the festival has been relocated to the Edmonton Exhibition Lands and Borden Parks. 

Today, I’m doing a savory version with some pulled pork with a seasonal fresh peach and onion chutney. Chutney is a condiment that originated in India that can add an extra zing to your meal. A chutney may be sweet and spicy or sweet and savory, depending on the spices and other ingredients used. Often served with meats, such as chicken, pork, or ham, as well as fish.

You’ve likely eaten naan bread at some time. The tasty Indian flatbread is traditionally cooked in the tandoor, carries a slight smoky aroma, and has a soft texture with pillow-like pockets studded over the top. Puffed flatbread has the power to move beyond a dinner accompaniment. It’s worthy of a role far better — like actually being the main course.

It proves to be super versatile — naan is soft and sturdy enough to take the place of bread, thin enough to be used as a flatbread or pizza dough, and pliable enough to work as a tortilla. It can be soaked, baked, fried, and folded to take on some surprising and delicious forms such as French toast, savory bread pudding, paninis, nachos or even as a dessert naan bread with bananas, strawberries & chocolate.

Ever since Brion & I got ‘tuned in’ to savory naan bread pizzas, we love them no matter what the topping is. Should be a good meal for today!

Print Recipe
Pulled Pork Naan Pizza w/ Peach Onion Chutney
Votes: 1
Rating: 5
You:
Rate this recipe!
Servings
Ingredients
Peach Onion Chutney
Caramelized Onions
Servings
Ingredients
Peach Onion Chutney
Caramelized Onions
Votes: 1
Rating: 5
You:
Rate this recipe!
Instructions
Peach Onion Chutney
  1. In a large heavy pot, combine sugar, vinegar, ginger, cumin, cinnamon & pepper flakes. Bring to a simmer over low heat, stirring until sugar dissolves. Add peaches & onion; increase heat to medium high & cook until peaches are tender & mixture thickens. Cool. ( I prefer to make this a day ahead).
Caramelized Onions
  1. In a skillet, heat oil until hot. Add onion & sprinkle with salt. Cook & stir about 15 minutes or until moisture has evaporated & onion is soft. Reduce heat, sprinkle with vinegar. Cook & stir until golden. Add brown sugar, stirring until caramel in color. Remove from heat & cool.
Assembly
  1. Preheat oven to 375 F.
  2. On a large sheet of parchment paper, place 4 Naan breads & place on a baking sheet.
  3. Carefully spread peach onion chutney liberally over each Naan bread. Sprinkle each with a bit of grated cheese.
  4. Layer with pulled pork & caramelized onions. Top with remaining cheese & bake 15-20 minutes or until hot & bubbly. Remove from oven & serve.

Crown Roast of Pork

HAPPY EASTER!

Turkey at Thanksgiving. Prime rib at Christmas. Brisket at Hanukkah. Ham at Easter. Candy at Halloween. Holiday food pairings make each separate celebration special—and something special we look forward to each year.  One reason ham became the meat of choice for Easter dinner is because it was available. Historically, pigs were slaughtered in fall and cured over the winter. They were ready to eat once spring arrived and the Lenten fast ended. Today ham is available year-round and while Brion loves pork chops, ham is definitely not a meat he enjoys. Enter the pork crown roast ….

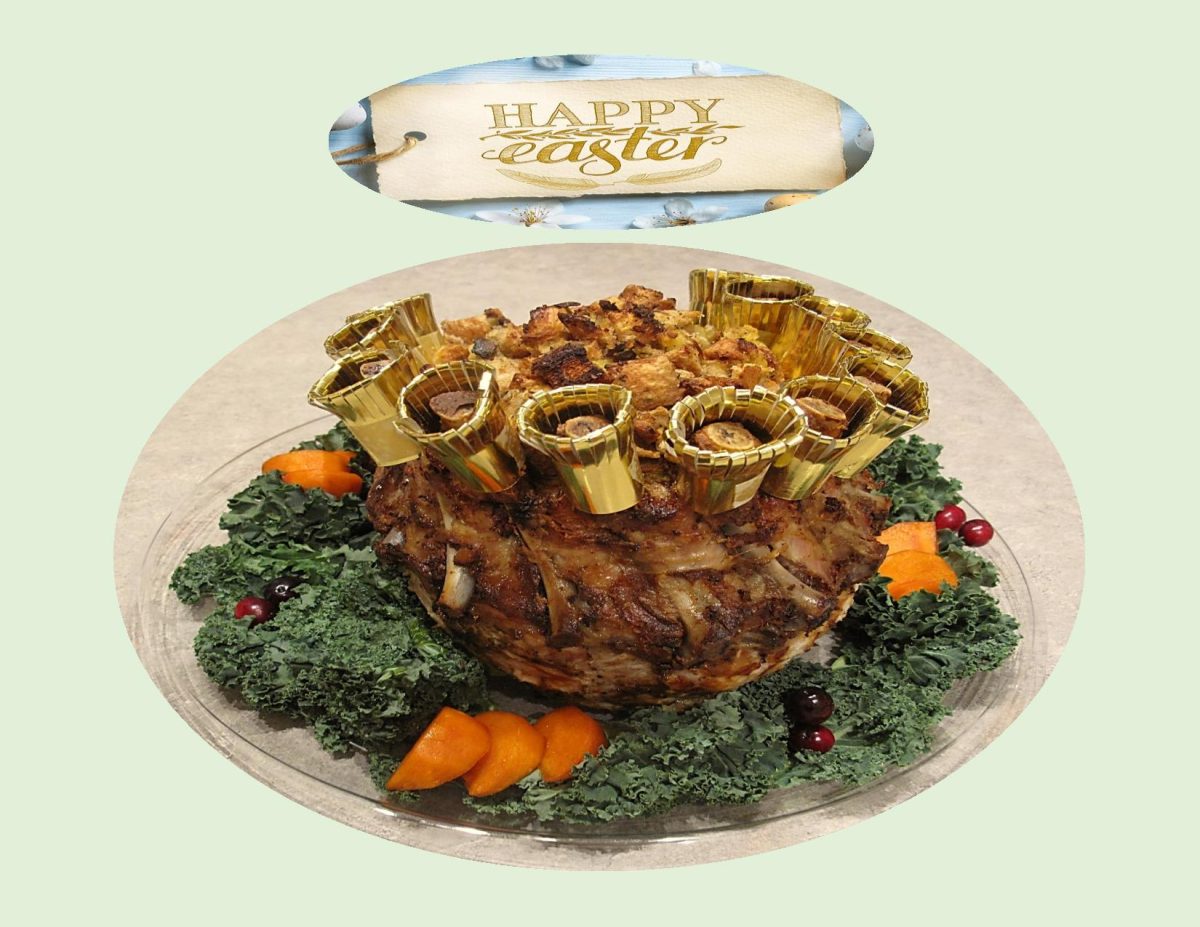
With its skyward-reaching ribs, a regal crown roast makes a stunning Easter dinner centerpiece.

Charred sticks of bone jutting from a wreath of fork-tender meat make this main seem medieval – as well as fit for a king and queen. There’s just something about a crown roast that makes it look like it belongs in the center of a long table in the dining room of a drafty castle filled with tapestries and enormous fireplaces.

The presentation is solely for appearance. If you can roast a turkey, you can prepare a majestic crown roast of pork.

Marinate the roast overnight or season it simply with salt and pepper, then tuck it into the oven. The interior space of the crown is a perfect spot for stuffing, making a beautiful presentation. Set it on a bed of greens or herbs, tuck in a few cranberries & persimmon slices around the rim and there you have it! Carving a crown roast is no more effort than slicing straight down between the rib bones.

Crown roast of pork is made from the rib portion of the loin. The meatiest part of the ribs forms the stable base of the crown. Common fears with making any roast are overcooking and drying it out or cooking it unevenly. If you roast a crown roast in a low & slow oven, you can get the entire roast pretty much exactly at the proper temperature from edge to center.

To enjoy with our meal, I’ve added some spiced cranberries. Now this is not just your basic cranberry sauce. Brion came home with a spiced cranberry liqueur to try so I couldn’t resist putting some in the cranberries. Wow, what an upgrade!

The distillery it comes from is located in the heart of Barrhead, Alberta. ‘West of the 5th’ was started by brothers Nathan and Caleb on their family farm in 2018. The family grows over 10-acres of fresh fruits to be used as flavoring in their award-winning moonshines. In just four short years of operating the distillery, the brotherly band have brought home five provincial recognition awards for their spirits.

With that being said, let’s enjoy & appreciate our Easter meals as we anticipate spring & the coming of a new season.

Print Recipe
Crown Roast of Pork
Votes: 1
Rating: 5
You:
Rate this recipe!
Course Main Dish
Cuisine American
Servings
Ingredients
Roast
  • 4-5 kg (13 Ribs) pork crown roast Frenched & prepped by butcher or yourself if you prefer.
Savory Stuffing
Fingerling Potatoes
Baby Carrots
Snow Peas
Course Main Dish
Cuisine American
Servings
Ingredients
Roast
  • 4-5 kg (13 Ribs) pork crown roast Frenched & prepped by butcher or yourself if you prefer.
Savory Stuffing
Fingerling Potatoes
Baby Carrots
Snow Peas
Votes: 1
Rating: 5
You:
Rate this recipe!
Instructions
Marinade
  1. The night before roasting meat, combine all marinade ingredients in a medium bowl. Spread marinade generously over entire roast, including bottom & between rib bones. Place roast in a large dish, cover with plastic wrap & refrigerate overnight.
Spiced Cranberries
  1. In a medium nonstick saucepan, combine all ingredients. Bring to a boil. Lower heat & cook until reduced & slightly thickened, about 20 minutes. Remove from heat, take out cinnamon sticks & cool. Refrigerate until ready to serve.
Stuffing
  1. Peel & cook potatoes, drain & mash. Set aside. Chop veggies. In a saucepan, melt butter & sauté veggies with herbs, salt & pepper. Remove from heat; combine with bread cubes, mashed potatoes & chicken broth. Add only enough chicken broth until it is moist but not mushy or falling apart. Mine usually takes the whole 2 cups. Refrigerate until ready to use.
Cooking Crown Roast
  1. Remove marinated roast from refrigerator & allow to sit at room temperature for 30 minutes before roasting.
  2. Preheat oven to 250 F. Adjust oven rack to a lower position. Place the roast on a wire rack set in a rimmed baking pan. Transfer to oven & roast until internal temperature reaches 160 F , about 8 hours. Remove from oven.
  3. Increase oven temperature to 350 F.
  4. Fill the center of the crown with prepared stuffing, mounding it slightly. Return roast to oven & roast until both roast & stuffing are browned & crispy on the exterior, about 15-20 minutes. Remove from oven, tent with foil, allow to rest for 15 minutes as it reaches the internal temperature of 165 F.
  5. Remove strings & carve by slicing in between each rib & serve with pork gravy & spiced cranberries. If you have extra stuffing, bake for about 30 minutes in a buttered casserole dish for a future meal.
Roasting Veggies
  1. While the crown roast is cooking, prepare veggies. Since you are using a 'low & slow' cooking temperature it will be necessary to stove top 'roast' the potatoes & carrots.
Fingerling Potatoes
  1. Wash & place potatoes in a glass microwave safe bowl. Microwave for 8 minutes. Remove & allow to cool for a few minutes. Heat skillet to a medium heat & add butter. Sauté the potatoes & add seasonings to taste. Cook for about 6-8 minutes until the potatoes are softened & browned.
Baby Carrots
  1. Steam carrots in microwave for a few minutes to partially cook them. Heat olive oil in a large skillet over medium-high heat. Add baby carrots, sprinkle with salt & pepper. Cook, stirring occasionally, until carrots are browned in spots & tender crisp, 6-8 minutes. Add apple cider vinegar & honey to skillet. Cook, stirring often, until liquid is syrupy & carrots are evenly coated, about 1 minute. Remove from heat & sprinkle with fresh thyme leaves.
Snow Peas
  1. Rinse, drain & trim snow peas. Heat a skillet over medium high heat, about 2-3 minutes. Add the olive oil & trimmed pea pods. Move them around to coat in oil, let them sear for a few minutes, stirring occasionally to avoid excessive browning. Add the minced garlic, stir again & let mixture become fragrant, about 30-60 seconds. Add the water & stir to move the snow peas around, Let the water evaporate & steam the pods, cooking them through, about 2-3 minutes. Season with salt & pepper to taste.
Recipe Notes
  • Depending on the amount of people you are serving the roast to, the amounts of veggies may need to be increased.
  • Roasting at this low, slow temperature produces the most incredibly tender roast you could imagine. I always use this same theory when roasting baby back ribs & get super tender ribs as well.

Pork Medallions w/ Blackberry Bacon Sauce

It seems there has been a bacon explosion in North America, in more ways than one. Novelty bacon dishes and other bacon-related items have been popularized rapidly via the internet. Fast-food chains boast about double bacon burgers, and upscale restaurants are wrapping steaks in bacon — even adding it to chic desserts. It’s the old sweet and savory marriage of flavors that seems to work so well.

Bacon mania has made bacon the star ingredient. The movement has been traced to the late 1990s when high-protein foods became a more prominent diet focus due in part to the Atkins diet.

The huge popularity of bacon has also encouraged product introductions such as bacon salt, maple bacon donuts, baconnaise, bacon-infused vodka, bacon ice cream, bacon jerky and chocolate covered bacon just to name a few. Condiments are the unsung heroes of the culinary world. A finishing sauce can be an important part of every meal. Whether you’re serving pork tenderloin, pork chops, pork loin, or pork roast, a flavor-filled sauce will guarantee to take the meal from good to great. We found this blackberry bacon sauce to do exactly that.

Print Recipe
Pork Medallions w/ Blackberry Bacon Sauce
Votes: 1
Rating: 5
You:
Rate this recipe!
Servings
Ingredients
Servings
Ingredients
Votes: 1
Rating: 5
You:
Rate this recipe!
Instructions
Sauce
  1. In a saucepan, cook bacon until almost crisp, remove to a paper towel.
  2. To the bacon drippings, add sliced mushrooms & garlic, sauté until cooked. Remove to a plate, set aside.
  3. To the saucepan, add remaining sauce ingredients & bring to a boil. Once boiling, reduce heat to simmer & allow to simmer for about 30 minutes.
  4. Remove from heat & allow to cool slightly then place in a food processor & pulse a few times.
  5. Pour sauce through a wire sieve & press to get everything but the seeds for your sauce.
  6. Add bacon & mushroom/garlic mixture. Combine well & set aside.
Tenderloin
  1. Preheat the oven to 425 F.
  2. Slice the tenderloin into even, 1 1/2 inch thick, medallions, sprinkle with garlic & onion powder & the salt & pepper.
  3. Then, heat the olive oil and butter in a large heavy skillet, cast iron if you have one. Braise the pork tenderloin medallions, you may have to work in 2 batches. Cook for 2 - 3 minutes on each side, remove from the skillet and cook the remaining pork. Using 2 wooden skewers, thread meat first with one & then with the other. It should resemble the unsliced tenderloin but do leave a tiny bit of space between each piece.
  4. Place on a baking sheet & roast for 30-35 minutes.
  5. To serve, plate the tenderloins and spoon (reheated) sauce over them. Garnish with a few whole blackberries & serve any remaining sauce on the side.

Spicy Apricot Mango Stilton Galette


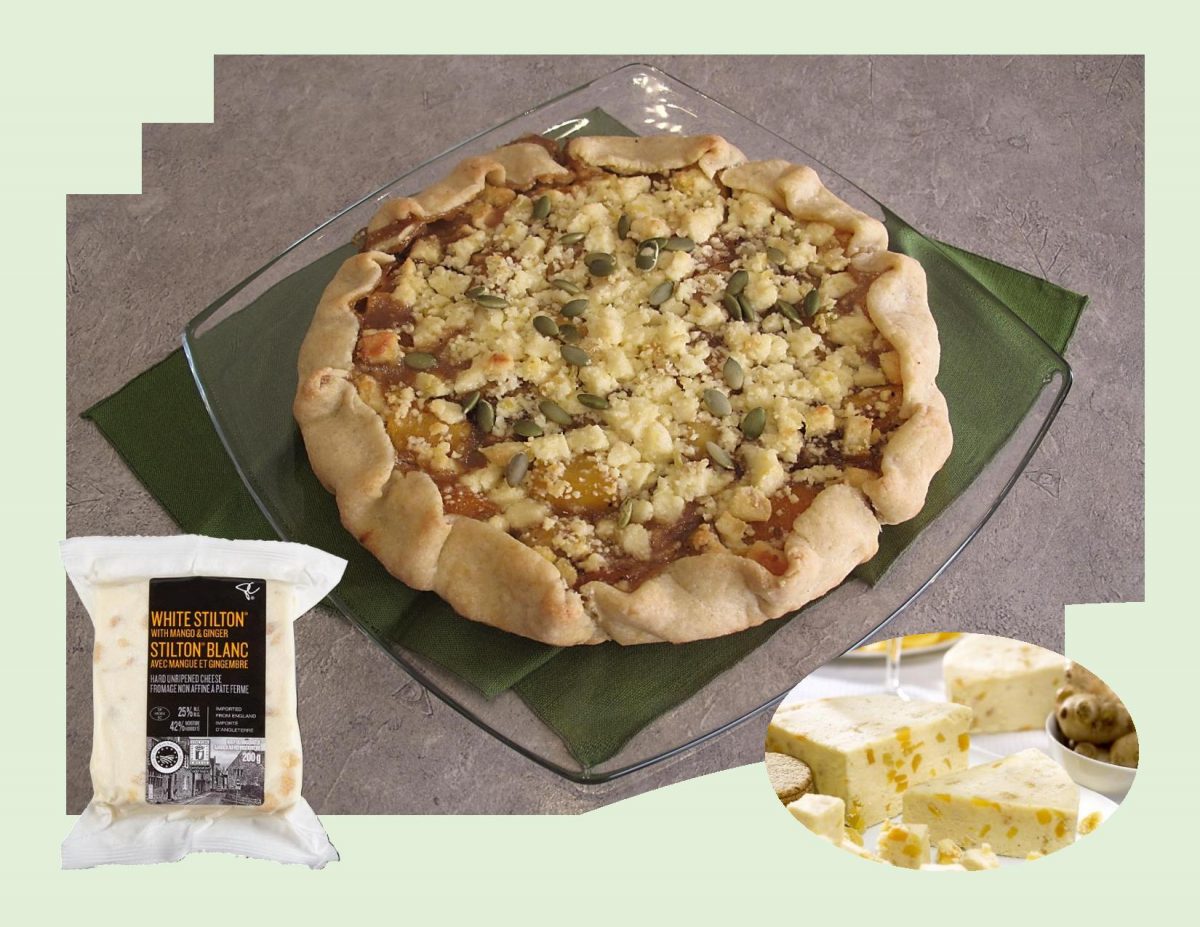
This spicy galette makes an interesting dessert with the sweetness of mango and apricot fruit, as well as savory with the creaminess of stilton, crunchy pepitas, and the perfection of a cornmeal pastry crust.

Stilton cheese takes its name from the village of Stilton, in the east of England. White Stilton has a light, fresh, slightly acidic flavor that makes it a perfect partner for fruit.

White Stilton with mango & ginger is a blended cheese which incorporates mango and ginger to impart a sweet, savory intense flavor to the traditional Stilton cheese. Stilton on its own is extremely creamy and delicious but the addition of fruit accords the cheese a new dimension. As it melts, the unusual combination of the mango adding a fruity flavor and the ginger adding a mildly warming, spiced overtone. White Stilton with mango & ginger is perfect for a breakfast or dessert cheese.

Print Recipe
Spicy Apricot Mango Stilton Galette
Votes: 1
Rating: 5
You:
Rate this recipe!
Servings
Servings
Votes: 1
Rating: 5
You:
Rate this recipe!
Instructions
Pastry
  1. In a small bowl, combine sour cream & ice water; set aside. In a large bowl, whisk together flour, cornmeal, sugar & salt. Using a pastry blender or fingertips, cut in the butter until mixture resembles BOTH coarse crumbs & small peas. Sprinkle the cold sour cream mixture over dough, 1 Tbsp at a time, tossing with a fork to evenly distribute it. After you have added all the sour cream mixture, dough should be moist enough to stick together when pressed; if not, add additional cold water, 1 tsp at a time. Do not overwork dough.
  2. Press dough into a disk shape & wrap in plastic wrap. Refrigerate for at least 2 hours. The dough can be kept in the refrigerator for a day or two or it can be wrapped airtight & frozen for a month. Thaw, still wrapped in refrigerator.
Filling
  1. In a saucepan over medium heat, add apple cider vinegar, brown sugar, ginger, anise seeds, cloves, pepper, cardamom, cinnamon & sea salt. When mixture starts to bubble, add dried apricots & mangoes. Cook, stirring often, until fruit is soft. Set aside to cool.
  2. Preheat the oven to 425 F.
  3. On a large sheet of parchment paper, roll or press out chilled pastry into a 13-inch circle. Spread mixture evenly over dough, leaving about a 1 1/2-inch border. Gently fold pastry over filling, pleating to hold it in. Sprinkle with crumbled Stilton cheese. Brush with egg wash (if using).
  4. Bake 35-45 minutes until filling bubbles up & crust is golden. Remove from oven & sprinkle with pepita seeds. Serve.
Recipe Notes
  • If filling seems too dry, add a bit of water or apple juice.

Pork Chops w/ Pear Chutney

The warm notes of ginger and cinnamon paired with the sweetness of the pears & shallots are exactly what makes these pork chops go from good to wow!

Brion & I have come to really enjoy chutneys over the years. I think I could make a chutney out of just about anything. You want the perfect balance of the trinity of chutney which is sweet, sour and spicy.

Chutney originated in India as a simple fruit paste preserved in honey, eventually evolving to incorporate a variety of fruits, spices and vegetables. During the 17th century when the British colonized India, they would bring chutney back to England as a novelty good. Because of its bright and exotic flavor, chutney became a popular condiment all over the world.

As chutney made its way to various parts of the world, people adopted new preparation techniques and experimented with various flavor profiles. This cranberry pear chutney really highlights the those wonderful fall pears.

Print Recipe
Pork Chops w/ Pear Chutney
Instructions
Pear Chutney
  1. In a medium pot, combine all chutney ingredients. Bring to a slight simmer for about 6-7 minutes until pears soften, but not mushy. Remove from heat. Set aside until pork chops have been cooked. Serve chutney at room temperature or slightly warmed.
Pork Chops
  1. Heat a large skillet over medium-high heat. Pat pork chops dry and season with salt and pepper to taste. Add 1 tablespoon oil to pan and heat until shimmering. Lay 4 chops in pan and sear until golden on one side, about 3 minutes. Turn and cook 1 more minute. Remove from pan; set aside and keep warm. Repeat with remaining oil and chops. Add chutney to pan and, scrape up any brown bits from bottom using a wooden spoon. Simmer until slightly thickened. Stir in cilantro. Serve chops with chutney.

Coconut Shrimp w/ Spicy Rhubarb Sauce

I have an obsession with rhubarb. I think because it is something I grew up with that makes it a nostalgic thing for me. Now, I’ll be the first to admit when it comes to rhubarb, my mind immediately jumps to desserts. But, over the years, I’m leaning more and more to using it in savory ways.

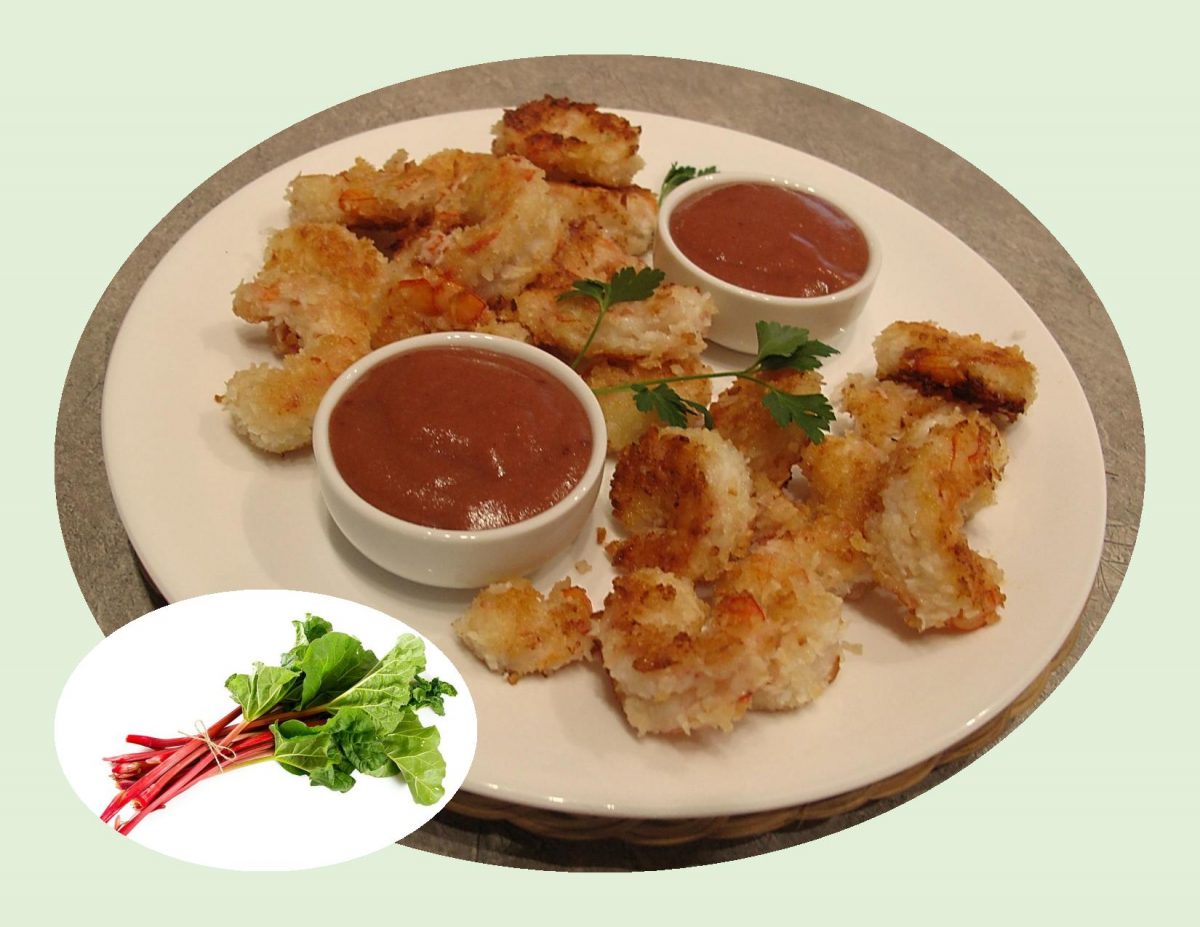
Tart and tangy, with just a little bit of sweet and spicy complexity, this rhubarb sauce is a unique and unexpected twist that is perfect served with coconut shrimp.

Brion & I love coconut shrimp which is really odd given that neither of us like coconut?? One of the nice things about this meal is that it takes minimal prep work but gives great results. We have tried many versions of sweet & spicy sauce with these shrimp and enjoyed them all. Today we’re experimenting with this savory rhubarb sauce. Should be good!

Print Recipe
Coconut Shrimp w/ Spicy Rhubarb Sauce
Votes: 1
Rating: 5
You:
Rate this recipe!
Servings
Votes: 1
Rating: 5
You:
Rate this recipe!
Instructions
Rhubarb Sauce
  1. In a heavy saucepan, combine sugar, cider vinegar, ginger, cinnamon & cumin. Bring to a simmer over low heat, stirring until sugar dissolves. Add rhubarb & onion; increase heat slightly & cook until rhubarb is tender & mixture thickens, about 5-7 minutes. Cool then place in a food processor with Hot Red Pepper Jelly & process to a smooth sauce. Adjust the amount of red pepper jelly used to your liking. Set aside.
Coconut Shrimp
  1. Using 3 separate bowls, place flour in the first, beaten egg in the second & panko/coconut mixture in the third.
  2. Clean & devein shrimp. Dust them with flour then dip in the egg & lastly coat with panko/coconut mixture.
  3. Preheat skillet over medium heat. Melt butter then add oil. Once the combo is heated, place the shrimp in the skillet & cook 2-3 minutes on each side until golden brown.
  4. Place cooked shrimp on paper towel then serve with spicy rhubarb sauce. We enjoyed these shrimp as a main course with rice & some steamed broccoli.

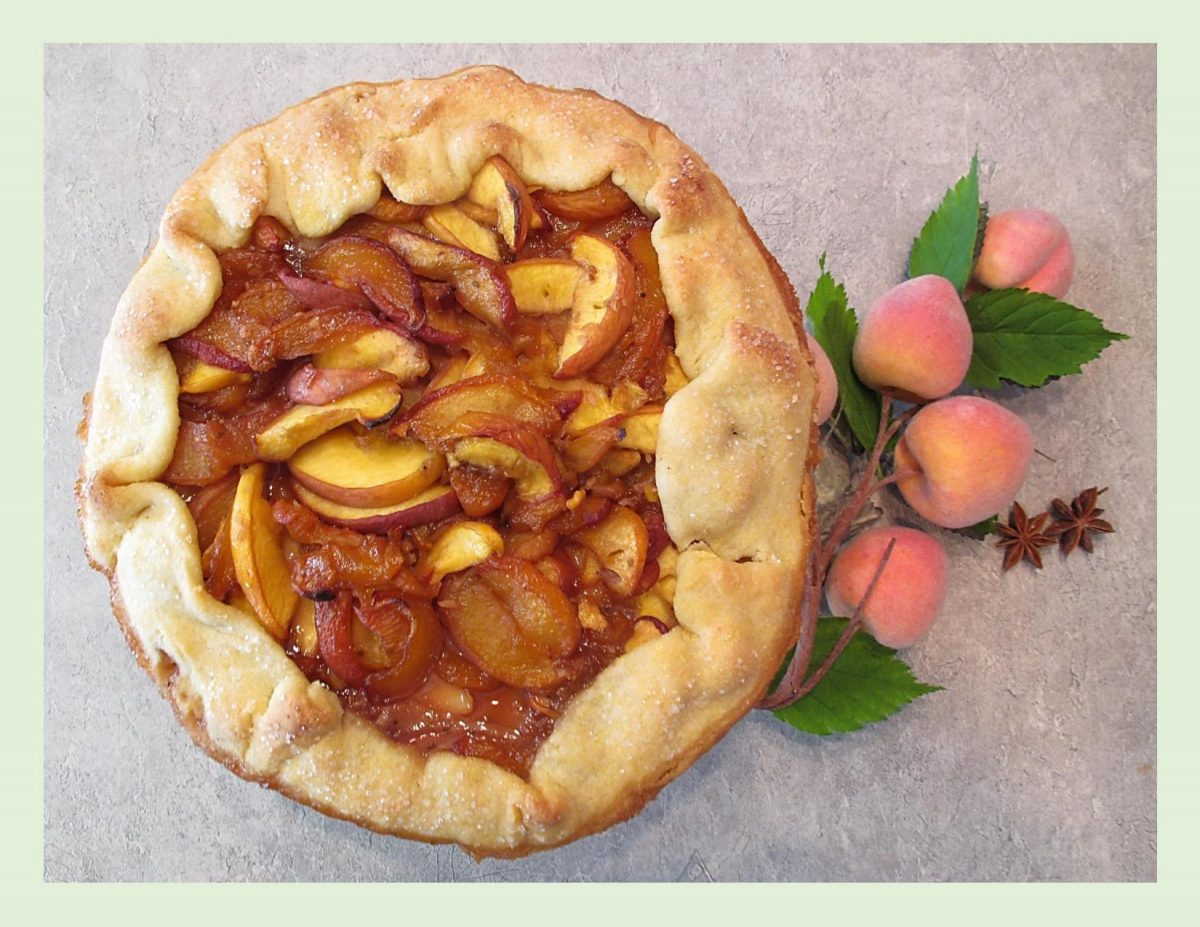
Peach Chutney Galette

This peach chutney galette has all the flavors of a classic peach pie, plus the pop of fresh ginger, apple cider vinegar and spice.

I love chutneys and find that just about any fruit can be made into one. Each chutney is a balance of sweet, sour, savory and spice with endless variations. When it comes to the ways you can eat or serve it, a few that come to mind are:

  • Add it to a chicken sandwich
  • Serve with cured meats & cheese
  • Serve on the side with empanadas or meat pies
  • Eat it with any cooked pork meal
  • Serve with grilled sausages or roasted poultry
  • Serve it with pate
  • As a topping for warm Brie cheese
  • Mixed into Greek yogurt
  • Puree it & use as a dipping sauce
  • Served on a burger

Peaches are one of those fruits that make their way into summer chutneys so why not put some in a galette and see what develops?!

Print Recipe
Peach Chutney Galette
Votes: 2
Rating: 4.5
You:
Rate this recipe!
Servings
Votes: 2
Rating: 4.5
You:
Rate this recipe!
Instructions
Pastry
  1. In a small bowl, combine sour cream & ice water; set aside. In a large bowl, whisk together flour, cornmeal, sugar & salt. Using a pastry blender or fingertips, cut in the butter until mixture resembles BOTH coarse crumbs & small peas. Sprinkle the cold sour cream mixture over dough, 1 Tbsp at a time, tossing with a fork to evenly distribute it. After you have added all the sour cream mixture, dough should be moist enough to stick together when pressed; if not, add additional cold water, 1 tsp at a time. Do not overwork dough.
  2. Press dough into a disk shape & wrap in plastic wrap. Refrigerate for at least 2 hours. The dough can be kept in the refrigerator for a day or two or it can be wrapped airtight & frozen for a month. Thaw, still wrapped in refrigerator.
Filling
  1. In a saucepan over medium heat, add apple cider vinegar, brown sugar, ginger, star anise, cloves, pepper, cardamom & sea salt. When mixture starts to bubble, fold in about 2 cups sliced peaches. Bring the mixture to a boil; turn down heat to a lively simmer. Cook, stirring often, 20-30 minutes, or until mixture has thickened enough to easily coat a spoon. Set aside to cool.
Assembly
  1. When chutney is cooled, preheat oven to 350 F. On a large sheet of parchment paper, roll or press out chilled pastry into a 12-inch circle.
  2. In a large bowl, stir to combine remaining peaches, cooled chutney, 1/4 cup sugar & cornstarch.
  3. Spread mixture evenly over dough, leaving a 1 1/2-inch border. Gently fold pastry over peach chutney filling, pleating to hold it in. Brush with egg wash (if using); sprinkle with sugar.
  4. Bake 35-45 minutes until filling bubbles up & crust is golden. Chill at least 2 hours to prevent the filling from running out. Serve as is or with a scoop of vanilla ice cream.