The end of October! Seriously, it seems like we were just getting into spring and now its Halloween. Brion and I were in a store around the end of September that already had Christmas displays up. For me, that really doesn’t work. Maybe it just comes as we get older, but I really enjoy to try to stay in the ‘moment’ and enjoy each day, season and year as they unfold. That time will never come again, so why do we feel the need to rush it so. I guess you could call it, ‘making the most of your own personal journey’.
Nevertheless, it is time to think about some treats for the special ‘little people’ next door. We have just wonderful neighbors on either side of us. One family has two boys and the other side, two girls. I especially enjoy to come up with something unique each year for them on Halloween.
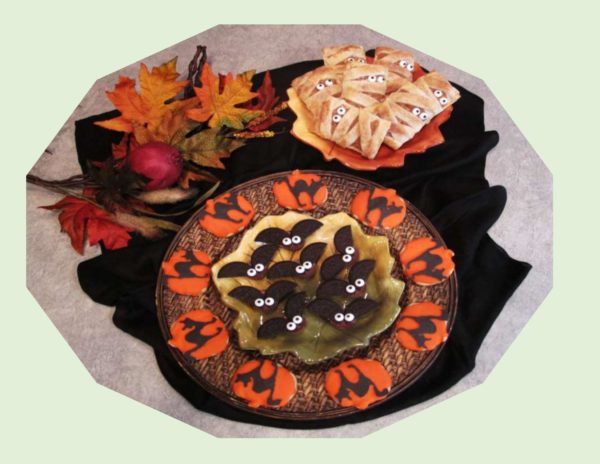
This year I decided to do some apple ‘mummy’ pastries (apple instead of pumpkin for kids, right?!), chocolate bats and black cat cookies. If these treats turn out they should look great! Fun! Fun! Fun!
Print Recipe
Halloween Cookies
Votes: 1
Rating: 5
You:
Rate this recipe!
Ingredients
Apple Mummy Cream Cheese Pastries
Ingredients
Apple Mummy Cream Cheese Pastries
|
Votes: 1
Rating: 5
You:
Rate this recipe!
|
Instructions
Apple Mummy Pastries makes 12
FOR CRUST: In a food processor, pulse flour, salt & sugar, then add butter. Pulse until only until coarse meal texture is obtained. Add chilled water 1-2 Tbsp at a time. If your dough doesn't come together in clumps add remaining water. Divide dough into two portions & shape each into a 5-inch disk. Cover with plastic wrap & chill for one hour.
FOR FILLING: On a cutting board, chop apple pie filling into smaller pieces. In a bowl, soften cream cheese & combine with apple filling & 1/2 tsp cinnamon. Cover bowl & chill until ready to assemble cookies.
Preheat oven to 375 F. Line a large baking sheet with parchment paper. On a floured work surface, roll out first disk of dough to about 13 X 11-inch rectangle. You will need to have straight edges so you may need to trim a bit. Make twelve 4 X 2 1/2-inch rectangles. Roll out second disk of dough & cut into 1/2-inch strips.
Space rectangles on prepared baking sheet & spread 2 heaping Tbsp of apple filling onto each one, leaving a rim on all sides uncoated. Brush uncoated edges with egg/water mixture. Top with strips to create a 'mummy' look, then seal edges with your fingertips & trim any excess. Brush strips with remaining egg white/water mixture & sprinkle with combined sugar & cinnamon. Bake about 10-12 minutes, until golden. When cooled secure edible candy eyes.
Chocolate Bats
In a bowl, beat cream cheese until smooth. Gradually beat in powdered sugar; set aside. Remove wrappers from Reeses cups. Gently separate Oreo cookies & scrape off frosting. Cut cookies in half to form 4 bat wings. Fill a plastic baggie with cream cheese frosting. Cut off the tip of one corner & pipe frosting onto one corner of each cookie half.
Press one cookie piece on the left of the Reeses cup & another cookie piece on the right forming your bat in flight. Pipe frosting on the back of the edible eyes & secure on top of the center of the Reeses cup.
Black Cat Cookies
In a mixing bowl, cream butter & sugar until light & fluffy. Add egg, & vanilla; combine then stir in flour, dry pudding mix & nuts. Combine well but do not over mix. Roll out dough to about 1/4-inch thick between 2 sheets of parchment. Place in freezer for about an hour.
Preheat oven to 350 F. Cut cooled dough into pumpkin shapes & place on parchment paper lined baking sheet. Bake about 8 minutes. Remove to wire racks to cool.
In a small double boiler, melt black candy melts. Pour melted wafers into a piping bag fitted with a fine tip. Place a large piece of waxed paper on a flat surface with a printout of black cats underneath. Trace cat shapes & fill in after. Allow to set completely, then peel shapes from waxed paper.
Ice cooled pumpkin cookies with orange frosting then lightly press a black cat on the top of each one. This recipe should make about 30 cookies.

In the early 1950’s, my father was able to purchase another piece of land about 4 miles from our home place. Between the two farms it became the equivalent of a ‘section’. Before this time, the cattle had to be moved to a community pasture in the foothills where they would have enough grass to graze on over the summer. At that time to transport them, you had no choice but to herd them down the road allowance for approximately 20-30 miles on foot. To say the least it was a long grueling event for both the cattle and family members.
The ‘other farm’, as we referred to it, had originally been a slaughter house for the town meat market. It consisted of one large building, corals and a few other buildings. There was a slough on the land which dad had converted to a ‘dug out’ where the cattle could go and drink freely. The land was used for grain crops where in turn the cattle could be pastured on.
One of my fondest memories about the other farm was our picnic lunches. In the summer when dad would be working on the land, instead of my mother just packing a lunch for him that he could take in the morning, she would fix a wonderful ‘picnic lunch’. At about 11:30 in the morning, mom would pack up the lunch she had prepared, complete with plates, silverware, a tablecloth, etc., and we would drive to the ‘other farm’. There was just the right amount of space between two grain buildings to set up a make-shift table and stools. We would put the table cloth down and spread out our little picnic ‘feast’. Dad would be so surprised and we would all enjoy our lunch immensely. Mom always knew how to make the most simple things fun for us.
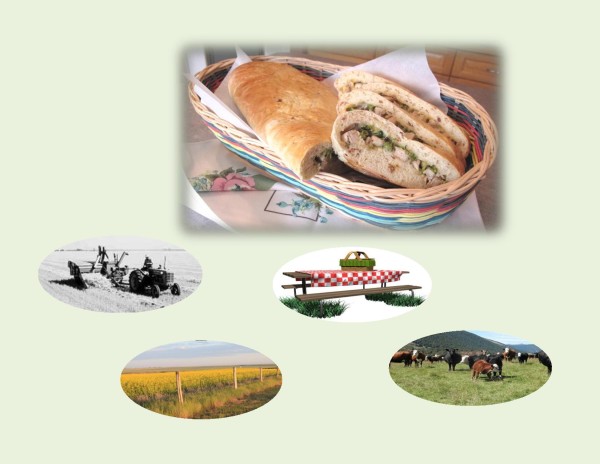
Lunch was always different from the your usual lunch box meal and my mother never seemed to be short on tasty ideas. I think you will enjoy trying this Spiced Chicken Stuffed Potato Loaf the next time you you have a crowd to feed.
Print Recipe
Spiced Chicken Stuffed Potato Loaf
A hearty chicken 'sandwich' rolled up and baked in a potato bread.
Votes: 1
Rating: 5
You:
Rate this recipe!
|
|
Votes: 1
Rating: 5
You:
Rate this recipe!
|
Instructions
Butterfly chicken breasts & carefully pound to flatten. In a large resealable plastic bag, combine marinade ingredients; add chicken breast. Seal bag & turn to coat; refrigerate for 4 hours, turning occasionally. Preheat oven to 375 F. Line a 9" baking dish with foil. Place chicken on foil & bake about 45 minutes or until no longer pink inside. Remove from oven, cool & chop.
Cut broccoli into small florets & microwave for 1 minute. Boil potato, mash & cool. Fry bacon, drain & crumble. Chop chives.
In a small bowl, combine yeast with lukewarm water; whisk until yeast is dissolved. Let stand about 3 minutes until foamy. Add butter, salt, sour cream & potato; mix well. Add bacon & chives; mix until just combined. Stir in flour, one cup at a time. When dough is completely blended, turn onto a lightly floured surface (using some of the remaining 1/4 cup flour). Knead dough about 10 minutes, until smooth & elastic. Place dough in a lightly greased bowl, cover with plastic wrap & let rise in a warm place until doubled in size, about 1 hour. Remove risen dough from bowl, turn onto lightly floured surface; roll dough to about a 12" X 15" rectangle. Place a large piece of parchment on a sheet pan. Roll dough onto a rolling pin then unroll onto parchment paper. Place 1/2 of the cheese down the center of dough, top with chicken, broccoli & remaining cheese. Fold short ends in about 1". Using parchment, fold one side over filling, overlapping with opposite side. Cover with plastic; allow to rise for 15 minutes while preheating oven to 375 F. Brush with egg wash. Bake for 25-30 minutes until golden.
Recipe Notes
- If you prefer less dough to filling ratio; make half of the dough into 'potato pan rolls' for another time.
- If you would like to serve with a quick 'sauce', combine a can of cream of mushroom soup with 1/2 can of milk.
- To simplify the process, use purchased frozen bread dough or pizza crust.
- Potato dough recipe adapted from girlversusdough.com