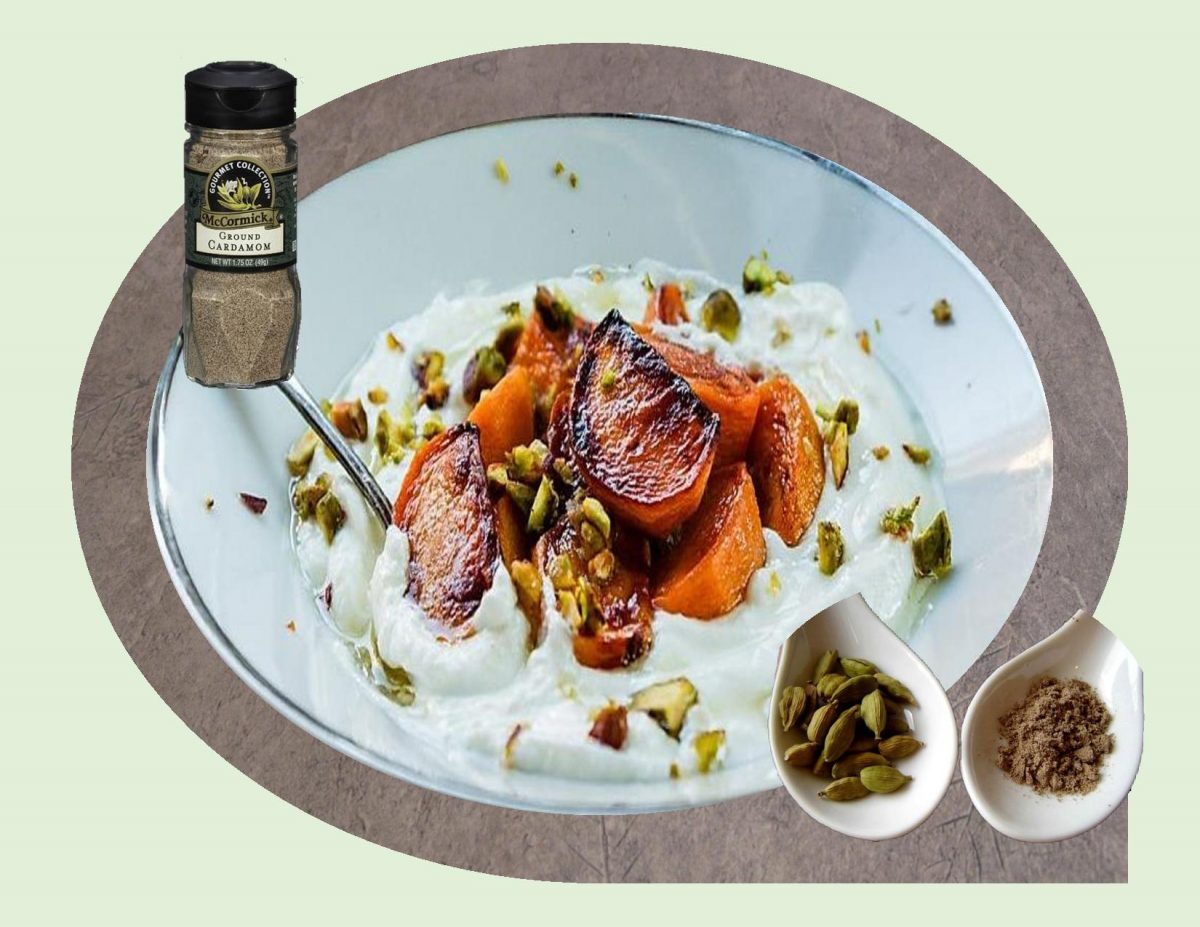
Persimmons are in season between November and February. Mildly sweet and juicy with a slight crunch reminiscent of a cross between a peach and a pear. Since there is only a short window in which you can enjoy this exotic fruit, persimmons make up for it by working well in both sweet and savory recipes.
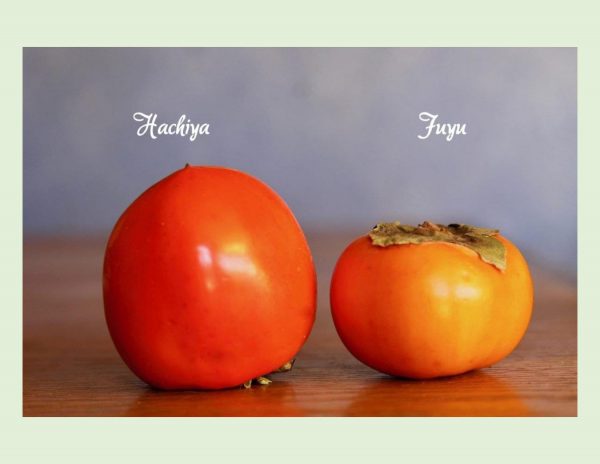
The two most commonly available varieties are Fuyu and Hachiyas. Some recipes prefer one over the other. Treat them like you would an apple and turn them into jams, puree, tarts and cakes. Paired with pork adds a nice fruity and caramelizing sweetness.
Fuyus are squat and round whereas Hachiyas are acorn shaped and have a pointed bottom. When buying persimmons, look for the unblemished skin with the green leaves and top still attached. The texture should be like a tomato-firm but a bit of give without being to soft. Persimmons are usually sold unripe, so leave them on the counter for a day or two until the skin deepens to a rich sunset orange.
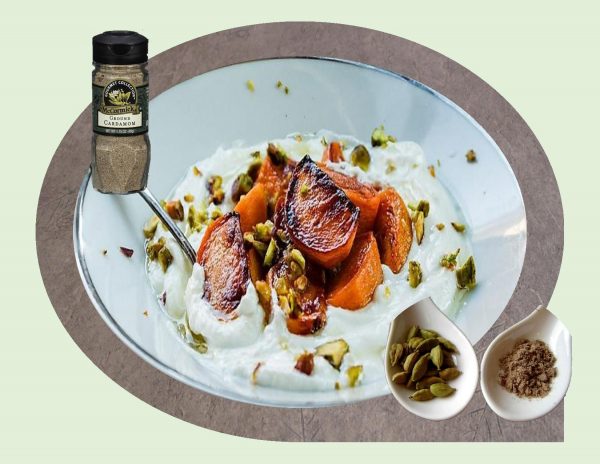
Cardamom is a complex flavor that can be used in any of the usual autumn and winter recipes. There is nothing subtle about cardamom, so when used in all but sparing amounts, it will dominate whatever its paired with. Cardamom has been used in Christmas baking in Germany since the middle ages.
You can eat roasted persimmons hot or cold. For a quick breakfast, make a batch ahead of time, then just reheat in the microwave or eat cold.
Print Recipe
Cardamom Roasted Persimmons
Votes: 1
Rating: 5
You:
Rate this recipe!
|
|
Votes: 1
Rating: 5
You:
Rate this recipe!
|
Instructions
Preheat oven to 375 F. In a small bowl, combine hot water with 3 Tbsp honey; stir until honey is dissolved. With a sharp knife, split the vanilla bean in half lengthwise & scrape half of the seeds into the bowl. Reserve excess seeds for yogurt.
Peel the persimmons, cut them in half lengthwise & then slice into 1-inch thick wedges. Arrange the slices in a baking dish, drizzle with lime juice & sprinkle with the honey mixture, cardamom & butter.
Roast persimmons for about 45-60 minutes spooning the pan juices over top occasionally. When done they should be tender & easily pierced with a knife.
In a small bowl, combine 1 1/2 Tbsp honey & yogurt. Add the remainder of the vanilla bean seeds; whisk until yogurt is smooth & well blended.
To serve, divide yogurt between 4 serving dishes, top with a quarter of the persimmons, drizzle with any extra syrup & sprinkle the pistachios on top.
-
Recipe Notes
- When using extract in place of vanilla bean in a recipe, use 1 teaspoon for every one inch of vanilla bean. Be sure to replace vanilla bean with vanilla extract and not vanilla flavoring or imitation vanilla, which are both a far cry from real vanilla.

In my second blog for the month of November/2018, I had featured an article on ‘Ube’ Sweet Rolls. This was my first experience using this interesting Filipino purple yam. Since we had really enjoyed the flavor, why not take it further?!
First, I just wanted to talk a bit more about this tuber. Ube originated in the Philippines and refers to a bright purple sweet potato. Traditionally it is boiled and mashed with coconut milk and sweetened condensed milk to form essentially ‘dessert mashed potatoes’. Unlike Matcha or Durian that have intense scents and flavors, ube doesn’t require a developed palate to enjoy.
It is easy to confuse ube with taro, but they are completely different foods. Taro is typically white on the inside and used in savory dishes, while ube is more commonly used in making sweets.
The violet purple color makes it highly photogenic, which gives it a natural marketing quality. The taste has been described as something similar to white chocolate with earthy nutty tones, gentle but not intense.
Fresh ube seems fairly difficult to find in North America but with a little persistence its possible. There are a few different forms it is sold in. Dehydrated powder, extract, ube halaya (or paste) or as a grated frozen product. Ube is not an exotic ingredient in the Philippines, but a common everyday staple that deserves a bit more respect and understanding.
When I saw a cheesecake recipe using ube, I couldn’t imagine a more perfect base for an Easter dessert. Creamy ube with the perfect note of tang and richness from the cream cheese.
Print Recipe
Easter 'Ube' Cheesecake Baskets
Votes: 1
Rating: 5
You:
Rate this recipe!
|
|
Votes: 1
Rating: 5
You:
Rate this recipe!
|
Instructions
Base
-
Line 8-9 large muffin cups with large paper liners. In a bowl, combine melted butter & crumbs; stir until mixture looks like coarse meal & all of the crumbs are moistened with the butter. Divide crumbs between lined cups; set aside.
Filling
-
Check for any hard particles in the thawed purple yam & discard them. Wrap purple yam (ube) in foil & steam for about 20-30 minutes or until very soft. Mash until creamy & let cool.
-
Preheat oven to 350 F. In a bowl, beat cream cheese until soft & fluffy. Add sugar & salt beating until combined. Add the cooled 'ube' & beat until incorporated & smooth.
-
Add eggs, one at a time, beating well after each addition then add vanilla. Pour into prepared 'cups'. Bake for 20-25 minutes or until they test done when the tip of a knife inserted in center comes out clean. Lay a piece of paper towel over a wire cooling rack. Remove cheesecake cups from oven; cool for a few minutes then lift out onto paper lined rack. Cool, then chill in the fridge for at least 6-8 hours.
Decorating
-
Place coconut in a zip lock baggie. Dissolve a few drops of food coloring in a teaspoon of water. Pour over coconut, seal & shake until it is the color you want.
-
Hollow out a small circle in the top of each cheesecake. Divide the yogurt between cheesecakes, filling each little divot with some. Next, divide the tinted coconut between the cheesecakes, covering the yogurt, to make a 'nest'. Top each nest with 3 'robin egg' Easter candies.

Anyone following my blog is well aware of my love for rhubarb. I think I’ve tried to use it in every capacity possible. Well, get ready for my next adventure — rhubarb Turkish delight! I refrain from eating a lot of chocolate bars, not that I don’t enjoy them, but seriously –. In Canada, the Nestle company sells a chocolate bar called ‘Big Turk’ for which Turkish delight forms the basic foundation. Of course, I love it!
Just a bit of food history background on the subject first. The Turkish name for the sweet comes from the Arabic rahat-ul hulkum which means ‘soothe or heal the throat’. This was abbreviated to rahat lokum and then lokum. The name ‘Turkish Delight’ was coined in the 18th century to make it easier to pronounce. As an improvement on the original recipe of honey or molasses, a mixture of water, flour, cornstarch and refined beet sugar were used to make a firm, chewy jelly.
Little has changed in the last 240 years. Although there are more than 24 different flavors, the biggest seller that still remains is a plain jelly studded with pistachios. Traditional Middle Eastern flavors include rose-pistachio, orange-blossom walnut, mint and rose-lemon.
Back to the rhubarb. Somewhere in my travels, I came across a recipe for rhubarb truffles that peeked my interest. After more research, I decided why not go right out on a limb and test my skills at making some rhubarb/rose Turkish delight. Actually, the end result was not bad. I have acquired a taste for the use of floral water in baking, Brion, not so much. It has to be used very sparingly or it becomes overpowering. I made three versions: Turkish delight plain or covered in white chocolate and a rhubarb truffle. A bit time consuming but a very unique flavor.
Print Recipe
Rhubarb/Rose Turkish Delights & Chocolates
Votes: 1
Rating: 5
You:
Rate this recipe!
Ingredients
Rhubarb/Rose Turkish Delight
Rhubarb Cream Cheese Truffles
Ingredients
Rhubarb/Rose Turkish Delight
Rhubarb Cream Cheese Truffles
|
Votes: 1
Rating: 5
You:
Rate this recipe!
|
Instructions
Rhubarb/Rose Turkish Delight
In a saucepan, put 1 1/4 cups water with sugar, rhubarb & lemon juice. Cook over low heat , stirring until sugar has dissolved, then increase the heat a little; simmer 5 minutes. Remove from heat; leave the rhubarb to infuse for 10 minutes, then pass through a sieve, reserving the juice & pulp separately (the pulp can be used in the truffles that follow).
Line a baking dish with cling film (the size will depend on how thick you want your candy) & set aside. In a small dish, blend cornstarch with remaining 1/4 cup water until smooth. In a saucepan, add rhubarb juice, gelatin powder, dissolved cornstarch & heat gently, stirring until gelatin has dissolved, then bring to a rolling boil.
Keep mixture at a steady rolling boil, stirring constantly, for about 12-14 minutes or until syrup reaches a soft ball stage. Cool slightly & then pour mixture into lined baking dish. Allow to cool at room temperature for about 12 hours or until the mixture is set; do not refrigerate.
Once the jelly is set, cut into pieces. Combine 1 Tbsp cornstarch with 2 Tbsp powdered sugar in a bowl, then roll the jellies in this mixture to coat them. Keep jellies in an airtight container in a cool place for up to 3 days; do not refrigerate. If you want to dip some of your jellies as I did, I found using a mini ice cube tray as a mold was helpful. I just set the piece of jelly in each cup & poured the white chocolate over & around it. Can be frozen until needed.
Rhubarb Cream Cheese Truffles
In a double boiler over medium heat, melt 55 grams of white chocolate chunks. Transfer to a bowl; add remaining ingredients EXCEPT milk chocolate & beat with an electric hand mixer until smooth. Cover & chill until solid enough to roll or scoop into balls.
Line a baking sheet with parchment paper. Melt milk chocolate. drop balls of rhubarb/cream cheese mixture, one at a time, into milk chocolate to coat. Carefully remove onto parchment paper & allow to harden. Can be frozen as well until needed.
-
Recipe Notes
- I also tried freezing the plain jellies without putting cornstarch/sugar mixture on them and it worked fine. They were actually nice tasting right out of the freezer.

It’s hard to think of Christmas without having shortbread. When I was growing up, fruitcake (or Christmas cake) and shortbread cookies were some of the staples associated with Christmas baking. Fruitcake has definitely become lost in the shuffle but it seems shortbread still remains. While the traditional shortbread consisted of three main ingredients — flour, sugar and butter, today it is flavored with any number of ingredients.
The first shortbread recipe appeared in a Scottish cookbook dated 1736. Early formulas called for yeast, but by 1850, most were utilizing only flour, sugar and butter combined in a ratio bakers still use today. Originally it started out as a twice-baked medieval bread roll that was dusted in sugar and allowed to harden. For a number of years, Scottish shortbread (biscuits) were classified as a bread by bakers so that they could avoid the tax placed on biscuits.
There are infinite variations on the classic version such as additions of nuts, alcohol, citrus zest, dried fruit, anise spice, floral water, chocolate, lemon curd, caramel or ganache.
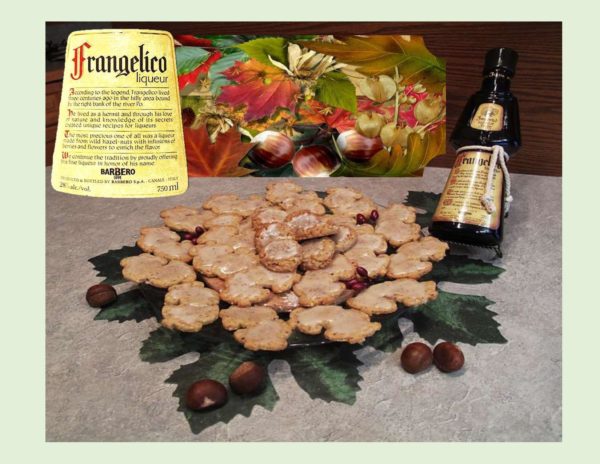
Some years ago, I started using a hazelnut liqueur in some of my Christmas baking. It adds a wonderful richness we really enjoy. My favorite is the Frangelico brand. It is distilled in the Piedmont region of northern Italy from an alcohol and water infusion of the nuts. Natural flavoring extracts such as cocoa and vanilla are added before blending with alcohol, sugar and water to meet the bottle strength. It’s origins go back over 300 years to the Christian monks who inhabited that area of Italy. The name Frangelico is derived from one of the monks, Fra. Angelico. The bottle itself, reflects this heritage, which looks like a glass monk complete with a rope belt. A bit pricey but if you are using it only for baking, the bottle lasts a long time.
This recipe was featured in a ‘Canadian Living’ magazine in December 2002. The perfect shortbread for the upcoming season.
Print Recipe
Hazelnut Liqueur Shortbread Cookies
Votes: 9
Rating: 3.67
You:
Rate this recipe!
|
|
Votes: 9
Rating: 3.67
You:
Rate this recipe!
|
Instructions
Shortbread
In a bowl, beat butter with sugar until light & fluffy followed by the liqueur & vanilla. Stir in cornstarch & salt. Next add flour, 1/3 at a time combining to make a smooth dough. Add nuts, then divide dough in half & chill until firm but not hard, about 30-60 minutes.
Roll out each disk of dough to a 1/4-inch thickness & chill again at least 30 minutes. Line a baking sheet with parchment paper. Cut into desired shapes, re-rolling scrapes. Place 1-inch apart on baking sheet; chill until firm, about 2 hours.
Preheat oven to 325 F. bake shortbread cookies for 15-20 minutes or until LIGHT golden. Remove from oven & place on cooking rack. Spread with glaze if desired.
Hazelnut Glaze
In a small bowl, whisk together powdered sugar, liqueur & 2 Tbsp water (adding more water if needed to make spreadable). Spread over shortbread cookies.

Definitely, roasted fruit is one of my favorite summer desserts. It becomes so intense when its been sizzling and caramelizing at a high temperature. Roasted strawberries are one fruit that can take any dish to the next level. Along with the fact that it will stain even the palest berries to a ruby red, the subtle use of aromatic ingredients like lemon, vanilla or rose water can breathe new life into your bland unripe berries. Another added bonus is that the seeds add a little crunch to the tender, supple structure of a roasted strawberry.
I wanted to make something quick and easy for dessert today. I just happened to have some strawberries on hand why not roast them. A while back I saw an idea on youtube.com with strawberries and of all things, the famous chocolate hazelnut spread, ‘Nutella’. I have to be honest, I have maybe only tasted it once or twice but what the heck! Of course, you guessed it, I would first want to read up on its history. You maybe know all this but—– It seems it all started with the same Italian family that gave us the glorious ‘Ferrero Rocher’ chocolates. Nutella was invented during WWII when the war had created a chocolate shortage.
In 1925, Italian chocolatier, Pietro Ferrero, perfected the so-called ‘pastone’ (pastry mesh) of chocolate and hazelnuts. The Piedmont region of Italy, which his family called home, is famed for its delicious and abundant hazelnuts. In 1946, he created pasta giandja (or giandujot) which was made in a small hard loaf or bar, wrapped in aluminum foil and could be sold at a cheaper price. This chocolate could be cut into slices to eat on bread which formed a big part of the diet at the time. In 1949, a spreadable version called supercrema gianduja was intoduced, which was later renamed ‘Nutella’ in 1964. The name gave the product international appeal. It said ‘nuts’ and it also said Italy — ‘ella’ being a common affectionate ending in Italian such as in mozzarella cheese, tagliatella (a form of pasta) or caramella (a sweet).
Fifty years on, the company is the number one user of hazelnuts worldwide. Interesting! OK, now on with the pastries.
Print Recipe
Roasted Strawberry & Hazelnut Pastries
Votes: 1
Rating: 5
You:
Rate this recipe!
|
|
Votes: 1
Rating: 5
You:
Rate this recipe!
|
Instructions
Roasted Strawberries
Preheat oven to 375 F. Slice off blossoms; leave small & medium berries whole, cutting largest ones in half. In a glass baking dish, toss with sugar, salt & lemon juice.
Roast, stirring once or twice, for about 30-40 minutes, long enough for the berry juices to thicken but not burn. Remove from oven; add vanilla & rose water. Set aside until ready to use.
Pastries
On parchment paper, lay out sheet of puff pastry. At one end of the pastry, spread hazelnut cream& top with cooled roasted strawberry 'jam'. Below the chocolate/strawberry mixture make 5 slices so you end up with six strips. Starting at top where the filling is, roll up pastry & join the two ends together to make a wreath.
Adjust oven to 400 F. Brush with egg wash , sprinkle with chopped hazelnuts. Lift wreath ON the parchment paper to baking sheet & bake for about 20 minutes or until golden brown.

Not a pie at all, traditional whoopie pies are two thin chocolate cakes sandwiched around a white frosting. The origin of the whoopie pie is somewhat controversial. Some people say they were invented in Medieval Germany and brought to the USA by immigrants. Women would bake cakes and use leftover batter and icing to make these special treats. The little cake sandwiches were placed in children’s lunch boxes, where upon discovering them, cries of ‘whoopie’ were shouted. From the basic chocolate and vanilla formula of the past, a whole host of varieties have since taken the stage.
I love the pastel shades of Spring and try to incorporate them into anything I can. When I was shopping the other day, I happened to see some little colorful French Macaron cookies in a bakery window. As great as they look, I personally have never cared for the ‘meringue’ type cookie. Nevertheless, it gave me some inspiration for some ‘spring’ whoopie pies. Adding a few new flavors to the chocolate and vanilla batters along with some flavored Mascarpone fillings takes whoopie pies (cookies) to a whole new level.
Print Recipe
'Spring" Whoopie Pies with Mascarpone Filling
Votes: 1
Rating: 5
You:
Rate this recipe!
Ingredients
Basic Vanilla Cookie Batter
MASCARPONE FILLINGS - Raspberry, Blueberry, Apricot & Strawberry Preserve
Ingredients
Basic Vanilla Cookie Batter
MASCARPONE FILLINGS - Raspberry, Blueberry, Apricot & Strawberry Preserve
|
Votes: 1
Rating: 5
You:
Rate this recipe!
|
Instructions
Preheat oven 350 F. Line baking sheets with parchment paper. In a large bowl, using an electric mixer, beat butter, sugar & vanilla until light & fluffy. Beat in egg. In another bowl, whisk together flour, baking soda & salt. Add flour mixture to butter mixture alternately with buttermilk.
In separate small bowls, divide vanilla batter into 4 equal portions. Leave one plain, to the second dish add pistachio nuts & a tiny bit of green food color gel. To the third dish add 2-3 Tbsp Chambord liqueur & red food coloring. To the fourth add lemon zest & yellow food color.
FOR CHOCOLATE BATTER: Follow directions in the first paragraph, adding cocoa along with flour mixture. Using a small scoop or heaped tablespoon, spoon mixtures onto baking sheet. Allow room for spreading. Bake for 10-12 minutes. DO NOT OVER BAKE. Remove from oven & transfer to wire rack.
While whoopies are baking prepare Mascarpone fillings. For every 60 grams of Mascarpone use 2-3 Tbsp of one of the preserve flavors.
When the whoopies are cold, match each with whoopie half with its closest partner size. Spread with a knife or use a piping bag to cover the flat side of one whoopie half of each pair generously with filling. Top each with its matching half, flat side down & gently press together.
Recipe Notes
- Another flavor you might enjoy is lemon curd which can be purchased in the preserve section of the grocery store.
- For chocolate filling, add a little cocoa powder & powdered sugar to some Mascarpone.
- For some of the vanilla whoopies, I made a Rosewater flavored filling with 1 tsp margarine, 60 gm Mascarpone, 3 Tbsp powdered sugar & 3/4 tsp rosewater.
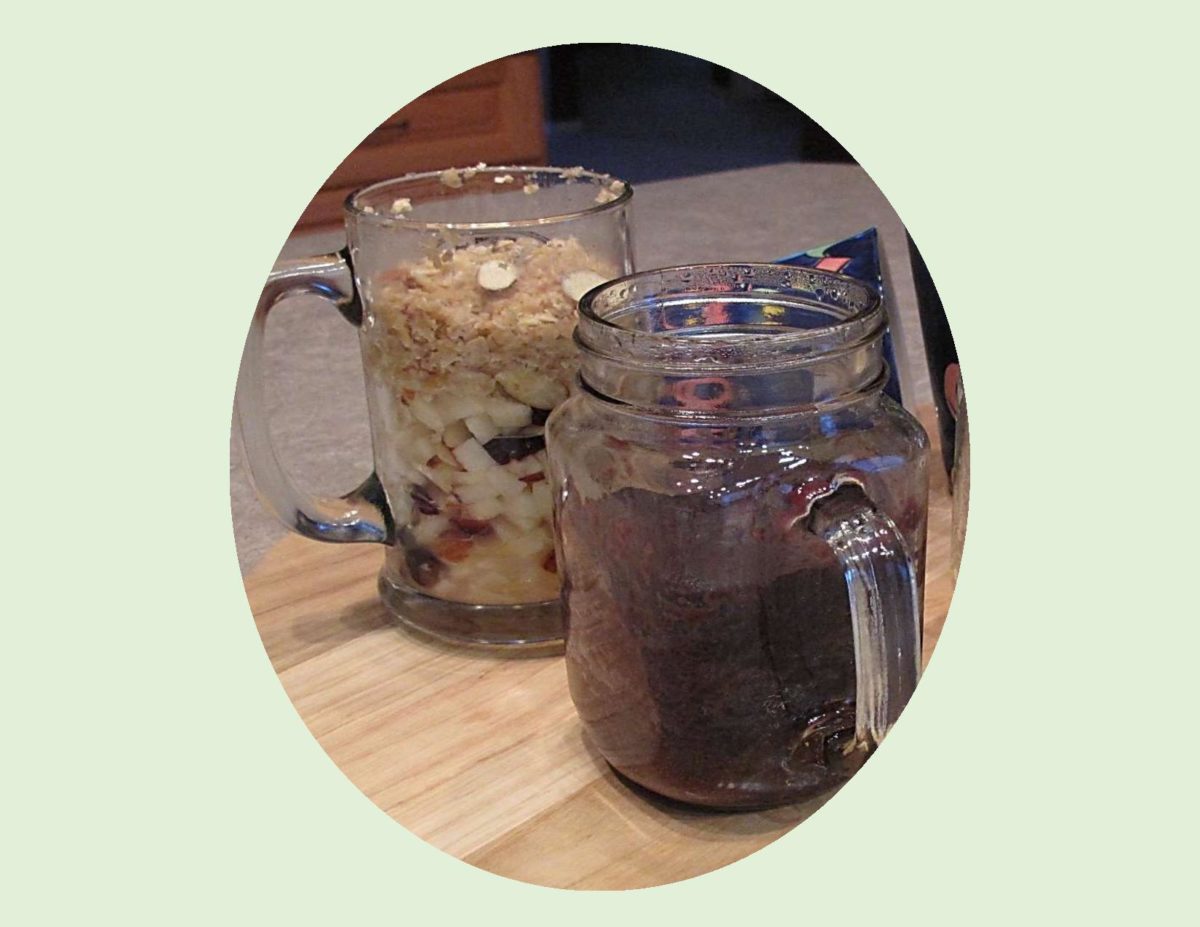
Mug cakes have been around for a while. We seem to like eating food out of mugs. Whether it’s a mug full of chili or just some cereal and milk, we like being able to hold our whole meal in our hands and enjoy it by the spoonful. Mug cakes have gained popularity not only because they are delicious, but because you can make them in five minutes. The technique uses a mug as the cooking vessel and takes just a few minutes to toss in the ingredients. It then goes into the microwave; as the butter in the mixture heats up, it creates air pockets that will cause the cake to quickly rise. The problem is that microwave baking is tricky and not every ‘cake-in-a-mug’ recipe you come across will work well.
I’ve tried a few with varying degrees of success. Nevertheless, they are a great way to satisfy an emergency homemade treat craving without even turning on the oven.
Here are some ideas you might like to try.
Print Recipe
Mug Crumble Cake/ Chocolate Mug Cake
Votes: 1
Rating: 5
You:
Rate this recipe!
|
|
Votes: 1
Rating: 5
You:
Rate this recipe!
|
Instructions
FRUIT CRUMBLE MUG CAKE
In a small bowl, combine apple with sugar & butter. Divide between 2 mugs. Cover each with plastic film & pierce several times. Cook in microwave for 1 minute at 800 watts or 50 seconds at 1000 watts. Add dried fruit & nuts & stir.
In a bowl, combine butter, brown sugar, oatmeal, flour & salt with your fingertips. Crumble on top of fruit in each mug. Microwave for 1 1/2 minutes at 800 watts or 1 minute 10 seconds at 1000 watts. Remove mugs from microwave & sprinkle with sliced almonds.
CHOCOLATE MUG CAKE
In a small bowl, combine dry ingredients. Add milk & oil; whisk together until smooth. Divide between 2 mugs & microwave on high for about 70 seconds. Remove from microwave. Cool a bit before eating.
Recipe Notes
- Be aware that success will depend on knowing how to adjust the cooking time according to YOUR microwave strength (watts). Be careful not to overcook your mug cakes.
- Each recipe should yield 2 mugs worth.


