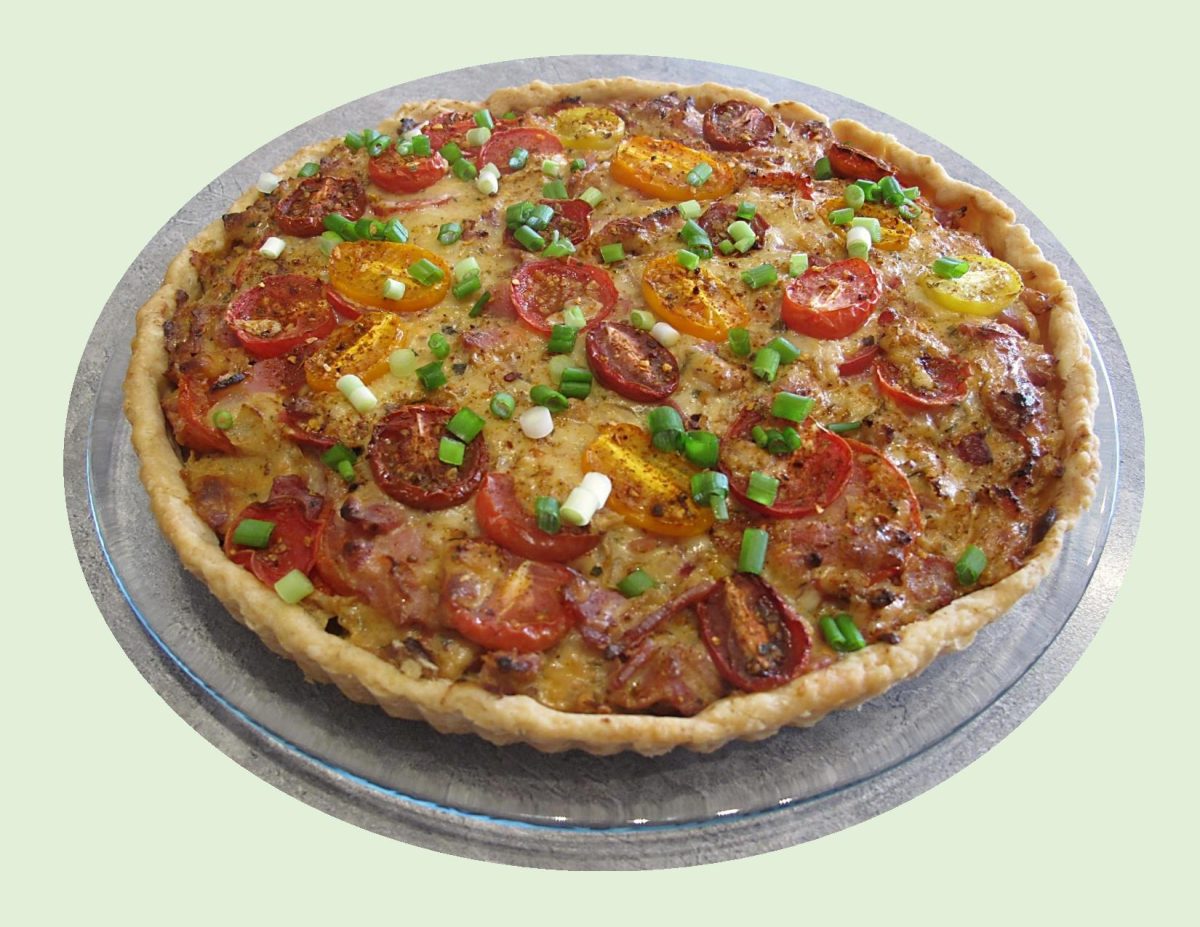
Savory Heirloom Tomato Tart

There’s something real special about using heirloom tomatoes as opposed to hybrid varieties. Heirloom tomatoes are ‘breed true’, meaning that the seeds can be saved to grow more of the same tomatoes year after year.  Generally, they are more expensive because they are not as prolific as hybrids, and they do not ship or store well.

The seeds from heirloom tomatoes (also called heritage tomatoes) have been selected over many years for desirable traits, such as size, color, and taste.  They are open-pollinated, meaning that bees, moths, birds, bats, wind, or rain pollinate the tomato flowers.

These days, many hybrid tomatoes are bred for traits such as high yield, disease resistance, and the ability to ship and store well.  This decreases costs for farmers and consumers and minimizes waste due to spoiled produce.

However, this cost savings and efficiency comes at the expense of flavor.  When you cross two tomato plants to make the offspring disease resistant or highly productive, you may also lose other traits, such as rich flavor.

This is exactly what has happened to many hybrid tomato varieties: they have lost some of the sugar and nutrient content that makes heirloom tomatoes taste sweeter and juicier. These little gems add such a special touch to this savory summer tart.

Print Recipe
Savory Heirloom Tomato Tart
Votes: 1
Rating: 5
You:
Rate this recipe!
Servings
Ingredients
Servings
Ingredients
Votes: 1
Rating: 5
You:
Rate this recipe!
Instructions
Filling
  1. Preheat oven to 400°F. Cut tomatoes into ½-inch-thick slices. Place about 7 or 8 slices (enough to cover top of pie) on a baking sheet lined with paper towels, and sprinkle with ¼ teaspoon of the salt. Cover with additional paper towels, and reserve.
  2. Arrange remaining tomatoes in a single layer on a lightly greased wire rack set on a large baking sheet. Sprinkle with ½ teaspoon of the salt. Bake in preheated oven until wilted and slightly dried out, 40 to 45 minutes. Cool completely, about 1 hour.
  3. Make Parmesan-Buttermilk Pie Crust. Instructions below.
  4. While pie crust cools, cook bacon in a skillet over medium-high until fat is beginning to render, 4 to 5 minutes. Add chopped shallots, and cook until bacon is crisp and shallots are caramelized, 6 to 7 more minutes. Stir in garlic; cook until fragrant, about 1 minute. Using a slotted spoon, transfer bacon mixture to a plate lined with paper towels to drain. Cool 20 minutes.
  5. Stir together cheese, ranch dressing, basil paste, chives, Dijon, and egg until combined. Sprinkle with pepper and remaining ¼ teaspoon salt & spices. Fold in bacon mixture.
  6. Gently spread a third of cheese mixture onto cooled Parmesan-Buttermilk Crust; layer with half of the roasted tomato slices in slightly overlapping pattern. Spread another third of cheese mixture on top of tomato slices. Repeat with remaining roasted tomato slices and cheese mixture. Top with reserved sliced fresh tomatoes, pressing filling gently into crust. Shield edges of pie with aluminum foil.
  7. Bake in preheated oven until filling is set, 40 to 45 minutes. Transfer to a wire rack, and let stand 1 hour before serving. Garnish with chopped green onion or chives.
Pastry
  1. Pulse flour, cheese, 1/2 teaspoon salt, and 1/4 teaspoon pepper in food processor until combined. Add butter and shortening. Pulse until butter and shortening are pea size pieces, about 5 times. Drizzle in buttermilk processing until dough begins to just come together. Gather and lightly knead dough into a ball on a large piece of plastic wrap; flatten into disk and wrap tightly. Chill at least 2 hours or up to 2 days.
  2. Preheat oven to 400°F. Roll dough on a floured surface into a 15- to 16-inch circle about 1/3 inch thick. Transfer to a 9-inch deep dish pie plate. Trim edges leaving a 1-inch overhang. Fold edges under and crimp. Freeze dough at least 20 minutes.
  3. Line piecrust with parchment paper, and fill with pie weights or dried beans. Bake at 400°F 20 minutes. Remove parchment and weights and bake until edges are golden and bottom of crust is set, about 8 more minutes. Cool completely, about 30 minutes.
Recipe Notes
  • Whether using store-bought or homemade dough, don't forget to blind-bake the crust (bake it a bit on its own) before adding the filling. This extra step will keep the crust from turning soggy as the pie bakes.
  • Another good pastry alternative would be one with cornmeal in it.

Roasted Tomato & Avocado Eggs Benedict

Eggs Benedict has been around for a long time. As with many dishes, there is always something that makes you want to take the classic combination to a new level which is equally delicious. Here are a few examples:

  • Classic Eggs Benedict: This brunch staple is typically composed of an English muffin, breakfast meat, a poached egg and Hollandaise sauce. 
  • Eggs Florentine: In this recipe, the Canadian bacon gets replaced by creamy spinach simmered in butter.
  • Eggs Royale: for royale, the Canadian bacon gets replaced by smoked salmon. This dish with the seafood twist is quite popular in the UK, Canada, and New Zealand.
  • Eggs Sardou: Try replacing your Canadian bacon with the delicious, buttered spinach, slow-cooked artichoke, and anchovies.  
  • Eggs Neptune: Canadian bacon gets replaced by fresh crab meat.
  • Eggs Cochon: To make this, replace the Canadian bacon with pork meat and the classic English muffin with buttermilk ‘biscuit’ to enhance the flavors. 
  • Eggs Tomato Avocado: Slow roasted tomatoes with sliced avocado.

I’m sure people will be eating eggs benedict forever. It will never go out of vogue. Eggs benedict is a dish that is here to stay for a long time. My choice today is with roasted tomato & avocado since Brion & I are avocado lovers. Of course, a little bit of bacon on the side wouldn’t hurt either!

Print Recipe
Roasted Tomato & Avocado Eggs Benedict
Instructions
Avocado Butter
  1. In a food processor, puree avocados, oil, lime juice, water & mustard. Cover & blend until smooth. Transfer to a small bowl & stir in cilantro paste & salt & pepper to taste. Cover & refrigerate until ready to use.
Roasted Tomatoes/Poached Eggs
  1. Preheat oven to 350 F.
  2. For Tomatoes: Line a baking sheet with foil. In a small bowl, combine a bit of Italian dressing with cherry tomatoes. Pour onto baking sheet and pull foil slightly up around them. Roast until they are starting to burst. Remove from oven & keep warm.
  3. For the poached eggs: For easier clean-up, grease each muffin cup. Then add 1 tablespoon water to each muffin cup–even if you are NOT making a full batch. Adding water to the empty muffins cups will help the pan not scorch in the oven.
  4. Crack one egg into each muffin cup.
  5. Bake for 11-13 minutes. 11 minutes, the yolk is very runny and egg whites are just about set; 13 minutes, the yolk is runny, but beginning to set around edges and egg whites are completely set.
  6. Using a spoon, gently scoop out the poached eggs at an angle, allowing the water to drain off the poached egg.
English Muffins
  1. Slice English muffins & toast. When toasted spread each piece with 'avocado butter'.
Serving
  1. Place 2 buttered English muffin halves on each of 6 serving plates. Divide roasted tomatoes between them. Lay sliced avocado on all 12 pieces. Top each muffin half with a poached egg then spoon more avocado butter on top. Sprinkle with fresh chives & serve immediately.

Turkey Prosciutto Wellington

HAPPY THANKSGIVING!

For the last 65 years, Canada has celebrated Thanksgiving Day on the second Monday in October. It’s one of those holidays that tend to bring families together, both physically and emotionally. Unfortunately, though, in this highly technological age, it seems as if we have become more connected digitally than emotionally.

The thing about fall is that it gives us a different perspective, it represents a time of change. As nature bursts with its fabulous fall foliage, it gives us a little bit of extra time to make the most of what we have left in this year before the grand finale. The word ‘thanksgiving‘ itself, makes one pause and ask, what am I thankful for this year?

Some time ago, I read an article that was posted on Facebook by Larry McDaniel. When things are verbalized it seems to make them unmistakably clear. I want to re-post this article as I thought it is certainly worth reading and giving some serious thought to.

So today I stopped and filled up my car and I was thankful.

Thankful that I have a car, thankful I have money to buy gas,

Thankful that there are no war planes flying over me,

Thankful that I will be eating soon,

Thankful that all my loved ones are safe and sound,

Thankful that I live in a country where I have freedom to do so many things,

Thankful that the air I breathe is not filled with smoke and gun powder,

Thankful that I will sleep in silence and wake up to a beautiful day.

I think its time that we all be a lot more thankful and definitely more grateful!!

Enjoy your Thanksgiving however you choose to celebrate it.

Print Recipe
Turkey Prosciutto Wellington
Instructions
  1. Preheat oven to 375 F.
  2. In a skillet, melt butter. Add leeks and mushrooms and sauté on medium high heat until leeks become tender, about 5-7 minutes. Add broth and stuffing mix. Mix well & remove from heat. Allow to cool to room temperature.
  3. Roll out puff pastry to a rectangle large enough to cover turkey breast. If two sheets are required, brush water or egg wash on one short edge of pastry and press edge of second sheet onto the first sheet. Press gently until seam is sealed.
  4. When stuffing is cool, cover pastry with stuffing, leaving a one-inch edge all the way around. Cover the stuffing layer with prosciutto. Brush turkey with mustard, then lay turkey just to right side of the center.
  5. Bring right side edge up & over the top of the turkey breast. Repeat with the left side. You should trim any excess dough before sealing so it won't be too thick.
  6. Mix beaten egg with a Tbsp of water & brush edges of pastry to seal. Tuck the ends of the dough around the turkey breast & over each other to seal.
  7. Place the turkey, seam side down, on a parchment covered baking sheet. Cut slits in the top of the dough to vent steam. Brush entire pastry with egg wash.
  8. Tent a piece of foil over the top & bake for about 30 minutes. Remove foil & continue baking until the crust is golden for about 20-30 minutes, depending on size of turkey breast. The internal temperature should reach 165 F.
  9. Remove from oven and allow to rest for 5-10 minutes before slicing. Top with cranberry sauce and serve.