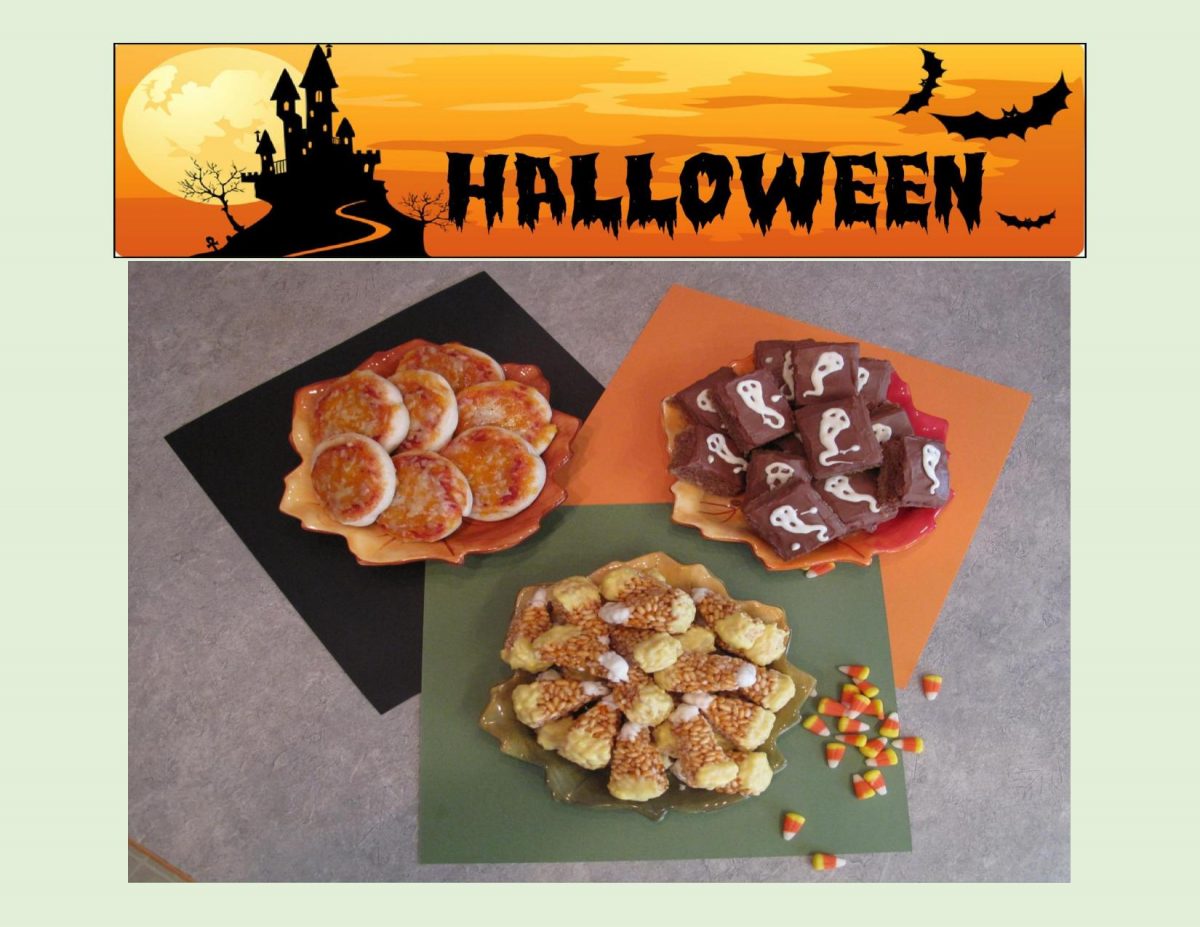
Well here we are, the end of October already, and Halloween has arrived. A number of years ago, Brion and I decided to take a different approach to this occasion. Rather than spending the evening running to the door to hand out treats, I would make some special goodies for our immediate neighbor’s ‘kids’. We have been lucky to have had the same neighbors for many years. Since food is my passion, its always fun to ‘create’ something that I think our four ‘young’ people will enjoy.
My choice of treats this year are brownie ghosts, krispie candy corn and some bite size pizzas. Most kids love chocolate so I think brownies will cover that and I swapped out the ‘waxy’ candy for rice krispies in the candy corn treats. Pizza bites aren’t exactly following the Halloween theme but the kids are getting older and I’m sure they will love them anyway.
Just an interesting little side note on the actual candy corn ‘candy’ since they seem to be synonymous with Halloween. Originally they were never tied to any time of year. Many candies of the day were molded into what was recognizable to regular folks. At the time, that was vegetables, fruits and other simple, earthy things.
When the Goelitz Confectionery Company first produced candy corn, it was called ‘chicken feed’. The boxes were illustrated with a colorful rooster logo and a tag line that read: ‘Something Worth Crowing For’. The multi-colored design was ground-breaking in the candy industry at the time it was invented. One of candy corn’s least favored qualities is that waxy texture. Strangely enough, even after more than 120 years, it still has a huge following as well as many other candy corn related and/or flavored recipes on the market.
ENJOY YOUR HALLOWEEN IN WHATEVER WAY WORKS FOR YOU!
Print Recipe
Brownie Ghosts - 'Krispie' Candy Corn - Pizza Pinwheels
Votes: 1
Rating: 5
You:
Rate this recipe!
Ingredients
Chocolate Dipped Candy Corn Treats
Ingredients
Chocolate Dipped Candy Corn Treats
|
Votes: 1
Rating: 5
You:
Rate this recipe!
|
Instructions
Bottom Layer of Brownies
Preheat oven to 350 F. Line a 9 X 9-inch baking pan with parchment paper. Combine all bottom layer ingredients until crumbly. Pat into pan & bake for 10 minutes.
Middle Layer of Brownies
In the microwave, very carefully melt chocolate (do NOT overheat) & add butter. Stir until combined & slightly cool; add beaten egg & sugar. In a small bowl, combine flour, baking powder & salt. Add to chocolate mixture alternately with combined milk & vanilla. Fold in walnuts. Carefully spread batter over bottom layer. Bake for 20-25 minutes; do not OVER BAKE. Remove from oven & cool. Slice into 20 squares.
Fudge Frosting
If you prefer to make your chocolate ghosts BEFORE the frosting, it will give them ample time to set before needed. TO MAKE FROSTING: Carefully melt chocolate & butter in microwave. Cool slightly; stir in powdered sugar & vanilla. Blend in hot water & beat until a smooth consistency. Spread icing evenly over brownies & decorate with a white chocolate ghosts.
White Chocolate Ghosts
Carefully melt white chocolate wafers in microwave. Pour melted chocolate into a piping bag fitted with a small hole tip. Place a large piece of waxed paper on a flat surface with a printout of ghost shapes underneath. Trace outline, then fill in the center. Allow to set completely, then peel ghosts from waxed paper & press lightly on top of brownies.
Chocolate Dipped Candy Corn Treats
Butter 2 round 5-inch baking pans. In a large pot over medium heat, melt butter. Add marshmallows & stir constantly until they are melted. Stir in a few drops of orange coloring & remove the pot from heat. Add rice krispies, being sure to stir until well coated. Press into prepared pans to set. Once treats have set, cut them into triangles & use your hand to gently round the corners for a more realistic look.
Melt candy coatings in separate dishes. Lay out a sheet of parchment paper. Dip the base of each triangle into the yellow chocolate, shaking off excess, then dip the tips into the white chocolate. Place them onto the parchment paper. Once the chocolate has set, you can store the treats at room temperature in an airtight container for up to three days. Yield 30 treats.
Mini Pizza Pinwheels
Preheat oven to 350 F. Line a large baking sheet with parchment paper. set aside.
Grate cheeses & combine in a small dish. Remove dough from packaging but DO NOT unroll. Slice each roll into 12 disks & space out on parchment paper. Using a 1/4 cup dry measure, (make sure you lightly butter & flour the bottom of your measure or it will stick to the dough). Press down the little disks to form a cavity. Divide the pizza sauce & grated cheese between the 24 disks.
Bake 10-12 minutes; remove from oven & cool on a wire rack.
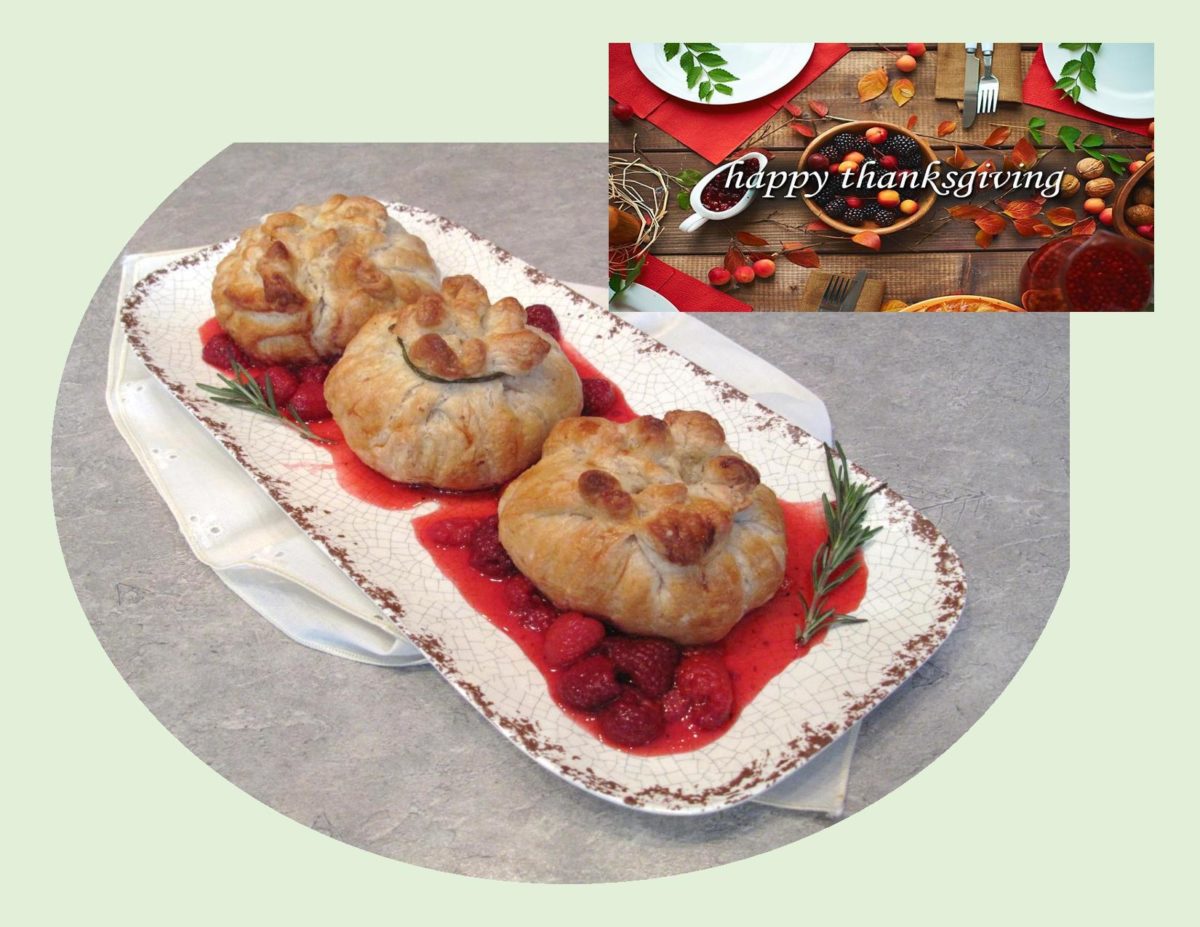
HAPPY THANKSGIVING!
Thanksgiving represents many things to me. I have wonderful memories of growing up on the farm and all the hustle and bustle of harvest time before winter came. Of watching the Autumn landscape transforming into a beautiful tapestry of reds, gold and yellows.
As the fall comes in, the days grow shorter and the mornings darker, we start to reflect on the year we have had with its inevitable highs and lows. The Autumn season gives us a little bit of extra time to make the most of what we have left in the year before the ‘grand finale’. It is so important to just take the time to be grateful and appreciate the blessings we are fortunate to have in our lives and make every day count.
Since turkey is usually our Christmas meal, I’m making some chicken breast with pears and Gorgonzola cheese ‘bundled’ in puff pastry for our Thanksgiving dinner today.
Print Recipe
Chicken & Pear Bundles
Votes: 1
Rating: 5
You:
Rate this recipe!
|
|
Votes: 1
Rating: 5
You:
Rate this recipe!
|
Instructions
Raspberry Coulis
In a small bowl, combine coulis ingredients well & set aside.
Chicken & Filling
Peel, core & chop pear. Chop walnuts & crumble cheese. Slice breasts in about 1/4-inch thickness; sprinkle with salt & pepper.
On parchment paper, roll thawed puff pastry to about 1/8-inch thickness. Cut 4 circles large enough to fit custard cups & have extra on top to gather & tie. Using the custard cup only as a form, place a circle of pastry in each. Line the pastry with thin sliced chicken breast, then sprinkle some walnuts & cheese in the bottom. Add some pear pieces, cheese, more walnuts. Top with another piece of chicken, cut to fit. Bring sides of pastry together in the center on top, pinch then tie with a chive green if you wish.
Preheat oven to 375 F. Line a baking sheet with parchment paper. In a cup, beat together egg wash. Lift bundles out of custard cups & place on baking sheet. Lightly brush egg wash over each bundle. Bake about 30-40 minutes or until pastry is puffed & golden & chicken is done (I sliced into one of the bundles just enough to see if the chicken was cooked).
Slightly warm coulis in microwave & pour some on the serving platter. Carefully lay bundles on top & garnish with fresh herbs if you wish.
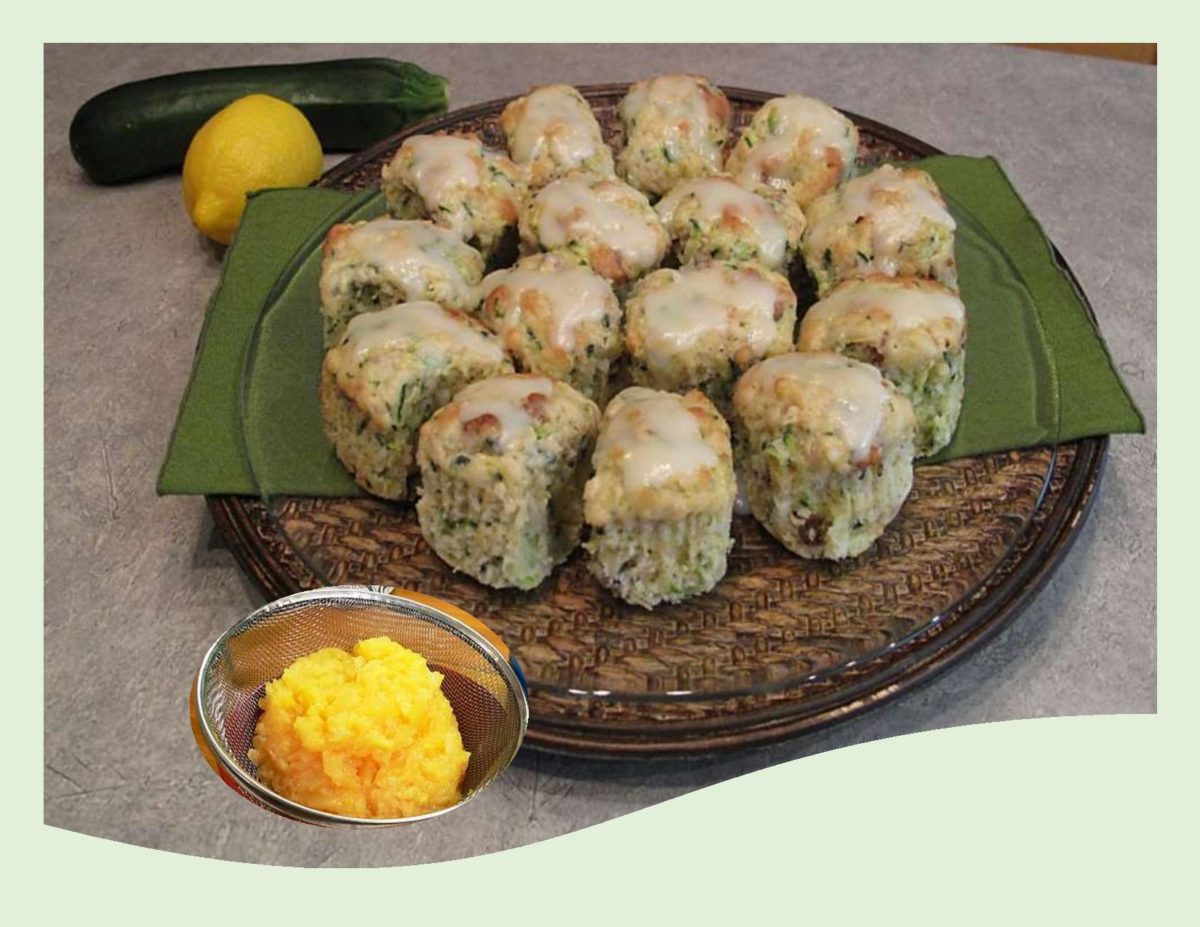
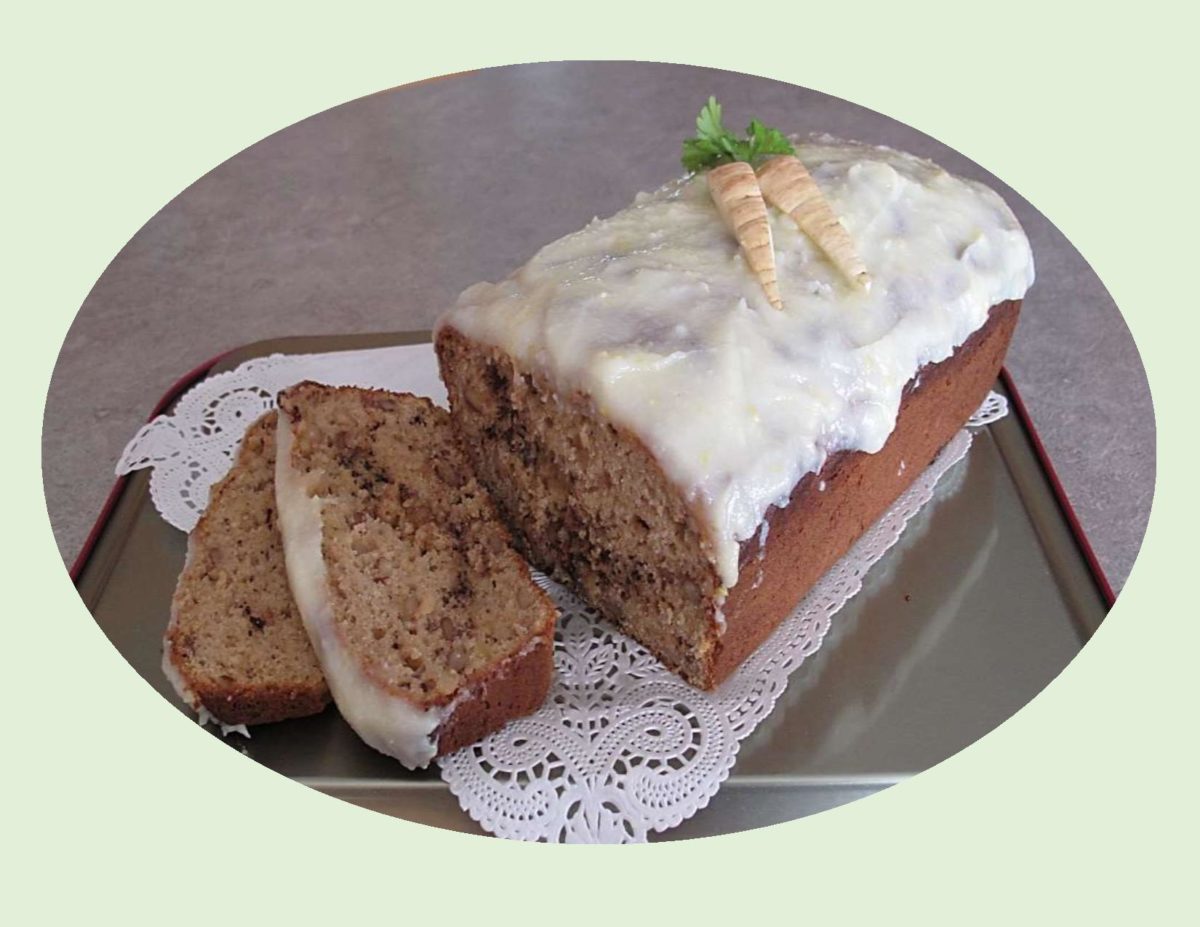
Created on the island of Jamaica, hummingbird cake was named after the islands national bird, the Red-billed Streamer-tail. These birds are members of the hummingbird family and are only found in Jamaica.
The cake typically has two or three layers with pecans, bananas, crushed pineapple, cinnamon and a cream cheese frosting. Most probably both cake and its name originated as a Jamaican marketing ploy. After Air Jamaica was established in October 1968, the new company chose this beloved hummingbird as its logo. Shortly thereafter, the Jamaica Tourist Board distributed ‘press kits’ to the foreign media. They showcased various ‘local’ dishes, focusing on American consumers, and was intended to attract American visitors to the island.
There are several theories about the origin of the cake’s name. One is that the cake is so delicious it makes you hum with happiness while another is that it is sweet enough for hummingbirds. Yet another theory is that people hover around the cake similar to the way hummingbirds hover around flowers. Foodtimeline.org notes that perhaps it was named after the way the cake draws people in and is eaten quickly similar to the eating pattern of those energetic little fliers.
Unlike traditional banana cakes, the bananas in hummingbird cake are usually left in pieces rather than mashed, providing texture and bursts of flavor along with the pineapple and nuts.
I am making an adaption of the hummingbird cake but using zucchini instead of bananas and drizzling it with a lemon glaze. I’ve also noticed a few other variations that sound real good. One was with grated sweet potato and roasted bananas as well as a rhubarb one — Yum!
Print Recipe
Zucchini 'Hummingbird' Squares with Lemon Drizzle
Votes: 2
Rating: 4.5
You:
Rate this recipe!
|
|
Votes: 2
Rating: 4.5
You:
Rate this recipe!
|
Instructions
Cake Batter
-
Shred zucchini into a bowl & add 2 Tbsp sugar; stir to combine. Scrape zucchini into a mesh strainer, set over bowl, allowing zucchini to drain for about half an hour. Press to squeeze out excess juice, then place mixture onto paper towels & squeeze to get out as much moisture as you can.
-
Preheat oven to 350 F. Butter & flour a loaf pan ( or mini squares pan); set aside. In a large bowl, whisk together flour, baking powder, baking soda & salt. Toss in walnuts & candied peel. Set aside.
-
In a medium bowl, stir together the remaining sugar, eggs, yogurt, butter, lemon juice, vanilla, drained pineapple & zucchini. Fold the wet mixture into dry ingredients, just until moistened. Scrape the batter into loaf pan, making sure to smooth the top of batter.
-
Bake for about 50-55 minutes for loaf (25-30 for minis), or until batter tests done when toothpick inserted comes out clean. Allow the loaf to cool slightly before drizzling with glaze.
Lemon Drizzle
-
In a bowl, combine powdered sugar & lemon juice, mixing until smooth. Spoon over warm squares allowing drizzle to set up before (cutting &) serving.
-

Today, December 21st, a very special member of our family is having his 15th birthday. He is ‘our’ little mini German Dachshund with the cute name of ‘Amigo’. My sister Loretta, adopted Amigo when he was only two months old so needless to say, their hearts have been well secured together.
Brion & I have had the incredible pleasure of being able to share in his life as well. On different occasions he stayed with us while Loretta had to attend to other things. It would usually take a bit of time at first for him to accept the idea she was gone temporarily. Then we would become part of his ‘pack’.
When I was growing up on the farm we had a Collie. I loved that dog but being a farm dog living outdoors, your interactions were only when you were out of the house. Until we cared for Amigo, I just had no idea what a privilege it is to be loved by a dog. Dachshunds are such a special breed. Amigo has left an imprint on my heart that will remain forever with me. Whenever Amigo is present, he brings such happiness and the perspective to enjoy the moment along with a dogs’ uncanny ability to understand humans and give so much unconditional love. We humans really need to learn some of these virtues.
As we watch him growing older, I find it so unfair that animals give so much and yet they still have to suffer the aches and pains of old age the same as humans. It seems they should be spared this ordeal.
Amigo is definitely a great source of pleasure to Loretta and I am truly grateful their lives were connected so long ago.
Two of Amigos favorite foods have always been cheese and chicken. Although he isn’t going to be having any, I’m putting a chicken meal on my blog today in honor of his birthday.
HAPPY BIRTHDAY, AMIGO!
Print Recipe
Cranberry-Gruyere Stuffed Chicken Breasts
Chicken breasts go from ordinary to extraordinary when filled with tart cranberries and Gruyere cheese.
Votes: 1
Rating: 5
You:
Rate this recipe!
|
|
Votes: 1
Rating: 5
You:
Rate this recipe!
|
Instructions
Chicken & Stuffing
Flatten chicken breast to a 1/4-inch thickness. In a small bowl, combine cheese & cranberries. Divide cheese mixture between breasts; roll up & secure with toothpicks.
Breading
In a food processor, place walnuts & parsley; cover & process until ground but not over processed. Transfer to a shallow bowl; stir in bread crumbs, salt & pepper. In another shallow bowl, combine eggs & mustard. Place flour in a third shallow bowl. Coat chicken with flour, then dip in egg mixture & coat with walnut mixture.
Preheat oven to 350 F. Line a baking sheet with greased foil paper. Place breasts seam side down & bake for 35-40 minutes or until thermometer reads 170 F. Remove from oven; discard toothpicks & serve. This is real nice served with couscous & a veggie.
-
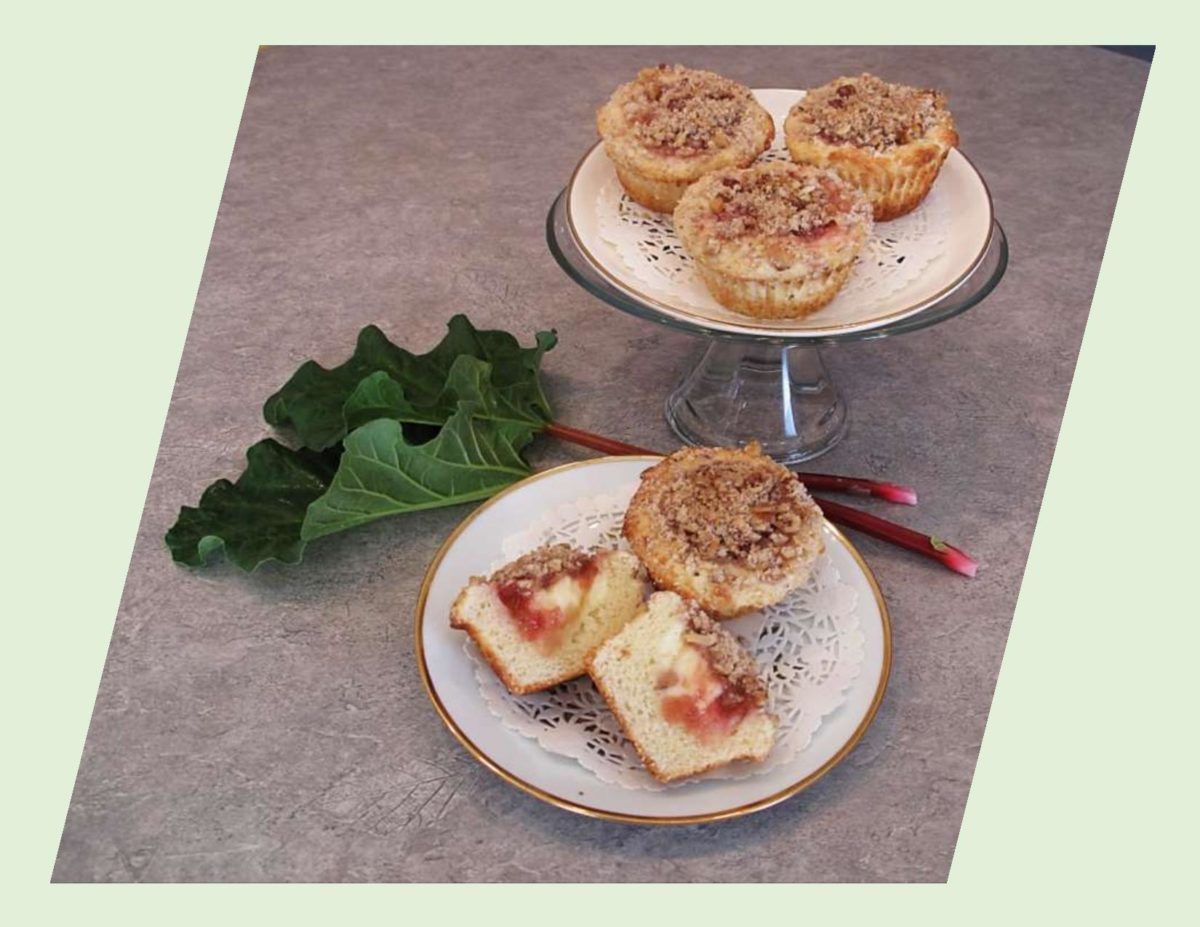
As usual, I can’t get enough of using rhubarb throughout its growing season. This year we started three new plants as our older ones are producing less and less. I think they are probably just becoming to shaded so we put the new ones in a great little spot on the south side of the garage.
Rhubarb’s awkward positioning between fruit and vegetable, sweet and tart, is a topic that’s constantly debated. It resembles sticks of celery dressed in their best pink Sunday attire, blushing from the first few washes of early sun peaking through its dense foliage after winter hibernation underground.
Pie remains the most common use for rhubarb, so much that older cookbooks called it the ‘pie plant’. While it generally is treated as a fruit, it has also been used as a savory ingredient, frequently paired with meats, cheese, stuffings, sauces and much more.
This is one of my favorite ‘sweet’ recipes from quite a few years ago. It has it all — rhubarb, cream cheese & streusal!
Print Recipe
Rhubarb Cheesecake Muffins
Votes: 2
Rating: 4.5
You:
Rate this recipe!
|
|
Votes: 2
Rating: 4.5
You:
Rate this recipe!
|
Instructions
Stewed Rhubarb
In a small saucepan, combine rhubarb, sugar & lemon slice. Bring to a boil, stirring until sugar melts. Reduce heat & simmer about 10-12 minutes or until thickened & reduced to about 1/2 cup. Allow to cool.
Batter
In a large bowl, combine flour & sugar. with a pastry blender, cut in butter to resemble coarse crumbs. In a small dish, measure 1 cup of the flour mixture & add walnuts & cinnamon. Set aside. To remaining flour mixture add baking powder, baking soda & salt. Set aside. In a third bowl, combine sour cream, vanilla & beaten egg.
Cream Cheese Filling
In a small bowl, beat together cream cheese, 1/4 sugar, egg & lemon zest. Fold in stewed rhubarb.
Assembly
Preheat oven to 350 F. Line a 12-cup muffin pan with paper cups. Stir SOUR CREAM mixture into FLOUR/BAKING POWDER mixture until just blended. Do not over mix! Spread this batter evenly over bottom & up the sides of each paper cup. Place a spoonful of FILLING MIXTURE in center of each, then top with WALNUT MIXTURE & bake 12-15 minutes or until muffins test done when a toothpick inserted comes out clean.
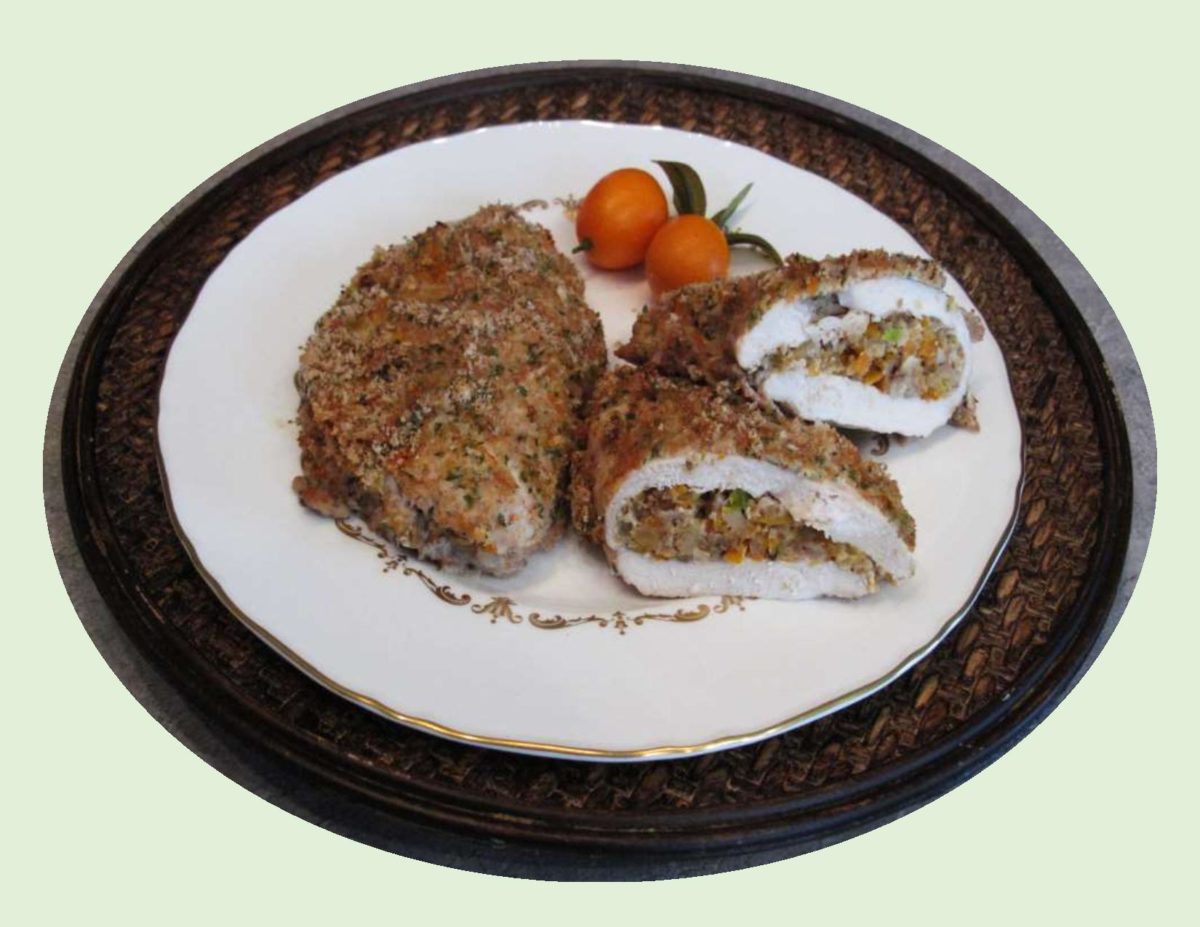
Kumquats are believed to have originated in China with their earliest historical mention being around the 12th century. Orange in color, this small bite-sized fruit can be eaten skin and all. The peel is the sweetest part of the fruit and the sourness comes from the pulp, seeds and juice.
Unlike it’s citrus kin, kumquats are able to withstand low temperatures and frost. A small evergreen shrub that can also be hydrophytic, which means they can grow in aquatic environments, and the fruits will drift towards the shore during harvest season. Kumquats are in season January thru April.
Commonly cultivated in Asia, the Middle East, parts of Europe and the southern United States. They can be used in every imaginable combination including pies, cookies, smoothies, ice cream, marmalade, marinades, salsa and vinaigrette. My choice today is in a stuffing for chicken breast. The combination of kumquats and orange tastes very unique.
Print Recipe
Kumquat & Walnut Stuffed Chicken Breast
Votes: 1
Rating: 5
You:
Rate this recipe!
|
|
Votes: 1
Rating: 5
You:
Rate this recipe!
|
Instructions
Wash & chop kumquats (do not peel). In a small bowl, combine with walnuts, onion & pepper.
Between two pieces of plastic wrap, pound chicken breasts to an even thickness. Spoon half of the filling on each breast. Fold over to encase filling; secure with picks if necessary. Preheat oven to 350 F.
Set out 3 shallow dishes. In one combine bread crumbs, orange zest & parsley; fill another with orange juice & in third beat the egg with water. Dip each stuffed breast carefully in orange juice, then in bread crumb mixture to coat, then in beaten egg & again in bread crumbs. Place coated breasts, seam side down, on a lightly buttered baking pan. Drizzle with melted butter.
Bake, covered, 30 minutes. Uncover & bake 10 more minutes or until chicken is cooked through.
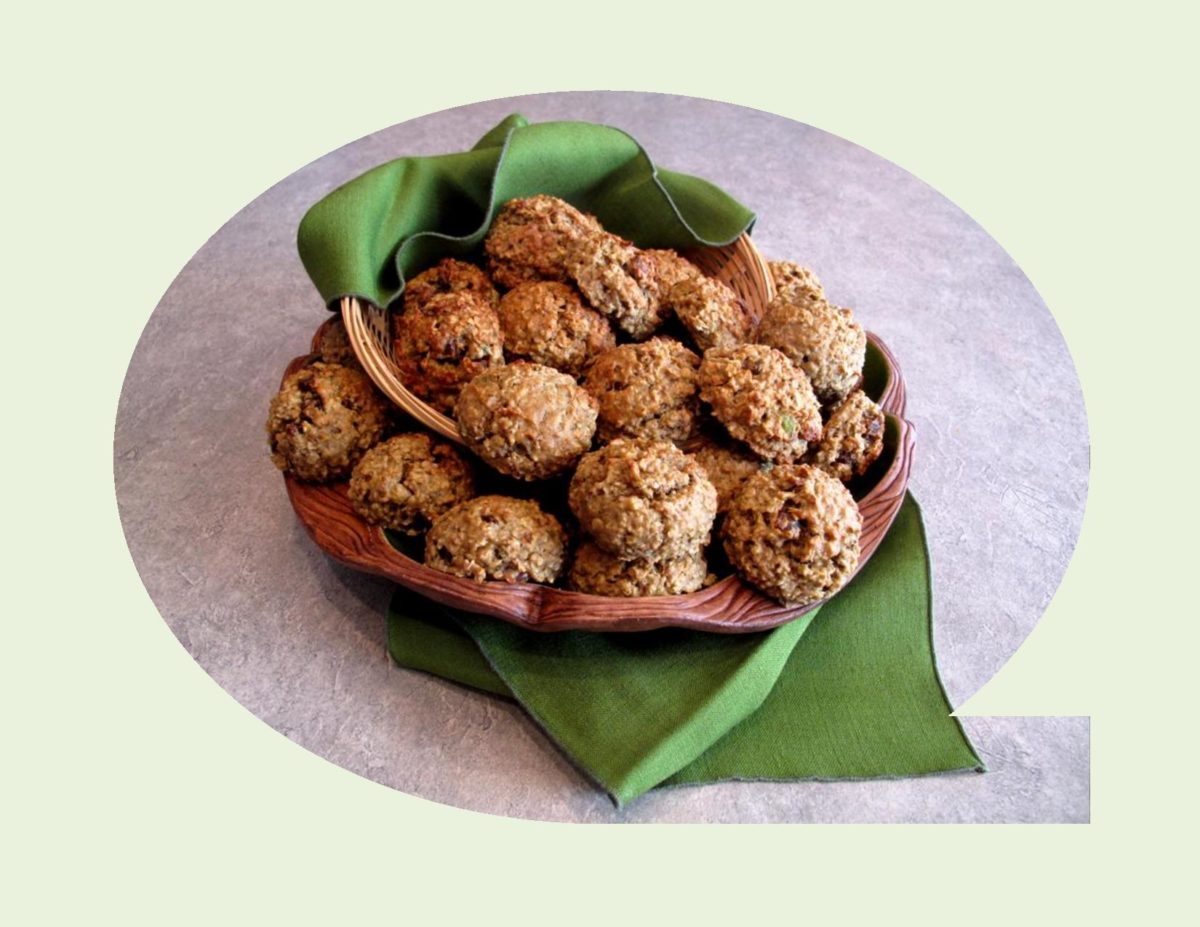
Most all muffin, scone and cake recipes will work just as well using mashed avocado as a substitute for butter. When they are pureed, avocados take on the texture of softened butter, which makes them easy to incorporate into the batter.
It’s hard not to love using avocados since they are the ‘good kind of fat’. To work out how much avocado you need in a recipe, simply halve the amount of butter that is called for in the recipe. The calorie difference is huge. For example, 250 grams of butter contains 1750 calories (or more), where as 125 grams of avocado ‘butter’ only adds 200 calories.
Avocados have a mild, fresh, slightly sweet flavor which allows them to pair well with other ingredients. The combination of avocado, oatmeal, cinnamon, dates & walnuts give these scones a unique flavor that gets only better after a day or two.
A while back I noticed that you can buy frozen avocado chunks at the grocery store. They come in a 400 gram bag. What a great idea instead of having to buy them and wait until they ripen. Ready when you need them!
Print Recipe
Avocado Oatmeal Scones
Votes: 3
Rating: 4.67
You:
Rate this recipe!
|
|
Votes: 3
Rating: 4.67
You:
Rate this recipe!
|
Instructions
Preheat oven to 375 F. Line baking sheet with parchment paper.
In a medium bowl, combine oatmeal, flour, baking powder, baking soda, cinnamon & salt. In a large bowl, cream together oil, avocado & brown sugar; stir in yogurt & eggs. Add oat mixture to avocado mixture & stir until combine. Fold in dates & walnuts.
Using a scoop, transfer the mixture onto lined baking sheet, spacing scones 2 inches apart. Bake 18-20 minutes or until golden brown. Transfer to wire racks to cool completely.
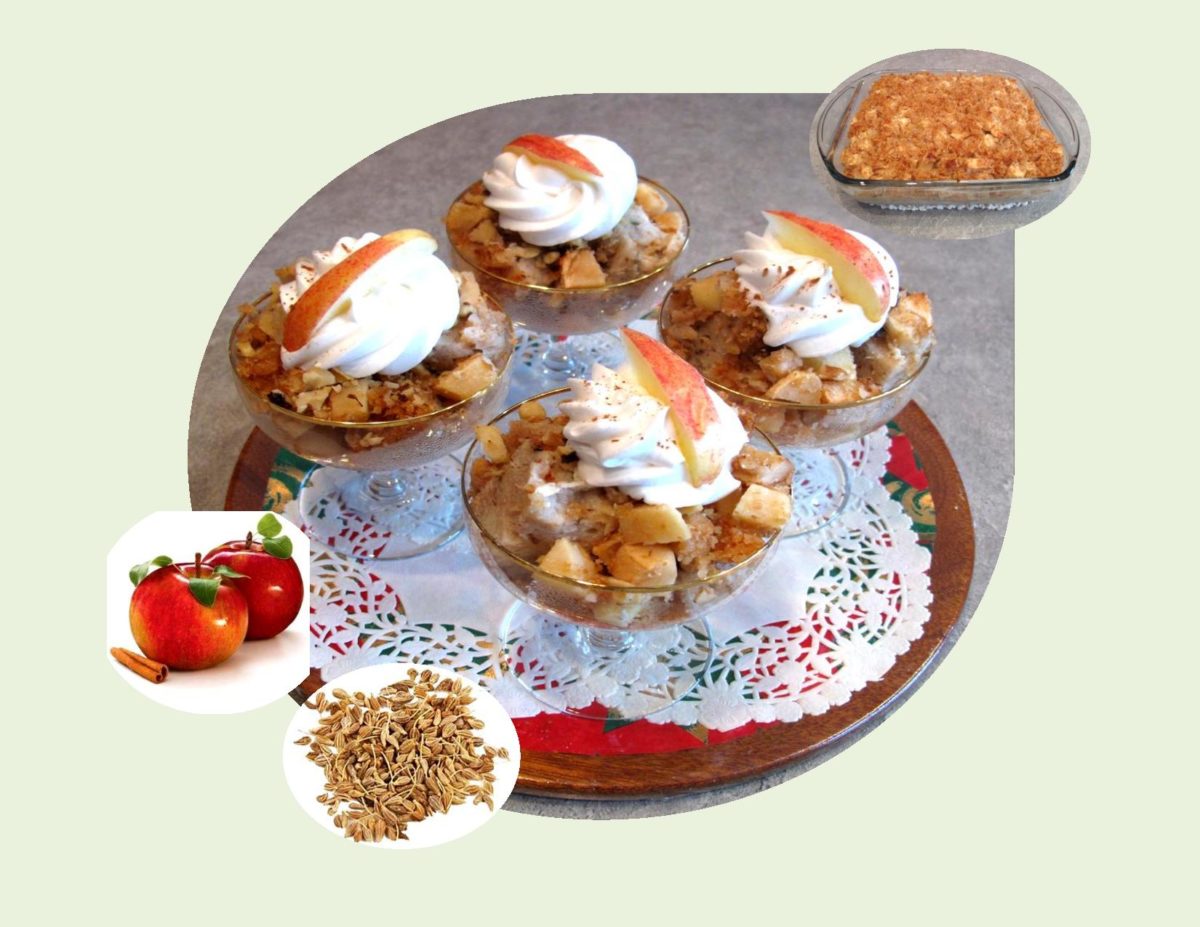
Bread pudding always gives me reason to remember good things. Why is it so beloved, aside from the extreme comfort food factor? It’s not that the dish was invented here — that honor likely goes to clever medieval or even ancient cooks in Europe and the Middle East who had a surplus of stale bread on their hands. The perfect embodiment of the virtues of frugality and indulgence: day old bread, too precious to waste, is bathed in a mixture of milk and eggs and made into either a sweet or savory bread pudding (with a few other additions) and baked into something sublime.
In 2015, ‘The Taste of a Memory’, a memorabilia/cookbook I wrote as a tribute to my wonderful parents, was published. It contained a compilation of stories, articles, recipes and reflections that evoke an intimate memory, special time period and fond emotion brought about by the aroma and taste of food. Writing them down not only puts them in print but allowed me to take a mental journey back to a gentler time. Hopefully this book will be enjoyed by future generations or just anyone choosing to read it. As with my other book endeavors, Brion’s strong support and technical savvy were invaluable.
For today’s blog, I chose a recipe from the book called APPLE-ANISE BREAD PUDDING. The licorice flavor of anise is one we both enjoy.
Anise seed is native to the Mediterranean basin and has been used throughout history in both sweet and savory applications. Anise seeds are not botanically related to star anise, but have nearly identical flavors and in ground form can be substituted for each other. For most part, Europeans use anise in cakes, cookies and sweet breads where as the Middle East uses it in soups and stews.
I don’t particularly recall my mother using anise in her cooking or baking but for my sister Loretta and I, it’s definitely one of our favorite flavors. I hope you enjoy this bread pudding recipe.
Print Recipe
Apple-Anise Bread Pudding
Votes: 1
Rating: 5
You:
Rate this recipe!
|
|
Votes: 1
Rating: 5
You:
Rate this recipe!
|
Instructions
Preheat oven to 350 F. Pulse bread CRUSTS ONLY in a food processor to make bread crumbs. Reserve 1 cup for the topping. Butter an 8 x 8-inch baking dish & coat with 1-2 Tbsp of the remaining bread crumbs.
With a mixer, beat eggs & then add the sugar. Mix in anise seeds, cinnamon, vanilla & milk until combined. Pour into a large bowl & add bread bread cubes. Fold together gently with a spatula then pour into prepared baking dish. Top with diced apples & chopped walnuts.
In a small dish, combine reserved 1 cup bread crumbs with 2 Tbs melted butter & 1 Tbsp sugar. Sprinkle topping evenly over pudding.
Prepare a 'hot water bath'. For this you will need another pan that's larger than & at least as deep as the bread pudding pan itself. When you set the bread pudding pan in it and add water it should go about halfway up the sides. This will ensure even, slow baking for a smooth velvety result.
Bake about an hour or until it tests done. Pudding should be puffy & golden. Serve as is or with whipped cream, your choice!
Recipe Notes
- ANISE SUGAR - for tea, on top of cookies or over fruit.
- In a blender, combine 1 cup sugar with 1 T. anise seed
- Blend on high speed until mixture is thoroughly combined
- Store in a moisture proof jar