
Honey mustard is one of those condiments you either really like or you hate it. I recall when one of my nephews was just about ‘knee high to a grasshopper’, he just LOVED it.
When he would dip that little KFC chicken nugget in some honey mustard, I think his eyes actually glazed over as he inhaled that flavor. It was just so incredibly cute to watch.
Combining honey with mustard brings out flavors not readily apparent in a straight honey. These two ingredients, when combined, flavor a variety of otherwise bland dishes such as chicken and pork. It’s often used in salad dressings, sandwich spreads, meat or veggie dips, ham glaze etc.
There seem to be many versions due to the fact that there are multiple types of honey and mustard. Although it is very often combined with mayo, I prefer it without. If you like this flavor, these ‘legs’ are for you!
Print Recipe
Honey Mustard Chicken Legs
Votes: 1
Rating: 5
You:
Rate this recipe!
|
|
Votes: 1
Rating: 5
You:
Rate this recipe!
|
Instructions
-
In a bowl, whisk together mustard, honey & olive oil. Add a pinch of salt & pepper to taste. In a baking dish, place the chicken pieces, skin side up. Pour mustard/honey mixture over all & place sprigs of rosemary between them.
Bake about 45 minutes or until cooked. Remove from oven & serve.

A while back, I was speaking with my neighbor, Meg, who told me about an ancient grain I had never known about. It is called Teff. This word originates from the Amharic word ‘teffa’ which means ‘lost’ due to the small size of the grain. An annual bunch grass native to the central highlands of Ethiopia and Eritrea. It can survive both wet and dry climates, high temperatures and bright light as well as not being subject to as many plant diseases as other cereal grains. It’s high nutritional value and reliable cultivation have made it Ethiopia’s most important grain crop. Teff’s size makes it convenient because it doesn’t take a large volume of teff seed to plant a field.
Ground into flour, teff is used to make the traditional bread called ‘injera’, a sourdough risen flatbread with a slightly spongy texture similar to a crepe. It can also be found in many gluten-free options of pancakes, breads, cereals, pie crusts, cookies and other snacks.
Meg had given me a package of ‘authentic‘ teff flour so I was anxious to try it. I noticed a great looking recipe for seeded teff rolls on the computer so I was all set. To compliment the teff rolls I made some shrimp burgers w/ avocado aioli. Nice meal!
Print Recipe
Shrimp Burgers on Seeded Teff Buns
Votes: 1
Rating: 5
You:
Rate this recipe!
|
|
Votes: 1
Rating: 5
You:
Rate this recipe!
|
Instructions
Seeded Teff Buns
In a small bowl, whisk together water, yeast, honey, oil & vinegar. Let stand 3-5 minutes or until yeast is dissolved & beginning to proof.
In a large bowl, stir together dry ingredients. Add yeast mixture to dry ingredients & mix on low speed until combined. Add in egg whites. Once combined, mix on high speed for 3-5 minutes.
Grease a 9-10 inch round baking pan. Scoop the batter into pan (with a spring release scoop) making about 6 buns. Place rolls right next to each other. Cover & let rise in a warm place for 20 minutes. Preheat oven to 375 F. Bake for 25-30 minutes. Remove from oven; cool slightly.
Shrimp Burgers
In a small bowl, combine all ingredients for shrimp burgers. Form into 4 patties & set on a plate with squares of wax paper between them. Put in fridge until ready to cook.
Avocado Aioli
In a small bowl, Combine all ingredients for avocado aioli until smooth. Cover & set in fridge until ready to use.
Assembly
In a large skillet, add 3 Tbsp oil & turn heat to medium-high. Gently place shrimp burgers on skillet & cook 3 minutes until golden, flip & cook another 3 minutes.
On each of the sliced, warm teff buns, place a shrimp burger with a generous dollop of avocado aioli. Don't hesitate to add some lettuce & tomato slices if you wish.
-

CELEBRATING CANADA DAY!
Food and drink are almost as synonymous with Canada Day as the colors of red and white. More importantly this date celebrates the historical event in which Canada gained its independence from Great Britain in 1867.
On July 1st, from coast to coast, the country’s birthday is highlighted with colorful parades, concerts, carnivals, festivals and firework displays.
Barbecues are definitely the preferred choice of food event as summer entertaining is all about laid-back get together’s. Easy food prep is the name of the game!
For our Canada Day barbecue, it had to be special so here’s what developed—
Print Recipe
Beef Burgers with Apricot/ Pistachio Chutney
Votes: 1
Rating: 5
You:
Rate this recipe!
|
|
Votes: 1
Rating: 5
You:
Rate this recipe!
|
Instructions
Chutney
In a skillet, saute shallots without browning. Add apricots, honey & apricot nectar. Simmer until liquid has evaporated. Set aside to cool at room temperature, then stir in the pistachios & a dash of vinegar. Refrigerate.
Burgers
In a large bowl, combine all the ingredients for the burgers. Shape into 4 patties & refrigerate.
Preheat the barbecue to high & when the grill is hot, place patties on the grill & sear on both sides, making sure not to turn them too soon. When burgers are well marked & can be lifted off the grill easily, remove them to another part of the barbecue where the heat has been reduced & let them finish cooking undisturbed.
While burgers are finishing, brush mushroom caps with oil & grill on both sides until done. Set them aside. Turn off one of the burners, place the burgers on that part of the grill & top each with a slice of cheese. Close the lid for a few minutes & cook over indirect heat until cheese is melted.
Serve on warmed or toasted ciabatta buns. Top each burger with a mushroom cap, a generous spoonful of chutney & some cucumber slices.

CELEBRATING FATHER’S DAY!
Honoring your father on Father’s Day doesn’t require his physical presence. I feel what is more important, is just the act of doing it. I am very grateful to have had a father who was such a strong role model in my life. Everything he did was driven by his commitment to provide and care for the family he loved.
My father passed away in 2005 and Brion’s in 2011. Both our Dad’s loved to talk and tell stories from their lives. We often wish we could retrace that time and hear their voices again. It seems you never fully appreciate your parents until they are no longer on this earth. It is so important to appreciate every hour they are in your life.
My special meal to honor them on this Father’s Day, is a nice medley of pork, shrimp and mushrooms.
Print Recipe
Seafood Stuffed Pork Medallions with Peppercorn Sauce
Votes: 1
Rating: 5
You:
Rate this recipe!
|
|
Votes: 1
Rating: 5
You:
Rate this recipe!
|
Instructions
Stuffed Mushrooms
Shred zucchini, sprinkle with a little salt & set aside. In a bowl, combine the cheeses, crumbled bacon, egg & seasonings. Squeeze as much liquid from zucchini as possible. Add it to the filling & mix well. Divide the filling between mushrooms. Place a small amount of Zesty Italian dressing in a cup. Dip bottom of each mushroom in dressing & allow to dip off for a few seconds. Place stuffed mushroom caps on a small baking dish making sure they will stay upright. Place in fridge until ready to bake.
Parmesan Shrimp
In a bowl, combine oil, garlic, oregano, basil, Parmesan, salt & pepper. Add shrimp & toss gently; thread onto skewers. Place on a plate & refrigerate until ready to cook.
Stuffing / Tenderloin
In a saucepan, saute garlic & shallots in 1 Tbsp olive oil for a few minutes. Add a few pinches of salt & pepper; stir in breadcrumbs. Add water; stir till all is combined & transfer to a bowl.
In a bowl, cream together butter & cream cheese. Add 1/2 of the capers, the parsley & stir thoroughly. Add the Gruyere & scallops, stirring gently. Set aside.
'Butterfly' tenderloin & pound making it all the same thickness. Spread stuffing evenly on flattened cut side. Starting with the long side, carefully ROLL the tenderloin as opposed to just FOLDING it over. On work surface, lay out bacon strips side by side. Lay stuffed tenderloin at one end & roll up in bacon strips, placing a toothpick at end of each strip.
Preheat the oven to 400 F. In a skillet, heat remaining 2 Tbsp olive oil, add the roast carefully & saute for about 3-4 minutes on each side to cook the bacon a bit. Place a rack in a shallow roasting pan & lay stuffed tenderloin on it; bake at 400 F. for 10 minutes, then reduce heat to 350 F. & bake for another 20 minutes. Remove from oven, set the roast on a cutting board, cover loosely with foil, & let rest while the shrimp & stuffed mushrooms are cooking. When ready to serve, slice into 1 - 1 1/2" thick 'medallions'.
Increase oven temperature to 400 F. Remove stuffed mushrooms from refrigerator, bake for 20-30 minutes or until filling is golden & mushrooms have softened. Meanwhile, line a baking sheet with foil, place skewered shrimp in oven for the last 6-8 minutes of cooking the mushrooms.
Peppercorn Sauce
This can be made earlier or while the last items are cooking in the oven. In a hot skillet, add butter, shallots & peppercorns; stir until shallots are golden, about 1 minute. Add broth & thyme sprigs; reduce heat & allow sauce to simmer for a few minutes. Remove thyme sprigs. Add cream & salt & pepper to taste. If you wish to thicken sauce, combine cornstarch & water in a small dish, stirring until smooth. Add a bit at a time to your hot mixture, stirring until desired thickness is achieved.
The versatility of chicken, as well as the ease and speed with which it can be cooked make it one of the most popular meats around.
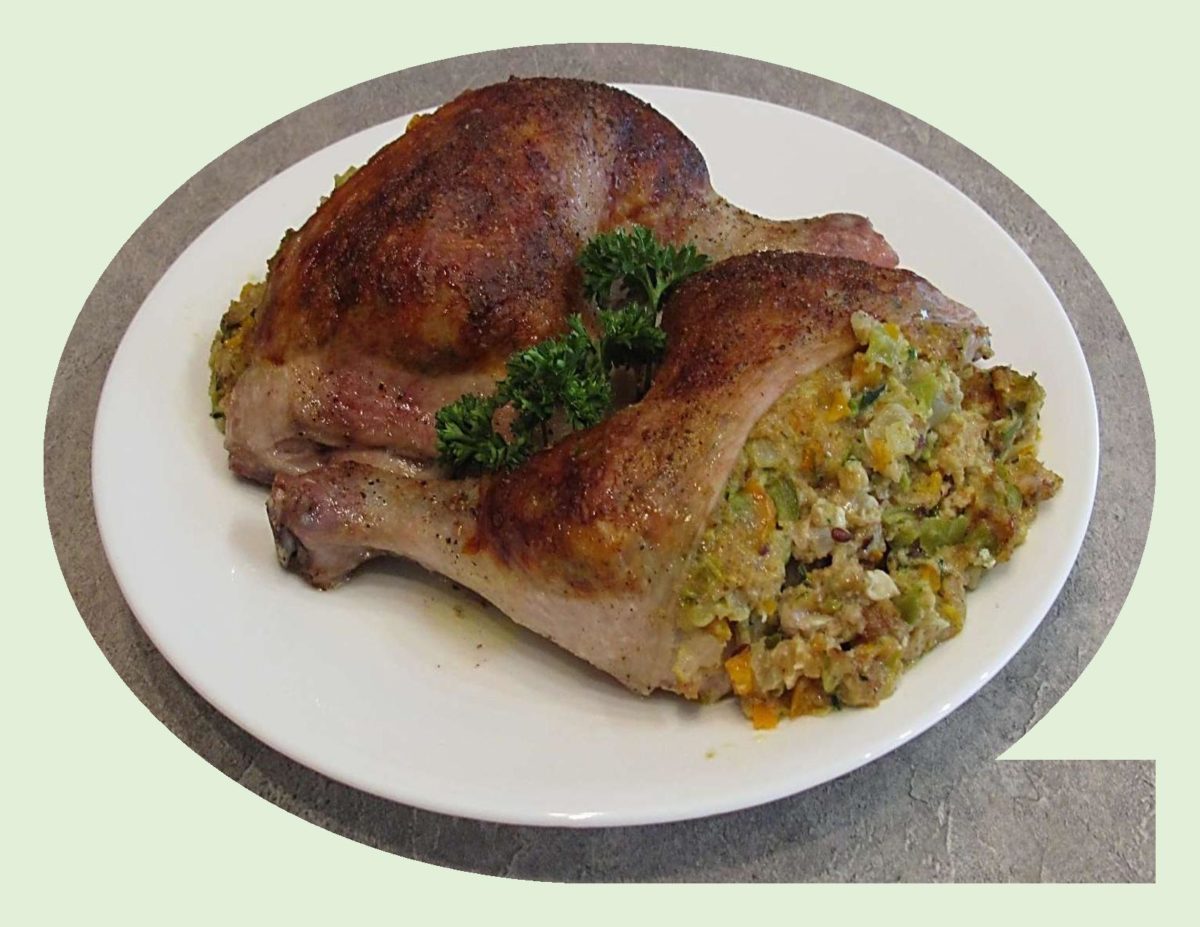
Chicken leg quarters, also referred to as whole chicken legs, consist of both the thigh and drumstick. This cut is sold bone-in/skin-on and for most part, quite economical. Because they are dark meat and many people prefer white meat, chicken legs are often over looked by the consumer.
I like to purchase these with six fresh leg quarters to the package. Usually you will find a bit of extra fat on them which needs to be trimmed as well as the backbone rinsed out. Freezing them in a meal size portions makes it so handy when ready to use.
Roasting them in a real slow oven temperature with just a little oil, salt & pepper always produces tasty results. After they have baked for an hour you can always turn up the temperature for a few minutes to crisp the skin if you wish.
Today, I thought it would be nice to do something a bit more special. Stuffing them with a veggie-cheese mixture not only tastes great but they had a nice visual effect on our plates.
Print Recipe
Stuffed Chicken Leg Quarters
Votes: 9
Rating: 3.56
You:
Rate this recipe!
|
|
Votes: 9
Rating: 3.56
You:
Rate this recipe!
|
Instructions
In a saucepan, melt butter, add onion & peppers; saute until tender crisp. Add grated zucchini, continue to cook for 2 minutes.
Remove from heat & place in a bowl. Add breadcrumbs, egg, salt, pepper & cheese. Refrigerate until cold.
Preheat oven to 350 F. Using fingers, loosen skin on chicken legs. Spoon some filling into each chicken leg working the stuffing down the drumstick. Combine the 2 Tbsp melted butter, dry mustard & Dijon mustard together & brush over chicken. Place the chicken in a shallow baking dish & bake for about 45 minutes or until cooked through. Remove from oven & serve.

Grains and seeds have always been high on my priority list to cook and bake with. Now, you take barley, a humble grain with good nutrition even though it doesn’t get much credit for it. The first barley grown in North America was in Newfoundland, Canada in 1578. Production moved westward from there to the prairie provinces.
Barley has a chewy texture with a slightly nutty flavor. It absorbs liquids in soups, stews and salad dressings, capturing their flavors. Barley flour gives baked goods a lovely rustic taste and look.
The difference between pot & pearl barley has to do with the milling process. Pot barley has most of the barley bran still intact whereas with the pearl barley, most of the bran is removed. Barley bran is found throughout the kernels so both are still healthy options.
There is absolutely nothing fancy about mushrooms and barley except for its flavor. This recipe combines the duo with dried apricots and almonds to make one amazing stuffing for the pork tenderloin. Yum!
Print Recipe
Barley & Apricot Stuffed Pork Tenderloin
Votes: 1
Rating: 5
You:
Rate this recipe!
|
|
Votes: 1
Rating: 5
You:
Rate this recipe!
|
Instructions
In a saucepan, heat oil, add onion & mushrooms; saute until softened, about 2 minutes. Stir in barley & chicken broth. Bring to a boil; cover pan & simmer about 15 minutes. Allow cooked barley mixture to cool, then stir in almonds, apricots, parsley, sage & thyme.
Preheat oven to 350 F. Slice tenderloin down the center, cutting just slightly more than half way through. Sprinkle with salt & pepper. Spoon barley stuffing on one side of the tenderloin then cover with the opposite side. If necessary, tie or skewer tenderloin to keep filling in during baking.
Place tenderloin on a rack in a roasting pan and roast in the oven until inserted meat thermometer registers 160 F. Any excess stuffing can be spooned into a small buttered baking dish & baked for the last 20 minutes to serve as a side.

From what I understand, the global dish called chicken parmigiana is a variation on the Italian entree known as eggplant parmigiana. Simply put, you deep fry eggplant, add cheese and tomato sauce and bake it. At some point in time, various regions in the world with large Italian immigrant populations, realized chicken would be an excellent alternative to the eggplant and chicken parmigiana evolved.
In America, the dish became popular around 1958. Often the name has been simplified to just ‘chicken parm‘. Usually composed of fried or breaded chicken fillets, smothered in mozzarella (or provolone), parmesan and tomato sauce all of which is then baked. Another version is using veal instead of chicken. Parmigiana is traditionally served over hot pasta as the main entree but it has also become a sandwich filling favored in subs, hoagies, etc.
In today’s recipe, I’m using parmesan cheese but omitting the mozzarella-tomato sauce. I wanted to accent the flavor with fresh basil in the sauce instead. We quite enjoyed it.
Print Recipe
Chicken Parmigiana with Basil Sauce
Votes: 1
Rating: 5
You:
Rate this recipe!
|
|
Votes: 1
Rating: 5
You:
Rate this recipe!
|
Instructions
Chicken
In a small bowl, combine breadcrumbs, cheese & parsley. Chop bacon finely & fry until crisp; drain. Add bacon to breadcrumb mixture.
Preheat oven to 350 F. In a saucepan, melt butter, add minced garlic, Worcestershire sauce & dry mustard. Mix well. Dip chicken fillets in butter mixture & place in a shallow ovenproof dish. Press crumb mixture on top of each fillet.
Bake, uncovered for 20 - 25 minutes.
Basil Sauce
In a saucepan, combine oil, vinegar, minced garlic, finely chopped basil leaves & cream; stir until heated through. Add egg yolk & stir until sauce thickens. Do not boil. Season with salt & pepper. Serve over chicken parmigiana.
There is no one way to create ‘meatloaf’ and it is precisely this capacity for re-invention that has allowed meatloaf to maintain a continued place on our dinner tables. The limitations for the iconic dish are none. The criteria is ground meat primarily and whether it is beef, pork, chicken, turkey or a blend of, doesn’t matter. The meat must be cut with a filler or the loaf becomes to dense. Bread crumbs, oatmeal, crackers, Japanese panko crumbs, rice, minced vegetables are all good choices. Egg and/or dairy of some kind is essential to bind and moisten. Seasoning is definitely a personal choice. The loaf shape is classic but the top can be glazed, sauced, as is, or baked with strips of bacon over it.
At one time, trying to find a casual restaurant that didn’t serve meatloaf would have been like an Italian one that didn’t serve pasta. Some believe meatloaf was born during the Depression of the 1930’s. To stretch the small amounts of meat people had, it was ground and mixed with stale bread crumbs. At times, these loaves actually contained more ‘loaf’ than meat.
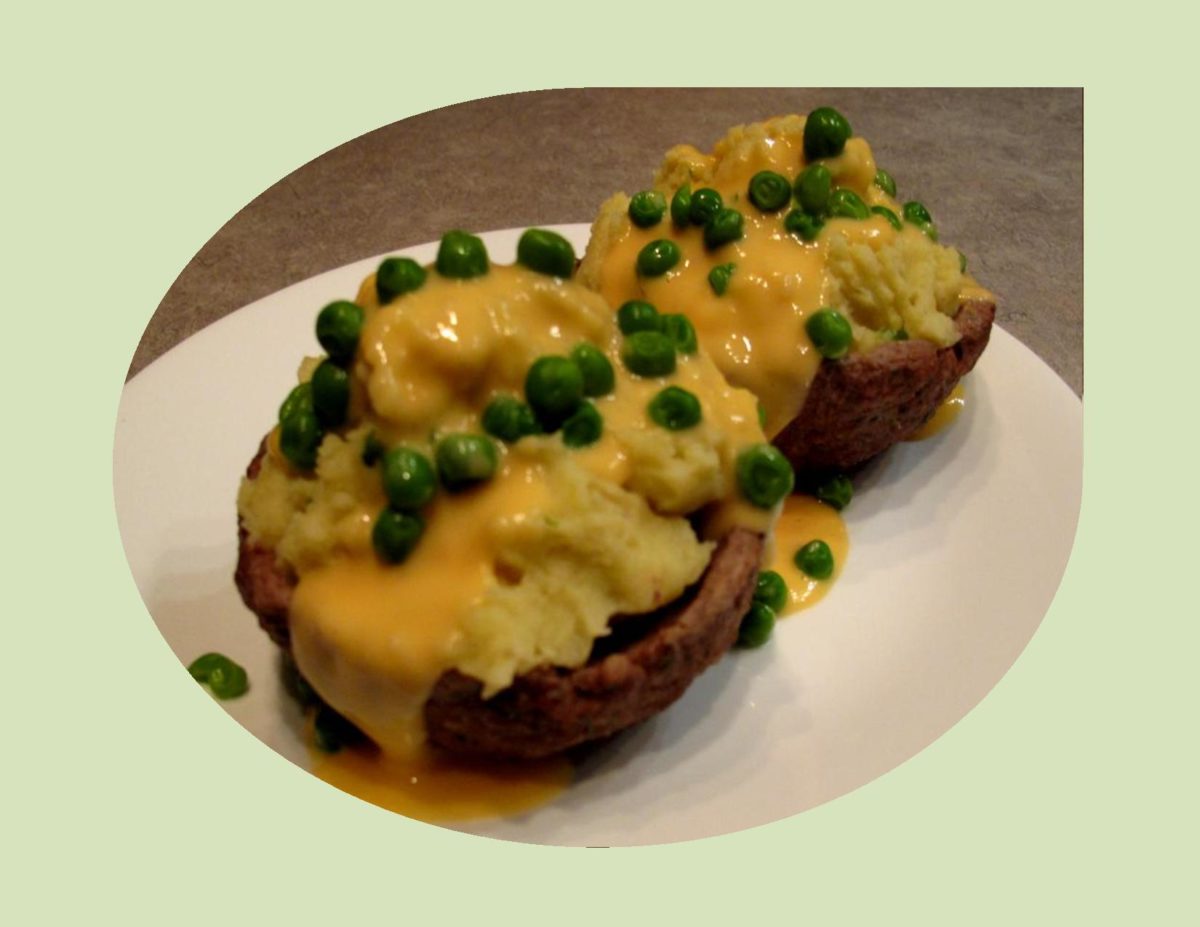
Whether you love meatloaf or hate it, the fact that it is still around after all these years is incredible. Today’s entree puts another spin on this old classic. This a recipe that was published in a Better Homes & Gardens magazine in the 70’s. Interesting!
Print Recipe
Mashed Potato-Meat Cups with Cheese 'Gravy'
Votes: 2
Rating: 5
You:
Rate this recipe!
|
|
Votes: 2
Rating: 5
You:
Rate this recipe!
|
Instructions
Meat Cups
-
In a skillet, heat oil & saute onions & garlic until translucent. Set aside to cool. In a large bowl, combine ground beef, salt, pepper, Worcestershire sauce, Parmesan, parsley, cooled onions & garlic, egg, breadcrumbs & milk. Combine well.
-
On 4 squares of waxed paper, shape into 4 patties with a 5-inch diameter. Shape each over an inverted custard cup; discard paper. Chill about an hour.
Mashed Potatoes
-
Peel & cook potatoes. In a large bowl, combine cooked potatoes, butter, seasonings, Parmesan & a splash of milk. Mash & add more milk gradually until potatoes are desired texture.
Cheese Sauce
-
In a saucepan, melt butter; whisk in flour, salt & pepper until smooth. Gradually whisk in milk. Bring to a boil; cook & stir while adding cheddar cheese. Cook, stirring constantly until thickened. Cook frozen peas.
Baking & Serving
-
Preheat oven to 375 F. Place inverted meat cups on a shallow baking dish. Bake for 20 minutes or until meat is cooked. Lift baked meat cups from custard cups & turn upright; fill with mashed potatoes. Place on serving plates, spoon cheese sauce over filled meat cups & top with green peas.

Eggs are one refrigerator staple that most households are rarely out of. While they have many uses, one of my personal favorites is always quiche. Another staple in my pantry is canned wild red salmon.
The idea for this quiche today came from an old appetizer recipe. It was for salmon tartlets with a cream cheese pastry. This type of pastry is one that seems to go either way —tender or tough. What I’ve come to find through trial and error, is that a 1:1 ratio by weight, of butter to cream cheese, ensures a flaky, tender crust. Cream cheese pastry is nice because it is so versatile. It can be used for both sweet and savory applications.
Since I am in ‘gourmet mode’ today, I decided to kick it up a notch and use a little exotic medley of fresh mushrooms. My choice is enoki, crimini, oyster, portabellini and button. For cheese, I’m going with Gorgonzola dolce. If I were to describe the end result, it would be, a tender, cream cheese pastry filled with an earthy mushrooms, red salmon and tangy Gorgonzola cheese. Hard to beat that flavor combination, but of course, only if you like those ingredients.
Print Recipe
Wild Red Salmon & Mushroom Quiche
Votes: 1
Rating: 5
You:
Rate this recipe!
|
|
Votes: 1
Rating: 5
You:
Rate this recipe!
|
Instructions
Pastry
In a bowl, beat butter & cream cheese; blend in flour to form pastry consistency. Press into a deep dish 8-inch quiche pan. Set aside in refrigerator until filling is prepared.
Quiche Filling
In a skillet, saute sliced green onions, mushrooms & garlic in margarine until moisture has evaporated. Remove from heat. Preheat oven to 400 F.
Grate cheese. In a container, whisk together eggs, milk & seasonings. Sprinkle about 1/2 of the Gorgonzola cheese in the bottom of the quiche shell. Top with mushroom mixture & salmon chunks then with remaining cheese.
Bake at 400 F. for 10 minutes, adjust heat to 350 F. & continue baking for another 30 minutes. When filling is set, remove from oven & cool at least 10 minutes before cutting. It tastes great just out of the oven, but even better the next day.

Today, March 21st, our family is honoring the memory of our wonderful father’s birth date. Although it has been 14 years since his passing, he lives on in our hearts. It never ceases to amaze me how many things your parents do that are imprinted on you at childhood. As I grow older, I see and hear my Dad living on through me.
It seems, we never fully appreciate our parents until they are gone. I’m told, ‘its a kid thing’, which doesn’t really seem to make it any better. I think my Dad would have enjoyed this meal I’m preparing today. It has an earthiness about it.
Root Vegetables, the unsung heroes of winter, sometimes have a reputation for being boring but they are anything but that. The perfect combination of hearty, satisfying and comforting, when roasted, the flavors become more complex.
Stuffing for some of us is the main event. I love to stuff anything –meat, vegetables, desserts, breads etc., etc. My goal is to push the boundaries on what filling consists of, so it changes it enough to be unique, but still reminds you of the original.
This roasted root vegetable stuffing is everything you love about stuffing with the added bonus of sweet roasted vegetables. The cracked mustard sauce drizzled over the stuffed pork tenderloin brings it all together.
Print Recipe
Roasted Root Vegetable Stuffed Tenderloin
Votes: 1
Rating: 5
You:
Rate this recipe!
|
|
Votes: 1
Rating: 5
You:
Rate this recipe!
|
Instructions
Stuffed Tenderloin
Preheat oven to 350 F. Line a baking sheet with aluminum foil. In a bowl combine onion, potato & carrots with 1 Tbsp olive oil, 1/4 tsp salt & a dash of pepper. Toss to coat well & place on baking pan. Roast for about 35 minutes or until tender & golden. Remove from oven; set aside.
In a medium bowl, beat eggs. Stir in the parsley, onion powder, garlic powder & 1/4 tsp pepper. Add bread crumbs, Romano cheese & chicken broth. Gently stir in roasted vegetables.
To butterfly pork tenderloin, trim any fat & the 'silverskin' from meat. Using a sharp knife, make a lengthwise cut down the center of the pork roast, cutting almost to, but not through, the other side of the meat. Spread the tenderloin flat between 2 sheets of plastic wrap. Pound meat lightly with the flat side of meat mallet to make a rectangle. Remove plastic wrap.
Spoon the stuffing over the tenderloin to within 1-inch of the sides. Roll up in a spiral, beginning with the short side. If necessary, tie meat with string ; place seam side down on a rack in a shallow roasting pan. Brush with 2 Tbsp olive oil or melted butter.
Adjust oven heat to 375 F. Roast, uncovered for 45 minutes or until meat thermometer registers 160 F. Prepare Cracked Mustard Sauce; slice tenderloin & spoon sauce over meat. Serve.
Cracked Mustard Sauce
In a small saucepan, cook garlic in butter until tender, but not brown. Stir in flour, mustard & dried thyme. Season with salt & pepper; add vegetable broth & light cream. Cook & stir until thickened & bubbly. Cook & stir for 1 minute more.


")


