
Scones were originally made from oats and shaped into a large round called a ‘bannock’. Each round was scored into four to six triangles and cooked on a griddle either over an open fire or on top of the stove.
A scone is not a cupcake. Making scones is like stirring together biscuits. A simple mixture of flour, salt, baking powder and/or soda, milk or sour cream, butter and sometimes eggs. Scones are the perfect blank canvas and can be flavored to taste and loaded with add-ons.
Many times, scones have been perceived as dry and boring. The classic scone is crusty on the outside and biscuit textured within. A cakey super moist texture should not be expected in a scone.
We found this dried fruit scone was excellent eaten slightly warm. The cardamom spice really enhanced the flavor of the papaya fruit in them. I used the flour/oatmeal combo, as I most often do because of the the nice texture and taste it gives. The glaze is optional as it kind of goes against the basics of a scone but what the heck!
Print Recipe
Tropical Papaya Scones with Vanilla Glaze
Votes: 6
Rating: 5
You:
Rate this recipe!
|
|
Votes: 6
Rating: 5
You:
Rate this recipe!
|
Instructions
Papaya Scones
Preheat oven to 350 F. Line a baking sheet with parchment paper.
In a food processor, pulse oatmeal for a few seconds then add next 5 ingredients & pulse a few more seconds. Add butter; whirl ONLY until mixture resembles coarse crumbs then place in a large bowl. Stir in chopped fruit.
In a small bowl, whisk together sour cream, milk & vanilla. Add to dry mixture blending only until JUST incorporated. Scoop onto baking sheet & bake for 10-12 minutes. Remove from oven & allow to cool slightly.
Vanilla Glaze
In a small bowl, whisk together glaze ingredients until smooth. With a small spoon, drizzle glaze over scones.

The end of October! Seriously, it seems like we were just getting into spring and now its Halloween. Brion and I were in a store around the end of September that already had Christmas displays up. For me, that really doesn’t work. Maybe it just comes as we get older, but I really enjoy to try to stay in the ‘moment’ and enjoy each day, season and year as they unfold. That time will never come again, so why do we feel the need to rush it so. I guess you could call it, ‘making the most of your own personal journey’.
Nevertheless, it is time to think about some treats for the special ‘little people’ next door. We have just wonderful neighbors on either side of us. One family has two boys and the other side, two girls. I especially enjoy to come up with something unique each year for them on Halloween.
This year I decided to do some apple ‘mummy’ pastries (apple instead of pumpkin for kids, right?!), chocolate bats and black cat cookies. If these treats turn out they should look great! Fun! Fun! Fun!
Print Recipe
Halloween Cookies
Votes: 1
Rating: 5
You:
Rate this recipe!
Ingredients
Apple Mummy Cream Cheese Pastries
Ingredients
Apple Mummy Cream Cheese Pastries
|
Votes: 1
Rating: 5
You:
Rate this recipe!
|
Instructions
Apple Mummy Pastries makes 12
FOR CRUST: In a food processor, pulse flour, salt & sugar, then add butter. Pulse until only until coarse meal texture is obtained. Add chilled water 1-2 Tbsp at a time. If your dough doesn't come together in clumps add remaining water. Divide dough into two portions & shape each into a 5-inch disk. Cover with plastic wrap & chill for one hour.
FOR FILLING: On a cutting board, chop apple pie filling into smaller pieces. In a bowl, soften cream cheese & combine with apple filling & 1/2 tsp cinnamon. Cover bowl & chill until ready to assemble cookies.
Preheat oven to 375 F. Line a large baking sheet with parchment paper. On a floured work surface, roll out first disk of dough to about 13 X 11-inch rectangle. You will need to have straight edges so you may need to trim a bit. Make twelve 4 X 2 1/2-inch rectangles. Roll out second disk of dough & cut into 1/2-inch strips.
Space rectangles on prepared baking sheet & spread 2 heaping Tbsp of apple filling onto each one, leaving a rim on all sides uncoated. Brush uncoated edges with egg/water mixture. Top with strips to create a 'mummy' look, then seal edges with your fingertips & trim any excess. Brush strips with remaining egg white/water mixture & sprinkle with combined sugar & cinnamon. Bake about 10-12 minutes, until golden. When cooled secure edible candy eyes.
Chocolate Bats
In a bowl, beat cream cheese until smooth. Gradually beat in powdered sugar; set aside. Remove wrappers from Reeses cups. Gently separate Oreo cookies & scrape off frosting. Cut cookies in half to form 4 bat wings. Fill a plastic baggie with cream cheese frosting. Cut off the tip of one corner & pipe frosting onto one corner of each cookie half.
Press one cookie piece on the left of the Reeses cup & another cookie piece on the right forming your bat in flight. Pipe frosting on the back of the edible eyes & secure on top of the center of the Reeses cup.
Black Cat Cookies
In a mixing bowl, cream butter & sugar until light & fluffy. Add egg, & vanilla; combine then stir in flour, dry pudding mix & nuts. Combine well but do not over mix. Roll out dough to about 1/4-inch thick between 2 sheets of parchment. Place in freezer for about an hour.
Preheat oven to 350 F. Cut cooled dough into pumpkin shapes & place on parchment paper lined baking sheet. Bake about 8 minutes. Remove to wire racks to cool.
In a small double boiler, melt black candy melts. Pour melted wafers into a piping bag fitted with a fine tip. Place a large piece of waxed paper on a flat surface with a printout of black cats underneath. Trace cat shapes & fill in after. Allow to set completely, then peel shapes from waxed paper.
Ice cooled pumpkin cookies with orange frosting then lightly press a black cat on the top of each one. This recipe should make about 30 cookies.
The pairing of chocolate and strawberries is hands down one of the best combos in dessert history. Both have long and rich histories. Strawberries were found growing wild in Italy centuries ago. The name itself has some myth around it stemming from the idea people put ‘straw’ around the base of the plant for both nutrients and protection.
Chocolate was enjoyed by Aztec and Mayan civilizations as a beverage and even used cocoa beans as a currency. As cocoa spread around the world, different ideas for its use emerged. Candy makers added milk & sugar or nuts and caramel to their chocolate confections.
In the 1960’s, Lorraine Lorusso created a decadent chocolate covered strawberry. As the story goes, she worked at a small gourmet shop called the Stop N’ Shop in Chicago, USA. She took a tempered version of the gourmet chocolate that was sold in the store and dipped some fresh strawberries into the mixture. She allowed the chocolate to harden and served these strawberries to their paying customers. The treat was an instant success.
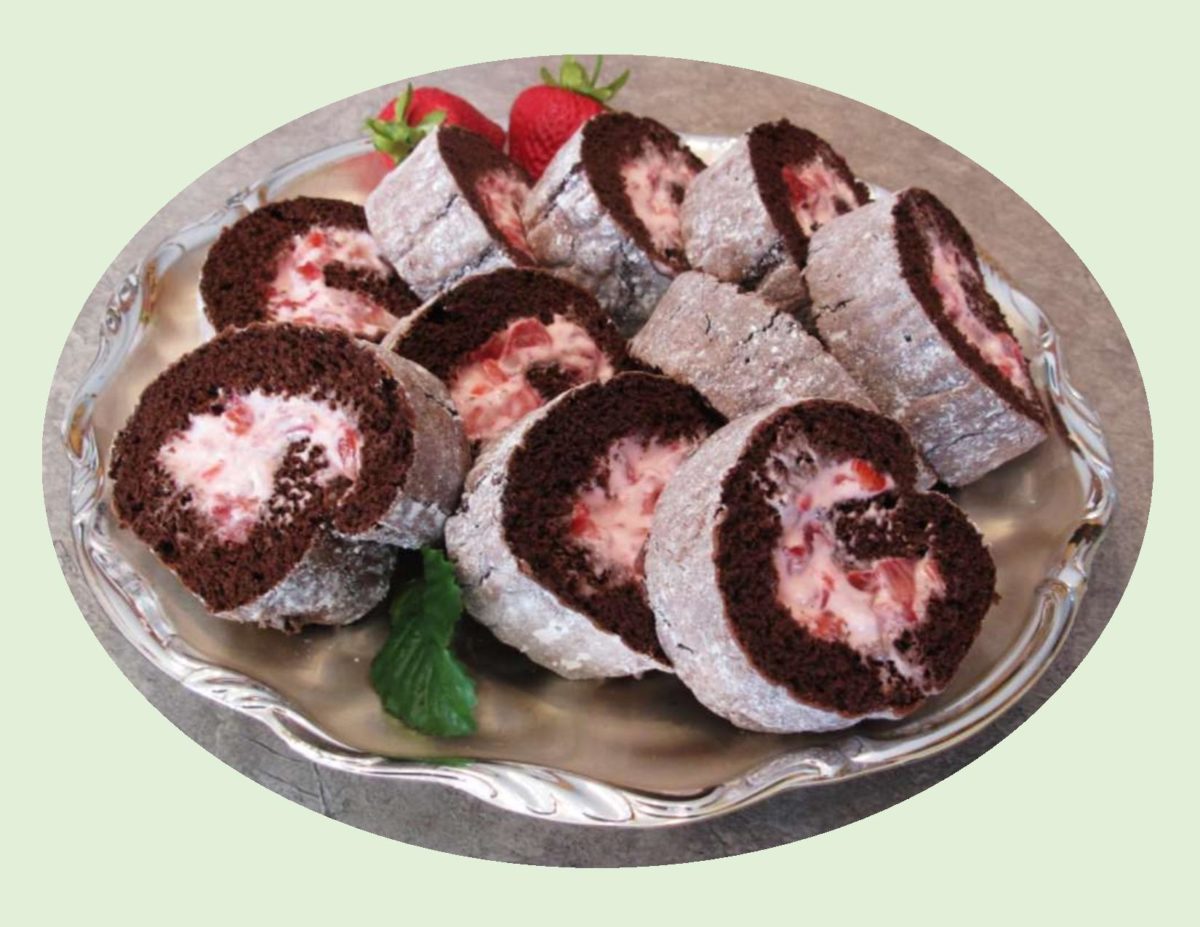
I’ve done my own pairing of strawberries and chocolate in this cake roll with a cream cheese filling. Hope you get a chance to enjoy one through the summer as well.
Print Recipe
Strawberry Cream Chocolate Roll
Votes: 1
Rating: 5
You:
Rate this recipe!
|
|
Votes: 1
Rating: 5
You:
Rate this recipe!
|
Instructions
Chocolate Cake
Preheat oven to 350 F. Line a 10 x 15-inch jelly roll pan with parchment paper. In a small bowl, combine flour, cocoa, baking powder & salt. Set aside.
In another bowl, whip egg whites until foamy, gradually adding HALF of the sugar. Beat until stiff peaks form. In a third large bowl, beat egg yolks until thick. Add remaining sugar, vanilla & water; beat until very thick. Gradually fold in flour mixture then egg whites.
Spread batter evenly into jelly roll pan. Bake for 14-16 minutes or until it tests done with a toothpick. Loosen edges & immediately turn cake onto a tea towel dusted with powdered sugar & remove parchment paper. Starting with narrower end, roll up cake in towel; cool completely.
Filling
In a small bowl, using an electric mixer, beat cream cheese, powdered sugar & lime juice. Fold in diced, fresh strawberries.
Assembly
Unroll cooled cake; remove towel. Spread cake with filling; roll up loosely to accommodate filling. Cover & refrigerate until ready to slice & serve.
With doughnuts, its all about the ‘hole’. No hole, no doughnut. That little circle means everything. The idea of frying a piece of dough is ancient. The Romans, Dutch, Spanish and Germans all did it. While we know who introduced the doughnut, the story behind the doughnut hole is a little less clear. The most likely explanation was that at some point, bakers started adding egg yolks to their recipes, which produced a richer dough. Of course, this meant the middle of the doughnut no longer cooked at the same rate as its edges, resulting in doughy, raw centers. They came to the conclusion, that if they removed the thick center, the doughnut would cook evenly throughout. It was also believed that the hole was formed to make it easy to ‘dunk’ the doughnut in coffee. However, as in all food history stories you will find various other versions that are more entertaining and whimsical.
In Canada, doughnut holes that are sold by the Tim Horton franchise, have become known as ‘Tim bits’. The name is a play on the word ‘tidbit’ (a delicate bit of food). They were introduced in April 1976 and are available in at least 20 flavors that differ from store to store.
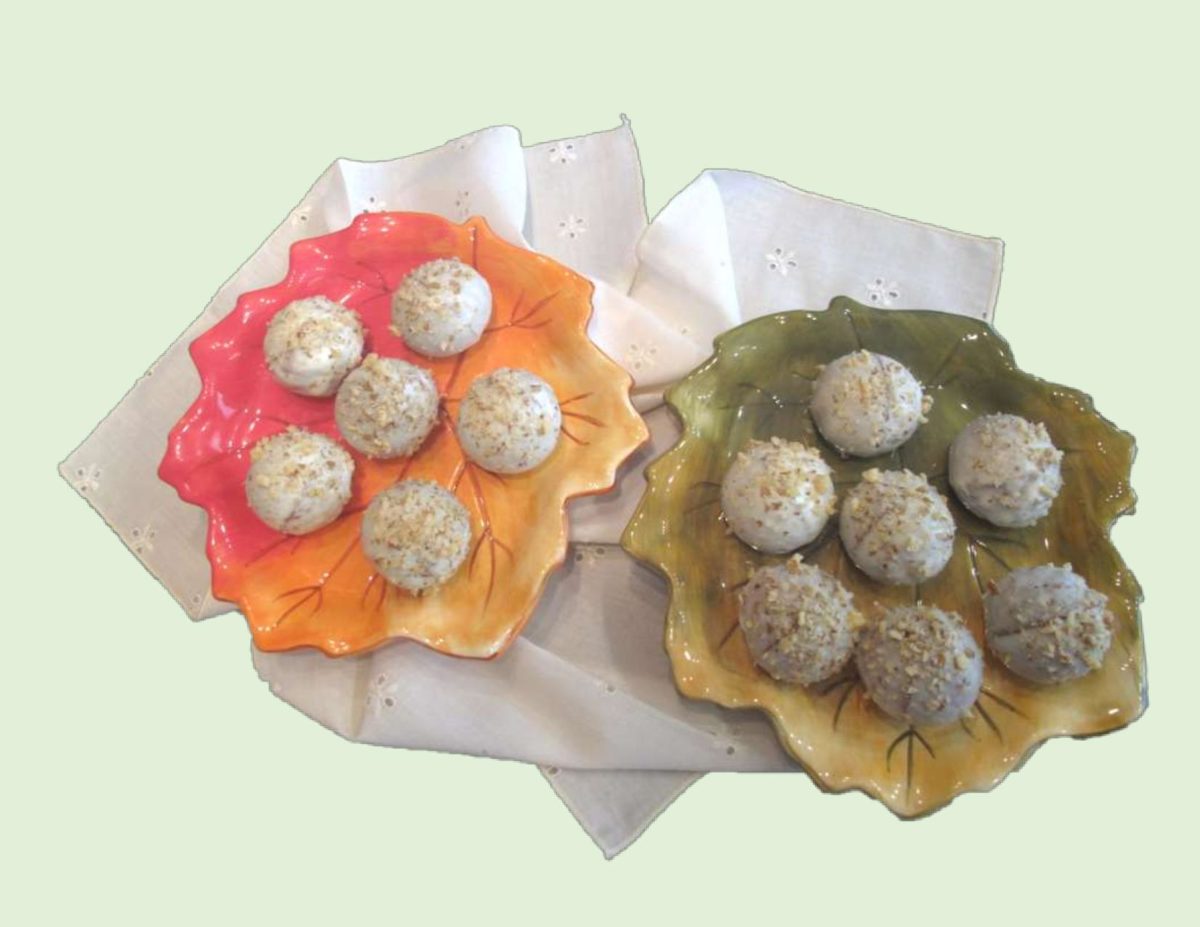
I’m not big on deep fried things whether they are sweet or savory. These carrot cake doughnut holes are baked — no frying necessary. Dip them in a bit of cream cheese ‘glaze’, sprinkle with remaining chopped walnuts and enjoy!
Print Recipe
Carrot Cake Doughnut Holes with Cream Cheese Glaze
Votes: 1
Rating: 5
You:
Rate this recipe!
|
|
Votes: 1
Rating: 5
You:
Rate this recipe!
|
Instructions
Doughnuts
Preheat oven to 350 F. In a bowl, finely grate carrots. Sift in flour then add brown sugar, soda & spices. Add egg & oil & beat until mixture is smooth. Fold in half of the chopped walnuts.
Butter & flour a cake pop pan. Divide batter between 14 holes. Secure top pan in place with rubber clamps. Bake for 10-12 minutes, testing with a toothpick at about 8 minutes. When baked, remove from oven & allow to cool before removing top pan.
Glaze
In a small bowl, with an electric mixer, beat cream cheese, margarine & milk. Gradually add sugar & vanilla beating to a glaze consistency.
Once doughnut holes are removed from pan & thoroughly cooled, dip in glaze, sprinkle with remaining walnuts. Allow to firm up in refrigerator before serving with forks.
Recipe Notes
- Self-Rising Flour is made with 1 1/2 tsp baking powder, 1/2 tsp salt & enough all-purpose flour to measure 1 cup.

Spring is definitely in the air, so bring on those fresh spring flavors. One that comes to my mind is lemon — zesty and full of some spring ‘zing’. My first thought is to pair lemon with some wild blueberries. I realize we are a long way from blueberry harvest time but the good news is that WILD blueberries are as good frozen as they are fresh. None of the nutritional values or antioxidant goodness is lost by freezing.
Canada is the world’s largest producer of ‘low-bush’ blueberries, which is another name for the wild blueberries native to eastern North America. They grow best on treeless land or on land that has been burned over. Growers do not plant them but instead manage wild stands that spread naturally by means of underground runners. The berries are often not uniform in appearance since managed fields can have several distinct runner systems.
The wild blueberries have a sweeter, tangier more intense flavor than their cultivated cousins. Harvest time comes in late August to early September, generally only lasting a few weeks.
This simple little dessert lets us get into the summer blueberry ‘season’ a little earlier and still has all the flavor.
Print Recipe
Wild Blueberry Lemon Drops
Votes: 1
Rating: 5
You:
Rate this recipe!
|
|
Votes: 1
Rating: 5
You:
Rate this recipe!
|
Instructions
Pastry
In a large bowl, combine butter & powdered sugar; cream well then stir in vanilla. In a small bowl, combine dry ingredients, gradually add to creamed mixture; blend well. Line the muffin pan size of your choice with paper cups. Divide dough into balls, placing one into each cup. With your fingers, press dough evenly up sides & on bottom of paper cups. Refrigerate until filling & streusal are made.
Streusal
In a small dish, combine streusal ingredients until mixture forms coarse crumbs.
Filling
Preheat oven to 350 F. Gently rinse & dry blueberries. In a small bowl, combine all other filling ingredients & whisk together until smooth. FOLD in blueberries. Divide filling evenly between pastry shells. Top with streusal & a spoon full of lemon curd. Bake about 25 minutes, (filling will rise slightly when set). Remove from oven. If you prefer, add a bit more lemon curd. Once tarts are cool, remove from pan. The paper cups will come off easily, leaving a pretty little corrugated design.
HAPPY MOTHER’S DAY!
Many people believe Mother’s Day was developed as a commercial holiday to sell cards, candy and flowers or to celebrate the domestic role of women in the home and family. Really, this day is more about women’s commitment to the past, present and the future. Most often, mother’s take the lead in passing down family stories, life lessons and traditions.
Mother’s Day isn’t a new holiday with some of its earliest celebrations being traced back to ancient Greece and Rome. Here in Canada, we set aside the second Sunday in May to honor our mother’s with expressions of love and gratitude.
Although my mother is no longer on this earth, her wonderful memory will live on forever. It is also with love, Brion and I celebrate his mother, Dolores, for her loving and kind ways.
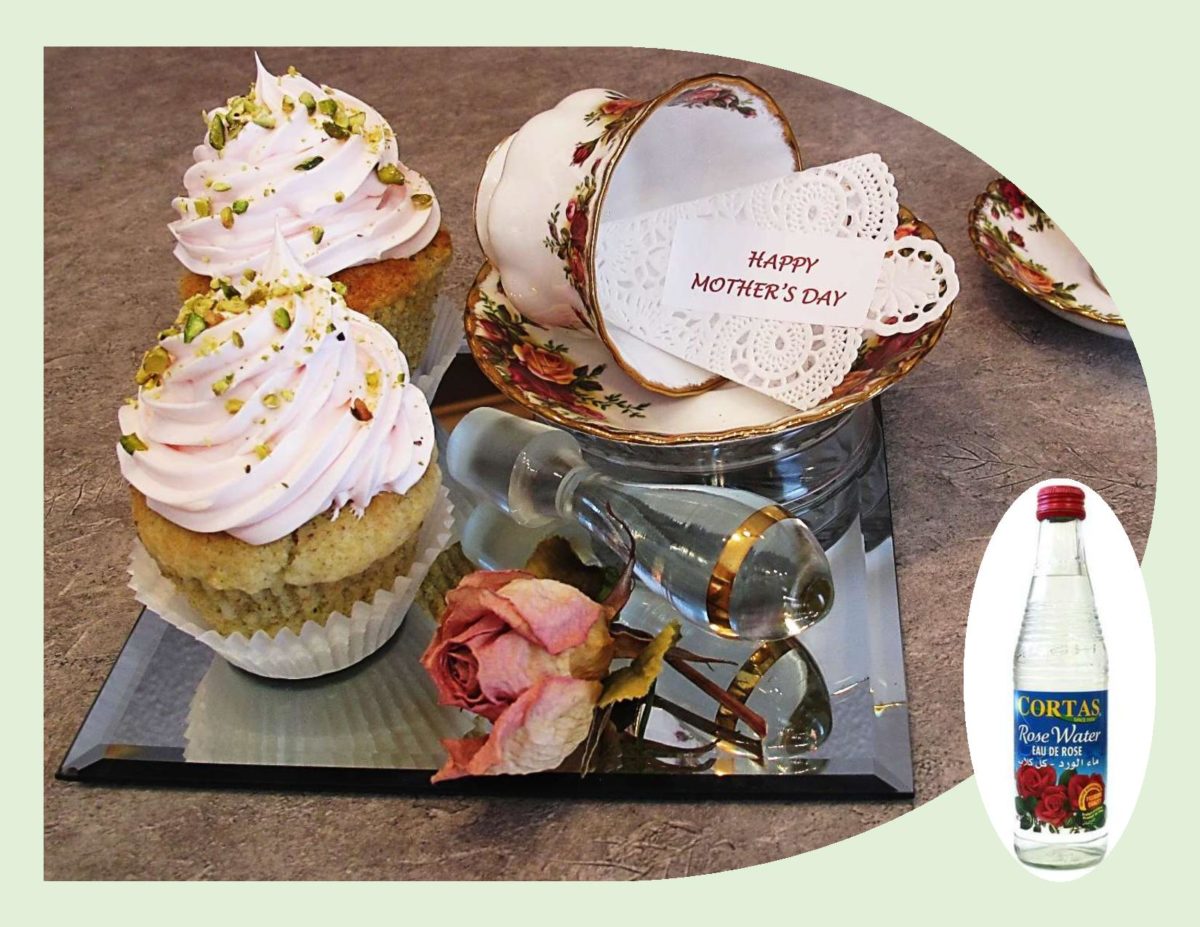
I was trying to come up with something special to bake for the blog recipe today. Lately I have enjoyed using rose & orange water in my cooking. Sweet and fragrant rose water is an elegant steam distillate of rose petals. The key is to use it sparingly as a little goes a long way. Used raw, the flavor is very floral and aromatic. When baked or roasted, that flowery essence mellows out, imparting notes similar to vanilla, with a fruity, more subtle aroma. There are a variety of ways to use rose water from cake and cookies to cocktails and even in roast chicken.
This flavor combination definitely takes the meaning of ‘special’ to a whole new level. Just what I was looking for.
Print Recipe
Pistachio Cardamom Cupcakes with Rosewater Frosting
Votes: 8
Rating: 3.63
You:
Rate this recipe!
Ingredients
Pistachio Cardamom Cupcakes
Rosewater Buttercream Frosting
Ingredients
Pistachio Cardamom Cupcakes
Rosewater Buttercream Frosting
|
Votes: 8
Rating: 3.63
You:
Rate this recipe!
|
Instructions
Cupcakes
Preheat oven to 325 F. Line muffin tin with paper liners & set aside.
In a bowl, whisk together flour baking powder, soda, cardamom & salt. Set aside. In another bowl, beat together softened butter, oil & sugar; mix well. Add eggs, one at a time, mixing well after each egg is added. Slowly add sour cream & vanilla. Fold in flour mixture being careful not to over mix batter.
Divide batter between the muffin cups. Bake 15-20 minutes or until a toothpick inserted into the center comes out clean. Remove from oven & place the individual muffins on a cooling rack.
Frosting
In a large bowl, combine powdered sugar, butter & 1 Tbsp milk. With an electric mixer, beat on low until sugar is incorporated then move to medium-high speed. Add rosewater a 1/4 tsp at a time (taste to prevent it becoming to strong for your liking) then food color. If the icing is not the proper consistency add another Tbsp of milk.
When the cupcakes are cool, frost each one using a large angled star tip. Top off each cupcake with a sprinkle of the reserved chopped pistachios.
Recipe Notes
- To make your cupcakes real special, decorate with some dried rosebuds.
- I was able to find rosewater easily in the ethnic section of the grocery store.


")


")


