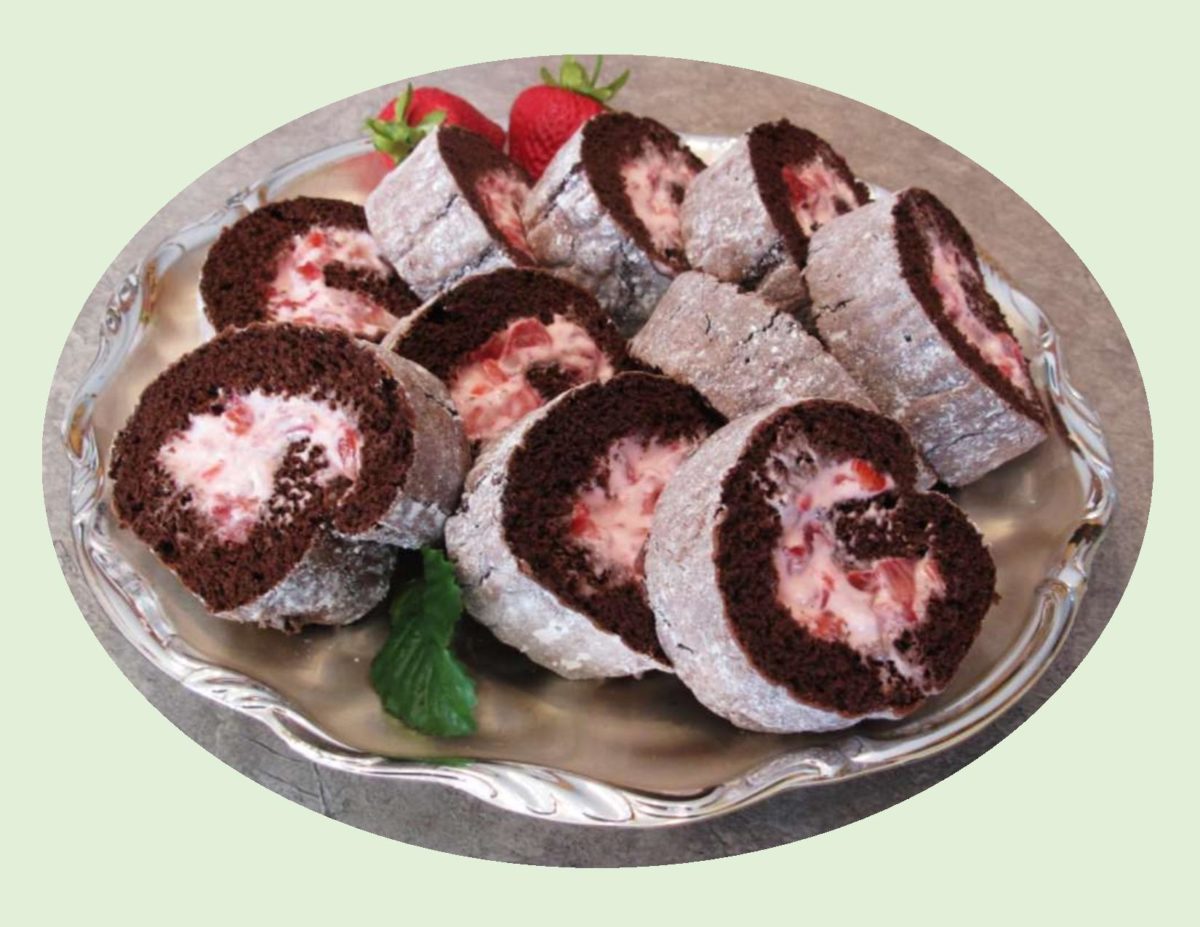
The pairing of chocolate and strawberries is hands down one of the best combos in dessert history. Both have long and rich histories. Strawberries were found growing wild in Italy centuries ago. The name itself has some myth around it stemming from the idea people put ‘straw’ around the base of the plant for both nutrients and protection.
Chocolate was enjoyed by Aztec and Mayan civilizations as a beverage and even used cocoa beans as a currency. As cocoa spread around the world, different ideas for its use emerged. Candy makers added milk & sugar or nuts and caramel to their chocolate confections.
In the 1960’s, Lorraine Lorusso created a decadent chocolate covered strawberry. As the story goes, she worked at a small gourmet shop called the Stop N’ Shop in Chicago, USA. She took a tempered version of the gourmet chocolate that was sold in the store and dipped some fresh strawberries into the mixture. She allowed the chocolate to harden and served these strawberries to their paying customers. The treat was an instant success.
I’ve done my own pairing of strawberries and chocolate in this cake roll with a cream cheese filling. Hope you get a chance to enjoy one through the summer as well.
Print Recipe
Strawberry Cream Chocolate Roll
Votes: 1
Rating: 5
You:
Rate this recipe!
|
|
Votes: 1
Rating: 5
You:
Rate this recipe!
|
Instructions
Chocolate Cake
Preheat oven to 350 F. Line a 10 x 15-inch jelly roll pan with parchment paper. In a small bowl, combine flour, cocoa, baking powder & salt. Set aside.
In another bowl, whip egg whites until foamy, gradually adding HALF of the sugar. Beat until stiff peaks form. In a third large bowl, beat egg yolks until thick. Add remaining sugar, vanilla & water; beat until very thick. Gradually fold in flour mixture then egg whites.
Spread batter evenly into jelly roll pan. Bake for 14-16 minutes or until it tests done with a toothpick. Loosen edges & immediately turn cake onto a tea towel dusted with powdered sugar & remove parchment paper. Starting with narrower end, roll up cake in towel; cool completely.
Filling
In a small bowl, using an electric mixer, beat cream cheese, powdered sugar & lime juice. Fold in diced, fresh strawberries.
Assembly
Unroll cooled cake; remove towel. Spread cake with filling; roll up loosely to accommodate filling. Cover & refrigerate until ready to slice & serve.
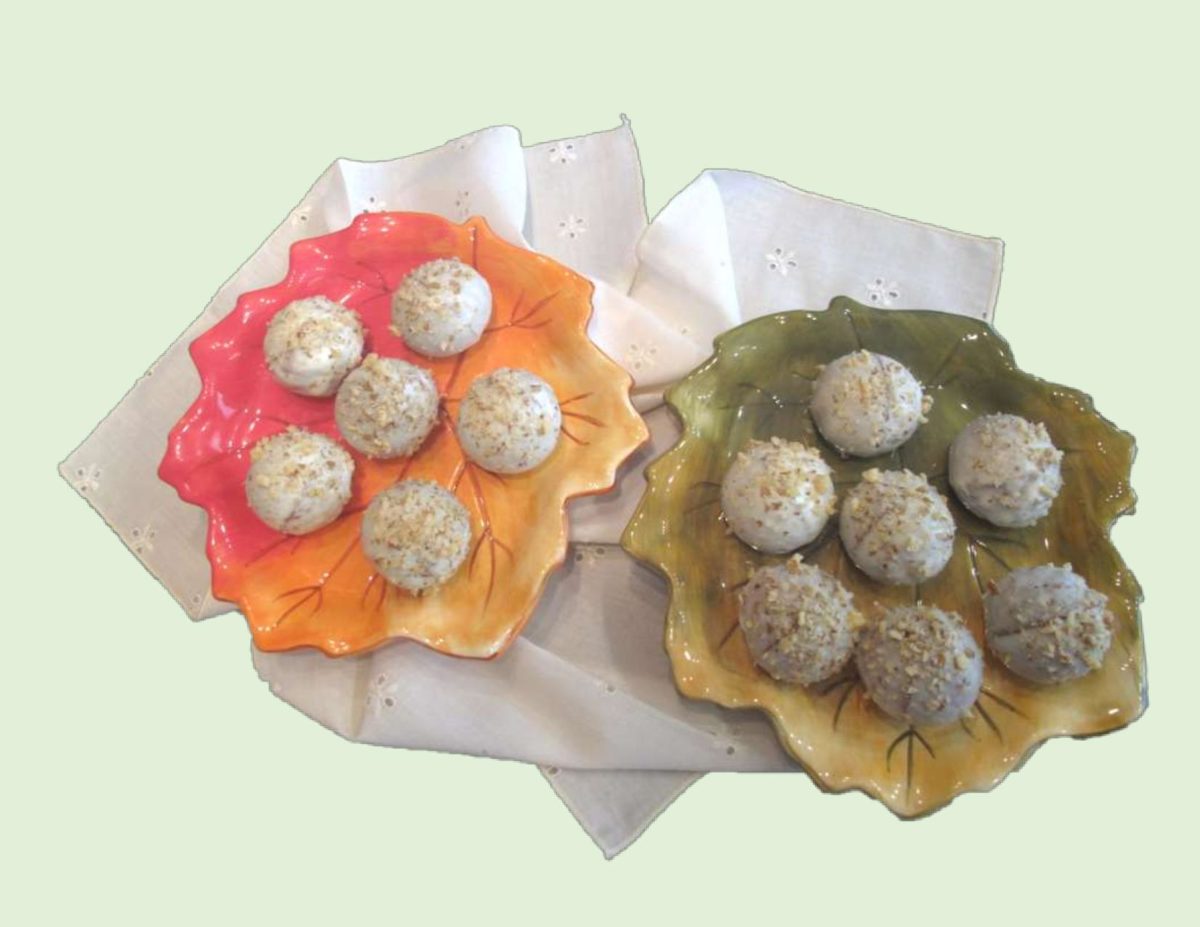
With doughnuts, its all about the ‘hole’. No hole, no doughnut. That little circle means everything. The idea of frying a piece of dough is ancient. The Romans, Dutch, Spanish and Germans all did it. While we know who introduced the doughnut, the story behind the doughnut hole is a little less clear. The most likely explanation was that at some point, bakers started adding egg yolks to their recipes, which produced a richer dough. Of course, this meant the middle of the doughnut no longer cooked at the same rate as its edges, resulting in doughy, raw centers. They came to the conclusion, that if they removed the thick center, the doughnut would cook evenly throughout. It was also believed that the hole was formed to make it easy to ‘dunk’ the doughnut in coffee. However, as in all food history stories you will find various other versions that are more entertaining and whimsical.
In Canada, doughnut holes that are sold by the Tim Horton franchise, have become known as ‘Tim bits’. The name is a play on the word ‘tidbit’ (a delicate bit of food). They were introduced in April 1976 and are available in at least 20 flavors that differ from store to store.
I’m not big on deep fried things whether they are sweet or savory. These carrot cake doughnut holes are baked — no frying necessary. Dip them in a bit of cream cheese ‘glaze’, sprinkle with remaining chopped walnuts and enjoy!
Print Recipe
Carrot Cake Doughnut Holes with Cream Cheese Glaze
Votes: 1
Rating: 5
You:
Rate this recipe!
|
|
Votes: 1
Rating: 5
You:
Rate this recipe!
|
Instructions
Doughnuts
Preheat oven to 350 F. In a bowl, finely grate carrots. Sift in flour then add brown sugar, soda & spices. Add egg & oil & beat until mixture is smooth. Fold in half of the chopped walnuts.
Butter & flour a cake pop pan. Divide batter between 14 holes. Secure top pan in place with rubber clamps. Bake for 10-12 minutes, testing with a toothpick at about 8 minutes. When baked, remove from oven & allow to cool before removing top pan.
Glaze
In a small bowl, with an electric mixer, beat cream cheese, margarine & milk. Gradually add sugar & vanilla beating to a glaze consistency.
Once doughnut holes are removed from pan & thoroughly cooled, dip in glaze, sprinkle with remaining walnuts. Allow to firm up in refrigerator before serving with forks.
Recipe Notes
- Self-Rising Flour is made with 1 1/2 tsp baking powder, 1/2 tsp salt & enough all-purpose flour to measure 1 cup.

About five years ago, Brion and I planted a ‘Cupid’ cherry tree in our back yard. I don’t know if you have ever heard about these ‘prairie’ cherry trees. They were developed here in Canada at the University of Saskatchewan for colder climates. A sour cherry was cross pollinated with a Mongolian cherry. This resulted in a variety of very hardy, smaller trees with a tart-sweet cherry about the size of the well-known ‘Bing’ variety. A group of five cherry trees were developed and became known as the ‘Romance’ series.
We chose this particular one because it is an early bloomer with large, dark red cherries that are both sweet and slightly astringent. The fruit matures in late August -early September with about a three week harvest period. The tree size is perfect as it matures to around eight feet tall. In the fall it’s glossy green leaves turn a beautiful yellow-orange. Last year we harvested over five pounds of cherries. Not a bad yield for a young tree.
I was going through the freezer the other day and noticed I still have some cherries left from last year. A Sour Cherry Cheesecake Galette seems like the perfect way to use them.
Print Recipe
Sour Cherry Cheesecake Galette
Votes: 1
Rating: 5
You:
Rate this recipe!
|
|
Votes: 1
Rating: 5
You:
Rate this recipe!
|
Instructions
Pastry
In a small bowl, combine sour cream & ice water; set aside. In a large bowl, whisk together flour, cornmeal, sugar & salt. Using a pastry blender or finger tips, cut in the butter until mixture resembles BOTH coarse crumbs & small peas. Sprinkle the cold sour cream mixture over dough, 1 Tbsp at a time, tossing with a fork to evenly distribute it. After you have added all the sour cream mixture, dough should be moist enough to stick together when pressed; if not, add additional cold water, 1 tsp at a time. Do not overwork dough.
Press dough into a disk shape & wrap in plastic wrap. Refrigerate for at least 2 hours. The dough can be kept in the refrigerator for a day or two or it can be wrapped airtight & frozen for a month. Thaw, still wrapped in refrigerator.
Filling
In a bowl, beat cream cheese, egg yolk, 2 Tbsp sugar & vanilla with an electric mixer until smooth. In another bowl, toss cherries with cornstarch & remaining 1 Tbsp sugar.
Assembly
Remove pastry from refrigerator. Preheat oven to 375 F. On a large sheet of parchment paper, roll out pastry dough into a 12-inch circle. Spread cream cheese mixture evenly over dough, leaving a 1 1/2-inch border. Spoon the cherries over cream cheese, leaving any excess juice in bowl. Gently fold pastry over cherries, pleating to hold it in. Brush with egg wash & sprinkle with sugar.
Bake 35-45 minutes until filling bubbles up & crust is golden. Cool for at least 20 minutes on a wire rack before serving.

I realize raspberry season in our part of the country is still a number of months away. I still see nothing wrong with using some of those frozen ones from last years crop. If there’s one thing I love, its an easy dessert that is still totally delicious. Combining raspberries and cream cheese is a match made in heaven then add some oatmeal and it becomes amazing.
The cheesecake part of this recipe has been one of my ‘go to’ recipes when it comes to the base for any any number of variations. Since I had some frozen raspberries on hand I though they would give this dessert just what it needs. I have also used different pie fillings and preserves in it or just left it as a plain cheesecake bar — all are good. These bars freeze well so its great when you need a bit of dessert on short notice.
Print Recipe
Raspberry Oatmeal Cheesecake Dessert
Votes: 1
Rating: 5
You:
Rate this recipe!
|
|
Votes: 1
Rating: 5
You:
Rate this recipe!
|
Instructions
Raspberry Filling
In a saucepan over medium heat, stir together 1 1/2 cups raspberries, sugar & water until sugar is dissolved. Bring to a boil, stirring often. Reduce heat & add vanilla. In a small dish, combine cornstarch & 2 Tbsp water; mix well. Add to boiling mixture, stirring over medium-low heat for about 4 minutes or until mixture has thickened. Remove from heat & allow to cool for 15 minutes, then fold in the last of the raspberries. Set aside.
Oatmeal Crust
In a bowl, combine flour & brown sugar; cut in butter until crumbly. Stir in oatmeal. Reserving 1 1/2 cups; press remainder onto bottom of a 15 x 10-inch jelly roll pan.
Cheesecake Filling
Preheat oven to 350 F. In a large bowl, using an electric mixer, beat cream cheese & sugar until fluffy. Add eggs; beat well. Add milk & vanilla then lemon juice & beat well.
Assembly
Pour cream cheese mixture over crust evenly. Next, carefully pour raspberry filling over cheesecake evenly. Sprinkle top evenly with reserved crumb mixture. Bake 25 minutes or until tests down. Cool thoroughly & cut into bars or diamond shapes.
Recipe Notes
- This recipe will divide easily into thirds for a smaller batch.
- If you prefer the raspberries sweeter, add another 1/4 cup sugar.
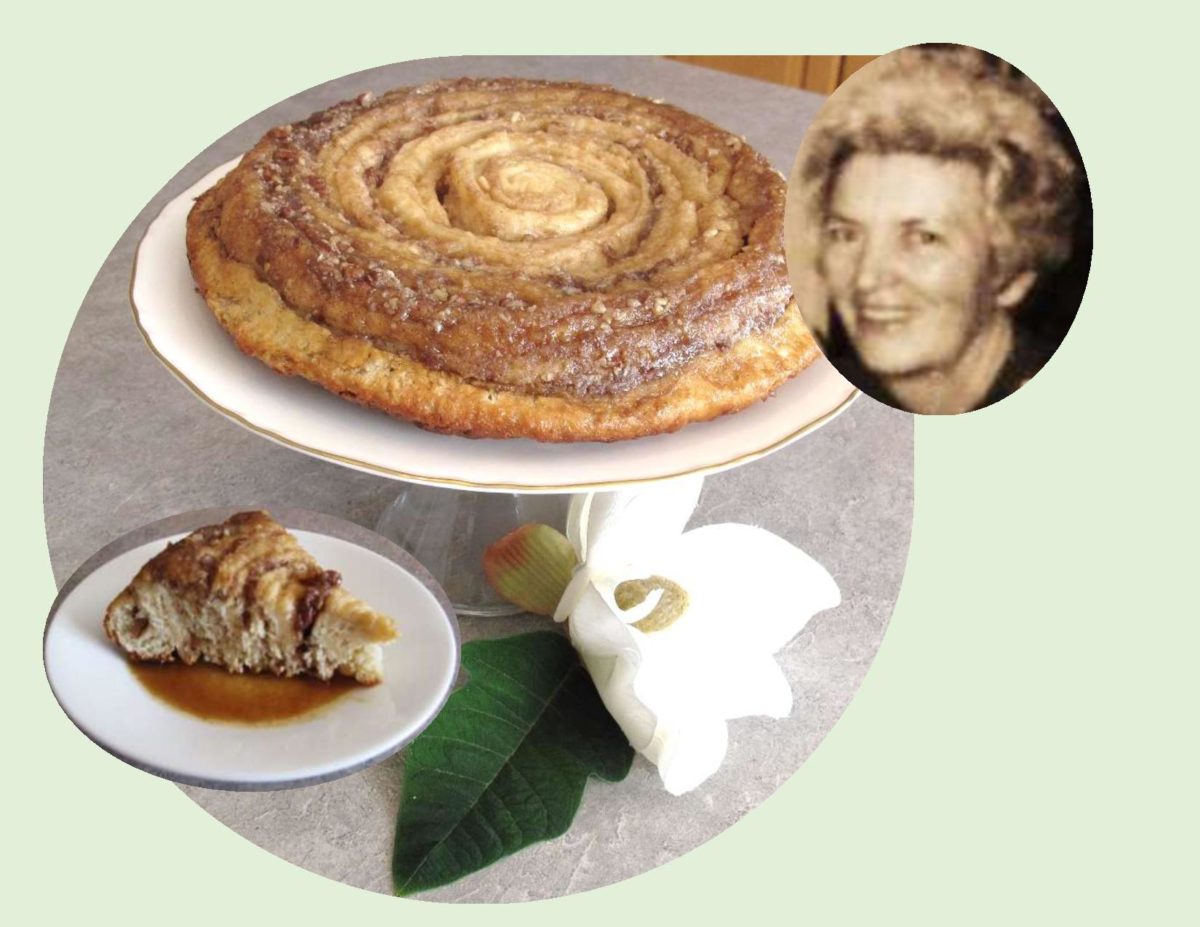
Today, March 28th, marks the date of my mother’s birthday. She passed away in 1978 at the age of 60. No matter how many years go by she will always be the never ending song in my heart. She had such a wonderful ability to make the everyday things more enjoyable. I have so many great memories of those times that I just took for granted and now realize how special they were. Her courage and strength to endure the harshness that farm life sometimes throws at you was nothing short of amazing. As we honor my mother today, we hold on to those precious memories that will never fade from our minds.
As I have mentioned so many times before, my mother was exceptional in her ability to cook and bake. Regularly, when she baked bread, one of the extra treats was a pan of cinnamon rolls. This Kahlua Nut Roll seemed perfect for today’s blog recipe.
In 1986, a little recipe pamphlet was published by Maidstone Wine & Spirits Inc. using Kahlua liqueur. All you had to do was write to them and request as many copies as you wanted free of charge. It contained about 90 recipes all using Kahlua. What a great bit of ‘PR’ work!
The oldest proof of Kahlua’s date of origin is a bottle found by Maidstone. The bottle came from Mexico and was dated 1937. The word Kahlua was discovered to have ties to ancient Arabic languages and the old label, which bears similarity to the current label, shows a turbaned man smoking a pipe beneath a Moorish archway. The only obvious change in the current label is the man has become a sombrero wearing man, napping beneath the same Moorish archway and in some labels there is no man pictured at all.
My Kahlua Cinnamon Nut Roll was adapted from this great little recipe pamphlet.
WONDERFUL MEMORIES OF OUR BEAUTIFUL MOM!
Print Recipe
Kahlua Cinnamon Nut Twist
Votes: 2
Rating: 4
You:
Rate this recipe!
Ingredients
Cream Cheese/Pecan Filling
Ingredients
Cream Cheese/Pecan Filling
|
Votes: 2
Rating: 4
You:
Rate this recipe!
|
Instructions
Yeast Dough
In a small dish, add yeast to lukewarm water; set aside. In a large bowl, combine milk, shortening, sugar & salt. Add 1 cup of flour; beat well. Add egg, yeast mixture & remaining 1 1/4 cups flour.; beat to form moderately stiff dough. Turn out on a floured work surface. Knead gently until smooth & elastic. Lightly butter bowl, form dough into a disk & cover with clean tea towel. Let rise in a warm place until doubled in bulk, about 50-60 minutes.
Cream Cheese/Pecan Filling
In a bowl, combine cream cheese & butter until smooth. In another dish, combine pecans, brown sugar, cinnamon & salt. Set aside.
Kahlua Syrup
In a small sauce pan, melt butter; add brown sugar & Kahlua liqueur. Bring to a boil; simmer until sugar dissolves. Remove from heat; reserve 1/3 cup syrup. Pour remaining syrup into a 9-inch round cake pan.
Assembly
When dough has risen, turn out on a lightly floured work surface & roll into a 14-inch square. Spread dough with cream cheese mixture & sprinkle sugar mixture on one half. Fold other half over sugar & press lightly to adhere.
Cut dough lengthwise into 5 strips. Beginning in the center of prepared pan, wrap strips in a spiral pattern, pinching ends together. Cover & let rise in a warm place until doubled in bulk.
Preheat oven to 350 F. Bake until golden & cooked through, about 25-30 minutes. Remove & let stand in pan 5 minutes. Invert onto serving plate; spoon reserved syrup over top.
-
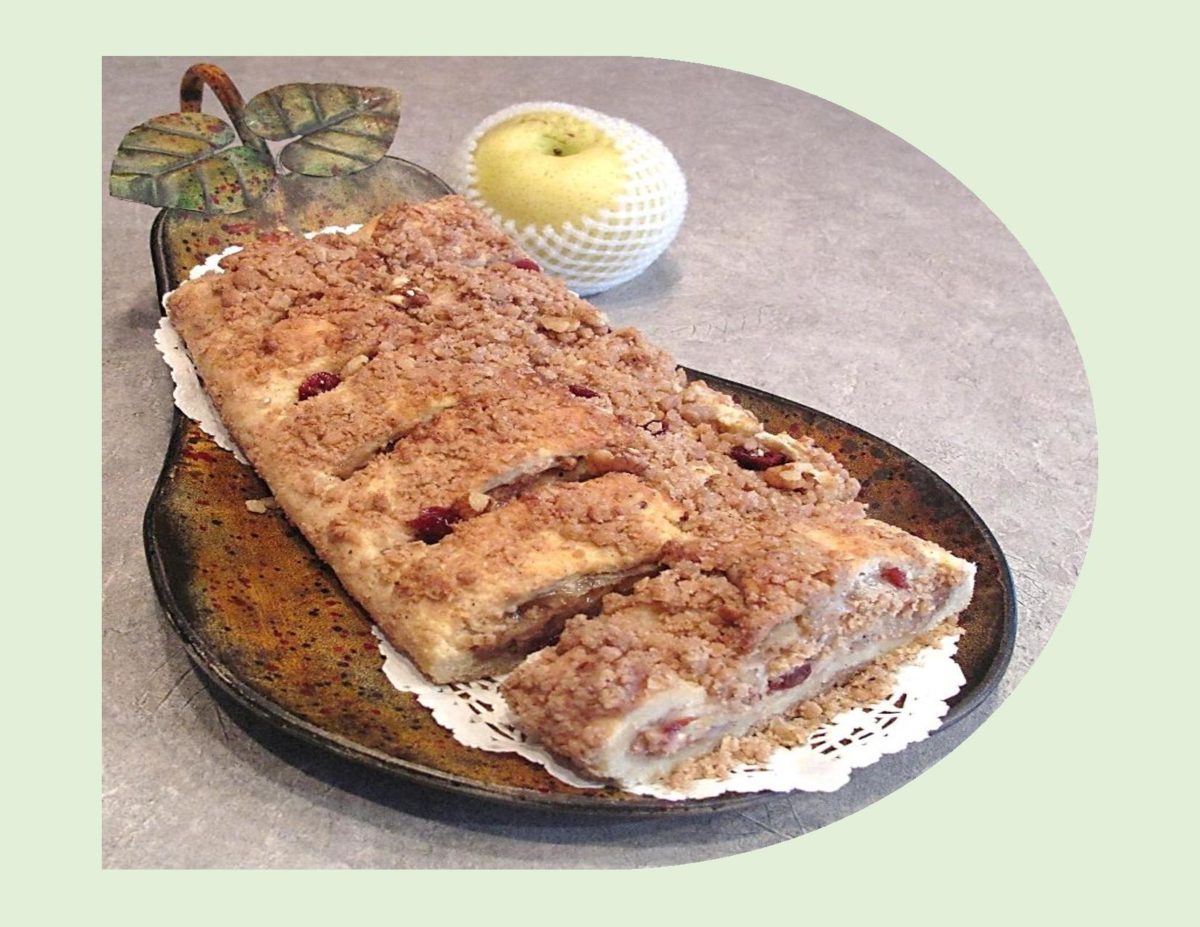
Perhaps its no surprise that Asian pears suffer an identity crises. They are often called ‘apple pears’ because of their crisp texture and apple flavor characteristics. Asian pears are a cross between the Ussuri pear and the Japanese Sand pear, having no relation whatsoever to apples.
Some of the Asian pears made their way west with Chinese and Japanese immigrants in the 1850’s. Their shape and taste were modified into fruit like the well known ‘Bartlett’pear. Other pears travelled eastward to Korea and Japan. These ‘Asian’ pears became more like an apple in shape and crisper in texture. Unlike other types of pears, which you want to eat when they have a bit of give to them, ripe Asian pears are firm. Even though they are hard, they still bruise easily, which is why you often see them sporting ‘foam net sweaters’ for protection in the grocery stores.
Since I had a couple of these nice juicy pears on hand as well as some Brie, putting them into strudel seems like a good idea. I’m just going to ‘wing it’ as the saying goes, and combine a few ideas to see what develops. What’s not to love about strudel, right?!
Print Recipe
Asian Pear & Brie Strudel
Votes: 2
Rating: 4.5
You:
Rate this recipe!
|
|
Votes: 2
Rating: 4.5
You:
Rate this recipe!
|
Instructions
Pear Filling
In a small saucepan, combine pears, apple juice & maple syrup. Bring to boiling; reduce heat & simmer uncovered about 5 minutes or until pears are tender. Drain pears; add nuts, cherries, brown sugar & apple pie spice. Toss gently until mixed; set aside.
Streusal
In a bowl, stir together flour, oats, sugars, spices & salt until fully combined. Gently stir in melted butter & crumble ingredients together. Set aside
Strudel Pastry
In a medium bowl, stir together flour, baking powder & salt. With a pastry blender, cut in cream cheese & shortening until mixture resembles coarse peas. Stir in milk. On a lightly floured work surface, knead dough gently about 20 times. On a sheet of parchment paper, press dough out to a 14"x 14" square & lightly butter pastry.
On another large sheet of parchment paper, spread streusal topping out evenly. Lay pastry, buttered side down over streusal & press down lightly. Lay thinly sliced BRIE cheese over pastry, then top evenly with pear filling. Roll up pastry from the longest side using parchment to do so.
Preheat oven to 350 F. Lay filled strudel roll with parchment on a baking sheet. Slice top of strudel part way through at 1" intervals. Remove any excess streusal. Bake about 40 minutes or until golden brown. Remove strudel from baking sheet & place on a wire rack. Sprinkle with excess streusal.
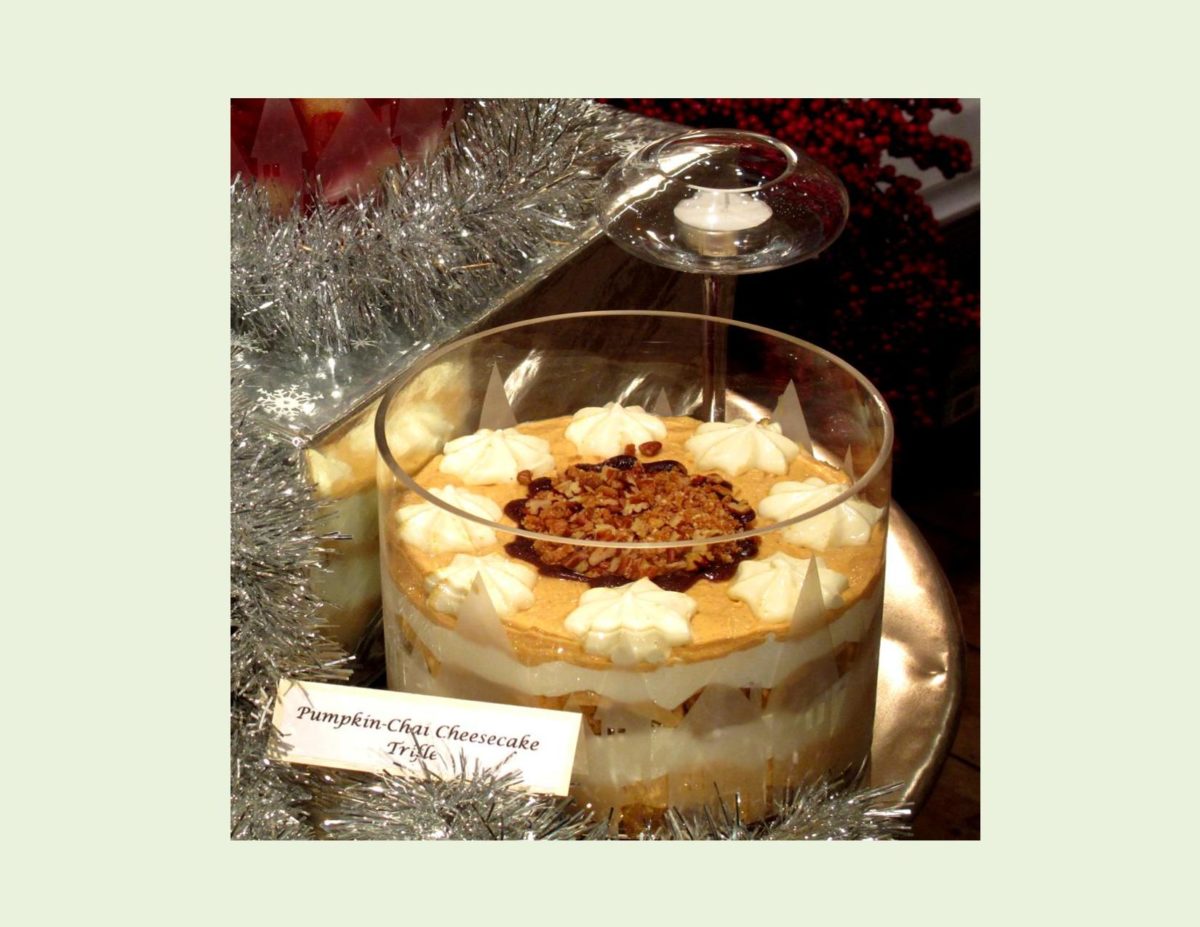
In the winter of 2011, Brion and I spent a month travelling Turkey. While in Istanbul, we happened to be staying in a hotel next to a Starbucks coffee shop. By chance I tasted a ‘Pumpkin Spice Chai Latte’. That unique flavor left a lasting memory with me. Back at home, I wanted to recreate that flavor. The recipe today is what developed from that memory.
The word trifle comes from the old French term, ‘trufle’ and literally means something whimsical or of little consequence. In actual food terms, it’s anything but. A proper English trifle is made with real egg custard poured over sponge cake, soaked in fruit and sherry then topped with whipped cream.
Though a simple dessert to make, trifle looks gorgeous with its multiple layers, colors and textures. It is not only served as a dessert but used as a centerpiece on occasion.
Many puddings evolved as a way of using leftovers, thus trifle originating from stale cake. Some of the many cake choices are sponge, Genoise, ladyfingers, pound cake and macaroons. Alcohol used, often ranges greatly from sherry, white wine, rum, liqueurs and scotch as well as just using a fruit juice. In order for the flavors to marry properly, trifle needs about 8 hours of refrigeration time. In North America, trifle is synonymous with the festive Christmas season.
My blog picture is a PUMPKIN CHIA CHEESECAKE TRIFLE that I made for a Christmas event. If you like pumpkin and cheesecake this trifle is for you!
Print Recipe
Pumpkin Chai Cheesecake Trifle
Votes: 2
Rating: 5
You:
Rate this recipe!
|
|
Votes: 2
Rating: 5
You:
Rate this recipe!
|
Instructions
Pound Cake
Preheat oven to 350 F. Spray a 9 x 9-inch square pan with baking spray.
In a large bowl, combine all dry ingredients (through allspice). In a medium bowl, whisk eggs, egg white, milk, oil and pumpkin until thoroughly blended. Combine wet ingredients with the dry ingredients, stirring until just blended. Spread batter into the prepared pan. Sprinkle pumpkin seeds on top.
Bake until lightly browned & a toothpick inserted into the center comes out clean, about 30 minutes. Cool in pan for 10 minutes, then turn out onto a wire rack & allow to cool completely. With a wooden skewer, poke holes in cake about 2-inches apart. Slowly pour 1/2 cup Apricot Brandy over cake. Refrigerate overnight.
Pumpkin Filling
In a medium bowl, beat cream cheese & pumpkin with a mixer until well blended. Add spices & dry pudding mix; beat until well blended. Gradually blend in milk.
Creme Filling
In a medium bowl, beat cream cheese with a mixer until creamy. Gradually beat in milk. Add dry pudding mix; blend well. Fold in thawed Cool Whip.
Topping
Preheat oven to 350 F. In a medium bowl, coarsely crush wafers; place in medium bowl. Add butter, nuts, sugar & 1/4 tsp pumpkin pie spice; mix well. Spread onto the bottom of a shallow pan. Bake 10-12 minutes or until light golden brown; cool. Break cooled, baked nut mixture into smaller pieces; store in airtight container at room temperature until ready to use.
ASSEMBLY
Cut pound cake into 1-inch cubes. Line bottom of a straight-sided trifle bowl with 1/3 of cake cubes, 1/3 pumpkin filling, 1/3 creme filling & 1/3 of the nut mixture. Repeat 2 more times. Decorate as desired. Drizzle with bottled Dulce de Leche Creme.

When cinnamon, sugar and butter are mixed together, the result is something many people all over the world find irresistible.
The first cinnamon roll was created in Sweden, around the 1920’s. After World War I, several goods such as sugar, eggs and butter, which had been heavily restricted, eventually returned to the grocery shelves. The spice trade from Southeast Asia also led to the invention of the roll. Cinnamon was not grown locally in the European countries, hence the spice trade from Sri Lanka led to the development of cinnamon use in the European countries. The influences of German baking techniques combine with Swedish and Danish ingredients can clearly be seen in the making of the cinnamon roll.
In Sweden, October 4th is ‘Kanelbulle’ day or national ‘Cinnamon Roll Day’. This holiday was originally created by the country’s Home Baking Council in 1999 to commemorate their 40th anniversary. Swedish cinnamon rolls are not as sweet and heavy as they are in North America. The dough contains a hint of cardamom spice and they are generally baked in muffin papers to make a more delicate treat.
Our family definitely enjoyed a lot of irresistible cinnamon rolls. As is everything that becomes the ‘norm’, you take it for granted until you no longer have it and it becomes a ‘taste of a memory’.
I recall my mother also making ‘potato’ doughnuts. The mashed potato seems to really add to the flavor of a yeast dough. In keeping with this Swedish ‘holiday’, I am making POTATO CINNAMON ROLLS or ‘Twists’.
Print Recipe
Potato Cinnamon Rolls (Twists)
Votes: 1
Rating: 5
You:
Rate this recipe!
|
|
Votes: 1
Rating: 5
You:
Rate this recipe!
|
Instructions
Dough
In a large mixing bowl, combine lukewarm milk with yeast; whisk until yeast is dissolved. Allow to stand about 3 minutes or until foamy. Add warm mashed potato, melted butter, eggs, sugar, cardamom & salt; mix well. Stir in flour, one cup at a time. When dough is completely blended, turn onto a lightly floured surface. Knead for about 10 minutes, until smooth & elastic.
Place dough in a lightly greased bowl, turning dough to completely coat it with grease. Cover with plastic wrap; allow to rise in a draft-free place until doubled in size. Punch down, turn out on a lightly floured work surface & let rest for about 10 minutes.
Cinnamon/Sugar Mix
In a small bowl, combine brown sugar & cinnamon; set aside.
Assembly
Line a baking sheet or two with parchment paper. On a lightly floured surface, roll dough out into a 14 x 14-inch square. Brush with melted butter & evenly sprinkle with cinnamon/sugar mixture. Fold dough into thirds like a business letter, then roll again into a 14 x 8-inch rectangle. Facing the long edge, cut dough into roughly 18 -8-inch strips. Twist each strip several times, slightly stretching it as you do so. Take one end of the twisted strip & coil the dough around your hand twice, then over the top. Coil dough again & tuck the loose end in at the bottom.
Arrange on baking sheets. Cover with plastic & allow to rise in a draft-free place, 45-60 minutes or until doubled in size. Place oven rack in middle position & preheat oven to 350 F.
If you prefer, you can brush rolls with egg wash & sprinkle with pearl sugar or chopped almonds instead of using cream cheese glaze. Bake for 15-20 minutes or until golden brown. While cinnamon rolls are baking, make glaze (if you are using it). With a mixer, beat together cream cheese & butter until light & fluffy. Blend in powdered sugar & vanilla. Add enough milk to achieve a drizzle-like consistency. Drizzle on rolls while still warm.
-
Recipe Notes
- Freezer Instructions: Form cinnamon rolls into twisted shape & place several inches apart on baking sheet to freeze rolls individually. Once frozen, transfer to a resealable plastic freezer bag. When ready to bake, place on a lightly greased baking sheet & allow to come to room temperature before baking.


