
What to call it — an omelette, frittata or quiche? While this trinity of brunch egg dishes all contain eggs, the preparation methods vary. All are delicious but here’s what defines them.
The traditional French omelette contains eggs, a splash of water and a pinch of salt and pepper. The briskly whipped eggs are cooked in clarified butter then turned out of the pan when still a little custardy and unset. These (colorless) omelettes are rolled up like a business letter and served with only a few herbs. In North America, we seem to want to ‘clean out the fridge’ so to speak, adding just about anything and everything. This version is cooked until mostly dry on top and golden on the bottom. As a rule, they are folded over once, then served.
Frittatas are generally thicker than omelettes. The ingredients are mixed in, instead of sprinkled on. While started on the stove, sometimes they are finished under the broiler then served in slices like a pie.
Quiche, on the other hand, is a savory custard baked in a pastry crust or a potato crust. Quiche gets its richness from the addition of whole milk, half & half or even heavy cream. Just to add another twist to the mix — enter the ‘crustless quiche-omelette’.
This particular meal at our house, was one of those ‘clean out the fridge’ ideas that turned out absolutely wonderful. I had posted the salmon/dill scones on a blog a number of years ago. They made an ideal compliment for this meal.
Print Recipe
Baked Avocado Bacon Omelette with Salmon/Dill Scones
Votes: 1
Rating: 5
You:
Rate this recipe!
|
|
Votes: 1
Rating: 5
You:
Rate this recipe!
|
Instructions
Baked Omelette
Preheat oven to 350 F. Spray a deep pie plate with cooking spray.
In a skillet, saute bacon until cooked but not real crisp; dry on paper towel & crumble. Add onions, mushrooms & garlic to skillet, sauteing in bacon drippings until tender crisp. Chop tomato & 1 avocado. Grate cheese. In a bowl, whisk together eggs, milk, salt & pepper. Add all prepared ingredients; gently stir.
Pour mixture into pie plate distributing evenly. Bake 35-40 minutes, rotating once half way through. Let omelette cool for 5 minutes. Top with remaining sliced avocado & serve.
Salmon/Dill Scones
Preheat oven to 350 F. Line 8 muffin cups with paper liners. In a bowl, mix together flour & baking powder. Add grated cheese, smoked salmon & dill. In a separate bowl, whisk egg, buttermilk & oil.
Place half of the wet ingredients into the dry ingredients & stir well. Then add the rest of the wet ingredients & mix until completely combined. Spoon into paper liners until each is filled halfway, then place a heaping tsp of cream cheese in the middle of each scone. Divide the rest of the batter between the 8 cups.
Bake for 10 minutes, rotate pan & continue to bake for another 10 minutes or until scones are just browning on top & test done.

I have always enjoyed making (and eating) tea breads. They can come in all sizes and even though they are called bread, for most part, I’d say they are cake.
Tea breads are part of the quick bread genre. They are considered quick because they don’t require kneading or rising time. Instead of yeast, usually baking powder or baking soda or a combination of both are used as a leavening agent.
Afternoon tea, the quintessential English custom, was introduced in England by a Duchess in the year 1840. The evening meal in her household was served fashionably late at 8 PM, thus leaving a long period of time between lunch and dinner (supper). The Duchess asked that a tray of tea, bread/butter and cake be brought to her room during the late afternoon. This pause for tea became a fashionable social event. Upper class and society women would change into long gowns, gloves and hats for their afternoon tea which was usually served in the drawing room between four and five PM.
This tea loaf, pairs sweet, ripe strawberries with the bright, clean flavor of lemon zest and is topped off with a tangy kiwi glaze. A match made in food heaven.
Print Recipe
Strawberry Tea Loaf with Fresh Kiwi Glaze
Votes: 1
Rating: 5
You:
Rate this recipe!
|
|
Votes: 1
Rating: 5
You:
Rate this recipe!
|
Instructions
Strawberry Tea Loaf
Preheat oven to 350 F. Grease a 9 X 5-inch loaf pan, line bottom with strip of parchment paper with 2-inch overhang on either end.
In a large bowl, whisk together flour, sugar, baking powder, baking soda & salt. In a separate bowl, whisk eggs, buttermilk, applesauce, lemon zest & vanilla. Pour egg mixture into dry ingredients. Mix just until incorporated. Fold in prepared strawberries. Scrape batter into pan.
Bake 50-60 minutes, or until cake tested with a toothpick in the center comes out clean. Cool loaf in pan, set on wire rack, 20 minutes before using parchment overhang to lift out loaf. Cool completely on rack. Slice & serve with kiwi glaze.
Kiwi Glaze
In a small saucepan, sprinkle gelatin over the cold water & set aside to soften. Peel the kiwi and blend in a food processor or blender until pureed. Be careful not to over-process as the black seeds will break down & change the color of the puree.
Add the kiwi puree to gelatin mixture. Heat mixture to dissolve gelatin but do not over heat. Continue to stir until dissolved. Keep covered in refrigerator until needed.
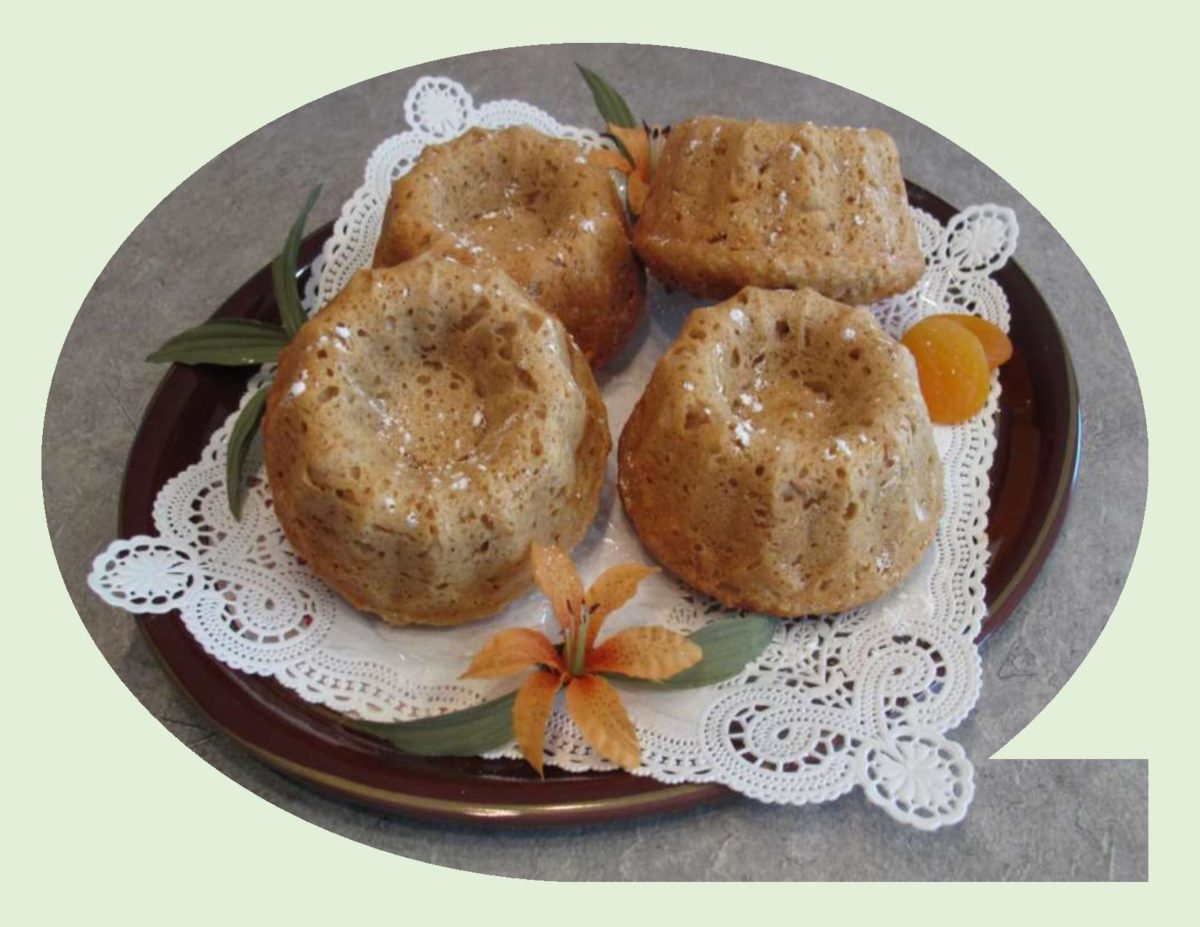
I don’t know if you recall Post Grape-Nuts cereal? It was one of the first ready-to-eat cereal products ever made available to the public. Developed by C.W. Post in 1897, Grape-Nuts was so named because of the glucose, which he called ‘grape sugar’, that formed during the baking process. This, combined with the nutty flavor of the cereal, is said to have inspired its name. Originally the cereal came out of the oven as a rigid sheet. He then broke it into pieces and ran them through a coffee grinder to produce the ‘nut’ sized nuggets.
In addition to being the first wide spread product to use a coupon ( Posts’ penny-off coupon was a game changer at that time), Grape-Nuts was also there for several famous moments in world history.
The cereal was made of wheat and malted barley. A unique muffin recipe I had used during some of my commercial food service years, made use of this particular cereal. It gave the muffins such a wholesome, nutty taste and was always enjoyed by customers.
Somewhere, in the late 90’s the cereal became discontinued here in Canada for whatever reason. I suspect with the dozens of cereals available these days, grocers ran out of shelf space. Anyway, I got an idea to re-invent that great tasting muffin recipe into a coffeecake. I understand that ‘Kashi 7 Whole Grain Nugget Cereal’ would be a good replacement. When I read the ingredients of oats, wheat, rye, brown rice, triticale, barley, buckwheat and sesame it sounded great or maybe even better.
Print Recipe
Vintage 'Grape-Nut' Coffeecake
Votes: 9
Rating: 4.33
You:
Rate this recipe!
|
|
Votes: 9
Rating: 4.33
You:
Rate this recipe!
|
Instructions
-
Preheat oven to 325 F. Butter a 12-cup bundt pan.
-
In a large bowl, combine first 7 ingredients & allow to stand for 10 minutes. In a small bowl, combine flour, baking soda & salt. When wet mixture is 'soaked', combine wet & dry ingredients, stirring ONLY until moistened.
-
Spread 1/3 of batter in bundt pan. Place dollops of apricot preserve (about 1/4 cup) over batter; carefully spreading evenly. Repeat again then ending with the top layer being cake batter. Bake until wooden pick inserted near center comes out clean, about 45 minutes to an 1 hour. Remove from oven; cool slightly before removing from pan. If you wish, coffeecake can be dusted with powdered sugar or drizzled with a cream cheese glaze.
Glaze
-
In a small bowl, whisk 60 grams of cream cheese with 1/2 cup powdered sugar, 2 Tbsp butter & 1/2 tsp vanilla until drizzling consistency. If necessary, add a little milk. Drizzle over coffeecake.

There’s no question, fresh blueberries are a pleasure to bake with. But, along with being quite expensive, their season is short. As a result, frozen ones become the backbone of winter blueberry desserts. Using them in a pie presents no problem. When it comes to putting them into a batter, frozen berries bleeding juice, turn that golden hue into a shade of purple green when baked. Not good! I’ve found a simple solution is to rinse the berries in cold water, then gently dry them between layers of paper towel. You will probably lose a bit of the berries nutrition, but for most part, the juice and vitamins will remain inside.
Pairing zucchini with fruit in baked goods might seem a little odd but no different than using carrots in cake. Zucchini has grown in popularity over the years due to its amazing growth rate in the garden and its versatility. It can be sauteed, baked, poached, stuffed, eaten raw and of course baked into breads, cakes, scones etc., etc.
These little blueberry/zucchini bars are extremely moist and tender. The lemon in the batter and the glaze takes them to the level of amazing in my opinion. We just loved them.
Print Recipe
Blueberry Zucchini Bars with Lemon Glaze
Votes: 4
Rating: 4.75
You:
Rate this recipe!
|
|
Votes: 4
Rating: 4.75
You:
Rate this recipe!
|
Instructions
Batter
Preheat oven to 350 F. Grease a 9 X 13-inch ( or 15 X 10 X 1) baking pan.
In a small bowl, combine zucchini, buttermilk, lemon zest & lemon juice; toss to combine. In a large bowl, cream butter & sugar until light & fluffy. Beat in eggs, one at a time. In a third bowl, whisk 3 1/4 cups flour, baking soda & salt; gradually add to creamed mixture alternately with zucchini mixture, mixing well after each addition. Toss blueberries in remaining flour; fold into batter.
Transfer batter to prepared pan, spreading evenly. Bake 50 minutes for 9 X 13-inch size or until light golden & a toothpick inserted in center comes out clean. Remove from oven to a wire rack.
Lemon Glaze
In a small bowl, mix glaze ingredients until smooth; spread over top while bars are still warm.
Recipe Notes
- This recipe easily divides in half for a smaller amount using an 8 X 8-inch baking pan.
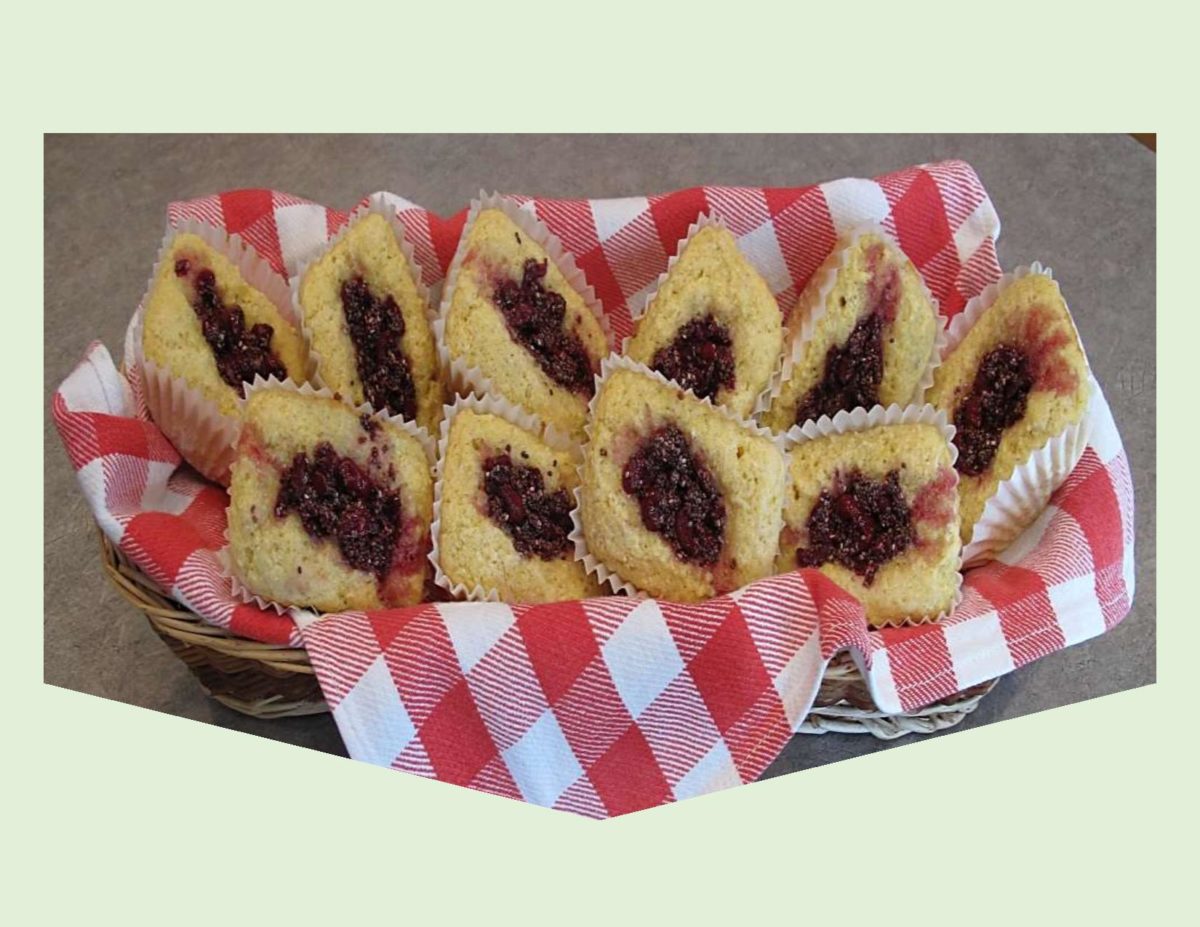
When I was growing up, cornbread was one of my favorites. My mother always called it ‘Johnny Cake’. Because it is a little sweeter than most dinner breads, it seemed like we were having dessert along with our soup, chili or whatever our main course was. That’s the nice thing about cornbread — it can be whatever you want it to be from breakfast to dessert.
Tucked away in the freezer, I have a little stash of sour cherries. On this occasion I’ve decided to make a bit of ‘sour cherry chia jam’ and add a dollop to the center of some cornbread scones.
Chia seeds used to be a niche ingredient you could only come up with at health food stores. Then all of a sudden they began appearing at the grocery store in the bulk department. As time has passed, the price is becoming a little better as well as the availability of them.
Chia seeds are harvested from a flowering plant in the mint family, which is native to parts of Mexico and Guatemala. Good quality seeds are naturally black or white in color, not brown. The brown chia seeds are immature ones which haven’t had a chance to mature properly, resulting in a bitter taste. Having a long shelf life, chia seeds will keep for several years when stored in a cool, dry place.
These scones may seem a bit unusual, but are well worth trying. I always enjoy to incorporate a bit of oatmeal for some extra flavor.
Print Recipe
Cornbread Scones with Sour Cherry Chia Jam
Votes: 2
Rating: 5
You:
Rate this recipe!
|
|
Votes: 2
Rating: 5
You:
Rate this recipe!
|
Instructions
Sour Cherry Chia Jam
In a saucepan, bring cherries to a boil, stirring frequently. Reduce heat to low & simmer until the cherries soften, about 5 minutes. Remove from heat & stir in honey & chia seeds. Continue stirring for about 5 minutes until mixture thickens. Use in making the cornbread scones. Store any leftovers in a glass jar in the refrigerator. The jam will keep in the fridge for up to a week.
Scones
Preheat oven to 350 F. Lightly butter mini loaf pans or whatever choice of pan is preferred. In a food processor, pulse oatmeal for a few seconds then add flour, cornmeal, salt, baking powder, baking soda & sugar. Pulse for a few more seconds to evenly mix. Add cold butter & pulse just slightly to cut in; do not over mix. Place in a bowl, add buttermilk & combine ONLY until just mixed.
Divide dough into 10 mini loaf cups. Place a dollop of cherry chia jam in the center of each scone. Bake 15-20 minutes or until they test done with a toothpick. Nice to serve warm.

Not a pie at all, traditional whoopie pies are two thin chocolate cakes sandwiched around a white frosting. The origin of the whoopie pie is somewhat controversial. Some people say they were invented in Medieval Germany and brought to the USA by immigrants. Women would bake cakes and use leftover batter and icing to make these special treats. The little cake sandwiches were placed in children’s lunch boxes, where upon discovering them, cries of ‘whoopie’ were shouted. From the basic chocolate and vanilla formula of the past, a whole host of varieties have since taken the stage.
I love the pastel shades of Spring and try to incorporate them into anything I can. When I was shopping the other day, I happened to see some little colorful French Macaron cookies in a bakery window. As great as they look, I personally have never cared for the ‘meringue’ type cookie. Nevertheless, it gave me some inspiration for some ‘spring’ whoopie pies. Adding a few new flavors to the chocolate and vanilla batters along with some flavored Mascarpone fillings takes whoopie pies (cookies) to a whole new level.
Print Recipe
'Spring" Whoopie Pies with Mascarpone Filling
Votes: 1
Rating: 5
You:
Rate this recipe!
Ingredients
Basic Vanilla Cookie Batter
MASCARPONE FILLINGS - Raspberry, Blueberry, Apricot & Strawberry Preserve
Ingredients
Basic Vanilla Cookie Batter
MASCARPONE FILLINGS - Raspberry, Blueberry, Apricot & Strawberry Preserve
|
Votes: 1
Rating: 5
You:
Rate this recipe!
|
Instructions
Preheat oven 350 F. Line baking sheets with parchment paper. In a large bowl, using an electric mixer, beat butter, sugar & vanilla until light & fluffy. Beat in egg. In another bowl, whisk together flour, baking soda & salt. Add flour mixture to butter mixture alternately with buttermilk.
In separate small bowls, divide vanilla batter into 4 equal portions. Leave one plain, to the second dish add pistachio nuts & a tiny bit of green food color gel. To the third dish add 2-3 Tbsp Chambord liqueur & red food coloring. To the fourth add lemon zest & yellow food color.
FOR CHOCOLATE BATTER: Follow directions in the first paragraph, adding cocoa along with flour mixture. Using a small scoop or heaped tablespoon, spoon mixtures onto baking sheet. Allow room for spreading. Bake for 10-12 minutes. DO NOT OVER BAKE. Remove from oven & transfer to wire rack.
While whoopies are baking prepare Mascarpone fillings. For every 60 grams of Mascarpone use 2-3 Tbsp of one of the preserve flavors.
When the whoopies are cold, match each with whoopie half with its closest partner size. Spread with a knife or use a piping bag to cover the flat side of one whoopie half of each pair generously with filling. Top each with its matching half, flat side down & gently press together.
Recipe Notes
- Another flavor you might enjoy is lemon curd which can be purchased in the preserve section of the grocery store.
- For chocolate filling, add a little cocoa powder & powdered sugar to some Mascarpone.
- For some of the vanilla whoopies, I made a Rosewater flavored filling with 1 tsp margarine, 60 gm Mascarpone, 3 Tbsp powdered sugar & 3/4 tsp rosewater.

Traditions are always an interesting subject to me and as we acknowledge St. Patrick’s Day it seems a good time to check out a few. Corned beef and cabbage is hardly an Irish tradition. While the Irish certainly cooked corned beef, it was actually bacon (more like ham) and cabbage that was the yearly tradition. The unpopularity of corned beef in Ireland comes from its relationship with beef in general. From early on, cattle in Ireland were not used for their meat but for their strength in the fields, their milk and the dairy products produced. In Gaelic Ireland, cows were a symbol of wealth and a sacred animal. Because of their sacred association, cows were only killed for their meat if they became too old to work or produce milk. Beef was not even a part of the diet of the majority of the population.
However, the move to America changed that for many Irish immigrants. Corned beef was made popular in New York bars at lunchtime. The bars offered a ‘free lunch’ to the Irish construction workers who were building NYC in the early part of the 20th century. The catch was that you had to buy a couple of beers or shots of whiskey to get the free lunch. This is how corned beef became known as an ‘Irish’ food.
The Irish Americans transformed St. Patrick’s Day from a religious feast day to a celebration of their heritage and homeland. The popularity of corned beef and cabbage never crossed the Atlantic to the homeland. Instead the traditional St. Patrick’s Day meal eaten in Ireland is either lamb or bacon.
While on the subject of traditions, it brings me to Irish Soda Bread. Contrary to belief, soda bread did not originate with the Irish but instead with Native Americans before European colonization. At that time soda bread was made by using pearl-ash or potash (a natural soda in wood ashes) to make the bread rise. This became the forerunner to baking soda.
In the early and mid 1800’s, Ireland adopted this soda bread which is most often identified with them. Because it required so few ingredients, soda bread was an economic choice for staple breads. Irish families generally had kitchens with open hearths instead of ovens with breads being baked on griddles or in iron pots. This resulted in a loaf that was dense, slightly sour and with a hard crust. The original recipe contained nothing more than flour, buttermilk, baking soda and salt. The buttermilk was leftover from the butter making process. Irish Soda Bread pairs well with soups, stews and meat dishes.
Print Recipe
Irish Soda Bread
Votes: 1
Rating: 5
You:
Rate this recipe!
|
|
Votes: 1
Rating: 5
You:
Rate this recipe!
|
Instructions
Preheat oven to 425 F. Lightly flour a baking sheet. In a large bowl, combine flour, caraway seeds, baking soda & salt. Stir in buttermilk to form moist clumps. Gather dough into a ball. On a lightly floured work surface, knead dough until it holds together, about 1 minute.
Shape dough into a 6-inch diameter by 2-inch high round. Place on prepared baking sheet. Cut a 1-inch deep X across the top of bread, extending almost to the edges. Bake until bread is golden brown about 35 minutes. Remove from oven, cool completely on a wire rack.
Today is Shrove Tuesday or Pancake Day. The date can be any time between February 3rd and March 9th. It is exactly 47 days before Easter Sunday, based on the cycles of the moon. The expression ‘Shrove Tuesday’ comes from the word shrive, meaning ‘absolve’. This day is observed by many Christians who make a special point of self-examination of considering what wrongs they need to repent and what amendments of life or areas of spiritual growth they especially need to ask God’s help in dealing with.
Shrove Tuesday precedes Ash Wednesday or the first day of Lent. Popular practices, such as indulging in food that one sacrifices before commencing the fasting and religious obligations associated with Lent.
FASTNACHT, (or Shrove Tuesday) is celebrated throughout Germany with masquerades, carnival processions and ceremonials that vary in character according to locality and folk custom. Fasching is Germany’s version of Mardi Gras, a French term for ‘Fat Tuesday’. This carnival climaxes on the night before the fast. It’s roots go way back to ancient Roman times.
Fastnachts are yeasted doughnuts that are eaten in Germany instead of pancakes. Typically they have no hole or filling and are dusted with powdered sugar. The rich treats presented a way to use up all of the butter, sugar and fat in the house prior to the self-denying diets of Lent.
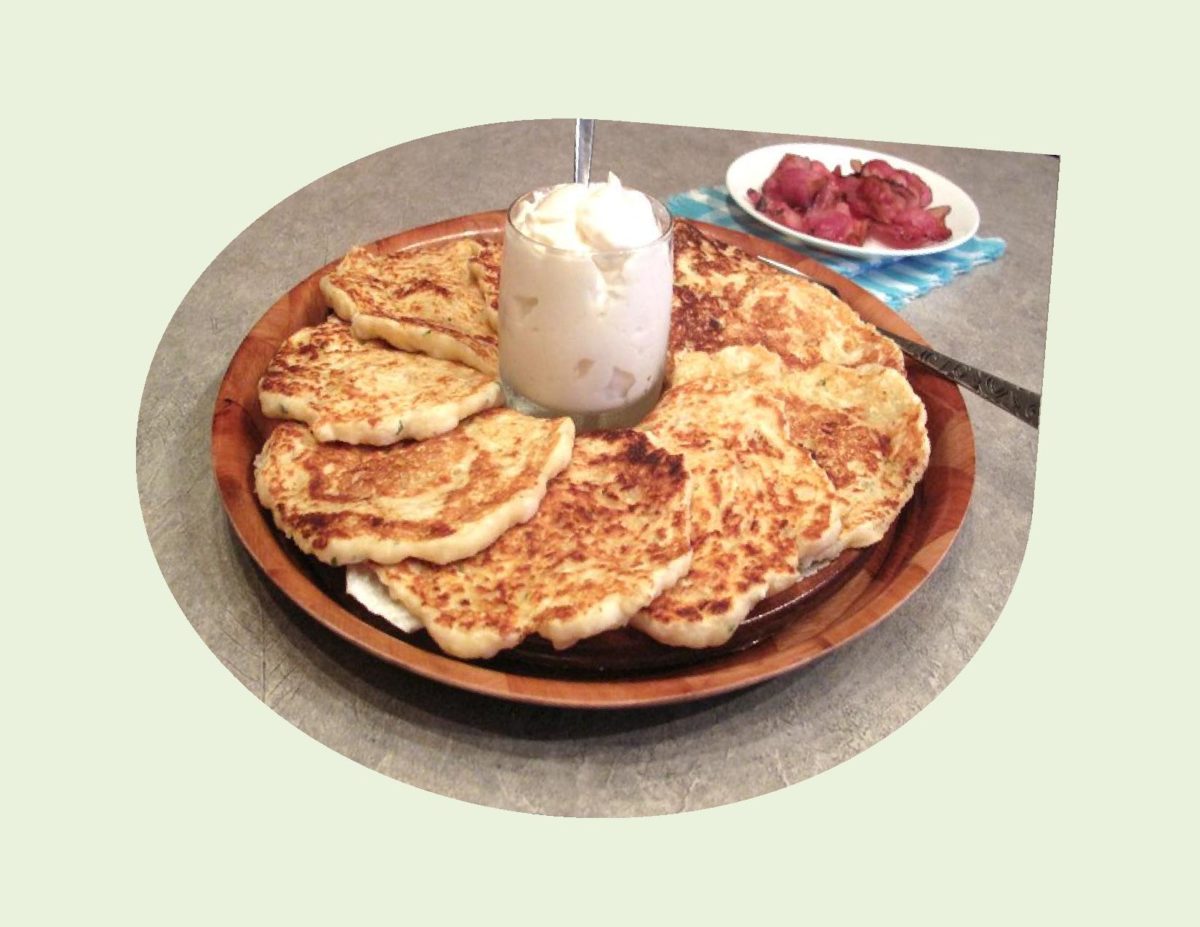
GERMAN POTATO PANCAKES are my Shrove Tuesday meal. I definitely grew up enjoying pancakes and with the many flavor options of today how could you not like them!
Print Recipe
Kartoffelpuffer - German Potato Pancakes
Sour cream or applesauce make great compliments to this meal.
Votes: 0
Rating: 0
You:
Rate this recipe!
|
|
Votes: 0
Rating: 0
You:
Rate this recipe!
|
Instructions
Par boil potatoes; cool slightly so you can peel & grate them. In a small bowl, combine next 6 ingredients. In a separate dish, whisk together melted margarine, buttermilk & eggs. Carefully combine wet & dry ingredients, stirring only until just blended.
Heat a non-stick griddle to 350 F. Fold potatoes into batter. Using a 1/4 cup measure, place batter on grill, spreading slightly. Brown lightly on both sides.


")


