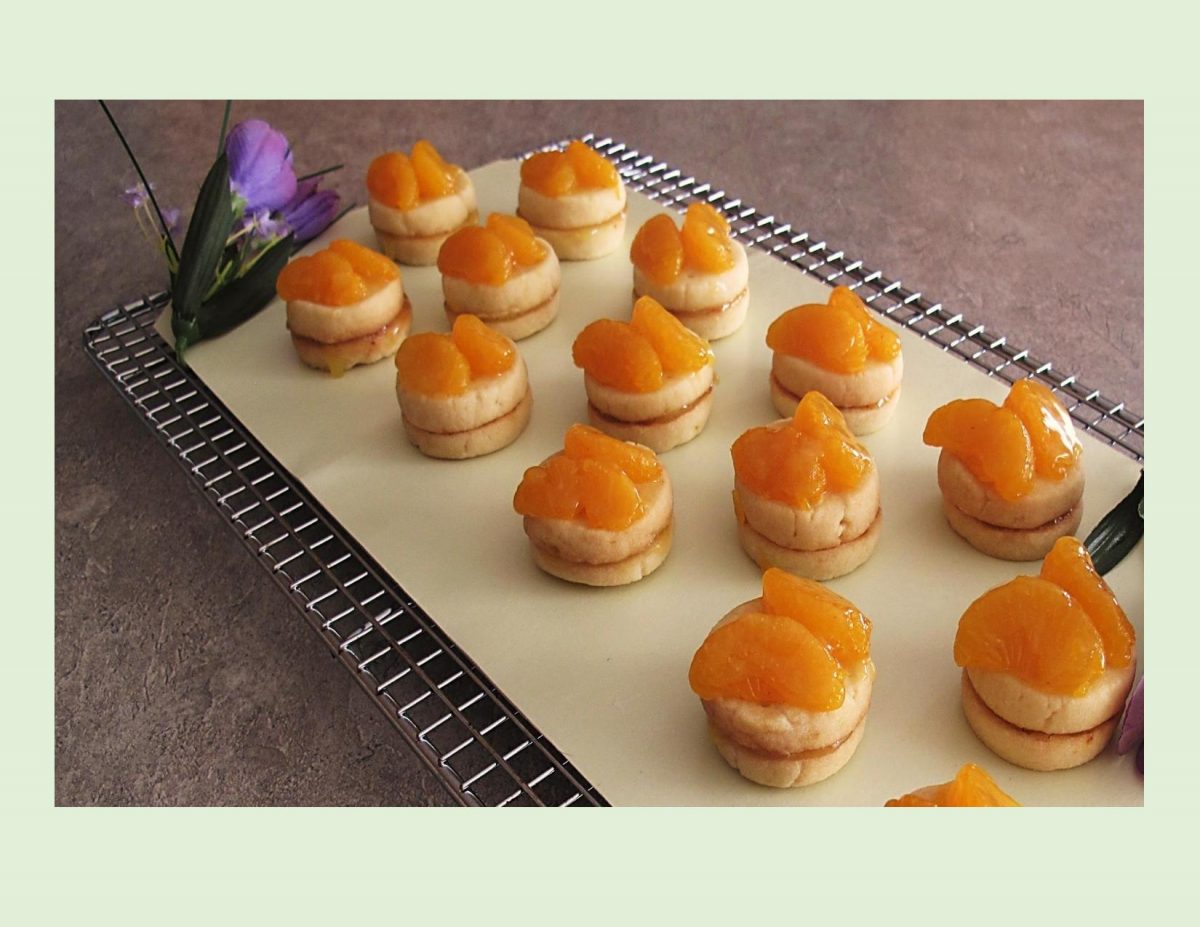
Its probably a bit too early for butterflies in our part of the country but these spring cookies are so special. Who could resist them when they’re naturally flavored with orange juice and zest and decorated with mandarin orange segments?
I have always loved cookies of all shapes, sizes and flavors. Today there are hundreds of cookie recipes throughout the world. Often geographic development was reflected in popular cookie recipes. It gave homemakers access to items not available previously. Around the turn of the century, the Kellogg brothers in the USA, invented cornflakes and cookies were made with cereal products. In the 1930’s, with the advent of electric refrigerators, icebox cookie recipes reached new heights of popularity. I’m sure that no one book could ever hold the recipes for all the various types of cookies that have been created.
These little filled cookies might seem quite basic but the flavor is amazing!
Print Recipe
Mandarin Butterfly Cookie Bites
Votes: 1
Rating: 5
You:
Rate this recipe!
|
|
Votes: 1
Rating: 5
You:
Rate this recipe!
|
Instructions
Filling
In a saucepan, combine filling ingredients. Cook over medium heat for 5-7 minutes, or until thickened and translucent, stirring constantly. Remove from heat. Cool completely. Set aside.
Cookies
In a large bowl, combine butter & powdered sugar. Beat until light & fluffy. Add flour, orange zest & salt. Beat on low until a soft dough forms. Cover with plastic wrap. Chill 1-2 hours or until firm.
Baking
Preheat oven to 350 F. Line a baking sheet with parchment paper.
Shape dough into 1-inch balls & place on lined baking sheet 2-inches apart. Flatten balls with the bottom of a glass; dipping glass in granulated sugar to prevent sticking. Using a fork, prick top of each cookie making 3 rows.
Bake for 10-12 minutes or until edges are light golden brown. Cool completely.
Fill & Decorate
Spread about 1/2 tsp filling on bottoms of half of the cookies. Gently press bottoms of remaining cookies against filling to for 'sandwiches'. On the top of each sandwich put a drop of remaining filling. Carefully lay two (towel dried) mandarin orange segments on it to form a butterfly.
Recipe Notes
- We found these just got better after a few days.
The ‘poke cake‘ is an advertising invention of the late 1970s, when Jell-O created it to increase sluggish sales. The Jell-O salads of the ‘50s and ‘60s were outmoded and on the wane so this was a way to bring it back. These cakes were colorful and easy to make. A fork, chopstick or the handle of a wooden spoon is used to poke deep holes all over the top of the baked cake. Next, it is topped with a colorful Jell-O syrup, which trickles into the cake looking like brightly colored streamers.
But, like all successful desserts, even the poke cake has undergone numerous reinterpretations over time. Starting from the base no longer cooked only in vanilla flavor but also made with coconut, lemon, chocolate, with fruit & yogurt, arriving at the holes that are filled in other choices such as chocolate, cream, jams, etc. etc.
Although it would seem like poke cakes are a phenomenon born in corporate American kitchens, drenching cake in flavorful liquids is not new, or an entirely an American creation. England’s sticky toffee pudding, a single layer date cake, is poked all over while still warm from the oven with a fork or skewer and drenched in sticky butterscotch sauce. Genoise, the classic French sponge cake, is almost always soaked in sugar syrups spiked with liqueur, not just for flavor, but to keep the cake fresh and prevent it from drying out. Pastel de tres leches, or ‘three-milks cake’, is a beloved Latin American classic. Made from sponge cake soaked in a milky syrup combining evaporated milk, sweetened condensed milk and heavy cream. All three called for this hole-poking action long before the 1970’s.
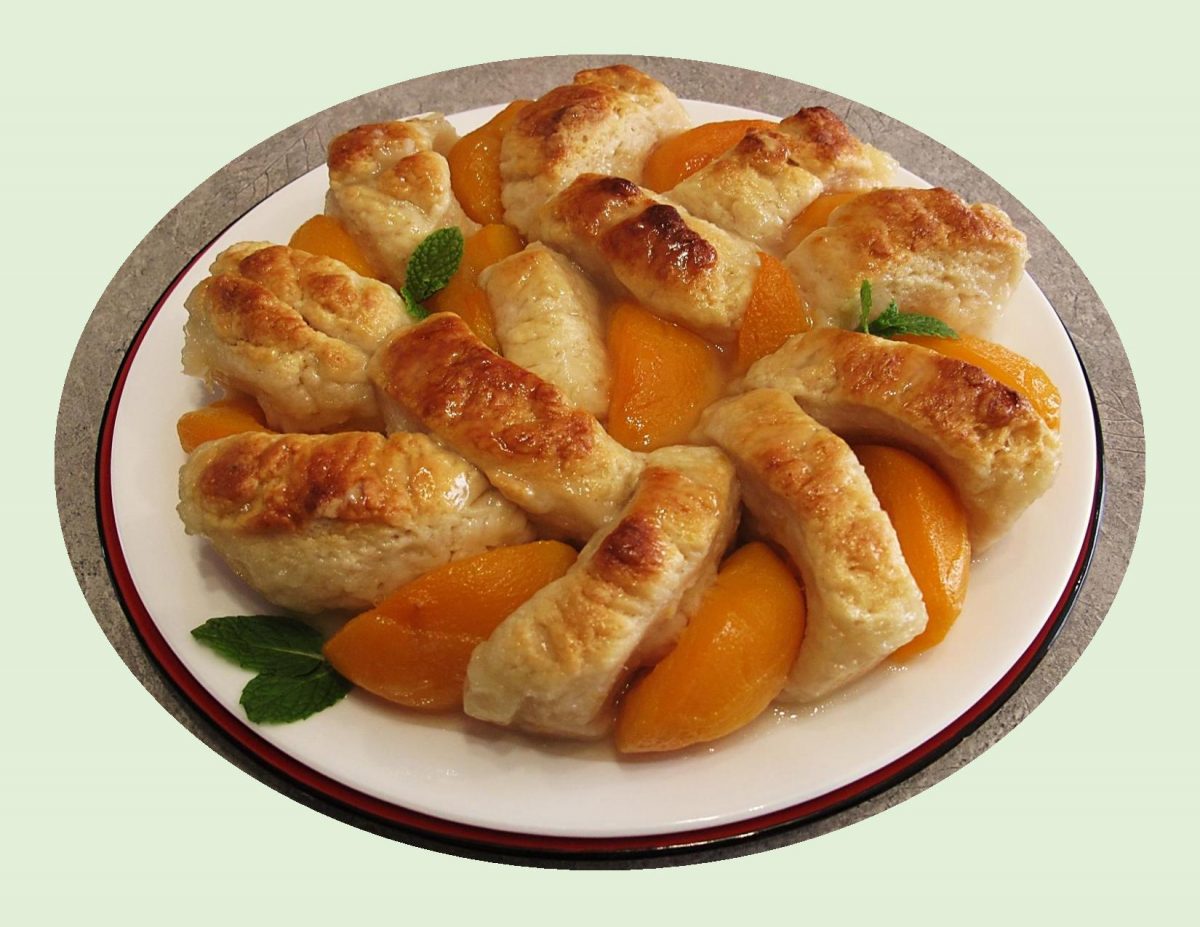
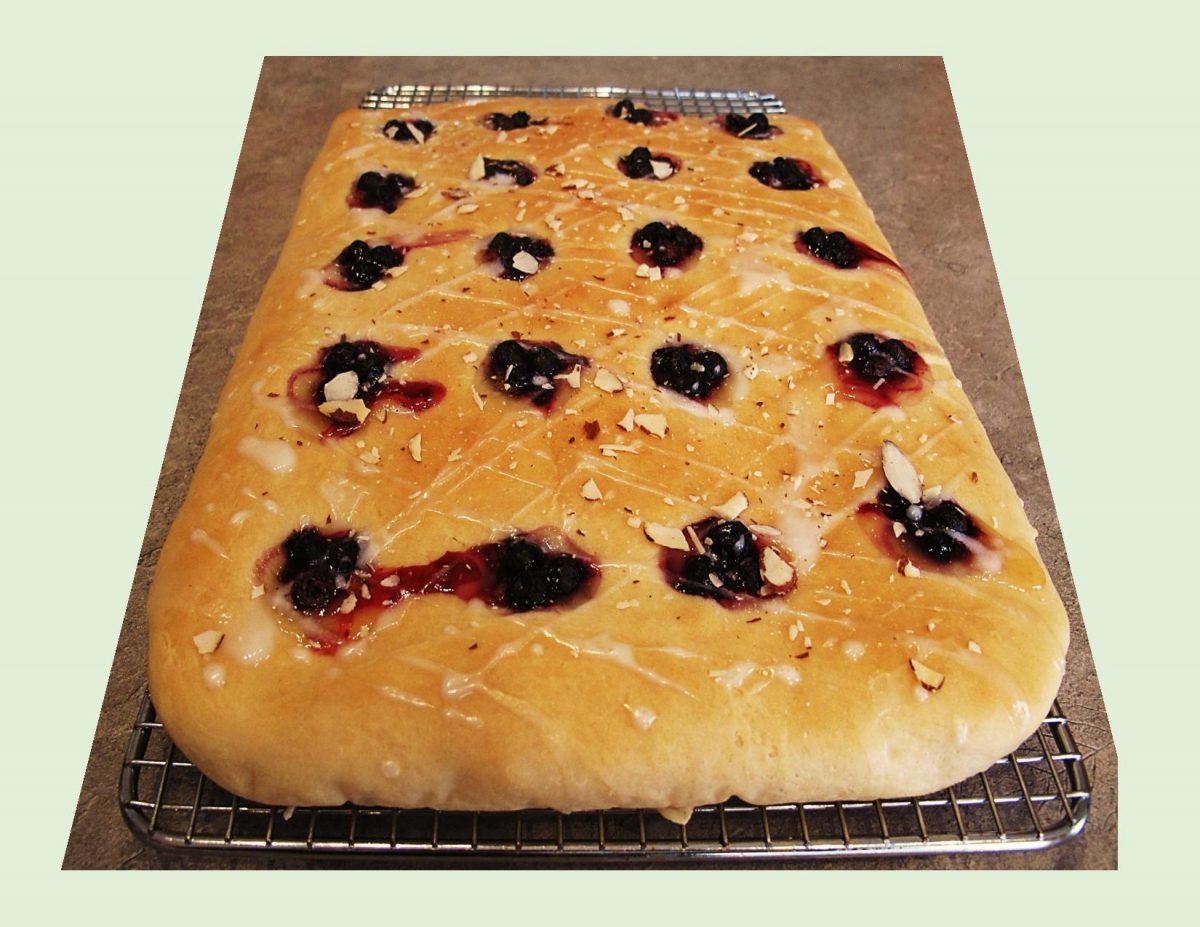
Of course, getting back to my German heritage, brings to mind a German butter cake or butter kuchen. This classic yeasted cake (actually more like bread), seems to be very closely aligned with the poke cake idea. After the dough has risen and been rolled out, deep impressions are made for the filling to nestle in. I think some blueberries and lemon curd will work nicely here.
Print Recipe
Blueberry Lemon Poke 'Bread'
Votes: 1
Rating: 5
You:
Rate this recipe!
|
|
Votes: 1
Rating: 5
You:
Rate this recipe!
|
Instructions
Dough
In a small dish, heat milk to lukewarm. Add yeast & 1 tsp sugar; let sit for 5 minutes to allow yeast to activate. In a large bowl, whisk together remaining 1/4 cup sugar, melted butter, sour cream & egg. Add yeast mixture & stir to combine.
In another bowl, whisk flour & salt. Add flour mixture to yeast mixture 1 cup at a time, combining after each addition. Once all flour has been added, knead on a lightly floured surface for about 2 minutes.
Lightly grease the large bowl, place dough in it & cover with plastic wrap & a tea towel. Allow to rest for at least one hour, in a draft free place until dough has doubled in volume.
Assembly & Bake
Line a 15" X 10"-inch jellyroll pan with parchment paper. Place dough on paper & press out evenly in pan. Make about 20 deep impressions in dough with your fingertips. Fill each one with a spoonful of lemon curd & top with a couple of large blueberries. Allow cake to rise 10 minutes.
-
Bake bread/cake for about 20 minutes or until golden. Meanwhile, combine glaze ingredients. Remove from oven: cool for just a few minutes then drizzle with glaze. Sprinkle with sliced almonds. Cut into 15 serving pieces.
The idea of lightly mingling two different batters in one cake seems to have originated in early 19th century Germany. The earliest version of marble cake consisted of a kugelhopf (sweet yeast bread), one half of which was colored with molasses and spices to achieve a dark colored batter. Bakers next began to do the same thing with sponge cake batter.
The marble cake came to North America with German immigrants. It wasn’t until the late 19th century, when chocolate gained a greater hold on the North American public, that ‘marble cake‘ as we know it today really took shape. The first known recipe to appear in an American cookbook went with the spice and molasses variety, though the base was a butter cake rather than a sponge or yeasted cake. Jewish German bakers eventually introduced the idea of using chocolate to create the darker batter in marble cakes.
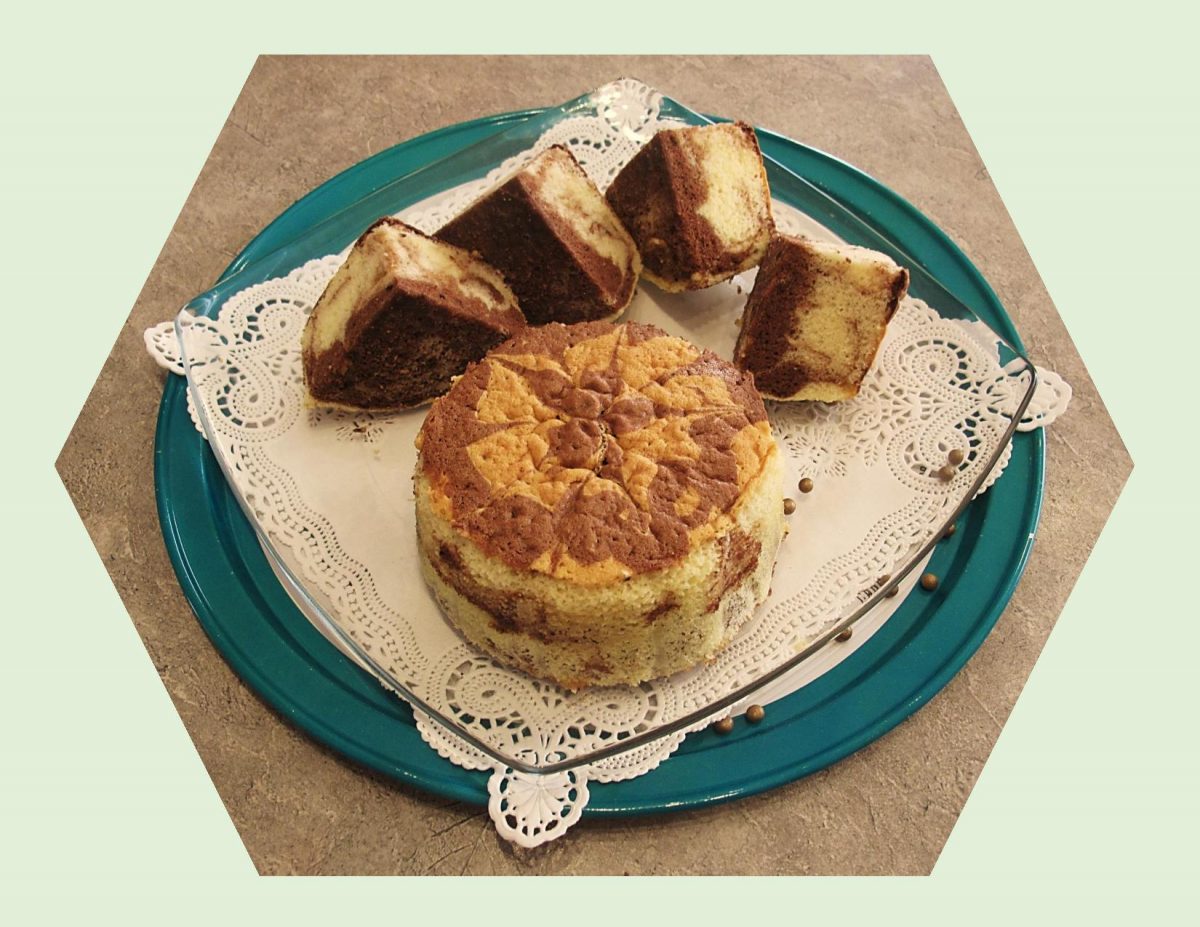
Of course, there is no right or wrong way to create the marbling effect. The only thing to know is that you should not overmix the batter. The colors are supposed to mingle but stay separate creating the distinct marbling design.
Print Recipe
German Marble Cake
Votes: 1
Rating: 5
You:
Rate this recipe!
|
|
Votes: 1
Rating: 5
You:
Rate this recipe!
|
Instructions
Preheat oven to 325 F. Either butter or line with parchment paper, (2) 5-inch mini springform pans; set aside.
In a bowl, melt butter, in microwave. In a small bowl, sift flour, baking powder & salt; add to butter & combine.
In a small bowl, whisk together egg yolks, milk & vanilla then add to butter mixture. Whisk until combined.
Beat egg whites until foamy then gradually add sugar; beat until stiff peaks form. Fold into batter.
In a small cup with a spout, place about 1/2 cup of the batter & add cocoa powder. Fold in to combine.
Divide white batter between 2 prepared pans. Pour chocolate batter onto each cake forming circles with it. Using a wooden skewer, make lines from the center out making a spider web design.
Bake for 45 minutes on bottom rack of the oven or until cake tests done with a wooden pick. Remove from oven, allow to cool for about 5 minutes on cooling rack. Flip over & cool in pans for at least 30 minutes. We enjoyed a small bit of raspberry puree with the cake.

Its hard to believe its already Easter Sunday. In North America, many of us like to enjoy or host an Easter brunch. Traditional favorites very often include glazed baked ham, quiche, frittata & French toast casseroles. Of course, there are the classic hard boiled eggs that have been dyed & decorated for the occasion. Many countries make their own signature Easter breads ands buns. The one thing that I always loved about Easter was it signified the coming of ‘Spring’ in our part of the world. Plants were coming to life in the garden, the birds were singing their cheery, little tunes & the stores were filled with beautiful pastel colored Easter ‘things’.
I wanted to come up with something unique for our Easter brunch this year. French toast is always good but I was thinking more along the savory line. Sweet potatoes seem to be one of those polarizing food items, people either love or hate. For most part, I think its the memory of the overly sweet casserole most of us remember from our childhoods. But have you ever thought about using them in a savory context?
I had seen an idea using grated sweet potato patties with avocado and poached eggs. The temptation to kick it up a notch and make a savory sweet potato ‘toast’ for a base become a wonderful Easter brunch for Brion & I.
Print Recipe
Savory Sweet Potato Toast w/ Avocado & Poached Egg
Votes: 1
Rating: 5
You:
Rate this recipe!
Ingredients
Savory Sweet Potato Bread
Ingredients
Savory Sweet Potato Bread
|
Votes: 1
Rating: 5
You:
Rate this recipe!
|
Instructions
Bread
Pierce sweet potato several times, and wrap in a paper towel. Microwave the wrapped potato 4 - 6 minutes, or until it is soft to the touch & cooked through. Remove from oven, cool slightly, peel & mash. Measure correct amount needed for bread & reserve the rest for another use.
In a small bowl, combine water, milk, sugar & yeast . Allow to sit until yeast is frothy.
In another bowl, whisk together flour & salt.
In a large bowl, combine sweet potato, butter, black pepper, cumin, coriander, thyme & sage. Taste & adjust seasonings if desired. Add yeast & flour mixtures. Combine well but don't overmix.
Turn dough out onto a lightly floured surface & knead until dough is smooth & elastic. Place dough in a lightly oiled bowl, cover with plastic wrap, & set in a draft free place until doubled in bulk.
Turn the dough out onto a flat work surface lightly dusted with flour. Leave to rest about 10 minutes. Grease a 9 x 5-inch loaf pan. Flatten, shape into a loaf & set inside of pan. Cover loosely with plastic wrap & set aside to rise.
Preheat oven to 375 F. When dough is about an inch over the top of pan, place in oven & bake about 45 minutes, rotating pan about half way through baking time. Remove from oven & allow to cool completely before slicing. It is a good idea to make bread the day before you want to serve it.
Additional Preparation
Preheat oven to 350 F. Place cherry tomatoes in an oven proof dish. Drizzle with 1 Tbsp olive oil & roast for about 15 minutes.
Cut avocados in half & peel off skin. Lay one half of the avocado, cut side down, & slice the avocado thinly. Fan out avocado slices so that they form a long line with the slices overlapping each other. Starting from one end, curl avocado slices toward center. Continue curling the avocado slices until you have a 'rose'. Repeat with remaining 3 halves.
Heat a griddle to 350 F. Slice sweet potato bread to your desired thickness. Lightly butter bread slices on both sides. When grill is heated, grill bread on both sides. Place on serving plates, cover & keep warm.
Bring some water to a boil then poach the eggs for about 2 minutes. Drain.
Top grilled savory bread with avocado roses, poached eggs & roasted cherry tomatoes. Sprinkle with red pepper flakes, salt & pepper.
Recipe Notes
- This dough is very soft so it is a bit tricky to work with. I would imagine if you prefer it to be firmer you could you less yeast.
- When working with it , I used a buttered spatula.
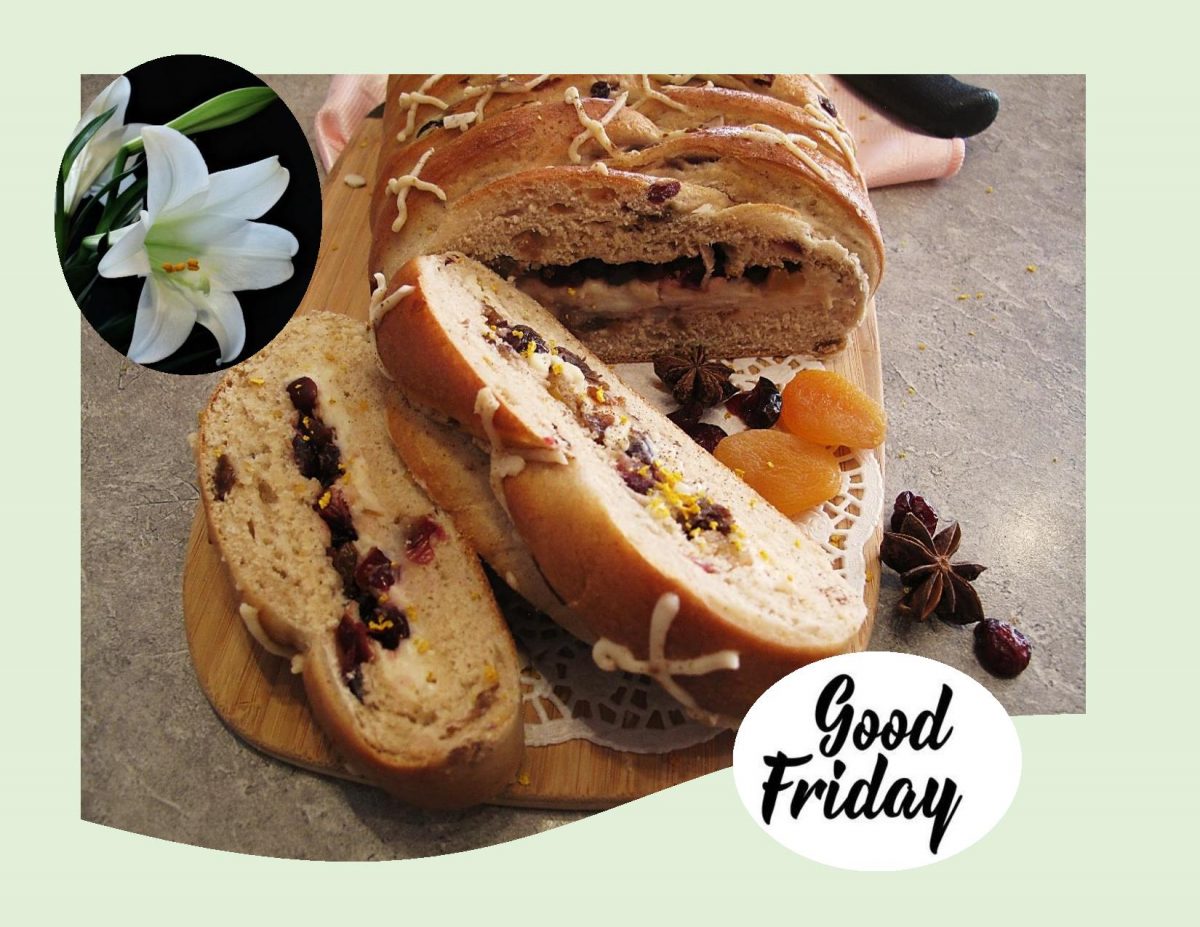
Hot Cross Buns, the sweet roll with a mythical history, are an Easter classic. This simple piece of spiced bread decorated with a cross, while not an extravagant treat, is a global food tradition. Given their long running history, it is no wonder there are so many fables surrounding their origin. From warding off evil spirits to cementing friendships, the stories of hot cross buns can be documented back to 6th century Greece.
While hot cross buns are now sold and enjoyed throughout the year, they were once reserved for Good Friday alone. Brion & I are extremely fond of these little gems, so every year I enjoy to come up with a new version but still not straying away from the original iconic bun (or bread) taste.
Print Recipe
Hot Cross Cream Cheese Braid
Votes: 1
Rating: 5
You:
Rate this recipe!
|
|
Votes: 1
Rating: 5
You:
Rate this recipe!
|
Instructions
Marinate Fruit
In a bowl with a lid, marinate prepared dried fruit in your choice of alcohol or orange juice overnight or at least 30 minutes.
Sweet Dough
In a bowl, combine yeast, lukewarm milk & 1 Tbsp sugar; allow to sit until frothy.
In a bowl, combine flour, salt, cinnamon, cardamom & ginger.
In a larger bowl, melt butter slightly; add remaining sugar, beaten egg, vanilla, a portion of the marinated fruit & frothy yeast mixture. Combine then add flour mixture & continue mixing to combine all ingredients.
On a lightly floured surface, knead dough for about 15 minutes. If necessary, add a bit more flour. Shape into a ball; place in a greased bowl, turn over once or twice to coat the dough with oil. Cover, let rise until doubled, about 1-1 1/2 hours.
Cream Cheese Filling
In a bowl, beat cream cheese, sugar, vanilla & any excess rum drained off fruit until smooth.
Assembly & Baking
On a lightly floured work surface or parchment paper, roll the dough into a 12 x 14-inch rectangle, ensure an even thickness of 1/4 inch.
Along one long side of the dough make parallel, 4-inch long cuts that are 1-inch apart (like piano keys), with a pizza cutter or sharp knife. Repeat on opposite side, making sure to line up these cuts with those you have already made on the other side.
Spoon all but 1/4 cup cream cheese filling down the center of the rectangle. (Reserve the 1/4 cup of the cream cheese for making crosses on baked braid). Leaving 1-inch on the top & bottom unfilled. Smooth cream cheese mixture then top with remaining marinated fruit.
Begin folding the cut side strips of dough in pairs over the filling at an angle, alternating left, then right, as if you were braiding, until you reach the other end. Tuck the ends underneath the braid.
Transfer to a baking sheet; cover with a loose plastic wrap & a towel. Allow to rise in a draft-free place until doubled in size, about 30 minutes. Preheat oven to 350 F. Just before placing braid in the oven, make the egg wash & lightly brush over the top of the braid.
Bake 20 minutes until golden brown. Check after 15 minutes; if the braid is starting to brown to fast, float a piece of foil, shiny side down, over it. Remove from oven & allow to cool slightly.
Decorating
Place 1/4 cup cream cheese mixture in a small piping bag that has been fitted with a small round tip. Make crosses on braid.
Recipe Notes
- If you would prefer, mix all the marinated fruit right into the dough instead of putting some in the filling.
- If you would rather not decorate with some crosses on top, use all cream cheese in the filling, your choice.
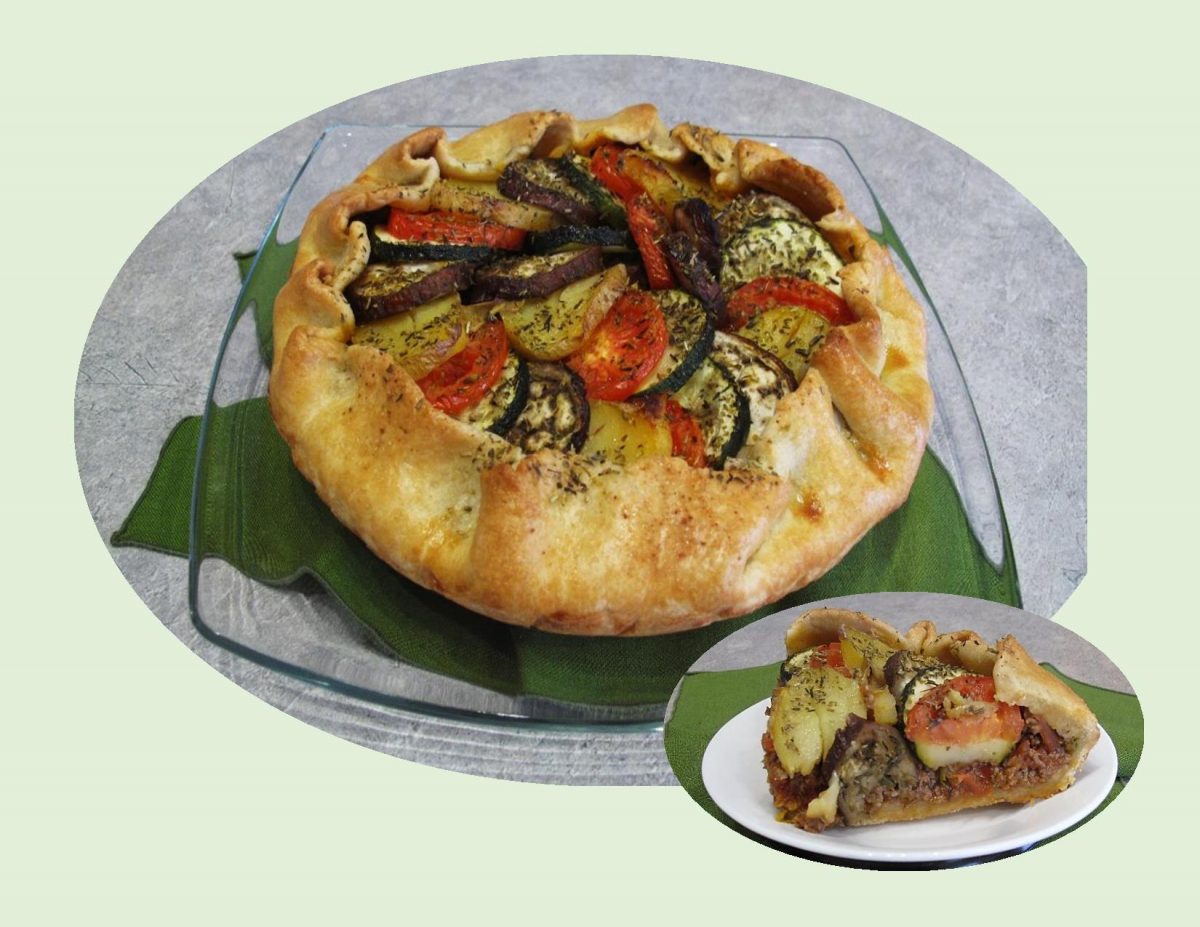
Ratatouille is a classic dish of southern France. Served as a side dish, hot or cold, arranged in a casserole or individual plates, its a recipe that lends itself to many different main dishes.
Ratatouille can be a challenging dish to pair with meat because the rich and luxurious flavors come from the freshness of the vegetables. There are, however, many types of meat that would not compete with ratatouille and still keep the meal light & satisfying.
For the meat lover, beef can make this meal quite enjoyable. Hence the inspiration for this galette: eggplant, squash, onion and tomato. Roasted together in the oven over a layer of seasoned beef all in a sturdy homemade pastry crust. Brion & I thought this vegetable-beef ratatouille came together in one harmonious blend and made a super nice meal.
Print Recipe
Ground Beef Ratatouille Galette
Votes: 1
Rating: 5
You:
Rate this recipe!
|
|
Votes: 1
Rating: 5
You:
Rate this recipe!
|
Instructions
Pastry
In a large bowl, whisk the flour, sugar, and salt. Using a pastry cutter or your fingertips, work the butter into the mixture until most of it resembles coarse meal with some pea-size pieces. Form a well in the center. Sprinkle with 4 Tbs. of the ice water. Mix with your fingertips until the dough holds together enough to form a ball. If too dry, add the remaining water by the teaspoon, and mix until the dough comes together.
Form the dough into a ball, put it between two sheets of plastic wrap, and then press it into a 12-14-inch round. Wrap it tightly in more plastic wrap, and refrigerate for at least 1 hour.
Veggies
Wash & slice veggies; set aside in refrigerator until ready to use.
Beef Filling
In a large skillet over medium heat. Brown beef until no longer pink; season with salt & pepper. Remove beef from skillet with a slotted spoon & set aside.
In the beef drippings, sauté shallot & 1 tsp Herbs de Provence until caramelized. Add beef back to pan with crushed tomatoes & 1 Tbsp olive oil. Stir & simmer for 6-7 minutes. Allow to cool slightly.
Assemble & Bake
Preheat oven to 425 F. Remove dough from fridge. Transfer pastry circle to a sheet of parchment paper.
Spread beef /sauce mixture evenly inside the circle leaving about 3" of dough from the edge. Place the veggies in a spiral, rotating for some color interest. Drizzle with 1 Tbsp olive oil, 1 tsp salt 2 tsps Herbs de Provence & some black pepper.
Fold edges of dough over filling, making sure there are no cracks. Brush the galette dough with egg wash.
Bake for about 45 minutes or until veggies are roasted & pastry is golden. Allow to cool slightly then slice & serve.

CELEBRATING ST. PATRICK’S DAY!
The term ‘green food’ can mean several things. More and more households are ‘going green’ with their menus, buying food from sustainable local sources. People who are ‘eating greener’ include those who grow their own food and compost all their waste to those who simply take a re-useable bag to the supermarket. Most of us are interested in making decisions that are better for the environment.
Others make immediately think ‘green vegetables’. Then of course there are those who , especially at this time of year, may think of the color green and foods with which to celebrate St Patrick’s Day. There is so much you could do with this holiday in terms of food such as rainbows, leprechauns, shamrocks, pot of gold ………
In North America, St. Patrick’s Day is pretty much just a fun day here. We wear green and we eat green. For the most part, its an excuse to party and drink some green beer. Brion & I aren’t into green beer exactly, so here’s our salute to this Irish day … Avocado Cheesecakes.
Print Recipe
Avocado Cheesecakes
Votes: 1
Rating: 5
You:
Rate this recipe!
|
|
Votes: 1
Rating: 5
You:
Rate this recipe!
|
Instructions
Preheat oven to 350 F. Line a mini cheesecake pan with paper liners or just use without if the cup bottoms are removable.
In a bowl, combine wafer crumbs & butter until completely moistened. Press crumb mixture into the bottom of each mini cup & set aside.
Beat cream cheese & brown sugar until blended. In a separate bowl, beat eggs. Add remainder of ingredients to the eggs & mix until combined.
Beat egg mixture into cream cheese mixture until well blended. Spoon over crusts, filling to the top of each mini cup.
Bake 15 minutes or until edges are golden & centers are set. Cool completely, then refrigerate for several hours.
No matter how you slice it, cheesecake is truly a dessert that has stood the test of time. From its earliest recorded beginnings to its current iconic status around the world, this creamy cake remains a favorite for dessert lovers of all ages.
The no-bake cheesecake, turned the process of making cheesecake into one that consisted mostly of stirring and chilling. Simply combine cream cheese, milk and Jell-O instant pudding mix, pour into a crust, and chill for an hour or two. The pudding mix sweetens and stabilizes the filling. Essentially foolproof, its a recipe that works every time and tastes custardy and rich with a lighter texture than the traditional cheesecake.
The original recipe for no-bake cheesecake has spawned numerous iterations, many of which were popularized by ‘Jell-O’ itself. The best part about the original formula was that it created harmony between industrialized shortcuts and the real thing. Jell-O eventually launched an entire ‘N0-Bake’ dessert line in 1966.
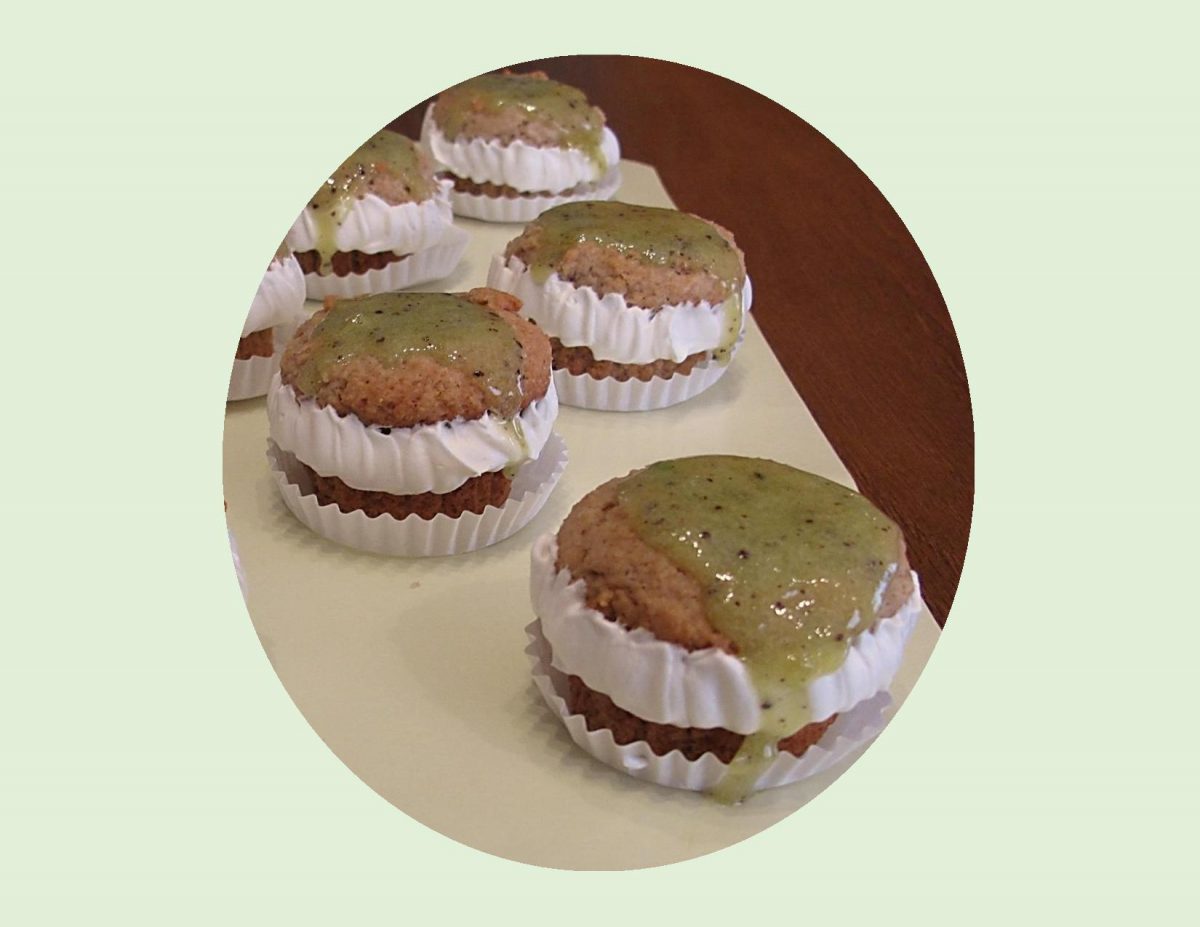
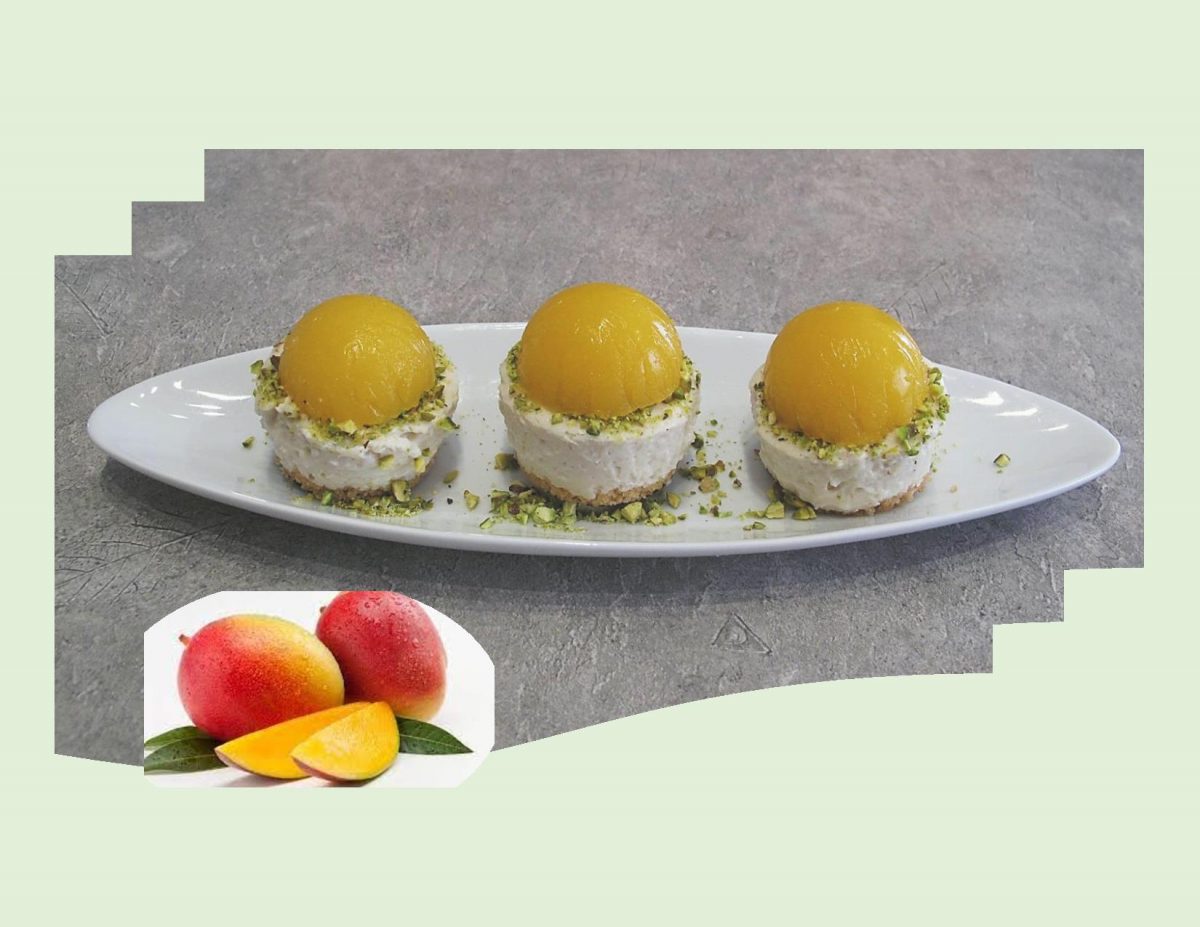
The simplicity of the recipe makes it endlessly adaptable. Of course, you can use different flavored pudding mixes or add spices or extracts to the filling for extra flavor and variation such as cinnamon, cardamom, lemon zest or almond extract. In addition you can serve the cheesecake with fruit or glaze as I’ve done here .
Print Recipe
No Bake Mango Cheesecake
Votes: 2
Rating: 5
You:
Rate this recipe!
|
|
Votes: 2
Rating: 5
You:
Rate this recipe!
|
Instructions
Crust
-
In a small bowl, combine crust ingredients, mixing well. Divide between mini cheesecake pan cups & press down firmly. Bake 5-7 minutes; allow to cool completely.
Cheesecake
In a bowl, beat cream cheese 1/2 cup milk until smooth. Add the remaining 1 1/2 cups milk, cardamom & instant pudding mix; beat until smooth. Divide between mini cheesecake pan cups, filling almost to the tops. Allow to chill for at least 2-3 hours.
Glaze
Place all glaze ingredients in saucepan & heat. As it comes to a boil, lower the heat & simmer 3-4 minutes. Turn off the heat & allow the glaze to cool slightly. Divide glaze between mini cheesecakes & allow it to set for 3-4 hours. Ensure that the cheesecake is properly set before topping with the glaze.
Recipe Notes
- For a bit of a different look, I filled my cheesecake cups right to the top. Then I poured my mango glaze into a cake pop pan to set a bit. When the glaze was firm enough I topped each cheesecake with one forming a dome instead of a flat layer.