
Every person who makes a homemade version of scalloped potatoes usually has had that recipe passed down to them from their mother, their mother’s mother or even further in their history, so the emotional attachment to the recipe immediately precludes any other scalloped potatoes from contention.
At an early age, I remember my mother ‘teaching‘ me the art of making scalloped potatoes. It came down to very thinly sliced potatoes sprinkled with flour, salt & pepper then covered with scalded milk and baked. I think it was dotted with butter and quite possibly topped with bread crumbs. For that matter, there might have even been a few thinly sliced onions involved but I have to admit, I’m a bit fuzzy on that. As plain and simple as it was, it tasted glorious to us.
This scalloped potato recipe starts with Yukon Gold potatoes. They have loads of great flavor and are a beautiful color both when they are raw as well as when they are cooked. For this particular recipe, keep the skin on the potato as it will add loads of fiber to the dish.
Food trends come and go and nothing highlights this more than looking up old recipes. Still eaten today, scalloped potatoes were the prolific side dish of the 1920s. Dairy was no longer rationed and the rich casserole took full advantage of this.
Print Recipe
Scalloped Potatoes w/ Mushrooms
Votes: 1
Rating: 5
You:
Rate this recipe!
|
|
Votes: 1
Rating: 5
You:
Rate this recipe!
|
Instructions
In a large saucepan, place potatoes & cover with water. Bring to a boil. Reduce heat; cook, uncovered until tender, 8-12 minutes. Drain.
In another saucepan, heat butter over medium-high heat. Add mushrooms & onion; cook & stir 6-8 minutes or until tender. Stir in garlic; cook 1 minute longer.
Preheat oven to 375 F. Butter an 8-inch square baking dish; set aside.
In a small bowl, whisk flour, broth & seasonings until smooth; stir into mushroom mixture. Bring to a boil, stirring constantly; cook & stir until sauce is thickened, 1-2 minutes. Remove from heat; stir in sour cream.
Thinly slice potatoes. Arrange half of the potatoes in baking dish. Spread half of the hot mushroom sauce over top; sprinkle with 1/2 of the cheese. Layer remaining potatoes , sauce & cheese & sprinkle with French Fried Onion Toppers if using.
Bake, uncovered, until heated through & cheese is melted, 12-15 minutes. Allow to stand 10 minutes before serving. Top with sliced green onions to garnish.
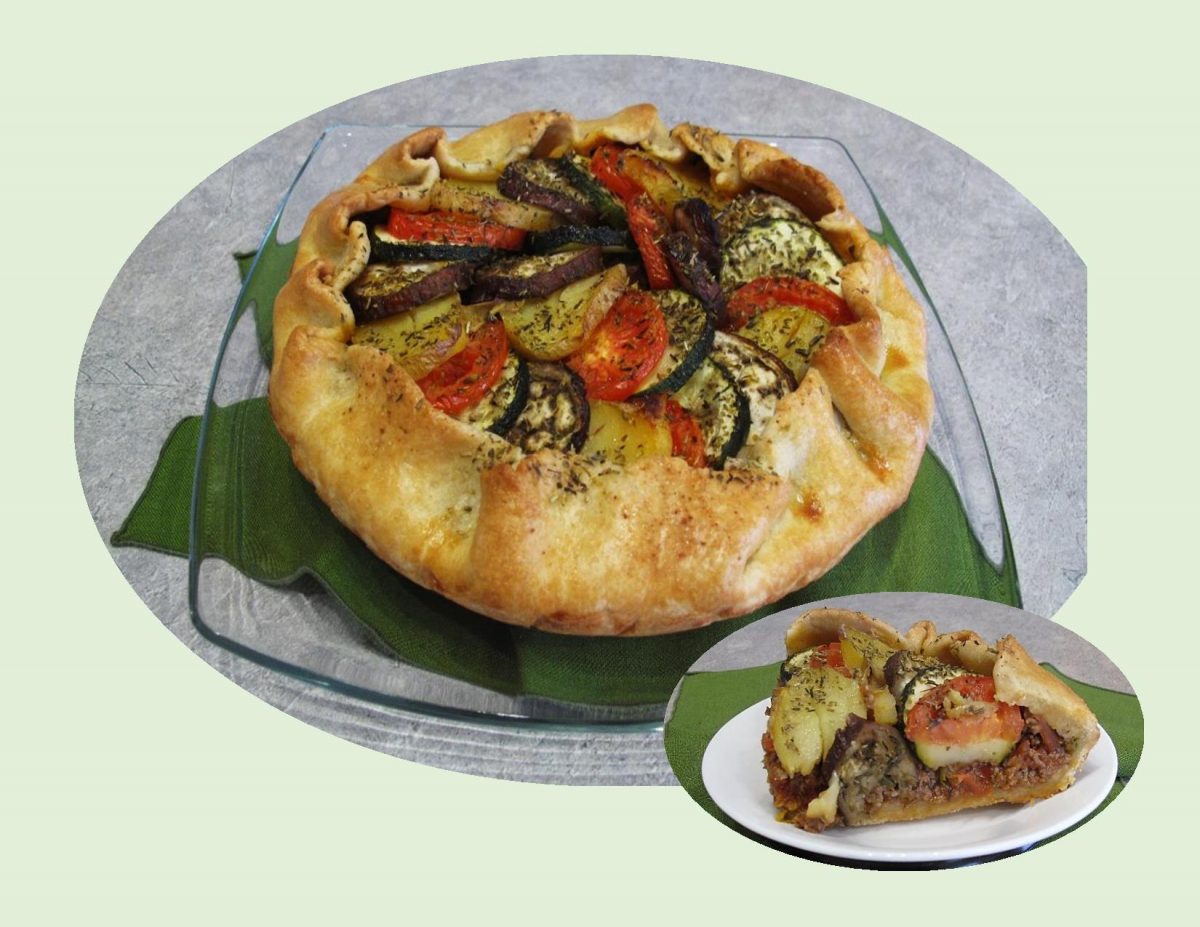
Ratatouille is a classic dish of southern France. Served as a side dish, hot or cold, arranged in a casserole or individual plates, its a recipe that lends itself to many different main dishes.
Ratatouille can be a challenging dish to pair with meat because the rich and luxurious flavors come from the freshness of the vegetables. There are, however, many types of meat that would not compete with ratatouille and still keep the meal light & satisfying.
For the meat lover, beef can make this meal quite enjoyable. Hence the inspiration for this galette: eggplant, squash, onion and tomato. Roasted together in the oven over a layer of seasoned beef all in a sturdy homemade pastry crust. Brion & I thought this vegetable-beef ratatouille came together in one harmonious blend and made a super nice meal.
Print Recipe
Ground Beef Ratatouille Galette
Votes: 1
Rating: 5
You:
Rate this recipe!
|
|
Votes: 1
Rating: 5
You:
Rate this recipe!
|
Instructions
Pastry
In a large bowl, whisk the flour, sugar, and salt. Using a pastry cutter or your fingertips, work the butter into the mixture until most of it resembles coarse meal with some pea-size pieces. Form a well in the center. Sprinkle with 4 Tbs. of the ice water. Mix with your fingertips until the dough holds together enough to form a ball. If too dry, add the remaining water by the teaspoon, and mix until the dough comes together.
Form the dough into a ball, put it between two sheets of plastic wrap, and then press it into a 12-14-inch round. Wrap it tightly in more plastic wrap, and refrigerate for at least 1 hour.
Veggies
Wash & slice veggies; set aside in refrigerator until ready to use.
Beef Filling
In a large skillet over medium heat. Brown beef until no longer pink; season with salt & pepper. Remove beef from skillet with a slotted spoon & set aside.
In the beef drippings, sauté shallot & 1 tsp Herbs de Provence until caramelized. Add beef back to pan with crushed tomatoes & 1 Tbsp olive oil. Stir & simmer for 6-7 minutes. Allow to cool slightly.
Assemble & Bake
Preheat oven to 425 F. Remove dough from fridge. Transfer pastry circle to a sheet of parchment paper.
Spread beef /sauce mixture evenly inside the circle leaving about 3" of dough from the edge. Place the veggies in a spiral, rotating for some color interest. Drizzle with 1 Tbsp olive oil, 1 tsp salt 2 tsps Herbs de Provence & some black pepper.
Fold edges of dough over filling, making sure there are no cracks. Brush the galette dough with egg wash.
Bake for about 45 minutes or until veggies are roasted & pastry is golden. Allow to cool slightly then slice & serve.
Salmon croquettes are basically a version of a salmon cake, salmon balls or patties and can be fried or baked. They were originally made of beef, probably leftovers that needed to be used up. Croquettes originated in France in about 1898 by the founder of classical French cuisine, Escoffier. As Escoffier’s chefs started to travel throughout the world, they took the recipe with them to other cultures where it was transformed based on local cuisines. From the original beef croquette, it branched out into salmon croquettes, chicken, vegetarian, and many other versions.
There are many variations of ‘croquettes‘ on the market, and just about every culture has developed their own recipe. Constantly, new recipes are formulated and something new is invented and created. With the input of different cultures, the original recipe has taken itself into many directions, different applications and ingredients. Very often salmon croquettes (cakes, balls or patties) are made with canned salmon though there are quite a few newer recipes that use fresh salmon that has been either chopped finely or ground to mold into the various shapes.
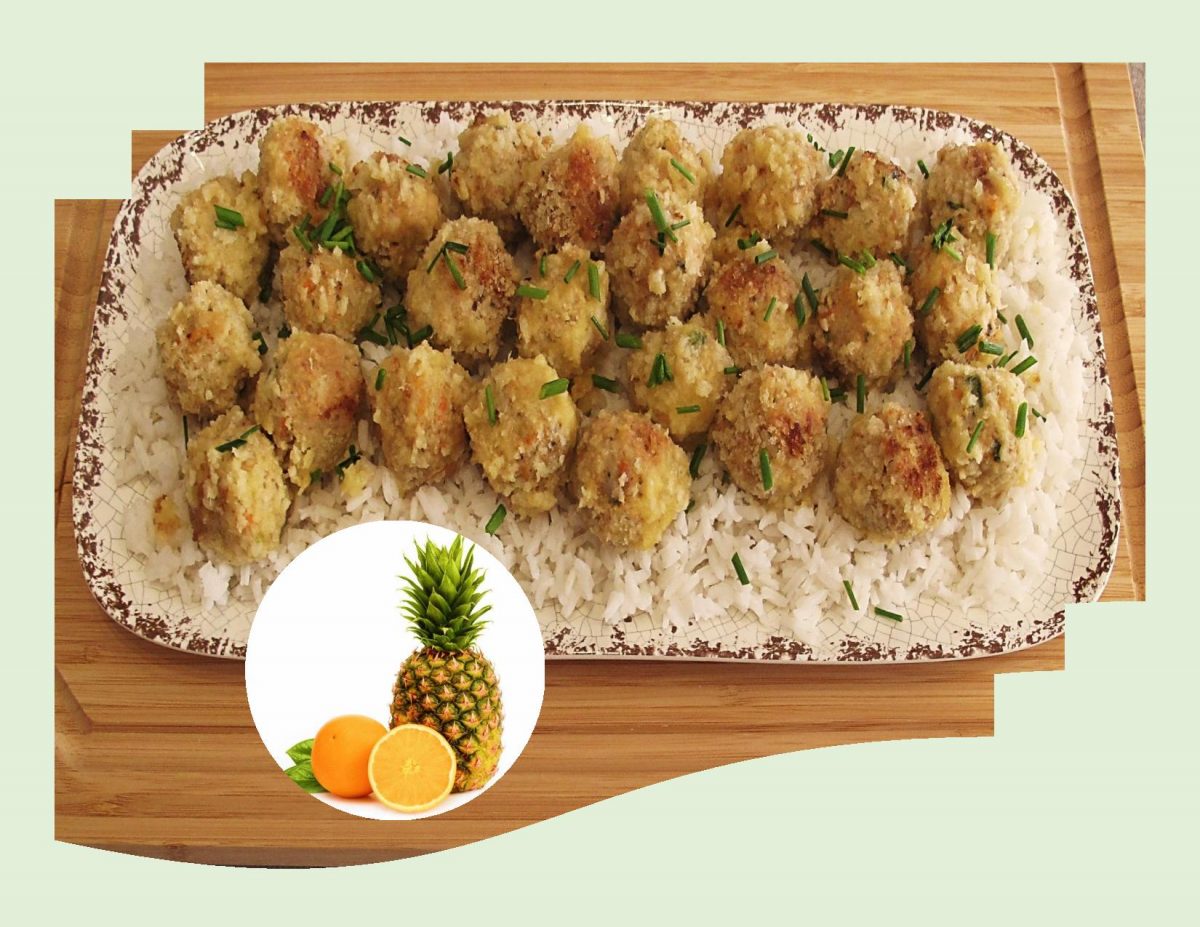
I think, using a zesty orange-pineapple glaze is the perfect compliment to these baked salmon balls.
Print Recipe
Baked Salmon Balls w/ Orange Pineapple Glaze
Votes: 1
Rating: 5
You:
Rate this recipe!
|
|
Votes: 1
Rating: 5
You:
Rate this recipe!
|
Instructions
Salmon Balls
-
If using canned salmon, drain & flake well. If using fresh salmon, brush with olive oil and season lightly with salt and pepper. Grill for about 6 minutes or bake wrapped in foil at 350 F. for approximately 10 minutes. When cool, flake salmon. Add carrot, green onion, potatoes, tartar sauce, egg, lemon juice, Worcestershire sauce, cilantro paste, Old Bay Seasoning, salt & pepper. Combine well.
Using a small scoop (about 1/2 oz size), measure salmon mixture out into palm of your hand & gently roll into balls. Mixture should make about 32 balls.
Roll salmon balls in Panko crumbs & place on a well buttered or sprayed baking sheet. Lightly spray tops with spray as well.
Bake about 30-40 minutes, turning halfway through. Remove from oven.
Glaze
Place all glaze ingredients into a small saucepan over medium heat. Stir gently & simmer for 15-20 minutes or until liquid begins to thicken slightly & reduces by half.
Drizzle over salmon balls or serve on the side. These salmon balls are nice served with rice & a steamed veggie.
Quiche, the great savory dish that originated in Germany, was perfected by French cooks who went on to create one of the most popular quiche in the world called the quiche Lorraine. Since then, many new variants of the quiche have been added. But all of those creative modifications involved mainly the filling, and the crust had that same nice and familiar, but plain taste. For that reason, many cooks didn’t bother with the crust dough preparation; instead they would buy good frozen puff pastry and concentrate on the filling.
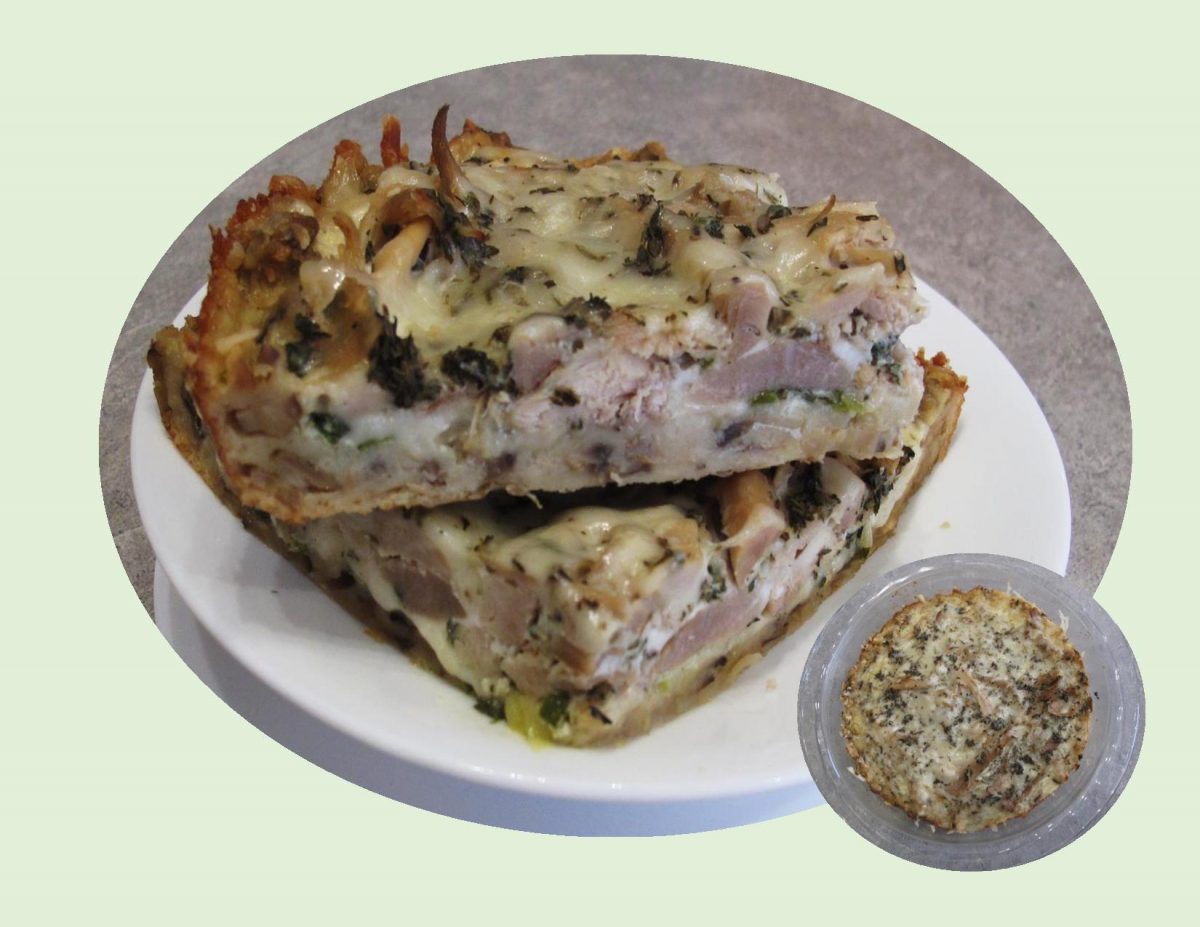
Enter the unique mushroom crust quiche! To my knowledge, the first publication of the recipe was in the mid 1970’s in ‘Sunset’s Favorite Recipes’ cookbook magazine. The main advantage of this recipe is that the mushroom crust is nice and light as well as it goes with almost any quiche filling.
For a crunchier crust, use wheat thins instead of saltines, regular onions instead of green or change up the spices. Use your choice of cheese, instead of Swiss go with Monterey Jack, gruyere, Jarlsberg or cheddar. Add bacon, sausage or some pulled turkey as I did. Of course, nothing wrong with just using veggies and cheese …. endless possibilities!
Print Recipe
Mushroom Crust Quiche
Votes: 2
Rating: 5
You:
Rate this recipe!
|
|
Votes: 2
Rating: 5
You:
Rate this recipe!
|
Instructions
In a skillet, melt 3 Tbsp butter over medium heat. Add mushrooms & garlic; cook until soft. Stir in crushed crackers. Remove from heat & press the mushroom mixture evenly over the bottom of a well-greased 8-9-inch pie pan.
In the skillet, melt 2 Tbsp butter. Add green onions & cook until soft; spread over mushroom crust.
-
Sprinkle about 3/4 of the grated Swiss cheese over the onion then top with the cooked, pulled turkey.
In a small container, whisk together eggs, milk, spices, salt & pepper. Combine the remaining Swiss cheese with the parmesan & sprinkle it over the turkey. Pour egg mixture over all & bake for about 30 minutes or until set. Allow to stand for a few minutes before serving.
Food history is full of surprises. The history of meatloaf, a North American staple, offers more than a trip down culinary lane. It provides a glimpse into how advances in technology have shaped the way we eat and prepare food today.
It turns out, the idea of mixing meat with a tenderizing filler traces back to the 4th & 5th century AD, when a Roman cookbook presented a recipe for patties made of chopped meat, bread & wine. But it wasn’t until the late 1800’s that American meatloaf was born, inspired by recipes offered by manufactures of the newly invented meat grinder.
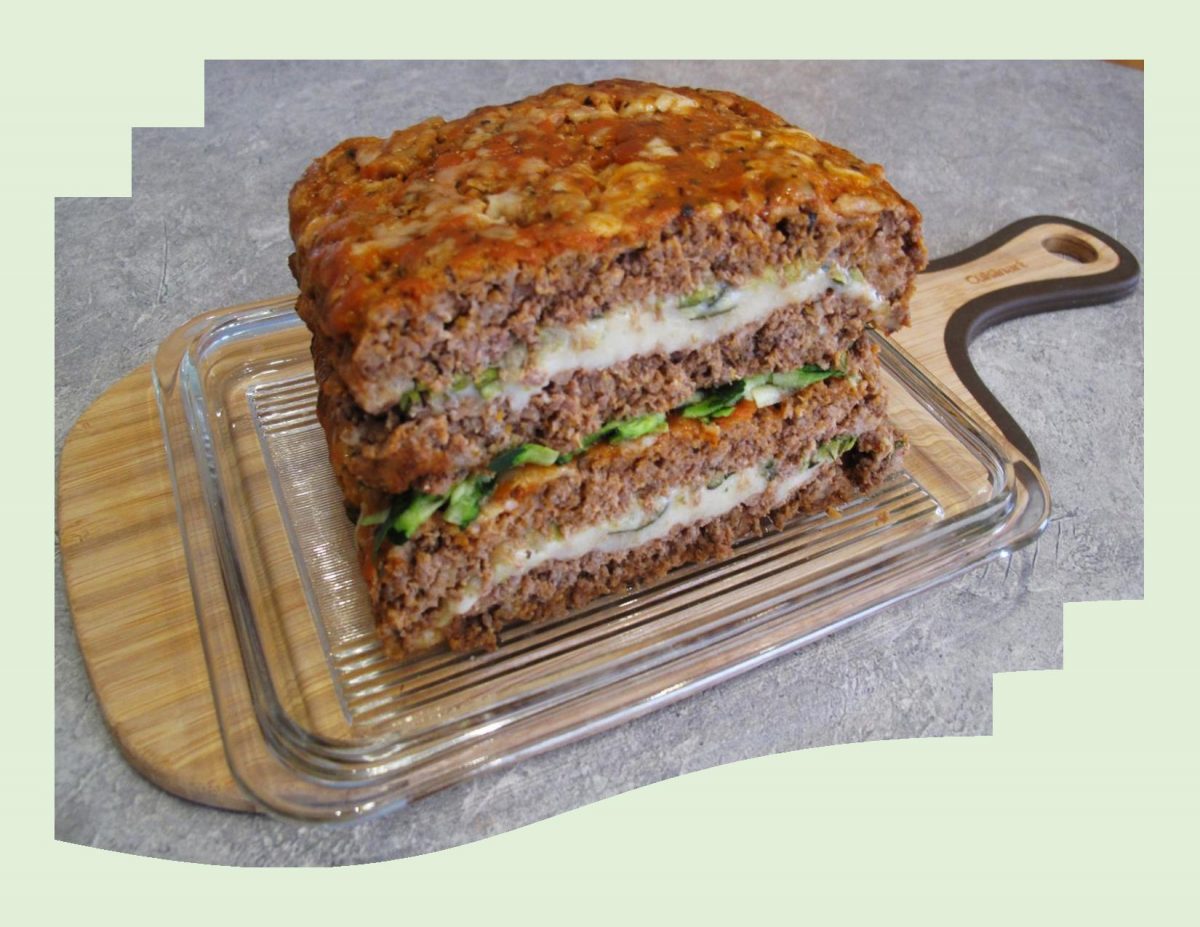
In the 1940’s, WWII rationing spawned meat-free loaves, whereas postwar creativity in the 1950’s & ’60’s produced the likes of Bacon-Dill Meatloaf. In the 1970’s & ’80’s, veal, pork & beef ‘meatloaf mix’ came into vogue. In the 1990’s, restaurateurs marketed upscale versions and today, innovations continue as loaves are stuffed, wrapped or laced with international flavors.
When we cook meatloaf, we’re connected to something bigger: a tradition, a time line. Meatloaf is elemental. It’s enduring, served without undue fuss or expensive implements …. comfort food without a doubt.
Print Recipe
Layered Zucchini Cheddar Meatloaf
Votes: 1
Rating: 5
You:
Rate this recipe!
|
|
Votes: 1
Rating: 5
You:
Rate this recipe!
|
Instructions
-
In a small bowl, combine tomato sauce, oregano, basil & garlic powder.
In a bowl, combine beef, bread crumbs, egg white, salt, pepper & HALF of the tomato sauce mixture; mix well.
Divide meat in half. On a sheet of wax paper, form 2 rectangles each about 8 X 10-inches. Spread zucchini over half of each rectangle. Divide cheese & sprinkle over zucchini, still covering only half the meat. Fold the meat over so that zucchini & cheese are inside. Pinch edges of meat to seal.
Place layered meat loaves on top of each other then place on a rack in a shallow baking pan. Top with remaining tomato sauce & sprinkle with Parmesan cheese.
Bake uncovered for about 1 1/2 hrs. or until meat is cooked. Allow to stand 5-10 minutes before slicing.

We tend to believe that if something takes more work, it automatically means that it has more value. Of course, anyone that follows this blog knows that I, being a ‘food industry’ person, quick isn’t generally what I’m all about. But in a world that thrives on making things complicated, dare to be simple some times. Enter the Stove Top Stuffing universe….
These chicken leg ‘quarters’ make such a nice meal when paired with stuffing. The smoky bacon flavor, the earthiness of the mushrooms as well as the slight sweetness of the cornbread stuffing complement each other well.
In a society that gravitates towards labels stamped with terms like organic or GMO-free, sometimes the simplicity of quick fix food can be a treat.
Print Recipe
Chicken Legs w/ Mushroom Cornbread Stuffing
Votes: 1
Rating: 5
You:
Rate this recipe!
|
|
Votes: 1
Rating: 5
You:
Rate this recipe!
|
Instructions
In a skillet, cook bacon until crisp; remove with a slotted spoon to paper towel. Drain, reserving 2 Tbsp of drippings.
Sauté celery & onion in drippings until tender. Add mushrooms, herbs & seasoning; cook & stir for 5 minutes. Remove from heat; stir in stuffing mix, celery leaves, parsley & bacon. Add broth & gently combine. Set aside.
Preheat oven to 350 F. Grease a 13" x 9" baking pan or line with greased foil paper.
Wash & trim any excess fat from chicken leg quarters. Loosen skin over thighs to form pockets for the stuffing.
Fill thigh 'pockets' with stuffing & place in baking pan. Place any remaining stuffing around the 2 leg quarters to bake at the same time. Cover with foil for about 30 minutes then uncover & finish roasting until chicken is cooked through & stuffing is lightly browned.
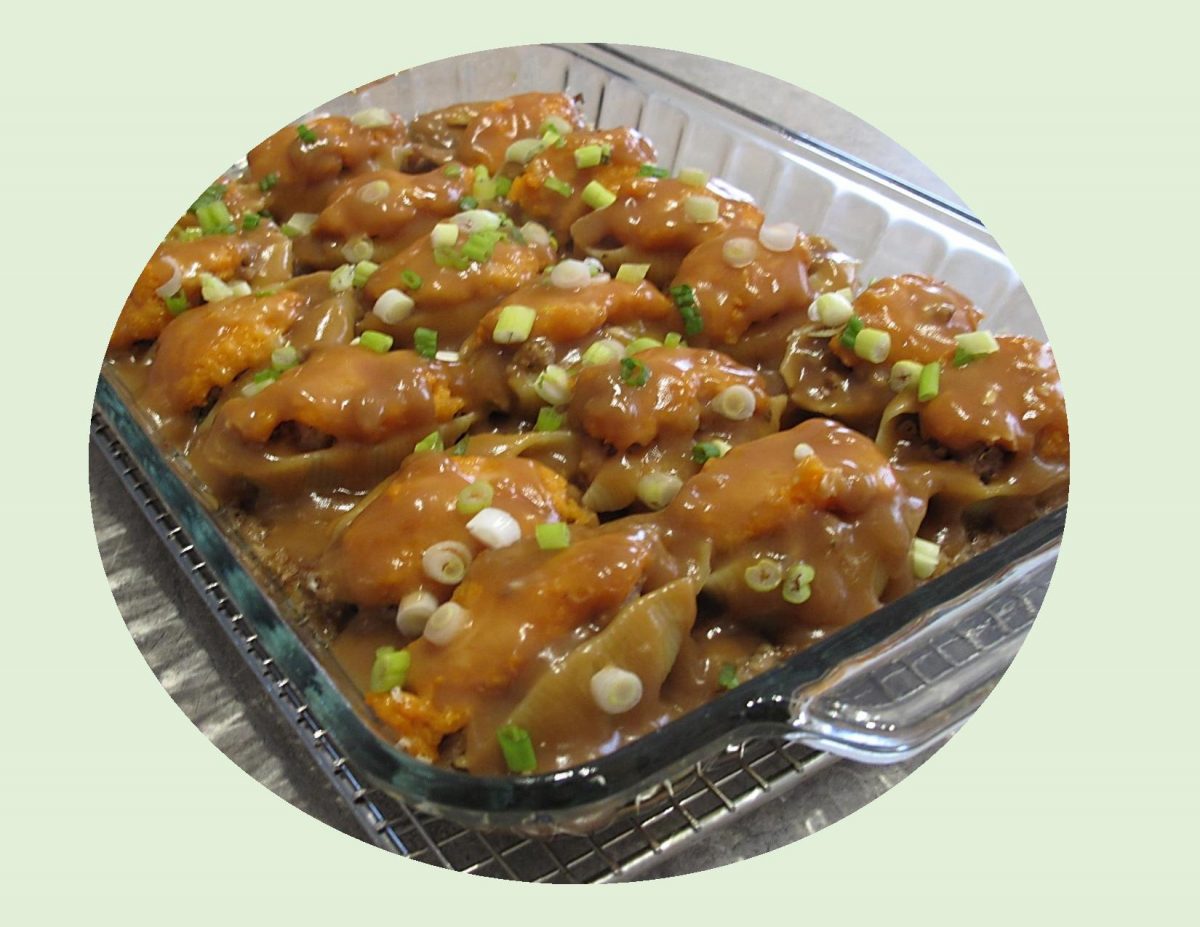
I have always favored using ‘conchiglioni’ pasta, the name derives from the Italian word meaning ‘seashells’. Their shape, size and consistency are the perfect vessel for bold, rich fillings and flavorful sauces. Baked pastas, or ‘pastas al forno’ as they are called in Italy, date back to the Renaissance when they were being served at the banquets of nobles.
Over the years, I have stuffed jumbo pasta shells with just about every imaginable filling I could conjure up. To say the least, I love this kind of meal.
Since we are just past ‘turkey season’ and if you are someone who enjoys that festive meal … here’s a new spin on it. Turkey, stuffing, sweet potatoes and gravy all tucked into some pasta shells.
Without a doubt, these shells were even better than I had expected and this recipe made enough that I froze some for another meal. What’s not to like about that?
Print Recipe
Turkey Stuffed Pasta Shells
Votes: 2
Rating: 5
You:
Rate this recipe!
|
|
Votes: 2
Rating: 5
You:
Rate this recipe!
|
Instructions
Cook pasta shells according to package directions for al dente. Drain & set aside.
In a large saucepan, scramble-fry ground turkey with spices until no longer pink.
-
In a large bowl, combine mozzarella cheese, turkey, stuffing & green onions. In a small bowl, Stir sweet potatoes with chili powder.
Fill each pasta shell with 2 Tbsp stuffing mixture & 2 tsp sweet potato mixture. Combine 1 cup of gravy with any remaining filling & spread on the bottom of a 13" x 9" baking dish. Place filled shells overtop, drizzle with remaining gravy & sprinkle with Parmesan cheese.
Bake, covered for 15-20 minutes or until heated through. Serve with cranberry sauce if you wish.

December 25th is not only Christmas Day, but it holds an extra special meaning for our family. It is my sister Rita’s birth date. When we were growing up, being able to enjoy all the great things that come with the Christmas meal as well as birthday cake …. could it get better than that!!
Although your family’s Christmas traditions may vary depending on the culture you were raised in, we like to think food is a language that needs no translation. I believe that many of our dishes are from an assortment of different cultures mixed into one recipe. Such is the case of our turkey dinner this year. I’ve incorporated a Moroccan inspired fruit stuffing along with our traditional savory one.
In view of the ongoing pandemic, hopefully caution will be taken in the holiday events your involved in. The best gift you can give this Christmas is not infecting others with Covid-19.
As much as I like certain aspects of the Christmas season, I find it becomes a little overwhelming. It seems a massive wave of Christmas capitalism takes over every aspect of one’s life from the end of October to January. I like to call it a form of OCD: Obsessive Christmas Disorder.
I was raised on a farm in southern Alberta at a time when Christmas celebrations were focused around our family blessings and not how many blow-up Santa Clauses or realistic sleighs we set up on our front lawns.
It would almost seem more importance is being given to getting more likes on Facebook & Instagram than it is carrying on a tradition based on family.
This year will not be perfect, it never is, and the holidays are a hard enough time for many, regardless of pandemics and catastrophic weather. I hope there will still be a little magic for everyone, however you spend the holidays.
HAPPY BIRTHDAY RITA!
WE LOVE YOU VERY MUCH & ARE SHARING YOUR DAY IN OUR THOUGHTS
Print Recipe
Turkey Breast w/ Fruity Savory Stuffing
Votes: 2
Rating: 5
You:
Rate this recipe!
|
|
Votes: 2
Rating: 5
You:
Rate this recipe!
|
Instructions
Fruit Stuffing
In a small bowl, combine dates, apricots, raisins, apple & orange juice & zest; season with spices & mix well. Set aside to marinate.
Savory Stuffing
In a saucepan, sauté onion, celery, garlic, mushrooms & seasonings in margarine. Remove from heat.
Place vegetable/seasoning mixture in a large bowl & combine with dry bread cubes & broth, adding only enough broth to make proper stuffing consistency. Set aside.
Turkey
-
Lay turkey breast on a clean work surface so that it lies open & flat. Cover with plastic wrap, then pound lightly with a meat mallet to flatten into an even thickness all over. Discard plastic wrap.
On one half of the turkey breast spread a thick layer of the savory stuffing then top it with the fruit stuffing. Fold the adjoining half of the turkey breast over all. Fasten with metal skewers if you wish to help to keep stuffing enclosed.
Place a wire rack in a roasting pan & lay stuffed turkey roast on it. Brush herb butter over turkey breast. Roast uncovered, until turkey reaches an internal temperature of 180 F. about 2 hours. Cover loosely with foil if top browns too quickly.
Place any extra savory stuffing in a buttered casserole & bake for about 30 minutes, until the top is lightly toasted.
Remove turkey breast from oven, tent with foil & allow to rest for about 5-10 minutes. Make sure to remove all toothpicks and/or skewers before slicing to serve.
Recipe Notes
- You will notice the recipe for the savory stuffing is well more than what is needed to stuff the turkey breast. For me personally, the stuffing is the most important part of the whole meal so I made sure there would be lots.
- Don't hesitate to half the recipe if you feel its more than what you need.
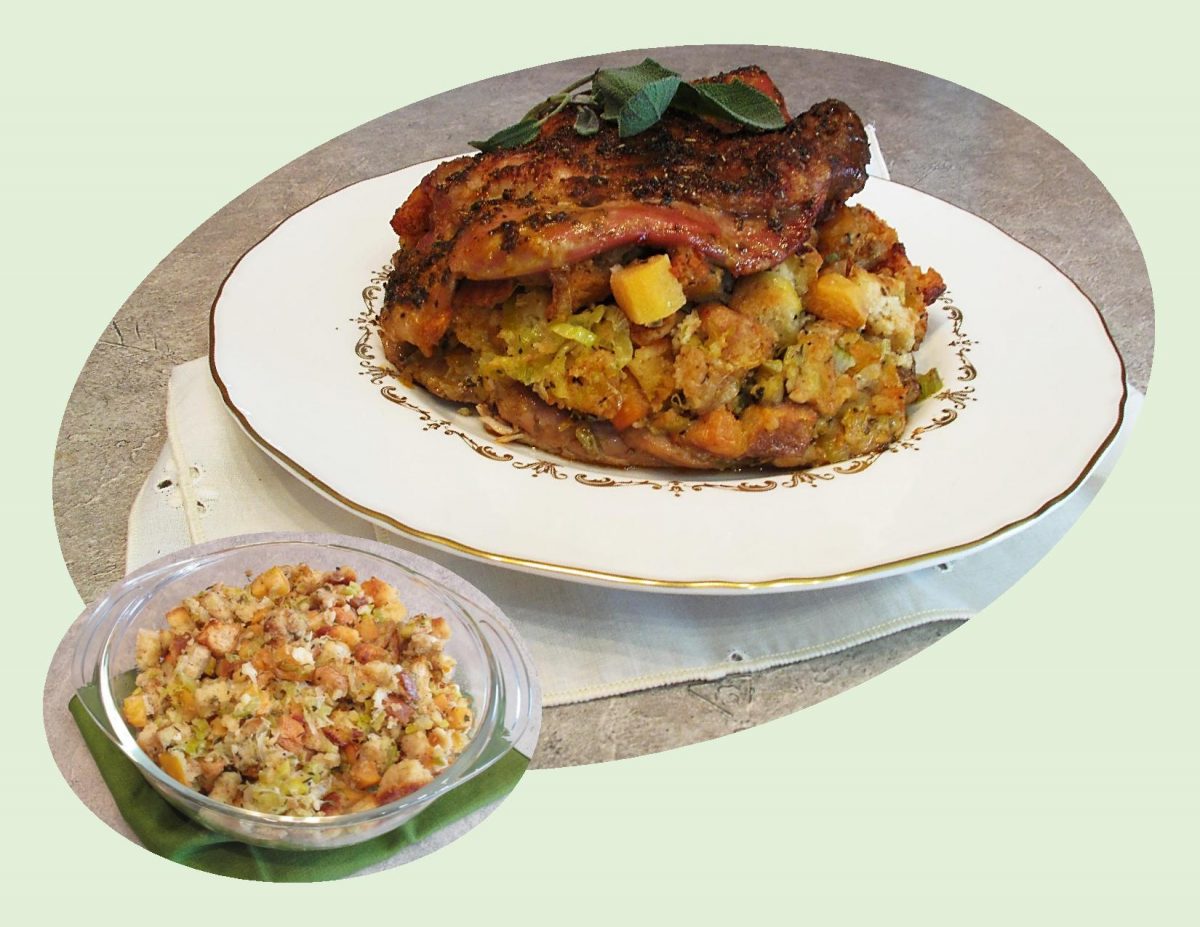
Cooking turkey parts instead of the entire bird serves a few purposes. It not only cuts way back on the cooking time but it allows you to cook more of your favorite pieces. For dark meat lovers, roasted turkey thighs are the perfect option as the meat is succulent and flavorful without losing its moistness during the roasting time.
As soon as I spot persimmons in the grocery store I can’t resist them. Persimmons are in season between November and February. They are mildly sweet and juicy with a slight crunch reminiscent of a cross between a peach and a pear. Since there is only a short window in which you can enjoy this exotic fruit, persimmons make up for it by working well in both sweet and savory recipes.
In acknowledgement to the USA Thanksgiving today (November 25th), I’m stuffing some turkey thighs with an interesting dressing containing persimmons & fresh sage. I know most people have their own traditional, ‘go-to‘ stuffing recipes, but I’m hoping at least a few will venture from the norm and try a little persimmon in your stuffing. I can assure you, its worth it.
Print Recipe
Turkey Thighs w/ Persimmon Sage Stuffing
Votes: 1
Rating: 5
You:
Rate this recipe!
Ingredients
Stuffing
- 454 gm bread, cubed
- 1 Tbsp olive oil
- 2 Tbsp unsalted butter, divided
- 2 shallots, minced, optional
- 2 celery stalks, trimmed & thinly sliced
- 1 medium (about 230 gm) leek, cleaned & thinly sliced
- 2 cloves garlic, minced
- 6 fresh sage leaves, chopped
- 3/4 tsp thyme
- 1/2 tsp pepper
- 1 cup vegetable or chicken broth
- salt to taste
- 1 large egg, lightly beaten
- 2 large firm Fuyu persimmons, peeled & cubed
|
Votes: 1
Rating: 5
You:
Rate this recipe!
|
Instructions
Stuffing
Preheat oven to 200 F. On a parchment or foil lined baking sheet, spread out the cubes of bread. Bake for about 10 minutes, until lightly toasted yet still pale in color. Set aside. Turn oven off until ready to bake ready to roast thighs if you wish.
In a large saucepan or pot over medium heat, add 1 Tbsp olive oil & 1 Tbsp butter. When butter has melted, add the shallot, celery & leek. Cook until softened, about 10 minutes. Add garlic, sage, thyme & pepper; cook until mixture is fragrant, about 2 minutes.
Pour in the broth and toss lightly until everything is completely mixed. Give the stuffing a taste & add salt to your personal taste. Fold in the beaten egg & cubed persimmons; toss lightly till combined.
Herb Butter
In a small dish, combine all herb butter ingredients & set aside.
Assembly & Baking
Arrange turkey thighs, skin side down on a work surface so they lay open & flat. Cover with plastic wrap, then pound lightly with a meat mallet to flatten to an even thickness.
-
Discard plastic wrap; spread stuffing over 2 turkey thighs, leaving a 1/4-inch border around edge. Top each with a remaining turkey thigh. Butter a casserole dish with remaining butter & transfer any leftover stuffing to casserole dish, spreading it out evenly.
Line a roasting pan with heavy duty foil paper. Grease foil on the bottom of pan & place the stuffed turkey thighs in roasting pan. Carefully spread HERB BUTTER over tops of stuffed thighs.
Roast uncovered, basting occasionally, until thighs reach an internal temperature of 180 F. about 2 hours. Cover with foil if top browns too quickly. Bake the extra stuffing for about 30-40 minutes, until the top of the stuffing is golden brown.
Remove turkey thighs from oven, tent with foil & allow to rest for about 5-10 minutes. Slice & serve.
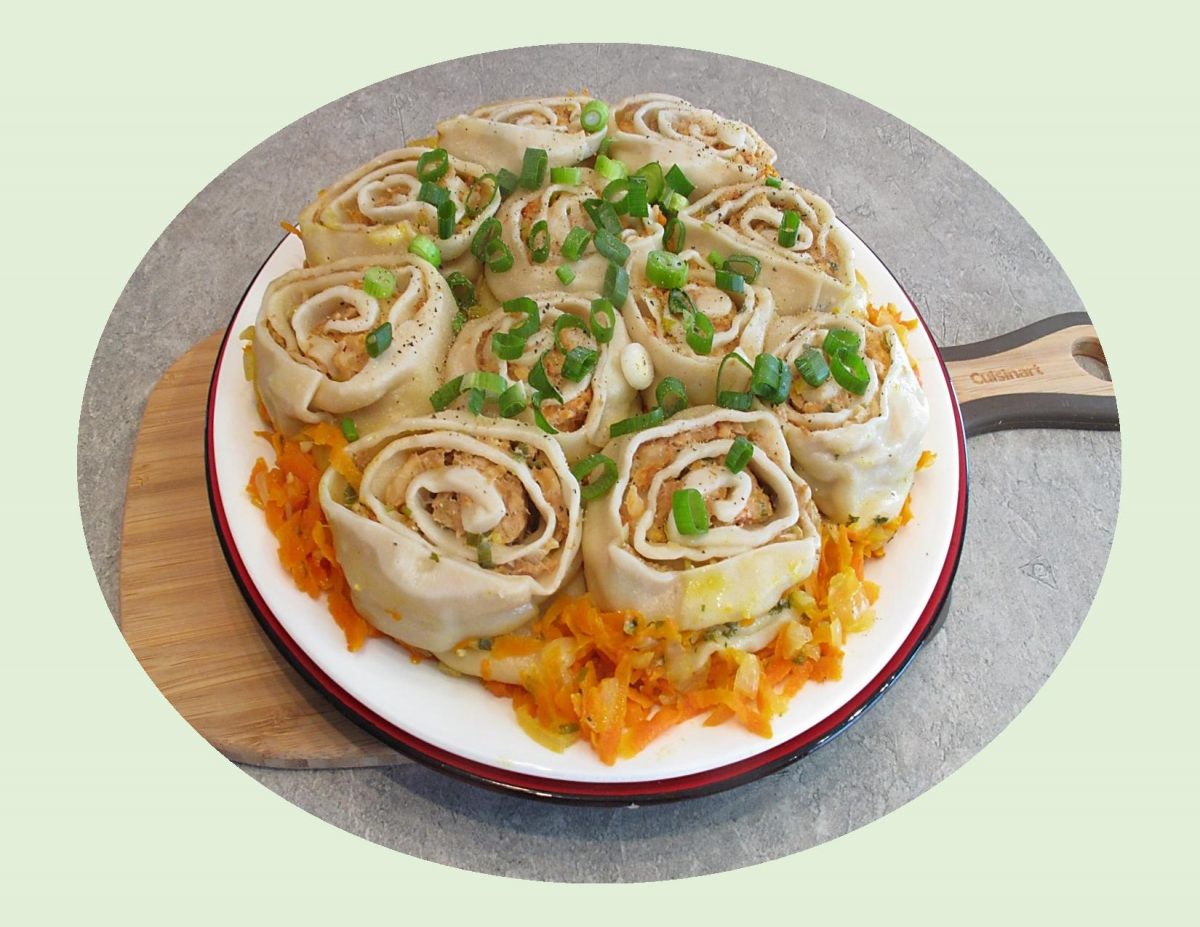
Though they come in all shapes and sizes, dumplings are a near-universal culinary constant as almost every culture has one. So naturally, dumpling recipes are incredibly versatile, coming with a wide array of fillings, wrappers, shapes and sizes. Eaten as an appetizer, dessert, side dish or for the main meal, they might just be the ultimate comfort food.
Chicken and shrimp go together surprisingly well, and this dish is no exception. In March of this year (2021), I posted a blog about Russian Pelmeni. Since then, Brion & I have had ‘pelmeni’ numerous times in which I’ve experimented with various fillings. In case you’re not familiar with these dumplings, traditional Russian pelmeni consist of a filling wrapped in thin, unleavened dough. The word “pelmeni” describes the ear-shaped appearance of these dumplings.
When I made them for the March blog, I used a different technique for preparing them. Instead of making them into the traditional ear shape, I rolled the dough out into a large rectangle. I then spread the raw meat filling over it very thinly and rolled it up in a jelly roll fashion. After slicing the roll into 2-inch pieces, they were steam cooked in broth in a skillet. It’s a quick and easy take on authentic pelmeni.
Since Brion & I eat a lot of chicken and shrimp, I could see no reason to ‘develop’ a new version with an almost oriental twist on it.
Print Recipe
Shrimp & Chicken Pelmeni
Votes: 1
Rating: 5
You:
Rate this recipe!
Ingredients
Broth for Steaming Pelmeni
Ingredients
Broth for Steaming Pelmeni
|
Votes: 1
Rating: 5
You:
Rate this recipe!
|
Instructions
Dough
In a bowl, combine all dough ingredients & knead until a smooth dough ball forms, about 10 minutes. Cover with plastic wrap & set aside to rest until your filling is prepared.
Filling
Chop mushrooms & mince garlic. In a skillet, heat butter & add garlic. When aromatic & light golden, add mushrooms & a light sprinkle of salt. Cook for about 2 minutes, until fragrant, soft & roughly a third of the original volume. Set aside in a bowl to cool.
Chop shrimp into pieces the size of large peas. Add to the mushrooms with the chicken, green onion, water chestnuts & ginger. Combine with a fork.
Stir together salt & white pepper, sugar, soy sauce & water. Pour over the filling; stir to mix & firm up. Cover & set aside to rest for 30 minutes.
Assembly
Once dough has rested, transfer to a floured surface. Roll out the dough into a large, THIN rectangle. Spread filling over the dough, leaving a 1/4-inch at the far side of the dough.
Tightly roll dough up, starting from the wider side, forming a log. Put seam side down to seal the edges. Seal ends of the dough as well. Using a very sharp knife, cut the dough log into 2-inch sections.
In a large skillet that will accommodate all pelmeni, heat oil & cook onion until translucent. Add garlic & continue cooking until fragrant. Add grated carrot; cook about 1-2 minutes more.
Place pelmeni rolls on top of veggies, add vegetable broth, salt & pepper. Cover with a lid & simmer for 30 minutes on a low heat. Check pelmeni from time to time, to make sure there is still some broth in the skillet. Add more broth if it evaporates too fast. Garnish with extra sliced green onions if desired. Serve.
Recipe Notes
- A nice condiment for these dumplings would be a sweet chili sauce.


