Thanks for the memories! This phrase says it all when I think back to the wonderful time we spent in France. Although this holiday is now 20 years past, the memories remain very vivid and special.
My sister, Loretta had joined Brion & I on this French vacation which had made it even more special. Our journey began in Paris where we had rented a car, then travelled south (about 613 km/380 miles) to the sleepy little village of St Thibery. For this segment of our trip we had rented an apartment to use as ‘home base’ during our time in this part of France. Many of these houses are from the 14th,15th & 17th century. The apartment was quaint but adequate even having a roof top patio.
St Thibery is situated between the larger towns of Agde & Pezenas and is just a short distance from the Mediterranean Sea. On one of our day trips we visited the town of Agde. It is one of the oldest towns in France and is captivating by its maze of narrow streets. Agde was built of black basalt from a volcanic eruption thus the black color of its buildings.
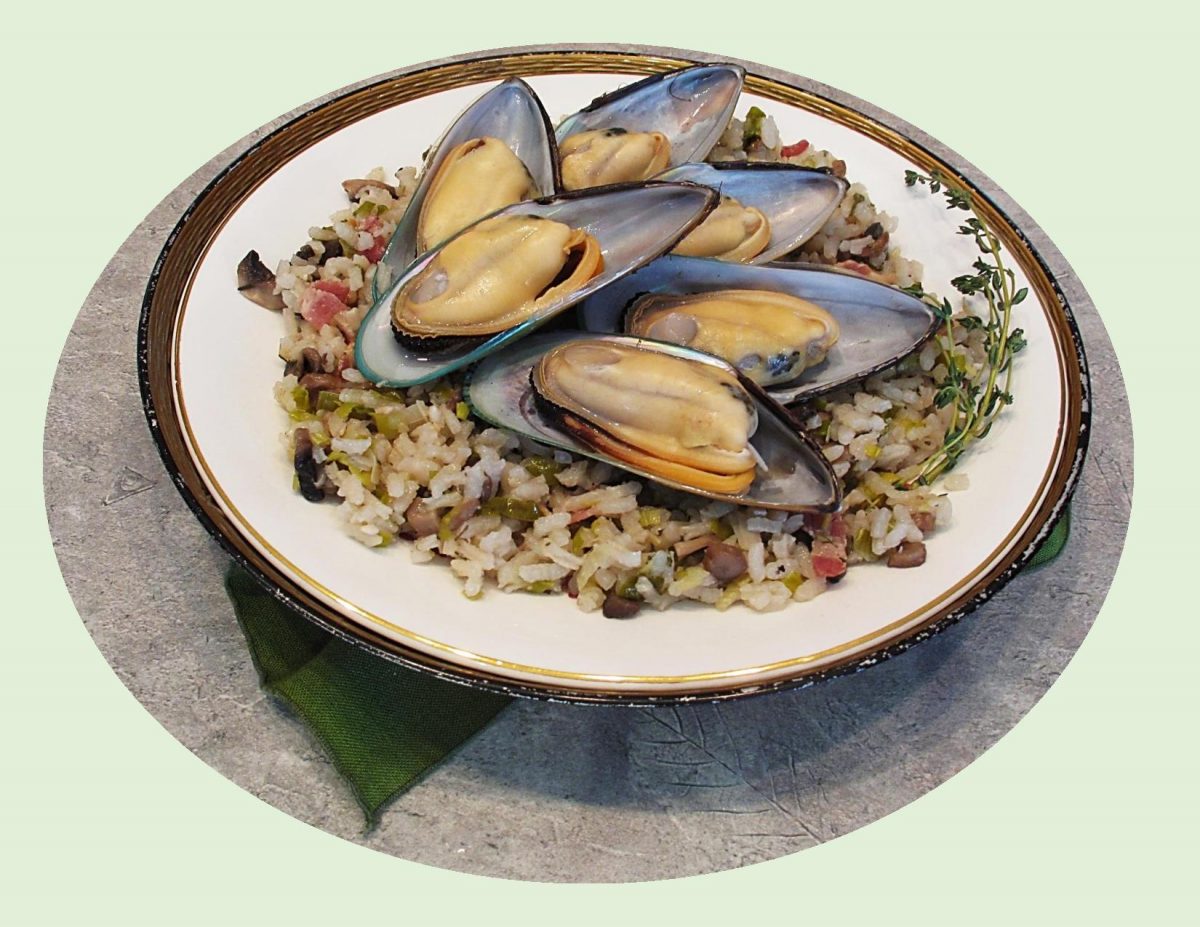
It was here we discovered a nice restaurant where we enjoyed some classic French steamed mussels. It would be an understatement to say how much the three of us enjoyed this feast of fresh seafood.
During the time we spent in the area, we made the 20 minute drive from St Thibery to Agde just to have some more mussels on numerous evenings.
Brion & I decided to revisit the taste of those ‘French’ mussels today with our supper meal. Of course, nothing compares to the ‘taste of a memory’!
Print Recipe
French Mussels w/ Bacon & Leek Risotto
Votes: 1
Rating: 5
You:
Rate this recipe!
|
|
Votes: 1
Rating: 5
You:
Rate this recipe!
|
Instructions
Risotto
Bring vegetable broth to a boil in a saucepan, then turn heat to low & keep at a simmer.
Heat a large skillet over medium heat; add bacon & sauté until crisp. Remove to a paper towel lined plate to drain & set aside.
Remove all but 2 Tbsp bacon drippings from skillet (add extra olive oil if necessary to equal 2 Tbsp) then add leeks, mushrooms & shallot. Turn heat up to medium-high; season with salt & pepper. Sauté until vegetables are tender & starting to turn golden brown, about 7-8 minutes. Add garlic & sauté for 1 minute. Add rice; stir to coat & cook for 1 more minute.
Turn heat back to medium; add wine & stir until absorbed by rice. Add hot vegetable broth; stir near constantly until rice is tender & all the broth is absorbed, about 25 minutes. If broth gets to a hard boil, turn heat down. Remove skillet from heat; stir in thyme, parmesan cheese & cooked bacon. Keep warm until mussels are ready.
Mussels
Heat olive oil & butter in a large pot over medium high heat. Sauté the onion & garlic until softened, about 5 minutes.
Add the mussels, wine, cream, butter & parsley. Season well with salt & pepper to taste.
Mix well, cover pot with a lid & cook until mussels are cooked through & opened, about 12-15 minutes.
Serve mussels along with the juices in the pan with risotto & crusty or garlic bread.
-
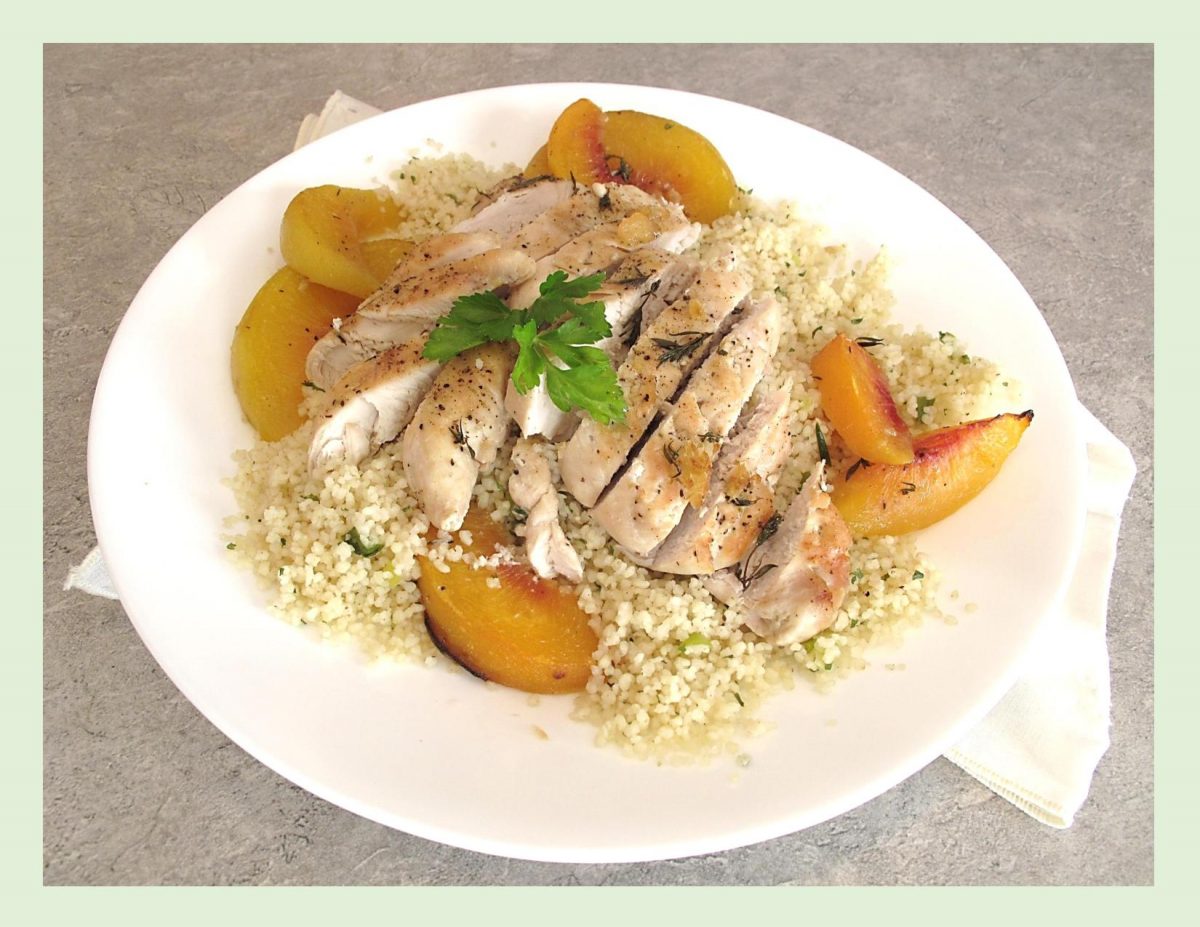
Meat and fruit pairings are delicious, yet the idea of using both fruit and meat in the same dish is undoubtedly a little controversial.
One of the things I enjoy about cooking is combining flavors to create a wholesome dish. Sometimes, its interesting just to combine ingredients and flavors that don’t seem like they should go together.
Chicken is a good match for a wide variety of fruits with peaches being one of them. Whether fresh or frozen, nothing partners better with peaches than fresh ginger. To enhance the flavor just a bit more, I’m making a fluffy, golden couscous, speckled with green onion and fresh parsley. Subtle cumin and ginger spices add a heady fragrance and warm flavor. Nothing fancy, just a great taste!
Print Recipe
Chicken w/ Peaches & Ginger
Votes: 1
Rating: 5
You:
Rate this recipe!
|
|
Votes: 1
Rating: 5
You:
Rate this recipe!
|
Instructions
Chicken
-
Heat oil in a large skillet over medium heat. Season the chicken with salt & pepper & cook on one side until golden, about 4-6 minutes. Flip, cook for 1 minute then transfer chicken to a 9x13-inch baking pan.
Place peaches, sugar, thyme & ginger over & around chicken. Add the chicken broth & bake for about 45 minutes or until chicken is cooked through. While chicken is baking prepare couscous.
Couscous
Heat 1 teaspoon of olive oil in medium saucepan over medium heat. Add green onion, cumin, ginger & garlic clove. Cook & stir for about 3 minutes until green onion is softened.
Add honey. Heat & stir for about 30 seconds until green onion is coated.
Add broth. Bring to a boil. Add couscous & 2 teaspoons oil. Stir. Cover. Remove from heat. Let stand for 5 minutes without lifting lid. Fluff with fork. Stir in chopped parsley & season with salt & pepper to taste.
Serve the chicken & peaches over couscous with any ginger sauce from baking pan.

CELEBRATING VICTORIA DAY!
For many Canadians, Victoria Day marks the unofficial beginning of summer. It is Canada’s oldest non-religious holiday and although we still hang on to the British Queen’s name (for old times sake), this truly Canadian holiday has everything to do with the end of the cold weather and short days and a lot to do with some great food.
This holiday is called ‘May Two-Four’ in some parts of Canada, a name that refers both to the date around which the holiday falls (May 24th) and Canadian slang for a case of twenty-four beers (a ‘two-four’), a drink popular during the long weekend.
I’m sure, for many this weekend, barbecuing will be up front and center with burgers, steaks and ribs taking top billing. Brion & I decided to wait a bit longer to start barbecuing and have some turkey sliders today instead.
In keeping with some food history ….
The name ‘slider’ originated in the 1940’s when sailors in the US Navy would refer to mini-burgers as sliders because of their extreme greasiness. In just one or two bites, the burger would just slide right down. Fortunately around 2007, sliders evolved from miniature ‘grease bombs’ to elegant culinary creations that now appeal to people of all backgrounds and tastes.
There’s something inherently appealing about a small burger. For the diet-conscious, the idea of a small gourmet burger is more feasible. When dining out, ordering sliders instead of an average sized hamburger also allows you to try several different varieties as they are often served in pairs.
The modern day slider has been reinvented from the traditional beef patty to being made from chicken, pork and veal as well as various seafood options. Having our turkey sliders in stuffing biscuits definitely added that gourmet touch.
Print Recipe
Turkey Sliders in Stuffing Biscuits
Votes: 2
Rating: 5
You:
Rate this recipe!
|
|
Votes: 2
Rating: 5
You:
Rate this recipe!
|
Instructions
Stuffing
In a large skillet, heat oil on medium. Add all stuffing ingredients & cook about 15 minutes or until tender, stirring occasionally. Transfer to a bowl & cool completely.
Biscuits
Preheat oven to 450 F. Spray two 12-cup muffin pans with baking spray.
In a bowl, whisk together flour, sugar, baking powder, baking soda & salt until blended. Add butter; with finger tips, combine until mixture resembles coarse crumbs. Stir in buttermilk & one third of cooked, cooled, 'stuffing mixture' until JUST blended.
Divide among the 24 muffin cups (about 3 Tbsp each). Bake 15 minutes or until golden brown; transfer biscuits from pans to wire cooling rack.
Turkey Sliders
Line a baking sheet with foil paper. In a bowl, combine turkey, salt & remaining cooked 'stuffing mixture'. Form into 24 patties (2-inch width); place on foil-lined baking sheet & bake for 15 minutes or until cooked through.
Assembly
Slice warm biscuits in half. Add turkey patties & dollops of mayo & cranberry preserves.
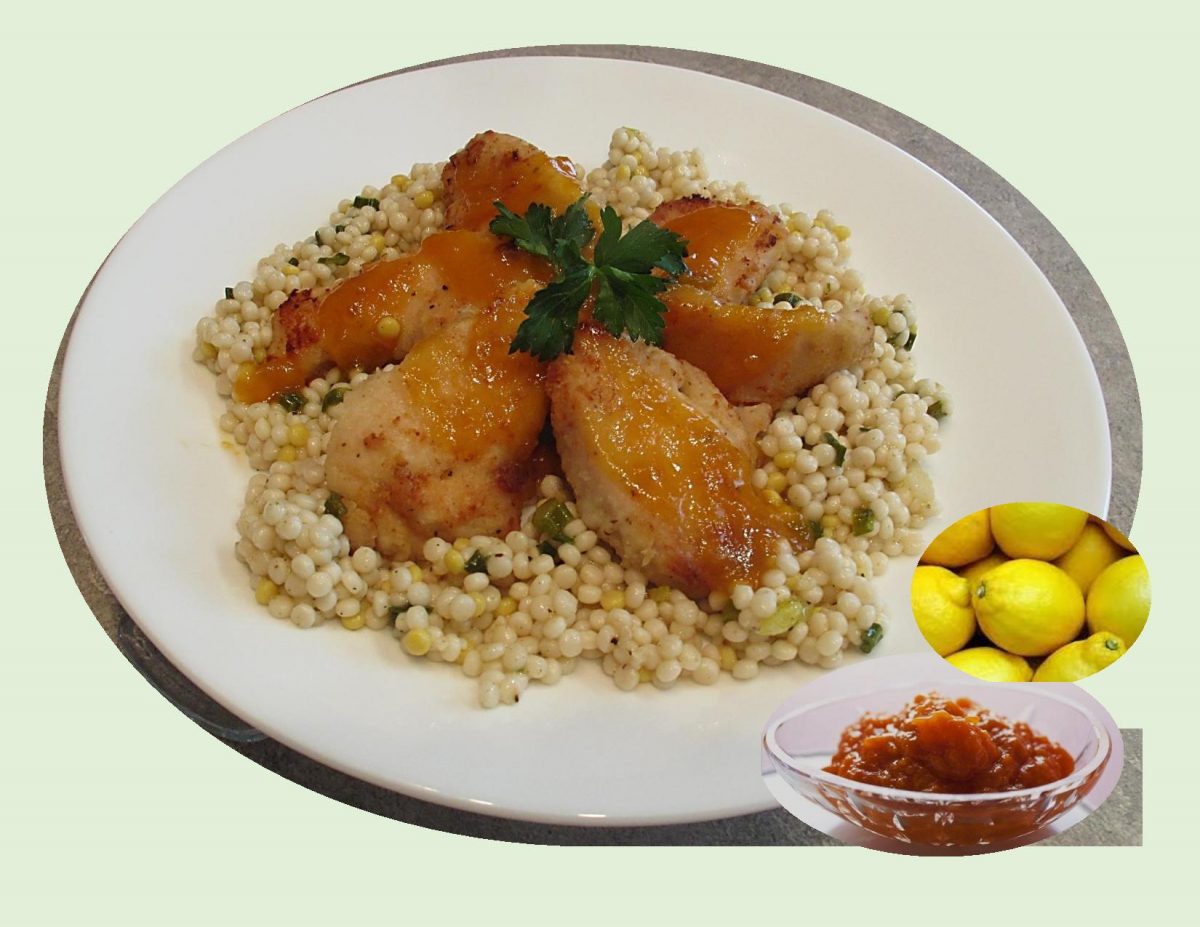
The flavors of the meal hint of Moroccan cuisine to me. It wasn’t until Brion & I visited Morocco on a holiday one year, that I realized how many of their spices appealed to me.
Moroccan cuisine is very refined because of its interactions and exchanges with other cultures and nations over the centuries. Its dishes are layered with sweet and spicy, earthy and bright flavors that reflect the vast array of spices available in their local markets.
Often referred to as the national dish of Morocco, couscous is made of tiny balls of wheat semolina, steamed so they’re are soft and fluffy. Subtle cumin and ginger spices add an exotic flavor to it.
Pairing apricot and lemon flavors with the chicken breast and serving it over couscous makes this simple meal quite special.
Print Recipe
Apricot Lemon Chicken Breast w/ Couscous
Votes: 1
Rating: 5
You:
Rate this recipe!
|
|
Votes: 1
Rating: 5
You:
Rate this recipe!
|
Instructions
Chicken
Preheat oven to 425 F. Spray a baking sheet with cooking spray.
Beat egg & water slightly. Stir together baking mix, lemon pepper & garlic powder. Pound chicken breasts gently to achieve uniform thickness. Dip chicken into egg mixture, then coat with baking mix mixture. Place on baking sheet & drizzle with melted butter.
Bake uncovered 20 minutes; turn chicken. Bake about 10 minutes longer until no longer pink inside. While chicken is baking prepare couscous & sauce.
Couscous
In a saucepan, heat 1 tsp oil; add green onion, cumin, ginger & garlic. Cook & stir for about 3 minutes until green onion is softened.
Add honey. Heat & stir for about 30 seconds until green onion is coated. Add broth. Bring to a boil. Add couscous & second amount of oil. Stir. Cover & remove from heat. Allow to stand for 5 minutes without lifting lid. Fluff with a fork & stir in remaining 3 ingredients.
Apricot Lemon Sauce
In a small saucepan over low heat, combine sauce ingredients, stirring occasionally, until warm.
To Serve
Place couscous on a serving platter. Top with chicken breasts & drizzle with apricot lemon sauce. Serve.

Borek (buhr-ECK’) is an essential part of life in Turkey. They are made for any occasion and can be eaten at any time of the day.
There are many variations with different kinds of fillings (cheese, potato, meat), different ways to cook them (fried, baked), different kinds of dough (filo, puff), but in the end they are all called ‘borek’.
You might not have have heard of ‘yufka’, but you have probably already eaten it in the dessert called ‘baklava’. Yufka is used in a lot of traditional Turkish recipes. Some say that it may have been the earlier form of phyllo/filo dough.
The dough itself is made from wheat flour, water and a bit of salt. Yufka finds its way onto the table in the form of casseroles, strudel or a filled pastry roll as well as just flat bread. Traditional Turkish specialties such as borek are made from thin sheets of this wheat dough that are filled and rolled.
Brion & I have many wonderful memories of the holiday time we spent in Turkey some years ago.
Print Recipe
Turkish Borek w/ Beef, Leeks & Potato
Votes: 2
Rating: 5
You:
Rate this recipe!
Ingredients
Beef, Leek & Potato Filling
Ingredients
Beef, Leek & Potato Filling
|
Votes: 2
Rating: 5
You:
Rate this recipe!
|
Instructions
Dough
in a medium bowl, whisk together flour & salt. Make a well in the center & pour in the water & oil. Using your fingers, draw the flour in from the sides, working mixture into a sticky dough.
Turn the dough out onto a floured surface & knead, adding more flour as necessary to prevent sticking, until the dough is smooth & elastic, about 3 minutes.
Transfer to the mixing bowl, drizzle with a little bit of oil & turn to coat. Cover the dough with plastic wrap & allow to rest in a draft-free place for 4 hours.
Borek Filling
In a saucepan, stir-fry ground meat with spices. Remove from saucepan, place in a bowl & set aside. Add 2 tablespoons oil to saucepan & sauté leeks & garlic until tender. Microwave potato, peel & mash with Parmesan cheese. Add leeks, garlic, potato & cheese to meat & spices. Season with salt & pepper to taste; combine well.
Assembly & Baking
Preheat oven to 350 F. Grease a round 11-inch diameter baking pan & set aside.
Divide dough into 2 equal pieces. Form each piece into a ball. On a lightly floured surface, roll the balls into very thin rounds, using more flour as needed to prevent sticking.
On one side of the dough, put a line of filling. Try to build a continuous line. Divide the filling between the 2 rounds. Roll the dough making sure filling is in the whole length of the roll.
Form a spiral with the meat roll in the baking pan, starting in the center. Add the second roll to complete the spiral, filling the pan. Brush borek with egg wash, making sure to brush all visible surfaces.
Bake on middle rack for 45 minutes or until pastry is golden. Let it cool for a bit before serving. Borek is best when freshly baked, however it still tastes great if stored in an airtight container for 2-3 days.

Like many recipes with folk origins, pierogi dough can be made in a variety of ways with some people using eggs & sour cream & others don’t. Making your own pierogis is actually an easier job than you might expect (just a little time consuming).
Like all ‘dumplings’, pierogis can pretty much do no wrong. They’re great as a side, as the main event or you guessed it ….. in a casserole or even dessert.
What makes it even better is that the filling possibilities are endless ….. the pierogi knows no boundaries!
Brion & I always enjoy a seafood meal. On a quest to come up with something different it occurred to me I had never put shrimp in a pierogi filling before. If it works in seafood lasagna why not a pierogis?!
Last summer I had posted a meal using a sun-dried tomato sauce. The once, incredibly popular, sun-dried tomatoes have become an underrated, ingredient that few people stock in their pantries anymore.
Sun-dried tomatoes are very versatile & can be used in unlimited ways, Because they’re dried, the flavors of the tomatoes are intensified. This sauce, with its bold & rich garlic & herb flavors was the perfect accompaniment for these shrimp pierogis. Definitely a keeper!
Print Recipe
Shrimp Pierogis w/ Sun-Dried Tomato Sauce
Votes: 1
Rating: 5
You:
Rate this recipe!
Ingredients
Shrimp Filling
- 1 leek, washed & thinly sliced then chopped USE ALL of the leek, discarding only discolored stalk ends
- 200 gm Crimini mushrooms, chopped
- 1 clove garlic, minced
- 1 Tbsp olive oil
- 1/4 cup + 1 Tbsp butter, divided
- 1/4 cup chicken broth
- 236 ml clam juice, bottled DIVIDED
- 300 gm WILD shrimp, peeled, deveined, rinsed & slightly chopped
- 1/4 cup flour
- 3/4 cup milk
- 1/4 tsp sea salt
- 1/4 tsp pepper, divided
- 1/2 cup heavy cream
- 30 gm Parmesan, grated
|
Votes: 1
Rating: 5
You:
Rate this recipe!
|
Instructions
Pierogi Dough ( Yield = 18)
In a large bowl, combine flour, salt, beaten egg, butter & sour cream. Mix until dough comes together. On a work surface, knead dough for 3-4 minutes until elastic. Place in a plastic container with a lid & refrigerate for at least an hour or overnight.
Shrimp Filling
In a large skillet over medium heat melt 1 Tbsp each, oil & butter. Saute leeks, mushrooms & garlic until tender.
Stir in half of the bottle of clam juice & the 1/4 cup chicken broth; bring mixture to a boil. Once boiling, add shrimp & 1/8 tsp pepper. Return to a boil, then reduce heat & let simmer for 4-5 minutes. Drain the filling, reserving liquid. Set aside.
In a large saucepan over medium-low heat, melt the remaining 1/4 cup butter. Stir in flour & mix until smooth. Gradually add in the milk & reserved liquid (from filling), while stirring constantly. Sprinkle in the rest of the salt & pepper. Bring sauce to a boil & cook for about 2 minutes until thickened, continuing to stir.
Remove the sauce from heat & mix in the heavy cream & Parmesan cheese. Take about 1/3 cup of the sauce & mix it with the shrimp filling. Place remaining sauce in a bowl & set aside to be added to the SUN-DRIED TOMATO SAUCE later.
Sun-Dried Tomato Sauce
Add oil to skillet & heat on a medium heat. Add onion & saute until it starts to soften. Add mushrooms, garlic, sun-dried tomatoes, zucchini, oregano & smoked paprika.
Cook for 2 minutes, while stirring, then add remaining clam juice, sea salt & RESERVED sauce. Gently combine. Set aside until pierogis are cooked & ready to serve.
Roll & Fill Pierogis
Remove pierogi dough from refrigerator & cut into 18 equal pieces (about 30 gm each). Roll each piece into about a 3 1/2-inch round. Place a heaping Tbsp of shrimp filling (about 30 gm) in the middle of pierogi. Dip your finger in a bowl of water & run it along the edge of the dough. Fold pierogi in half, carefully pinching together edges to seal it completely.
Cook & Serve
Bring a large pot of salted water to a boil. Carefully drop pierogis in & boil until all the pierogis float to the surface & dough becomes somewhat translucent, about 3-5 minutes. Remove pierogis with a slotted spoon, making sure to let as much of the excess water drip off as possible.
In a large skillet, heat a Tbsp of butter. Place drained pierogis in skillet. Do not over-crowd so that they can all lightly brown on both sides. Reheat sun-dried tomato sauce & place in a serving dish. When pierogis have fried a bit, (blot on paper towel if you wish), then add to sauce on serving dish.
Recipe Notes
- When making the pierogis, nothing wrong with rolling out all the dough at the same time & cutting your circles with a cookie cutter. I just personally like dividing the dough so I don't have to do any re-rolling with the scraps. Just personal preference.
- If you happened to have any filling leftover, just add it to you sun-dried tomato sauce.

New Year’s Eve ……. normally this eve would bring about lots of parties and celebrations but the start of 2021 looks much more subdued. As expected, cities have cancelled or modified their plans due to the pandemic. Although tradition has been silenced this year, one thing that will never change is the ticking of time and the arrival of a New Year at midnight on December 31st.
When I was growing up, I recall one of the Christmas tree ornaments my mother had was a mushroom with a white spotted red cap. At that time, I remember thinking it seemed unusual as a Christmas tree ornament but never really questioned it. Many years later, through my interest in food history, I understand the connection.
In Germany and other parts of Central and Eastern Europe this iconic mushroom (Amanita muscaria) has long been considered a symbol of good luck and is intertwined with the Yuletide Season.
‘The Mushroom’ of Christmas and the New Year is frequently found growing underneath pine trees because the roots of this specific mushroom can only grow in the root zones of certain trees. There is some speculation that the red & white of Christmas and the use of pine trees may be linked to these humble mushrooms.
Even though the Amanita muscaria mushroom is toxic and should never be eaten it is still symbolizes the hope for good fortune in the coming year. The tradition of gifting mushroom imagery has stuck around, especially for those of German or Austrian descent who still exchange the pretty red & white mushrooms at Christmas time (often in the form of cards or other trinkets). Its not hard to understand why ‘meringue’ mushrooms are a popular decoration for the ‘Yule Log’ cakes.
After all these years, I understand the meaning of my mothers little mushroom ornament. New Year’s of 2020 seems like a good time to make a mushroom finger food in hopes of having the good fortune of Covid 19 coming to an end so we can all resume ‘normal’ life in 2021.
Print Recipe
Mushroom, Caramelized Onion & Gruyere Finger Food
Votes: 1
Rating: 5
You:
Rate this recipe!
|
|
Votes: 1
Rating: 5
You:
Rate this recipe!
|
Instructions
Preheat oven to 400 F. Line 2 baking sheets with parchment paper.
In a large, heavy bottomed skillet, heat olive oil over medium-low heat; add onions. Cook, stirring occasionally, until they begin to caramelize, about 20 minutes.
Add the butter to the pan. Once melted, add the mushrooms & sauté, stirring occasionally, until they are completely soft & all the liquid evaporates, about 20 minutes.
Add the garlic, sage & thyme; sauté until fragrant, about 1 minute. Season with salt & pepper to taste.
Add the broth, scraping the bottom of the pan to pull up all of the browned bits, & cook until all of the liquid has evaporated. Remove from heat.
Unfold the thawed sheet of puff pastry & cut out 36 circles from dough, placing them evenly spaced on the baking sheets. Using a very sharp knife, make four small scores around the perimeter of the dough, about 1/4 to 1/2-inch from the edge.
Top the rounds of puff pastry with a small spoonful of the mushroom mixture, trying to keep the filling within the score marks. Top with grated Gruyere cheese. Brush the edges of the dough rounds with the egg wash.
Bake until the pastry is golden brown, about 15-25 minutes. Garnish with fresh chopped parsley.
-
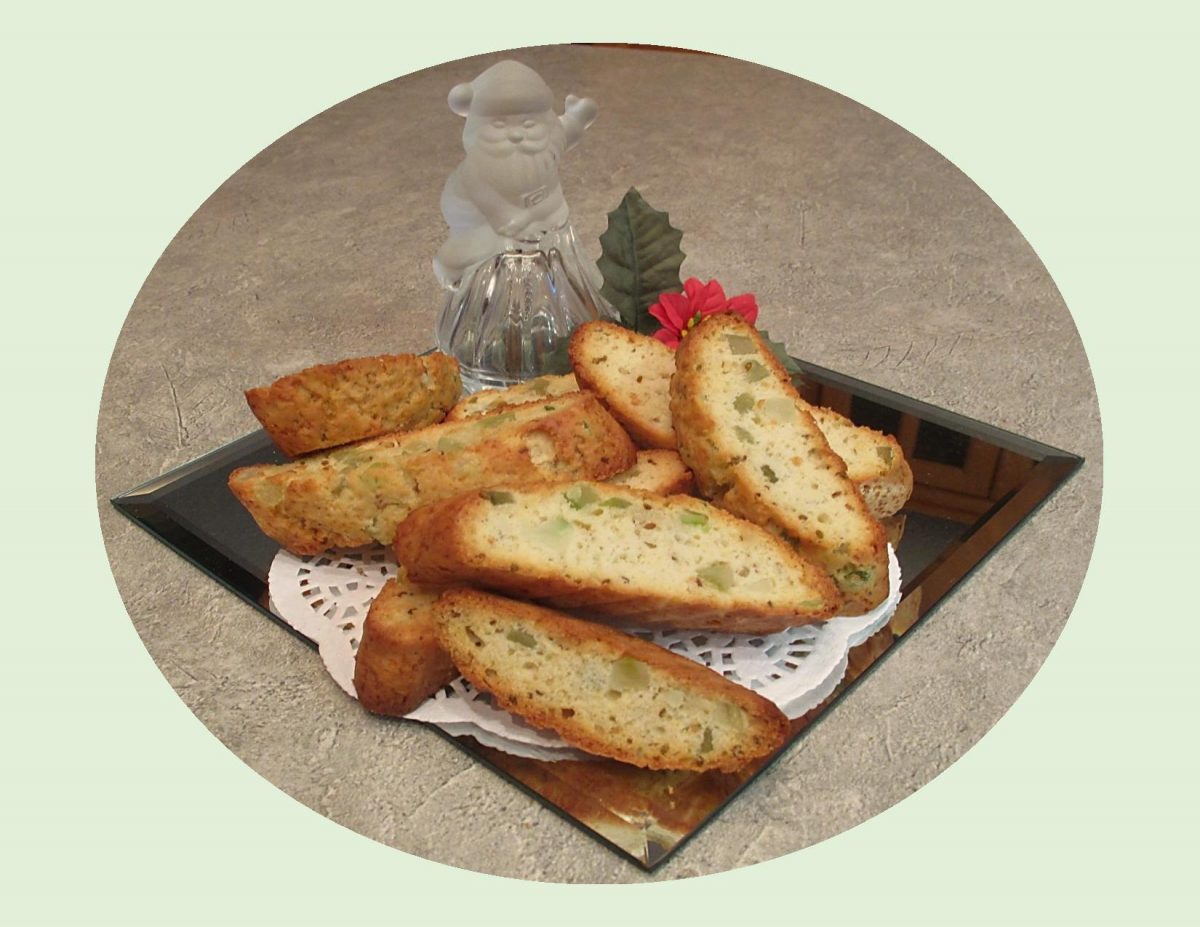
When most people mention biscotti, they actually mean a specific type of Italian cookie called ‘cantuccini’. Italians use the term biscotti to refer to any type of crunchy cookie, round, square and otherwise as the British use the word biscuit. Here in North America, biscotti refers to a specific type of Italian cookie, derived from the ‘Tuscan cantuccini‘, which is a hard, almond flavored cookie that is baked twice and usually served with the sweet Italian dessert wine, Vino Santo. This wine is loved for its intense flavors of hazelnut and caramel. When paired with biscotti, Vino Santo is inarguably Italy’s most famous welcoming tradition. What makes this wine truly special is the natural winemaking process which gives it a unique taste.
The word biscotti derives from ‘bis’, Latin for twice, and ‘coctum’ or baked (which became ‘cotto’, or cooked).
The original biscotti was created by a bakery in Prato, Italy. Cantuccini became a staple in the Tuscan cities of Florence and Prato then spread throughout the Italian peninsula. Tuscan biscotti are flavored with almonds from the plentiful almond groves of Prato. From the original recipe it expanded to lemon flavored dough as well as other flavors and spices with additions such as raisins, dried fruits and peels to chocolate morsels and nuts.
Biscotti have been baked for centuries and its iconic texture was the perfect for for sailors who were at sea for months. In modern times, biscotti range in texture from very hard to somewhat spongy and more cake-like. First, the sticky dough is shaped into a log and baked until firm. After a short cooling period, the log is sliced into diagonal pieces and baked again to cook out the moisture and produce the crisp, dry-textured cookie with a longer shelf life. The classic recipe has no butter or oil, using only eggs to bind the ingredients together. They are typically made in a 3, 5 or 7-inch size.
I have to be honest, biscotti has never been one of my ‘go-to’ cookie recipes. But, for something quick and easy, I decided to make a small recipe using two of my favorite ingredients …. anise seed & citron peel. Brion & I tried dipping them in wine and we realized we have been missing out on something real good!!
Print Recipe
Anise Citron Biscotti
Votes: 1
Rating: 5
You:
Rate this recipe!
|
|
Votes: 1
Rating: 5
You:
Rate this recipe!
|
Instructions
-
In a bowl, combine oil & sugar followed by vanilla & eggs.
In another bowl, combine flour, salt, baking powder & anise seed then gradually stir this mixture into the egg mixture. Lastly, fold in citron peel.
Divide dough in half & form into two logs (about 6"x 2"). Place logs on a parchment lined baking sheet.
Bake for about 30-35 minutes; remove from oven & set aside to cool for about 10 minutes. Reduce heat to 275 F.
Cut logs on the diagonal into 3/4-inch thick slices. Lay the slices on their sides on lined baking sheet.
Bake for another 20-25 minutes, turning halfway through baking time.
Cool on baking sheet for 5 minutes, then carefully transfer to a wire rack to finish cooling. Store in an airtight container.
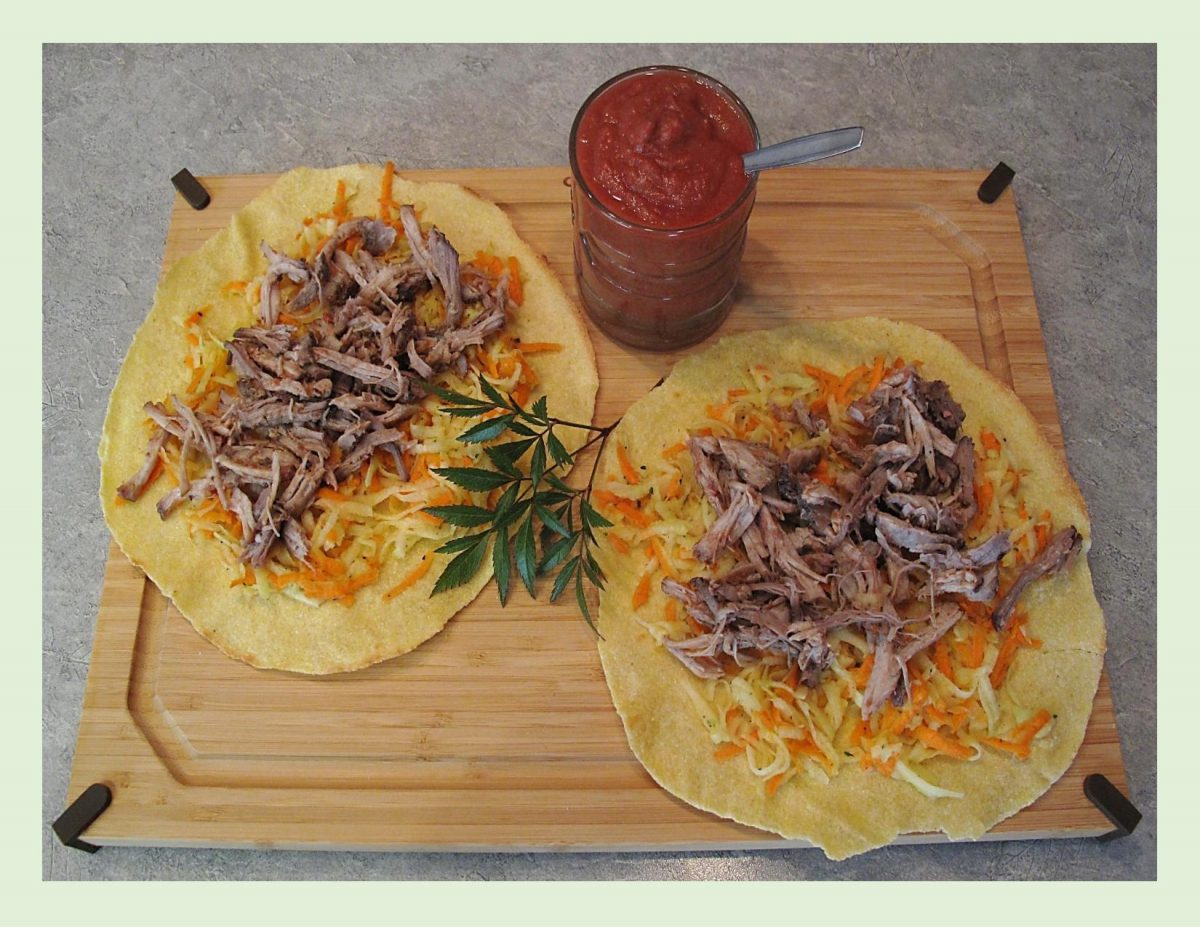
Slow cooked meat is definitely not a new thing. Truly authentic pulled pork is actually a barbecue dish, cooked for hours over a charcoal pit until it falls apart, ready to be easily shredded or ‘pulled’ apart to serve.
I’m sure most of us have attended a classic Hawaiian Luau at one time or another in our lives. The main course of this Hawaiian feast is always the ‘kalua’ roast pork. Kalua is a traditional Hawaiian cooking method that utilizes an ‘Imu’, a type of underground steam oven.
My experience, was that it was definitely pull-apart tender but far too greasy for my liking. It has taken a lot of years for me to want to make even a North American version of this pulled pork idea. To my surprise, it didn’t turn out greasy and was pretty tasty.
The idea that it has to be roasted in an outdoor pit is really not true. It can be made easily in a standard domestic oven. Of course the seasonings, temperatures and serving methods are all open to debate.
Pork shoulder is ideal for pulling purposes, either bone-in or boneless. It has an optimum fat content that yields to create tender, ‘melty‘ meat, but its essential to cook it slowly to allow the protein to break down properly. Using a dry rub will also help create tenderness and flavor.
There are numerous ways you can serve pulled pork such as on some fresh brioche buns, with cornbread or in tacos. We are going to have ours in corn tortillas with some kohlrabi coleslaw and roasted rhubarb sauce.
Print Recipe
Pulled Pork w/ Roasted Rhubarb Sauce
Votes: 1
Rating: 5
You:
Rate this recipe!
Ingredients
Dry Rub for Pork Shoulder
Ingredients
Dry Rub for Pork Shoulder
|
Votes: 1
Rating: 5
You:
Rate this recipe!
|
Instructions
Pork Shoulder
Drizzle pork with 2 Tbsp of oil; sprinkle with spices & orange zest & rub into meat. Place in a plastic zip-lock bag & refrigerate overnight (about 24 hours).
Bring meat to room temperature. Preheat oven to 275 F. Place meat in a roasting pan & bake until thickest part registers 170 F. on a meat thermometer. Basically, roast until it's falling apart. Remove roast from oven & transfer to a large platter. Allow the meat to rest for about 10 minutes. While still warm, take 2 forks & 'pull' the meat to form shreds. Keep warm until ready to assemble tortillas.
Roasted Rhubarb Sauce
Prepare sauce on the day you START to marinate meat.
Preheat oven to 425 F. Line a baking sheet with foil & spray generously with non-stick cooking spray.
Place chopped rhubarb & garlic cloves on the prepared baking sheet. Roast for 15-20 minutes, or until rhubarb is soft.
Transfer the rhubarb & garlic to a food processor or blender. Puree with one cup of water until smooth.
Pour the puree into a medium saucepan. Add remaining ingredients & mix well. Add additional water, as needed, until sauce is desired consistency.
Bring to a simmer over medium-low heat. Simmer for 10-15 minutes. Cool before pouring into a small glass pitcher. Refrigerate any leftovers when meal is finished.
Kohlrabi Coleslaw
Prepare dressing in a screw-top jar; combine vinegar, oil, sugar, salt & pepper. Cover & shake well. In a bowl, combine kohlrabi & carrots; drizzle with dressing.
Assembly
During the roasting time of the meat, prepare kohlrabi coleslaw. When everything is ready, lay out warm tortillas, top with coleslaw & pulled pork shreds. Drizzle with prepared rhubarb sauce. Fold or roll tortilla & enjoy!
Recipe Notes
- Instead of drizzling the rhubarb sauce, you can put your shredded pork in a bowl with some rhubarb sauce & combine. I find that distributes the sauce more evenly ... just a personal preference.
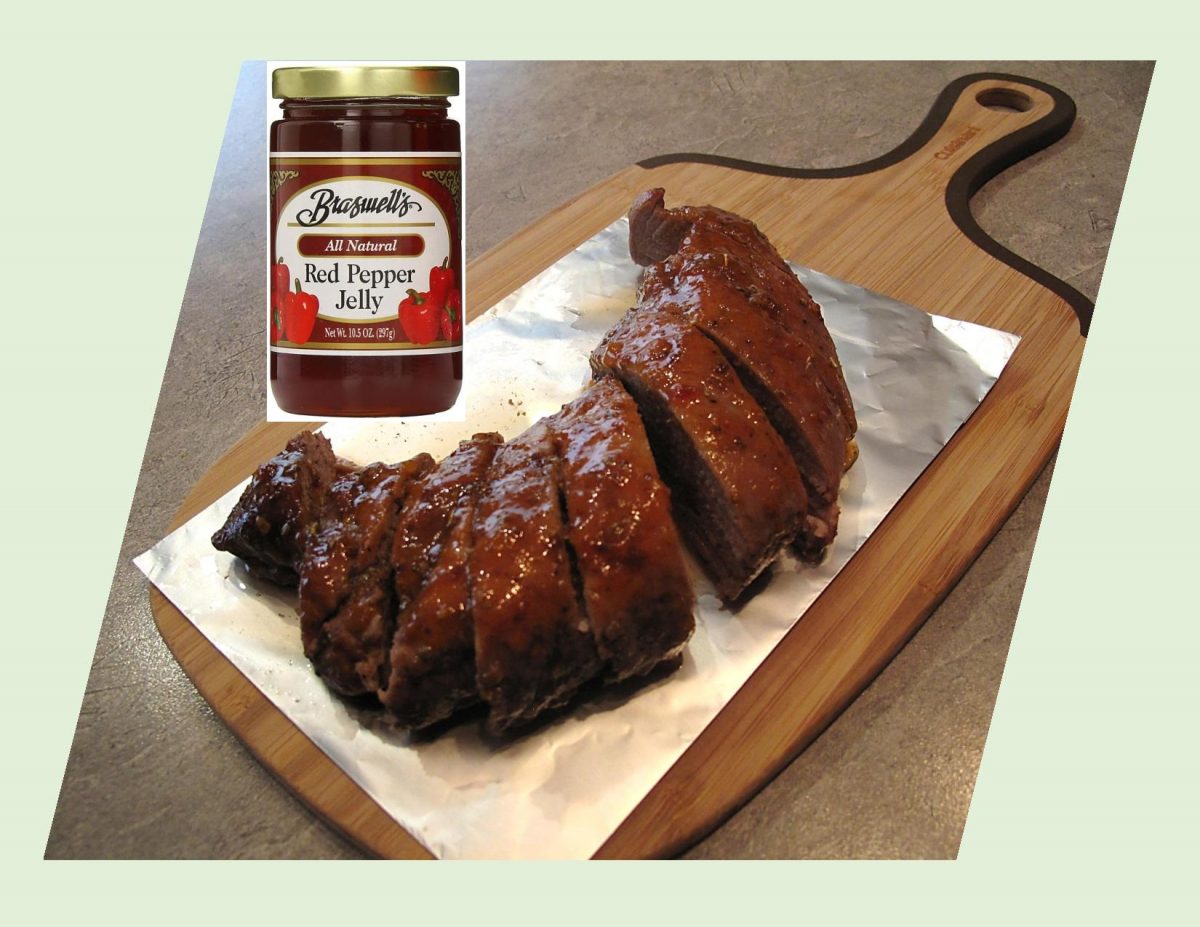
There’s something very complex about the taste of sweet and spicy. Have you ever used hot pepper jelly? If not, its a preserve in a jelly form …. somewhere between jam and jelly. The main ingredients are peppers, sugar and vinegar which are combined with pectin to form a preserve.
Hot pepper jelly is such a versatile product, that there is no limit of different ways you can use it, depending on your taste preference.
I was thinking that if this recipe appeals to you and you purchase some of this jelly, here are a few other ways you could make use of it.
- Ham & Turkey Sandwich – use jelly instead of mustard
- Cocktail Meatball Glaze
- Serve on Cornbread – with or without butter!
- Dip for Egg rolls
- On a Bagel with Cream Cheese
- Sauce for Hot Wings or Chicken Tenders
- Topping for Baked Brie Cheese
- Glaze for Baked Ham
One thing about pork tenderloin is it will never disappoint when it comes to tenderness and flavor.
Print Recipe
Savory Pork Wellington w/ Pepper-Peach Glaze
Votes: 1
Rating: 5
You:
Rate this recipe!
|
|
Votes: 1
Rating: 5
You:
Rate this recipe!
|
Instructions
Tenderloin
Remove silver skin from tenderloin by sliding the knife tip under one end of the silver skin. Keep the blade flat (parallel to the meat) & slide the knife between the meat & the silver skin, pulling up on the sliver skin as you go. Discard silver skin. Remove any excess fat if any.
Glaze
In a small saucepan, heat jelly, preserves, vinegar, mustard, brown sugar & sage to simmering over medium heat; stirring occasionally. Remove saucepan from heat.
-
After trimming the meat, brush it all over with a generous amount of olive oil. Place the tenderloin in a skillet that has been heated to a hot temperature previously. Sear tenderloin about 1 1/2 minutes on each quarter turn.
Place meat on a piece of foil paper in a roasting pan. Lightly coat the meat with some of the glaze using a brush so it will spread evenly. Roast tenderloin for about 25-35 minutes depending on the size of your tenderloin.
Insert a probe thermometer into the thickest part of your meat & check the temperature. The pork will continue to cook for about 10 more degrees outside of the oven & then will stop cooking after that. Once out of the oven, Generously brush meat with remaining glaze. Allow to rest between 5 & 10 minutes before slicing.
Recipe Notes
- I had actually doubled the glaze recipe so we would have some extra since we both enjoy pepper jelly. Strangely enough, it tasted real good not only on the meat but the mashed potatoes we had with it.


