CELEBRATING CANADA DAY!
Food and drink are almost as synonymous with Canada Day as the colors of red and white. More importantly this date celebrates the historical event in which Canada gained its independence from Great Britain in 1867.
On July 1st, from coast to coast, the country’s birthday is highlighted with colorful parades, concerts, carnivals, festivals and firework displays.
Barbecues are definitely the preferred choice of food event as summer entertaining is all about laid-back get together’s. Easy food prep is the name of the game!
For our Canada Day barbecue, it had to be special so here’s what developed—
Print Recipe
Beef Burgers with Apricot/ Pistachio Chutney
Votes: 1
Rating: 5
You:
Rate this recipe!
|
|
Votes: 1
Rating: 5
You:
Rate this recipe!
|
Instructions
Chutney
In a skillet, saute shallots without browning. Add apricots, honey & apricot nectar. Simmer until liquid has evaporated. Set aside to cool at room temperature, then stir in the pistachios & a dash of vinegar. Refrigerate.
Burgers
In a large bowl, combine all the ingredients for the burgers. Shape into 4 patties & refrigerate.
Preheat the barbecue to high & when the grill is hot, place patties on the grill & sear on both sides, making sure not to turn them too soon. When burgers are well marked & can be lifted off the grill easily, remove them to another part of the barbecue where the heat has been reduced & let them finish cooking undisturbed.
While burgers are finishing, brush mushroom caps with oil & grill on both sides until done. Set them aside. Turn off one of the burners, place the burgers on that part of the grill & top each with a slice of cheese. Close the lid for a few minutes & cook over indirect heat until cheese is melted.
Serve on warmed or toasted ciabatta buns. Top each burger with a mushroom cap, a generous spoonful of chutney & some cucumber slices.
Thirty or more years ago, balsamic vinegar was relatively unknown outside of Italy. Due to our exposure to gourmet food magazines, television cooking shows and celebrity chefs, there is hardly a household without a bottle in its pantry these days.
Balsamic vinegar actually derives its name from the word ‘balm’, which refers to an aromatic resin or odor, as well as a substance that soothes, relieves and heals.
For hundreds of years, wealthy Italian families have made balsamic vinegar for their own consumption, nurturing their supplies over the years. Passed on from generation to generation, gifting small amounts to treasured friends and honored guests and perhaps even bequeathing some to a daughter as part of her ‘dowry’. Balsamic vinegar came to be considered a symbol of peace.
In about 1980, the popularity of balsamic vinegar soared due to Italian chefs discovering how intense flavors complemented modern Mediterranean cuisine. Local families couldn’t gear up production to meet the new demand. New producers developed imitation versions, consequently many of us have yet to taste truly authentic balsamic vinegar or ‘Aceto Balsamico Tradizionale’, as its known in Italian.
Print Recipe
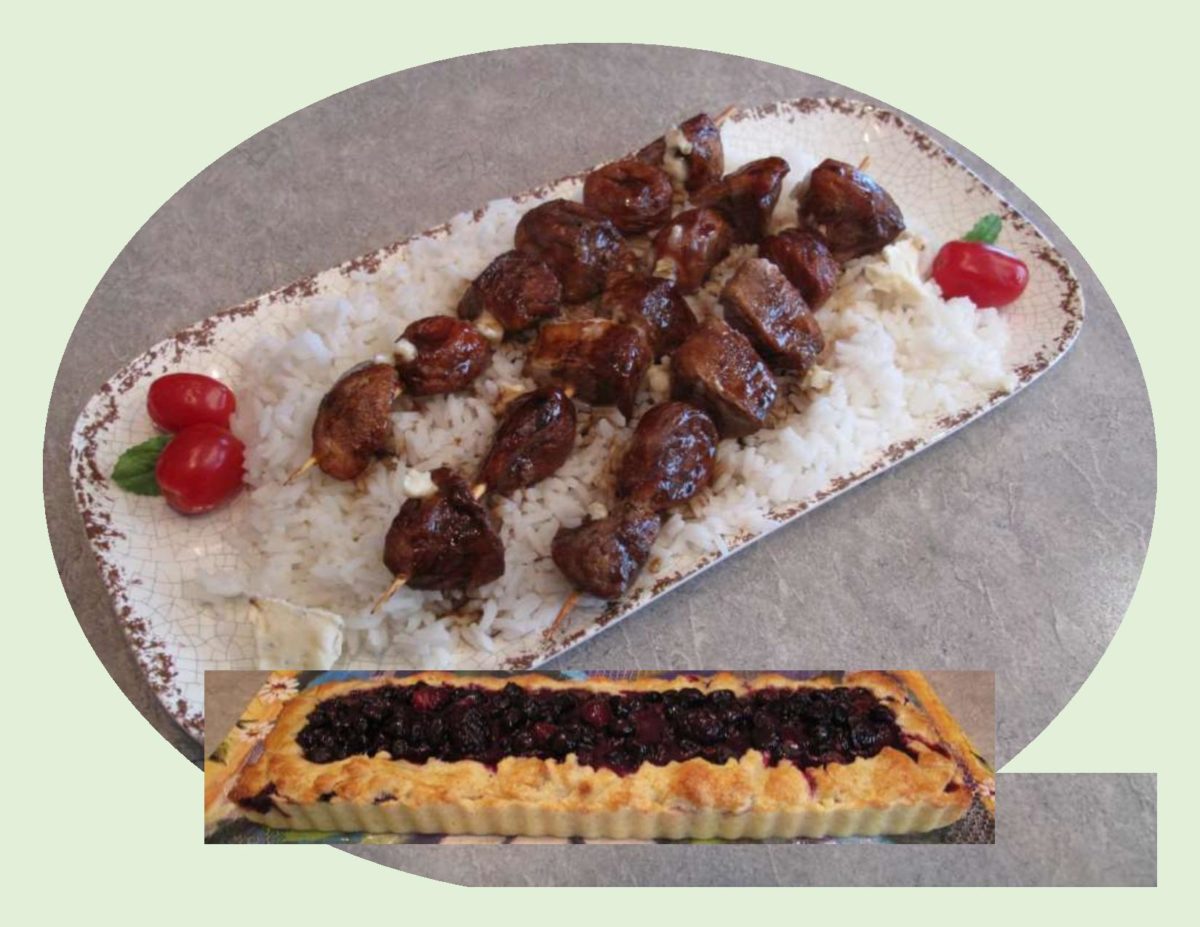
Balsamic Glazed Fig & Pork Kabobs
Votes: 1
Rating: 5
You:
Rate this recipe!
|
|
Votes: 1
Rating: 5
You:
Rate this recipe!
|
Instructions
Cut pork into 1-inch cubes. Combine next seven ingredients; place pork cubes in a plastic bag. Toss to coat well; refrigerate until ready to grill. In a small dish, make a glaze by whisking together vinegar, honey, mustard & oil. Set aside.
On water-soaked wooden skewers, thread pork cubes & figs. Grill, covered, on a greased rack over medium-high direct heat, turning occasionally, about 8-10 minutes. During last half of grilling, brush cooked surfaces frequently with glaze.
Let skewers stand 5 minutes; add a tomato to each. Transfer to serving platter & sprinkle lightly with Gorgonzola & basil. Serve some of your Blueberry & Blackberry Rustic Tart for dessert.
Perogies are of virtually untraceable Central or Eastern European origin although speculation has it the recipe could have been brought from the Far East.
Thinking beyond potatoes and cheddar — who knew that perogies could be filled with fruit?! Although the most traditional fruit filling is plum, many fruits will work. Summer perogies are often filled with apricots, sweet or sour cherries and apples. At Christmas, sweet poppy seed filling is a popular choice. This simple food turns into a wonderful dessert when served with orange sauce, lemon curd, a basic chocolate ganache or even a raspberry or strawberry coulis.
I realize we are not quite into summer yet but blueberries are great anytime. What makes berries so attractive as a filling is their size and texture. Perogies need only a short time to cook – a few minutes each in water than in the frying pan so the berries will break down sufficiently in this amount of time.
While savory perogies are often fried, baked or even deep fried after being boiled, most fruit perogies are served without frying, lending a delicate texture to the more delicate flavor of the fruit.
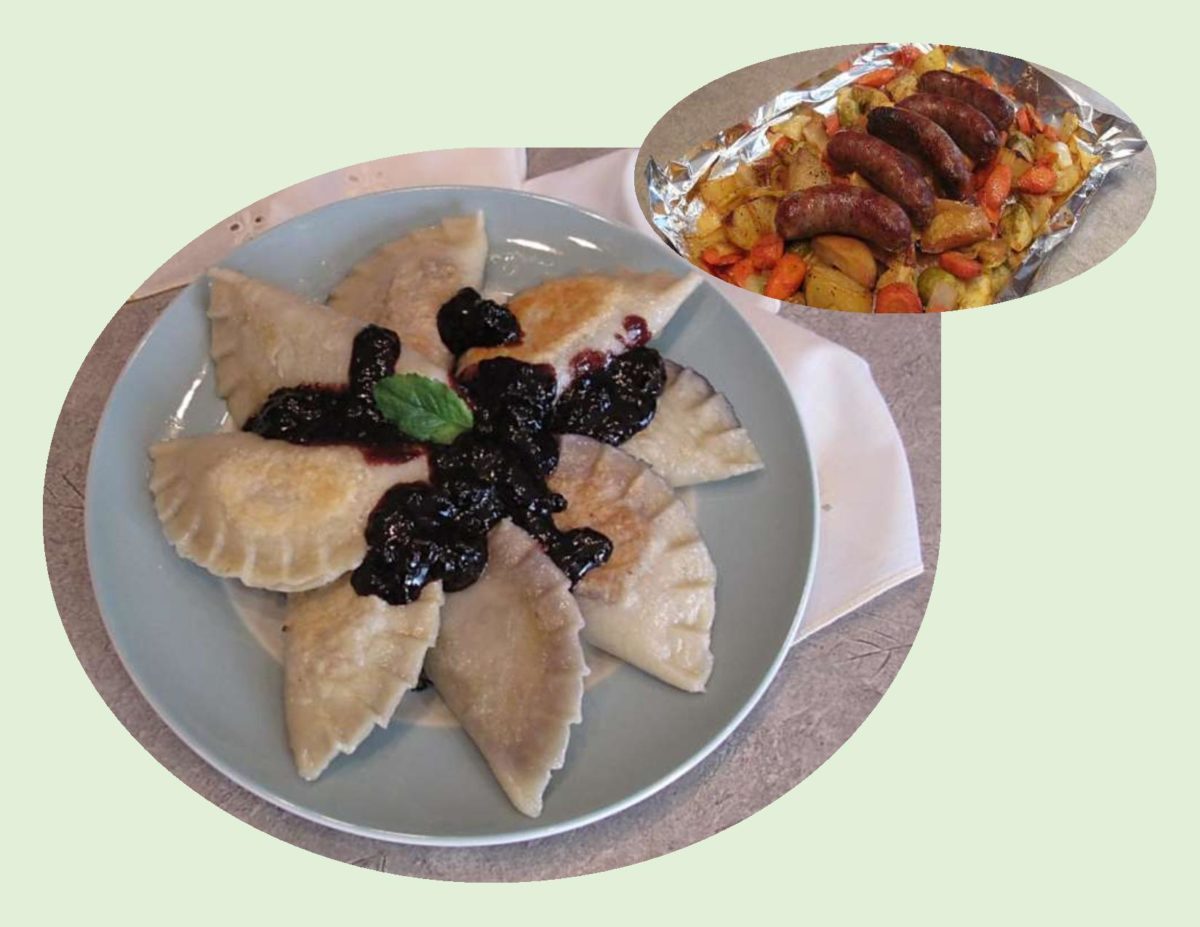
Since I wanted to serve these blueberry perogies as a compliment to our roasted bratwurst and veggies, we preferred them slightly fried and topped with a sweet/savory balsamic blueberry sauce. It made a great combo!
Print Recipe
Blueberry Perogies
Votes: 1
Rating: 5
You:
Rate this recipe!
Ingredients
Balsamic Wild Blueberry Sauce
Blueberry Filling for Perogies
Ingredients
Balsamic Wild Blueberry Sauce
Blueberry Filling for Perogies
|
Votes: 1
Rating: 5
You:
Rate this recipe!
|
Instructions
Balsamic Sauce
In a small saucepan over low heat, place blueberries, garlic & honey; stir until mixture begins to boil & thicken. Stir in balsamic vinegar. Bring sauce to a boil & allow to reduce slightly to become the consistency of honey. Set aside, keeping warm until ready to serve.
Blueberry Filling
Wash & dry blueberries; set aside. In a small dish, combine cornstarch & sugar; set aside.
Perogy Dough
In a large bowl, whisk together flour & salt. In a separate bowl, whisk together egg, sour cream & oil until well mixed. Add liquid ingredients to dry mixture & gently combine. Before the dough is completely mixed, transfer to a lightly floured work surface. Knead dough 7 or 8 times to form a soft ball. Do NOT over-work dough.
Roll out dough to 1/8-inch thickness. Using a 3 1/2-inch cutter, cut circles out of the dough or if you prefer to just cut same size pieces from dough ball. Stretch each to a 'perogy' size. Place about 1 tablespoon of berries on each round of dough. Sprinkle 1/4 teaspoon of the sugar/cornstarch mixture over berries. Moisten the edge of each dough circle with a little water & fold the dough over filling. Pinch the edges firmly to create a tight seal.
Place perogies on a baking sheet lined with parchment paper while preparing them. Keep covered with a slightly moist towel until ready to cook.
Fill a large pot with about 8 cups of water. Add 1 teaspoon of salt (+ 1 tsp oil if you wish), cover & bring to a boil. Cook perogies in batches. Stir gently until perogies float, cook about 2-3 minutes. Do not over cook or dough will be tough.
Serve perogies with warm balsamic wild blueberry sauce.
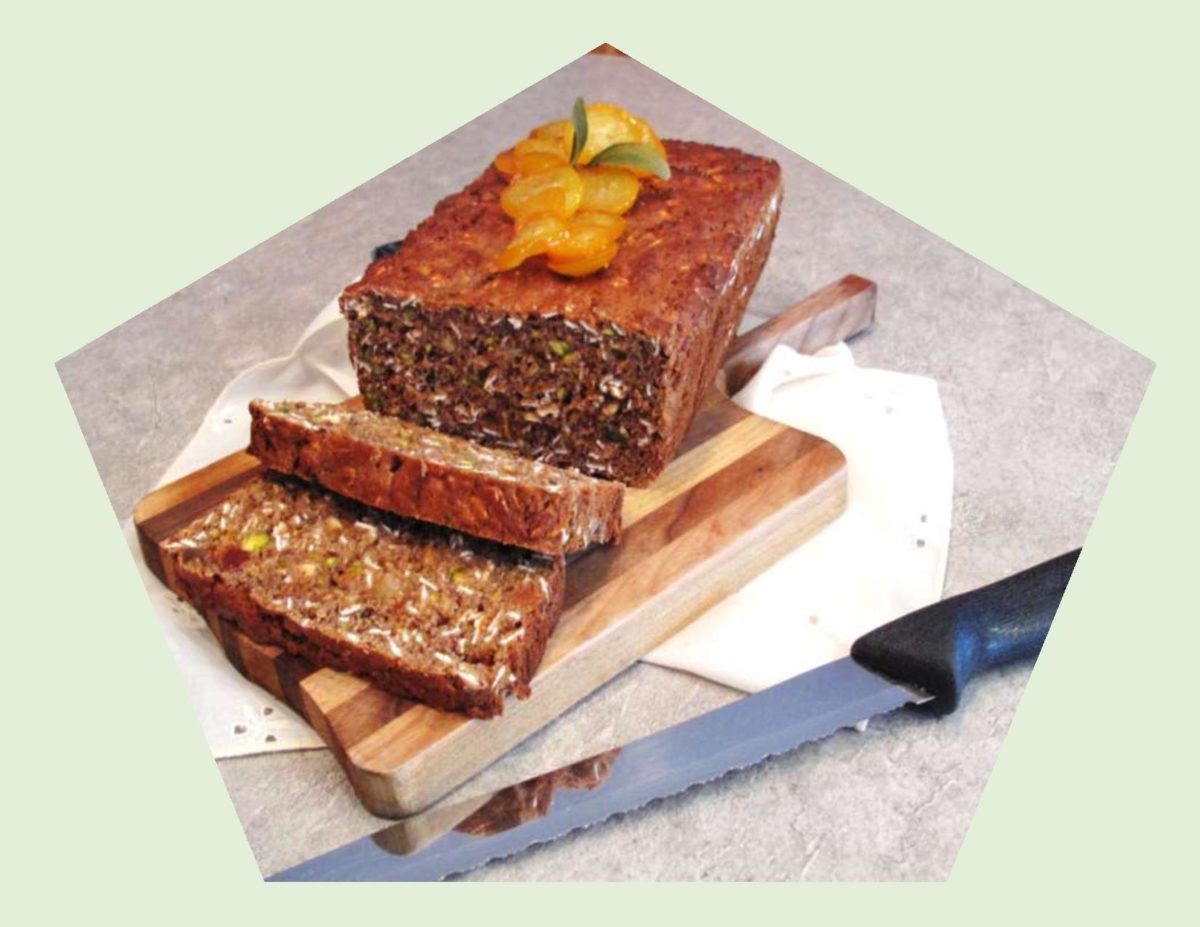
This fruited bread is unlike any other oatmeal bread. It has the sweet tartness of kumquats, healthy oatmeal and flax, dried fruit, nuts, honey and applesauce all in one loaf.
Oatmeal bread is very nostalgic for me. Although it wasn’t one of the breads in my mother’s weekly rotation, when she did make it, it was heavenly. I’m not sure if her recipe was one she had developed or if it came from another source.
Often when it comes to choosing a recipe, we find inspiration on the packaging of our basic pantry staples. One of the most iconic brands to feature recipes like this was Quaker Oats. Their first recipe for oatmeal bread appeared in 1886. It made two loaves of sandwich bread. Somewhere along the way, they kicked it up a notch, featuring a ‘fruited oatmeal bread’ recipe.
This kumquat oatmeal bread uses baking powder as opposed to yeast for anyone with a yeast intolerance. I think you will agree, it has an amazing flavor if you get a chance to make some.
Print Recipe
Kumquat Oatmeal Bread
Votes: 1
Rating: 5
You:
Rate this recipe!
|
|
Votes: 1
Rating: 5
You:
Rate this recipe!
|
Instructions
Preheat oven to 350 F. Grease a 9 X 5-inch loaf pan & set aside.
In a medium bowl, whisk together flours, baking powder, cinnamon, salt, flax meal & oats. Add kumquat puree, honey, applesauce, eggs, vanilla, nuts & fruit. Pour into greased loaf pan.
Bake for 40 - 45 minutes; don't over bake. Cool in pan for 5 minutes on cooling rack. Loosen around edges; remove from pan & cool a bit more.
-
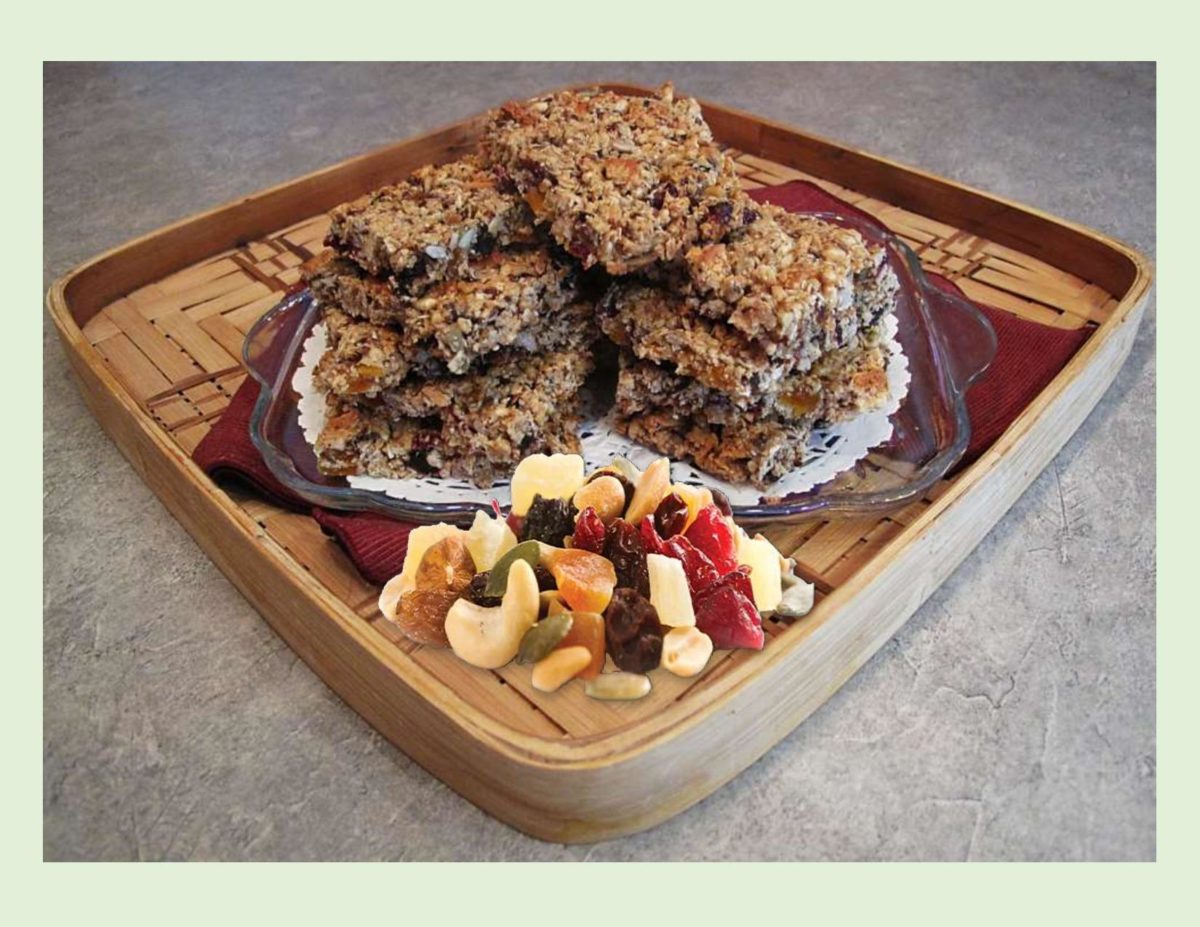
As I’ve probably said before, I love anything ‘oatmeal’. Foods that bring back comforting memories are precious and should always be savored. Oatmeal is one of them for me along with seeds and grains.
Granola bars began appearing on grocery shelves in the mid-1970’s often as thin slabs of oats and honey. Now this idea has morphed into bars of all types. Sweet, soft, chewy, crunchy, protein, fruit and on and on ……
The next merchandising ploy is ‘branding’ them as clean, natural or organic. Then another element that has been thrown into the mix is convenience. For the busy consumer that wants to eat on the go, but doesn’t want to sacrifice healthy eating, food bars are exceptionally convenient. Next, you notice the attention paid to capitalize on niche groups. Marketing specific bars with particular ingredients or health benefits aimed at a targeted gender, makes it personal to the consumer.
After all is said and done, it just makes good sense to me to make your own bars. Not only can you decide how ‘healthy’ you want to make them, but they are extremely quick and easy. In a short space of time you have a pile of great bars at half the cost, clean eating, low fat, low calorie, gluten-free or whatever resonates with you.
Print Recipe
Granola Bars
Votes: 1
Rating: 5
You:
Rate this recipe!
Ingredients
- 1 cup assorted nuts, chopped ( walnuts, almonds, pecans, etc.)
- 2 cups rolled oats,
- 1/4 tsp salt
- 1/2 cup honey
- 1 1/2 cups assorted dried fruits, chopped ( figs, apricots, cherries, cranberries, apples, raisins etc.)
- 1/2 cup crispy brown rice ( I purchased this at a 'bulk barn')
- 1/2 cup seeds (flax, chia, sesame, pumpkin, sunflower)
|
Votes: 1
Rating: 5
You:
Rate this recipe!
|
Instructions
-
Preheat oven to 350 F. Line a 9 X 14-inch baking dish with parchment paper.
-
In a food processor, SLIGHTLY pulse oats & nuts; transfer to a large bowl. Add salt, honey, fruit, crispy rice & seeds. Combine well. Press mixture firmly into baking pan, compress to level surface.
-
Bake for about 20 minutes. Allow to cool completely in pan. Remove from pan by lifting with edges of parchment paper. Cut into bars & store in an airtight container with waxed paper between layers to prevent sticking together. Recipe can be easily doubled or cut into whatever size bar works for you.
Recipe Notes
- This is such a great bar because you can use whatever fruit, nuts or seeds you prefer.
- If it seems a bit dry after mixing, add a few more Tbsp of honey.

It seems we never get enough of taking just about anything we do to the next level. Case in point would be pizza dough. It started as a very thin, crispy crust and evolved into whatever thickness you wanted to make it. Enter the ‘stuffed’ crust with a ring of cheese encased in the outer edges of your pizza! Then, of course, the actual pizza fillings can be virtually anything that you choose or have available.
Bread sticks, on the other hand, aren’t something that have remained unscathed either. Probably the original simple design was ‘grissini’ (as they are known in Italy). Today’s bread sticks come in many forms from super crispy, thin ones to the larger ones often served with spaghetti and used to mop up excess sauce. Now, here’s where it gets one step better. Enter ‘homemade stuffed’ bread sticks. For inspiration all you have to do is think about all of your pizza toppings. Use them as options for either mixing into your dough or actually stuffing into a bread stick.
Being shrimp and Parmesan lovers, the natural thing for me to do was incorporate both into some bread sticks. The next step was to pair them with a nice light broccoli-cheddar soup. A match made in heaven even if I do say so myself.
Print Recipe
Parmesan-Shrimp Bread Sticks with Broccoli Cheddar Soup
Votes: 1
Rating: 5
You:
Rate this recipe!
Ingredients
Parmesan Shrimp Bread Sticks
Lite Broccoli Cheddar Soup
Ingredients
Parmesan Shrimp Bread Sticks
Lite Broccoli Cheddar Soup
|
Votes: 1
Rating: 5
You:
Rate this recipe!
|
Instructions
Parmesan Shrimp Bread Sticks
Combine all ingredients, in the order listed, in a bowl of a stand mixer fitted with a dough hook. Mix on medium-low until the dough comes together. Continue to mix on medium-low for 5 minutes to knead. Dough is ready when it is stretchy & smooth. Transfer the dough to an oiled bowl, cover with plastic wrap & allow to rise for about an hour or until doubled in bulk.
Bread Stick Filling
Peel, devein & slightly chop raw shrimp; place in a bowl. Grate & slightly chop fresh Parmesan cheese. Combine oil, minced garlic, spices & Parmesan cheese with chopped shrimp.
Preheat oven to 425 F. Line a baking sheet with parchment paper. Punch dough down; on a lightly floured work surface, press dough into roughly an 8 X 12-inch rectangle. Top with shrimp filling & sprinkle with dill weed. Slice lengthwise into 8 strips; fold each strip in half enclosing filling. Twist each strip slightly & lay on baking sheet. Top each bread stick with some grated mozzarella cheese (or you could put it on as soon as they come out of the oven). Bake for 7-10 minutes or until golden brown. Serve warm with soup.
Broccoli-Cheddar Soup
In a large saucepan, saute onion & garlic in olive oil until tender. Stir in flour; cook for 1 minute. Gradually whisk in broth. Bring to a boil; cook & stir for 1-2 minutes or until slightly thickened.
Add the broccoli, tarragon, thyme & pepper; return to a boil. Reduce heat; cover & simmer for 10 minutes or until broccoli is tender. Add milk; cook, uncovered 5 minutes longer. Remove from heat; cool to room temperature.
In a blender, process about half of the soup until smooth. Return to saucepan; heat through. Reduce heat. Add 100 grams of cheese; stir just until melted. Serve immediately, garnishing with remaining cheese.
Recipe Notes
- When time is of the essence and you need to speed up the process, use a tube of purchased refrigerated pizza or bread stick dough instead of making your own.
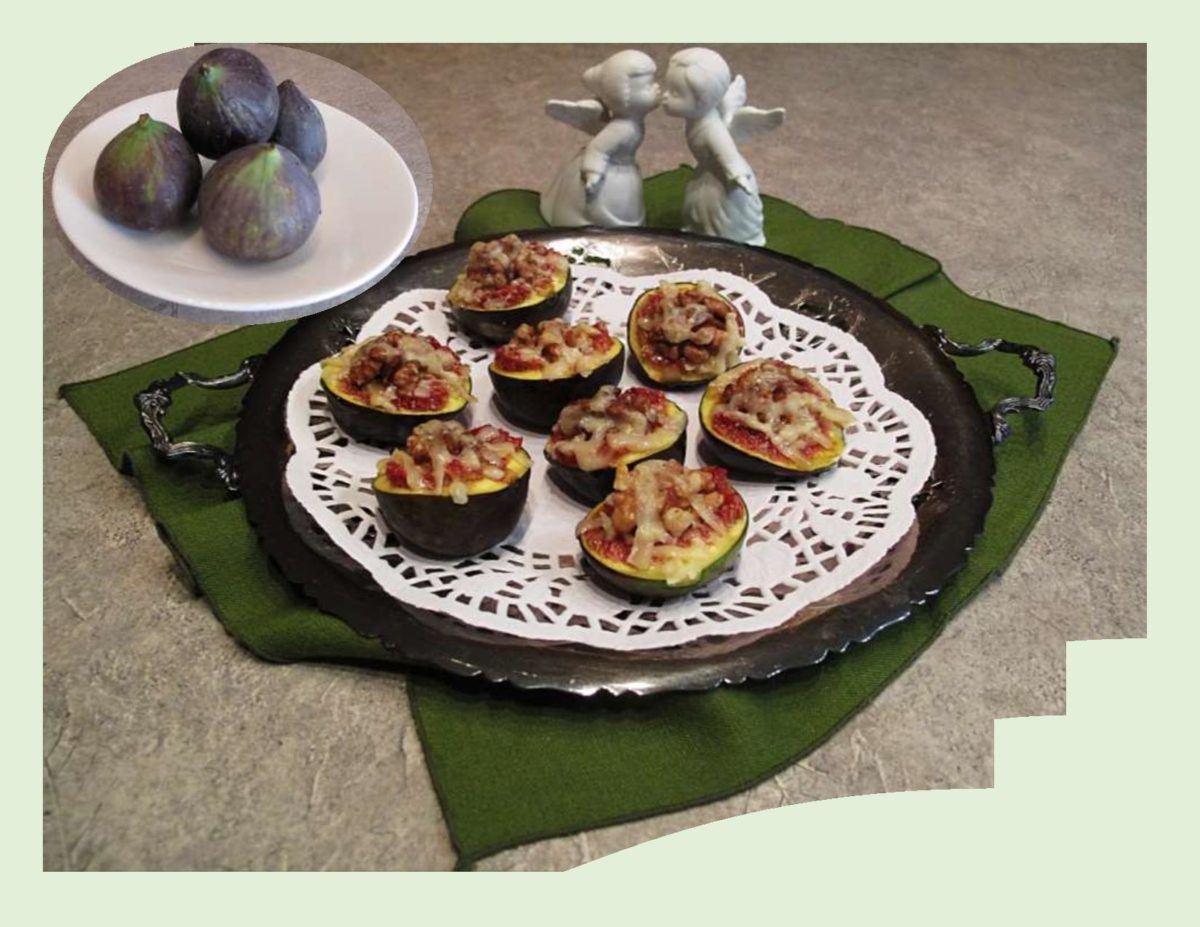
We are definitely well on our way to the ‘holiday’ season. For some, there will be endless social events and family gatherings, all of which require those quintessential little bite-size hors’d’ouvers. Being someone who loves to work with food, the Christmas season is like a blank canvas. Having spent a lifetime in the commercial food industry, I’m definitely no stranger to the endless hours of preparing these tasty little morsels. It gives you the ultimate presentation challenge when hundreds are required (as well as being tiring and a bit tedious at times).
One item that seems to always add a special note of elegance is the use of figs. Not for everyone, but for those who do enjoy them, they are irresistible. Figs can be eaten raw, grilled, poached or baked and can be paired with walnuts, honey, cheese, wine, citrus, cured meats and a variety of spices.
Turkey is the largest producer of figs in the world. The Smyrna/Calimyrna figs arrived in California, USA. in the 18th century, along with a special breed of wasp once needed for fertilization. Today, the most widely grown types of figs, including Black Mission, self-pollinate without any wasp labor.
The base of the fig plant’s flower, or soft pod, and little ‘seeds’ are the fruit’s structure and are all edible. Dried figs keep well without refrigeration and give you that concentrated, sweet flavor.
These ‘fast and fabulous’, three ingredient hors’d’ouvers are truly a must for all fig lovers!
Print Recipe
Turkish Figs with Anise & Walnuts
Votes: 2
Rating: 5
You:
Rate this recipe!
|
|
Votes: 2
Rating: 5
You:
Rate this recipe!
|
Instructions
-
Cut hard stem from the top of figs & discard. Slice figs in half horizontally & place sliced side up on a baking sheet. Using your finger, make a depression in the center of each. Place a 1/4 tsp of honey on each half & sprinkle with ground anise or seeds.
Press a walnut halve into center of each fig the top with grated cheese. Bake until cheese melts & is bubbly, about 5 minutes. Serve.
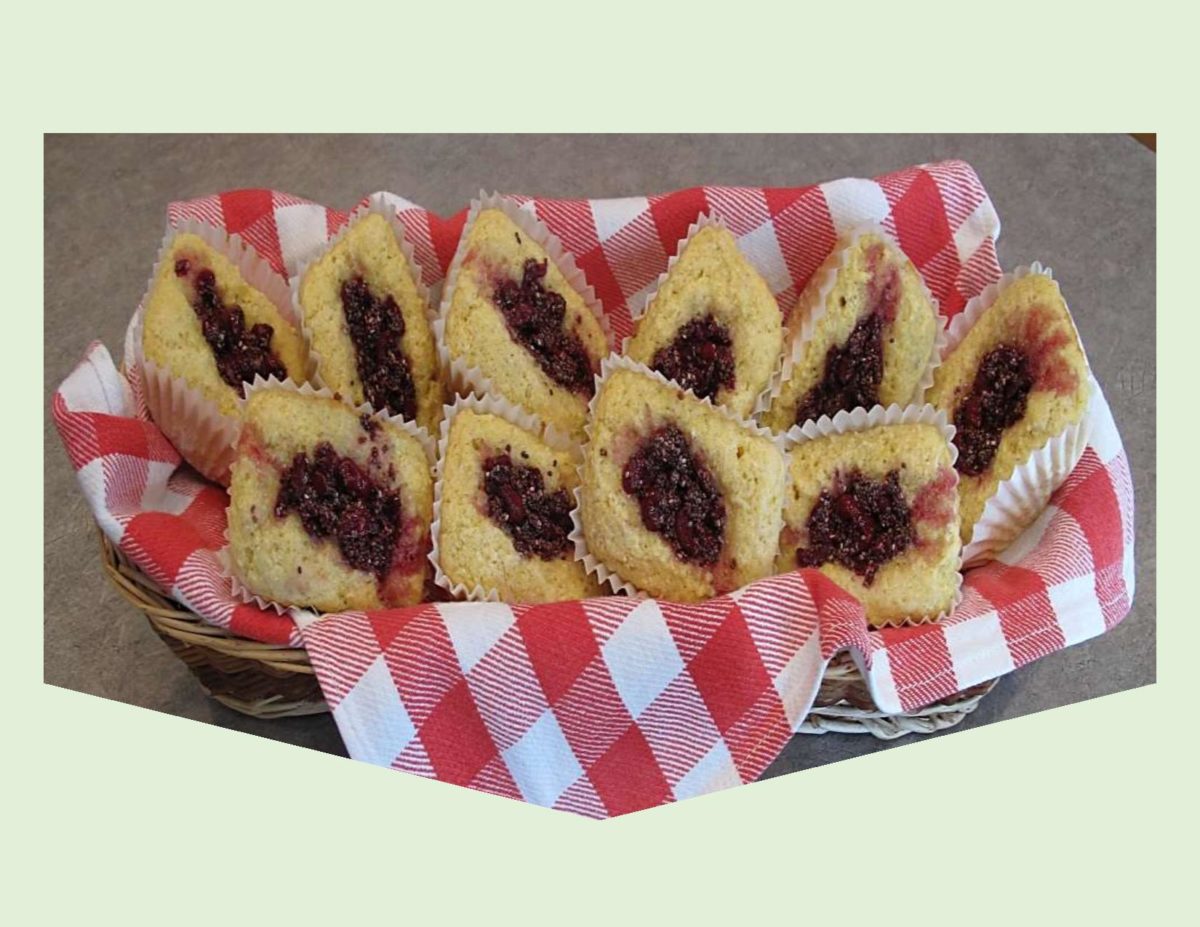
When I was growing up, cornbread was one of my favorites. My mother always called it ‘Johnny Cake’. Because it is a little sweeter than most dinner breads, it seemed like we were having dessert along with our soup, chili or whatever our main course was. That’s the nice thing about cornbread — it can be whatever you want it to be from breakfast to dessert.
Tucked away in the freezer, I have a little stash of sour cherries. On this occasion I’ve decided to make a bit of ‘sour cherry chia jam’ and add a dollop to the center of some cornbread scones.
Chia seeds used to be a niche ingredient you could only come up with at health food stores. Then all of a sudden they began appearing at the grocery store in the bulk department. As time has passed, the price is becoming a little better as well as the availability of them.
Chia seeds are harvested from a flowering plant in the mint family, which is native to parts of Mexico and Guatemala. Good quality seeds are naturally black or white in color, not brown. The brown chia seeds are immature ones which haven’t had a chance to mature properly, resulting in a bitter taste. Having a long shelf life, chia seeds will keep for several years when stored in a cool, dry place.
These scones may seem a bit unusual, but are well worth trying. I always enjoy to incorporate a bit of oatmeal for some extra flavor.
Print Recipe
Cornbread Scones with Sour Cherry Chia Jam
Votes: 2
Rating: 5
You:
Rate this recipe!
|
|
Votes: 2
Rating: 5
You:
Rate this recipe!
|
Instructions
Sour Cherry Chia Jam
In a saucepan, bring cherries to a boil, stirring frequently. Reduce heat to low & simmer until the cherries soften, about 5 minutes. Remove from heat & stir in honey & chia seeds. Continue stirring for about 5 minutes until mixture thickens. Use in making the cornbread scones. Store any leftovers in a glass jar in the refrigerator. The jam will keep in the fridge for up to a week.
Scones
Preheat oven to 350 F. Lightly butter mini loaf pans or whatever choice of pan is preferred. In a food processor, pulse oatmeal for a few seconds then add flour, cornmeal, salt, baking powder, baking soda & sugar. Pulse for a few more seconds to evenly mix. Add cold butter & pulse just slightly to cut in; do not over mix. Place in a bowl, add buttermilk & combine ONLY until just mixed.
Divide dough into 10 mini loaf cups. Place a dollop of cherry chia jam in the center of each scone. Bake 15-20 minutes or until they test done with a toothpick. Nice to serve warm.

Figs, another symbol of Autumn, begin to ripen in late summer. Native to European and Middle Eastern regions but today are widely available around the world. This tear-drop shaped fruit is singular in appearance and flavor. From their characteristic perfumed fragrance to their fragile skin, that is often slit from ripeness, revealing drops of honeyed nectar.
I love the sweet earthiness of figs with all their little seeds, whether they are fresh or dried. Any recipe that calls for peaches, pears, prunes or dates can be substituted successfully with figs. Pairing them with the aromatic anise flavor of fennel is a great compliment to salmon as well as other entrees or baking.
Fennel has been a favorite of Italians for many years due to its mild sweet anise flavor. All parts of the fennel plant, including the bulb, stalk, leaves and seeds are edible.
This recipe is simple but has a wonderful flavor. We enjoyed it served over Jasmine rice.
Print Recipe
Salmon with Roasted Figs & Braised Fennel
Votes: 1
Rating: 5
You:
Rate this recipe!
|
|
Votes: 1
Rating: 5
You:
Rate this recipe!
|
Instructions
Fennel
Preheat oven to 375 F. Cut outer leaves of fennel off & discard. Remove stalks, reserving a few fronds for garnish if you wish. Cut the fennel into quarters leaving root in tact. Place a large oven-proof pan over medium-high heat. Add olive oil & allow to heat. Place fennel into the pan ; cook & sear to a golden brown, about 3-4 minutes. Season with salt & pepper & add the chicken broth. Place in preheated oven & roast for about 10 minutes or until slightly soft but still holding quite a bit of firmness in center.
In a small saucepan, combine honey, vinegar & chili powder. Heat & simmer for 3 minutes. Quarter figs & place them on a baking sheet. Drizzle figs with the honey mixture. Place in the oven & roast for 4 minutes or until warm, bubbly & caramelized but still holding their shape.
Salmon
Season salmon fillets with salt & pepper. In a large non-stick skillet, add vegetable oil & heat. Place salmon in skillet & fry on each side until flesh is opaque & translucent in the center. Do not overcook. Serve immediately with the roasted caramelized figs.


")


")

