No matter what the stuffing or style is, love for the empanada is not a difficult one to understand. They are cheap, easy to eat, transportable, and versatile.
Empanadas look as good as they taste; perfect food for a picnic. Eating outdoors, spaced apart is probably one of the safest ways to gather during the ongoing pandemic crisis. The great thing about picnicking is that you can do it practically anywhere you can throw a blanket down. If you can’t make it to a park or field, your yard, porch or any flat surface with a little grass (or sand), some sun (& shade) will do.
Empanadas can be eaten for breakfast, lunch and dinner. They can be served as appetizers or snacks (hot or cold), but they can easily make a full and satisfying main course.
The very basics for an empanada are a combination of three things; dough, filling and a cooking method. The dough can be made from wheat flour, cornmeal, mashed plantains, potatoes, yuca, sweet potatoes etc. and the fillings can consist of meat, fish or vegetables. The cooking method is usually to be baked or fried although some can be cooked on a griddle or grill.
According to food historians, empanadas with seafood filling first appeared in a 1520 cookbook, published during the Moorish invasions.
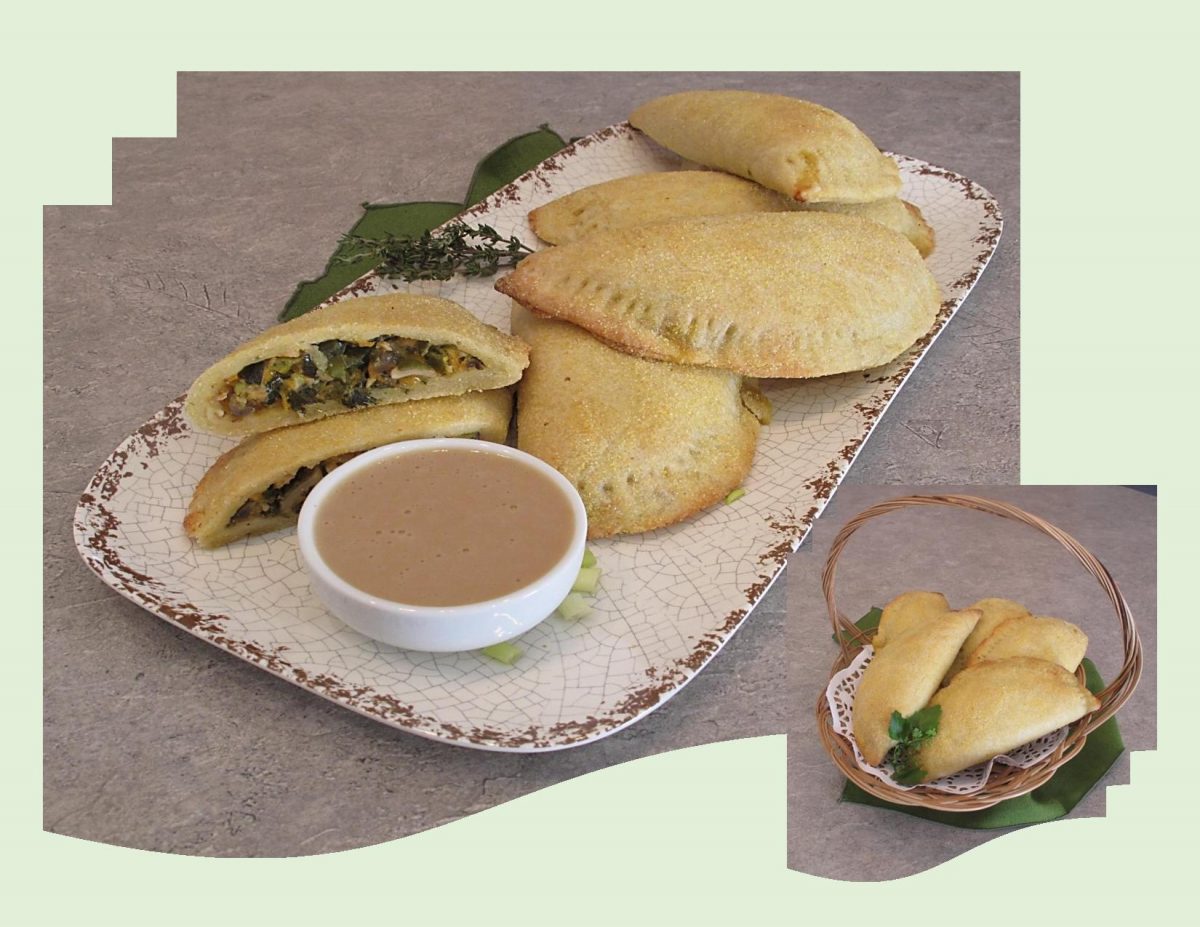
I was real interested to see what I could do to make some salmon empanadas taste special. We found they were good as a hot meal served with the remaining ‘sauce’ or eaten COLD for a picnic lunch.
Print Recipe
Salmon Picnic Empanadas
Votes: 1
Rating: 5
You:
Rate this recipe!
|
|
Votes: 1
Rating: 5
You:
Rate this recipe!
|
Instructions
Cornmeal Pastry
In a small bowl, combine sour cream & ice water; set aside. In a large bowl, whisk together flour, 1/2 cup cornmeal, sugar & salt. Using a pastry blender or finger tips, cut in butter until mixture resembles both coarse crumbs & small peas. Sprinkle the cold sour cream mixture over dough, tossing with a fork to evenly distribute it. Do NOT overwork dough.
Cover bowl with plastic wrap & refrigerate for at least an hour.
Soy Sauce
In a skillet, melt butter & sprinkle with flour. Allow to cook for a few minutes. In a bowl, whisk together broth, milk & soy sauce. Slowly add to flour/butter mixture, stirring constantly until sauce thickens. Remove from skillet & set aside.
Filling
In the skillet, sauté salmon filet in 1 Tbsp oil until JUST cooked. Remove to a dish. With a fork, 'shred' salmon; set aside.
In the skillet, sauté vegetables in remaining Tbsp of oil for a couple of minutes. Add seasonings, shredded salmon, 1/3 cup prepared soy sauce & grated cheddar. Toss to combine; set aside to cool.
Assembly & Baking
Divide chilled pastry into 10 balls. Roll each one in cornmeal. Place a ball between 2 sheets of plastic wrap & roll into a 6-inch circle.
Divide filling into 10 portions. Place a portion on one side of the pastry circle, leaving about a 1/2-inch border (on filled side). With your fingertips, moisten edge of pastry with a bit of milk or water. Flip opposite side over filling & press edges together to enclose it well. Use a fork to make the classic look.
-
Repeat with remaining pastry & filling. Lay empanadas on a baking sheet lined with parchment paper. Bake for about 20 minutes or until pastry is baked & slightly browned.
Most often guacamole is relegated to a small bowl next to some tortilla chips. Brion & I love ‘guac’ and since its so quick and easy to make, we use our fair share. This creamy, citrus infused quac is the perfect foil for this salty, savory salmon.
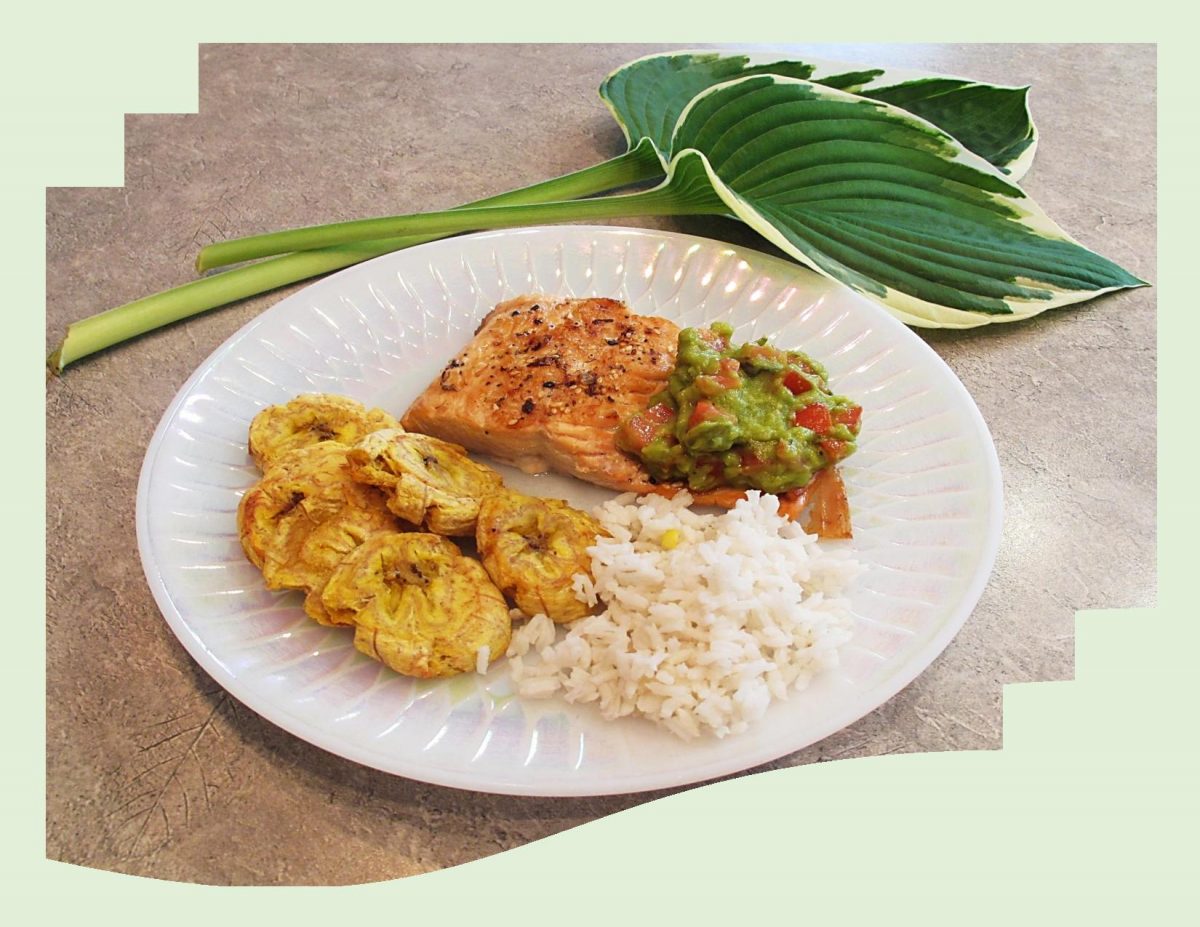
Plantains make another good pairing to this meal. While technically, they can be eaten raw when they are very ripe, the fruit is called a ‘cooking banana’ for a reason. For most part, they are prepared like a vegetable …. specifically, a potato. Around the world, the fruit is used to make breakfast, lunch, dinner and even dessert.
The unripe plantain is traditionally prepared with a deep-frying method. The frying is done twice to ensure a crispy chip. You first peel the green plantains and slice them. Then the chips are fried on both sides, removed from the oil and blotted on paper towel. The plantains are now flattened somewhat and re-fried to provide extra crispiness. Salt may be used to add flavor to the chips. The thicker version should be served hot or warm and are nice eaten with guacamole, garlic sauce or grated cheese as a side dish.
As always, in my quest to bake rather than deep fry, I decided to bake our plantains today.
Print Recipe
Roasted Salmon & Plantains w/ Guacamole
Votes: 1
Rating: 5
You:
Rate this recipe!
|
|
Votes: 1
Rating: 5
You:
Rate this recipe!
|
Instructions
Guacamole
In a large bowl, coarsely mash avocados with lime juice & salt. Stir in garlic, onion, cilantro & diced tomato. Cover & set aside until ready to use,
Plantains
Preheat oven to 375 F. Line a large baking sheet with aluminum foil placed shiny side up. Brush one side of foil lightly with oil.
Peel & slice plantains into 1/3-inch slices. Place the plantains on the oiled side of the baking sheet & roast for about 10 minutes. Remove from oven & with the bottom of a tumbler, 'squash' each piece down flat. Thinner = crispier. Season with coarse sea salt.
Brush opposite side of pan with olive oil & add the salmon fillets to the baking sheet. Brush salmon lightly with a bit of oil & season with your choice of seasonings.
Place the salmon & plantains in the oven & roast for about 10 minutes or until salmon flakes when you cut into it & is slightly opaque.
Serve salmon topped with guacamole alongside plantains. Steamed rice compliments this meal as well.
If you follow this blog, you have probably noticed numerous entries on plantains. For many years, prior to Brion & I living in Ecuador for three months, I saw them but didn’t take much of an interest. After tasting this veg/fruit, it definitely changed my attitude about them.
Plantains are like a cousin to the banana and depending on the ripeness you cook them in different ways. The main difference between bananas and plantains is that the former has more sugar and less starch, while the later has just the reverse and has to be cooked before eating. A plantain’s taste depends on how ripe it is. When it is almost black, that’s when its the sweetest.
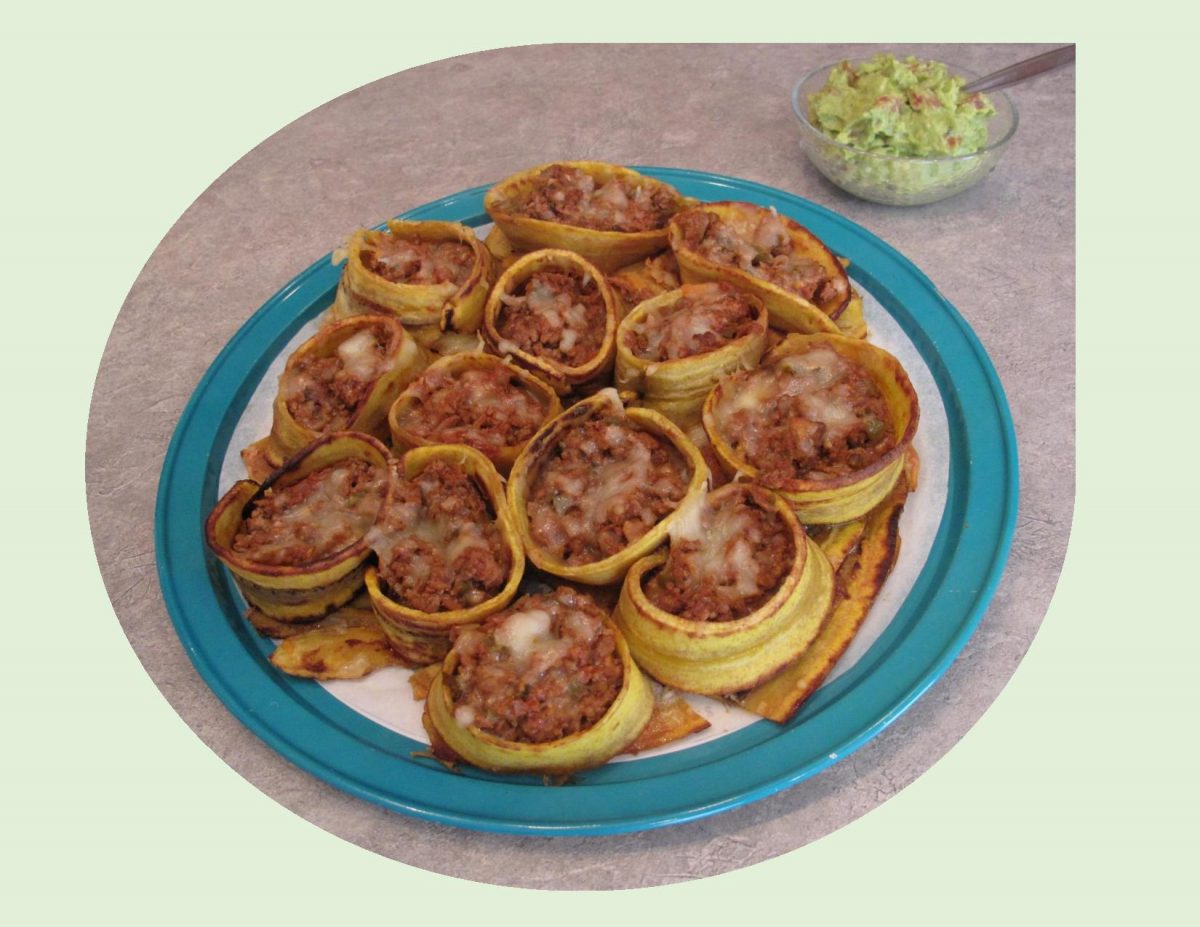
If you like the combination of sweet and savory flavors, you will enjoy this meal. Basically it consists of a slice of baked ripe plantain, formed in a ring and filled with a spicy, ground turkey mixture, topped with cheese. Of course, you would never want to forget to serve them with guacamole!
It’s hard to experience another cultures food without something making an impact on your taste buds it seems. But, I guess that’s what is supposed to happen.
Print Recipe
Plantain Lasagna Rolls w/ Guacamole
Votes: 1
Rating: 5
You:
Rate this recipe!
|
|
Votes: 1
Rating: 5
You:
Rate this recipe!
|
Instructions
Plantains
Preheat oven to 400 F. Using a sharp knife, cut both ends off the plantain. Slit a shallow line down the long seam of the plantain; peel only as deep as the peel. Remove peel by pulling it back. Slice the plantains horizontally into 6 pieces.
Spray a baking sheet & place plantain slices on it in a single layer. Lightly spray over plantains with baking spray & bake for about 12-15 minutes. Turn slices over after about 8 minutes. Plantains should turn slightly brown. Remove from oven.
Filling
In a large saucepan over medium heat, brown ground turkey in oil & season with salt & pepper. Use a wooden spoon to break it into small pieces. Add onions, garlic, green pepper & saute until tender crisp. Add tomato sauce, water, olives & spices. Reduce heat to low & simmer covered about 7-10 minutes stirring frequently. Remove from heat & cool slightly. Grate cheese.
Assembly
Preheat oven (if it was turned off after baking plantains) to 400 F. Lightly butter a 9 X 13-inch baking pan. Cut 6 of the slices into 4 pieces each. With the remaining 12 slices form rings & secure each with a toothpick. Place the rings in baking pan then place 2 cut pieces in the bottom of each ring to form a 'bottom'.
Using 1/2 of the turkey filling, divide evenly between plantain rings. Using 1/2 of the cheese, place some in each ring on top of the turkey then repeat, making another layer with remaining filling & cheese. Drizzle or spoon beaten eggs over stuffed plantain rings (it will help to hold them together).
Bake 15-20 minutes or until plantains are heated through & egg is set. Remove from oven & allow to sit for 5 minutes then remove toothpicks before serving. Serve with guacamole.
Guacamole
While plantain is baking, mash avocado & add remaining ingredients. Combine well & serve with stuffed plantain.
Pizza is one of those foods that works for just about everyone. From meat eaters to vegetarians, kids, adults and everyone in between. Year-round, its the perfect entree for family or party events.
Brion & I always enjoy pizza, preferably homemade. Usually my go-to toppings would be veggies, chicken or seafood, but nothing says it can’t be ground meat.
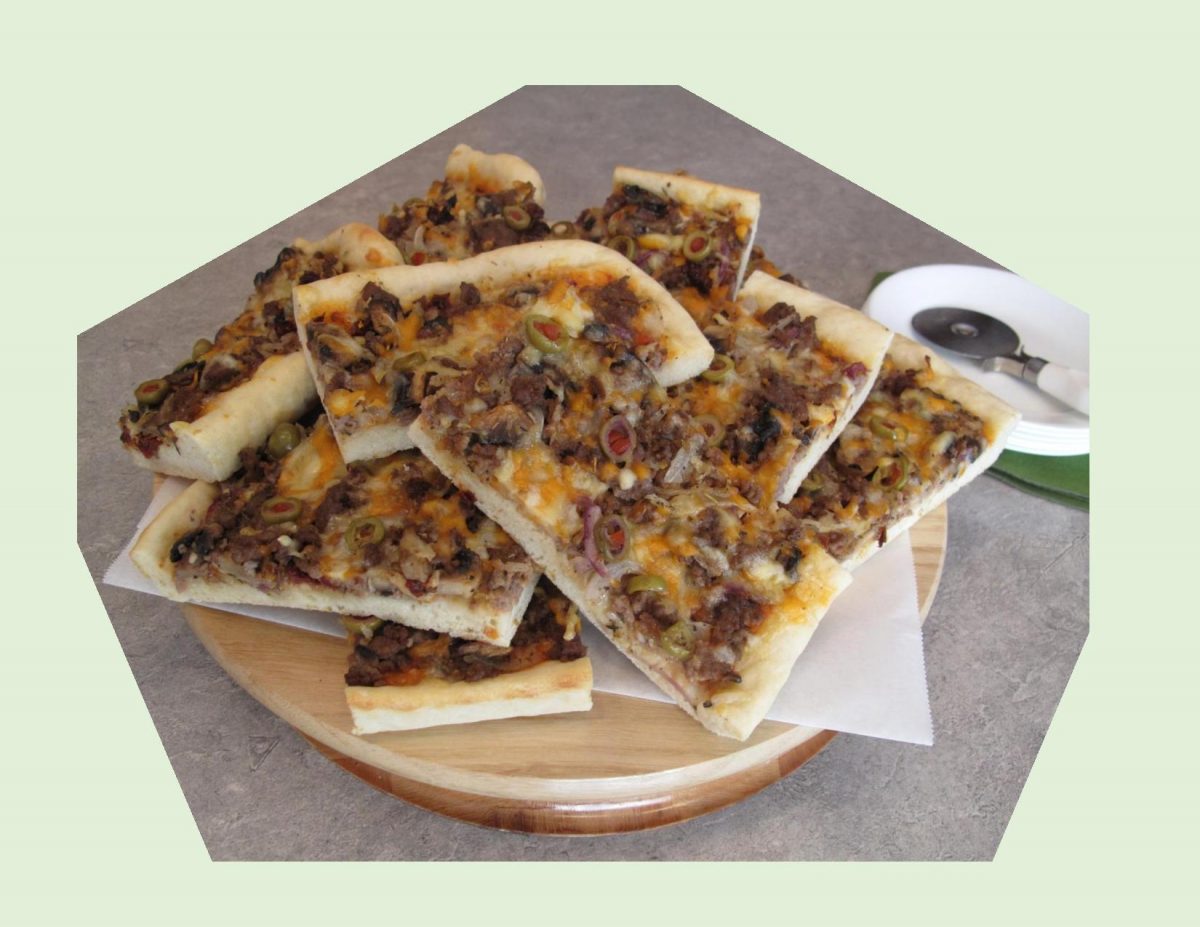
One of the things that seemed to improve on the flavor of this pizza was the caramelized onions. It takes only a few extra minutes but is worth it. For the sauce, I tried a blend of prepared lite Alfredo & marinara and then used a combo of cheeses instead of just one. Its always interesting to me what develops when you ‘step out of the box’.
Of course, if you have time to make a full fledged pizza crust it will take it all to the next level. But, I never hesitate, when I’m too busy, to use a purchased, refrigerated pizza crust. Pizza is just good, so do what works for you!
Print Recipe
Hamburger & Caramelized Onion Pizza
Votes: 1
Rating: 5
You:
Rate this recipe!
Ingredients
- 3 Tbsp butter, divided
- 1 large sweet onion, sliced
- 200 grams fresh mushrooms, sliced
- 454 grams lean ground beef
- 2 cloves garlic, minced
- 1 tsp Italian seasoning
- 1/2 tsp salt
- 1/4 tsp pepper
- Homemade OR purchased PIZZA CRUST
- 1/4 cup EACH prepared Alfredo sauce & marinara sauce
- 1/2 cup red bell pepper, coarsely chopped
- 4 pieces sun-dried tomatoes, sliced
- 15-20 green olives, sliced
- 80 grams cheddar, shredded OR use 200 gm of your choice of cheese instead of the ones listed here
- 55 grams Gouda cheese, shredded
- 65 grams mozzarella chese, shredded
|
Votes: 1
Rating: 5
You:
Rate this recipe!
|
Instructions
Pizza Crust
For my PIZZA CRUST RECIPE, you can find it in either JULY or AUGUST 2019 blog entries on this site. It is a yeast dough so it will take a bit of time to prepare (but worth it).
Pizza Toppings
-
In a skillet, melt 2 Tbsp butter & add onion. Cook over medium heat, stirring occasionally, 20-25 minutes or until onion is browned & caramelized. Remove onion mixture from skillet; set aside.
Add 1 Tbsp butter to skillet & saute mushrooms until tender & moisture has evaporated. Remove from skillet; add to onion mixture. Place ground beef & garlic in skillet; cook over medium heat, stirring occasionally, 5-6 minutes or until browned. Drain off fat. Stir in caramelized onions, mushrooms, Italian seasoning, salt & pepper.
Assembly
Spread Alfredo/marinara sauce blend over either homemade or purchased PIZZA CRUST. Sprinkle with a small portion of your cheese blend. Top with ground beef mixture, red pepper, sun-dried tomatoes, sliced green olives & remaining grated cheese. Bake 15-20 minutes or until crust is nicely golden brown.
Recipe Notes
- To grill pizza, heat one side of gas grill on medium or charcoal grill until coals are ash white. Place coals to one side in charcoal grill. Place pizza onto grill opposite coals. Close lid; grill, rotating once 12-15 minutes or until heated through & cheese is melted.

For some of us, the best part of salads is everything but the greens! I have always had a hard time digesting lettuce so I’m never drawn to it when we get to salad season.
The idea of a full meal (lettuce-less) salad has always appealed to me. Of course there are many of these using a variety of ingredients. Probably one of the most popular was the taco salad. The earliest record of it dates back to the 1960’s with its predecessor being the small teacup-sized ‘Tacup’. It consisted of beef, beans, sour cream and cheese, served in a small ‘bowl’ made entirely of a Fritos tortilla.
The taco in a Tacup was invented by Charles Elmer Doolin, the founder of Fritos (tortilla chips). He created a device that looked like tongs but with two tart molds at the end of each tong. One mold would fit within the other mold with a tortilla sandwiched between them. The scalloped-edged shell was the dipped into hot oil. Holes in the bottom mold exposed the tortilla to the hot oil, enabling it to cook evenly.
Tacups were first served in Dallas, Texas in the early 1950’s and by 1955, he was selling them in Fritos’ flagship restaurant, ‘Casa de Fritos’, at Disneyland in Anaheim, California. It became popular enough that the Tacup was made bigger and served as a full, main-dish sized salad bowl.
Today’s salad is a satisfying meal (without a shred of lettuce) served in an edible tortilla bowl.
Print Recipe
Chicken Avocado Fiesta Salad
Votes: 1
Rating: 5
You:
Rate this recipe!
Ingredients
Salad
- 2 boneless/skinless chicken breasts, cut into thin strips
- 6 strips bacon
- 1-2 cobs of corn, cooked
- 2 avocados, peeled, pitted & cubed
- 1 large Roma tomato, diced
- 2-3 green onions, sliced
- 1/3 cup black olives, sliced
- 80 grams Gouda cheese, cubed small
- 2 Tbsp chives, thinly sliced
- 2 Tbsp fresh dill, chopped
|
Votes: 1
Rating: 5
You:
Rate this recipe!
|
Instructions
Marinade
In a small bowl, whisk together marinade ingredients. In a large resealable plastic bag, pour marinade. Add sliced chicken; seal & turn to coat. Refrigerate for 1-4 hours. When finished marinating, cook chicken over medium-high heat for 5-6 minutes or until meat is no longer pink. Remove from heat & set aside.
Salad
Cook corn cobs in a pot of boiling, salted water, covered for 5-7 minutes. When cool enough to handle, hold the corncob vertically on a slip-proof cutting board & cut corn kernels from top to bottom around the sides with a sharp knife. Leave corn in bite-sized pieces.
Fry bacon slices until brown & crispy. Chop into small pieces.
Peel, pit & cube avocados. Sprinkle with a bit of lime or lemon juice to keep from turning brown. Dice Roma tomato. Slice green onions, chives & dill. Drain sliced black olives. Cube Gouda cheese.
Tortilla Bowls
Preheat oven to 350 F. Brush the inside of 2 heat-resistant glass bowls with oil. Place one tortilla in each bowl so that the shape more or less adheres to the bowl. Line each tortilla with cheddar cheese slices & then place the second tortilla on top.
Place the bowls with the layered tortillas in the oven & bake for 7 minutes. Remove the bowls from the oven & allow to cool before removing the 'edible tortilla bowls'.
Assembly
Place tortilla bowls on serving plates. Place cooked chicken on the bottom, top with corn, avocados, tomato, onions, olives Gouda & herbs. Drizzle with Ranch dressing (or dressing of choice). If you wish, before putting the dressing on, give it 30 seconds in the microwave to warm it slightly again.
-
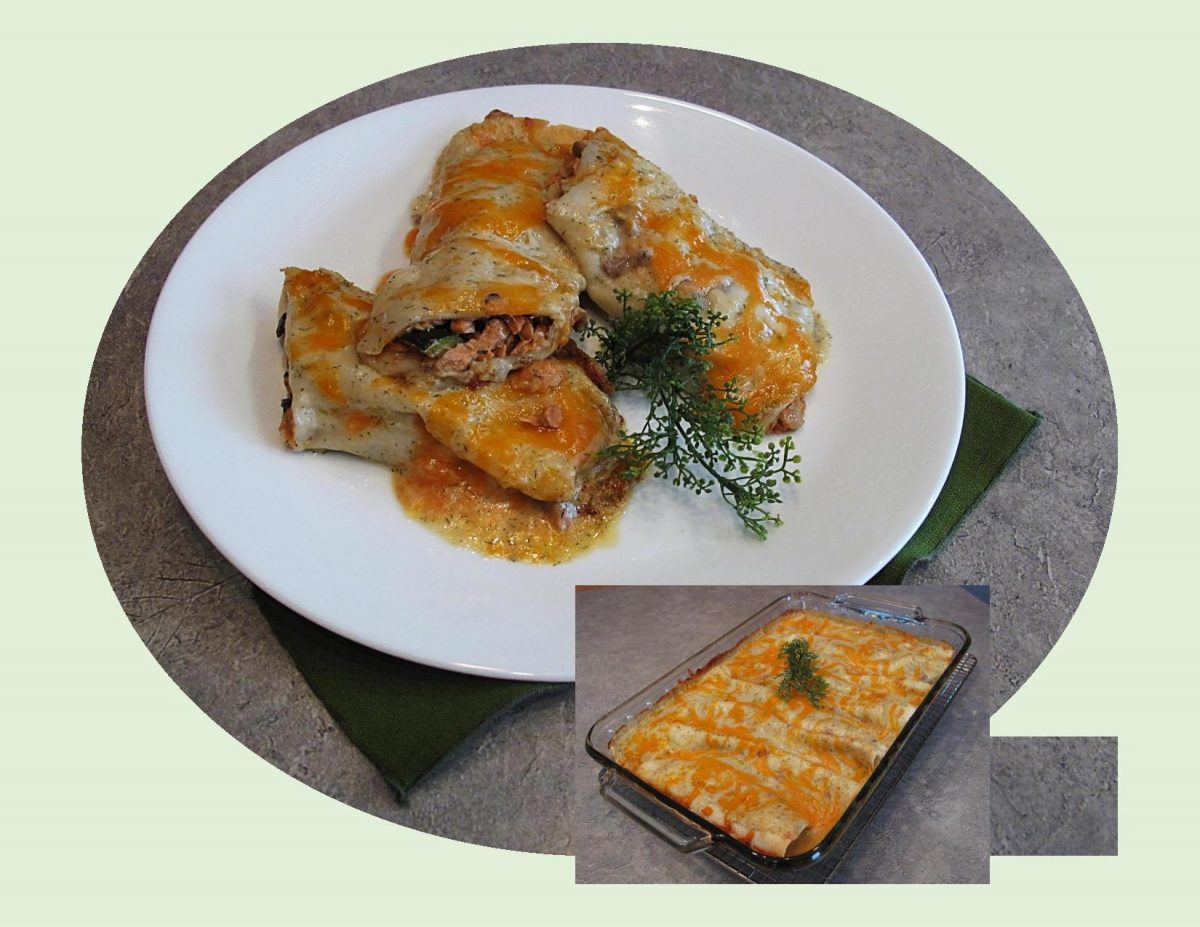
Salmon and zucchini have always been a great pairing, but have you tried this combo in some enchiladas?
Wild canned salmon doesn’t have to just mean sandwiches. This high quality protein makes for an incredible pantry staple that is ready when you need it. Add it to just about any plate … over top a green salad, in a wrap, served over rice, pasta, zucchini noodles, potatoes or squash etc., etc.
When I originally developed this recipe, it served as a filling for some jumbo pasta shells. After a few modifications, it became an enchilada meal.
As their original form as Mexican street food, enchiladas were simply corn tortillas dipped in chili sauce and eaten without fillings. There are now so many varieties, which are distinguished primarily by their sauces, fillings or form. Here are a few examples:
Enchiladas suizas are topped with a milk or cream based white sauce such as bechamel.
Enfrijoladas are topped with refried beans.
Enchiladas verdes are sauced with salsa verde and typically made with white corn tortillas, poached chicken breast and cheese.
Entomatadas are made with tomato sauce.
Enchiladas montadas are a stacked variation.
Always on the quest for something different!!
Print Recipe
Salmon & Zucchini Enchiladas
Votes: 4
Rating: 5
You:
Rate this recipe!
|
|
Votes: 4
Rating: 5
You:
Rate this recipe!
|
Instructions
In a saucepan, saute onion, zucchini & mushrooms until tender-crisp; place in a large bowl & set aside.
In saucepan, melt butter & remove from heat. Stir in water & sauce mix. Return to heat & bring to a boil, stirring constantly. Reduce heat & simmer 3 minutes.
To bowl of sauteed vegetables add drained salmon chunks & a small amount of cooked 'dill sauce'. Lay out tortilla shells on a work surface & divide mixture between them. Blend together remaining dill sauce, reserved salmon juice & soup.
Preheat oven to 350 F. In a 9 X 13-inch baking dish, spread some sauce over the bottom. Lay filled, rolled tortillas single file in baking dish. Pour remaining sauce over all & top with grated cheese combo. Bake about 30-40 minutes.

Although, avocados are most traditionally used as a main ingredient in guacamole or to top a salad or sandwich, used in baking they are amazing.
When adding them into yeast bread recipes, you can replace all the butter with equal amounts of room temperature, mashed, ripe avocado. The ripeness of the avocado is very important as it needs to be very soft for it to work perfectly.
In addition to their creamy texture and mild flavor, avocados have a high water content so they can help to make baking softer, chewier and less likely to crumble.
You can freeze mashed, fresh, ripe avocados if you want to have an ’emergency supply’ on hand. To freeze, mash the avocados with a fork or blender. Add some lime juice and mix well. For every avocado use about 1 tablespoon of lime juice to prevent them from browning. Fill a freezer weight zip-lock bag with this puree. Remove the air from the bag, then zip closed and freeze. Best to use frozen avocados within 4-5 months of freezing.
I thought some Major Grey’s mango chutney would be a perfect compliment to these avocado rolls. Major Grey’s chutney is a style of chutney not a brand. The ingredients in Major Grey’s chutney vary both across commercial brands and recipes, but a few elements seem to remain constant like mangoes, raisins, citrus, onions, a sugar of some sort, and warm spices. The chutney is sweet and tangy with a nice ‘kick’ of heat at the end that’s enough to compliment the different layers of flavor without consuming them. You will often see it served with curried dishes or as a compliment to meats and cheeses.
Major Grey’s chutney is considered by many the gold standard of all chutneys. Complete with its own legend of a 19th Century British Army officer who presumably lived in British India and created this unique condiment.
The great part about making your own chutney is that you can tailor the ‘sweet & heat’ balance to your own preferences. Of course, there is absolutely nothing wrong with just picking up a jar at the supermarket!!
Print Recipe
Avocado Dinner Buns w/ Major Grey's Mango Chutney
Votes: 1
Rating: 5
You:
Rate this recipe!
Ingredients
Major Grey's Mango Chutney
Ingredients
Major Grey's Mango Chutney
|
Votes: 1
Rating: 5
You:
Rate this recipe!
|
Instructions
Avocado Rolls
In a small bowl, place yeast, lukewarm milk & 1 tsp sugar. Stir; cover & set aside until frothy, about 10 minutes.
In a large bowl, whisk together remaining 1/4 cup sugar, mashed avocado, eggs. Add yeast mixture & stir to combine.
In another bowl, whisk flour & salt. Add flour mixture to yeast mixture gradually, combining after each addition. Once all flour has been added, knead on a lightly floured surface for about 2 minutes.
Lightly grease the large bowl, place dough in it & cover with plastic wrap & a tea towel. Allow to rest for at least an hour in a draft-free place until dough has doubled in volume.
Punch dough down. Divide into 18 equal pieces in shape into balls. Place into a greased baking dish & cover with plastic wrap/towel. Allow to rise until doubled in volume, about an hour.
Preheat oven to 350 F. Bake rolls about 20 minutes or until golden. Remove from oven; cool for just a few minutes then brush with the Tbsp of butter. Serve with Mango Chutney.
Mango Chutney
In a saucepan, combine all chutney ingredients; bring to a boil. Reduce heat to medium-low; cook, stirring, until reduced & thick. Refrigerate any not used on rolls.

If you like corn, chances are you are also a big fan of cornbread in its many interesting forms. I used to think that cornbread was so good it didn’t need anything extra thrown in the ‘mix’.
Cornbread appeals to all of our senses, a pop and sizzle as batter pours onto a hot griddle, the earthy fragrance that fills the kitchen when its baking. Then there’s the taste …. !! We love what makes us feel good, especially comfort foods that are warm, simple and delicious.
The beauty of cornbread is that it can take on so many different flavors. It can be sweet, savory or as spicy as you would like. Thanks to its simplicity, there are very few food items it wouldn’t pair with, so the limits to cornbread-based culinary creations are endless.
While this isn’t necessarily your classic cornbread it makes a very interesting meal served with a baked potato and some Parmesan zucchini fries.
Print Recipe
Ham & Cheese Cornbread Roll
Votes: 1
Rating: 5
You:
Rate this recipe!
|
|
Votes: 1
Rating: 5
You:
Rate this recipe!
|
Instructions
Cornbread Roll
Preheat oven to 400 F. Line a 15 X 10 X 1-inch jelly-roll pan with parchment paper. Set aside.
In a small bowl, whisk together cornmeal, flour, sugar & baking powder; set aside. With a hand mixer, beat egg whites with cream of tartar until stiff but not dry. Alternately fold in cornmeal mixture & oil; fold in cheddar cheese saving some to sprinkle on top of roll before placing in the oven.
Spread batter evenly in prepared pan & bake for 5-6 minutes (top should spring back when lightly touched with finger; do NOT over bake). Remove from oven & turn bread onto a towel that has been lightly sprinkled with cornmeal. Remove & discard parchment paper. Starting at narrow end, roll bread with towel; set on a wire rack & allow to cool for 5 minutes.
Filling
In a small bowl, mash together butter, mustard, onion & Worcestershire sauce until combined & thick. Unroll bread, remove towel & top with ham slices; spread filling mixture over ham & sprinkle with shredded Swiss cheese. Reroll bread & place, seam side down on lined jelly roll pan. Sprinkle with remaining cheddar cheese & bake until cheese is melted, about 5-6 minutes.

The quintessential Mexican ‘Conchas’ are a type of sweet roll topped with a cookie crust, shaped for it’s namesake, a seashell. Though its precise origin is not known, all conchas are made from an enriched, yeasted dough similar to brioche or challah. What isn’t really clear, is the point at which a baker decided to cover a small round of sweet dough with a thin layer of cookie dough and then bake it.
Traditionally, the bread roll itself is not flavored, but the cookie dough topping has either a vanilla or chocolate flavor. This topping is an essential element on the sweet roll but the color or the way it is scored or decorated can be done in many different ways. Sometimes, brown or white sugar or even colorful sprinkles are dusted over the topping.
Conchas are sometimes split in half horizontally and filled with anything from whipped cream, custard or even refried beans. Some bakeries have been experimenting with new concha flavors. Cinnamon, walnut, agave nectar with golden raisins and pecan flavor are some that have been introduced.
It seems that conchas are at their best when eaten fresh which makes good sense being made from a yeast dough. It’s going to be interesting to see if I can create some of these little conchas with such a mysterious past.
Print Recipe
Mexican Sweet Buns or 'Conchas'
Votes: 1
Rating: 5
You:
Rate this recipe!
|
|
Votes: 1
Rating: 5
You:
Rate this recipe!
|
Instructions
Sweet Dough
In a dish, add yeast to lukewarm WATER & allow to sit for 5 minutes so yeast can activate. In a large bowl, whisk together lukewarm MILK, sugar, butter, salt & egg. Add yeast mixture & stir to combine. Add flour, about a 1/3 at a time, combining after each addition. Once all the flour has been added, knead on a lightly floured surface for about 2 minutes. The dough should be elastic & slightly sticky but easy to handle.
Place dough in a large greased bowl & turn the dough over to coat. Cover with plastic wrap & allow to rise in a warm place until doubled, about 1 1/2 hours.
Topping
In a bowl, beat the sugar, margarine & vanilla together until light & fluffy. Stir in flour & mix until a thick dough forms. Add additional flour if needed. Divide dough into 3 or 4 even pieces & tint each with food color. If the dough becomes sticky from the food color, add more flour. Cover pieces with plastic wrap until ready to use.
Assembly
When dough is ready, turn out on a lightly floured surface. Divide the dough into 16 even pieces ( press dough into a 14 x 14-inch rectangle; with a sharp knife cut into 4 strips in each direction). Shape each dough piece into a ball by tucking the corners under ( don't roll between your palms, this will just deflate the dough & make it tough). Place dough buns on a large baking sheet that has been lined with parchment paper.
Roll out the topping pieces on a lightly floured surface. Cut into 2 1/2-inch rounds with a cookie cutter or pastry ring. Use the pastry ring to score lines into the dough to resemble the ridges on a seashell (concha).
Transfer the scored topping dough rounds to the buns using an offset spatula. If the topping doesn't adhere naturally, use a pastry brush to apply a few dots of water on the underside before applying to the buns.
Allow the buns to rise for about 40 minutes. Before its time to bake, preheat oven to 375 F. Bake buns for 18-20 minutes or until they are just lightly browned on the bottom.
Recipe Notes
- The topping is made with margarine as it will yield a crunchy & flaky texture.
Despite having a fairly short history, Mexican fajitas are one of the most popular dishes in the world today. Apart from the fact that fajitas are incredibly tasty, they are actually very healthy not to mention the ease in cooking and assembling them.
As with many foods, time has changed the contents of the fajita and has evolved slightly from the original simplicity of the ranch worker’s dish, with different cuts of meat being chosen such as chicken or seafood. The vegetables have not changed as much as the meat, with peppers, onions & chilies still being predominant ingredients in the dish.
Probably, the most important thing when making fajitas is the marinade. It not only makes the ingredients incredibly tender but very flavorful.
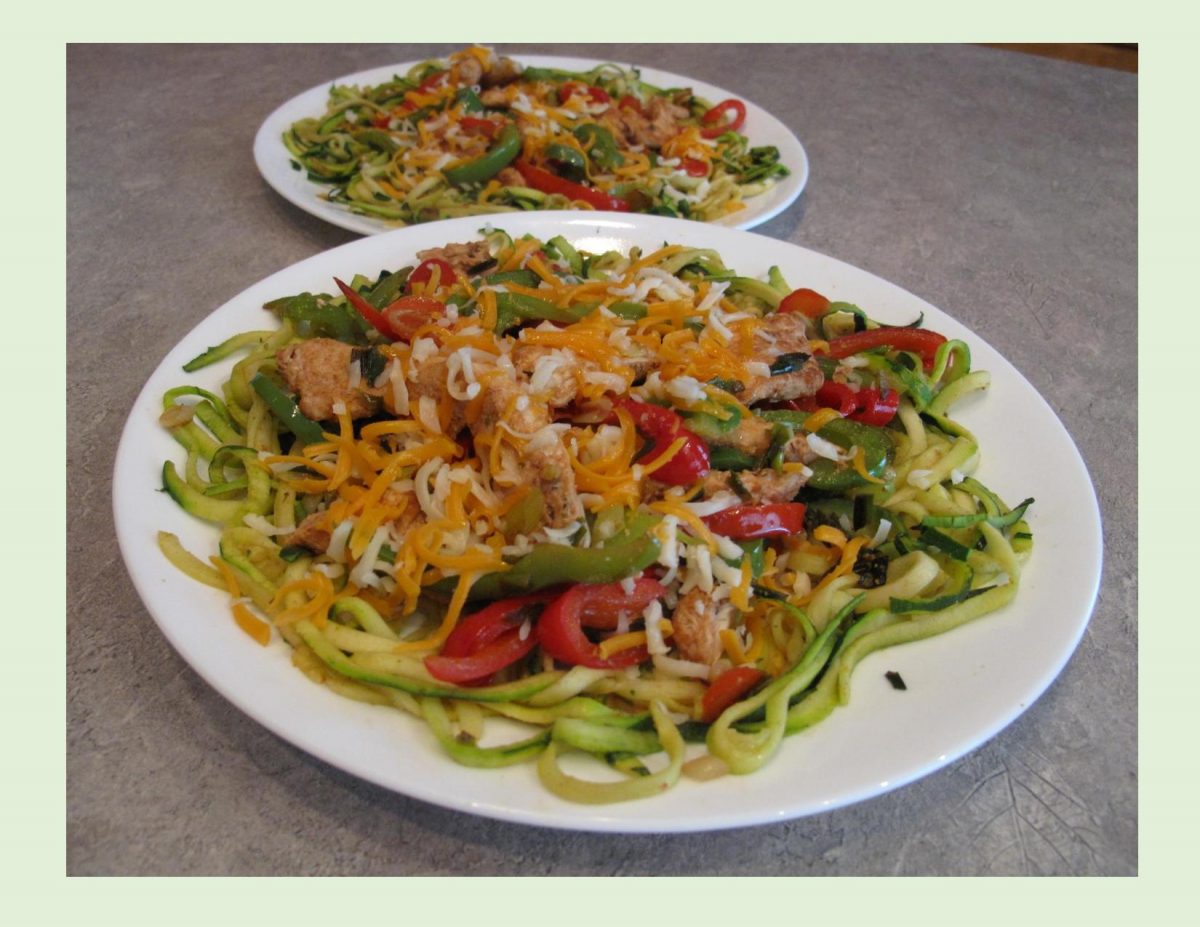
Fajitas usually require some tortillas. While they are wonderful tasting, using zucchini noodles (or zoodles) as a base for the fajita chicken gives this meal an amazing flavor. Zucchini is perhaps the most popular choice for vegetable noodles. It’s long, thin shape makes it easy to spiralize and its neutral flavor allows it to pair well with almost any sauce or topping. This meal has such eye appeal along with a great taste.
Print Recipe
Fajita Chicken w/ Zucchini Noodles
Votes: 1
Rating: 5
You:
Rate this recipe!
|
|
Votes: 1
Rating: 5
You:
Rate this recipe!
|
Instructions
In a large resealable plastic bag, combine oil, lemon juice & seasonings (RESERVE a small bit of seasoning for zucchini noodles); add chicken, seal & turn to coat. Refrigerate for at least an hour.
Wash zucchini & trim off ends. Using a spiralizer, cut zucchini into 'noodles'. Set aside. Prepare peppers & green onion.
When chicken has finished marinating, Add 1 Tbsp oil to a griddle & saute peppers & onion until just tender crisp. set aside & keep warm. Add another Tbsp oil to griddle. Saute zucchini noodles for 2-3 minutes. Remove from heat, sprinkle with reserved seasoning & keep warm.
Grill marinated chicken strips until cooked through. Divide zucchini between serving plates. Top with peppers, onions & grilled chicken. Sprinkle with grated cheese.


