
Having frozen rhubarb to bake into a spiced rhubarb & orange cake in the middle of winter is a treat! Rhubarb is treasured by many simply for its sophisticated flavor. Those who love rhubarb, value its tart pungency, which more often than not is mellowed with sugar and made aromatic with vanilla, cinnamon, nutmeg, cardamom or orange rind.
Sweets are the staple at the end of a meal; the luring incentive for the kids to eat their vegetables, the weakness for many dieters, and the go-to fix for those with sugar addictions.
Hot or cold, a simple mini dessert can turn an average meal into a memorable event. Rhubarb and orange is a much-loved flavor combination, making this recipe a perfect winter dessert.
Print Recipe
Spiced Rhubarb & Orange Pudding
Votes: 1
Rating: 5
You:
Rate this recipe!
|
|
Votes: 1
Rating: 5
You:
Rate this recipe!
|
Instructions
Place orange in a deep saucepan, cover with water. Place saucepan over high heat & bring to a boil. Place a lid on it & reduce heat to low. Simmer until the orange is very tender when pierced with a sharp knife. Drain, quarter & set aside to cool completely.
Preheat oven to 350 F. Lightly butter six-1 cup ovenproof baking dishes.
Place rhubarb, brown sugar, spices, vanilla & water in a heavy based saucepan over medium heat. Bring to a simmer & cook, stirring occasionally, for 5-6 minutes until rhubarb thickens. Remove from heat & set aside.
Place cooled orange quarters with the skin on into a food processor & puree until smooth. Add flour, butter, buttermilk, sugar & eggs & process until smooth.
Divide batter among prepared baking dishes. Place on a baking tray & bake for 40 minutes or until tops are golden.
Serve warm topped with spiced rhubarb & whip cream.
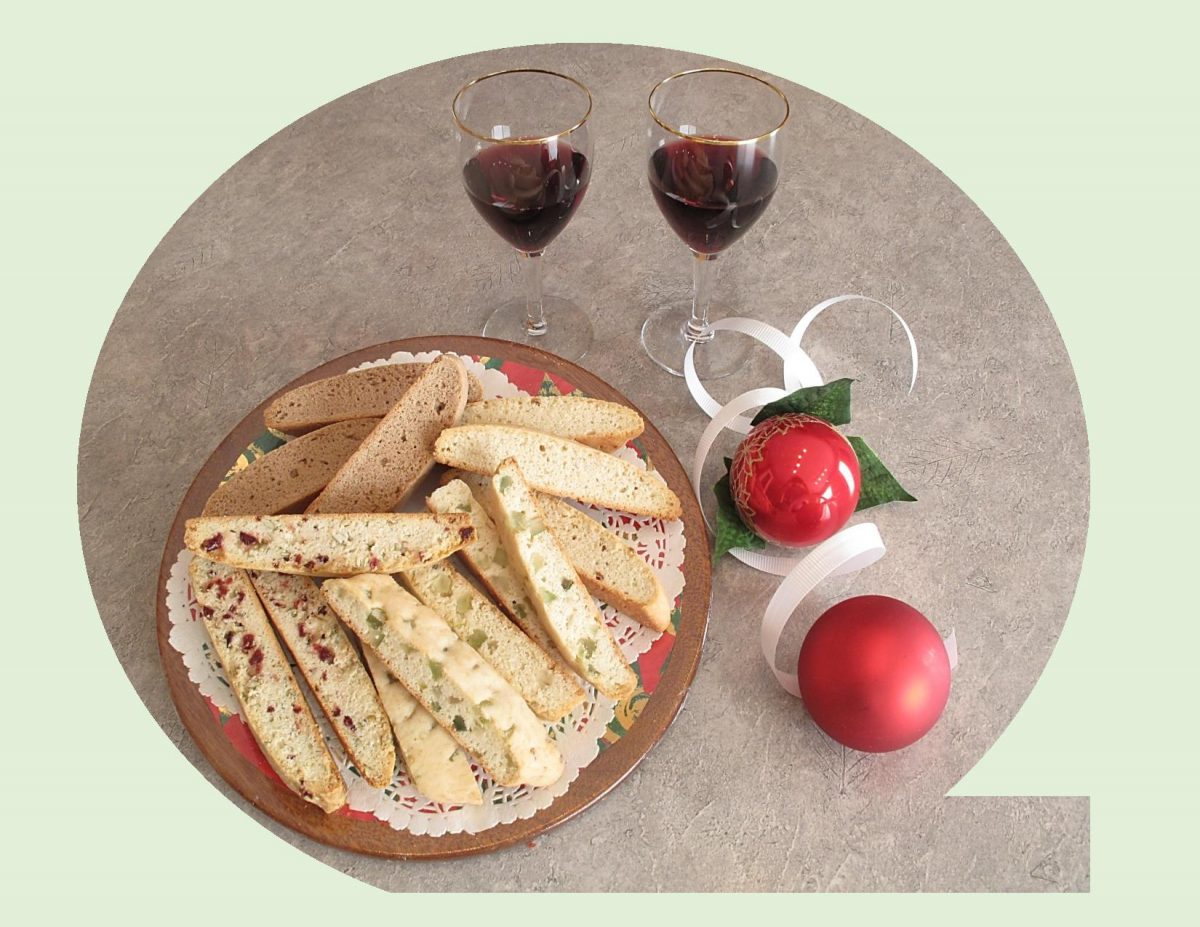
Biscotti are time consuming to say the least, but they’re also one of the easiest and tastiest cookies you’ll ever make. No special equipment is needed; just a bowl, a couple of baking sheets and some parchment paper.
The word biscotti is derived from the Latin biscoctus, meaning twice baked or cooked: the dough is formed into logs, baked, cooled and baked again. Whereas Italians use the word ‘biscotti’ to refer to various cookies, North Americans use the term to refer to the singular long, crisp, twice-baked Italian cookie. It wasn’t until the 1990’s that biscotti became a treasured North American favorite.
Despite their centuries old heritage, there is no one perfect way to make biscotti. Some recipes call for eggs, which is the traditional method, while others use butter or oil. The choice is yours; just keep in mind that those made with butter or oil will have both a softer texture and a shorter shelf life.
Today, it seems, biscotti is everywhere with an endless array of flavors. Classics such as almond, anise and hazelnut to gingerbread, maple walnut or mint chocolate chip. There are also savory biscotti made with various cheeses and herbs that are so good when paired with a charcuterie plate, an assortment of olives and cheeses or even a bowl of soup.
Since the holiday season is upon us and as you have probably noticed, I like making the most of basic recipes with some variations. Being able to make four different flavors using one basic recipe definitely speeds up the process.
Votes: 1
Rating: 5
You:
Rate this recipe!
Ingredients
Basic Biscotti Dough (use 1 recipe per variation)
Cardamom Orange Variation
Seeded Cranberry Variation
Speculoos Spice Variation
Ingredients
Basic Biscotti Dough (use 1 recipe per variation)
Cardamom Orange Variation
Seeded Cranberry Variation
Speculoos Spice Variation
|
Votes: 1
Rating: 5
You:
Rate this recipe!
|
Instructions
Biscotti Dough
Preheat oven to 300 F. Line 2 baking sheets with parchment paper.
TO MAKE 80 BISCOTTI IN TOTAL, USE ONE RECIPE OF THE BASIC BISCOTTI DOUGH FOR EACH VARIATION. THE MIXING PROCEDURE IS ALWAYS THE SAME, JUST VARY EACH ONE WITH THE DIFFERENT ADDITIONS.
Using an electric mixer, cream together butter & sugar until light & fluffy. Add eggs & vanilla extract (add orange zest in CARDAMOM ORANGE variation). Mix until combined.
In another bowl, whisk together flour, (SPICES where called for), baking powder & salt.
Add dry ingredients to wet ingredients a little at a time, mixing on low until JUST incorporated. Add CITRON PEEL or PEPITA SEEDS & CRANBERRIES to the variations calling for them.
Shaping & Baking
For each recipe (or variation), shape dough into a log that is about 16-inches long. Place 2 logs on each baking sheet. Use your hands to flatten the dough logs until they are about 3/4-inch thick. Gently press the sides & ends of the logs to even them out & flatten them.
If desired, sprinkle logs with coarse sugar. Bake for 20-25 minutes, until lightly golden & the center of the logs is almost firm & bounces back when touched.
Let the logs cool on the baking sheets for 10 minutes. Reduce heat to 275 F. Using a sharp knife to cut the logs into 3/4-inch thick diagonal slices. Press straight down with the knife, rather than using a sawing motion. Lay the slices, cut side up, back on the lined baking sheets.
Bake another 20-25 minutes, turning halfway through baking time. Cool on baking sheet for 5 minutes, then carefully transfer to a wire rack to finish cooling. Store in an airtight container at room temperature for 1-2 weeks or in the freezer for 3 months.
You will have roughly 20 biscotti from each variation.
Recipe Notes
- Since I have a nut allergy, sadly I can't use them, but don't hesitate to make some variations of your own.

The story of Benedictine dates back to 1510 when a Venetian monk of the Abbey of Fécamp, Dom Bernardo Vincelli, created an elixir intended to support good health. The concoction was so well-received that the Benedictine monks of Fécamp continued the liqueur’s production up until the French Revolution. One of the Benedictine monks had a copy of the recipe for the elixir in a book he gave to a friend for safekeeping during the Revolution. That friend’s grandchild was Alexandre Le Grand.
Over 300 years later in 1863, Alexandre le Grand, a wine trader from Fécamp sought to resurrect it. After a year of attempting to recreate the mysterious brew, le Grand finally succeeded, transforming it into the liqueur it is today. He named it Benedictine, in honor of the monk Dom Bernardo Vincelli, and went on to erect a palace that would house its distillation: the Palais Benedictine in Fécamp.
Its recipe remains a secret, known by a select few and with only three copies in existence, each kept safe in a different locale. It includes a combination of 27 herbs and spices derived from plants from around the globe, including juniper, myrrh, saffron, vanilla, thyme, coriander and more. The ingredients are carefully combined and slowly distilled several times in copper stills that date back to the time of Alexandre le Grand. The liquid is then aged in oak casks for approximately two years and always stored at the Palais Benedictine. With an ABV of 40%, it is classified as a brandy and often served as a digestif after meals or used in cocktail recipes.
During the Middle Ages, about 90% of the population of Europe was the non-landowning laboring class, with the remainder split between the nobility and church. The monks were the keepers of most scientific and medical knowledge, as they were literate and often spent time copying important texts from one monastery to the next. Some monasteries operated hospitals and probably all had medicinal herb gardens and apothecaries (pharmacists) on site to make medicines for themselves and the surrounding community.
The liqueur tastes primarily of honey and baking spices, with citrus peel, herb, and stone fruit notes.
Print Recipe
Benedictine Liqueur Mini Cupcakes
Votes: 1
Rating: 5
You:
Rate this recipe!
|
|
Votes: 1
Rating: 5
You:
Rate this recipe!
|
Instructions
Cupcakes
Preheat oven to 350 F. Line 2 mini cupcake pans ( 2-inch diameter) with paper liners.
Place sugar & zest in the mixer bowl & blend until moist & fragrant. Add butter & beat until white. Add eggs, one at a time; beating well after each one.
In a separate bowl, combine flour, salt & baking powder. With mixer on low speed, add the flour, milk & liqueur alternately, scraping down sides of the bowl. Divide cake batter between the 24 paper lined cups.
Bake 16-18 minutes, or until risen & baked through, testing with a toothpick in the center of the cupcake. Remove from baking pan & allow to cool.
Frosting
Combine butter & cream cheese with a mixer until smooth & creamy. Blend in Benedictine liqueur. Slowly add the powdered sugar until you reach the right consistency. If you are using a pastry bag ensure that you have a medium consistency.
Pipe the frosting onto each cupcake then garnish as you wish.

Much like the butter tart and date square, the Nanaimo bar fits Canada’s apparent fondness for rich, decadent sweets. It is a dessert bar that requires no baking and generally consists of three layers: a graham wafer crumb and shredded coconut base, custard-flavored butter icing in the middle, and a layer of chocolate ganache on top. It is named after Nanaimo, British Columbia, where it was popularized in the years following WWII. It subsequently rose to wider prominence after Expo ’86.
Susan Mendelson is perhaps most responsible for commercializing the Nanaimo bar. She sold the bar during the 1970s to help pay her tuition, and in 1979 founded The Lazy Gourmet, a café and catering company in Vancouver, which claims to be the first business to sell the dessert. Mendelson wrote the official cookbook for Expo ’86, held in Vancouver, and included the Nanaimo bar.
After that, the Nanaimo bar began to be sold on BC Ferries and spread in popularity across Canada. It can now be found in Costco, Starbucks and countless cafes in Canada and the United States. There can be some variations with each of these layers — e.g., adding mint, mocha or other flavoring, as well as food coloring, to the icing center, or various nuts to the base — but a classic Nanaimo follows the traditional trio.
In a bid to take advantage of the bar’s popularity, the city of Nanaimo launched a tasting trail much like Ontario has done for the butter tart. Different locations in and around Nanaimo serve different variations on the classic dessert, from flavors such as maple bacon and peanut butter to deep-fried Nanaimo bars, Nanaimo bar spring rolls, Nanaimo bar waffles and cheesecake and Nanaimo bar coffee and cocktails.
All that being said , here’s my Christmas version of a Nanaimo thumbprint cookie.
Print Recipe
Nanaimo Bar Thumbprint Cookies
Votes: 1
Rating: 5
You:
Rate this recipe!
|
|
Votes: 1
Rating: 5
You:
Rate this recipe!
|
Instructions
Cookies
-
In a medium bowl, whisk together the flour, graham crumbs, cocoa, baking powder & salt.
In a large bowl, beat the butter & sugar for 3-4 minutes, until fluffy. Beat in the egg & vanilla. On low speed or using a spatula, stir in the dry ingredients, along with the coconut and walnuts.
Roll dough into 1 1/2-inch size balls & place a couple inches apart on a parchment-lined baking sheet. Use your thumb to create an indentation in each cookie.
Bake for 14 minutes, until just set. Remove & use the back of a small spoon to gently reform the indentations. Transfer to a rack to cool completely.
Filling
In a bowl, beat the butter, powdered sugar, custard powder, cream and vanilla until smooth and fluffy, adding a bit more cream or powdered sugar as needed to create a spreadable frosting. Place the filling in a piping bag fitted with a 1/2-inch plain tip, or in a zip-lock bag; seal and and cut off one corner.
Assembly
Pipe some frosting into each cooled cookie. In a small bowl, melt the chocolate & butter in the microwave in 10 second increments, stirring in between, until smooth. Drizzle the cookies with a fork. Set back on the cooled baking sheets to allow them to set.
Recipe Notes
Substitute for Bird's Custard Powder:
- For each Tbsp of custard powder that's called for in the recipe, you can make your own custard mix with 1 Tbsp of cornstarch plus 1 tsp of vanilla extract & a pinch of salt.
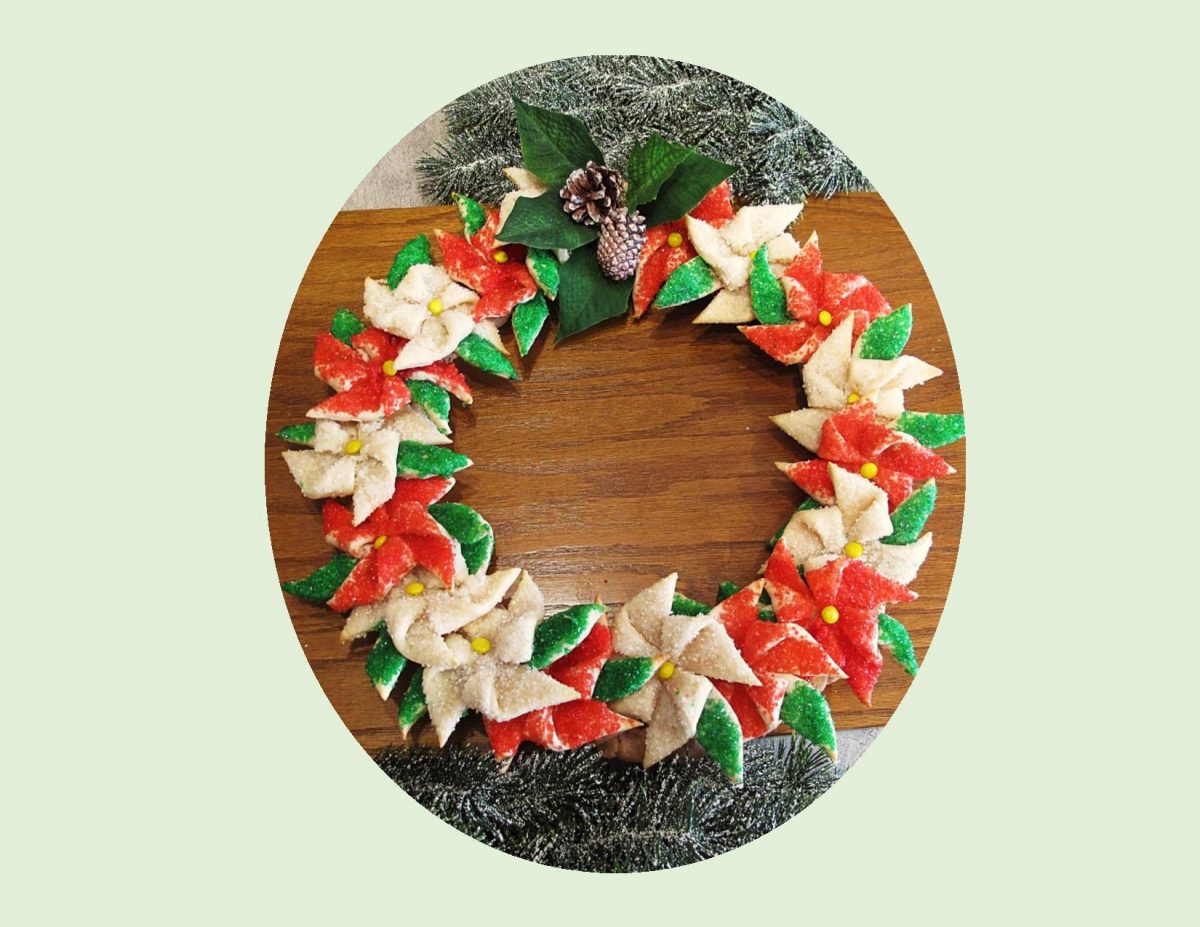
There are certain plants that play important and often mysterious roles in holiday traditions and celebrations all over the world. From the Egyptians who decorated trees during the winter solstice, to the Pagans and Druids who used mistletoe in their winter customs, stories of ritualized plant use span continents and history and have become infused into the mythologies that span generations. I’ve always wondered how poinsettias and Christmas became intertwined. After a bit of research this is what I found.
It seems the story behind poinsettias is rich in history and lore. The vibrant plants are native to the rocky canyons of Guatemala and Mexico. Poinsettias were cultivated by the Mayans and Aztecs, who valued the red bracts as a colorful, reddish-purple fabric dye, and the sap for its many medicinal qualities. The poinsettia was first associated with Christmas in southern Mexico in the 1600s, when Franciscan priests used the colorful leaves and bracts to adorn extravagant nativity scenes.
There is an old Mexican legend about how Poinsettias and Christmas come together, it goes like this:
There was once a poor Mexican girl called Pepita who had no present to give the baby Jesus at the Christmas Eve services. As Pepita walked to the chapel, sadly, her cousin Pedro tried to cheer her up.
‘Pepita’, he said, ‘I’m sure that even the smallest gift, given by someone who loves him will make Jesus happy.’
Pepita didn’t know what she could give, so she picked a small handful of weeds from the roadside and made them into a small bouquet. She felt embarrassed because she could only give this small present to Jesus. As she walked through the chapel to the altar, she remembered what Pedro had said. She began to feel better, knelt down and put the bouquet at the bottom of the nativity scene. Suddenly, the bouquet of weeds burst into bright red flowers, and everyone who saw them were sure they had seen a miracle. From that day on, the bright red flowers were known as the ‘Flores de Noche Buena’, or ‘Flowers of the Holy Night’.
The shape of the poinsettia flower and leaves are sometimes thought as a symbol of the Star of Bethlehem which led the Wise Men to Jesus. The red colored leaves symbolize the blood of Christ. The white leaves represent his purity.
Although it doesn’t pre-date Christianity like its Christmas counterparts, the holiday season wouldn’t be the same without the reds and greens of the poinsettia.
Print Recipe
Poinsettia Cookie Wreath
Votes: 1
Rating: 5
You:
Rate this recipe!
|
|
Votes: 1
Rating: 5
You:
Rate this recipe!
|
Instructions
Poinsettia Cookies
In a large bowl, beat the cream cheese, butter, sugar & flavorings with an electric mixer on medium-high speed until light and fluffy, about 2 minutes, scraping down the bowl with a rubber spatula as needed.
Reduce the mixer speed to low and beat in the flour & salt until combined. Divide the dough between 2 large pieces of plastic wrap. Flatten each into a 1/2-inch-thick disk and wrap. Refrigerate until firm, at least 1 hour or overnight.
Line two baking sheets with parchment.
Roll out 1 disk of dough between 2 heavy sheets of plastic wrap into a square about 1/8 inch thick. You should be able to cut (9) 3-inch squares from it as well as have some edges left for making about 18 leaves. Re-wrap & refrigerate dough scraps while you shape the poinsettias.
Cut a 1 1/2-inch slit in all four corners of each dough square to form 8 points. Fold over every other point, moisten tip with egg white & press into the center of the square. Arrange cookies on prepared cookie sheet. Refrigerate while you repeat the same procedure with the other disk of dough.
Cut enough leaves out of the scraps using a sharp knife or a leaf-shaped cutter, making 2 leaves for each poinsettia. Arrange the leaves on plate & lightly brush with egg white, then sprinkle with green sanding sugar. Set aside in the refrigerator.
Preheat the oven to 350 F.
Lightly brush the poinsettias with egg white & sprinkle half with red sanding sugar & half with white sanding sugar. Brush the ends of 2 leaves & tuck underneath each poinsettia on opposite sides. (No need to press the dough; it will meld together as it bakes.)
Bake, rotating the baking sheet halfway through, until the cookies are puffed and the edges are golden, 20 to 25 minutes. Immediately press a yellow (chocolate) candy in the center of each warm cookie. Let cool 5 minutes, then transfer the cookies to a wire rack to cool completely.
Spicy Wreath Cookie
In a large bowl, combine all ingredients. Mix until a dough forms. Roll dough into a long strip about 43-inches in length.
-
On a sheet of parchment, draw a round circle about 13 1/2-inch circumference. Place on a baking sheet or use a large round pizza pan.
Lay the long strip of cookie dough in a circle following your pencil drawing to form the wreath base on the parchment lined baking sheet. Flatten gently to about 1-inch thickness. With a knife, make zig-zag indentations on the dough.
Bake for about 20 minutes until done but not overbaked. Cool.
Assembly
Using a bit of gel paste from a purchased tube, anchor each cookie in place on top of wreath base to form 'poinsettia wreath'. Finish with adding a ribbon or some holly leaves & pinecones or personalize to your own taste.
Recipe Notes
- I like to save the heavy plastic wrap from frozen puff pastry for recipes like this. When you roll the dough between two sheets of plastic wrap as opposed to using flour on your board, it really keeps the dough from becoming so dry.
- I found if I took the poinsettia cookies out of the oven about 5 minutes before they were finished baking & pressed the candy center in then returned them to the oven, the candies stuck to the cookies better.
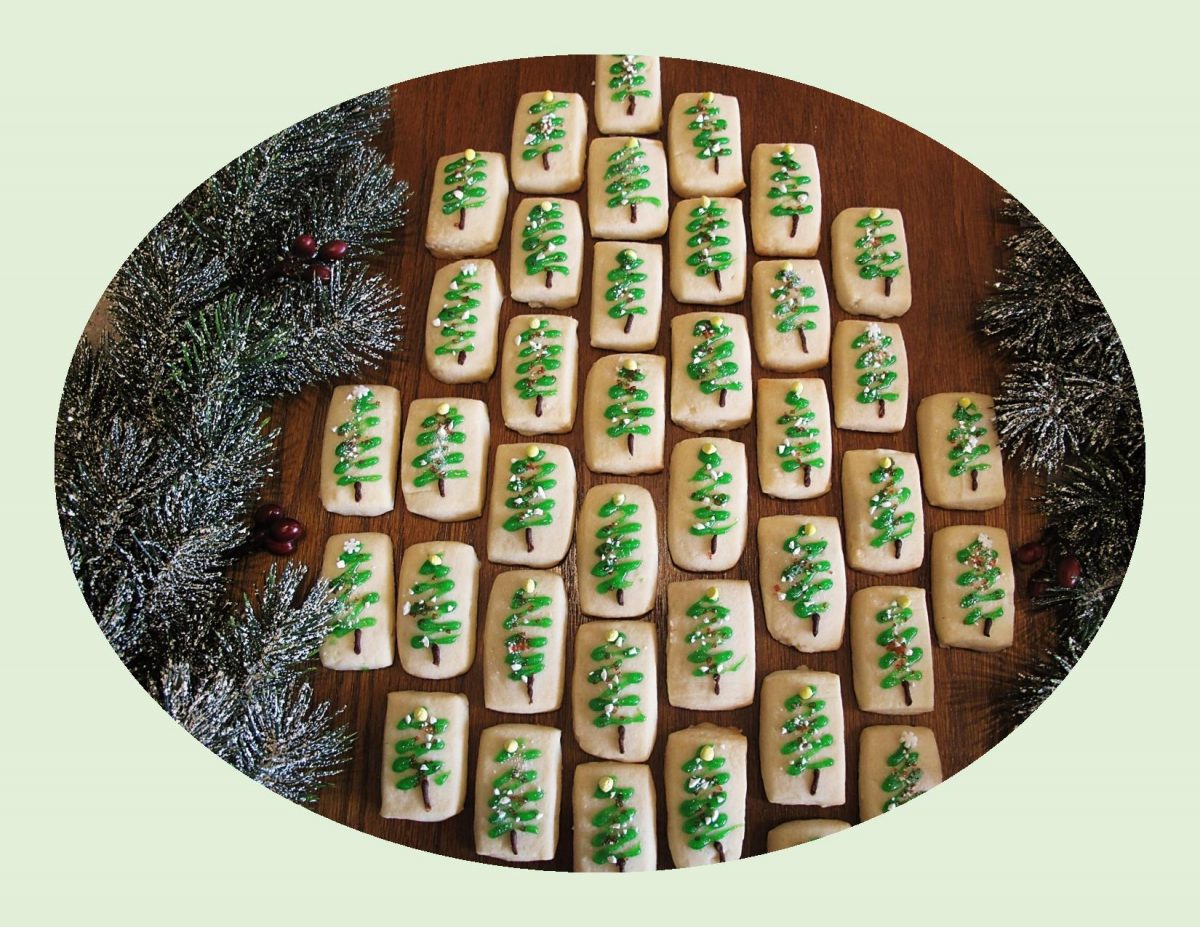
Years and years ago, the Canada Cornstarch company printed a four-ingredient recipe for shortbread on the side of a cornstarch box and the rest is history.
Here in Canada, shortbread is in our DNA. This beloved cookie is simplicity personified. If the holidays had their own taste, I’m pretty sure it would be a shortbread cookie.
Over 40 years ago a Canadian company, by the name of Mary Macleod’s Shortbread was opened in Toronto, Canada. Mary, a homemaker and fantastic baker who took her love of this cookie and created Canada’s first shortbread-only bakery.
Her shop was an instant hit when she first opened its doors – she’d bake until midnight, and her goods would be sold out by noon the next day. Mary’s business grew and expanded, and her loyal customers followed her everywhere, but, to this day, the company crafts small-batch, all-butter shortbreads, the best butter being the key.
Mary Macleod’s Shortbread became synonymous with the Christmas season. Many people have made shortbread part of their holiday and family traditions.
Shortbread is undoubtedly one of the best cookies, but it’s without question that it all comes down to the butter. A good shortbread cookie can be transformed into the stuff of dreams by placing freshly baked shortbread into a tin, store it in the back of your pantry, somewhere cool, and forget it for a few months. You’ll be amazed at the flavor when it comes time to eat it.
So here we are … the famous Canada cornstarch shortbread cookies!
Print Recipe
Shortbread Christmas Trees
Votes: 1
Rating: 5
You:
Rate this recipe!
|
|
Votes: 1
Rating: 5
You:
Rate this recipe!
|
Instructions
In a bowl, sift together cornstarch, powdered sugar & flour. Blend in butter & flavoring with a spoon, mixing until a soft, smooth dough forms. If dough is too soft to handle, cover & chill about 1 hour.
Between 2 sheets of parchment paper, roll dough out into a rectangle about 12" x 7" & 1/2-inch thickness. Make 7 strips on the longest side & 6 strips on the short side. Transfer to ungreased baking sheets spacing 1 1/2-inches apart. Place baking sheets in refrigerator & chill 30 minutes. Halfway through preheat oven to 300 F.
Bake for about 20 minutes or until edges are just barely browned.
When shortbread is cooled, decorate with icing & sprinkles to create Christmas tree design.
Recipe Notes
- The almond flavor is optional but I think it adds a nice touch.
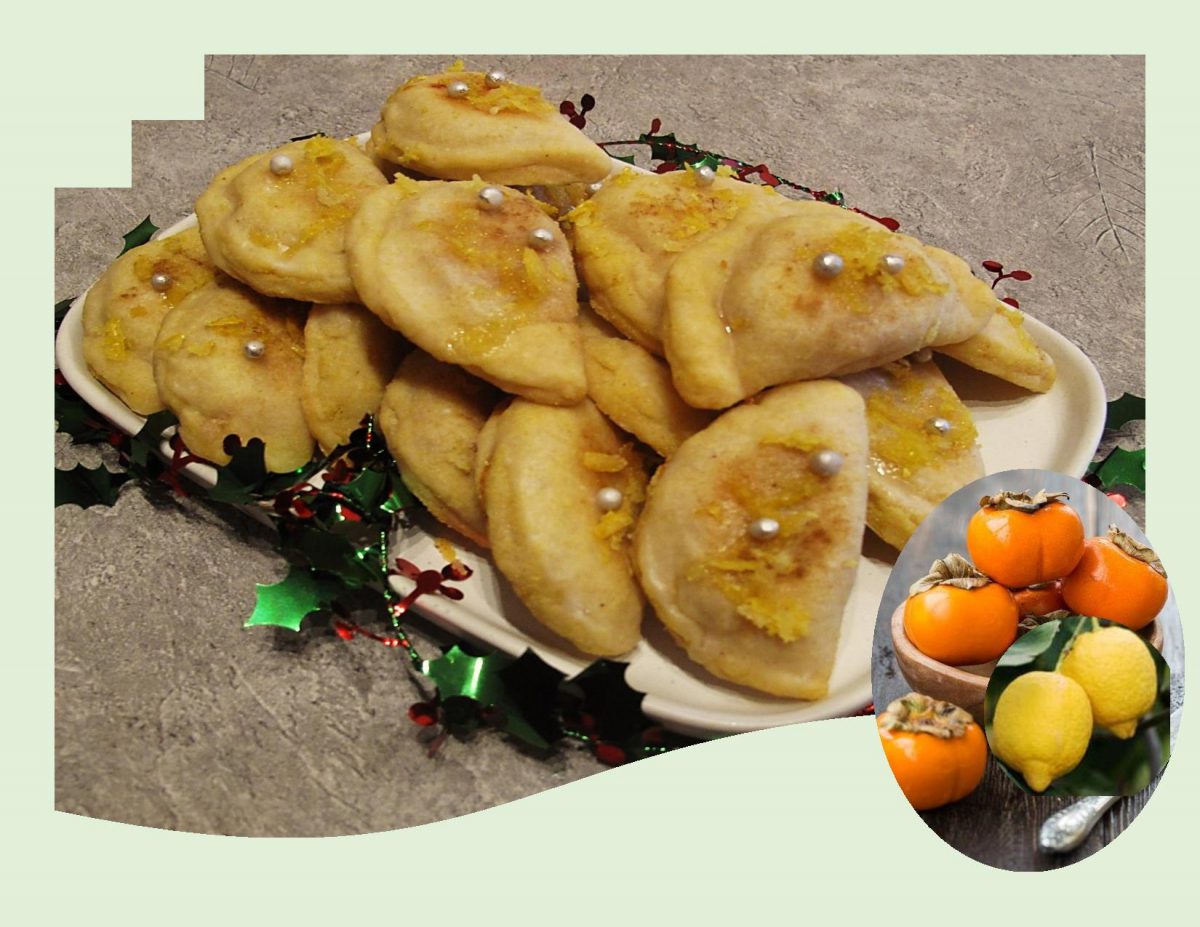
Let’s face it: we live in a world of portable food. Much like with many heritage recipes, there’s room for debate about how to make a proper hand pie. Historically, hand pies were primarily created with reconstituted dried fruit–apples, peaches–since fresh fruit often is too wet to be supported by the delicate pastry. Today, a blend of dried and fresh fruit (or a generous amount of thickener) yields a nicely balanced mixture of flavors and texture.
Hand pies are very often deep fried, but can be skillet fried (preferably in cast iron) or baked for those who are wanting something more health conscious. The dough is typically an adapted form of biscuit dough instead of traditional pie crust, which is better able to withstand the frying process without splitting or leaking filling.
Persimmons are typically in season from September to December. As soon as I see them at the grocery store, I just can’t resist making them into something special. Using my favorite cornmeal pastry gives them a bit of an interesting crunch and balances out the sweet persimmon filling.
Print Recipe
Persimmon Lemon Hand Pies
Votes: 1
Rating: 5
You:
Rate this recipe!
|
|
Votes: 1
Rating: 5
You:
Rate this recipe!
|
Instructions
Cornmeal Pastry
In a small bowl, combine sour cream & ice water; set aside. In a large bowl, whisk together flour, cornmeal, sugar & salt. Using a pastry blender or fingertips, cut in the butter until mixture resembles BOTH coarse crumbs & small peas. Sprinkle the cold sour cream mixture over dough, 1 Tbsp at a time, tossing with a fork to evenly distribute it. After you have added all the sour cream mixture, dough should be moist enough to stick together when pressed; if not, add additional cold water, 1 tsp at a time. Do not overwork dough.
Press dough into a disk shape & wrap in plastic wrap. Refrigerate for at least 2 hours. This dough can be kept in the refrigerator for a day or two or it can be wrapped airtight & frozen for a month. Thaw, still wrapped in refrigerator.
Persimmon Filling
In a skillet, melt butter & sprinkle sugar evenly over it. Add peeled, sliced persimmons & sauté until liquid is bubbling & lightly golden. Reduce heat & continue cooking until persimmons are tender (if you wish, thicken any juices with cornstarch). Add 5-spice & salt. At this point you can either mash persimmons to make a filling or you can puree them in a food processor,
Assembly/Baking
Prepare egg wash. Remove pastry from fridge & roll out to 1/8-inch thickness. Using a 3-inch cookie cutter, cut into 18 rounds. On each round place a heaping teaspoon of persimmon filling. Fold in half & seal with your fingertips. Place the mini hand pies on a parchment lined baking sheet & keep in the fridge or freezer while you continue to make the rest of the pastries.
-
Brush egg was all over the pastry crusts. Bake for about 12 minutes or until crust is golden brown. Remove from oven & place pastries on a wire rack to cool.
Lemon Glaze
Grate lemon to make lemon zest for top of pastries. In a small dish combine powdered sugar with enough fresh lemon juice to make a runny glaze. Dip pastry tops in glaze then sprinkle with lemon zest & silver dragees.

Why do we eat cheese with fruit? Most people don’t question the notion. Our earliest image of enjoying cheese is a still-life of a glass of wine, a slab of cheese (probably brie), and a fat cluster of grapes.
We eat fruit with our cheese because the combination of flavors are complementary, because the fruit brings out certain notes in the cheese, or vice versa. You have sweet and juicy against salty and savory, firm versus soft, nutty with candylike, and so on and so forth.
This sweet pear and cheddar tart is the best of both worlds. Bosc pears are beautiful; they have a crisp, dense, slightly grainy texture with a sweet flavor and subtle hints of fall spices. So I’m thinking why not make it a trio? Port wine is a sweet, red, fortified wine from Portugal that pairs wonderfully with aged cheddar cheese. What’s not to like??
This elegant pear tart is topped with cheddar streusel and served with a raspberry-port wine sauce.
Print Recipe
Cheddar Pear Tart
Votes: 1
Rating: 5
You:
Rate this recipe!
Ingredients
Raspberry-Port Wine Sauce
Ingredients
Raspberry-Port Wine Sauce
|
Votes: 1
Rating: 5
You:
Rate this recipe!
|
Instructions
Sauce
Puree raspberries in a blender. Pour into a wire sieve placed over a bowl to remove seeds. Add port wine to raspberry juice. Chill. Alternatively, whisk in cornstarch & place in a small saucepan. Heat, stirring constantly until sauce cooks & thickens. Set aside to cool.
Tart
Line a tart pan with a removable bottom with foil paper then a piece of parchment paper. Spread 170 gm of the shredded cheddar cheese evenly in bottom of lined pan. Chill.
Prepare pears & place in a large bowl, toss pear slices with lemon juice if using. Layer pears over shredded cheddar in baking pan. Chill.
-
In a medium bowl, combine flour, sugar, 5-spice & 60 gm shredded cheddar cheese; cut in butter & sprinkle over pears.
Bake for 50-60 minutes until top is browned. Cool on a wire rack.
Place on a serving platter, cut into wedges & serve with raspberry-port wine sauce.
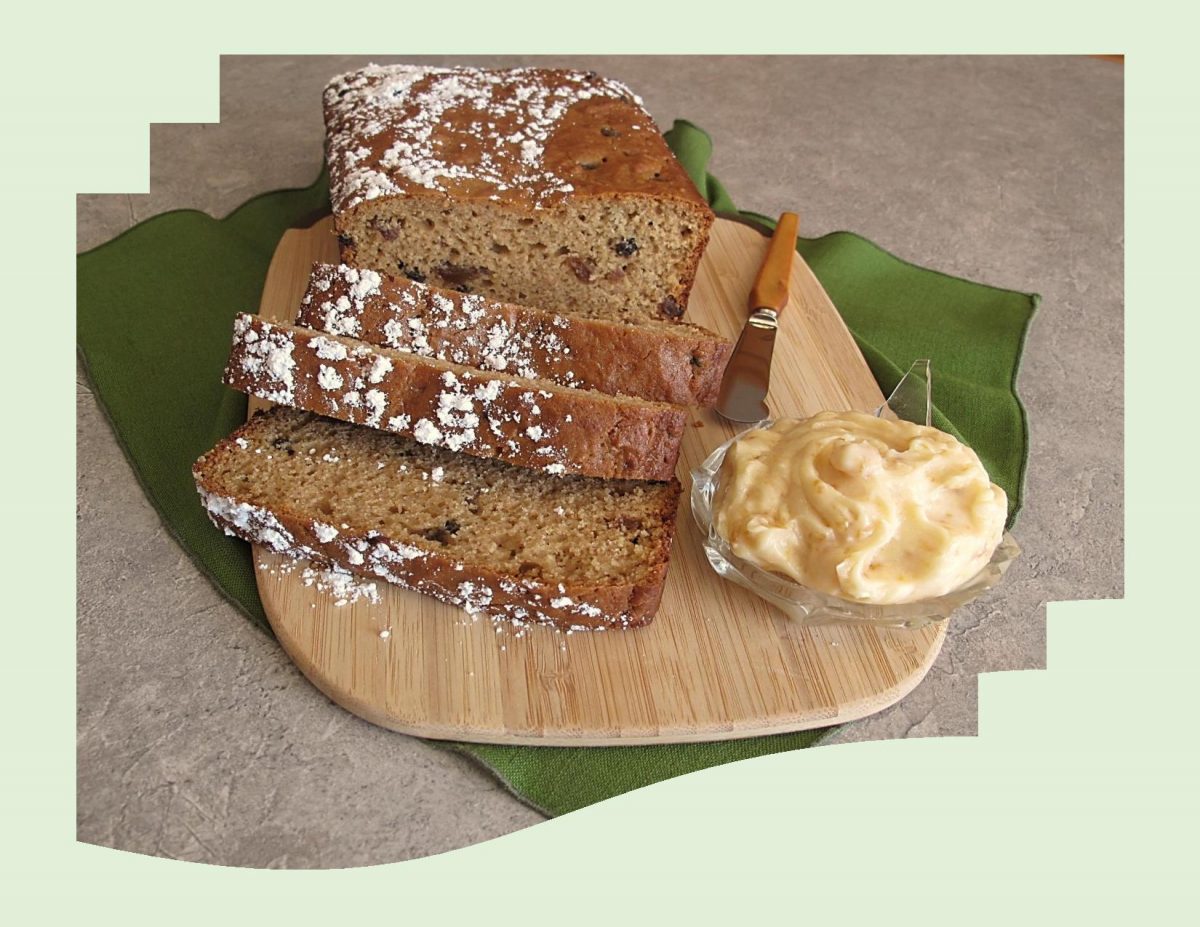
I just can’t resist fitting a bit of fruit mincemeat into my Christmas baking, so this year it comes in a quick bread. Quick breads cover a wide range, from biscuits and scones, which are made from a dough, to muffins and loaves that are made from a batter. They can be large or small, savory or sweet. The major thing that identifies them is the fact that they are, as their name implies, quick to make.
Quick breads have evolved as a distinctly different tradition after the introduction of baking powder in 1850. Before that, breads and cakes were leavened with yeast.
These breads come in all shapes and sizes. Even though they are called breads, lets be clear, they are a cake of sorts. Some breads are light and airy, others are hearty and dense. The ingredients used will greatly affect the final volume and texture. Oats gives breads a somewhat dense and chewy texture. Sugar helps to keep breads tender and without salt will taste flat.
The basic way to prepare a quick bread is the two-bowl method. This entails mixing all dry ingredients separately from the liquid and sugar, then quickly combining the two with only a few strokes. The idea is to not overmix or overbake.
If you like mincemeat, this loaf is so nice to have on hand during the Christmas season.
Print Recipe
Mincemeat Quick Bread w/ Orange Spread
Votes: 2
Rating: 5
You:
Rate this recipe!
|
|
Votes: 2
Rating: 5
You:
Rate this recipe!
|
Instructions
Bread
Preheat oven to 350 F. Butter a 4 1/2-cup ring mold pan or bottom only of a 9 x 5 x 3-inch loaf pan.
In a large bowl, beat eggs; stir in mincemeat, brown sugar, milk & butter.
In another bowl, whisk together flour baking powder & salt. Add to wet mixture, combining ONLY until flour mixture is moistened. Pour into chosen baking pan
Bake about 45-50 minutes or until wooden pick inserted in center comes out clean. Remove from oven & cool 10 minutes before removing from pan.
Sprinkle with powdered sugar if you wish. Serve warm or cool with Orange Butter.
Orange Butter
In a small bowl, beat marmalade with butter until softened & blended.
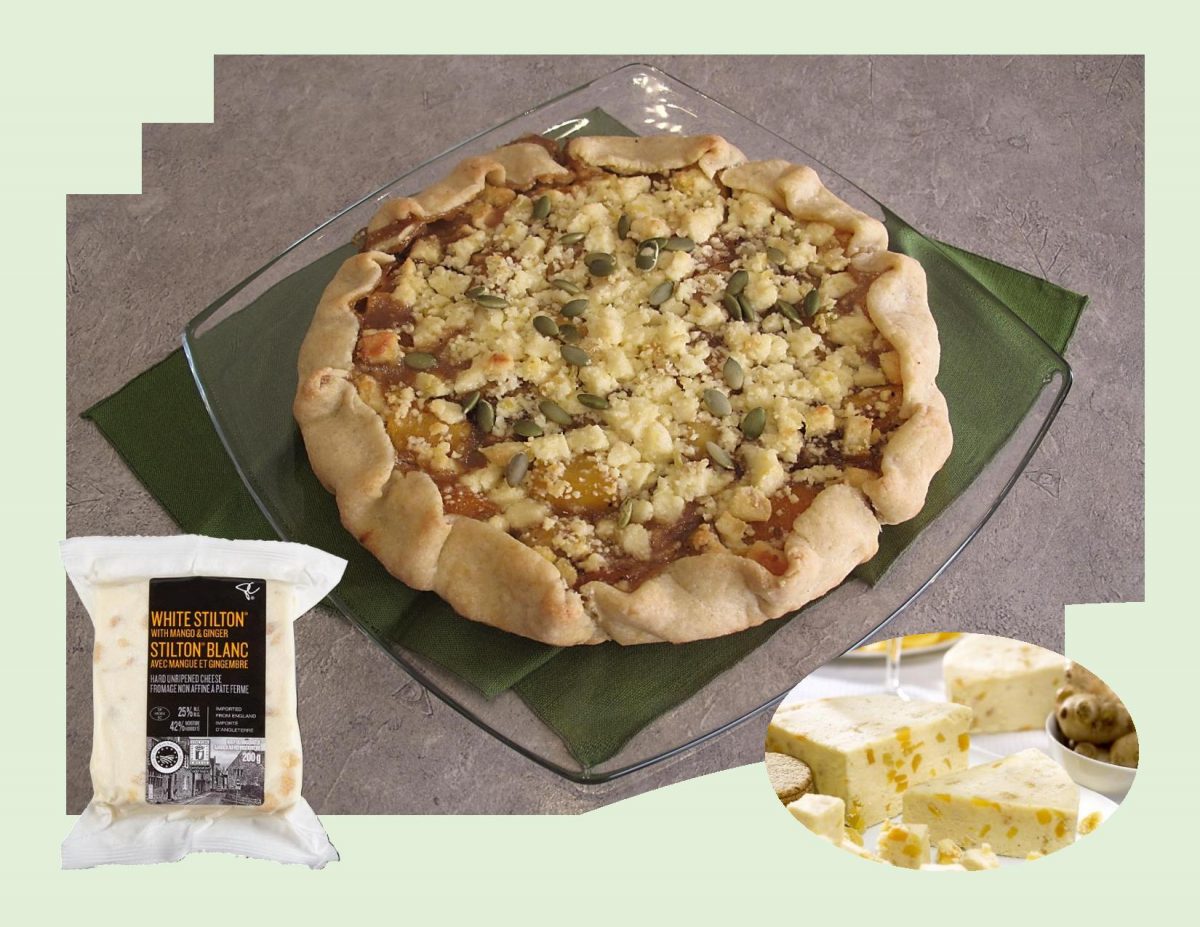
This spicy galette makes an interesting dessert with the sweetness of mango and apricot fruit, as well as savory with the creaminess of stilton, crunchy pepitas, and the perfection of a cornmeal pastry crust.
Stilton cheese takes its name from the village of Stilton, in the east of England. White Stilton has a light, fresh, slightly acidic flavor that makes it a perfect partner for fruit.
White Stilton with mango & ginger is a blended cheese which incorporates mango and ginger to impart a sweet, savory intense flavor to the traditional Stilton cheese. Stilton on its own is extremely creamy and delicious but the addition of fruit accords the cheese a new dimension. As it melts, the unusual combination of the mango adding a fruity flavor and the ginger adding a mildly warming, spiced overtone. White Stilton with mango & ginger is perfect for a breakfast or dessert cheese.
Print Recipe
Spicy Apricot Mango Stilton Galette
Votes: 1
Rating: 5
You:
Rate this recipe!
|
|
Votes: 1
Rating: 5
You:
Rate this recipe!
|
Instructions
Pastry
In a small bowl, combine sour cream & ice water; set aside. In a large bowl, whisk together flour, cornmeal, sugar & salt. Using a pastry blender or fingertips, cut in the butter until mixture resembles BOTH coarse crumbs & small peas. Sprinkle the cold sour cream mixture over dough, 1 Tbsp at a time, tossing with a fork to evenly distribute it. After you have added all the sour cream mixture, dough should be moist enough to stick together when pressed; if not, add additional cold water, 1 tsp at a time. Do not overwork dough.
Press dough into a disk shape & wrap in plastic wrap. Refrigerate for at least 2 hours. The dough can be kept in the refrigerator for a day or two or it can be wrapped airtight & frozen for a month. Thaw, still wrapped in refrigerator.
Filling
In a saucepan over medium heat, add apple cider vinegar, brown sugar, ginger, anise seeds, cloves, pepper, cardamom, cinnamon & sea salt. When mixture starts to bubble, add dried apricots & mangoes. Cook, stirring often, until fruit is soft. Set aside to cool.
Preheat the oven to 425 F.
On a large sheet of parchment paper, roll or press out chilled pastry into a 13-inch circle.
Spread mixture evenly over dough, leaving about a 1 1/2-inch border. Gently fold pastry over filling, pleating to hold it in. Sprinkle with crumbled Stilton cheese. Brush with egg wash (if using).
Bake 35-45 minutes until filling bubbles up & crust is golden. Remove from oven & sprinkle with pepita seeds. Serve.
Recipe Notes
- If filling seems too dry, add a bit of water or apple juice.


