Baked Cheesy Ground Beef Stuffed Potatoes

For the most part, a baked potato with a pat of butter and a little salt is just great on its own. But stuff them with an assortment of savory ingredients such as shrimp, oysters or ground meat and it easily constitutes a whole meal.

I think my first encounter with this idea came when the Wendy’s restaurant chain introduced the Stuffed Baked Potato to their menu in 1983. Their original goal was to give the customer another choice or alternative to the same old ‘fries’. I think it retailed for 99 cents at the time. The one I remember having a couple of times was with cheese sauce and fresh broccoli. It tasted great to me, not being a fried food lover.  Of course, since then the whole concept has been ratcheted up in both flavor and eye appeal.

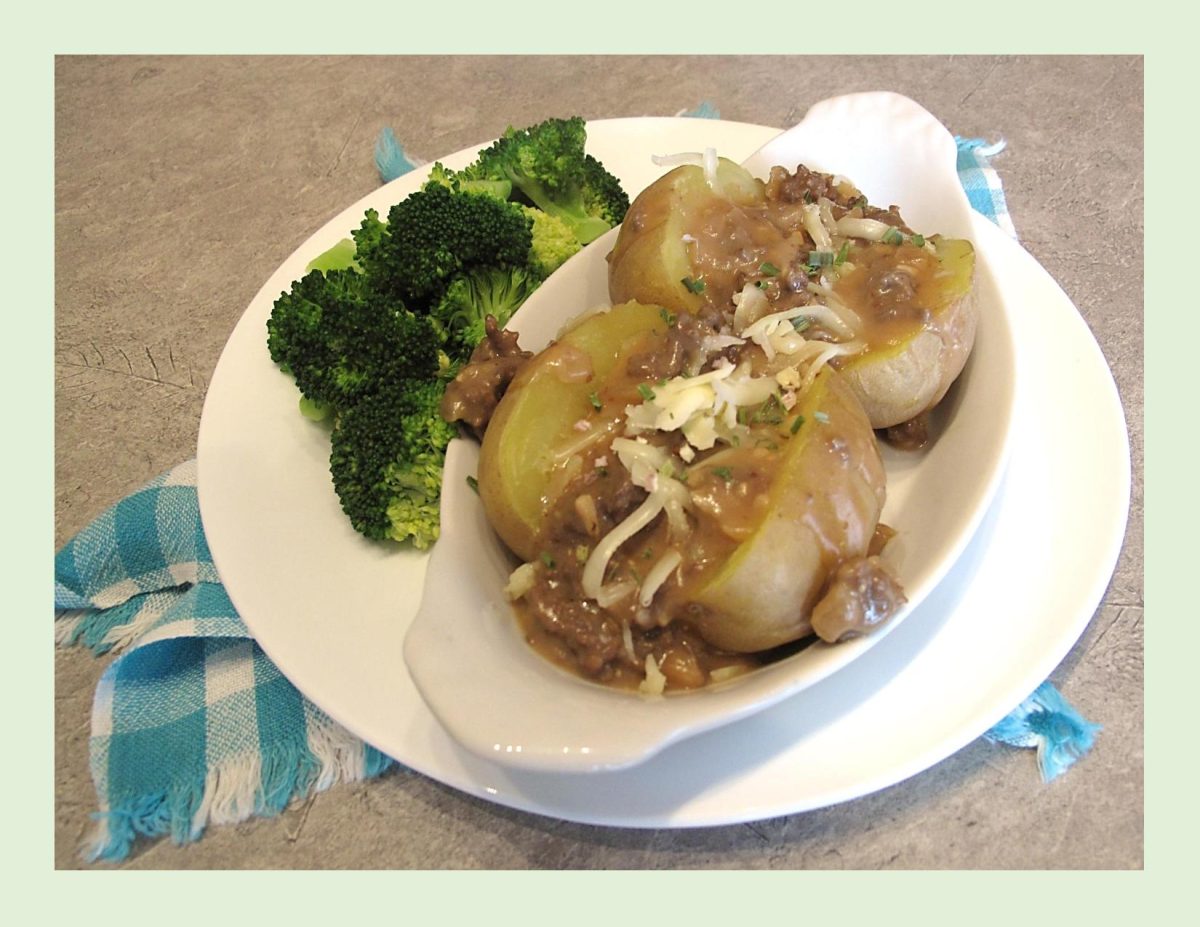
This version is browned ground beef in a cheesy mustard béchamel sauce served over baked potatoes. Makes such a super good meal with a bit of steamed broccoli.

Print Recipe
Baked Cheesy Ground Beef Stuffed Potatoes
Votes: 1
Rating: 5
You:
Rate this recipe!
Servings
Votes: 1
Rating: 5
You:
Rate this recipe!
Instructions
  1. Pre-heat the oven to 400 F.
  2. Wash the potatoes & pat dry. Prick with a knife or the tines of a fork, place on the oven rack and bake for approximately 45 minutes or until tender.
  3. While the potatoes are cooking, brown the ground beef in a large skillet. Season with 1/4 teaspoon of salt & set aside.
  4. In a separate pan, add 1 tablespoon of the butter & the diced onion. Cook on medium low heat, stirring often, until the onions begin to caramelize. Add the minced garlic, continue cooking for another minute and then remove from the heat. Add the cooked onion & garlic mixture to the cooked ground beef.
  5. In the pan, melt the remaining 3 tablespoons of butter & whisk in the flour. Cook for a minute to make a roux. Slowly whisk in the beef stock, milk, Worcestershire sauce, mustard, salt, ground black pepper & shredded cheddar cheese. Continue cooking & stirring, on low heat, until the mixture begins to thicken. Add the beef mixture into the sauce.
  6. When the potatoes are cooked, slice open and pour on the cheesy beef mixture. Garnish with parsley if you wish. Serve hot.

Pumpkin Angel Food Mini Bundt Cakes

Pumpkin angel food?! That’s probably not what you’d expect when you think of angel food cake or pumpkin, but this recipe is actually a very tasty combo. 

Of course, pumpkin-based desserts are a traditional fall dessert, so I am sure that you will be surprised that I am posting this pumpkin angel food cake recipe in April. It seems I have some pumpkin puree that’s in the freezer just waiting to be used before we get too far into the spring and summer season.

Brion has always loved angel food, so I thought why not add the pumpkin puree to kick it up a notch. Pairing it with the right fruits can also enhance its flavors. Instead of frosting or a whipped topping I am making some caramelized apples and raisins spiced with anise and cardamom.

  • Anise has a distinct licorice-like flavor. It adds depth and enhances the overall aromatic profile of the compote.
  • Cardamom is a fragrant spice with citrusy and herbal notes. It adds warmth and sophistication and complements pumpkin beautifully.

For a cake that’s quite sweet, some salted pepita seeds sprinkled on top are a bit of necessary and delicious balance.

Simply put, it’s an easy cake mix recipe dressed up with warm spices and pumpkin purée served with caramelized apples, raisins and salted pepita seeds. Yum!

Print Recipe
Pumpkin Angel Food Mini Bundt Cakes
Votes: 1
Rating: 5
You:
Rate this recipe!
Servings
MINI BUNDT CAKES
Ingredients
Pumpkin Angel Food Mini Bundt Cakes
Caramelized Apples & Raisins
Servings
MINI BUNDT CAKES
Ingredients
Pumpkin Angel Food Mini Bundt Cakes
Caramelized Apples & Raisins
Votes: 1
Rating: 5
You:
Rate this recipe!
Instructions
Cake
  1. Preheat oven to 350 F.
  2. In a large mixing bowl combine everything except the Angel Food Cake mix and ingredients to prepare cake. Mix until combined. Set aside.
  3. In a different bowl combine the Angel Food Cake mix and ingredients required to make the cake. Carefully fold in 1/4 of the batter into the pumpkin mixture. Then gently fold in the rest of the batter.
  4. Carefully pour or spoon into an 24 ungreased mini bunt cake pans. Place pans in oven on the middle rack.
  5. Bake for 15 -20 minutes or until cake is golden brown and springs back. Immediately invert pans onto a wire rack.
  6. Cool for 10 minutes.
  7. Serve with caramelized apples & raisins & a dollop of whipped topping. Sprinkle with salted pepita seeds.
Apples & Raisin Compote
  1. In a medium saucepan, melt butter then add water & sugar. When the caramel is golden brown, add the raisins, swirling them into the caramel.
  2. When raisins begin to plump, add apples & orange zest, then sprinkle with spices. Lower heat & simmer 5-10 minutes to thicken.
  3. Do not overcook compote as it will thicken when cooled.

Broccoli Soup w/ Boursin Cheese & Bacon Chips

Comfort food is many things to many people. One of the things that I think of as comfort food is a warm bowl of cream of broccoli soup. Its creamy texture and subtle flavors have the power to soothe your taste buds as well as your soul. But this soup is more than just a comforting dish; it’s a culinary gem with a fascinating history and impressive nutritional benefits. This velvety delight has its roots in the traditional French soup known as Potage Saint-Germain. Originating from the Saint-Germain-en-Laye region in France, this soup was originally crafted with peas. However, as culinary creativity knows no bounds, innovative cooks began swapping peas for broccoli, giving birth to Cream of Broccoli Soup.

Cream of Broccoli Soup has the incredible ability to cater to a wide range of palates and dietary preferences. Whether it’s a casual family dinner, a gathering with friends, or a formal occasion, this soup fits the bill perfectly.

In 1990, the Campbell Soup Company debuted a commercial variety of cream of broccoli soup. They devised it to be used as a soup and as an ingredient to be used in other dishes. During that time, the Campbell Soup Company published a booklet of broccoli dishes that are prepared using their canned cream of broccoli soup, which was offered free to consumers through the provision of a stamped, self-addressed envelope to the company. Some of the dishes in the booklet included ‘Easy Broccoli Bake’ and ‘Two-Step Chicken Broccoli Divan’. After the original soup’s debut, the company devised and marketed additional cream of broccoli-style soups, such as broccoli cheese soup, chunky chicken broccoli cheese soup and cream of chicken and broccoli soup.

Today, I decided to make our broccoli soup using Boursin cheese instead of cheddar. The garlic and herbs in the Boursin give some added depth to the flavor. Plus, it melts into the soup so smoothly and provides extra creaminess. Another nice thing about this recipe is it’s super creamy without the use of heavy cream. Such great comfort food!

Print Recipe
Broccoli Soup w/ Boursin Cheese & Bacon Chips
Votes: 1
Rating: 5
You:
Rate this recipe!
Servings
Servings
Votes: 1
Rating: 5
You:
Rate this recipe!
Instructions
  1. Peel & slice onion & garlic. Cut broccoli into pieces. Peel & dice potato into pieces. In a saucepan sauté onion for a few minutes, add the garlic & broccoli & potato pieces.
  2. Cover with water, add chicken or vegetable stock powder & simmer for 25-30 minutes until veggies are tender. Meanwhile, grill bacon & slice for garnish.
  3. With a slotted spoon, remove some of the broccoli florets if you wish to keep whole & set aside. In a food processor, puree remaining veg/broth mixture.
  4. Add the Boursin & seasoning, puree again to obtain a homogeneous preparation. Fold in reserved broccoli florets. Serve hot topped with bacon bits.

Potato Lefse

From a traditional homemade staple to a quick on-the-go snack from a gas station to ferries or even a fancy dish at a wedding, the story of lefse is intertwined with Norwegian history.

The first lefse didn’t contain potatoes, they were made from flour. Women would travel from house to house, village to village to make lefse to last the winter months. The flour lefse would cook up like a cracker and be able to last through the season. Many households stored their lefse is wooden boxes covered in cloth or just stacked on shelves. When you were ready to enjoy some lefse it was dipped in water and soaked between damp cloth until softened.

Then came the introduction of potatoes, abundant and easy to grow. The potato was incorporated into many Norwegian foods. Like Ireland, Norway suffered from the effects of the potato famine in the mid-1800’s, which is about the time that many Norwegians came to North America. They brought their knowledge and rolling pins. The result is a Norwegian ‘potato bread’ delicacy that is part of a special tradition replicated in many Norwegian-American homes for more than 150 years.

In Norway, the lefse is sweet or savory, thick or thin, can be made from wheat or potatoes, and can be served with a wide variety of accompaniments. Recipes and even names vary considerably across Norway. 

In many parts of western, eastern and central Norway, lefse are used as an alternative to bread. They are eaten with savory, salty foods or with sweet foods.

Common savory fillings include cured ham and cheese. They can also be served as wraps, with fillings such as smoked salmon and cream cheese. Common sweet fillings are sugar and cinnamon. These are often served folded or rolled into tubes. As with waffles, the combination of brown cheese (or ‘brunost’ is a tan-colored ‘whey cheese’ with a distinctive caramel flavor) and jam is another sweet option.

There is no one best lefse recipe. You can choose to make thick, sweet lefse, or thin ones for savory wraps, with potato or without. There are so many options, not to mention the countless ‘secret’ family recipes handed down through generations.

I recall the first time I ever had the opportunity to try Norwegian lefse. I was in grade school and my friend asked me to come to her house for lunch. At the time, I wasn’t really sure what to make of it, but I remember it tasted good … just like a thin potato pancake!

Brion & I decided to use our lefsa as a wrap and make fish ‘tacos’ out of them. It turned out to be a great choice!

Print Recipe
Potato Lefse
Votes: 1
Rating: 5
You:
Rate this recipe!
Course Main Dish
Cuisine Norwegian
Keyword potato lefse
Servings
Ingredients
Course Main Dish
Cuisine Norwegian
Keyword potato lefse
Servings
Ingredients
Votes: 1
Rating: 5
You:
Rate this recipe!
Instructions
  1. In a pot, place potatoes & cover with cold water. Put a lid on the pot & bring to a boil. Reduce heat to a simmer & cook until soft. Drain & put potatoes through a ricer (or grate fine) while still hot. Combine with butter & refrigerate until cool.
  2. Combine potatoes with the rest of the ingredients. Mix just until blended. Add milk only if needed to combine dough. Cover & chill thoroughly.
  3. Divide dough into 8 equal pieces & roll into balls. Between 2 sheets of dry waxed paper roll each ball to a 6-inch diameter.
  4. Heat a flat griddle to 400 F.
  5. Grill lefsa, flipping mid-way through, about 60 seconds on each side, or until freckled.
  6. Serve warm or at room temperature as is or with topping or 'filling' of choice.
Recipe Notes
  • The yield will vary depending on how much dough you use for each one.
  • SOME FILLING SUGGESTIONS:
  • Spread with butter & a sprinkle of brown sugar
  • Spread with mustard & wrap around sausage, brats or hot dogs
  • Spread with butter or cream cheese & wrap around leftover chicken, turkey, pot roast or your favorite deli meat. Eat hot or cold.
  • Use as a wrap for salads such as egg, tuna, chicken & salmon.
  • Spread with cranberry sauce, applesauce or Nutella.
  • Wrap around warm meatballs.
  • Wrap around scrambled eggs with or without crumbled sausage or bacon.

Shrimp Pizza w/ Artichoke & Garlic Sauce

It’s hard to get bored of pizza, but sometimes you want to change things up a bit. In addition to trying new toppings and cheeses, consider using an alternative to tomato sauce on pizza.

Pizza night is a cherished tradition in many households, but sometimes, it’s good to break away from the routine and experiment with new flavors. One of the easiest ways to do this is by trying out different alternative pizza sauces.

The other day Brion & I were in a Winners/Homesense store. Of course, my favorite spot is always the area where they have all the cookware and specialty food items. I saw bottled sauce made with artichokes and garlic. Immediately my thoughts were as to how I could use it. It was quite pricey, so I opted to try and make a copycat version at home.

While tomato sauce has long been associated with traditional pizza, there is a whole new world of flavors waiting to be discovered by breaking from tradition. Tradition of course has its place—there’s a reason classic tomato-topped pizza has been a staple for generations. But there is more to pizza sauce than regular tomato. There are exciting flavors, interesting textures, sweet things, spicy things, cheesy things, even exotic things!

Here are some ideas for making pizza without tomato sauce:

  • White pizza – Make a white sauce with olive oil, garlic, parsley, and a dash of salt and pepper. Spread it on the pizza dough instead of tomato sauce. Top with cheeses like mozzarella, ricotta, or feta, and veggies.
  • Pesto pizza – Spread pesto sauce on the dough instead of tomato sauce. Top with veggies and cheeses.
  • BBQ chicken pizza – Use BBQ sauce as the base instead of tomato sauce. Top with chicken, red onion, cheddar cheese, etc.
  • Mediterranean pizza – Make a tahini sauce base. Top with artichoke hearts, kalamata olives, feta, red onion, etc.
  • Breakfast pizza – Scramble eggs with veggies and meats. Spread it on the dough. Sprinkle with cheeses.
  • Buffalo chicken pizza – Spread buffalo wing sauce on the dough. Top with chicken, blue cheese, mozzarella, celery, onion.
  • Thai pizza – Make a spicy peanut sauce base. Top with chicken, carrot, onion, cilantro, mozzarella.
  • Carbonara pizza – Spread an alfredo sauce base. Top with bacon, onion, Parmesan, egg, parsley.

The best thing about pizza is that there are endless ways to enjoy it. So here you have it … shrimp pizza with artichoke & garlic sauce. Yum!

Print Recipe
Shrimp Pizza w/ Artichoke & Garlic Sauce
Votes: 1
Rating: 5
You:
Rate this recipe!
Servings
Votes: 1
Rating: 5
You:
Rate this recipe!
Instructions
Sauce
  1. Place all ingredients except oil in food processor. With motor running, Add olive oil in a slow stream to make an emulsion. Place in a dish & set aside.
Pizza Toppings
  1. Fry bacon until done but not crisp. Drain on a paper towel then chop into bite-sized pieces. In the same skillet, sauté shrimp until just cooked & remove it from skillet.
  2. Sauté sliced mushrooms & sliced onions until just cooked.
  3. Slice cherry tomatoes in halves & prepare fresh herbs.
  4. Shred mozzarella cheese.
Assembly
  1. Preheat oven to 350 F.
  2. Spread each naan bread with artichoke & garlic sauce.
  3. Top pizzas with onions, mushrooms, shrimp & bacon. Sprinkle shredded cheese over all then dot with halved cherry tomatoes & herbs.
  4. Bake 10-15 minutes or until cheese is bubbly & tomatoes are roasted. Serve.
Recipe Notes
  • You will no doubt have extra artichoke & garlic sauce. Store it in an air-tight container for up to one week. Enjoy it on toasted bread or swirl into cooked pasta.

Onion Scones

You might imagine scones as a food that is only served with jam and cream, but there are many variations on this classic tea cake. This flaky treat can also come in a savory scone version with add-ins like cheese and chopped bacon or sun-dried tomato & basil etc.  A scone is closer to a pastry than it is to bread mainly because it doesn’t include any yeast and has almost identical ingredients to a short crust with different fat to flour ratios.

So why not onion scones?? Because onions really form the foundation of our cooking, they are often the first thing that goes in the pan, and they are the flavor base for everything from chicken soup to a quick skillet pasta. Cooked onions give dishes a rich savory flavor and a subtle sweetness — you don’t always know onions are there once the dish has been spiced and sauced, but you’d definitely miss them if they weren’t.

Scone ingredients prefer to be cold. All your starting components need to be kept as cool as possible – this will help to guarantee the soft, light and well-risen qualities of your next batch of scones.

North American or British scones – what’s the difference? British scones are served with butter/cream whereas North American scones or ‘biscuits’ are far butterier and are typically served alongside meat and veg style savory dishes.

These onion scones make such a nice addition to a beef stew meal.

Print Recipe
Onion Scones
Votes: 1
Rating: 5
You:
Rate this recipe!
Course Main Dish
Keyword onion scones
Servings
Course Main Dish
Keyword onion scones
Servings
Votes: 1
Rating: 5
You:
Rate this recipe!
Instructions
  1. Preheat oven to 375 F.
  2. In a microwave-safe bowl, combine the yellow onion, green onions, garlic & butter. Microwave on high for 2 minutes, then stir. Microwave for another 1-2 minutes or until the vegetables are tender. Remove bowl from microwave & let the vegetables cool for 10 minutes.
  3. In a large bowl, combine the flour, cheese, sugar, baking powder, pepper & salt.
  4. Add the sautéed onion mixture to the flour mixture along with the light cream & egg. Stir JUST until combined.
  5. Gently press the dough together with your hands to form a ball.
  6. On an ungreased baking sheet, press the dough into an 8-inch circle. Cut the circle into 8 wedges. Separate the wedges slightly.
  7. Bake for 12-15 minutes or until scones are lightly browned. Brush with more melted butter & serve immediately.

Salmon Wellington

HAPPY EASTER!

Easter is here and Salmon Wellington is the perfect holiday meal! The richness of the mushroom duxelles, pairs perfectly with the hearty salmon fish fillet and scallops and the buttery puff pastry just takes this dish to the next level.

Mushroom duxelles is an intensely flavored combination of finely chopped mushrooms, shallots, and fresh herbs such as thyme or parsley that are slowly cooked to a paste-like consistency. French in origin and named after the marquis d’Uxelles, this mushroom condiment is traditionally used in the preparation of beef Wellington, but it can also be used to flavor soups and sauces as well as to fill omelets and ravioli. 

Wellington fillet as we know it today was first made famous by the American chef and star Julia Child, who introduced the filet de bśuf en croûte, the French crust beef fillet, as ‘Filet of Wellington Beef’ during her TV show ‘The French Chef’, on the 1965 New Year’s Eve episode. From that day on, the recipe began to appear in various recreational circles in North America, as well as being taken up in the most important cookbooks.

A Salmon Wellington is a copycat version of the popular English ‘Beef Wellington’. Because puff pastry takes about 20 minutes to bake (salmon takes 12-15 minutes), keep the salmon refrigerated until you’re ready to assemble. Starting with cold salmon ensures it doesn’t overcook. To prevent the bottom from getting soggy, pat dry the salmon thoroughly before assembling. Also, make sure to cut slits on the puff pastry once assembled to allow the steam to escape. Don’t open the oven until ready since puff pastry needs full consistent heat to bake into flaky layers.

You’ll be so impressed when it’s time to take it out of the oven because it just looks amazing. However, you’ll be more impressed with how it tastes. Just like an elegant and flavorful fish pie!

Print Recipe
Salmon Wellington
Votes: 1
Rating: 5
You:
Rate this recipe!
Course Main Dish
Cuisine French
Servings
SERVINGS
Votes: 1
Rating: 5
You:
Rate this recipe!
Instructions
Mushroom Duxelles
  1. In a food processor, pulse the mushrooms to a roughly diced consistency,15-20 seconds. In a saucepan, melt 2 Tbsp butter over medium-high heat. Add mushrooms, a heavy pinch of salt & pepper, shallots, garlic, rosemary & thyme. Sauté until moisture from the mushrooms has evaporated, about 15 minutes. Transfer to a bowl & set aside.
Scallop Filling
  1. In a small bowl, combine the scallops (or shrimp), cream, onions, parsley, dill, garlic, pesto, salt & pepper. In another small bowl, beat egg white on medium speed until soft peaks form; fold into scallop mixture.
Assembly
  1. Preheat oven to 400 F. Line a 15 x 10 x 1-inch baking sheet with parchment paper.
  2. On a lightly floured surface, roll each pastry sheet into a 12 x 10-inch rectangle. Cut each sheet into FOUR- 6 x 5-inch rectangles. Divide mushroom mixture evenly & spread over 4 pieces of pastry leaving a 1/2-inch border.
  3. Center the salmon pieces on top. Next, top each salmon piece with a quarter of the scallop filling.
  4. Top each with a pastry rectangle & crimp to seal. With a sharp knife, cut several slits in the top to let steam escape. Place on the baking sheet & brush with egg wash. Bake for 20-25 minutes or until a thermometer reads 160 F.
Dill Cream Sauce
  1. While salmon is baking, mix all sauce ingredients & refrigerate until serving time.

Chai Spiced Hot Cross Bread Pudding w/ Vanilla Sauce

CELEBRATING GOOD FRIDAY!

Bread pudding always gives me reason to remember good things. Truly a comfort food for those of us that recall it from childhood days. It’s not that the dish was invented here — that honor likely goes to clever medieval or even ancient cooks in Europe and the Middle East who had a surplus of stale bread on their hands. The perfect embodiment of the virtues of frugality and indulgence: day old bread, too precious to waste, is bathed in a mixture of milk and eggs and made into either a sweet or savory bread pudding (with a few other additions) and baked into something sublime. What makes it special is the blend of spices mixed into it and the sauce.

The chai spice baking blend, which is sometimes overlooked, adds a distinct warm flavor and depth. It can include a number of different spices. Cardamom is the most common ingredient, followed by some mixture of cinnamon, ginger, star anise and cloves. Pepper, coriander, nutmeg and fennel are also used but they are slightly less common.

This bread pudding combines hot cross buns with spices inspired by the world’s love affair with Indian chai. The origins of hot cross buns may go back as far as the 12th century. According to the story, an Anglican monk baked the buns and marked them with a cross in honor of Good Friday. Over time they gained popularity, and eventually became a symbol of Easter weekend.

Bread pudding, when done right, should have the perfect balance of gooey goodness and chewy texture. That’s why stale bread/buns are important. The bread needs a degree of crunch otherwise you will have ‘mush pudding’. For additional flavor, the pudding is served with a vanilla sauce. Who says bread pudding has to be boring!

Print Recipe
Chai Spiced Hot Cross Bread Pudding w/ Vanilla Sauce
Votes: 1
Rating: 5
You:
Rate this recipe!
Servings
Ingredients
Bread Pudding
Vanilla Sauce
Servings
Ingredients
Bread Pudding
Vanilla Sauce
Votes: 1
Rating: 5
You:
Rate this recipe!
Instructions
Bread Pudding
  1. Place cubed hot cross buns in a greased 9 x 9-inch baking dish.
  2. In a large bowl, combine the milk, brown sugar, eggs, vanilla, spices & salt. Pour over buns, making sure that the bread is completely covered by the milk mixture.
  3. Cover & refrigerate for at least an hour or overnight.
  4. Set out the chilled bread pudding while you preheat the oven to 350 F.
  5. Bake 40 - 45 minutes, or until a knife inserted into the center of the pudding comes out clean. Remove from oven & serve with vanilla sauce.
Vanilla Sauce
  1. In a small saucepan, melt butter & add flour. Stir until mixture has a nutty aroma.
  2. Add salt, cream & sugar; stir until mixture becomes thick. Remove from heat & stir in vanilla.
  3. Spoon over servings of warm bread pudding.
Recipe Notes
  • You will notice I have only used 2 Tbsp sugar in the vanilla sauce to offset the sweetness of the pudding.

Benedictine Liqueur Coffeecake w/ Strawberries

Today, March 28, was the birth date of my mother. She passed away in 1978 at the age of sixty. Although 46 years have passed, it seems like it was only yesterday. She was truly an ‘Angel on Earth’, never to be forgotten by her family or by the people whose lives she touched.

I have so many memories of her wonderful cooking and baking. In her honor today, I decided to post a unique coffeecake recipe.

Since I have become a huge fan of Dom Benedictine Liqueur in sweet & savory recipes, this is the fifth recipe I have developed using it in the ingredients. When I first ‘discovered’ this interesting liqueur, I searched high and low for recipes to incorporate it in my baking and cooking. After having no success finding any, I resorted to my favorite ‘hobby’ of recipe development. So far, I have had good results.

If you’re not familiar with this liqueur, here is a brief bit of history about it. For more in-depth info, check out my blog article from December 2022 under Benedictine Liqueur Cupcakes.

The story of Benedictine dates back to 1510 when a Venetian monk of the Abbey of Fécamp, Dom Bernardo Vincelli, created an elixir intended to support good health. It includes a combination of 27 herbs and spices derived from plants from around the globe, including juniper, myrrh, saffron, vanilla, thyme, coriander and more. The liqueur tastes primarily of honey and baking spices, with citrus peel, herb, and stone fruit notes.

Print Recipe
Benedictine Liqueur Coffeecake w/ Strawberries
Votes: 1
Rating: 5
You:
Rate this recipe!
Servings
SLICES
Servings
SLICES
Votes: 1
Rating: 5
You:
Rate this recipe!
Instructions
Strawberry Puree
  1. In a food processor, puree strawberries (SET ASIDE ABOUT 8 SLICING INTO THE TOPPING). Over medium-low heat, simmer puree until you have reduced the mixture by about half. Allow to cool completely before using in cake batter.
Coffeecake
  1. Preheat oven to 350 F. Butter a large cylinder pan (or a 9-inch round). Dust with flour & set aside.
  2. Toast pecans on a sheet pan in the oven for 7-8 minutes. Remove nuts from pan right away to prevent further toasting & place on a cutting board to cool, then finely chop.
  3. Sift flour, baking powder & salt together in a bowl. Set aside.
  4. In a large bowl, using a mixer, beat eggs on high until light in color, about 2 minutes. Reduce speed to medium & add sugar; beat until mixture is pale & thick, about 4 minutes. Reduce speed to low; mix in oil & liqueur.
  5. Using a rubber spatula, lightly fold in flour mixture in 3 batches. Fold in toasted pecans. Spread half the cake batter in prepared baking pan. Place dollops of strawberry puree in a zigzag pattern down center of batter. Using the handle of a spoon, swirl puree lightly into batter. Top with remaining batter.
  6. Bake cake until a cake tester inserted in center comes out clean, about 25-30 minutes. Allow cake to cool in pan on a wire rack for 10 minutes. Turn cake onto a wire rack to cool completely.
Strawberry Puree Topping
  1. With the remainder of the strawberry puree, add honey & vanilla to taste. Combine well. Slice remaining fresh strawberries & fold into puree.
Serving
  1. Slice coffeecake & top with strawberry puree topping. Of course nothing says you can't add some whipped cream or vanilla ice cream!

Hoisin Beef & Rice Roulade

Hoisin is not a sauce I use regularly but in this case I found it puts a nice Asian twist on a traditional meatloaf. Impressive enough to serve to guests but easy enough to prepare on a weeknight.

The history of hoisin sauce is as rich and complex as its flavor. The name ‘hoisin’ comes from the Chinese phrase meaning ‘seafood sauce’ due to its seafood-like flavor but ironically, the sauce doesn’t contain any seafood. It’s believed to have originated in southern China, and its use has evolved over centuries. Once a luxury only the wealthy could afford, it has become a staple in Chinese households and restaurants worldwide. An intriguing tale associated with hoisin sauce is its role during the mid-Autumn festival in China, where it’s used in preparing traditional mooncakes, symbolizing unity and completeness.

Traditionally, hoisin sauce was made from fermented soybeans, rice wine, sugar, spices, and other ingredients. Today, hoisin sauce is widely used in many Chinese dishes including Peking duck, dim sum, barbecued pork, and spring rolls. It has also become a popular ingredient in other Asian cuisines such as Japanese and Vietnamese.

Hoisin sauce is a culinary chameleon, seamlessly blending into a wide array of dishes. Some of the many roles of hoisin sauce are as a

  • Dipping sauce for spring rolls, dumplings, and other appetizers. Its sweet and savory notes perfectly balance the flavors of these bite-sized delights.
  • As marinade and glaze hoisin sauce works wonders with meats like chicken, pork, and beef. The sugars in the sauce caramelize beautifully when grilled, creating a rich and flavorful exterior.
  • Adding hoisin sauce to stir-fried vegetables and proteins introduces a delectable dimension to your dishes. Its thick consistency helps create a glossy coating that clings to the ingredients, delivering an irresistible taste in every bite.
  • From noodle stir-fries to fried rice, hoisin sauce can elevate these dishes with its unique blend of flavors. Just a drizzle can transform a simple plate of noodles into a gourmet delight.
Print Recipe
Hoisin Beef & Rice Roulade
Votes: 1
Rating: 5
You:
Rate this recipe!
Course Main Dish
Cuisine Asia
Servings
Votes: 1
Rating: 5
You:
Rate this recipe!
Instructions
  1. Prepare rice according to package directions. Cool slightly. Stir cooked rice with carrot, red pepper, green onion & cilantro. Reserve.
  2. Preheat oven to 350 F. In a medium sized bowl, stir breadcrumbs with milk, eggs, ginger, Worcestershire sauce, garlic, salt & pepper. Let stand for 5 minutes.
  3. Line a rimmed baking sheet with foil. Grease foil well; top with a second sheet of foil (to use as a guide when rolling the beef). Crumble beef into bread crumb mixture; mix gently until combined. Press the beef into a 1/3-inch thick, rectangular layer on the prepared baking sheet.
  4. Spread rice mixture evenly over the beef, leaving a 1-inch border around the edge. Roll beef, jellyroll-style, using the top layer of foil to guide & shape the beef into a compact log. Discard extra foil. Smooth the surface using fingers to fill in any gaps. Pinch ends closed. Bake for 45 minutes.
  5. Meanwhile, stir hoisin sauce with lime juice, ketchup, honey & sesame oil; brush evenly over roulade. Bake roulade for an additional 15 minutes.